
2
Symmetric Encryption and Decryption
In this chapter, we will learn about the important concepts of symmetric encryption – cipher, encryption mode, and padding. There will be an overview of modern ciphers, encryption modes, and padding types and recommendations on which technology to use in which situation. The usage of those technologies will be illustrated by code examples. This is the first chapter that will contain code examples; thus, we will also need to learn how to initialize older versions of the OpenSSL library if we ever want to run our code with an older version of OpenSSL.
We are going to cover the following topics in this chapter:
- Understanding symmetric encryption
- An overview of the symmetric ciphers supported by OpenSSL
- Block cipher modes of operation
- Padding for block ciphers
- How to generate symmetric encryption keys
- Downloading and installing OpenSSL
- How to encrypt and decrypt with AES on the command line
- Initializing and uninitializing OpenSSL library
- How to compile and link with OpenSSL
- How to encrypt with AES programmatically
- How to decrypt with AES programmatically
Technical requirements
This chapter will contain commands that you can run on a command line and C source code that you can build and run. For the command-line commands, you will need the openssl command-line tool with OpenSSL dynamic libraries. For building the C code, you will need OpenSSL dynamic or static libraries, library headers, a C compiler and, a linker. If you don’t have OpenSSL components installed, this chapter will teach you how to install them.
We will implement some example programs in this chapter in order to practice what we are learning. The full source code of those programs can be found here: https://github.com/PacktPublishing/Demystifying-Cryptography-with-OpenSSL-3/tree/main/Chapter02.
Understanding symmetric encryption
Symmetric encryption is used for encrypting data with an encryption key. Note that an encryption key is not the same as a password, but an encryption key can be derived from a password. How to do so will be explained in a Chapter 5, Derivation of an Encryption Key from a Password.
Symmetric encryption is called symmetric because the same key is used both for encryption and decryption operations. There is also asymmetric encryption, where different keys (public and private) are used for encryption and decryption. Asymmetric encryption will be covered in Chapter 6, Asymmetric Encryption and Decryption.
In order to symmetrically encrypt something, you have to use a symmetric encryption algorithm. This kind of algorithm is also called a cipher. It is worth noting the term cipher has a broad meaning and can refer to any encryption or encryption-related algorithm, including algorithms for symmetric and asymmetric encryption, message digests, and even a set of algorithms used during a TLS connection – for example, ECDHE-ECDSA-AES256-GCM-SHA384. In the course of this book, we will use the term cipher to mean different things depending on the current context. For example, right now, the context is symmetric encryption – thus, we are using cipher to denote a symmetric encryption algorithm.
Useful data that is being encrypted is called plaintext, even if it is not text. Images, music, videos, archives, or databases, anything you want to encrypt is plaintext in encryption terms.
The result of encryption process, encrypted data, is called ciphertext. Ciphertext almost never looks like text, but this terminology is still used in the industry.
Using the given terminology, we can say that encryption transforms plaintext into ciphertext and decryption transforms ciphertext back into plaintext.
In order to encrypt some plaintext, you have to do the following:
- Choose an encryption algorithm (cipher).
- Generate an encryption key.
- Generate an initialization vector (IV).
- Choose the cipher operation mode.
- Choose the padding type.
- Encrypt the plaintext with the cipher, key, and padding using the chosen cipher operation mode.
Depending on the cipher and its operation mode, some of these steps may not be required. For instance, stream ciphers and some block cipher operation modes do not require padding.
Someone with little experience in cryptography may ask, “why do I have to choose so many parameters? When I used encrypted archives, my archiver only asked me for a password, not for a cipher, a key, an IV, a mode, or a padding type!” The answer is that an archiver or another user-friendly tool handles all those things behind the scenes, makes most of these choices on behalf of the user, and generates an encryption key from the user-supplied password.
Nevertheless, we are going to learn a bit about the basic encryption concepts mentioned in order to make conscious choices and understand how those concepts work together. We will start by learning about encryption algorithms (or ciphers).
An overview of the symmetric ciphers supported by OpenSSL
In this section, we will review the symmetric encryption algorithms supported by OpenSSL, but, first, we need to introduce some concepts that will help us to understand the differences between ciphers, their properties, and their advantages and disadvantages. Symmetric ciphers are divided into two categories: block ciphers and stream ciphers.
Comparing block ciphers and stream ciphers
Block ciphers operate on blocks of data. For example, a popular Advanced Encryption Standard (AES) cipher has a block size of 128 bits, meaning that the cipher encrypts or decrypts data in 128-bit blocks. If the amount of data is larger than the block size, the data is split into blocks of the needed size needed for processing. If the plaintext length is not multiple of the block size, the last block is usually padded up to the block size according to the chosen padding type. Thus, in most block cipher operation modes, the ciphertext length is always a multiple of the block size.
What happens during encryption by the block cipher, explained simply? Input to the encryption is a block of plaintext (for example, 16 bytes), the encryption key, and possibly some cipher operation mode-specific data (for example the previous ciphertext block or the IV). Individual bytes of the plaintext are put into a list or a matrix. Then, different logical and arithmetical operations are performed on the plaintext bytes, the encryption key bytes, and the additional operation mode-specific data bytes: bit rotations, eXclusive OR (XOR), addition or subtraction, or the exchange of full or partial bytes in the list or matrix. The output of those operations is a ciphertext block of the same size as the input plaintext block. For decryption, the input is a ciphertext block, the encryption key, and the operation mode-specific data. The operations from the encryption phase are performed in the opposite order and, as a result, the ciphertext block is transformed back into the plaintext block:

Figure 2.1 – How block ciphers work
Stream ciphers do not operate on blocks but operate on single bytes or even bits of data. This means that stream ciphers do not need padding. They also do not have operating modes, although some researchers are trying to introduce operation modes for stream ciphers too. These characteristics of stream ciphers make them easier to use, especially for streamed data, easier to implement, and faster to perform than block ciphers. However, cryptographers believe that the existing stream ciphers are generally less secure than block ciphers and it is easier to further weaken the security of a stream cipher through an implementation mistake than it is with a block cipher.
How do stream ciphers work, explained simply? During both encryption and decryption, a stream cipher generates a so-called pseudorandom cipher digit stream or keystream, based on the encryption key and the IV or nonce (number used once). The cipher takes bytes of the encryption key and the IV and performs logical and mathematical operations on them in order to generate an infinite stream of seemingly random bytes. This is the keystream we refer to. We can say that a stream cipher, when generating the keystream, works like a pseudorandom number generator (PRNG), which is seeded by the encryption key and the IV. On encryption, the ciphertext stream is produced by combining the keystream with the plaintext stream. Usually, the keystream bytes and the plaintext bytes are just XOR-ed. On decryption, the same keystream is generated and combined with the ciphertext stream. If the ciphertext stream was produced by XOR-ing the keystream with the plaintext stream, then the plaintext stream is recovered by using the same XOR operation, but this time, on the keystream and the ciphertext stream. In order to produce the same keystream for decryption, the same encryption key and IV must be used:

Figure 2.2 – How stream ciphers work
Understanding symmetric cipher security
When cryptographers are talking about security of a cipher, they usually measure cipher security or cipher strength in security bits. For example, if an attacker needs to perform 2256 computational operations to break a cipher, then the cipher security is 256 bits.
The maximum amount of security bits a cipher can have is the length of the used encryption key. For example, if a cipher uses a 256-bit encryption key, its strength is no more than 256 bits. It’s rather easy to prove. Let’s imagine an attacker has some ciphertext, does not have the encryption key and the corresponding plaintext, but can distinguish the valid plaintext from random data. The attacker’s goal is to recover the encryption key or the plaintext. If the key length is 256 bits, then there are 2256 possible encryption keys that can be used with the current cipher. The attacker can use brute force, also known as the exhaustive search approach – that is, trying every possible key for decrypting the ciphertext. Then, they must try no more than 2256 times – that is, perform 2256 computational operations at most.
Here, a computational operation does not mean a very basic operation, such as a Central Processing Unit (CPU) instruction, but a complete attempt at decrypting a small amount of ciphertext, such as one ciphertext block. The important thing here is that the amount of the computational operations depends on the key length. Decryption of one ciphertext block is very fast and cheap on modern CPUs, but doing such an operation 2256 times would take billions of years. Encryption security is based on the attacker’s necessity to perform an infeasible number of operations to decrypt the ciphertext or recover the key.
It’s important to understand that the computational complexity grows exponentially depending on the key length – meaning, breaking a 256-bit key is not two times more computationally expensive than breaking a 128-bit key. It is 2128 times more computationally expensive. Longer keys require more computational power during normal operation than shorter keys but in the case of symmetric encryption, this difference is not significant. Therefore, it makes sense to use longer keys.
Most ciphers aim to be as strong as their key allows. In practice, security researchers often find smarter ways to attack encryption than just brute force. This way, security of a cipher may weaken – for example, from 256 to 224 security bits. A cipher is considered secure if, after applying the smartest possible attack, it still retains enough security bits.
How many bits of security is enough?
As of 2021, the consensus among security researchers and the recommendation of the US’ National Institute of Standards and Technology (NIST) is the following:
- 112 bits of security should be enough until 2030.
- 128 bits of security should be enough until the next revolutionary breakthrough in technology or mathematics.
One such technological breakthrough is expected in the coming years. This is quantum computing. Quantum computers already exist, but they are quite expensive and still not powerful enough to be used for cryptography breaking. Quantum computing is expected to halve the number of security bits for symmetric cryptographic algorithms. It means that ciphers that were previously 256-bit strong will become only 128-bit strong and those that previously were 128-bit strong will reduce their cryptographic strength to only 64 bits.
As we previously noted, security researchers are constantly looking for smarter ways to break cryptography. Thus, the effective security of any cipher is usually a bit lower than its key length.
Popular symmetric ciphers support key lengths of up to 256 bits.
Given the preceding considerations, I recommend using 256-bit symmetric encryption keys with a strong symmetric cipher whenever possible. This amount of security bits should be enough for the foreseeable future, even considering ongoing security research and the ongoing development of quantum computing.
Reviewing the AES cipher
AES is the most popular modern symmetric cipher. If you are unsure which symmetric cipher to use, use this cipher. This cipher is both fast and secure. AES is a block cipher with a block size of 128 bits. There are three variants of the AES cipher, using keys of different lengths: 128, 192, and 256 bits. Those three variants are called AES-128, AES-192, and AES-256, respectively.
There was a lot of research about AES security to find smarter ways than brute force to break the cipher. AES stands quite strong against these attempts. The current best attacks reduce AES security strength by only 2 bits: to 126, 190, and 254 bits of security for AES-128, AES-192, and AES-256, respectively.
It is worth mentioning though that modern x86 and x86_64 CPUs have hardware acceleration for AES, called Advanced Encryption Standard New Instructions (AES-NI), making the already-fast AES cipher even faster. Some ARMv8 CPUs support an optional ARMv8 Cryptographic Extension that also accelerates AES.
AES uses an encryption algorithm called Rijndael. Rijndael supports more block sizes and key lengths than when standardized as AES. Thus, we can say that AES is a subset of Rijndael. Many people use the terms AES and Rijndael interchangeably, as synonyms. The Rijndael algorithm was developed by two Belgian cryptographers, Vincent Rijmen and Joan Daemen. The name Rijndael is based on parts of the authors’ surnames, Rij and Dae.
Why does AES have Standard in its name? Because AES was standardized in 2001 by NIST as the standard encryption algorithm for sensitive commercial and (US) government information. It is worth mentioning that AES is not the only cipher used for the US government’s sensitive information, but AES is the most popular symmetric cipher in the world that the general public has access to.
Reviewing DES and 3DES ciphers
Data Encryption Standard (DES) was the previous encryption standard, the predecessor of AES. It is a block cipher with a block size of 64 bits and a key length of 56 bits. Both the block size and key length are too short for the cipher to be secure. Cryptography researchers further reduced the DES security to 39 to 41 security bits. In practice, a DES key can be recovered on a modern consumer-grade PC in a matter of days or even hours.
3DES or Triple DES is a cipher based on the usual DES. Basically, 3DES is DES applied three times with two or three different keys. 3DES security is considered to be 112 bits for the three-key variant and only 80 bits for the two-key variant.
It is not recommended to use DES or 3DES ciphers for new encryptions. However, DES was in use for many years and some organizations may still have old data encrypted by DES. Some legacy systems may have also implemented 3DES but not AES for network security and so 3DES may be needed for interoperability. If the usage of old insecure ciphers is needed for legacy systems, it is strongly recommended to limit this usage to internal networks and migrate to more modern ciphers as soon as possible.
3DES is three times slower than usual DES. DES itself is a rather slow cipher compared to AES and other competitors. On modern workstations, the slowness of DES or 3DES should not be significant, but if a server serves a lot of clients using a slow cipher, this slowness may be significant. It is one more reason to migrate to a faster and more secure cipher.
Reviewing the RC4 cipher
RC4 is an old stream cipher that can use keys with a length of 40 to 2,048 bits. The cipher was very popular in the past because of its speed and the simplicity of its implementation, but over the years, many flows were discovered in the algorithm and it is now considered insecure. For example, one of the attacks reduces the security of RC4 with 128-bit keys to just 26 bits.
An interesting fact about RC4 is that, for a period of time in 2013, RC4 was used as the main SSL/TLS cipher, because all the block ciphers used in SSL 3.0 and TLS 1.0 were targeted by the infamous Browser Exploit Against SSL/TLS (BEAST) attack, but RC4, being a stream cipher, was not affected by it.
The problem with RC4 is the same as with DES. RC4 was popular for a long time in the past and some organizations may still have old data encrypted by RC4. Some organizations may also have legacy systems in use that do not support modern encryption algorithms. The recommendation to such organizations is the same as with DES: migrate to modern systems and ciphers and in the meantime, limit the usage of RC4-affected data or network streams to the organization’s internal networks.
At the time of writing, popular modern web browsers still support 3DES for interoperability with old servers, but do not support single DES or RC4 anymore.
Reviewing the ChaCha20 cipher
ChaCha20 is a modern stream cipher. It is secure and fast. ChaCha20 can be used with a 128-bit or 256-bit key. The main variant of the cipher uses a 256-bit key and OpenSSL only supports the main variant. At the time of writing, there are no known attacks that can reduce the security of the full 20-round ChaCha20 cipher – thus, its security remains the same as the key length, 256 bits.
The ChaCha20 cipher is developed by Daniel J. Bernstein (DJB), a famous cryptography and security researcher. DJB is also known for his other projects, such as qmail, djbdns, Poly1305, and Curve25519. ChaCha20 is a performance-optimized modification of the Salsa20 cipher from the same author. ChaCha20 became popular when Google started to use it in their Chrome browser, together with the Poly1305 message authentication code (MAC) algorithm from the same author. Then, support for ChaCha20 and Poly1305 was also added to OpenSSH. Becoming a popular stream cipher, ChaCha20 has effectively become the successor of RC4.
As mentioned earlier, ChaCha20 is a fast cipher. ChaCha20 is faster than AES in software implementations. Hardware AES acceleration on x86 or x86_64 and ARMv8 makes AES faster than ChaCha20, but this acceleration is not included in all CPUs. For instance, low-end ARM CPUs, used in mobile and other devices, do not have such optimization, nor do they have as much processing power as x86_64 CPUs in desktop computers. Therefore, ChaCha20 may be preferred on low-end devices over AES, especially for encrypting network data streams.
One minor disadvantage of ChaCha20 is that it uses a block counter, which is only 32-bit. Because of that, the cipher is only considered secure on contiguous plaintexts that do not exceed 256 GiB of data. It should be enough for network data streams but might not be enough for the encryption of large files. A workaround is to split very long plaintexts into shorter chunks, at most 256 GiB, and reset the block counter and nonce before encrypting each chunk.
Reviewing other symmetric ciphers supported by OpenSSL
OpenSSL supports some other symmetric ciphers that are less popular than the four ciphers mentioned above.
Some of them, such as Blowfish, CAST5, GOST89, IDEA, RC2, and RC5, are block ciphers with a block size of 64 bits or with variable block sizes, whose OpenSSL implementation uses a block size of 64 bits. Those ciphers are not recommended to use for very long ciphertexts (longer than 32 GiB) because of collision attacks and the birthday paradox. The solution for this issue is to split long plaintexts into chunks smaller than 32 GiB and use a different encryption key and IV for each chunk. The algorithms using 64-bit blocks are quite old. Many of them were developed in the 1990s and some even in the 1970s.
Other algorithms, such as ARIA, Camellia, SEED, and SM4, are block ciphers with 128-bit block sizes. With 128-bit block sizes, you can encrypt very long plaintexts without worrying about collision attacks, up to 256 exabytes.
Some of the less popular algorithms are good, but some have technical disadvantages compared to AES. Many of the old algorithms are significantly slower than AES, up to 10 times slower, but most of the less common ciphers supported by OpenSSL are still secure. We are not going to review every less common cipher in detail, but the following are worth mentioning.
The less popular ciphers can be grouped into the following categories.
National ciphers
National ciphers are developed and standardized in a particular country. There is usually a lot of pride around the national cipher in the crypto community of the country where the cipher was developed. Often such ciphers are good, but not very popular outside of the country of origin.
CAST5, also known as CAST-128, is a cipher developed by Canadian researchers Carlisle Adams and Stafford Tavares in 1996. The name CAST represents the initials of the cipher authors, but also has a connotation of randomness, which makes sense, because a good cipher produces ciphertext that looks like random data. The CAST5 cipher uses 128-bit keys. No known attack has been developed yet on the full 16-round CAST5. Therefore, its security level remains at 128 bits. An interesting fact about CAST5 is that for a long time, it was the default symmetric cipher in the GNU Privacy Guard (GnuPG) software, until the default was changed to AES. For some time, CAST5 was also the default cipher in the original Pretty Good Privacy (PGP) software. CAST5 is one of the standard ciphers used by the Canadian government. You may be required to use this cipher if your software interacts with the computer systems of Canadian state organizations.
GOST89, also known as Magma, is an old government standard cipher from the USSR and Russia. It was developed in 1970s by the KGB and first published as a classified standard in 1989. GOST89 has a successor cipher, GOST2015, also known as Kuznyechik, but GOST89 is not declared obsolete. GOST stands for GOvernment STandard. GOST89 uses 256-bit keys. Extensive cryptoanalysis has been done on GOST89 and the best theoretical attack reduces the security of GOST89 to 178 bits, at the cost of impractical memory and storage requirements. Some cryptanalysts point out that insecure S-boxes exist for GOST89, but OpenSSL includes only secure GOST89 S-boxes. As GOST89 is one of the government standards of the Russian Federation, you may be required to use this cipher if your software interacts with the computer systems of Russian state organizations.
SEED and ARIA are ciphers from South Korea. Both are in use in South Korea, but seldom elsewhere in the world. SEED was developed in 1998 and ARIA was developed in 2003. Both are block ciphers with a block size of 128 bits. ARIA is based on AES and supports the same key lengths as AES – 128, 192, and 256 bits. SEED uses 128-bit keys. No practical attack on SEED or ARIA has been developed at the time of writing – hence, the security of the ciphers is believed to be the same as the key length. ARIA is optimized for hardware implementations, also in low-end hardware. In software implementation it is one-and-a-half to two times slower than AES. SEED and ARIA are the national standards of South Korea. You may be required to use this cipher if your software interacts with the computer systems of South Korean state organizations.
Camellia is a 128-bit block cipher developed in 2000 in Japan by NTT and Mitsubishi Electric. The cipher is named after the Camellia japonica flower. The Camellia cipher is similar in design to AES and has security and performance comparable to AES. AES-NI instructions in x86_64 CPUs can be used for the hardware acceleration of Camellia. Much of AES-related cryptanalysis also applies to Camellia. As AES, Camellia supports keys of 128, 192, and 256 bits. Camellia is a patented cipher but is available under a royalty-free license. Camellia is one of the standardized ciphers in Japan. You may be required to use Camellia if your software interacts with the computer systems of Japanese state organizations.
SM4 is another cipher from the East – this time, from China. The year of its development is not publicly known, as the cipher was secret for some time and was declassified in 2006. The cipher uses 128-bit blocks and 128-bit keys. As with the Camellia cipher, AES-NI instructions in x86_64 CPUs can be used for the hardware acceleration of SM4. Several cryptanalytical attempts were made, but no attack has been developed on the full 32-round SM4 cipher yet – thus, its security remains at 128 bits. SM4 is a Chinese national standard for encryption and is used for wireless Local Area Networks (LANs) in China. You may be required to use SM4 if your software interacts with the computer systems of Chinese state organizations.
The RC cipher family
The RC family is a collection of ciphers developed by a famous cryptographer Ron Rivest. RC stands for Ron’s Code or Rivest Cipher. RC2, the predecessor of RC4, is and old cipher developed in 1987. RC2 is vulnerable to related-key attacks. Not very much research has been done on this cipher by independent cryptanalysts, but the cryptography community is skeptical about the security of RC2. Another drawback of RC2 is that being a variable key length cipher, RC2 supports short insecure keys.
RC5 was developed in 1994. The cipher is notable for the simplicity of its implementation. It is a cipher with a variable key length (0 to 2,040 bits) and variable block size (32, 64, or 128 bits). OpenSSL only supports 64-bit blocks for RC5 and keys up to 2,040 bits. The default key length in OpenSSL is 128 bits – it is also the length recommended by the author of the cipher. No practical attack on RC5 has been developed yet, but, like RC2, RC5 supports short insecure keys, which is a drawback.
Other ciphers
International Data Encryption Algorithm (IDEA) was developed in 1991 as an intended replacement for DES. IDEA is known as the default cipher in PGP version 2, which was the time when PGP became widespread. IDEA was covered by patents at the time of its creation, but the last patent expired in 2012. Because of the patents, GnuPG could not use IDEA in its core code. For the same reason, the author of PGP decided to change the default cipher to CAST5 in PGP version 3. The cipher uses 128-bit keys. The best-known attack reduces its security to 126 bits. The Blowfish cipher was developed by probably the most famous cryptography researcher in the world, Bruce Schneier. Schneier developed Blowfish as a free-to-use, symmetric cipher in 1993 when most other ciphers were proprietary and patent-encumbered. Blowfish is a variable-length cipher, supporting key lengths of 32 to 448 bits. So far, no practical attack has been developed against full 16-round Blowfish. But Blowfish, being a variable-key-length cipher, supports short insecure keys. Thus, it is not possible to say upfront whether Blowfish-encrypted data is encrypted securely. The decrypting software has to examine the key length, make a decision about the security level of the encrypted data, and inform the user whether the decryption process is interactive, but not all software does it. That’s a second weakness of Blowfish, in addition to its small 64-bit block size. The author of Blowfish has developed a successor to Blowfish, Twofish, which uses a 128-bit block size and key lengths of minimum 128, 192, or 256 bits. He recommends the users of Blowfish to migrate to Twofish.
Block cipher modes of operation
Block ciphers can operate in different encryption modes, also known as modes of operation. As we already know, block ciphers encrypt plaintext data block by block. Encryption modes specify how blocks of ciphertext are chained together. We are now going to review most popular operation modes.
Reviewing the Electronic Code Book mode
The simplest operation mode is Electronic Code Book (ECB). In this mode, each plaintext block is encrypted into a ciphertext block using only the encryption key, without using an IV or previous plaintext or ciphertext blocks. Then, the ciphertext blocks produced are concatenated.
The ECB mode can be illustrated by the following image:

Figure 2.3 – How ECB mode works
Image Source: Wikipedia, licensing: Public Domain
In the ECB mode, the same plaintext always produces the same ciphertext. It is a security issue because patterns in the plaintext are preserved in the ciphertext and are visible to an observer.
Let’s consider the following image and its encrypted representation:

Figure 2.4 – An example of an image and its encrypted representation
The source of the both penguin images: https://isc.tamu.edu/~lewing/linux/, author: Larry Erwing, licensing: “Permission to use and/or modify this image is granted provided you acknowledge me [email protected] and The GIMP if someone asks”
As illustrated, even though the second image is encrypted, we can see what was been drawn and that the ECB mode does not provide efficient encryption protection. Therefore, we should use a smarter operation mode – for example, Cipher Block Chaining (CBC) mode.
Reviewing CBC mode
In CBC mode, the ciphertext of the current block depends on the ciphertext of the previous block. How does that work? Unlike ECB mode, where every plaintext block is encrypted as is, in CBC mode, the current plaintext block is XOR-ed with the previous ciphertext block and then the result of the XOR operation is encrypted, producing the current ciphertext.
What happens with the very first plaintext block, for which no previous ciphertext exists? The first plaintext block is XOR-ed with an IV. An IV is a block of data used for initializing the cipher. In many modes, including CBC, the IV is usually generated randomly and is the same size as the cipher block size. The IV is usually not kept secret and is stored together with the ciphertext because it is needed for decryption. However, sometimes, when possible and it makes sense, for example, in TLS protocol version 1.1 and above, the IV is transmitted in the encrypted form.
The CBC operation mode can be illustrated by the following diagram:

Figure 2.5 – How CBC mode works
Here is an encryption of the same penguin image in CBC mode:

Figure 2.6 – An example of image encryption in CBC mode
The source of both the penguin image and the pseudo-randomness image: https://isc.tamu.edu/~lewing/linux/, author: Larry Erwing, licensing: “Permission to use and/or modify this image is granted provided you acknowledge me [email protected] and The GIMP if someone asks”
As illustrated, the patterns in the original image were not preserved during the encryption. It is impossible to say, observing the encrypted image, what was drawn in the original image. As we can see, CBC mode provides good encryption protection. It hides both the exact original data from an observer and the relationships between parts of the original data. Other non-ECB modes of operation produce similar seemingly random images.
The IV used in the CBC mode must be unpredictable for a given message, in order to resist the chosen-plaintext attack. An easy way to satisfy that requirement is to generate the IV randomly.
In almost any encryption mode, including CBC, an IV must only be used for one message encrypted with the given encryption key and must not be reused for another message. Therefore, we can say that an IV is usually a nonce. For some operation modes, it is said that the IV is derived from a nonce.
CBC mode was invented in 1976 and for many years, it was the most popular mode of operation, both for file and network traffic encryption. Nowadays, GCM (described a bit later) is becoming more popular, especially for networking. CBC mode remains quite good for file encryption. GCM is based on the Counter (CTR) mode, which we will review next.
Reviewing CTR mode
In CTR mode, plaintext itself is not processed by the encryption algorithm, as with AES. Instead, a sequence of counter blocks is encrypted by the block cipher. For example, each counter block may consist of a concatenated 64-bit random nonce and an actual 64-bit integer counter, incrementing for each next block. The important things are that the first counter block is not reused for the encryption of another plaintext with the same encryption key and all the counter blocks are different.
The simplest and most popular way to increment a counter is to just add 1 to it, but this way is not mandatory. Other operations, such as adding or subtracting more than 1, or something more complex, such as XOR and bit shifting, are also acceptable. The important thing is that the counter sequence will not start to repeat itself.
OK, in CTR mode, we are encrypting some counter sequence instead of the plaintext, but how does this help us? How do we protect the plaintext? We take the encrypted counter blocks and XOR them with the plaintext blocks. The result of that XOR operation is our ciphertext.
CTR operation mode can be illustrated by the following diagram:
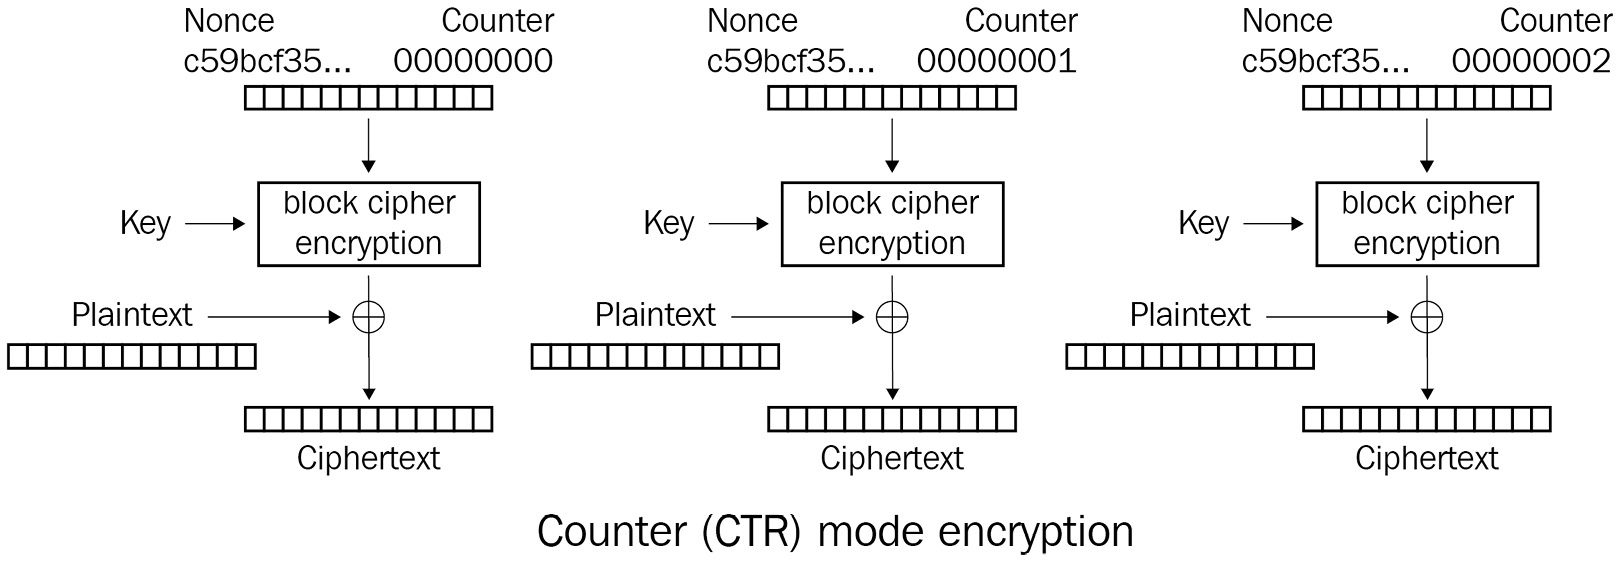
Figure 2.7 – How CTR mode works
Image source: Wikipedia, licensing: Public Domain
We can say that CTR mode converts a block cipher into a stream cipher. Indeed, the sequence of encrypted counter blocks is our keystream! We XOR that keystream with the plaintext, just as we do when using a stream cipher!
We can think about the first counter block in a similar way as that of the IV. Similar to the IV in CBC mode, the first counter block (or at least its random part) is usually saved together with the ciphertext because it is needed for the decryption. The counter block incrementation method is also usually not a secret. In the case of OpenSSL, it can even be looked up in the OpenSSL code. Therefore, all counter blocks are known to a possible observer or attacker, But encrypted counter blocks are not known to the observer if they do not possess the encryption key. If the observer could obtain the encrypted counter blocks (the keystream), they would be able to recover the plaintext just by XORing the keystream with the ciphertext.
The IV used in CTR mode must never be reused with the same encryption key for another message. If you reuse it, the same keystream will be generated for encrypting multiple messages. Two ciphertexts encrypted with the same keystream can be XORed and the result will be the same as XORing the corresponding plaintexts. Plaintexts often have much less randomness than the keystream and thus, a plaintext recovery attack becomes much easier than an attack on the ciphertext. Furthermore, if the chosen plaintext attack is possible, then the keystream can be recovered just by XORing the plaintext and the ciphertext, and then the recovered keystream can be used to decrypt any message encrypted by the same keystream or produced by the same key and IV. While IV uniqueness is a very important requirement in CTR mode, IV unpredictability is not a requirement in this mode, unlike in CBC mode. This is because CTR’s resistance against the chosen plaintext attack is based on the unpredictability of the next keystream block, not on the unpredictability of the IV. Some cryptographers criticize CTR mode because the block cipher is fed with non-secret data in order to produce the keystream. However, nowadays, CTR mode is widely accepted and respected by cryptographers, such as Niels Ferguson and Bruce Schneier, who believe that it is secure. It is also worth mentioning that the CTR mode was invented by two other respected cryptographers, Whitfield Diffie and Martin Hellman, who are famous for inventing the Diffie-Hellman (DH) key exchange method used in TLS.
As CTR mode converts a block cipher to a stream cipher, it has the same advantages as stream ciphers. In CTR mode, plaintext padding is not needed and thus, padding oracle attacks are avoided. The keystream can also be precalculated in advance, not necessarily at the time of encryption. Finally, encryption and decryption operations just XOR the keystream with the plaintext – hence, different plaintext blocks can be encrypted or decrypted in parallel using the precalculated keystream.
CTR mode serves as the basis for the more advanced Galois/Counter mode (GCM).
Reviewing GCM
In GCM, the ciphertext is produced in the same way as in CTR mode. The counter blocks are encrypted with a block cipher, producing the keystream. Then, the keystream is XORed with the plaintext, producing the ciphertext.
The difference from CTR mode is that GCM not only encrypts the plaintext but also authenticates the ciphertext. This means that the knowledge of the encryption key allows us to verify the integrity of the ciphertext or, in other words, detect unauthorized changes to the ciphertext if the verification has failed. This detection is useful because many attacks work by changing the ciphertext, feeding the changed ciphertext to an oracle, and analyzing the oracle feedback.
An oracle in cryptography is a program, device, or network node that possesses an encryption key and is able encrypt or decrypt data. An oracle gives some feedback, sometimes in the form of (correctly or incorrectly) encrypted or decrypted data, sometimes in the form of an error message, or sometimes, an oracle exposes other information – for example, the time taken to decrypt. This can differ between successful and unsuccessful decryption. The oracle feedback allows an attacker or a cryptanalyst to get data that may help to break the encryption.
Authenticated encryption (AE) modes, such as GCM, make it possible to detect unauthorized changes to the encrypted data and refuse to use the corrupted data.
Some authenticated encryption modes allow us to combine encrypted and unencrypted data for authentication. This is needed for storing or transmitting data that is not confidential but is related to encrypted confidential data and needs protection from unauthorized changes. These encryption modes are called authenticated encryption with associated data (AEAD). GCM is an AEAD mode – extra data added will only be authenticated but not encrypted.
How does GCM authenticate the ciphertext? Each ciphertext block is converted into a number and is used in the finite field arithmetic over the Galois field, together with an initial block, which depends on the encryption key. Hence, the mode of operation is called the Galois/Counter mode. The authentication operation produces an authentication tag that can be used by the decrypting party to verify the integrity of the ciphertext.
The output of the encryption in GCM then contains the IV, ciphertext, and authentication tag.
GCM operation can be illustrated by the following diagram:

Figure 2.8 – How GCM works
Image authors: D. McGrew and J. Viega at NIST, licensing: Public Domain
GCM is a bit special. It only works on 128-bit block sizes and requires a 96-bit IV. Thus, it is impossible to use it with old 64-bit block ciphers. OpenSSL can only use GCM with the AES cipher.
GCM and other AE modes authenticate the data. If the decrypting party wants to verify the ciphertext integrity, it must process the whole ciphertext in order to validate the authentication tag. Usually, decryption and validation are done simultaneously. Hence, if the validation fails, the decrypted data should be discarded.
The requirement for the IV in AES-GCM is the same as in CTR mode: the IV must be unique, meaning that the same IV must not be reused with the same encryption key for another message. If the IV is reused, the same attacks that apply in CTR mode can also apply in AES-GCM. In addition, an attacker can recover the key used for authenticating the messages (not the encryption key). With the authenticating key, the attacker can produce fake authentication tags and inject unwanted, seemingly authenticated data into the ciphertext stream.
GCM is currently the most popular block encryption mode used in the TLS protocol. GCM has been supported since TLS 1.2. Older versions of the TLS protocol used CBC mode.
The TLS protocol always verifies encrypted data integrity, even if a non-AE encryption mode is used. The TLS protocol uses MACs for verification. On the internet, a lot of bad things can happen to the passing traffic. Someone can try Man in the Middle (MITM) attack on your data. Someone else can try to use your server as an oracle. Therefore, data authentication is more important on the network than on a local filesystem.
As we have mentioned, GCM is vulnerable to various attacks if the key-IV pair is reused for another message. As a response to that weakness, Advanced Encryption Standard in Galois/Counter Mode with a Synthetic Initialization Vector (AES-GCM-SIV) mode has been invented.
Reviewing AES-GCM-SIV
AES-GCM-SIV is a variant of the AES cipher in GCM. The distinctive feature and advantage of AES-GCM-SIV is that this algorithm provides resistance to IV or nonce misuse, meaning that the algorithm ensures that the same IV will not be reused for different messages.
AES-GCM-SIV does not take the IV as a part of the input data, as most encryption modes do. Instead, this algorithm takes the second secret key for authentication. AES-GCM-SIV generates the authentication tag based on the plaintext, additional authenticated data, and the authentication key. The generated authentication tag is also used as the IV for the plaintext encryption. This generated IV is called the Synthetic Initialization Vector (SIV). As the IV depends on the plaintext, it will be different for different plaintexts.
A disadvantage of AES-GCM-SIV is that the algorithm needs two passes over the plaintext: one for generating the auth tag and IV and another one for encryption.
Other block cipher operation modes
There are many other operation modes for block ciphers, such as propagating CBC (PCBC), cipher feedback (CFB) mode, output feedback (OFB) mode, Counter with CBC-MAC (CCM) mode, Carter-Wegman + CTR (CWC) the Sophie Germain Counter Mode (SGCM), and so on. Those modes are not very popular; therefore, they will not be reviewed here.
Choosing the block cipher operation mode
The best block cipher operation mode supported by OpenSSL is believed to be GCM. GCM supports authentication in addition to encryption, does not require padding, and thus is immune to padding oracle attacks. GCM also allows to precalculate the keystream and parallelize encryption and decryption. If you use GCM, be sure to use a different IV for every plaintext that you encrypt with the same encryption key. It is very important – otherwise, your encryption will not be secure.
The former de facto standard block cipher operation mode is CBC. You will probably find a lot of CBC usage in existing software and a lot of existing data encrypted using CBC. CBC mode needs padding applied to plaintext. If you develop or support software that uses CBC mode, you will have to understand what padding is.
Padding for block ciphers
In CBC mode, block ciphers encrypt plaintext data block by block – but what happens to the last plaintext block, which in most cases, is smaller than the block size? It cannot be encrypted as is, because a block cipher requires a complete data block as input. Thus, the last plaintext block is padded up to the block size.
OpenSSL can add padding automatically when finalizing encryption and remove it when finalizing decryption. This feature can be disabled – in such a case, the developer must pad and unpad the plaintext data himself.
Cryptographers invented different types of padding. For symmetric encryption, OpenSSL only supports Public Key Cryptography Standard number 7 padding (PKCS #7 padding), also known as PKCS7 padding, simply PKCS padding, or standard block padding. PKCS #7 padding consists of N bytes, each having the value N. For example, if the cipher block size is 16 bytes (128 bits) and the last block of plaintext is only 10 bytes of data, then the padding length will be 6 bytes and each padding byte will have a value of 0x06. The padding will look as follows: 0x06 0x06 0x06 0x06 0x06 0x06.
As we see, PKCS #7 padding has the advantage that it encodes the length of padding, thus indirectly encoding the length of the useful plaintext data in the last block. Hence, the exact length of the whole plaintext data does not need to be transmitted along with the data. For what it’s worth, the length of the last data block is concealed from an observer of the ciphertext because the padding bytes are encrypted together with the last useful data bytes.
What happens if the plaintext length is a multiple of the block size and the last plaintext block fully fills the to-be-encrypted block? In such a case, PKCS #7 padding is added anyway. A block of padding-only bytes is appended to the plaintext as the last block for encryption. For modern ciphers with 128-bit block sizes, 16 bytes of padding are appended, each with a value of 0x10. If seemingly unneeded padding was not added, it would be impossible to know after the decryption of the last block whether the last byte was a padding byte or a plaintext data byte.
What does it mean that OpenSSL supports PKCS #7 padding? It means that OpenSSL will automatically add padding on encryption, remove padding on decryption, and check whether the existing PKCS #7 padding is correct. The existing padding would not be correct if the decrypted plaintext did not finish with N bytes to the value of N. In this case, OpenSSL will return an error when trying to finalize the decryption.
Note that PKCS #7 padding is sometimes called PKCS #5 padding. PKCS #5 padding uses the same padding principle (N bytes to the value of N) but is only defined for blocks up to 64 bits.
The disadvantage of PKCS #7 padding is that the resulting ciphertext is susceptible to padding oracle attacks. However, padding oracle attacks are only possible if an attacker can force the encryption of a lot of attacker-controlled plaintext with the same encryption key – for example, by sending data using JavaScript on TLS connections. If we control all the encrypted plaintext (for example, we just encrypt a file), then it is impossible, or very hard, at least, to accomplish the padding oracle attack.
If you control the encryption method and want to avoid padding oracle attacks, you can pad and unpad manually with random data. In this case, you will have to store or send the length of the plaintext, or at least of the last plaintext block, with the ciphertext.
How to generate a symmetric encryption key
Generating an encryption key for symmetric encryption is surprisingly easy. You just request the needed amount of random bytes from your cryptographically secure random generator!
Which random generator is considered cryptographically secure? It is a random generator that generates bytes that are extremely hard to predict. The unpredictability of generated random bytes is accomplished by using the entropy caused by unpredictable events from the outside world. Often, cryptographically secure random generators use the entropy caused by the unpredictable timing of the input from a keyboard and mouse. If the keyboard and mouse are unavailable, for example, when an application is running in a container, then another source of entropy can be used, such as microfluctuations in the CPU speed. Another common entropy source is a ring oscillator that can be included in the CPU or another chip.
What is the correct amount of random bytes? It is the same as the key length of your chosen cipher. For example, if you have chosen AES-256, you will need 256 random bits or 32 random bytes.
Some ciphers, such as DES or IDEA, have classes of weak keys, which render the encryption by those keys insecure, but for all popular ciphers, the probability of randomly generating a weak key is very low.
Where do you get a cryptographically secure random generator? It depends on your operation system (OS) . For example, on Linux, you can get secure random bytes from a /dev/random device, running the following command on the command line:
$ xxd -plain -len 32 -cols 32 /dev/random
Here and in the rest of the book, command-line examples follow these conventions:
- Lines beginning with $ represent commands entered at the command prompt.
- The $ prefix itself is the command-line prompt.
- The rest of the line after the $ prefix is the entered command.
- Lines not beginning with $ represent the output of the commands.
If you want to generate secure random bytes in your C code, OpenSSL provides the RAND_bytes() function, which uses an OS-dependent cryptographically secure pseudorandom generator (CSPRNG) and will provide you with the requested amount of secure random bytes. You can also use that function on the command line using the openssl rand command:
$ openssl rand -hex 32
The obtained encryption key can be used for symmetric encryption. It must also be saved in a safe place or securely transmitted to the decrypting party in order to decrypt the ciphertext later.
In many cases, you don’t need a random encryption key, but need a key generated deterministically – for example, from a password or a passphrase. In such cases, you need to use a Password-Based Key Derivation Function (PBKDF). More information about PBKDFs will be given in Chapter 5, Derivation of an Encryption Key from a Password.
Downloading and installing OpenSSL
We have now learned enough about the building blocks of symmetric encryption. It is time to use our knowledge to encrypt some data using OpenSSL, but first, we need to get the required components of OpenSSL.
The OpenSSL toolkit is distributed from its official website (https://www.openssl.org/) in the form of source code. If you are a software developer, you can compile OpenSSL using the documentation supplied with the source code. Compiling OpenSSL from the source is the preferred way if you want a particular version of OpenSSL or want to compile it with specific options.
You can also get OpenSSL in a compiled form. Almost all Linux distributions contain OpenSSL in the form of one or several installable packages. For example, in order to install OpenSSL on Debian or Ubuntu Linux, you only need to issue one command:
$ sudo apt install openssl libssl3 libssl-dev libssl-doc
Another Linux distribution may use a different command, but for any Linux distribution, the installation will be similar. Users of FreeBSD, NetBSD, or OpenBSD can install OpenSSL from BSD ports. Users of macOS can also install OpenSSL using a package manager, such as Homebrew or MacPorts.
It is also possible to install OpenSSL on Windows using a package manager for Windows, such as Scoop, Chocolatey, or winget. But, unlike on other operating systems, on Windows, users often do not use package managers and use standalone installation packages. These standalone installers are also made for OpenSSL by third-party developers. The incomplete list of those installers can be found at https://wiki.openssl.org/index.php/Binaries.
What do you get on your system after installing OpenSSL? The OpenSSL toolkit consists of the following components:
- Dynamic libraries
- Static libraries
- C header files
- The openssl command-line tool
- Documentation
What is the purpose of each component?
The dynamic libraries (.so or .dll files) are needed for linking applications that use the OpenSSL library dynamically and the subsequent execution of those applications. The OpenSSL toolkit includes two libraries, libcrypto and libssl. libcrypto contains an implementation of cryptography algorithms and libssl contains an implementation of SSL and TLS protocols. libssl depends on libcrypto and cannot be used without it. libcrypto, on the other hand, can be used without libssl, if only crypto functionality is needed, without SSL/TLS. On systems with package managers, such as Linux and BSDs, a package with OpenSSL dynamic libraries is usually called libssl, optionally with the version suffix – for instance, libssl3. The libssl package must be installed if any other installed package needs the OpenSSL library. There are many applications that use the OpenSSL library – hence, the libssl package will be installed on most systems.
Static libraries (.a or .lib files) are needed for linking OpenSSL statically into applications. When a static library is linked to an application, that static library is included in the application executable file and is not needed to be available at runtime, unlike dynamic libraries. Therefore, static libraries are only needed during development. On systems with package managers, a package with OpenSSL static libraries is usually called libssl-dev, libssl-devel, openssl-devel, or something similar. Note the dev or devel suffix – it gives a hint that the package is needed for development.
C header files are needed for the compilation of C/C++ applications that need OpenSSL. They are only needed for development – thus, on systems with package managers, they are included in the same package as static libraries – that is, libssl-dev, libssl-devel, or openssl-devel.
The openssl command-line tool is needed for using OpenSSL functionality on the command line without having to write your own applications. The tool is very useful for system administrators and DevOps engineers. On systems with package managers, the openssl tool is usually contained in a package with the same name, openssl. The openssl package may contain man (manual) pages for the openssl tool, or those man pages may reside in a separate package with documentation.
As every library, OpenSSL needs documentation. Originally being a library for Unix, OpenSSL supplies documentation for its Application Programming Interface (API) in the form of man pages. On systems with package managers, a package with the documentation may be called libssl-doc, openssl-man, or similarly. The package may also include code examples. Note that OpenSSL also has its man pages in HTML format available on its official website: https://www.openssl.org/docs/manpages.html.
Now, when we have the OpenSSL components installed, let’s get our feet wet with some encryption.
How to encrypt and decrypt with AES on the command line
We are going to encrypt a file using the openssl command-line tool.
$ seq 1000 >somefile.txt
Using our knowledge of the symmetric encryption concepts, we are choosing the following parameters for our encryption:
- Cipher: AES-256
- Operation mode: CBC (we should have chosen GCM, but that mode is not supported by the command-line tool)
- Padding type: standard block padding
How can we find out how to encrypt the command line from the documentation? We can begin with the openssl tool man page:
$ man openssl
On that man page, we can see different subcommands that the openssl tool supports. From the man page, we can figure out that we need the enc subcommand. We can then refer to the openssl-enc man page for documentation on the enc subcommand:
$ man openssl-enc
From the openssl-enc man page, we can figure out which parameters the subcommand needs. We see that the enc subcommand needs an encryption key and IV, among other parameters. We can just generate those values randomly with the rand subcommand. Its documentation can be read in the usual way:
$ man openssl-rand
OK, we have read enough documentation – let’s generate a 256-bit encryption key using our recently acquired knowledge:
$ openssl rand -hex 32
74c8a19fee9e0710683afe526462ce8a960ca1356e113bf3a08736a68a48eca0
We also need to generate a 128-bit IV, the same length as the block size:
$ openssl rand -hex 16
4007fbd36f08cb04869683b1f8a15c99
Finally, let’s encrypt some files:
$ openssl enc
-aes-256-cbc
–K
74c8a19fee9e0710683afe526462ce8a960ca1356e113bf3a08736a68a48eca0
-iv 4007fbd36f08cb04869683b1f8a15c99
-e
-in somefile.txt
-out somefile.txt.encrypted
openssl is not printing anything to the terminal. By old Unix tradition, that means a successful execution. In unsuccessful cases, errors would be printed.
Let’s check that the encrypted file has been created:
$ ls -o somefile.txt*
-rw-rw-r-- 1 alexei 3893 Jul 27 20:17 somefile.txt
-rw-rw-r-- 1 alexei 3904 Jul 27 20:26 somefile.txt.encrypted
Note that the encrypted file is 11 bytes longer (3904 versus 3893 bytes) and 3,904 is a multiple of 16. As you may have guessed, the extra 11 bytes are padding for the 16-byte blocks.
If you examine the contents of the encrypted file, you will see seemingly random binary data, as expected.
Let’s try to decrypt the file:
$ openssl enc
-aes-256-cbc
-K 74c8a19fee9e0710683afe526462ce8a960ca1356e113bf3a08736a68a48eca0
-iv 4007fbd36f08cb04869683b1f8a15c99
-d
-in somefile.txt.encrypted
-out somefile.txt.decrypted
Again, there’s no output, meaning the execution was successful.
Let’s check that the decrypted file has exactly the same contents as the original one. We can do it by looking at the file’s contents in an editor, but it is more reliable to compare their checksums:
$ cksum somefile.txt*
1830648734 3893 somefile.txt
1830648734 3893 somefile.txt.decrypted
4000774547 3904 somefile.txt.encrypted
As we can see, both size (3893) and checksum (1830648734) match for somefile.txt and somefile.txt.decrypted, meaning that the files are identical. The size and checksum of somefile.txt.encrypted are different, as expected.
If you are on Windows and do not have the cksum command, you can use OpenSSL’s message digest calculation functionality to calculate cryptographically strong checksums (message digests):
$ openssl dgst somefile.txt*
SHA256(somefile.txt)= 67d4ff71d43921d5739f387da09746f405e425b07d727e4c69d029461d1f051f
SHA256(somefile.txt.decrypted)= 67d4ff71d43921d5739f387da09746f405e425b07d727e4c69d029461d1f051f
SHA256(somefile.txt.encrypted)= 5a6a88e37131407c9dc9b8601b3195c8a33c75a20421a1733233a963ba42aef3
Message digests are much more reliable than checksums produced by the cksum command, but the calculation of cryptographically strong message digests is much slower. In our case, we don’t expect somefile.txt.decrypted to be specially crafted for achieving a special checksum. Thus, we don’t need the advantages of cryptographically strong checksums – cksum checksums will do just fine. Also, it’s a bit more difficult to compare digests in the openssl dgst output, because the digests are not lined up. Message digests will be covered in detail in Chapter 3, Message Digests.
What will happen if we try to decrypt the file using the wrong encryption key or IV? Let’s find out. Note that the first byte of the key has been changed from 0x74 to 0x00:
$ openssl enc
-aes-256-cbc
-K 00c8a19fee9e0710683afe526462ce8a960ca1356e113bf3a08736a68a48eca0
-iv 4007fbd36f08cb04869683b1f8a15c99
-d
-in somefile.txt.encrypted
-out somefile.txt.decrypted
bad decrypt
140283139302720:error:06065064:digital envelope routines:EVP_DecryptFinal_ex:bad decrypt:../crypto/evp/evp_enc.c:610:
The decryption has failed, but how did openssl detect the failure? Decryption is just a sequence of arithmetical and logical operations on a block of 16 bytes. We did not use authenticated encryption to check the data integrity. We also did not provide openssl with any checksum for checking the result of the decryption. It is the standard padding that helped! The decryption of the last block resulted in a block of garbage data, which did not have the right padding at the end, and openssl detected that.
Let’s take a look at the checksum listing:
$ cksum somefile.txt*
1830648734 3893 somefile.txt
1498277506 3888 somefile.txt.decrypted
4000774547 3904 somefile.txt.encrypted
Note that the decrypted file is 16 bytes shorter that the encrypted file (3888 versus 3904 bytes). This is because until the last encrypted block, it was impossible to detect failure, and openssl wrote all the blocks to the output file except the last one. The checksums of somefile.txt and somefile.txt.decrypted are different, as expected. The contents of somefile.txt.decrypted look like garbage because we tried to decrypt with the wrong key.
What if we used a cipher operation mode that did not require padding – for example, CTR? Let’s try to decrypt our file in CTR mode:
$ openssl enc
-aes-256-ctr
-K 00c8a19fee9e0710683afe526462ce8a960ca1356e113bf3a08736a68a48eca0
-iv 4007fbd36f08cb04869683b1f8a15c99
-d
-in somefile.txt.encrypted
-out somefile.txt.decrypted
No output, meaning that openssl did not detect any errors. Remember we have tried to decrypt with the wrong key and in the wrong mode! The decryption result cannot be right. Let’s examine the file sizes and the checksums:
$ cksum somefile.txt*
1830648734 3893 somefile.txt
1916084428 3904 somefile.txt.decrypted
4000774547 3904 somefile.txt.encrypted
The checksums of somefile.txt and somefile.txt.decrypted are different, as expected. The contents of somefile.txt.decrypted look like garbage, as expected. Note the size of somefile.txt.decrypted: 3904, the same size as somefile.txt.encrypted. We were decrypting in CTR mode – thus, all the (wrongly) decrypted data was considered plaintext without padding. The padding was neither checked nor removed. That’s why the decrypted file size is the same as the encrypted file size and that’s why openssl could not detect decryption failure.
As we can see, it is quite useful to have some checksum or message digest in order to check the decryption result.
We have played enough with the command line so far. Let’s write our first program that uses OpenSSL as a library.
Initializing and uninitializing OpenSSL library
As of version 1.1.0, the OpenSSL library does not require explicit initialization and uninitialization. The library will automatically initialize and uninitialize.
However, it is still possible to initialize OpenSSL explicitly if some non-standard initialization is needed. It is also possible to uninitialize explicitly, but it is discouraged, especially in multithreaded programs or if OpenSSL may be used by both the program and another library in the same process. Note that after uninitialization, it is not possible to initialize OpenSSL again.
Explicit initialization is done by calling the OPENSSL_init_ssl() function. Explicit uninitialization is done by calling the OPENSSL_cleanup() function.
Older versions of OpenSSL, below 1.1.0, will not initialize automatically. If you need to use an old OpenSSL version, you have to initialize it explicitly, using now-deprecated functions called SSL_library_init() and EVP_cleanup().
You can read the API documentation for these functions on their man pages:
$ man OPENSSL_init_ssl
$ man OPENSSL_cleanup
$ man SSL_library_init
$ man EVP_cleanup
Most OpenSSL functions have a man page that has the same name as the function name. It is a good source of documentation. As was mentioned before, the man pages are also available on the OpenSSL website in HTML format.
Let’s write a simple program that will only initialize and uninitialize OpenSSL, just to demonstrate how to make calls to the library and compile and link a program that uses OpenSSL. Here is its complete source code:
// File: init.c
#include <openssl/ssl.h>
#include <stdio.h>
int main() {
   printf("Initializing OpenSSL...
");
   OPENSSL_init_ssl(0, NULL);
   printf("Unintitializing OpenSSL...
");
   OPENSSL_cleanup();
   printf("Done.
");
   return 0;
}
The source code of the init program is also available on GitHub: https://github.com/PacktPublishing/Demystifying-Cryptography-with-OpenSSL-3/blob/main/Chapter02/init.c.
The program looks very simple. Let’s find out how to compile and link it with OpenSSL.
How to compile and link with OpenSSL
How to compile and link your program with OpenSSL depends on how you installed OpenSSL. If you are on Unix, you could install OpenSSL C headers and library files into the include and lib system directories, such as /usr/include and /usr/lib/x86_64-linux-gnu. In such a case, compilation and linking can be accomplished using one simple command:
$ cc init.c -lssl -lcrypto
The headers and library files will be looked up in the include and lib system directories. Therefore, it’s not necessary to explicitly specify directories for header and library searches. The output executable will be called a.out.
If are on Unix and the preceding command did not work for you, check that you installed the OpenSSL development package, such as libssl-dev or openssl-devel.
If you have not installed OpenSSL system-wide or do not want to use system-wide installation, you will have to specify paths to the OpenSSL C headers and library files explicitly:
cc
-I/path/to/openssl/c/headers
-L/path/to/openssl/library/files
-o init
init.c
-lssl -lcrypto
Note that we also used the -o init switch to specify the output executable name, because a.out is not the most descriptive name. Note that -lssl -lcrypto switches also reside on the command line after the source file name. This is important. Libraries must be specified after the files that want to use them. If one library uses another, the library that uses another library is specified before the used library.
The specified library path may include dynamic or static OpenSSL libraries. Either type is supported. If both dynamic and static libraries are available, the linker will choose the dynamic libraries.
This method of calling the compiler directly with only a few switches is OK for small programs. For larger programs, you will want to use a build tool, such as GNU Make, BSD Make, or CMake, or an IDE, where you will specify the needed paths and switches and avoid repeating them on the command line.
If you are using Microsoft Windows, you will likely use an IDE, such as Microsoft Visual Studio. You will need to specify paths to the OpenSSL C headers and library files because on Windows, there is no concept of system include and library paths. However, don’t underestimate the power of command-line build tools because they are quite useful for build automation and Continuous Integration.
Here is a sample Makefile file that can be used by the make tool to build our init program:
# File: Makefile
CFLAGS  += -I/usr/include
LDFLAGS += -L/usr/lib/x86_64-linux-gnu
LDLIBS  += -lssl -lcrypto
init:
In this sample Makefile file, we used implicit make compilation rules, providing compiler options via implicit variables. If the OpenSSL headers and libraries are in the system paths, we can omit the switches with paths to the implicit CFLAGS and LDFLAGS variables. make and the compiler cannot figure out by themselves which libraries are needed for linking; thus, we cannot omit the -lssl –lcrypto switches to the LDLIBS variable.
In order to build with make, just run the following:
$ make
Do so from the same directory where the Makefile and init.c files reside.
Let’s check that our compiled executable is linked with libssl and libcrypto:
$ ldd init
...
libssl.so.3 => /lib/x86_64-linux-gnu/libssl.so.3 (0x00007fd72096a000)
libcrypto.so.3 => /lib/x86_64-linux-gnu/libcrypto.so.3 (0x00007fd72068d000)
...
Finally, let’s run the executable!
$ ./init
Intitializing OpenSSL...
Unintitializing OpenSSL...
Done.
The output is as expected.
We have got our feet wet – written and built a very easy application that calls OpenSSL but does not really do anything useful. It was helpful for learning how to build programs that use OpenSSL. Let’s build on our success by developing a more useful program – one that encrypts a file, similar to openssl enc.
How to encrypt with AES programmatically
When using OpenSSL as a library, we do not have to limit ourselves to the functionality that the openssl tool provides. openssl is a good tool, but it does not expose the whole functionality of OpenSSL. For instance, openssl enc does not support encryption or decryption in GCM, but OpenSSL as a library allows us to do that.
In this section, we are going to develop a program that can encrypt a file using an AES-256 cipher in GCM. We will call our program encrypt.
In order to avoid passing too many values on the command line, we will store the IV and authentication tag in the encrypted file. Unlike the encryption key, the IV and auth tag are public information and do not have to be kept secret. The format of the encrypted file will be the following:

Table 2.1 – The encrypted file format
Our encryption program will need three command-line arguments:
- Input file name
- Output file name
- Encryption key, hex-encoded
Here is our high-level plan for the implementation:
- Generate a random IV and write it into the output file
- Initialize encryption
- Encrypt chunk by chunk, reading plaintext chunks from the input file and writing the resulting ciphertext chunks into the output file
- Finalize encryption
- Get the authentication tag and write it into the output file
Let’s figure out how to perform all those stages.
Implementing the encryption program
Here is how we implement the encryption:
- First, let’s allocate the input and output buffers:
const size_t BUF_SIZE = 64 * 1024;
const size_t BLOCK_SIZE = 16;
unsigned char* in_buf = malloc(BUF_SIZE);
unsigned char* out_buf = malloc(BUF_SIZE + BLOCK_SIZE);
Those are buffers that will be used for reading input data and storing output data before writing. Note that the output buffer is a bit longer than the input buffer. This is because in some cases, according to OpenSSL documentation, encryption may produce ciphertext longer than plaintext, up to BLOCK_SIZE - 1 bytes longer. In our case, it should not happen, but let’s follow the OpenSSL documentation anyway.
- The generation of the IV is easy – we just have to use the RAND_bytes() function that we already mentioned:
RAND_bytes(iv, IV_LENGTH);
- Then, we have to initialize encryption. The first thing we have to do for initializing encryption is to create a cipher context:
EVP_CIPHER_CTX* ctx = EVP_CIPHER_CTX_new();
Let’s talk a bit about the EVP_ prefix and the _CTX suffix. When developing programs using OpenSSL, you will see and use those acronyms very often.
EVP stands for Envelope and denotes the usage of the Envelope API. The Envelope API is a high-level API allowing us to accomplish high-level operations – for example, encrypting a long plaintext in the needed operation mode. The Envelope API will provide the developer with a collection of data structures and functions for the task, such as the initialization of encryption, setting a key and IV, adding plaintext chunks for encryption, finalizing encryption, and getting post-encryption data, such as an authentication tag. In contrast to the Envelope API, OpenSSL also has the old encryption API and functions such as AES_encrypt(), AES_cbc_encrypt(), and AES_ofb128_encrypt(). That old API has a number of disadvantages:
- Inconsistency in naming. For example, the AES_ofb128_encrypt() function has a block size (128) in the name, but AES_cbc_encrypt() does not.
- Higher-level functions, such as AES_cbc_encrypt() and lower-level functions, such as AES_encrypt(), which encrypts only one block, are mixed in the same AES_ namespace. This is confusing.
- The choice of the cipher – for example, AES, SEED, or Camellia – is communicated via the function name prefix – that is, AES_, SEED_, or Camellia_. The cipher operation mode is also communicated via function name: substrings such as cbc or ofb128. This leads to the need for many similar functions to exist, one for each combination of ciphers and operation modes. Instead, cipher and operation modes should have been passed as function parameters.
- The collection of functions is incomplete. For example, the AES_ctr128_encrypt() function for encrypting in CTR mode may or may not be listed in OpenSSL header files. It depends on the OpenSSL version. Functions for some ciphers – for example, ARIA and SM4, are not available in the old API at all.
- The authors probably recognized the issue with a lot of similar functions, did not want to have a separate decryption function for each encryption function, and thus decided to communicate an encryption or decryption action via a function parameter. As a result, in order to decrypt in CBC mode, the library user has to call a function called AES_cbc_encrypt(), but pass an enc=0 parameter to indicate decryption. Meanwhile, to only decrypt one block, the developer has to call the AES_decrypt() function. Quite inconsistent.
- It is impossible to add extra parameters for encryption or decryption when calling higher-level functions – for example, enabling or disabling padding. The developer then has to use the block-level AES_encrypt() function and program the desired operation mode himself.
- Functions supporting operation modes can only take full plaintext or ciphertext. It is impossible to supply data chunk by chunk – for example, if data does not fit into the memory buffer or we are performing streaming encryption. This is a very serious drawback.
Fortunately, the mentioned issues are solved in the EVP API. The old encryption API is officially deprecated since OpenSSL 3.0.
Now – about the CTX abbreviation. CTX stands for Context. When developing with OpenSSL, you will see and use a lot of contexts – for encryption, the calculation of message digests and message authentication codes, key derivation, TLS connections, TLS sessions, and TLS settings. What is a context? It is a C structure that stores data relevant to the current operation. Some contexts are more high-level and they store settings that can be applied to several operations of the same kind – for example, to several TLS connections.
In our case, EVP_CIPHER_CTX stores the cipher type, the encryption key, the IV, flags, and the current internal state of the encryption operation. It is possible to set data, such as key and IV, into EVP_CIPHER_CTX and get data out of it, such as an authentication tag. The EVP_CIPHER_CTX object is supplied to all functions that we need to call during encryption in our chosen operation mode:
- OK, we have created our EVP_CIPHER_CTX object. The next thing we have to do is to initialize the context and the encryption process with the chosen operation mode, key, and IV:
EVP_EncryptInit(ctx, EVP_aes_256_gcm(), key, iv);
- Initialization is done. Now, we can encrypt chunk by chunk, using the EVP_EncryptUpdate() function:
while (!feof(in_file)) {
size_t in_nbytes = fread(in_buf, 1, BUF_SIZE, in_file);
int out_nbytes = 0;
EVP_EncryptUpdate(
ctx, out_buf, &out_nbytes, in_buf, in_nbytes);
fwrite(out_buf, 1, out_nbytes, out_file);
}
- Encryption is almost done. Now, we have to finalize it using the EVP_EncryptFinal() function:
int out_nbytes = 0;
EVP_EncryptFinal(ctx, out_buf, &out_nbytes);
fwrite(out_buf, 1, out_nbytes, out_file);
Encryption finalization is an operation that depends on the used cipher and mode. For example, in the CBC mode, the finalization operation adds padding to the last data block and encrypts it, producing the last ciphertext block. It means that the finalization operation may produce data – thus, it takes the output buffer as one of the parameters.
- In GCM, the finalization operation calculates the authentication tag, which reminds us that we have to get it from the context object and write into the output file:
EVP_CIPHER_CTX_ctrl(
ctx, EVP_CTRL_GCM_GET_TAG, AUTH_TAG_LENGTH, auth_tag);
fwrite(auth_tag, 1, AUTH_TAG_LENGTH, out_file);
- The last operation that we need to do is to free the EVP_CIPHER_CTX object that is no longer required in order to avoid memory leaks:
EVP_CIPHER_CTX_free(ctx);
Those were all the OpenSSL operations that we needed!
The full source code of the encryption program can be found on GitHub as an encrypt.c file: https://github.com/PacktPublishing/Demystifying-Cryptography-with-OpenSSL-3/blob/main/Chapter02/encrypt.c .
At the given URL, you can find the complete implementation but almost without error handling, so that the error handling doesn’t clutter the code and the code flow is more visible.
Here is another implementation, encrypt-with-extended-error-checking.c , with extended error handling: https://github.com/PacktPublishing/Demystifying-Cryptography-with-OpenSSL-3/blob/main/Chapter02/encrypt-with-extended-error-checking.c.
The code is not as readable as in the first implementation, but the second implementation may be useful for debugging and troubleshooting.
A small remark about the usage of the goto statement in the code – we all know the statement “Go To Statement Considered Harmful” and we should not overuse it. Some developers think that goto should not be used at all, but sometimes, goto is useful – for example, for deduplicating the cleanup code, as in the preceding examples. In C++, we would be able to use destructors for automatic cleanup, but in C, we don’t have that possibility.
Running the encrypt program
Let’s try to run our encrypt program:
- Generate a sample file for further encryption:
$ seq 20000 >somefile.txt
- Encrypt the file:
$ ./encrypt somefile.txt somefile.txt.encrypted 74c8a19fee9e0710683afe526462ce8a960ca1356e113bf3a08736a68a48eca0
Encryption succeeded
- Check the files sizes and checksums:
$ cksum somefile.txt*
3231941463 108894 somefile.txt
3036900166 108922 somefile.txt.encrypted
The original and the encrypted files are different, as expected. The encrypted file is 28 bytes longer because it contains the IV and auth tag in addition to the ciphertext.
Looks good so far – but can we decrypt what we encrypted?
How to decrypt with AES programmatically
In this section, we are going to develop the decrypt program that can encrypt a file encrypted by the encrypt program.
Our decryption program will be similar to the encryption program and will also take three command-line arguments:
- Input file name
- Output file name
- Encryption key, hex-encoded
This time, the input file is the encrypted file created by the preceding encrypt program.
Let’s make a high-level plan, similar to how we did before:
- Read the IV from the input file.
- Initialize decryption.
- Decrypt chunk by chunk, reading plaintext chunks from the input file and writing the resulting plaintext chunks into the output file.
- Read the authentication tag from the input file and set it into the cipher context.
- Finalize decryption.
As we can see, the decryption plan is very similar to the encryption plan – initalize, process, and finalize. Let’s see how it is implemented in the concrete code.
Implementing the decrypt program
Here is how we implement the decryption:
- We read the IV:
size_t in_nbytes = fread(iv, 1, IV_LENGTH, in_file);
size_t current_pos = in_nbytes;
Note the current_pos variable. This time, we cannot rely on reading up to the end of the input file and need to track our position in the input file.
- We initalize the decryption. Note that this time, we initialize using the EVP_DecryptInit() function instead of EVP_EncryptInit():
ctx = EVP_CIPHER_CTX_new();
EVP_DecryptInit(ctx, EVP_aes_256_gcm(), key, iv);
- The main part is decrypting chunk by chunk. For decryption, we use the EVP_DecryptUpdate() function instead of EVP_EncryptUpdate():
while (current_pos < auth_tag_pos) {
size_t in_nbytes_left = auth_tag_pos - current_pos;
size_t in_nbytes_wanted =
in_nbytes_left < BUF_SIZE ?
in_nbytes_left : BUF_SIZE;
in_nbytes = fread(in_buf, 1, in_nbytes_wanted, in_file);
current_pos += in_nbytes;
int out_nbytes = 0;
EVP_DecryptUpdate(
ctx, out_buf, &out_nbytes, in_buf, in_nbytes);
fwrite(out_buf, 1, out_nbytes, out_file);
}
Note this part of the decryption loop:
size_t in_nbytes_wanted =
in_nbytes_left < BUF_SIZE ?
in_nbytes_left : BUF_SIZE;
Here, we are avoiding reading too much from the input file in order to avoid reading the authentication tag into the ciphertext buffer.
- When we have read and decrypted the ciphertext, it’s time read the authentication tag and set it into the cipher context:
fread(auth_tag, 1, AUTH_TAG_LENGTH, in_file);
EVP_CIPHER_CTX_ctrl(
ctx, EVP_CTRL_GCM_SET_TAG, AUTH_TAG_LENGTH, auth_tag);
We have to set the authentication tag before finalizing the decryption – otherwise, the finalization operation will fail.
- Finally, for finalizing the decryption, we have to use the EVP_DecryptFinal() function instead of EVP_EncryptFinal():
int out_nbytes = 0;
EVP_DecryptFinal(ctx, out_buf, &out_nbytes);
fwrite(out_buf, 1, out_nbytes, out_file);
The authentication tag will be validated during the finalization operation. Therefore, finalization will fail in any of the following cases:
- The authentication tag has not been set to the cipher context.
- The ciphertext has been corrupted.
- A wrong key, IV, or auth tag has been used for the decryption.
The full source code of the decrypt program can be found on GitHub as a decrypt.c file: https://github.com/PacktPublishing/Demystifying-Cryptography-with-OpenSSL-3/blob/main/Chapter02/decrypt.c.
There is also an alternative implementation, decrypt-with-extended-error-checking.c, with extended error checking, useful for debugging and troubleshooting: https://github.com/PacktPublishing/Demystifying-Cryptography-with-OpenSSL-3/blob/main/Chapter02/decrypt-with-extended-error-checking.c.
We have implemented our decryption program. Let’s run it.
Running the decrypt program
Time to run our decrypt program and examine the checksums of the produced files:
- Decrypt the file using the decrypt program:
$ ./decrypt somefile.txt.encrypted somefile.txt.decrypted 74c8a19fee9e0710683afe526462ce8a960ca1356e113bf3a08736a68a48eca0
Decryption succeeded
- Looks good! Let’s check the file checksums:
$ cksum somefile.txt*
3231941463 108894 somefile.txt
3231941463 108894 somefile.txt.decrypted
3036900166 108922 somefile.txt.encrypted
The original and the decrypted files have the same size and checksum. Our decryption has indeed succeeded!
- What will happen if we supply the wrong key to our decryption program? Let’s check! We are expecting an error message and garbage in the erroneously decrypted file. Let’s use the version of the program with the extended error checking this time:
$ ./decrypt-with-extended-error-checking somefile.txt.encrypted somefile.txt.decrypted
74c8a19fee9e0710683afe526462ce8a960ca1356e113bf3a08736a68a48ec0a
Could not finalize decryption
Decryption failed
As expected, decryption failed at the finalization operation. The authentication tag validation failed because of the wrong encryption key.
- Let’s look at the files:
$ cksum somefile.txt*
3231941463 108894 somefile.txt
502982927 108894 somefile.txt.decrypted
3036900166 108922 somefile.txt.encrypted
The original and the decrypted files have the same size, but different checksums. If we examine the contents of the decrypted file, we will only see garbage. That’s how changing only one byte in the key affects the decryption.
What advice can I give to developers working with encryption? Be very careful with the implementation and use the correct encryption key!
We have learned how to encrypt, decrypt, and check that the decryption was correct. Let’s proceed to the summary.
Summary
In this chapter, we have learned what symmetric encryption is and how it differs from asymmetric encryption. We also learned what a cipher is, what block ciphers and stream ciphers are, how cipher security is measured, and how much security is enough. Then, we learned which ciphers are supported by OpenSSL, which you should use in which situation, and which ciphers you should avoid. We also learned which cipher operation modes exist, how they differ, and which you should use.
We discussed padding, why it exists, and in which cases you should use it. We also covered oracle and how to download and install OpenSSL. We explored and saw what is included in the OpenSSL toolkit, how to initialize the OpenSSL library, and how to compile and link your program with the OpenSSL library. Finally, we learned how to generate an encryption key and an IV, how to encrypt and decrypt a file using the OpenSSL command-line tool, and how to encrypt and decrypt a file programmatically using the OpenSSL library.
In this chapter, we used checksums in order to check whether files were identical. It was very useful. We also mentioned message digests, which are cryptographically strong checksums. In the next chapter, we will learn more about message digests, specifically which message digest algorithms are supported by OpenSSL and how to calculate message digests using OpenSSL.