Chapter 10. Advanced Topics
In this chapter, we’ll do a quick pass through some of the more advanced topics. We’re going to assume that you have a pretty good hold on Docker by now and that you’ve already got it in production or at least you’re a regular user. We’ll talk some more about deployment tools, networking, orchestration, security, and advanced configuration.
Some of this chapter covers configurable changes you can make to your Docker installation. These can be useful. But Docker has good defaults and the defaults are much better tested and usually more robust than the alternatives. Keep in mind that this is early production release software and things are moving fast. The defaults have the most eyeballs on them and therefore have had the largest number of bug fixes. You should stick to the defaults on your operating system unless you have a good reason to change them and have educated yourself on what those changes mean to you.
Pluggable Backends
Docker has a very clean external interface and, in part because it’s largely a single static Go binary, it looks pretty monolithic. But there’s actually a lot going on under the covers that is configurable, and the two kinds of backends are a good example. With Docker, you can easily swap both how Docker interacts with the underlying filesystem and how it talks to the kernel about containers! Those are powerful switches and you’ll want to know what they do before throwing them. First we’ll talk about execution drivers, then the filesystem backends.
Execution Driver
Docker is not the mechanism for talking to the Linux kernel and managing the life cycle of containers. It seems like this might be true, because Docker knows how to do the right things out of the box. That’s because it ships with a container engine known as the execution driver. This driver is exposed as a standard API, and while the driver has to be built into Docker at compile time, they were originally switchable at runtime with a simple command-line argument. By default, Docker ships with the “native” driver enabled. Before the release of Docker 1.10, you could change the execution driver to the LXC (Linux Container) driver with a simple command-line argument when you started Docker:
docker daemon -e lxc
This is no longer possible in current releases, but is still interesting to discuss, since it illuminates some of the ways that Docker interacts with the underlying system. If you were to change your execution driver, it would most likely drastically affect how Docker interacts with the kernel and might even introduce additional runtime dependencies to your environment.
Docker Engine now ships with “native” as the only available execution driver. The native driver has seen the heaviest development and is tightly controlled by Docker, while other execution drivers often suffered from quality control issues. Useful functionality, like the /stats endpoint on the API (which we talked about in Chapter 8), is only available on the native execution driver. So let’s find out what your system is running by using docker info:
$ docker info
Containers: 18
Images: 286
Storage Driver: aufs
 Root Dir: /var/lib/docker/aufs
 Backing Filesystem: extfs
 Dirs: 323
Execution Driver: native-0.2
Kernel Version: 3.8.0-35-generic
Operating System: Ubuntu precise (12.04.3 LTS)
CPUs: 1
Total Memory: 987.9 MiB
Name: ubuntu
ID: UNKL:ZFZ5:ELSF:DU7Z:WJBM:NVPO:WDUZ:BO53:UFAD:KARC:NSSH:ZA5Q
We’ve shown this before, but hopefully after this chapter you’ll have a better idea of what that means. This Ubuntu server is running the “native-0.2” execution driver. The native driver is versioned so that in theory you could compile your Docker against different versions of libcontainer and have it exercise only the functionality that’s available in that version of the library. Unless you are building Docker from source and intentionally changing things, these will always be correctly matched for you and are therefore nothing to worry about.
native, lxc, windows, etc.
Originally the Docker project leveraged work done by the Linux Containers Project (LXC) to control container life cycles. LXC was the one and only execution driver until the release of Docker 0.9 and the newly added support for a standardized execution driver API. This was done with the intention of bringing many other virtualization layers into the fold, including non-container engines. It was envisioned that things like FreeBSD jails and Solaris Zones might appear as execution drivers. We haven’t seen that really play out so far. The LXC driver is no more, and now Docker automatically utilizes either the native or windows execution drivers that ship with Docker.
Because LXC was not a part of the Docker project, it was hard for Docker to ensure that the LXC project didn’t introduce changes that caused issues with Docker. It also made it challenging for Docker to ensure that important changes required in the next LXC release were prioritized.
As a result, in version 0.9, the LXC execution driver was replaced with libcontainer, a Docker-native Go library for working with containers, namespaces, and cgroups. All modern Docker builds use libcontainer as the default backend.
Warning
Containers configured with different execution drivers are not compatible with each other. You will need to recreate containers when swapping the execution driver.
Storage
Backing all of the images and all of the containers on your Docker server is a storage backend that handles reading and writing all of that data. Docker has some strenuous requirements on its storage backend: it has to support layering, the mechanism by which Docker tracks changes and reduces both how much disk a container occupies and how much is shipped over the wire to deploy new images. Using a copy-on-write strategy, Docker can start up a new container from an existing image without having to copy the whole image. The storage backend supports that. The storage backend is what makes it possible to export images as groups of changes in layers, and also lets you save the state of a running container. In most cases, you need the kernel’s help in doing this efficiently. That’s because the filesystem view in your container is generally a union of all of the layers below it, which are not actually copied into your container. Instead, they are made visible to you, and only when you make changes does anything get written to your container’s own filesystem.
Docker relies on an array of possible kernel drivers to handle the layering. The Docker codebase contains code that can handle interaction with all of these backends, and the decision about which to use can be configured on daemon restart. So let’s take a look at what is available and some of the pluses and minuses of each.
AUFS, Device Mapper, BTRFS, vfs, etc.
Various backends have different limitations that may or may not make them your best choice. In some cases, your choices of which backend to use are limited by what your distribution of Linux actually supports. Using drivers that are built in to the kernel that your distribution ships with will make life ever so much easier. It’s generally best to stay near the tested path here as well. We’ve seen all manner of oddities from various backends since Docker’s release. And, as usual, the common case is always the best supported one. Different backends also report different statistics up through the Docker Remote API (/info endpoint). This is potentially useful for monitoring your Docker systems.
- AUFS
-
The original backend, and at the time of this writing the officially recommended one, is AUFS: a union filesystem driver with reasonable support on various popular Linux distributions. It was never accepted into the mainline kernel, however, and this has limited its availability on various distributions. It is not supported on recent versions of RedHat, Fedora, or CentOS, for example. It is not shipped in the standard Ubuntu distribution, but is in the Ubuntu
linux-image-extrapackage.Its status as a second-class citizen in the kernel has lead to the development of many of the other backends now available. Older, but still recent, versions of AUFS had a limitation of 42 layers, which might constrain how you build base images if you are running on such a version. If you are shipping images for public consumption, you should definitely keep this limitation in mind because even if you don’t have it, someone else probably does. The current limit in Docker for AUFS is 127 layers, which is probably well more than you should ever use for performance reasons. AUFS has been a pretty good performer on recent kernels and is quite well-tested with Docker.
devicemapper-
RedHat’s various distributions have not supported AUFS recently, so RedHat contributed a backend to the Docker project based on
devicemapper, which is a heavily tested layer of the Linux kernel that underpins things like LVM, disk encryption, and other software RAID implementations.The Docker backend was written quickly to just get some support for Docker into RedHat-based distributions, and at first had some major flaws. Most of these have been addressed now and it’s reasonably stable. But even in later versions of Docker, it has been shown to be only somewhat reliable in production. Unlike AUFS, which can usually be unloaded from the kernel and then reloaded, devicemapper often has other kernel modules that depend on it. That means that the worst failure modes currently require a reboot of the whole server on which Docker is running. Performance is reasonable, but no one would call it speedy when using the loopback mode (the default). It does support using disk partitions raw, which should be faster. It does not have much tolerance for having anything at all written into the container during runtime. It’s the default choice on RedHat/CentOS distributions before RedHat/CentOS 7.
BTRFS-
btrfsis fundamentally a copy-on-write filesystem, which means it’s a pretty good fit for the Docker image model. On systems that don’t support AUFS and where thebtrfsdriver is present, it’s the default backend. This includes, for example, RHEL and CentOS 7. It also works on various Ubuntu versions. Like AUFS and unlikedevicemapper, Docker is using the backend in the way it was intended. That means it’s both pretty stable in production and also a good performer. It scales reasonably to thousands of containers on the same system. A major drawback for Red Hat–based systems is thatbtrfsdoes not support SELinux. If you havebtrfsavailable, we currently recommend it as the most stable backend for production. The space is changing rapidly, however, and new backends keep becoming available. vfs-
The
vfsdriver is the simplest, and slowest, to start up of the supported drivers. It doesn’t really support copy-on-write. Instead, it makes a new directory and copies over all of the existing data. It was originally intended for use in tests and for mounting host volumes. It is very slow to create new containers, but runtime performance is native, which is a real benefit. It is very simple in mechanism, which means there is less to go wrong. Docker, Inc., does not recommend it for production use so you should proceed with caution if you think it’s the right solution for your production environment. overlayfs-
overlayfsis now the union filesystem driver that is supported in the mainline Linux kernel as of version 3.18. That’s good news for its long-term support. It also means that it’s likely to get a lot of attention to performance and will be available on most Linux distributions once they catch up with version 3.18 and higher kernels. It is a bit like AUFS but fundamentally simpler underneath, which leads to very strong performance. The Docker backend is still under active development, but we expect it to be a good option going forward.
Note
The Docker community is frequently improving support for a variety of filesytems. For example, ZFS support was added in Docker 1.7 and XFS is the new default filesystem for devimapper-backed systems in Docker 1.9. For more details about the supported filesystems, take a look at the official documentation.
Warning
Storage backends can have a big impact on the performance of your containers. And if you swap the backend on your Docker server, all of your existing images will disappear. They are not gone, but they will not be visible until you switch the driver back. Caution is advised.
You can use docker info to see which storage backend your system is running. It will also tell you what the underlying filesystem is in cases where there is one. In some cases, like with devicemapper on raw partitions or with btrfs, there won’t be a different underlying filesystem.
Like with execution drivers, storage backends can be swapped via command-line arguments to docker on startup. If we wanted to switch our Ubuntu system from AUFS to devicemapper, we would do that like this:
$ docker daemon --storage-driver=devicemapper
That will work on pretty much any Linux system that can support Docker because devicemapper is almost always present. You will need to have the actual underlying dependencies in place for the other drivers. For example, without AUFS in the kernel—usually via a kernel module—Docker will not start up with AUFS set as the storage driver.
Getting the right storage driver for your systems and deployment needs is one of the more important technical items to get right when taking Docker to production. Be conservative; make sure the path you choose is well-supported in your kernel and distribution.
Containers in Detail
While we all talk about Linux containers as a single entity, they are implemented through several separate mechanisms that all work together: Control Groups (cgroups), namespaces, and SELinux/AppArmor. cgroups provide for resource limits, namespaces allow for processes to use identically named resources and isolate them from each other’s view of the system, and SELinux/AppArmor provides strong security isolation. We’ll talk about SELinux and AppArmor in a bit. But what do cgroups and namespaces do for you?
Control Groups (cgroups)
Operations teams have often aimed for one server per intensive task. So, for example, you don’t run your applications on the database server because they have competing resource demands and their resource usage could grow unbounded and come to dominate the server, starving neighbors of performance.
On real hardware systems, this could be quite expensive and so solutions like virtual servers are very appealing, in part because you can share expensive hardware between competing applications, and the virtualization layer would handle your resource partitioning. While it saves money, this is a reasonably expensive way to go about it if you don’t need all the other separation provided by virtualization, because running multiple kernels introduces a reasonable overhead on the applications. Maintaining virtual machines is also not the cheapest solution. All the same, cloud computing has shown that it’s immensely powerful and with the right tooling, incredibly effective.
But if the only kind of isolation you needed was resource partitioning, wouldn’t it be great if you could do that on the same kernel? For many years, you could assign a “niceness” value to a process and it would give the scheduler hints about how you wanted this process to be treated in relation to others. But it wasn’t possible to impose hard limits like those that you get with virtual machines. And niceness is not at all fine-grained: I can’t give something more I/O and less CPU than other processes. This fine-grained control, of course, is one of the promises of Docker, and the mechanism that it uses to do that is cgroups, which predate Docker and were invented to solve just that problem.
Control Groups, or cgroups for short, allow you to set limits on resources for processes and their children. This is the mechanism that Docker uses to control limits on memory, swap, and CPU resources. They are built in to the Linux kernel and originally shipped back in 2007 in Linux 2.6.24. The official kernel documentation defines them as “a mechanism for aggregating/partitioning sets of tasks, and all their future children, into hierarchical groups with specialized behaviour.” It’s important to note that this setting applies to a process and all of the children that descend from it. That’s exactly how containers are structured.
Every Docker container is assigned a cgroup that is unique to that container. All of the processes in the container will be in the same group. This means that it’s easy to control resources for each container as a whole without worrying about what might be running. If a container is redeployed with new processes added, you can have Docker assign the same policy and it will apply to all of them.
We talked previously about the cgroups hooks exposed by Docker via the Remote API. This allows you to control memory, swap, and disk usage. But there are lots of other things you can limit with cgroups, including the number of I/O operations per second (iops) a container can have, for example. You might find that in your environment you need to use some of these levers to keep your containers under control, and there are a few ways you can go about doing that. cgroups by their nature need to do a lot of accounting of resources used by each group. That means that when you’re using them, the kernel has a lot of interesting statistics about how much CPU, RAM, disk I/O, and so on. that your processes are using. So Docker uses cgroups not just to limit resources but also to report on them. These are many of the metrics you see, for example, in the output of docker stats.
The /sys filesystem
The primary way to control cgroups in a fine-grained manner, even if you configured them with Docker, is to manage them yourself. This is the most powerful method because changes don’t just happen at creation time—they can be done on the fly.
On systems with systemd, there are command-line tools like systemctl that you can use to do this. But since cgroups are built into the kernel, the method that works everywhere is to talk to the kernel directly via the /sys filesystem. If you’re not familiar with /sys, it’s a filesystem that directly exposes a number of kernel settings and outputs. You can use it with simple command-line tools to tell the kernel how to behave in a number of ways.
It’s important to note that this method of configuring cgroups controls for containers only works directly on the Docker server and is not available remotely via any API. If you use this method, you’ll need to figure out how to script this for your own environment.
Warning
Changing cgroups values yourself, outside of any Docker configuration, breaks some of the repeatability of Docker deployment. Unless you tool changes into your deployment process, settings will go away when containers are replaced.
Let’s use an example of changing the CPU cgroups settings for a container we already have running. First we need to get the long ID of the container, and then we need to find it in the /sys filesystem. Here’s what that looks like:
$ docker ps --no-trunc
CONTAINER ID IMAGE        COMMAND       CREATED     STATUS    NAMES
dcbbaa763... 0415448f2cc2 "supervisord" 3 weeks ago Up 2 days romantic_morse
Here we’ve had docker ps give us the long ID in the output, and the ID we want is “dcbbaa763daff1dc0a91e7675d3c93895cb6a6d83371e25b7f0bd62803ed8e86”. You can see why Docker normally truncates this. In the examples we’re going to truncate it, too, to make it at least a little readable and fit into the constraints of a printed page. But you need to use the long one!
Now that we have the ID, we can find our container’s cgroup in the /sys filesystem. Cgroups are laid out so that each kind of setting is grouped into a module and that module is exposed at a different place in the /sys filesystem. So when we look at CPU settings, we won’t see blkio settings, for example. You might take a look around in the /sys to see what else is there. But for now we’re looking at the CPU controller, so let’s inspect what that gives us. You need root access on the system to do this because you’re manipulating kernel settings:
$ ls /sys/fs/cgroup/cpu/docker/dcbbaa763daf
cgroup.clone_children  cpu.cfs_period_us  cpu.rt_runtime_us  notify_on_release
cgroup.event_control   cpu.cfs_quota_us   cpu.shares         tasks
cgroup.procs           cpu.rt_period_us   cpu.stat
Note
The exact path above will change a bit depending on the Linux distribution your Docker server is running on and what the hash of your container is. For example, on CoreOS, the path would look something like this: /sys/fs/cgroup/cpu/system.slice/docker-8122be2d7a67a52e949582f6d5
cb2771a8469ab20ecf7b6915e9217d92ddde98.scope/
You can see that under cgroups, there is a docker directory that contains all of the Docker containers that are running on this host. You can’t set cgroups for things that aren’t running because they apply to running processes. This is an important point that you should consider. Docker takes care of reapplying cgroups settings for you when you start and stop containers. Without that mechanism, you are somewhat on your own.
Back to our task. Let’s inspect the CPU shares for this container. Remember that we earlier set these via the Docker command-line tool. But for a normal container where no settings were passed, this setting is the default:
$ cat /sys/fs/cgroup/cpu/docker/dcbbaa763daf/cpu.shares
1024
1024 CPU shares means we are not limited at all. Let’s tell the kernel that this container should be limited to half that:
$ echo 512 > /sys/fs/cgroup/cpu/docker/dcbbaa763daf/cpu.shares
$ cat /sys/fs/cgroup/cpu/docker/dcbbaa763daf/cpu.shares
512
There you have it. We’ve changed the container’s settings on the fly. This method is very powerful because it allows you to set any cgroups setting at all for the container. But as we mentioned earlier, it’s entirely ephemeral. When the container is stopped and restarted, the setting is reset to the default:
$ docker stop dcbbaa763daf
dcbbaa763daf
$ cat /sys/fs/cgroup/cpu/docker/dcbbaa763daf/cpu.shares
cat: /sys/fs/.../cpu.shares: No such file or directory
You can see that the directory path doesn’t even exist any more now that the container is stopped. And when we start it back up, the directory comes back but the setting is back to 1024:
$ docker start dcbbaa763daf
dcbbaa763daf
$ cat /sys/fs/cgroup/cpu/docker/dcbbaa763daf/cpu.shares
1024
If you were to change these kinds of settings in a production system via the /sys fileystem directly, you’d want to tool that directly. A daemon that watches the docker events stream and changes settings at container startup, for example, is a possibility. Currently, the community has not contributed much rich tooling to this aspect. It’s likely that Docker will eventually expand the native driver’s functionality to allow this level of configuration.
Kernel Namespaces, User Namespaces
Inside each container, you see a filesystem, network interfaces, disks, and other resources that all appear to be unique to the container despite sharing the kernel with all the other processes on the system. The network interface on the actual machine, for example, is a single shared resource. But to your container it looks like it has the run of an entire network interface to itself. This is a really useful abstraction: it’s what makes your container feel like a machine all by itself. The way this is implemented in the kernel is with namespaces. Namespaces take a single global resource and make it appear as a single owned resource to the container.
Rather than just having a single namespace, however, containers have a namespace on each of the six types of resources that are currently namespaced in the kernel: mounts, UTS, IPC, PID, network, and user namespaces. We’ll explain all of those in a minute. But essentially when you talk about a container, you’re talking about a number of different namespaces that Docker sets up on your behalf. So what do they all do?
- Mount namespaces
-
Docker uses these primarily to make your container look like it has its entire own filesystem namespace. If you’ve ever used a
chrootjail, this is its tougher cousin. It looks a lot like achrootjail but goes all the way down to the kernel so that evenmountandunmountsystem calls are namespaced. If you usedocker execornsenterto get into a container, you’ll see a filesystem rooted on “/”. But we know that this isn’t the actual root partition of the system. It’s the mount namespaces that make that possible. - UTS namespaces
-
Named for the kernel structure they namespace, and ultimately from the “Unix Timesharing System,” UTS namespaces give your container its own hostname and domain name. This is also used by older systems like NIS to identify which domain a host belongs to. When you enter a container and see a hostname that is not the same as the machine on which it runs, it’s this namespace that makes that happen.
Note
With the release of Docker Engine 1.7, it is now possible to have a container use its host’s UTS namespace, by specifying the --uts=host option when launching the container with docker run.
- IPC namespaces
-
These isolate your container’s System V IPC and POSIX message queue systems from those of the host. Some IPC mechanisms use filesystem resources like named pipes, and those are covered by the mount namespace. The IPC namespace covers things like shared memory and semaphores that aren’t filesystem resources but which really should not cross the container wall.
- PID namespaces
-
We already showed you that you can see all of the processes in containers in the Linux
psoutput on the host Docker server. But inside the container, processes have a totally different PID. This is the PID namespace in action. A process has a unique PID in each namespace to which it belongs. If you look in/procinside a container, or runps, you will only see the processes inside the container’s PID namespace. - Network namespaces
-
This is what allows your container to have its own network devices, ports, etc. When you run
docker psand see the bound ports for your container, you are seeing ports from both namespaces. Inside the container yournginxmight be bound to port 80, but that’s on the namespaced network interface. This namespace makes it possible to have what seems to be a completely separate network stack for your container. - User namespaces
-
These provide isolation between the user and group IDs inside a container and those on the Docker host. Earlier when we looked at
psoutput outside the container and inside and saw different user IDs, this is how that happened. A new user inside a container is not a new user on the Docker host’s main namespace, and vice versa. There are some subtleties here, though. For example, root in a user namespace is not necessarily root on the main system. Some of this work is reasonably new to the Linux kernel and there are concerns about security leakage, which we’ll talk about in a bit.
Note
Docker Engine 1.10 added the --userns-remap argument to the docker daemon command, so that it is easier to run all containers within a user and group context that is unprivileged on the host system. This protects the host from various potential security exploits. For more information about this topic, read through the official docker daemon documentation.
So namespaces provide the visual, and in many cases functional, isolation that makes a container look like a virtual machine even though it’s on the same kernel. Let’s explore what some of that namespacing that we just described actually looks like.
Exploring Namespaces
One of the easiest to demonstrate is the UTS namespace, so let’s use docker exec to get a shell in a container and take a look. From within the docker server, run the following:
$ hostname
docker2
$ docker exec -i -t 28970c706db0 /bin/bash -l
# hostname
28970c706db0
Although docker exec will work from a remote system, here we ssh into the Docker server itself in order to demonstrate that the hostname of the server is different from inside the container.
That docker exec command line gets us an interactive process (-i) and allocates a pseudo-tty (-t), and then executes /bin/bash while executing all the normal login process in the bash shell (-l). Once we have a terminal open inside the container’s namespace, we ask for the hostname and get back the container ID. That’s the default hostname for a Docker container unless you tell Docker to name it otherwise. This is a pretty simple example, but it should clearly show that we’re not in the same namespace as the host.
Another example that’s easy to understand and demonstrate is with PID namespaces. Let’s log in to the Docker server again, take a look at the process list of one of our containers, and then get the same list from inside the container:
$ docker exec -i -t 28970c706db0 /bin/bash -l
# ps -ef
UID        PID  PPID  C STIME TTY          TIME CMD
root         1     0  0 22:20 ?        00:00:00 /bin/bash
root        22     0  0 22:53 ?        00:00:00 /bin/bash -l
# exit
logout
$ ps axlf
...
46049     1  20   0 706552 18228 futex_ Ssl  ?       2:16 /usr/bin/docker -d
46135 46049  20   0  18104  1892 n_tty_ Ss+  pts/0   0:00  \_ /bin/bash
What we can see here is that from inside our container, the original command run by Docker from the CMD in our Dockerfile is /bin/bash and it has been assigned the PID 1 inside the container. You might recall that this is the PID normally used by the init process on Unix systems. In this case, the /bin/bash we started to create the container in the first place is the first PID, so it gets ID 1. But in the Docker host’s main namespace, we do a little work to find our container’s processes and we see the PID there is not 1, it’s 46135 and it’s a child of the docker daemon, which is PID 46049.
The other namespaces work in essentially the same manner and you probably get the idea by now. It’s worth pointing out here that when we were working with nsenter back in Chapter 4, we had to pass a pretty arcane (at that point) set of arguments to the command when we ran it to enter a container from the Docker server. Let’s look at that command
line now:
$ sudo nsenter --target $PID --mount --uts --ipc --net --pid
root@3c4f916619a5:/#
After explaining namespaces in detail, this probably makes a lot more sense to you. You’re telling nsenter exactly which of the namespaces you want to enter. It can also be educational to use nsenter to only enter parts of the namespace of a throwaway container to see what you get. In the example above, we enter all of the namespaces we just talked about.
When it comes down to it, namespaces are the primary thing that make a container look like a container. Combine them with cgroups and you have a reasonably robust isolation between processes on the same kernel.
Security
We’ve spent a good bit of space now talking about how Docker contains applications, allows you to constrain resources, and uses namespaces to give the container a view of the world that is unique to the container. We also briefly mentioned the need for SELinux/AppArmor. One of the wins for containers is the ability to replace virtual machines in a number of cases. So let’s take a look at what isolation we really get, and what we don’t.
How Secure Is Your Container?
You are undoubtedly aware by now that the isolation you get from a container is not as strong as that from a virtual machine. We’ve been reinforcing the idea from the start of this book that containers are just processes running on the Docker server. Despite the isolation provided by namespaces, containers are not as secure as you might imagine if the idea of a lightweight virtual machine persists.
One of the big boosts in performance for containers, and one of the things that makes them lightweight, is that they share the kernel of the Docker server. This is also the source of the greatest security concerns around Docker containers. The main reason is that not everything in the kernel is namespaced. We talked about all of the namespaces that exist and how the container’s view of the world is constrained by the namespaces it runs in. But there are still lots of places in the kernel where really no isolation exists. And namespaces only constrain you if you can’t tell the kernel to give you access to a different one.
For purposes of security, containers are more secure than an application on the host directly because cgroups (if you use them), and namespaces provide some isolation from the host’s core resources. But you must not think of containers as a substitute for good security practices. If you think about how you would run an application on a production system, that is really how you should run your containers. If your application would run as a non-privileged user in a non-container environment, then it should be run in the same manner inside the container, for example. You can tell Docker to run your whole container as a non-privileged user, and in production deployments, this is probably what you want to do. You can’t, unfortunately, enforce that Docker start all containers as non-privileged users at this time. But starting them that way yourself, or at least dropping privileges inside the running application as soon as possible, is a good idea.
Let’s look at some security risks and controls.
UID 0
The first and most overarching security risk in a container is that the root user in the container is actually the root user on the system. There are extra constraints on root in a container, and namespaces do a good job of isolating root in the container from the most dangerous parts of the /proc and /sys filesystems, for example. But generally speaking you have root access so if you can get access to resources outside of your namespace, then the kernel will see you as root. And Docker starts all services in containers as root by default which means you are then responsible for managing privilege in your applications just like you are on any Linux system. Let’s explore some of the limits on root access and look at some obvious holes. This is not intended to be an exhaustive statement on container security, but rather to give you a healthy understanding of some of the classes of security risks.
First, we’ll fire up a container and get a bash shell using the public Ubuntu image shown in the following code. Then we’ll see what kinds of access we have:
$ sudo docker run -t -i ubuntu /bin/bash
root@808a2b8426d1:/# lsmod
Module                  Size  Used by
xt_nat                 12726  2
xt_tcpudp              12603  8
veth                   13244  0
xt_addrtype            12713  2
xt_conntrack           12760  1
iptable_filter         12810  1
acpiphp                24119  0
ipt_MASQUERADE         12759  4
aufs                  191008  14
iptable_nat            12909  1
nf_conntrack_ipv4      14538  2
nf_defrag_ipv4         12729  1 nf_conntrack_ipv4
nf_nat_ipv4            13316  1 iptable_nat
nf_nat                 26158  4 ipt_MASQUERADE,nf_nat_ipv4
nf_conntrack           83996  6 ipt_MASQUERADE,nf_nat
ip_tables              27473  2 iptable_filter,iptable_nat
x_tables               29938  7 ip_tables,xt_tcpudp
bridge                101039  0
floppy                 70206  0
...
We’ve cut the output down a bit, but what we’re looking at here is a new container that we started and we’ve just asked the kernel to tell us what modules are loaded. That’s not too surprising: a normal user can do that. But it does reinforce that we’re talking to the same Linux kernel. If you run this listing on the Docker server itself, it will be identical. So we can see the kernel modules; what happens if we try to unload the floppy module?
root@808a2b8426d1:/# rmmod floppy
rmmod: ERROR: ... kmod_module_remove_module() could not remove 'floppy': ...
rmmod: ERROR: could not remove module floppy: Operation not permitted
That’s the same error message we would get if we were a nonprivileged user telling the kernel what to do. This should give you a good sense that the kernel is doing its best to prevent us from doing things we shouldn’t. And because we’re in a limited namespace, we also can’t get the kernel to give us access to the top-level namespace either. We’re really relying on there being no bugs in the kernel that allow us to escalate that, however, because if we do, we’re root and can change things.
We can contrive a simple example of how things can go wrong by starting a bash shell in a container that has had the Docker server’s /etc bind mounted into the container’s namespace. Keep in mind that anyone who can start a container on your Docker server can do what we’re about to do any time they like because you can’t configure Docker to prevent it:
$ docker run -i -t -v /etc:/host_etc ubuntu /bin/bash
root@e674eb96bb74:/# more /host_etc/shadow
root:!:16230:0:99999:7:::
daemon:*:16230:0:99999:7:::
bin:*:16230:0:99999:7:::
sys:*:16230:0:99999:7:::
...
irc:*:16230:0:99999:7:::
nobody:*:16230:0:99999:7:::
libuuid:!:16230:0:99999:7:::
syslog:*:16230:0:99999:7:::
messagebus:*:16230:0:99999:7:::
kmatthias:$1$aTAYQT.j$3xamPL3dHGow4ITBdRh1:16230:0:99999:7:::
sshd:*:16230:0:99999:7:::
lxc-dnsmasq:!:16458:0:99999:7:::
Here we’ve used the -v switch to Docker to tell it to mount a host path into the container. The one we’ve chosen is /etc, which is a dangerous thing to do. But it serves to prove a point: we are root in the container and root has file permissions in this path. So we can look at the real /etc/shadow file any time we like. There are plenty of other things you could do here, but the point is that by default you’re only partly constrained.
Privileged containers
There are times when you need your container to have special kernel capabilities that would normally be denied to the container. This could include many things like mounting a USB drive, modifying the network configuration, or creating a new Unix device.
In the following code, we try to change the MAC address of our container:
$ docker run --rm -ti ubuntu /bin/bash
root@b328e3449da8:/# ip link ls
1: lo: <LOOPBACK,UP,LOWER_UP> mtu 65536 qdisc noqueue state ...
    link/loopback 00:00:00:00:00:00 brd 00:00:00:00:00:00
9: eth0: <BROADCAST,UP,LOWER_UP> mtu 1500 qdisc noqueue state ...
    link/ether 02:42:0a:00:00:04 brd ff:ff:ff:ff:ff:ff
root@b328e3449da8:/# ip link set eth0 address 02:0a:03:0b:04:0c
RTNETLINK answers: Operation not permitted
root@b328e3449da8:/# exit
As we can see, it doesn’t work. This is because the underlying Linux kernel blocks the nonprivileged container from doing this, which is exactly what we normally want. However, assuming that we need this functionality for our container to work as intended, the easiest way to significantly expand a container’s privileges is by launching it with the --privileged=true argument:
$ docker run -ti --rm --privileged=true ubuntu /bin/bash
root@88d9d17dc13c:/# ip link ls
1: lo: <LOOPBACK,UP,LOWER_UP> mtu 65536 qdisc noqueue state ...
    link/loopback 00:00:00:00:00:00 brd 00:00:00:00:00:00
9: eth0: <BROADCAST,UP,LOWER_UP> mtu 1500 qdisc noqueue state ...
    link/ether 02:42:0a:00:00:04 brd ff:ff:ff:ff:ff:ff
root@88d9d17dc13c:/# ip link set eth0 address 02:0a:03:0b:04:0c
root@88d9d17dc13c:/# ip link ls
1: lo: <LOOPBACK,UP,LOWER_UP> mtu 65536 qdisc noqueue state ...
    link/loopback 00:00:00:00:00:00 brd 00:00:00:00:00:00
9: eth0: <BROADCAST,UP,LOWER_UP> mtu 1500 qdisc noqueue state ...
    link/ether 02:0a:03:0b:04:0c brd ff:ff:ff:ff:ff:ff
root@88d9d17dc13c:/# exit
In the preceding output, you will notice that we no longer get the error and the link/ether entry for eth0 has been changed.
The problem with using the --privileged=true argument is that you are giving your container very broad privileges, and in most cases you likely only need one or two kernel capabilities to get the job done.
If we explore our privileged container some more, we will discover that we have capabilities that have nothing to do with changing the MAC address. I can even do things that could cause issue with both Docker and the host system. In the following code, we are going to create a memory swapfile1 and enable it:
$ docker run -ti --rm --privileged=true ubuntu /bin/bash
root@0ffcdd8f7535:/# dd if=/dev/zero of=/swapfile1 bs=1024 count=100
100+0 records in
100+0 records out
102400 bytes (102 kB) copied, 0.00046004 s, 223 MB/s
root@0ffcdd8f7535:/# mkswap /swapfile1
Setting up swapspace version 1, size = 96 KiB
no label, UUID=fc3d6118-83df-436e-867f-87e9fbce7692
root@0ffcdd8f7535:/# swapon /swapfile1
root@0ffcdd8f7535:/# swapoff /swapfile1
root@0ffcdd8f7535:/# exit
exit
Warning
In the previous example, if you do not disable the swapfile before exiting your container, you will leave your Docker host in a bad state where Docker can’t destroy the container because your host is accessing a swapfile that is inside the container’s filesystem.
In that case, the error message will look something like this:
FATAL [0049] Error response from daemon:
Cannot destroy container 0ff...670:
 Driver overlay failed to remove root filesystem 0ff...670:
 remove /var/lib/docker/overlay/0ff...670/upper/swapfile1:
 operation not permitted
You can fix this from the Docker server by running:
$ sudo swapoff /var/lib/docker/overlay/0ff...670/upper/swapfile1
So as we’ve seen, it is possible for people to do bad things in a fully privileged container.
To change the MAC address, the only kernel capability we actually need is CAP_NET_ADMIN. Instead of giving our container the full set of privileges, we can give it this one privilege by launching our Docker container with the --cap-add argument, as shown here:
$ docker run -ti --rm --cap-add=NET_ADMIN ubuntu /bin/bash
root@852d18f5c38d:/# ip link set eth0 address 02:0a:03:0b:04:0c
root@852d18f5c38d:/# ip link ls
1: lo: <LOOPBACK,UP,LOWER_UP> mtu 65536 qdisc noqueue state ...
    link/loopback 00:00:00:00:00:00 brd 00:00:00:00:00:00
9: eth0: <BROADCAST,UP,LOWER_UP> mtu 1500 qdisc noqueue state ...
    link/ether 02:0a:03:0b:04:0c brd ff:ff:ff:ff:ff:ff
root@852d18f5c38d:/# exit
You should also notice that although we can change the MAC address, we can no longer use the swapon command inside our container.
$ docker run -ti --rm --cap-add=NET_ADMIN ubuntu /bin/bash
root@848aa7924594:/# dd if=/dev/zero of=/swapfile1 bs=1024 count=100
100+0 records in
100+0 records out
102400 bytes (102 kB) copied, 0.000575541 s, 178 MB/s
root@848aa7924594:/# mkswap /swapfile1
Setting up swapspace version 1, size = 96 KiB
no label, UUID=3b365d90-8116-46ad-80c5-24341299dc41
root@848aa7924594:/# swapon /swapfile1
swapon: /swapfile1: swapon failed: Operation not permitted
root@848aa7924594:/# exit
By using both the --cap-add and --cap-drop arguments to docker run, you can finely control the Linux kernel capabilities that your container has.
SElinux, AppArmor
Earlier we talked about how containers are a combination of two or three things: cgroups, namespaces, and SELinux or AppArmor. We’re going to talk about the latter two systems now. They allow you to apply security controls that extend beyond those normally supported by Unix systems. SELinux originally came out of the US National Security Agency and supports very fine-grained control. AppArmor is an effort to achieve many of the same goals without the level of complication involved in SELinux. It actually predates SELinux, having first appeared in 1998 in the Immunix Linux distribution. Novell, SuSE, and Canonical have been some of its recent champions.
Docker ships by default with reasonable profiles enabled on platforms that support them. This means that on Ubuntu systems, AppArmor is enabled and configured, and on CentOS/RHEL/Fedora systems, SELinux is. You can further configure these profiles to prevent things like what we’ve just done in Chapter 9, and if you’re running Docker in production, you should do a risk analysis and determine if this is something you should look at. Here’s a quick outline of the benefits we’re getting from these systems.
They provide what is known as Mandatory Access Control. This is a class of security system where a system-wide security policy grants users (or “initiators”) access to a resource (or “target”). What this allows you to do is to prevent anyone, including root, from accessing a part of the system that they should not have access to. You can apply the policy to a whole container so that all processes are constrained. Many chapters would be required to give a very clear overview of how to configure these systems in detail. The default profiles are doing things like blocking access to parts of the /proc and /sys filesystems that would be dangerous to expose in the container, even though they show in the container’s namespace. They also provide more narrowly scoped mount access to prevent containers from getting ahold of mount points they should not see.
If you are considering using Docker containers in production, you should make certain that the systems you are running have AppArmor or SELinux enabled and running. For the most part, both systems are reasonably equivalent. But in the Docker context, one notable limitation of SELinux is that it only works fully on systems that support filesystem metadata, which means that it won’t work for you on BTRFS-backed Docker daemons, for example. Only the devicemapper backend currently fully supports SELinux. Unfortunately, that backend is also not currently very stable for production. The OverlayFS backend is going to support this shortly. AppArmor, on the other hand, does not use filesystem metadata and so works on all of the Docker backends. Which one you use is going to be somewhat distribution-centric, so you may be forced to choose a filesystem backend based on which distribution you run.
How Secure Is the Docker Daemon?
From a security standpoint, the Docker daemon is the only completely new risk you are introducing to the network. Your containerized applications are not less secure and are at least a little more secure than they would be if deployed outside of containers. But without the containers, you would not be running the daemon. You can run Docker such that it doesn’t expose any ports on the network. In this model, you’d need to do something like set up an SSH tunnel to each Docker server if you wanted to control the containers. That’s not very useful, so nearly everyone will expose one or more ports on the local network.
The default configuration for Docker on all the distributions we’re familiar with leave Docker isolated from the network with only a local Unix socket exposed. Since you cannot remotely administer Docker when it is set up this way, many people add the nonencrypted port 2375 to the configuration. This is great for getting going with Docker, and depending on your security analysis it might be all right for you. But it’s probably not what you should do in any environment where you need a reasonable level of security.
You can do a few things to tighten Docker down that make sense in most production environments. But no matter what you do, you are relying on the Docker daemon itself to be resilient against things like buffer overflows and race conditions, two of the more common classes of security vulnerabilities. This is true of any network service. The risk is perhaps a little higher from Docker because it has access to control all of your applications, and because of the privileges required, it has to run as root.
The basics of locking Docker down are common with many other network daemons: encrypt your traffic and authenticate users. The first is reasonably easy to set up on Docker and the second is not as easy. If you have certificates you can use for protecting HTTP traffic to your hosts, such as a wildcard cert for your domain, you can turn on TLS support to encrypt all of the traffic to your Docker servers. This is a good step. The Docker documentation will walk you through doing this.
Authorization is more complicated: Docker does not provide any kind of fine-grained authorization: you either have access or you don’t. But the authentication control it does provide is reasonably strong: signed certificates. Unfortunately this also means that you don’t get a cheap step from no authentication to some authentication without also having to set up your own certificate authority in most cases. If your organization already has one, then you are in luck. Certificate management needs to be implemented carefully in any organization both to keep them secure and to distribute them efficiently. So, given that, here are the basic steps:
-
Set up a method of generating and signing certificates.
-
Generate certificates for the server and clients.
-
Configure Docker to require certificates with
--tlsverify.
Detailed instructions on getting a server and client set up, as well as a simple certificate authority are included in the Docker documentation.
Because it’s a daemon that runs with privilege, and because it has direct control of your applications, it’s probably not a good idea to expose Docker directly on the Internet. If you need to talk to your Docker hosts from outside your network, you should consider something like a VPN or an SSH tunnel to a jump host.
Networking
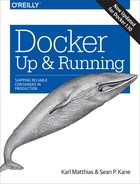
Early on we described the layers of networking that are in place between a Docker container and the real live network. Let’s take a closer look at how that works. Figure 10-1 shows a drawing of a typical Docker server, where there are three containers running on their private network, shown on the right. One of them has a public port (TCP port 10520) that is exposed on the Docker server. We’ll track how an inbound request gets to the Docker container and also how a Docker container can make an outbound connection to the external network.
Figure 10-1. Swarm Manager controlling Docker cluster
If we have a client somewhere on the network that wants to talk to the nginx server running on TCP port 80 inside Container 1, the request will come into the eth0 interface on the Docker server. Because Docker knows this is a public port, it has spun up an instance of docker-proxy to listen on port 10520. So our request is passed to the docker-proxy process, which then makes the request to the correct container address and port on the private network. Return traffic from the request flows through the same route.
Outbound traffic from the container follows a different route, in which the docker-proxy is not involved at all. In this case, Container 3 wants to contact a server on the public Internet. It has an address on the private network of 172.16.23.1 and its default route is the docker0 interface 172.16.23.7. So it sends the traffic there. The Docker server now sees that this traffic is outbound and it has traffic forwarding enabled. And since the virtual network is private, it wants to send the traffic from its own public address instead. So the request is passed through the kernel’s network address translation layer (NAT) and put onto the external network via the eth0 interface on the server. Return traffic passes through the same route. Note that the NAT is one-way, so containers on the virtual network will see real network addresses in response packets.
You’ve probably noted that it’s not a simple configuration. It’s a fair amount of mechanism, but it makes Docker seem pretty transparent. It’s also a contributor to the security posture of the Docker stack because the containers are namespacd into their own network namespace, are on their own private network, and don’t have access to things like the main system’s DBus or IPTables.
Let’s take a look at what is happening at a more detailed level. The interfaces that show up in ifconfig or ip addr show in the Docker container are actually virtual Ethernet interfaces on the Docker server’s kernel. They are then mapped into the network namespace of the container and given the names that you see inside the container. Let’s take a look at what we see when running ip addr show on a Docker server. We’ll shorten the output a little for clarity and typesetting issues, as shown here:
$ ip addr show
1: lo: <LOOPBACK,UP,LOWER_UP>
    link/loopback 00:00:00:00:00:00 brd 00:00:00:00:00:00
    inet 127.0.0.1/8 scope host lo
    inet6 ::1/128 scope host
       valid_lft forever preferred_lft forever
2: eth0: <BROADCAST,MULTICAST,UP,LOWER_UP>
    link/ether 00:0c:29:b2:2a:21 brd ff:ff:ff:ff:ff:ff
    inet 172.16.168.178/24 brd 172.16.168.255 scope global eth0
    inet6 fe80::20c:29ff:feb2:2a21/64 scope link
       valid_lft forever preferred_lft forever
4: docker0: <BROADCAST,MULTICAST,UP,LOWER_UP>
    link/ether 56:84:7a:fe:97:99 brd ff:ff:ff:ff:ff:ff
    inet 172.17.42.1/16 scope global docker0
    inet6 fe80::5484:7aff:fefe:9799/64 scope link
       valid_lft forever preferred_lft forever
112: vethf3e8733: <BROADCAST,UP,LOWER_UP>
    link/ether b6:3e:7a:ba:5e:1c brd ff:ff:ff:ff:ff:ff
    inet6 fe80::b43e:7aff:feba:5e1c/64 scope link
       valid_lft forever preferred_lft forever
What that is telling us is that we have the normal loopback interface, our real Ethernet interface eth0, and then the Docker bridge interface, docker0, that we described earlier. This is where all the traffic from the Docker containers is picked up to be routed outside the virtual network. The surprising thing in this output is that vethf3e8733 interface. When Docker creates a container, it creates two virtual interfaces, one of which sits on the server-side and is attached to the docker0 bridge, and one that is exposed into the container’s namespace. What we’re seeing here is the server side interface. Notice how it doesn’t show up as having an IP address assigned to it? That’s because this interface is just joined to the bridge. This interface will also have a totally different name in the container’s namespace as well.
It would be entirely possible to run a container without the whole networking configuration that Docker puts in place for you. And the docker-proxy can be somewhat throughput limiting for very high-volume data services. So what does it look like if we turn it off? Since the beginning, Docker has let you do this on a per-container basis with the --net=host command-line switch. There are times, like when you want to run high throughput applications, where you might want to do this. But you lose some of Docker’s flexibility when you do it. Even if you never need or want to do this, it’s useful to expose how the mechanism works underneath.
Warning
Like other things in this chapter, this is not a setting you should take lightly. It has operational and security implications that might be outside your tolerance level. It can be the right thing to do, but you should consider the repercussions.
Let’s start a container with --net=host and see what happens, as shown here:
$ docker run -i -t --net=host ubuntu /bin/bash
$ ip addr show
1: lo: <LOOPBACK,UP,LOWER_UP>
    link/loopback 00:00:00:00:00:00 brd 00:00:00:00:00:00
    inet 127.0.0.1/8 scope host lo
    inet6 ::1/128 scope host
       valid_lft forever preferred_lft forever
2: eth0: <BROADCAST,MULTICAST,UP,LOWER_UP>
    link/ether 00:0c:29:b2:2a:21 brd ff:ff:ff:ff:ff:ff
    inet 172.16.168.178/24 brd 172.16.168.255 scope global eth0
    inet6 fe80::20c:29ff:feb2:2a21/64 scope link
       valid_lft forever preferred_lft forever
3: lxcbr0: <BROADCAST,MULTICAST,UP,LOWER_UP>
    link/ether fe:59:0b:11:c2:76 brd ff:ff:ff:ff:ff:ff
    inet 10.0.3.1/24 brd 10.0.3.255 scope global lxcbr0
    inet6 fe80::fc59:bff:fe11:c276/64 scope link
       valid_lft forever preferred_lft forever
4: docker0: <BROADCAST,MULTICAST,UP,LOWER_UP>
    link/ether 56:84:7a:fe:97:99 brd ff:ff:ff:ff:ff:ff
    inet 172.17.42.1/16 scope global docker0
    inet6 fe80::5484:7aff:fefe:9799/64 scope link
       valid_lft forever preferred_lft forever
112: vethf3e8733: <BROADCAST,UP,LOWER_UP>
    link/ether b6:3e:7a:ba:5e:1c brd ff:ff:ff:ff:ff:ff
    inet6 fe80::b43e:7aff:feba:5e1c/64 scope link
       valid_lft forever preferred_lft forever
That should look pretty familiar. That’s because when we run a container with the host networking option, we’re just in the host’s network namespace. Note that we’re also in the server’s UTS namespace. Our server’s hostname is “docker2,” so let’s see what the container’s hostname is:
$ hostname
docker2
If we do a mount to see what’s mounted, though, we see that Docker is still maintaining our /etc/resolv.conf, /etc/hosts, and /etc/hostname. Interestingly, the /etc/hostname simply contains the server’s hostname. Just to prove that we can see all the normal networking on the Docker server, let’s look at netstat -an and see if we can see the docker daemon running:
$netstat -an | grep 2375
tcp6       0      0 :::2375                 :::*                    LISTEN
So we are indeed in the server’s network namespace. What all of this means that if we were to launch a high-throughput network service, we would be able to expect network performance from it that is essentially native. But it also means we could bind to ports that would collide with those on the server, so if you do this you should be careful about how you allocate port assignments.
With the release of Docker 1.7, the --userland-proxy flag was added to Docker Engine. When you set this flag to false while launching the Docker daemon (--userland-proxy=false), Docker will completely disable the userland-proxy and instead rely on hairpin NAT functionality to route traffic between local containers. It is likely that this will eventually become the preferred approach, once it has been proven to be reliable.
In Docker 1.9, a new network subcommand was added to the docker client. This subcommand allows you to view and manipulate the Docker network layers and how they are attached to containers that are running on the system.
Listing the networks available from Docker’s perspective is easily accomplished with the following command:
# docker network ls
NETWORK ID          NAME                DRIVER
c37e1476e9c1        none                null
d7f88e502765        host                host
15dd2b3b16b1        bridge              bridge
You can then find out more details about any individual network by using the docker network inspect command along with the network ID:
# docker network inspect 15dd2b3b16b1
[
    {
        "Name": "bridge",
        "Id": ...,
        "Scope": "local",
        "Driver": "bridge",
        "IPAM": {
            "Driver": "default",
            "Config": [
                {
                    "Subnet": "172.18.0.0/16"
                }
            ]
        },
        "Containers": {
            "...": {
                "EndpointID": "...",
                "MacAddress": "04:42:ab:26:03:52",
                "IPv4Address": "172.18.0.2/16",
                "IPv6Address": ""
            }
        },
        "Options": {
            "com.docker.network.bridge.default_bridge": "true",
            "com.docker.network.bridge.enable_icc": "true",
            "com.docker.network.bridge.enable_ip_masquerade": "true",
            "com.docker.network.bridge.host_binding_ipv4": "0.0.0.0",
            "com.docker.network.bridge.name": "docker0",
            "com.docker.network.driver.mtu": "1500"
        }
    }
]
Docker networks can be created and removed, as well as attached and detached from individual containers by using the network subcommand.
There is a lot more you can configure with the Docker network layer. However, the defaults, host networking, and userland-proxyless mode, are the ones that you’re most likely to use or encounter in the wild. Some of the other things you can configure, for example, are the DNS servers used, the resolver options, the default gateways the containers use, and much more. The networking section of the Docker documentation gives an overview of how to do some of these things.
Note
For advanced network configuration of Docker, check out Weave—a virtual network tool for spanning containers across multiple Docker hosts.
And if you are going to be using Kubernetes, take a look at CoreOS’s flannel, which is an etcd-backed network fabric for containers.
1 Swapfiles are used to virtually extend your system’s memory capacity by giving it access to a large file for additional storage space.