
Secondary XML documents
Databases
SOAP Web services
In the previous chapter, we learned how to use scripts to perform custom validation and calculation functions on the data in forms.
But the data in a form isn’t the only data that’s relevant. There is external data in documents, databases, and Web services that can help in form completion, validation, and process integration. In this chapter we’ll show you how to work with these secondary data sources.
Skills required

This chapter builds on the InfoPath script-writing skills that were introduced in the previous chapter. You’ll also need some background in Web services (see Chapter 19, “Web services introduction”, on page 414 and Chapter 23, “Web services technologies”, on page 484) and XPath (see Chapter 17, “XPath primer”, on page 384 and Chapter 24, “XML Path Language (XPath)”, on page 498).
As we’ve learned, every InfoPath form has a primary data source that is either an XML file, a database or a SOAP Web service. This primary data source is the abstract XML document that is retrieved, edited, saved and/or submitted using the InfoPath form.
In completing a form, it is often useful to query or include data from other, secondary, data sources; for example:
To validate the value of a field against a list of valid values stored in a database or file
To bring in a list of values to be included in a drop-down list
To automatically complete information in the form; for example, to fill in the city and state based on the ZIP code.
In InfoPath, this is accomplished by defining secondary data sources and accessing them from scripts. Setting up a secondary data source is not much different from setting up the primary data source.
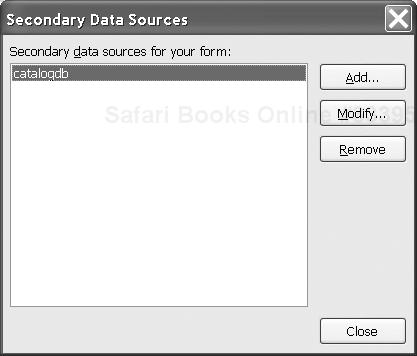
On the Tools menu, click Secondary Data Sources. This will bring up the Secondary Data Sources dialog shown in Figure 11-1.
Click Add. This will bring up the Data Source Setup Wizard, which is also used to set up the primary data source.
Choose whether it is an XML file, a database, or a SOAP Web service, and follow the wizard instructions. These instructions were described in greater detail in 9.3.6.3, “Using an XML example”, on page 205, 9.3.6.4, “Starting from a database”, on page 206 and 9.3.6.5, “Starting from a SOAP Web service”, on page 212.
When prompted, choose a name for the data source.
If the secondary source is an XML file, the wizard will prompt you to add it to the form template as a resource (unless it was previously added using Resource Manager). If you decline, other users of the form may not have access to the secondary source.
The Widget Wear product catalog is stored in an XML document. It looks something like Example 11-1.
Example 11-1. A product catalog in XML (catalog.xml)
<catalog>
  <product id="334">
    <name>Ten-Gallon Hat</name>
    <dept>ACC</dept>
  </product>
  <product id="356">
    <name>White Linen Blouse</name>
    <dept>WMN</dept>
  </product>
  <product id="522">
    <name>Deluxe Golf Umbrella</name>
    <dept>ACC</dept>
  </product>
  <product id="999">
    <name>Miscellaneous</name>
    <dept>NA</dept>
  </product>
</catalog>
When a user enters a product number, you want it to be checked against the product catalog to determine whether it is valid. The script functions shown in Example 11-2 will accomplish this. This script can be seen in action using the order_xml.xsn example file. The OnValidate function for the item number field calls another function, lookupCatalog, to determine whether the product number exists in the catalog. The line if (!desc) determines whether the desc variable contains a null value. If it does, it was not found in the catalog and an error is reported.
Example 11-2. Script to validate product number against catalog
function msoxd__item_number_attr::OnValidate(eventObj) {
  var desc = lookupCatalog(eventObj.Site.nodeTypedValue)
  if (!desc)
    eventObj.ReportError(eventObj.Site,
      "Invalid product number.", false)
}

function lookupCatalog(prodNum) {
  var catDom = XDocument.GetDOM("catalog");
  var nameNode = catDom.selectSingleNode(
        "//product[@num='" + prodNum + "']/name");
  if (nameNode)
    return nameNode.nodeTypedValue;
}
The lookupCatalog function first assigns the DOM of the catalog document to the variable catDom using the GetDOM method and referring to the document by the name specified for the secondary data source (catalog). It then selects from the catalog the name node that has that product number. It does this by stringing together an XPath expression that will look, for example, like: //product[@num='334']/name
The brackets in the XPath expression surround what is known as a predicate, which limits results to nodes that meet a certain criterion; in this case, those whose num attributes are equal to 334.[1]
If the function finds an appropriate node, it returns the node’s typed value. If it does not find such a node, it returns a null value, signaling to the OnValidate function that the product was not found in the catalog.
Suppose that in addition to validating the product number, you want to fill in the product description automatically with the name data found in the catalog. The script function shown in Example 11-3 will accomplish this.
Example 11-3. Script to fill in the product name
function msoxd__item_number_attr::OnAfterChange(eventObj) {
  if (eventObj.IsUndoRedo) return;
  var descNode = eventObj.Site.selectSingleNode("../ns1:desc")
  var desc = lookupCatalog(eventObj.Site.nodeTypedValue)
  if (desc)
    descNode.nodeTypedValue = desc
  else
    descNode.nodeTypedValue = ""
}
The function is triggered by the OnAfterChange event, which occurs after the OnValidate event. It is very similar to the OnValidate function, in that it calls the lookupCatalog to retrieve the product description. This function, however, updates the description node with the name retrieved from the catalog. Note that it uses the relative XPath expression ../ns1:desc to retrieve the description. The .. step accesses the parent, while the ns1:desc step accesses the desc child of the parent.
Rather than validating a product number after it is entered, you could forestall errors by including the valid values in a drop-down list. This technique does not require a script; it is simply a matter of setting up the list control.
To test this out on our order form example:
Select the product number field and right-click.
On the resulting context menu, point to Change To, then click Drop-Down List Box.
Double-click the field to bring up its properties dialog, shown in Figure 11-2.
Under List box entries, click Look up in a database, Web service, or file.
Select the
catalogdata source from the drop-down list.Use the button to the right of the Entries box to bring up the data source structure and select the
numnode.Click OK. The Entries field should now say
/catalog/product/@num.Click OK again to return to the form.

If the product catalog were in a relational database rather than an XML document, we could still perform similar validation and form completion functions. InfoPath has built-in support for Access and SQL Server databases, but also has a variety of techniques for supporting other databases.
For example, suppose we have an Access database, catalog.mdb, which has a table named CATALOG, shown in Figure 11-3.

This process can be seen in action using the order_db.xsn example form. First, we set up a secondary data source for the database. This process is identical to the process for setting up a database as a primary data source, described in 9.3.6.4, “Starting from a database”, on page 206. In our example, we specified a secondary data source named catalogdb that pointed to the catalog.mdb database, and chose all the table columns.
Tip
In general, you’ll want to set up a secondary data source for each type of query that you will be performing on the data, rather than for each database or table. Doing so allows you to select only the tables, columns and joins that are relevant to the query, reducing the amount of data returned and ensuring that the data is joined appropriately.
Once a secondary data source is set up, we can use a very similar script to what we used when selecting from a standalone XML document. The only changes required are to the lookupCatalog function, which is shown in Example 11-4.
Example 11-4. Script to check product number against database
function lookupCatalog(prodNum)
{
  var catdbDom = XDocument.GetDOM("catalogdb");
  catdbDom.setProperty("SelectionNamespaces",
  'xmlns:d="http://schemas.microsoft.com/office/infopath/2003/'
           + 'ado/dataFields"'),
  var nameNode = catdbDom.selectSingleNode(
                 "//d:CATALOG[@NUM='" + prodNum + "']/@NAME");
  if (nameNode)
    return nameNode.nodeTypedValue;
}
InfoPath will convert the Access results into XML that can then be queried using the same methods we used to query the catalog XML document. An example of the XML output of the query is shown in Example 11-5.
Example 11-5. Output of the catalog database query
<dfs:myFields xmlns:dfs=
"http://schemas.microsoft.com/office/infopath/2003/dataFormSolution"
xmlns:d=
"http://schemas.microsoft.com/office/infopath/2003/ado/dataFields">
  <dfs:dataFields>
    <d:CATALOG NUM="334" NAME="Ten-Gallon Hat" DEPT="ACC"/>
    <d:CATALOG NUM="356" NAME="White Linen Blouse" DEPT="WMN"/>
    <d:CATALOG NUM="522" NAME="Deluxe Golf Umbrella" DEPT="ACC"/>
    <d:CATALOG NUM="999" NAME="Miscellaneous" DEPT="NA"/>
  </dfs:dataFields>
</dfs:myFields>
The output document has a CATALOG element for each row in the CATALOG table, and each column is represented as an attribute. As this is a different structure from that of the catalog.xml file in Example 11-1, we use a different XPath expression in line 8 of Example 11-4 to retrieve the name.
In addition, because the CATALOG element is in its own namespace, we also need to use a prefix in the XPath expression. In order to map the prefix to the namespace, we call the setProperty method to set the SelectionNamespaces property, as shown in lines 4 through 6 of Example 11-4.
The built-in database support described in the previous section will work for both Access and SQL Server databases. There are a number of techniques for accessing other kinds of databases using InfoPath, such as:
building a SOAP Web service that accesses the data and returns it as XML (for example, using ADO.NET)
writing scripts that access the database through any data access API, such as ADO, or a custom API provided by a vendor
importing and exporting data from a database as XML files (most relational databases support this) and consuming the files in InfoPath[2]
As we saw in 9.3.6.5, “Starting from a SOAP Web service”, on page 212, InfoPath can send and receive data from SOAP Web services. When the entire XML document is to be passed to (or retrieved from) the Web service, the setup is simply to design the form based on the Web service (as was described in that chapter). However, you may want to call a Web service as a secondary data source, for the purpose of validating or completing a form.
For example, Web services are available that will validate a ZIP code and return information about it, such as the city and state. We could set up our order form to allow the user to enter a ZIP code, then call a Web service to retrieve the city and state and fill them in automatically.
We will use the ZIP code Web service that was introduced in 6.2.1, “The ZIP code Web service”, on page 123.[3] We set it up as a secondary data source in the same way we set up a Web service as a primary data source in 9.3.6.5, “Starting from a SOAP Web service”, on page 212.
We chose the operation GetInfoByZIP from the list after entering http://www.webservicex.net/uszip.asmx?WSDL as the Web service URI. We named the secondary data source GetInfoByZIP.
For a working copy of this example, use the order_ws.xsn file.
We won’t be using the Office Web Services Toolkit that we used with Word. It doesn’t – and doesn’t need to – support InfoPath. That’s because InfoPath hides the complexity of SOAP natively, with built-in support for parsing and generating SOAP messages.
InfoPath communicates with the Web service using SOAP documents whose envelopes contain the input and output message elements. To provide a SOAP-free interface to your scripts, it incorporates those message elements in a document that we refer to as a “Web services interface document”.[4]
In our case, the document looks something like Example 11-6. It has two namespaces: one with the prefix ws for the Web service message elements, and one with the prefix dfs for InfoPath’s housekeeping elements.
Example 11-6. Interface document with message elements as sent to the Web service
<dfs:myFields xmlns:dfs=
"http://schemas.microsoft.com/office/infopath/2003/dataFormSolution"
              xmlns:ws="http://www.webserviceX.NET">
  <dfs:queryFields>
    <ws:GetInfoByZIP>
      <ws:USZip>49684</ws:USZip>
    </ws:GetInfoByZIP>
  </dfs:queryFields>
  <dfs:dataFields>
    <ws:GetInfoByZIPResponse>
      <ws:GetInfoByZIPResult/>
    </ws:GetInfoByZIPResponse>
  </dfs:dataFields>
</dfs:myFields>
We’ll describe the document first, then show you how to write the script that creates and reads it.
Before the document is sent to the service, the input message is complete: there is an input parameter in ws:USZip. Although there is an element in the output message for the result (ws:GetInfoByZIPResult), it is empty.
After the Web service is called, the document has the service output in the content of the GetInfoByZIPResult element, roughly as shown in Example 11-7. The only change to the document is the NewDataSet element that was returned with the requested information.
Example 11-7. Interface document after output element is completed by the Web service
<dfs:myFields xmlns:dfs=
"http://schemas.microsoft.com/office/infopath/2003/dataFormSolution"
              xmlns:ws="http://www.webserviceX.NET">
  <dfs:queryFields>
    <ws:GetInfoByZIP>
      <ws:USZip>49684</ws:USZip>
    </ws:GetInfoByZIP>
  </dfs:queryFields>
  <dfs:dataFields>
    <ws:GetInfoByZIPResponse>
      <ws:GetInfoByZIPResult>
        <NewDataSet>
          <Table>
            <CITY>Traverse City</CITY>
            <STATE>MI</STATE>
            <ZIP>49684</ZIP>
            <AREA_CODE>616</AREA_CODE>
            <TIME_ZONE>E</TIME_ZONE>
          </Table>
        </NewDataSet>
      </ws:GetInfoByZIPResult>
    </ws:GetInfoByZIPResponse>
  </dfs:dataFields>
</dfs:myFields>
Example 11-8 shows the script that causes InfoPath to invoke the Web service and update the form with the returned city and state.
Example 11-8. Script that invokes the Web service
function msoxd_ns1_postal_code::OnAfterChange(eventObj)
{
  if (eventObj.IsUndoRedo) return;

  //Get a reference to the Web service data source
  var webService = XDocument.DataObjects.Item("GetInfoByZIP")

  webService.DOM.setProperty("SelectionNamespaces", "xmlns:dfs=" +
    "'http://schemas.microsoft.com/office/infopath/" +
    "2003/dataFormSolution'" +
    " xmlns:ws='http://www.webserviceX.NET' ")

  //Set the value of the ZIP code node in the input message
  var zipParm = webService.DOM.selectSingleNode(
    "/dfs:myFields/dfs:queryFields/ws:GetInfoByZIP/ws:USZip" )
  zipParm.text = eventObj.Site.text

  //call the Web service
  webService.Query()

  //Set the city and state values in the form
  XDocument.DOM.selectSingleNode( "//ns1:city" ).text =
    webService.DOM.selectSingleNode( "//CITY" ).text
  XDocument.DOM.selectSingleNode( "//ns1:state" ).text =
    webService.DOM.selectSingleNode( "//STATE" ).text
}
line 1
The function is executed when a change is made to the
postal_codefield of the primary document.
line 3
If the change is an undo or redo of a previous change, the script exits with no action.
line 6
A data object is constructed with the structure and properties of an empty Web service interface document for our data source (
GetInfoByZIP). The variablewebServiceis created to point to the object.
lines 8 through 11
The namespace prefixes for the interface document are declared and stored as properties of the
webServiceobject.
lines 14 and 15
The variable
zipParmis created as a pointer to the (currently empty)ws:USZipnode of thewebServiceobject.
line 16
The text of the
postal_codenode of the primary document (i.e. the ZIP code that was typed into the form by the user) is assigned to theUSZipnode of the input message through the pointer variablezipParm.
line 19
Line 19 calls the Web service. InfoPath copies the input message element from the
webServiceobject and includes it in a SOAP document that it sends to the service. When it receives the return SOAP document, it extracts the content of the output message element and inserts it into thewebServiceobject. The XML linearization of thewebServiceobject now looks like Example 11-7.
lines 21 through 24
The
CITYandSTATEvalues from thewebServiceobject are copied to the corresponding nodes in the primary XML document.
[2] Refer to the documentation for your DBMS product to determine your options for accessing data as XML.
[3] If you have not read that section of the book, you should do so before proceeding.
[4] The document and its related schema documents are stored in the form template. The file names are based on the name you gave to the secondary data source.