
Solaris 10 delivered a revolutionary new subsystem called the Solaris Dynamic Tracing Framework (or DTrace for short). DTrace is an observability technology that allows us, for the first time, to answer virtually every question we ever wanted to ask about the behavior of our systems and applications.
Before Solaris 10, the Solaris observational toolset was already quite rich; many examples in this book use tools such as truss(1), pmap(1), pstack(1), vmstat(1), iostat(1), and others. However, as rich as each individual tool is, it still provides only limited and fixed insight into one specific area of a system. Not only that, but each of the tools is disjoint in its operation. It’s therefore difficult to accurately correlate the events reported by a tool, such as iostat, and the applications that are driving the behavior the tool reports. In addition, all these tools present data in different formats and frequently have very different interfaces. All this conspires to make observing and explaining systemwide behavioral characteristics very difficult indeed.
Solaris dynamic tracing makes these issues a thing of the past. With one subsystem we can observe, quite literally, any part of system and application behavior, ranging from every instruction in an application to the depths of the kernel. A single interface to this vast array of information means that, for the first time ever, subsystem boundaries can be crossed seamlessly, allowing easy observation of cause and effect across an entire system. For example, requests such as “show me the applications that caused writes to a given device” or “display the kernel code path that was executed as a result of a given application function call” are now trivial to fulfill. With DTrace we can ask almost any question we can think of.
With DTrace we can create custom programs that contain arbitrary questions and then dynamically modify application and kernel code to provide immediate answers to these questions. All this can be done on live production environments in complete safety, and by default the subsystem is available only to the superuser (uid 0). When not explicitly enabled, DTrace has zero probe effect and the system acts as if DTrace were not present at all.
DTrace has its own scripting language with which we can express the questions we want to ask; this language is called “D.” It provides most of the richness of “C” plus some tracing-specific additions.
The aim of this chapter is not to go into great detail on the language and architecture but to highlight the essential elements that you need to understand when reading this book. For a thorough treatment of the subject, read the Solaris Dynamic Tracing Guide available at http://docs.sun.com.
As an introduction to DTrace and the D language, let’s start with a simple example.
The truss(1) utility, a widely used observational tool, provides a powerful means to observe system and library call activity. However, it has many drawbacks: It operates on one process at a time, with no systemwide capability; it is verbose with fixed-output format; and it offers its users a limited choice of questions. Moreover, because of the way it works, truss can reduce application performance. Every time a thread in a process makes a system call, truss stops the thread through procfs, records the arguments for the system call, and then restarts the thread. When the system call returns, truss again stops the thread, records the return code, and then restarts it. It’s not hard to see how this can have quite an impact on performance. DTrace, however, operates completely in the kernel, collecting relevant data at the source. Because the application is no longer controlled through procfs, the impact on the application is greatly minimized.
With DTrace we can surpass the power of truss with our first script, which in itself is almost the simplest script that can be written. Here’s a D script, truss.d, that lets us observe all global system call activity.
#!/usr/sbin/dtrace -s

syscall:::entry
{
}
There are a few important things to note from the above example. The first line of the program is as follows:
#!/usr/sbin/dtrace -s
This specifies that the dtrace(1M) program is to be used as the interpreter, and the -s argument tells dtrace that what follows is a D program that it should execute. Note: The interpreter line for all the examples in this chapter is omitted for the sake of brevity, but it is still very much required.
Next follows a description of the events we are interested in looking at. Here we are interested in what happens every time a system call is made.
syscall:::entry
This is an example of a probe description. In DTrace, a probe is a place in the system where we want to ask a question and record some pertinent data. Such data might include function arguments, stack traces, timestamps, file names, function names, and the like.
The braces that follow the probe specification contain the actions that are to be executed when the associated probe is encountered. Actions are generally focused on recording items of data; we’ll see examples of these shortly. This example contains no actions, so the default behavior is to just print the name of the probe that has been hit (or fired in tracing parlance) as well as the CPU it executed on and a numerical ID for the probe.
Let’s run our simple script.
sol10# ./truss.d
dtrace: script './truss.d' matched 225 probes
CPU     ID                    FUNCTION:NAME
  0     13                      write:entry
  0    103                      ioctl:entry
  0    317                    pollsys:entry
  0     13                      write:entry
  0    103                      ioctl:entry
  0    317                    pollsys:entry
^C
As you can see from the preceding output, the syscall:::entry probe description enabled 225 different probes in this instance; this is the number of system calls currently available on this system. We don’t go into the details now of exactly what this means, but be aware that, when the script is executed, the kernel is instrumented according to our script. When we stop the script, the instrumentation is removed and the system acts in the same way as a system without DTrace installed.
The final thing to note here is that the execution of the script was terminated with a Control-C sequence (as shown with the ^C in the above output). A script can itself issue an explicit exit() call to terminate; in the absence of this, the user will have to type Control-C.
The preceding script gives a global view of all system call activity. To focus our attention on a single process, we can modify the script to use a predicate. A predicate is associated with a probe description and is a set of conditions placed between forward slashes (“/”). For example:
#pragma D option quiet

syscall:::entry
/pid == 660/
{
        printf("%-15s: %8x %8x %8x %8x %8x %8x
",
            probefunc, arg0, arg1, arg2, arg3, arg4, arg5);
}
If the expressions within the predicate evaluate to true, then we are interested in recording some data and the associated actions are executed. However, if they evaluate to false, then we choose not to record anything and return. In this case, we want to execute the actions only if the thread making the system call belongs to pid 660.
We made a couple of additions to the D script. The #pragma just tells DTrace not to print anything unless it’s explicitly asked to do so (the -q option to dtrace(1M) does the same thing). Second, we added some output formatting to printf() to display the name of the system call that was made and its first six arguments, whether the system call has them or not. We look more at output formatting and arguments later. Here is some example output from our script.
s10## ./truss.d
write          :       16  841b548        8        0 831de790         8
read           :       16 f942dcc0       20        0 831de790        20
write          :       16  841b548        8        0 831de790         8
read           :       16 f942dcc0       20        0 831de790        20
pollsys        : f942dce0        1 f942dbf0        0 831de790  f942dbf0
write          :        5 feab36b1        1        e 81b31250         1
pollsys        :  8046ef0        2  8046f88        0 81b31250   8046f88
With a few lines of D we have created the functional equivalent of truss -p.
Now that we’ve seen a simple example, let’s look at some of the basic building blocks of DTrace.
D is a block-structured language similar in layout to awk. A program consists of one or more clauses that take the following form:
probe
/ optional predicates /
{
        optional action statements;
}
Each clause describes one or more probes to enable, an optional predicate, and any actions to associate with the probe specification. When a D program contains several clauses that enable the same probe, the clauses are executed in the order in which they appear in the program. For example:
syscall::read:entry
{
        printf("A");
}

syscall::read:entry
{
        printf(" B");
        exit(1);
}
The above script contains two clauses; each clause enables the read(2) system call entry probe. When this script is executed, the system is modified dynamically to insert our tracing actions into the read() system call. When any application next makes a read() call, the first clause is executed, causing the character “A” to be displayed. The next clause is executed immediately after the first, and the sequence “B” is also displayed. The exit(1) call terminates the tracing session, an action that in turn causes the enabled probes and their actions to be removed. The system then returns to its default state. Executing the script we see this:
sol10# ./read.d
A B
The preceding explanation is a huge simplification of what actually happens when we execute a D script. The important thing to note here is the dynamic nature of the modifications that are made when a D script is executed. The modifications made to the system (the “instrumentation”) exist just for the lifetime of the script. When no DTrace scripts are running, the system acts just as if DTrace were not installed.
By default, DTrace provides tens of thousands of probes that you can enable to gain unparalleled insight into the behavior of a system (use dtrace -l to list them all). Each probe can be referred to by a unique numerical ID or by a more commonly used human-readable one that consists of four colon-separated fields. These are defined as follows:
provider:module:function:name
Provider. The name of the DTrace provider that created this probe. A provider is essentially a kernel module that creates groups of probes that are related in some way (for example, kernel functions, an application’s functions, system calls, timers).
Module. The name of the module to which this probe belongs if the probe is associated with a program location. For kernel probes, it is the name of the module (for example,
ufs); for applications, it is a library name (for example,libc.so).Function. The name of the function that this probe is associated with if it belongs to a program location. Kernel examples are
ufs_write()andclock(); a userland (a program running in user-mode) example is theprintf()function oflibc.Name. The name component of the probe. It generally gives an idea of its meaning. Examples include
entryorreturnfor kernel function calls,startfor an I/O probe, andon-cpufor a scheduling probe.
Note two key facts about probe specifications:
If any field in a probe specification is empty, that field matches any value (that is, it acts like a wildcard).
sh(1)-like pattern matching is supported.
Table 10.1 lists examples of valid probe descriptions.
Table 10.1. Examples of DTrace Probe Descriptions
Meaning | |
|---|---|
| The |
| All the probes in the kernel |
| The |
| All the matches of |
| All system call entry and return probes |
| All the places in the kernel from which a physical I/O can occur |
| All the places in kernel where a currently executing thread is taken off the CPU |
Although it isn’t necessary to specify all the fields in a probe, the examples in this book do so in order to remove any ambiguity about which probes are being enabled. Also note that a comma-separated list of probes can be used to associate multiple probes with the same predicate and actions.
In previous examples we saw the syscall provider being used to ask questions concerning system call usage. Exactly what is a provider and what is its relationship to a probe? A provider creates the probes that are essentially the individual system points at which we ask questions. There are a number of providers, each able to instrument a different part of the system.
The following providers are of special interest to us:
fbt. The Function Boundary Tracing provider places probes at the entry and return point of virtually every kernel function. This provider illuminates the operation of the Solaris kernel and is used extensively in this book. Its full power is realized when it is used in conjunction with the Solaris source code.pid. This provider probes for userland processes at function entry, function return, and even down to the instruction level.syscall. This provider probes at the entry and return point of every system call.profile. This provider gives us timer-driven probes. The timers can be specified at any resolution from nanoseconds to days and can interrupt all CPUs or just one.sdt. The Statically Defined Tracing provider enables programmers to place probes at arbitrary locations in their code and to choose probe names that convey specific meaning. (For example, a probe namedtransmit-startmeans more to most observers than the function name in which it sits.)
The following providers leverage the sdt provider to grant powerful observability into key Solaris functional areas:
sched. This provider affords a group of probes for scheduling-related events. Such events include a thread being placed on the CPU, taken off the CPU, put to sleep, or woken up.io. This provider probes for I/O-related events. Such events include I/O starts, I/O completion, and I/O waits.proc. The probes of theprocprovider examine process creation and life cycle events. Such events includefork,exec, thread creation, and signal send and receive.vminfo. Thevminfoprovider is layered on top of the kstat updates to the vm kstat. Every time an update is made to a member of the vm kstat, a probe is fired.sysinfo. Thesysinfoprovider is also layered on top of the kstat updates, in this case, to the sys kstat. Every time an update is made to a member of the sys kstat, a probe is fired.
The syscall example used earlier is simple and powerful. However, the output quickly becomes voluminous and overwhelming with thousands of lines generated in seconds. It rapidly becomes difficult to discern patterns of activity in the data, such as might be perceived in a view of all system calls sorted by count. Historically, we would have generated our data and post-processed this by using tools such as awk(1) or perl(1), but that approach is laborious and time wasting. DTrace enables us to succinctly specify how to group vast amounts of data so that we can easily observe such patterns. The mechanism that does this is termed an aggregation. We use aggregations to refine our initial script.
syscall:::entry
{
        @sys[probefunc] = count();
}
And here is the output now.
sol10# ./truss.d
dtrace: script './truss.d' matched 225 probes
^C

  <output elided>
  fcntl
  xstat                                                           1113
  lwp_park                                                        2767
  setcontext                                                      4593
  lwp_sigmask                                                     4599
  write                                                           7429
  setitimer                                                       8234
  writev                                                          8444
  ioctl                                                          17718
  pollsys                                                       135603
  read                                                          141379
Instead of seeing every system call as it is made, we are now presented with a table of system calls sorted by count: over 330, 000 system calls presented in several lines!
The concept of an aggregation is simple. We want to associate the value of a function with an arbitrary element in an array. In our example, every time a system call probe is fired, the name of the system call is used (using the probefunc built-in variable) to index an associative array. The result of the count() function is then stored in this element of the array (this simply adds 1 to an internal variable for the index in the array and so effectively keeps a running total of the number of times this system call has been entered). In that way, we do not focus on data at individual probe sites but succinctly collate large volumes of data.
An aggregation can be split into two basic components: on the left side, a named associative array that is preceded by the @ symbol; on the right side, an aggregating function.
@name [ keys ] = function();
An aggregating function has the special property that it produces the same result when applied to a set of data as when applied to subsets of that data and then again to that set of results. A simple example of this is finding the minimum value of the set [5, 12, 4, 7, 18]. Applying the min() function to the whole set gives the result of 4. Equally, computing the minimum value of two subsets [5, 12] and [4, 7, 18] produces 5 and 4. Applying min() again to [5, 4] yields 4.
Several aggregating functions in DTrace and their results are listed below.
count. Returns the number of times called.avg. Returns the mean of its arguments. The following example displays the average write size that each process makes. The third argument to thewrite(2)system call is the size of the write being made. Since arguments are indexed from 0,arg2is therefore the size of the write.syscall::write:entry { @sys[execname] = avg(arg2); } sol10# ./avg.d dtrace: script './avg.d' matched 1 probe ^C ls 101 egrep 162 gnome-panel 169 gnome-terminal 290 soffice.bin 309 metacity 334 battstat-applet- 366 init 412 mozilla-bin 1612 gconfd-2 27763sum. Returns the total value of its arguments.max. Returns the maximum value of its arguments.min. Returns the minimum value of its arguments.quantize. Stores the specified argument in the appropriate bucket in a power-of-2 series.
The following example stores in the appropriate bucket the size of the memory requested in the call to malloc().
pid$1:libc:malloc:entry
{
        @["malloc sizes"] = quantize(arg0);
}

sol10# ./malloc.d 658
dtrace: script './malloc.d' matched 1 probe
^C

  malloc sizes
           value  ------------- Distribution ------------- count
               2 |                                         0
               4 |@@                                       405
               8 |@@@@                                     886
              16 |@@@@@@@                                  1673
              32 |@                                        205
              64 |@@@@@@                                   1262
             128 |@@@@@@@                                  1600
             256 |@@@@@@@                                  1632
             512 |                                         3
            1024 |                                         5
            2048 |@@@@                                     866
            4096 |                                         10
            8192 |@@@                                      586
           16384 |                                         0
The example shows that 1673 memory allocations between the size of 16 and 31 bytes were requested. The @ character indicates the relative size of each bucket.
lquantize. Linear quantizations are frequently used to drill down on buckets of interest when thequantize()function has previously been used. This time we use a linear range of buckets that goes between two sizes with a specified step size. The example below specifies that calls tomalloc()between 4 and 7 bytes in size go in their own bucket.
pid$1:libc:malloc:entry
{
        @["malloc sizes"] = lquantize(arg0,4,8,1);
}

sol10# ./lmalloc.d 658
dtrace: script './lmalloc.d' matched 1 probe
^C

  malloc sizes
           value  ------------- Distribution -------------  count
             < 4 |                                          6
               4 |@                                         423
               5 |                                          0
               6 |@                                         400
               7 |                                          0
            >= 8 |@@@@@@@@@@@@@@@@@@@@@@@@@@@@@@@@@@@@@@    18452
Having looked at aggregations, we now come to the two basic data types provided by D: associative arrays and scalar variables. An associative array stores data elements that can be accessed with an arbitrary name, known as a key or an index. This differs from normal, fixed-size arrays in a number of different ways:
There are no predefined limits on the number of elements in the array.
The elements can be indexed with an arbitrary key and not just with integer keys.
The storage for the array is not preallocated or contained in consecutive storage locations.
Associative arrays in D commonly keep a history of events that have occurred in the past to use in controlling flow in scripts. The following example uses an associative array, arr, to keep track of the largest writes made by applications.
syscall::write:entry
/arr[execname] < arg2/
{
        printf("%d byte write: %s
", arg2, execname);
        arr[execname] = arg2;
}
The actions of the clause are executed if the write size, stored in arg2, is larger than that stored in the associative array arr for a given application. If the predicate evaluates to true, then this is the largest write seen for this application. The actions record this by first printing the size of the write and then by updating the element in the array with the new maximum write size.
D is similar to languages such as C in its implementation of scalar variables, but a few differences need to be highlighted. The first thing to note is that in the D language, variables do not have to be declared in advance of their use, much the same as in awk(1) or perl(1). A variable comes into existence when it first has a value assigned to it; its type is inferred from the assigned value (you are allowed to declare variables in advance but doing so isn't necessary). There is no explicit memory management in D, much as in the Java programming language. The storage for a variable is allocated when the variable is declared, and deallocated when the value of 0 is assigned to the variable.
The D language provides three types of variable scope: global, thread-local, and clause-local. Thread-local variables provide separate storage for each thread for a given variable and are referenced with the self-> prefix.
fbt:ufs:ufs_write:entry
{
        self->in = timestamp;
}
In the clause above, every different thread that executes the ufs_write() function has its own copy of a variable named in. Its type is the same as the timestamp built-in variable, and it holds the value that the timestamp built-in variable had when the thread started executing the actions in the clause. This is a nanosecond value since an arbitrary time in the past.
A common use of thread-local variables is to highlight a sequence of interest for a given thread and also to associate data with a thread during that sequence. The following example uses the sched provider to record, by application, all the time that a specified user (UID 1003) spent executing.
sched:::on-cpu
/uid == 1003/
{
        self->ts = timestamp;
}

sched:::off-cpu
/self->ts/
{
        @time[execname] = sum(timestamp - self->ts);
        self->ts = 0;
}
The above D script contains two clauses. The first one uses the sched:::oncpu probe to enable a probe at every point in the kernel where a thread can be placed onto a processor and run. The predicate attached to this probe specifies that the actions are only to be executed if the uid of the thread is 1003. The action merely stores the current timestamp in nanoseconds by assigning the timestamp built-in variable to a thread-local variable, self->ts.
The second clause uses the sched:::off-cpu probe to enable a probe at every location in the kernel where a thread can be taken off the CPU. The self->ts variable in the predicate ensures that only threads owned by uid 1003 that have already been through the sched:::on-cpu probe shall execute the following actions. Why couldn’t we just predicate on uid == 1003 as in the first clause? Well, we want to ensure that any thread executing the following actions has already been through the first clause so that its self->ts variable is set. If it hasn't been set, we will end up storing a huge value in the @time aggregation because self->ts will be 0! Using a thread-local variable in predicates like this to control flow in a D script is a common technique that we frequently use in this book.
sol10# ./sched.d
dtrace: script './sched.d' matched 6 probes
^C

  cat                                                          1247134
  xterm                                                        1830446
  ksh                                                          3909045
  stdlibfilt                                                   5499630
  make                                                        60092218
  sh                                                         158049977
  sed                                                        162507340
  CC                                                         304925644
  ir2hf                                                      678855289
  sched                                                     2600916929
  ube_ipa                                                   2851647754
  ccfe                                                      5879225939
  ube                                                       7942433397
The preceding example can be enhanced with the profile provider to produce output at a given periodic rate. To produce output every 5 seconds, we can just add the following clause:
profile:::tick-5s
{
              printa(@time);
              trunc(@time);
}
The profile provider sets up a probe that fires every 5 seconds on a single CPU. The two actions used here are commonly used when periodically displaying aggregation data:
printa(). This function prints aggregation data. This example uses the default formatting, but we can control output by using modifiers in much the same way as withprintf(). Note that we refer to the aggregation result (that is, the value returned from the aggregation function) by using the@formatting character with the appropriate modifier. The aboveprinta()could be rewritten withprinta("%-56s %@10d", @time);trunc(). This function truncates an aggregation or removes its current contents altogether. Thetrunc()action deletes all the keys and the aggregation results if no second, optional, value is given. Specifying a second argument, n, removes all the keys and the aggregation values in the aggregation apart from the top n values.
In DTrace, probe arguments are made available through one or two mechanisms, depending on which provider is responsible for the probe:
args[]. Theargs[]array presents a typed array of arguments for the current probe.args[0]is the first argument,args[1]the second, and so on. The providers whose probe arguments are presented through theargs[]array includefbt,sched,io, andproc.arg0...arg9. Theargn built-in variables are accessible by all probes. They are raw 64-bit integer quantities and, as such, must be cast to the appropriate type.
For an example of argument usage, let’s look at a script based on the fbt provider. The Solaris kernel, like any other program, is made up of many functions that offer well-defined interfaces to perform specific operations. We often want to ask pertinent questions upon entry to a function, such as, What was the value of its third argument? or upon exit from a function, What was the return value? For example:
fbt:ufs:ufs_read:entry
/uid == 1003/
{
        self->path = stringof(args[0]->v_path);
        self->ts = timestamp;
}

fbt:ufs:ufs_read:return
/self->path != NULL/
{
        @[self->path] = max(timestamp - self->ts);
        self->path = 0;
        self->ts = 0;
}
This example looks at all the reads performed through ufs file systems by a particular user (UID 1003) and, for each file, records the maximum time taken to carry out the read call. A few new things require further explanation.
The name of the file being read from is stored in the thread-local variable, self->path, with the following statement:
self->path = stringof(args[0]->v_path);
The main point to note here is the use of the args[] array to reference the first argument (args[0]) of the ufs_read function. Using MDB, we can inspect the arguments of ufs_read:
sol10# mdb -k
Loading modules: [ unix krtld genunix dtrace specfs ufs ip sctp usba uhci fctl s1394 nca
lofs audiosup nfs random sppp crypto ptm ipc ]
> ufs_read::nm -f ctype
C Type
int (*)(struct vnode *, struct uio *, int, struct cred *, struct caller_context *)
The first argument to ufs_read() is a pointer to a vnode structure (struct vnode *). The path name of the file that is represented by that vnode is stored in the v_path member of the vnode structure and can be accessed through args[0]->v_path. Using MDB again, we inspect the type of the v_path member variable.
> ::print -t struct vnode v_path
char *v_path
The v_path member is a character pointer and needs to be converted to DTrace’s native string type. In DTrace a string is a built-in data type. The stringof() action is one of many features that allow easy manipulation of strings. It converts the char * representation of v_path into the DTrace string type.
If the arg0 built-in variable had been used, a cast would be required and would be written as this:
self->path = stringof(((struct vnode *)arg0)->v_path);
The predicate associated with the ufs_read:return probe ensures that its actions are only executed for files with a non-NULL path name. The action then uses the path name stored in the self->path variable to index an aggregation, and the max() aggregating function tracks the maximum time taken for reads against this particular file. For example:
sol10# ./ufs.d
dtrace: script './ufs.d' matched 2 probes
^C

  /lib/ld.so.1                                                    3840
  /usr/share/lib/zoneinfo/GB                                      5523
  <output elided>
  /usr/share/man/man1/ls.1                                     2599836
  /./usr/bin/more                                              3941344
  /./usr/bin/tbl                                               3988087
  /usr/share/lib/pub/eqnchar                                   4397573
  /usr/share/lib/tmac/an                                       5054675
  /./usr/bin/nroff                                             7004599
  /./usr/bin/neqn                                              7021088
  /./usr/bin/col                                               9989462
  /usr/share/man/windex                                       13742938
  /./usr/bin/man                                              17179129
Now let’s look at a syscall-based example of return probe use. The following script exploits the fact that syscall probes have their return value stored in arg0 and the error code for the call stored in the errno built-in variable.
syscall::open*:entry
{
        self->path = arg0;
}
syscall::open*:return
/self->path != NULL && (int)arg0 == -1 && errno == EACCES/
{
        printf("UID %d permission denied to open %s
",
            uid, copyinstr(self->path));
        self->path = 0;
}
The first clause enables probes for the open(2) and open64(2) system calls. It then stores the address of the buffer, which contains the file name to open, in the thread-local variable self->path.
The second clause enables the corresponding syscall return probes. The conditions of interest are laid out in the predicate:
The stored file name buffer isn’t a
NULLpointer (self->path!=NULL).The open failed (
arg0== - 1).The open failed owing to insufficient permissions (
errno== EACCES).
If the above conditions are all true, then a message is printed specifying the UID that induced the condition and the file for which permissions were lacking .
sol10# ./open.d
UID 39079 permission denied to open /etc/shadow
Finally, a note regarding the copyinstr() action used in the second clause above: All probes, predicates, and associated actions are executed in the kernel, and therefore any data that originates in userland must be copied into the kernel to be used. The buffer that contains the file name to be opened in our example is a buffer that resides in a userland application. For the contents to be printed, the buffer must be copied to the kernel address space and converted into a DTrace string type; this is what copyinstr() does.
DTrace gives us the freedom to observe interactions across many different subsystems. The following slightly larger script demonstrates how we can follow all the work done in userland and the kernel by a given application function. We can use dtrace -p to attach to and instrument a running process. For example, we can use a script that looks at the function getgr_lookup() in the name services cache daemon. The getgr_lookup() function is called to translate group IDs and group names. Note that here we are interested in the principle of examining a particular function; the actual program and function chosen here are irrelevant.
#pragma D option flowindent

pid$target:a.out:getgr_lookup:entry
{
        self->in = 1;
}

pid$target:::entry,
pid$target:::return
/self->in/
{
        printf("(pid)
");
}

fbt:::entry,
fbt:::return
/self->in/
{
        printf("(fbt)
");
}

pid$target:a.out:getgr_lookup:return
/self->in/
{
        self->in = 0;
        exit(0);
}
The #pragma flowindent directive at the start of the script means that indentation will be increased on entry to a function and reduced on the same function’s return. Showing function calls in a nested manner like this makes the output much more readable.
The pid provider instruments userland applications. The process to be instrumented is specified with the $target macro argument, which always expands to the PID of the process being traced when we attach to the process by using the -p option to dtrace(1M).
The second clause enables all the entry and return probes in the nscd process, and the third clause enables every entry and return probe in the kernel. The predicate in both of these clauses specifies that we are only interested in executing the actions if the thread-local self->in variable is set. This variable is set to 1 when nscd’s getgr_lookup() function is entered and set to 0 on exit from this function (that is, when the return probe is fired). For example:
sol10# dtrace -s ./nscd.d -p 'pgrep nscd`
dtrace: script './nscd.d' matched 43924 probes
CPU FUNCTION
  0  -> getgr_lookup                           (pid)
  0    -> mutex_lock                           (pid)
  0      -> mutex_lock_impl                    (pid)
  0      <- mutex_lock_impl                    (pid)
  0    <- mutex_lock                           (pid)
  0    -> _xstat                               (pid)
  0      -> copyout                            (fbt)
  0      <- kcopy                              (fbt)
  0      -> syscall_mstate                     (fbt)
  0        -> gethrtime_unscaled               (fbt)
  0        <- gethrtime_unscaled               (fbt)
  0      <- syscall_mstate                     (fbt)
  0      -> syscall_entry                      (fbt)
 <output elided>
  0      <- syscall_exit                       (fbt)
  0      -> syscall_mstate                     (fbt)
  0        -> gethrtime_unscaled               (fbt)
  0        <- gethrtime_unscaled               (fbt)
  0      <- syscall_mstate                     (fbt)
  0    <- _xstat                               (pid)
  0    -> get_hash                             (pid)
  0      -> abs                                (pid)
  0        -> copyout                          (fbt)
  0        <- kcopy                            (fbt)
  0      <- abs                                (pid)
  0    <- get_hash                             (pid)
  0    -> memcpy                               (pid)
  0      -> copyout                            (fbt)
  0      <- kcopy                              (fbt)
  0    <- memcpy                               (pid)
  0    -> mutex_unlock                         (pid)
  0    <- mutex_unlock                         (pid)
  0   | getgr_lookup:return                    (pid)
  0  <- getgr_lookup
DTrace provides a very useful feature by which we can access symbols defined in the Solaris kernel from within a D script. We can use the backquote character (`) to refer to kernel symbols, and this information can be used to great advantage when we are exploring the behavior of a Solaris kernel. For example, a variable named mpid is declared in the Solaris kernel source to keep track of the last PID that was allocated. It is declared in uts/common/os/pid.c as follows:
static pid_t mpid;
The following script uses this variable to calculate the rate of process creation on the system and to output a message if it exceeds a given amount (10 processes per second in this case):
dtrace:::BEGIN
{
        cnt = 'mpid;
}
profile:::tick-1s
/'mpid < cnt+10/
{
        cnt = 'mpid;
}

profile:::tick-1s
/'mpid >= cnt+10/
{
        printf("High process creation rate: %d/sec
", 'mpid - cnt);
        cnt = 'mpid;
}
The first clause uses the BEGIN probe from the dtrace provider to initialize a global variable (cnt) to the current value of the mpid kernel variable.
The BEGIN, END, and ERROR probes are special probes that belong to the dtrace provider. These probes are essentially virtual probes in that they aren’t associated with any code location or timer source. The BEGIN probe fires before any other probes when we start the tracing session and allows us to perform tasks such as data initialization. The END probe is called when the tracing session is terminated either with a Control-C or an explicit call to the exit() action. Its main function is to print data collected during the execution of the script. The ERROR probe is less commonly used; it is called upon abnormal termination of the script.
Both of the next two clauses in the previous example enable the profile:::tick-1s probe. The probe fires every second, and the two clauses are executed in the order specified in the script. The important thing to note is that the predicates in the two clauses contain mutually exclusive logic, which ensures that only one of them will be true at any one time—either ten processes have been created in the last second or they haven’t!
The predicate in the first profile:::tick-1s clause specifies that its actions should only be executed if fewer than ten processes have been created (the 'mpid variable is within ten of its value one second ago as stored in the cnt variable). If fewer than ten processes have been created in the last second, the cnt variable is updated with the current value of mpid.
The actions in the second clause are executed when more than ten processes have been created. If cnt has already been updated in the first clause, then the predicate will be false and the actions are not executed (a message is then printed with the growth rate, and the cnt variable is updated). For example:
sol10# ./scope.d
High process creation rate: 30/sec
High process creation rate: 31/sec
High process creation rate: 35/sec
High process creation rate: 35/sec
High process creation rate: 44/sec
High process creation rate: 44/sec
High process creation rate: 20/sec
DTrace defines numerous actions, only a small percentage of which are used in this book. Actions that you may see used include normalize(), stack(), and ustack().
normalize(). This action effectively divides the values in the aggregation by a supplied normalization factor. A simple example is the use of atick-5sprobe to display data that you want displayed as a per-second rate:syscall::read:entry { @reads[probefunc] = count(); } tick-5s { printa("%s (non normalized) %50@d ", @reads); normalize(@reads, 5); printa("%s ( normalized ) %50@d ", @reads); trunc(@reads); }The above example uses a single aggregation,
@reads, to store the number of read system calls made. Every 5 seconds the contents of the aggregation are displayed byprinta()and then divided by 5 to give a per-second value with thenormalize()action. The normalized aggregation is then printed and its contents are deleted with thetrunc()action. For example,sol10# ./norm.d read (non normalized) 5012 read ( normalized ) 1002stack(). This action produces the stack trace of the kernel thread at the time of execution. It commonly indexes aggregations to determine the most common callstacks when at a given probe. It can also be an invaluable tool for learning how the code flow in the kernel works because it gives a ready view of the call sequence up to a given point. The following script and output show the most frequently executed call sequence through theufsfile system over a given trace period.fbt:ufs::entry { @ufs[stack()] = count(); } END { trunc(@ufs, 1); } sol10# ./stack.d dtrace: script './stack.d' matched 419 probes ^C CPU ID FUNCTION:NAME 0 2 :END genunix`fop_lookup+0x18 genunix`lookuppnvp+0x371 genunix`lookuppnat+0x11a genunix`lookupnameat+0x8b genunix`cstatat_getvp+0x16d genunix`cstatat64_32+0x48 genunix`lstat64_32+0x25 unix`sys_syscall32+0x101 18650ustack(). This action is the equivalent of the stack function for userland applications. The following script and output display the stack trace of the userland application that is generating most of the work in theufscode.#!/usr/sbin/dtrace -s fbt:ufs::entry { @ufs[ustack()] = count(); } END { trunc(@ufs, 1); } sol10# ./ustack.d dtrace: script './stack.d' matched 419 probes ^C CPU ID FUNCTION:NAME 0 2 :END libc.so.1`lstat64+0x7 libc.so.1`walk+0x44b libc.so.1`walk+0x44b libc.so.1`walk+0x44b libc.so.1`walk+0x44b libc.so.1`walk+0x44b libc.so.1`nftw64+0x185 find`main+0x2b6 find`0x80513d2 231489
The find(1) application is at the top of the list here. The walk() routine is listed multiple times because it is recursively called to walk a file tree.
This section presents two sample applications that demonstrate the interaction of the Mustang Java HotSpot Virtual Machine and the Solaris 10 DTrace Framework. The first example, Java2Demo, is bundled with the Mustang release and will already be familiar to most developers. Because the hotspot provider is built into the Mustang VM itself, running the application is all that is required to trigger probe activity. The second example is a custom debugging scenario that uses DTrace to find a troublesome line of native code in a Java Native Interface (JNI) application.
The following script, written in the D programming language, defines the set of probes that DTrace will listen to while the Java2Demo application is running. In this case, the only probes of interest are those related to garbage collection.
#!/usr/sbin/dtrace -Zs

#pragma D option quiet

self int cnt;

dtrace:::BEGIN
{
        self->cnt == 0;
        printf("Ready..
");
}

hotspot$1:::gc-begin
/self->cnt == 0/
{
        self->tid = tid;
        self->cnt++;
}

hotspot$1:::*
/self->cnt != 0 /
{
        printf("  tid: %d, Probe: %s
", tid, probename);
}

hotspot$1:::gc-end
{
        printf("  tid: %d, D-script exited
", tid);
        exit(0);
}
Start the sample application:
java -jar Java2Demo.jar.Note the application’s PID (11201 for this example).
Start the D script, passing in the PID as its only argument:
hotspot_gc.d 11201.
The following output shows that DTrace prints the thread ID and probe name as each probe fires in response to garbage collection activity in the VM:
Ready..
 tid: 4, Probe: gc-begin
 tid: 4, Probe: mem-pool-gc-begin
 tid: 4, Probe: mem-pool-gc-begin
 tid: 4, Probe: mem-pool-gc-begin
 tid: 4, Probe: mem-pool-gc-begin
 tid: 4, Probe: mem-pool-gc-begin
 tid: 4, Probe: mem-pool-gc-end
 tid: 4, Probe: mem-pool-gc-end
 tid: 4, Probe: mem-pool-gc-end
 tid: 4, Probe: mem-pool-gc-end
 tid: 4, Probe: mem-pool-gc-end
 tid: 4, Probe: mem-pool-gc-begin
 tid: 4, Probe: mem-pool-gc-begin
 tid: 4, Probe: mem-pool-gc-begin
 tid: 4, Probe: mem-pool-gc-begin
 tid: 4, Probe: mem-pool-gc-begin
 tid: 4, Probe: mem-pool-gc-end
 tid: 4, Probe: mem-pool-gc-end
 tid: 4, Probe: mem-pool-gc-end
 tid: 4, Probe: mem-pool-gc-end
 tid: 4, Probe: mem-pool-gc-end
 tid: 4, Probe: gc-end
 tid: 4, D-script exited
The next script shows the thread ID (tid) and probe name in all probes; class name, method name and signature in the “method-compile-begin” probe; and method name and signature in the compiled-method-load probe:
#!/usr/sbin/dtrace -Zs

#pragma D option quiet

self int cnt;

dtrace:::BEGIN
{
        self->cnt == 0;
        printf("Ready..
");
}
hotspot$1:::method-compile-begin
/self->cnt == 0/
{
        self->tid = tid;
        self->cnt++;
        printf(" tid: %d, %21s, %s.%s %s
", tid, probename,
        copyinstr(arg2), copyinstr(arg4), copyinstr(arg6));
}

hotspot$1:::method-compile-end
/self->cnt > 0/
{
        printf(" tid: %d, %21s
", tid, probename);
}

hotspot$1:::compiled-method-load
/self->cnt > 0/
{
        printf(" tid: %d, %21s, %s %s
", tid, probename,
           copyinstr(arg2), copyinstr(arg4));
}

hotspot$1:::vm-shutdown
{
        printf(" tid: %d, %21s
", tid, probename);
        printf(" tid: %d, D-script exited
", tid);
        exit(0);
}

hotspot$1:::*
/self->cnt > 0/
{
        printf(" tid: %d, %21s, %s %s
", tid, probename,
           copyinstr(arg2), copyinstr(arg4));
}
Its output shows:
Ready..
tid: 9,  method-compile-begin, sun/java2d/SunGraphics2D.setFont (Ljava/awt/Font;)V
tid: 9,  compiled-method-load, setFont (Ljava/awt/Font;)V
tid: 9,    method-compile-end
tid: 9,  method-compile-begin, sun/java2d/SunGraphics2D validateCompClip
tid: 9,  compiled-method-load, validateCompClip ()V
tid: 9,    method-compile-end
tid: 8,  method-compile-begin, javax/swing/RepaintManager addDirtyRegion0
tid: 8,  compiled-method-load, addDirtyRegion0 (Ljava/awt/Container;IIII)V
tid: 8,    method-compile-end
tid: 9,  method-compile-begin, java/io/BufferedInputStream read
tid: 9,  compiled-method-load, read ()I
tid: 9,    method-compile-end
tid: 8,  method-compile-begin, java/awt/geom/AffineTransform translate
tid: 8,  compiled-method-load, translate (DD)V
tid: 8,    method-compile-end
tid: 9,  method-compile-begin, sun/awt/X11/Native getInt
tid: 9,  compiled-method-load, getInt (J)I
tid: 9,    method-compile-end
tid: 8,  method-compile-begin, sun/java2d/SunGraphics2D setColor
tid: 8,  compiled-method-load, setColor (Ljava/awt/Color;)V
tid: 8,    method-compile-end
tid: 9,  method-compile-begin, sun/reflect/GeneratedMethodAccessor1 invoke
tid: 9,  compiled-method-load, invoke (Ljava/lang/Object;[Ljava/lang/Object;)Ljava/
lang/
Object;
tid: 9,    method-compile-end
tid: 9,  method-compile-begin, sun/java2d/SunGraphics2D constrain
tid: 9,  compiled-method-load, constrain (IIII)V
tid: 9,    method-compile-end
tid: 8,  method-compile-begin, java/awt/Rectangle setLocation
tid: 8,  compiled-method-load, setLocation (II)V
tid: 8,    method-compile-end
tid: 9,  method-compile-begin, java/awt/Rectangle move
tid: 9,  compiled-method-load, move (II)V
tid: 9,    method-compile-end
tid: 8,  method-compile-begin, java/lang/Number <init>
tid: 8,  compiled-method-load, <init> ()V
tid: 8,    method-compile-end
tid: 8,  method-compile-begin, sun/awt/X11/XToolkit getAWTLock
tid: 8,  compiled-method-load, getAWTLock ()Ljava/lang/Object;
tid: 8,    method-compile-end
tid: 17,           vm-shutdown
tid: 17, D-script exited
The next example demonstrates a debugging session with the hotspot_jni provider. Consider, if you will, an application that is suspected to be calling JavaTM Native Interface (JNI) functions from within a critical region. A JNI critical region is the space between calls to JNI methods GetPrimitiveArrayCritical and ReleasePrimitiveArrayCritical. There are some important rules for what is allowed within that space. Chapter 4 of the JNI 5.0 Specification makes it clear that within this region, “Native code should not run for an extended period of time before it calls ReleasePrimitiveArrayCritical.” In addition, “Native code must not call other JNI functions, or any system call that may cause the current thread to block and wait for another Java thread.”
The following D script will inspect a JNI application for this kind of violation:
#!/usr/sbin/dtrace -Zs

#pragma D option quiet

self int in_critical_section;

dtrace:::BEGIN
{
        printf("ready..
");
}

hotspot_jni$1:::ReleasePrimitiveArrayCritical_entry
{
        self->in_critical_section = 0;
}
hotspot_jni$1:::GetPrimitiveArrayCritical_entry

{
        self->in_critical_section = 0;
}

hotspot_jni$1:::*
/self->in_critical_section == 1/
{
        printf("JNI call %s made from JNI critical region
", probename);
}

hotspot_jni$1:::GetPrimitiveArrayCritical_return
{
        self->in_critical_section = 1;
}

syscall:::entry
/pid == $1 && self->in_critical_section == 1/
{
        printf("system call %s made in JNI critical region
", probefunc);
}
Output:
system call brk made in JNI critical section
system call brk made in JNI critical section
system call ioctl made in JNI critical section
system call fstat64 made in JNI critical section
JNI call FindClass_entry made from JNI critical region
JNI call FindClass_return made from JNI critical region
From this DTrace output, we can see that the probes FindClass_entry and FindClass_return have fired due to a JNI function call within a critical region. The output also shows some system calls related to calling printf() in the JNI critical region. The native code for this application shows the guilty function:
#include "t.h"
/*
 * Class:     t
 * Method:    func
 * Signature: ([I)V
 */
JNIEXPORT void JNICALL Java_t_func
  (JNIEnv *env, jclass clazz, jintArray array) {
   int* value = (int*)env->GetPrimitiveArrayCritical(array, NULL);
   printf("hello world");
   env->FindClass("java/lang/Object");
   env->ReleasePrimitiveArrayCritical(array, value, JNI_ABORT);
}
Mustang is the first release to contain built-in DTrace probes, but support for the DTrace jstack() action was actually first introduced in the JavaTM 2 Platform Standard Edition 5.0 Update Release 1. The DTrace jstack() action prints mixed-mode stack traces including both Java method and native function names. As an example of its use, consider the following application, which periodically sleeps to mimic hanging behavior:
public class dtest{
    int method3(int stop){
        try{Thread.sleep(500);}
        catch(Exception ex){}
        return stop++;
    }
    int method2(int stop){
        int result = method3(stop);
        return result + 1;
    }
    int method1(int arg){
        int stop=0;
        for(int i=1; i>0; i++){
            if(i>arg){stop=i=1;}
            stop=method2(stop);
        }
        return stop;
    }
    public static void main(String[] args) {
        new dtest().method1(10000);
    }
}
To find the cause of the hang, the user would want to know the chain of native and Java method calls in the currently executing thread. The expected chain would be something like:
<chain of initial VM functions> ->
dtest.main -> dtest.method1 -> dtest.method2 -> dtest.method3 ->
java/lang/Thread.sleep -> <chain of VM sleep functions> ->
<Kernel pool functions>
The following D script (usestack.d) uses the DTrace jstack() action to print the stack trace:
#!/usr/sbin/dtrace -s

BEGIN { this->cnt = 0; }
syscall::pollsys:entry
/pid == $1 && tid == 1/
{
   this->cnt++;
   printf("
	TID: %d", tid);
   jstack(50);
}

syscall:::entry
/this->cnt == 1/
{
   exit(0);
}
And the stack trace itself appears as follows:
$ usejstack.d 1344 | c++filt
CPU     ID                    FUNCTION:NAME
 0    316                    pollsys:entry
   TID: 1
   libc.so.1'__pollsys+0xa
   libc.so.1'poll+0x52
   libjvm.so'int os_sleep(long long,int)+0xb4
   libjvm.so'int os::sleep(Thread*,long long,int)+0x1ce
   libjvm.so'JVM_Sleep+0x1bc
   java/lang/Thread.sleep
   dtest.method3
   dtest.method2
   dtest.method1
   dtest.main
   StubRoutines (1)
   libjvm.so'void JavaCalls::call_helper(JavaValue*,methodHandle*,JavaCallArgu-
ments*,Thread*)+0x1b5
   libjvm.so'void os::os_exception_wrapper(void(*)(JavaValue*,methodHandle*,JavaCallAr-
guments*,Thread*),JavaValue*,methodHandle*,Ja
vaCallArguments*,Thread*)+0x18
   libjvm.so'void JavaCalls::call(JavaValue*,methodHandle,JavaCallArgu-
ments*,Thread*)+0x2d
   libjvm.so'void jni_invoke_static(JNIEnv_*,JavaValue*,_jobject*,JNICallType,_
jmethodID*,JNI_ArgumentPush er*,Thread*)+0x214
   libjvm.so'jni_CallStaticVoidMethod+0x244
   java'main+0x642
   StubRoutines (1)
The command line shows that the output from this script was piped to the c++filt utility, which demangles C++ mangled names making the output easier to read. The DTrace header output shows that the CPU number is 0, the probe number is 316, the thread ID (TID) is 1, and the probe name is pollsys:entry, where pollsys is the name of the system call. The stack trace frames appear from top to bottom in the following order: two system call frames, three VM frames, five Java method frames, and the remaining frames are VMframes.
It is also worth noting that the DTrace jstack action will run on older releases, such as the Java 2 Platform, Standard Edition version 1.4.2, but hexadecimal addresses will appear instead of Java method names. Such addresses are of little use to application developers.
In addition to the jstack() action, it is also possible for pre-Mustang users to add DTrace probes to their release with the help of VM Agents. A VM agent is a shared library that is dynamically loaded into the VM at startup.
VM agents are available for the following releases:
For The Java 2 Platform, Standard Edition, version 1.4.2, there is a
dvmpi agent that uses the Java Virtual Machine Profiler Interface (JVMPI).For The Java 2 Platform Standard Edition 5.0, there is a
dvmtiagent that uses the JVM Tool Interface (JVM TI).
To obtain the agents, visit the DVM java.net project website at
https://solaris10-dtrace-vm-agents.dev.java.net/
and follow the “Documents and Files” link. The file dvm.zip contains both binary and source code versions of the agent libraries.
The following diagram shows an abbreviated view of the resulting directory structure once dvm.zip has been extracted:
          build   make   src    test
            |
       ---------------------
         |      |     |      |
        amd64  i386  sparc  sparcv9
         |      |     |      |
        lib    lib   lib    lib
Each lib directory contains the pre-built binaries dvmti.jar, libdvmpi.so, and libdvmti.so. If you prefer to compile the libraries yourself, the included README file contains all necessary instructions.
Once unzipped, the VM must be able to find the native libraries on the filesystem. This can be accomplished either by copying the libraries into the release with the other shared libraries, or by using a platform-specific mechanism to help a process find it, such as LD_LIBRARY_PATH. In addition, the agent library itself must be able to find all the external symbols that it needs. The ldd utility can be used to verify that a native library knows how to find all required externals.
Both agents accept options to limit the probes that are available, and default to the least possible performance impact. To enable the agents for use in your own applications, run the java command with one of the following additional options:
For additional options, consult the DVM agent README. Both agents have their limitations, but dvmpi has more, and we recommend using the Java Standard Edition 5.0 Development Kit (JDK 5.0) and the dvmti agent if possible.
When using the agent-based approach, keep in mind that:
The
dvmpiagent uses JVMPI and only works with one collector. JVMPI has historically been an unstable, experimental interface, and there is a performance penalty associated with using it. JVMPI only works with JDK 5.0 and earlier.The
dvmtiagent uses JVM TI and only works with JDK 5.0 and later. It works with all collectors, has little performance impact for most probes, and is a formal and much more stable interface.Both agents have some performance penalty for method entry/exit and object alloc/free, less so with the dvmti agent.
The
dvmtiagent uses BCI (byte code instrumentation), and therefore adds bytecodes to methods (if method entry/exit or object alloc/free probes are active).Enabling the allocation event for the JVMTI agent creates an overhead even when DTrace is not attached, and the JVMPI agent severely impacts performance and limits deployment to the serial collector.
Section C.1 provides a D script for testing DVM probes. The DVM agent provider interface, shown in Section C.2, lists all probes provided by dvmpi and dvmti.
Although DTrace instruments are found at both user and kernel level, the majority of the instrumentation and probe-processing activity take place in the Solaris kernel. This section looks at the basic architecture of DTrace, provides a high-level overview of the process of instrumentation, and examines what happens when this instrumentation is activated.
Figure 10.1 presents the architecture of the DTrace subsystem.
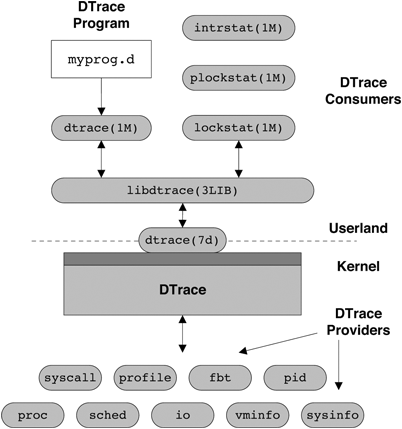
Processes, known as consumers, communicate with the DTrace kernel subsystem through the interfaces provided in the DTrace library, libdtrace(3LIB). Data is transferred between consumers and the kernel by ioctl(2) calls on the dtrace pseudo-device provided by the dtrace(7d) device driver. Several consumers are included in Solaris 10, including lockstat(1M), plockstat(1M), and intrstat(1M), but generalized access to the DTrace facility is provided by the dtrace(1M) consumer. A consumer’s basic jobs are to communicate tracing specifications to the DTrace kernel subsystem and to process data resulting from these specifications.
A key component of libdtrace is the D compiler. The role of a compiler is to transform a high-level language into the native machine language of the target processor, the high-level language in this case being D. However, DTrace implements its own virtual machine with its own machine-independent instruction set called DIF (D Intermediate Format), which is the target language for compilation. The tracing scripts we specify are transformed into the DIF language and emulated in the kernel when a probe fires, in much the same way as a Java virtual machine interprets Java bytecodes. One of the most important properties of DTrace is its ability to execute arbitrary code safely on production systems without inducing failure. The use of a runtime emulation environment ensures that errors such as dereferencing null pointers can be caught and dealt with safely.
The basic architecture and flow of the D compiler is shown in Figure 10.2.
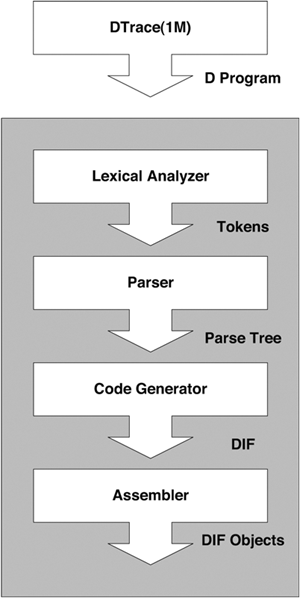
The input D script is split up into tokens by the lexical analyzer; the tokens are used by the parser to build a parse tree. The code generator then makes several passes over the nodes in the parse tree and generates the DIF code for each of the nodes. The assembler then builds DIF Objects (DIFO) for the generated DIF. A DIFO stores the return type of the D expression encoded by this piece of DIF along with its string and variable tables. All the individual pieces of DIFO that constitute a D program are put together into a file. The format of this file is known as the DTrace Object Format (DOF). This DOF is then injected into the kernel and the system is instrumented.
Take as an example the following D clause:
syscall::write:entry
/execname == "foo" && uid == 1001/
{
        self->me = 1;
}
This clause contains two DIF objects, one for the predicate and one for the single action. We can use the -S option to dtrace to look at the DIF instructions generated when the clauses are compiled. Three DIF instructions are generated for the single action shown above.
OFF OPCODE      INSTRUCTION
00: 25000001    setx DT_INTEGER[0], %r1         ! 0x1
01: 2d050001    stts %r1, DT_VAR(1280)          ! DT_VAR(1280) = "me"
02: 23000001    ret  %r1
The DIF virtual machine is a simple RISC-like environment with a limited set of registers and a small instruction set. The first instruction loads register r1 with the first value in a DIFO-specific array of integer constants. The second instruction stores the value that is now in register r1 into the thread-specific variable me, which is referenced through the DIFO-specific variable table. The third instruction returns the value stored in register r1.
The encodings for DIF instructions are called opcodes; it is these that are stored in the DIFO. Each instruction is a fixed 4 bytes, so this DIFO contains 12 bytes of encoded DIF.
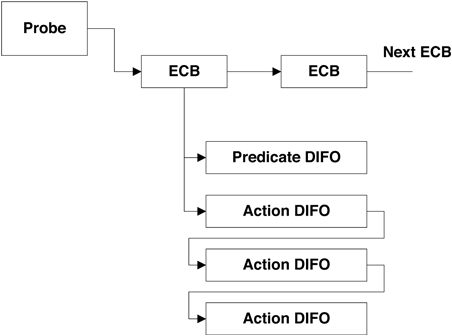
The DOF generated by the compilation process is sent to the DTrace kernel subsystem, and the system is instrumented accordingly. When a probe is enabled, an enabling control block (ECB) is created and associated with the probe (see Figure 10.3). An ECB holds some consumer-specific state and also the DIFOs for this probe enabling. If it is the first enabling for this probe, then the framework calls the appropriate provider, instructing it to enable this probe. Each ECB contains the DIFO for the predicates and actions associated with this enabling of the probe. All the enablings for a probe, whether by one or multiple consumers, are represented by ECBs that are chained together and processed in order when the probe is fired. The order is dictated by the sequence in which they appear in a D script and by the time at which that the instrumentation occurs (for example, new ECBs are put at the end of existing ECBs).
The majority of the DTrace subsystem is implemented as a series of kernel modules with the core framework being implemented in dtrace(7d). The framework itself performs no actual instrumentation; that is the responsibility of loadable kernel modules called providers. The providers have intimate knowledge of specific subsystems: how they are instrumented and exactly what can be instrumented (these individual sites being identified by a probe). When a consumer instructs a provider to enable a probe, the provider modifies the system appropriately. The modifications are specific to the provider, but all instrumentation methods achieve the same goal of transferring control into the DTrace framework to carry out the tracing directives for the given probe. This is achieved by execution of the dtrace_probe() function.
As an example of instrumentation, let’s look at how the entry point to the ufs_write() kernel function is instrumented by the fbt provider on the SPARC platform. A function begins with a well-known sequence of instructions, which the fbt provider looks for and modifies.
sol10 # mdb -k
Loading modules: [ unix krtld genunix dtrace specfs ufs ip sctp usba uhci fctl s1394 nca
lofs audiosup nfs random sppp crypto ptm ipc ]
> ufs_write::dis -n 1
ufs_write:                      save      %sp, -0x110, %sp
ufs_write+4:                    stx       %i4, [%sp + 0x8af]
The save instruction on the SPARC machine allocates stack space for the function to use, and most functions begin with this. If we enable fbt::ufs_write:entry in another window, ufs_write() now looks like this:
> ufs_write::dis -n 1
ufs_write:                      ba,a      +0x2bb388     <dt=0x3d96>
ufs_write+4:                    stx       %i4, [%sp + 0x8af]
The save instruction has been replaced with a branch to a different location. In this case, the location is the address of the first instruction in ufs_write + 0x2bb388. So, looking at the contents of that location, we see the following:
> ufs_write+0x2bb388::dis
0x14b36ec:                      save       %sp, -0x110, %sp
0x14b36f0:                      sethi      %hi(0x3c00), %o0
0x14b36f4:                      or         %o0, 0x196, %o0
0x14b36f8:                      mov        %i0, %o1
0x14b36fc:                      mov        %i1, %o2
0x14b3700:                      mov        %i2, %o3
0x14b3704:                      mov        %i3, %o4
0x14b3708:                      mov        %i4, %o5
0x14b370c:                      sethi      %hi(0x11f8000), %g1
0x14b3710:                      call       -0xe7720      <dtrace_probe>
0x14b3714:                      or         %g1, 0x360, %o7
The save instruction that was replaced is executed first. The next seven instructions set up the input arguments for the call to dtrace_probe(), which transfers control to the DTrace framework. The first argument loaded into register o0 is the probe ID for ufs_write, which is used to find the ECBs to be executed for this probe. The next five mov instructions copy the five input arguments for ufs_write so that they appear as arguments to dtrace_probe(). They can then be used when probe processing occurs.
This example illustrates how a kernel function’s entry point is instrumented. Instrumenting, for example, a system call entry point requires a very different instrumentation method. Placing the domain-specific knowledge in provider modules makes DTrace easily extensible in terms of instrumenting different software subsystems and different hardware architectures.
When a probe is fired, the instrumentation inserted by the provider transfers control into the DTrace framework and we are now in what is termed “probe context.” Interrupts are disabled for the executing CPU. The ECBs that are registered for the firing probe are iterated over, and each DIF instruction in each DIFO is interpreted. Data generated from the ECB processing is buffered in a set of per-consumer, per-CPU buffers that are read periodically by the consumer.
When a tracing session is terminated, all instrumentation carried out by providers is removed and the system returns to its original state.
DTrace is a revolutionary framework for instrumenting and observing the behaviour of systems, and the applications they run. The limits to what can be learned with DTrace are bound only by the users knowledge of the system and application, but it is not necessary to be an operating systems expert or software developer to make effective use of DTrace. The usability of DTrace allows for users at any level to make effective use of the tool, gaining insight into performance and general application behaviour.
The io probes are listed in Table 10.2, and the arguments are described in Sections 10.6.1.1 through 10.6.1.3.
Table 10.2. io Probes
Probe | Description |
|---|---|
| Probe that fires when an I/O request is about to be made either to a peripheral device or to an NFS server. The |
| Probe that fires after an I/O request has been fulfilled. The |
| Probe that fires immediately before a thread begins to wait pending completion of a given I/O request. The |
| Probe that fires when a thread is done waiting for the completion of a given I/O request. The |
The bufinfo_t structure is the abstraction that describes an I/O request. The buffer corresponding to an I/O request is pointed to by args[0] in the start, done, wait-start, and wait-done probes. The bufinfo_t structure definition is as follows:
typedef struct bufinfo {
              int b_flags;                    /* flags */
              size_t b_bcount;                /* number of bytes */
              caddr_t b_addr;                 /* buffer address */
              uint64_t b_blkno;               /* expanded block # on device */
              uint64_t b_lblkno;              /* block # on device */
              size_t b_resid;                 /* # of bytes not transferred */
              size_t b_bufsize;               /* size of allocated buffer */
              caddr_t b_iodone;               /* I/O completion routine */
              dev_t b_edev;                   /* extended device */
} bufinfo_t;
                                                               See /usr/lib/dtrace/io.d
The b_flags member indicates the state of the I/O buffer, and consists of a bitwise-or of different state values. The valid state values are in Table 10.3.
Table 10.3. b_flags Values
Flag | Description |
|---|---|
| Indicates that the data transfer has completed. |
| Indicates an I/O transfer error. It is set in conjunction with the |
| Indicates that the buffer is being used in a paged I/O request. See the description of the |
| Indicates that the buffer is being used for physical (direct) I/O to a user data area. |
| Indicates that data is to be read from the peripheral device into main memory. |
| Indicates that the data is to be transferred from main memory to the peripheral device. |
| The I/O request is asynchronous, and will not be waited upon. The |
The structure members are as follows:
b_bcountis the number of bytes to be transferred as part of the I/O request.b_addris the virtual address of the I/O request, unlessB_PAGEIOis set. The address is a kernel virtual address unlessB_PHYSis set, in which case it is a user virtual address. IfB_PAGEIOis set, the b_addr field contains kernel private data. Exactly one ofB_PHYSandB_PAGEIOcan be set, or neither flag will be set.b_lblknoidentifies which logical block on the device is to be accessed. The mapping from a logical block to a physical block (such as the cylinder, track, and so on) is defined by the device.b_residis set to the number of bytes not transferred because of an error.b_bufsizecontains the size of the allocated buffer.b_iodoneidentifies a specific routine in the kernel that is called when the I/O is complete.b_errormay hold an error code returned from the driver in the event of an I/O error.b_erroris set in conjunction with theB_ERRORbit set in theb_flagsmember.b_edevcontains the major and minor device numbers of the device accessed. Consumers may use the D subroutinesgetmajor()andgetminor()to extract the major and minor device numbers from theb_edevfield.
The devinfo_t structure provides information about a device. The devinfo_t structure corresponding to the destination device of an I/O is pointed to by args[1] in the start, done, wait-start, and wait-done probes. The members of devinfo_t are as follows:
typedef struct devinfo {
              int dev_major;                  /* major number */
              int dev_minor;                  /* minor number */
              int dev_instance;               /* instance number */
              string dev_name;                /* name of device */
              string dev_statname;            /* name of device + instance/minor */
              string dev_pathname;            /* pathname of device */
} devinfo_t;
                                                               See /usr/lib/dtrace/io.d
dev_major. The major number of the device. Seegetmajor(9F)for more information.dev_minor. The minor number of the device. Seegetminor(9F)for more information.dev_instance. The instance number of the device. The instance of a device is different from the minor number. The minor number is an abstraction managed by the device driver. The instance number is a property of the device node. You can display device node instance numbers withprtconf(1M).dev_name. The name of the device driver that manages the device. You can display device driver names with the -D option toprtconf(1M).dev_statname. The name of the device as reported byiostat(1M). This name also corresponds to the name of a kernel statistic as reported bykstat(1M). This field is provided so that aberrant iostat or kstat output can be quickly correlated to actual I/O activity.dev_pathname. The full path of the device. This path may be specified as an argument toprtconf(1M)to obtain detailed device information. The path specified bydev_pathnameincludes components expressing the device node, the instance number, and the minor node. However, all three of these elements aren’t necessarily expressed in the statistics name. For some devices, the statistics name consists of the device name and the instance number. For other devices, the name consists of the device name and the number of the minor node. As a result, two devices that have the samedev_statnamemay differ indev_pathname.
The fileinfo_t structure provides information about a file. The file to which an I/O corresponds is pointed to by args[2] in the start, done, wait-start, and wait-done probes. The presence of file information is contingent upon the filesystem providing this information when dispatching I/O requests. Some filesystems, especially third-party filesystems, might not provide this information. Also, I/O requests might emanate from a filesystem for which no file information exists. For example, any I/O to filesystem metadata will not be associated with any one file. Finally, some highly optimized filesystems might aggregate I/O from disjoint files into a single I/O request. In this case, the filesystem might provide the file information either for the file that represents the majority of the I/O or for the file that represents some of the I/O. Alternately, the filesystem might provide no file information at all in this case.
The definition of the fileinfo_t structure is as follows:
typedef struct fileinfo {
              string fi_name;                 /* name (basename of fi_pathname) */
              string fi_dirname;              /* directory (dirname of fi_pathname) */
              string fi_pathname;             /* full pathname */
              offset_t fi_offset;             /* offset within file */
              string fi_fs;                   /* filesystem */
              string fi_mount;                /* mount point of file system */
} fileinfo_t;
                                                               See /usr/lib/dtrace/io.d
fi_name. Contains the name of the file but does not include any directory components. If no file information is associated with an I/O, the fi_name field will be set to the string <none>. In some rare cases, the pathname associated with a file might be unknown. In this case, the fi_name field will be set to the string <unknown>.fi_dirname. Contains only the directory component of the file name. As withfi_name, this string may be set to<none>if no file information is present, or<unknown>if the pathname associated with the file is not known.fi_pathname. Contains the full pathname to the file. As withfi_name, this string may be set to<none>if no file information is present, or<unknown>if the pathname associated with the file is not known.fi_offset. Contains the offset within the file, or -1 if either file information is not present or if the offset is otherwise unspecified by the filesystem.
The vminfo provider probes correspond to the fields in the “vm” named kstat: A probe provided by vminfo fires immediately before the corresponding vm value is incremented. Table 10.4 lists the probes available from the VM provider. A probe takes the following arguments:
arg0. The value by which the statistic is to be incremented. For most probes, this argument is always 1, but for some it may take other values; these probes are noted in Table 10.4.arg1. A pointer to the current value of the statistic to be incremented. This value is a 64–bit quantity that is incremented by the value inarg0. Dereferencing this pointer allows consumers to determine the current count of the statistic corresponding to the probe.
For example, if you should see the following paging activity with vmstat, indicating page-in from the swap device, you could drill down to investigate.
# vmstat -p 3
     memory           page          executable      anonymous      filesystem
   swap  free  re  mf  fr  de  sr  epi  epo  epf  api  apo  apf  fpi  fpo  fpf
 1512488 837792 160 20 12   0   0    0    0    0 8102    0    0   12   12   12
 1715812 985116 7  82   0   0   0    0    0    0 7501    0    0   45    0    0
 1715784 983984 0   2   0   0   0    0    0    0 1231    0    0   53    0    0
 1715780 987644 0   0   0   0   0    0    0    0 2451    0    0   33    0    0

$ dtrace -n anonpgin'{@[execname] = count()}'
dtrace: description 'anonpgin' matched 1 probe
  svc.startd                                                       1
  sshd                                                             2
  ssh                                                              3
  dtrace                                                           6
  vmstat                                                          28
  filebench                                                      913
The VM probes are described in Table 10.4.
Table 10.4. DTrace VM Provider Probes and Descriptions
Description | |
|---|---|
| Fires whenever an unmodified anonymous page is freed as part of paging activity. Anonymous pages are those that are not associated with a file; memory containing such pages include heap memory, stack memory, or memory obtained by explicitly mapping |
| Fires whenever an anonymous page is paged in from a swap device. |
| Fires whenever a modified anonymous page is paged out to a swap device. |
| Fires whenever a fault is taken on a page and the fault is neither a protection fault nor a copy-on-write fault. |
| Fires whenever a copy-on-write fault is taken on a page. |
| Fires whenever a page is freed as a result of paging activity. Whenever |
| Fires whenever an unmodified executable page is freed as a result of paging activity. |
| Fires whenever an executable page is paged in from the backing store. |
| Fires whenever a modified executable page is paged out to the backing store. If it occurs at all, most paging of executable pages will occur in terms of |
| Fires whenever an unmodified file system data page is freed as part of paging activity. |
| Fires whenever a file system page is paged in from the backing store. |
| Fires whenever a modified file system page is paged out to the backing store. |
| Fires whenever a page fault is taken by the kernel on a page in its own address space. Whenever |
| Fires whenever a page fault is taken that results in I/O from a backing store or swap device. Whenever |
| Fires whenever a page is reclaimed off of the free page list. |
The sched probes are described in Table 10.5.
Table 10.5. sched Probes
Probe | Description |
|---|---|
| Probe that fires whenever a thread’s priority is about to be changed. The |
| Probe that fires immediately before a runnable thread is dequeued from a run queue. The |
| Probe that fires immediately before a runnable thread is enqueued to a run queue. The |
| Probe that fires when the current CPU is about to end execution of a thread. The curcpu variable indicates the current CPU. The curlwpsinfo variable indicates the thread that is ending execution. The curpsinfo variable describes the process containing the current thread. The |
Probe that fires when a CPU has just begun execution of a thread. The | |
| Probe that fires immediately before the current thread is preempted. After this probe fires, the current thread will select a thread to run and the |
| Probe that fires when a scheduling decision has been made, but the dispatcher has elected to continue to run the current thread. The |
| Probe that fires when a thread is preempted and then re-enqueued at the front of the run queue due to a preemption control request. See |
| Probe that fires when a thread that is using preemption control is nonetheless preempted and re-enqueued at the back of the run queue. See |
| Probe that fires when a thread that had preemption control enabled and its time slice artificially extended executed code to yield the CPU to other threads. |
| Probe that fires immediately before the current thread sleeps on a synchronization object. The type of the synchronization object is contained in the |
| Probe that fires when a CPU has been instructed by another CPU to make a scheduling decision—often because a higher-priority thread has become runnable. |
| Probe that fires as a part of clock tick-based accounting. In clock tick-based accounting, CPU accounting is performed by examining which threads and processes are running when a fixed-interval interrupt fires. The |
| Probe that fires immediately before the current thread wakes a thread sleeping on a synchronization object. The |
The argument types for the sched probes are listed in Table 10.5; the arguments are described in Table 10.6.
Table 10.6. sched Probe Arguments
Probe | args[0] | args[1] | args[2] | args[3] |
|---|---|---|---|---|
|
|
|
|
|
|
|
|
|
|
|
|
|
|
|
|
|
|
|
|
|
|
|
|
|
|
|
|
|
|
|
|
|
|
|
|
|
|
|
|
|
|
|
|
|
|
|
|
|
|
|
|
|
|
|
|
|
|
|
|
|
|
|
|
|
|
|
|
|
|
As Table 10.6 indicates, many sched probes have arguments consisting of a pointer to an lwpsinfo_t and a pointer to a psinfo_t, indicating a thread and the process containing the thread, respectively. These structures are described in detail in lwpsinfo_t and psinfo_t, respectively.
The cpuinfo_t structure defines a CPU. As Table 10.6 indicates, arguments to both the enqueue and dequeue probes include a pointer to a cpuinfo_t. Additionally, the cpuinfo_t corresponding to the current CPU is pointed to by the curcpu variable.
typedef struct cpuinfo {
              processorid_t cpu_id;           /* CPU identifier */
              psetid_t cpu_pset;              /* processor set identifier */
              chipid_t cpu_chip;              /* chip identifier */
              lgrp_id_t cpu_lgrp;             /* locality group identifer */
              processor_info_t cpu_info;      /* CPU information */
} cpuinfo_t;
The definition of the cpuinfo_t structure is as follows:
cpu_id. The processor identifier, as returned bypsrinfo(1M)andp_online(2).cpu_pset. The processor set that contains the CPU, if any. Seepsrset(1M)for more details on processor sets.cpu_chip. The identifier of the physical chip. Physical chips may contain several CPUs. Seepsrinfo(1M)for more information.The
cpu_lgrp. The identifier of the latency group associated with the CPU. Seeliblgrp(3LIB)for details on latency groups.The
cpu_info. Theprocessor_info_tstructure associated with the CPU, as returned byprocessor_info(2).
The lockstat provider makes available probes that can be used to discern lock contention statistics or to understand virtually any aspect of locking behavior. The lockstat(1M) command is actually a DTrace consumer that uses the lockstat provider to gather its raw data.
The lockstat provider makes available two kinds of probes: content-event probes and hold-event probes.
Contention-event probes. Correspond to contention on a synchronization primitive; they fire when a thread is forced to wait for a resource to become available. Solaris is generally optimized for the noncontention case, so prolonged contention is not expected. These probes should be used to understand those cases where contention does arise. Because contention is relatively rare, enabling contention-event probes generally doesn’t substantially affect performance.
Hold-event probes. Correspond to acquiring, releasing, or otherwise manipulating a synchronization primitive. These probes can be used to answer arbitrary questions about the way synchronization primitives are manipulated. Because Solaris acquires and releases synchronization primitives very often (on the order of millions of times per second per CPU on a busy system), enabling hold-event probes has a much higher probe effect than does enabling contention-event probes. While the probe effect induced by enabling them can be substantial, it is not pathological; they may still be enabled with confidence on production systems.
The lockstat provider makes available probes that correspond to the different synchronization primitives in Solaris; these primitives and the probes that correspond to them are discussed in the remainder of this chapter.
The four lockstat probes pertaining to adaptive locks are in Table 10.7. For each probe, arg0 contains a pointer to the kmutex_t structure that represents the adaptive lock.
Table 10.7. Adaptive Lock Probes
Probe Name | Description |
|---|---|
| Hold-event probe that fires immediately after an adaptive lock is acquired. |
| Contention-event probe that fires after a thread that has blocked on a held adaptive mutex has reawakened and has acquired the mutex. If both probes are enabled, |
| Contention-event probe that fires after a thread that has spun on a held adaptive mutex has successfully acquired the mutex. If both are enabled, |
| Hold-event probe that fires immediately after an adaptive lock is released. |
The three probes pertaining to spin locks are in Table 10.8.
Table 10.8. Spin Lock Probes
Probe Name | Description |
|---|---|
| Hold-event probe that fires immediately after a spin lock is acquired. |
| Contention-event probe that fires after a thread that has spun on a held spin lock has successfully acquired the spin lock. If both are enabled, |
| Hold-event probe that fires immediately after a spin lock is released. |
Thread lock hold events are available as spin lock hold-event probes (that is, spin-acquire and spin-release), but contention events have their own probe specific to thread locks. The thread lock hold-event probe is described in Table 10.9.
Table 10.9. Thread Lock Probes
Probe Name | Description |
|---|---|
| Contention-event probe that fires after a thread has spun on a thread lock. Like other contention-event probes, if both the contention-event probe and the hold-event probe are enabled, |
The probes pertaining to readers/writer locks are in Table 10.10. For each probe, arg0 contains a pointer to the krwlock_t structure that represents the adaptive lock.
Table 10.10. Readers/Writer Lock Probes
| Description |
|---|---|
| Hold-event probe that fires immediately after a readers/writer lock is acquired. |
| Contention-event probe that fires after a thread that has blocked on a held readers/writer lock has reawakened and has acquired the lock. |
| Hold-event probe that fires after a thread has successfully upgraded a readers/writer lock from a reader to a writer. Upgrades do not have an associated contention event because they are only possible through a nonblocking interface, |
| Hold-event probe that fires after a thread had downgraded its ownership of a readers/writer lock from writer to reader. Downgrades do not have an associated contention event because they always succeed without contention. |
| Hold-event probe that fires immediately after a readers/writer lock is released. |
This following section lists all probes published by the hotspot provider.
Three probes are available related to the VM life cycle, as shown in Table 10.11.
Table 10.11. VM Life Cycle Probes
Probe | Description |
|---|---|
| This probe fires just as the VM initialization begins. It occurs just after |
| This probe fires when the VM initialization finishes, and the VM is ready to start running application code. |
| Probe that fires as the VM is shutting down due to program termination or error |
Two probes are available for tracking thread start and stop events, as shown in Table 10.12.
Each of these probes has the arguments shown in Table 10.13.
Table 10.13. Thread Life Cycle Probe Arguments
Argument | Description |
|---|---|
| A pointer to mUTF-8 string data which contains the thread name |
| The length of the thread name (in bytes) |
| The Java thread ID. This is the value that will match other hotspot probes that contain a thread argument. |
| The native/OS thread ID. This is the ID assigned by the host operating system. |
| A boolean value that indicates if this thread is a daemon or not. A value of 0 indicates a non-daemon thread. |
Two probes are available for tracking class loading and unloading activity, as shown in Table 10.14.
Each of these probes has the arguments shown in Table 10.15.
Table 10.15. Class-Loading Probe Arguments
Argument | Description |
|---|---|
| A pointer to mUTF-8 string data which contains the name of the class begin loaded |
| The length of the class name (in bytes) |
| The class loader ID, which is a unique identifier for a class loader in the VM. This is the class loader that has loaded or is loading the class |
| A boolean value which indicates if the class is a shared class (if the class was loaded from the shared archive) |
The following probes measure the duration of a system-wide garbage collection cycle (for those garbage collectors that have a defined begin and end), and each memory pool can be tracked independently. The probes for individual pools pass the memory manager’s name, the pool name, and pool usage information at both the begin and end of pool collection.
The provider’s GC-related probes are shown in Table 10.16.
Table 10.16. Garbage Collection Probes
Probe | Description |
|---|---|
| Probe that fires when system-wide collection is about to start. Its one argument ( |
| Probe that fires when system-wide collection has completed. No arguments. |
| Probe that fires when an individual memory pool is about to be collected. Provides the arguments listed in Table 10.17. |
| Probe that fires after an individual memory pool has been collected. |
The memory pool probe arguments are as follows:
Table 10.17. Garbage Collection Probe Arguments
Argument | Description |
|---|---|
| A pointer to mUTF-8 string data that contains the name of the manager which manages this memory pool |
| The length of the manager name (in bytes) |
| A pointer to mUTF-8 string data that contains the name of the memory pool |
| The length of the memory pool name (in bytes) |
| The initial size of the memory pool (in bytes) |
| The amount of memory in use in the memory pool (in bytes) |
| The number of committed pages in the memory pool |
| The maximum size of the memory pool |
The following probes indicate which methods are being compiled and by which compiler. Then, when the method compilation has completed, it can be loaded and possibly unloaded later. Probes are available to track these events as they occur.
Probes that mark the begin and end of method compilation are shown in Table 10.18.
Table 10.18. Method Compilation Probes
Probe | Description |
|---|---|
| Probe that fires as method compilation begins. Provides the arguments listed below |
| Probe that fires when method compilation completes. In addition to the arguments listed below, |
Method compilation probe arguments are shown in Table 10.19.
Table 10.19. Method Compilation Probe Arguments
Argument | Description |
|---|---|
| A pointer to mUTF-8 string data which contains the name of the compiler which is compiling this method |
| The length of the compiler name (in bytes) |
| A pointer to mUTF-8 string data which contains the name of the class of the method being compiled |
| The length of the class name (in bytes) |
| A pointer to mUTF-8 string data which contains the name of the method being compiled |
| The length of the method name (in bytes) |
| A pointer to mUTF-8 string data which contains the signature of the method being compiled |
| The length of the signature(in bytes) |
When compiled methods are installed for execution, the probes shown in Table 10.20 are fired.
Table 10.20. Compiled Method Install Probes
Description | |
|---|---|
| Probe that fires when a compiled method is installed. In addition to the arguments listed below, |
| Probe that fires when a compiled method is unin-stalled. Provides the arguments listed in Table 10.21. |
Compiled method loading probe arguments are as follows:
Table 10.21. Compiled Method Install Probe Arguments
Argument | Description |
|---|---|
| A pointer to mUTF-8 string data which contains the name of the class of the method being installed |
| The length of the class name (in bytes) |
| A pointer to mUTF-8 string data which contains the name of the method being installed |
| The length of the method name (in bytes) |
| A pointer to mUTF-8 string data which contains the signature of the method being installed |
| The length of the signature(in bytes) |
As an application runs, threads will enter and exit monitors, wait on objects, and perform notifications. Probes are available for all wait and notification events, as well as for contended monitor entry and exit events. A contended monitor entry is the situation where a thread attempts to enter a monitor when another thread is already in the monitor. A contended monitor exit event occurs when a thread leaves a monitor and other threads are waiting to enter to the monitor. Thus, contended enter and contended exit events may not match up to each other in relation to the thread that encounters these events, though it is expected that a contended exit from one thread should match up to a contended enter on another thread (the thread waiting for the monitor).
All monitor events provide the thread ID, a monitor ID, and the type of the class of the object as arguments. It is expected that the thread and the class will help map back to the program, while the monitor ID can provide matching information between probe firings.
Since the existance of these probes in the VM causes performance degradation, they will only fire if the VM has been started with the command-line option -XX:+ExtendedDtraceProbes. By default they are present in any listing of the probes in the VM, but are dormant without the flag. It is intended that this restriction be removed in future releases of the VM, where these probes will be enabled all the time with no impact to performance.
The available probes are shown in Table 10.22.
Table 10.22. Monitor Probes
Probe | Description |
|---|---|
| Probe that fires as a thread attempts to enter a contended monitor. |
| Probe that fires when the thread successfully enters the contended monitor. |
| Probe that fires when the thread leaves a monitor and other threads are waiting to enter. |
| Probe that fires as a thread begins a wait on an object via |
| Probe that fires when the thread completes an |
| Probe that fires when a thread calls |
Monitor probe arguments are shown in Table 10.23.
Table 10.23. Monitor Probe Arguments
Argument | Description |
|---|---|
| The Java thread identifier for the thread peforming the monitor operation |
| A unique, but opaque identifier for the specific monitor that the action is performed upon |
| A pointer to mUTF-8 string data which contains the name of the class of the object being acted upon |
| The length of the class name (in bytes) |
A few probes are provided to allow fine-grained examination of the Java thread execution. These consist of probes that fire anytime a method in entered or returned from, as well as a probe that fires whenever a Jav object has been allocated.
Since the existance of these probes in the VM causes performance degradation, they will only fire if the VM has been started with the command-line option -XX:+ExtendedDtraceProbes. By default they are present in any listing of the probes in the VM, but are dormant without the flag. It is intended that this restriction be removed in future releases of the VM, where these probes will be enabled all the time with no impact to performance.
The method entry and return probes are shown in Table 10.24.
Table 10.24. Application Tracking Probes
Probe | Description |
|---|---|
| Probe which fires when a method is begin entered. Only fires if the VM was created with the |
| Probe which fires when a method returns normally or due to an exception. Only fires if the VM was created with the |
Method probe arguments are shown in Table 10.25.
Table 10.25. Application Tracking Probe Arguments
Argument | Description |
|---|---|
| The Java thread ID of the thread that is entering or leaving the method |
| A pointer to mUTF-8 string data which contains the name of the class of the method |
| The length of the class name (in bytes) |
| A pointer to mUTF-8 string data which contains the name of the method |
| The length of the method name (in bytes) |
| A pointer to mUTF-8 string data which contains the signature of the method |
| The length of the signature(in bytes) |
The available allocation probe is shown in Table 10.26.
The object allocation probe has the arguments shown in Table 10.27.
Table 10.27. Allocation Probe Arguments
Argument | Description |
|---|---|
| The Java thread ID of the thread that is allocating the object |
| A pointer to mUTF-8 string data which contains the name of the class of the object being allocated |
| The length of the class name (in bytes) |
| The size of the object being allocated |
The JNI provides a number of methods for invoking code written in the Java Programming Language, and for examining the state of the VM. DTrace probes are provided at the entry point and return point for each of these methods. The probes are provided by the hotspot_jni provider. The name of the probe is the name of the JNI method, appended with “_entry” for enter probes, and “_return” for return probes. The arguments available at each entry probe are the arguments that were provided to the function (with the exception of the Invoke* methods, which omit the arguments that are passed to Java method). The return probes have the return value of the method as an argument (if available).
Table 10.28. MDB Reference for DTrace
| Description |
|---|---|
| Disassemble a DIF instruction |
| Print a DIF object |
| Print a DOF actdesc |
| Print a DOF ecbdesc |
| Print a DOF header |
| Print a DOF probedesc |
| Print a DOF relodesc |
| Print a DOF relocation header |
| Print a DOF section header |
| Dump DOF |
| Print dtrace(1M)-like output |
| Print DTrace aggregation hash statistics |
| Print DTrace dynamic variable hash statistics |
| Print DTrace error hash |
| Print DTrace helper trace |
| Print active DTrace consumers |
| Translate a dtrace_id_t to a dtrace_probe_t |
| Walk DOF section header table given header address |
| Walk DTrace aggregation keys |
| Walk DTrace dynamic variables |
| Walk hash of DTrace error messasges |
| Walk DTrace helper trace entries |
| Walk DTrace per-consumer softstate |