[A.7.1] No amount of contingency planning can prepare you for every possible problem. At some point, though, you need to cross that thin line between discussion and action to officially begin your implementation.
At this stage, you’ve outlined all of the actors and use cases, you understand your user and management expectations, and you have made some fundamental decisions about how to set up ClearQuest. Now it is time to start defining your database.
There are several options available with regard to the type of database to use with ClearQuest. Looking at your deployment design, which we addressed in previous chapters, helps in the decision. Of course, if you are using a Windows platform, you will have different options than if you are using a UNIX platform. You may also have your hands tied with using a specific database, depending on business or licensing agreements. Some organizations have corporate agreements with database vendors, so make yourself familiar with all of your system and software restrictions before committing yourself to any development efforts.
This is yet another example of why it is important to understand your entire system design before moving forward. A decision to change your database may also change your system design.
ClearQuest supports the following types of databases:
Microsoft Access
SQL Server
SQL Anywhere
Oracle
DB2
We address specifics associated with each of these later in this chapter.
Table 7-1 describes the various schemas that are built into ClearQuest.
[S.7.1] One approach to deciding which schema will work best for you involves starting with the Blank schema and adding the things you want as you become more accustomed to the tool and as your users understand how the tool fits into the way they work. This is an acceptable way to go, but you could end up wasting a lot of time—don’t forget that you’ll also be responsible for implementing the solution, debugging, and so forth. Another choice might be to select the Enterprise schema, which has everything but the kitchen sink (and don’t be surprised if the next version of ClearQuest includes that, as well). Again, going with this option could be a waste of time. However, with the Enterprise schema you could be wasting not just your time but also the time of your engineers, managers, and others who would need to provide input, test the solution, and ultimately might not have their needs met by this implementation.
Table 7-1. ClearQuest Schemas
Schema | Description | Best Used For |
|---|---|---|
Blank | Contains only record types | Best used for custom projects that you set up from the start |
Used to create a schema from scratch | ||
Common | Contains fields and record types common to all predefined schemas | A generalized solution when multiple teams will be using ClearQuest and you will expand over time |
Included in each ClearQuest schema (which consists of this schema and one or more packages) | ||
DefectTracking | Contains the fields necessary to start using ClearQuest to track defects in a software development environment | Field and test teams |
AnalystStudio | For use with Rational AnalystStudio | Architects, designers, and prototype implementations |
Contains fields and rules that work with Rational Rose and RequisitePro | ||
DevelopmentStudio | For use with Rational DevelopmentStudio | Developers, QA, and CM teams |
Contains fields and rules that work with Rational PurifyPlus | ||
TestStudio | For use with Rational TestStudio | A more specialized solution for test teams using these other IBM Rational products |
Contains fields and rules that work with Rational TeamTest, RequisitePro, Purify, Quantify, and PureCoverage | ||
Enterprise | For use with Rational EnterpriseStudio | End-to-end development using Rational tools such as ClearCase, PurifyPlus, Rose, and RequisitePro |
Contains fields and hooks that work with most Rational Suite products | ||
Enabled for UCM | ||
UnifiedChange Management | Provides support for integration with UCM and sets up ClearQuest to use the predefined ClearCase policies | Integration with ClearCase UCM |
Your goal should be simplicity: Pick the schema that offers the minimum features you need, and then add to your solution over time. By taking this approach, you’ll find that you can implement much faster and get your customers working quickly and with more productivity.
[T.7.1] If you are using ClearQuest for the first time, you will need to create a database schema and databases. You do this with the ClearQuest Designer tool, which you find in the Start menu: Rational Software → ClearQuest → ClearQuest Designer. You will first need to log in, using the window shown in Figure 7-1.

By default, the user is “admin” and there is no password.
Once you have logged in, ClearQuest will automatically present you with a schema to open. You can select an existing schema, or you can simply close this window.
[A.7.2, A.7.3] There are two major approaches to working with users in your ClearQuest design: Let everyone have access to everything, or restrict users or groups of users to specific actions and data within the database. This is where the size of your organization, your security requirements, and the level of control you need play an important role in your efforts regarding user and role assignment.
In the first case, the solution is very easy: You don’t worry about any users or groups and just tell everyone the admin password. Then they can log on to ClearQuest as the admin user and basically do whatever they want. This is typically not very reasonable, though, so you probably won’t choose this option.
[S.7.2, S.7.3] A variation of this approach creates a few user accounts that allow for specific types of access to the application. This option requires some planning. First, you have to look at all of the actors of your system; you could easily create a user for each human actor you have. Then you give the password to everyone who fits the role from the use case analysis, as we described in Chapter 5.
The downside of this approach, as you will quickly learn, is that you have no real audit trail on who did what. Additionally, the passwords for the different users are shared, and people will quickly find the user who has the most privileges and use that user ID all of the time. The upside of using this model is that you have to add only a small number of users, and you typically have to do it only once, so no real user management is required.
[S.7.4, S.7.5] Worth mentioning is that version 2003.06.15 of ClearQuest (and anything newer) offers support for the Lightweight Directory Access Protocol (LDAP). For many enterprise customers, this is a great option for user management.
You can easily add a user with the User Administration tool, which you can access from the Windows Start menu or the ClearQuest menu option Tools → User Administration. The window shown in Figure 7-2 appears when you open this tool.

To add a user, select User Action → Add User, as shown in Figure 7-3.

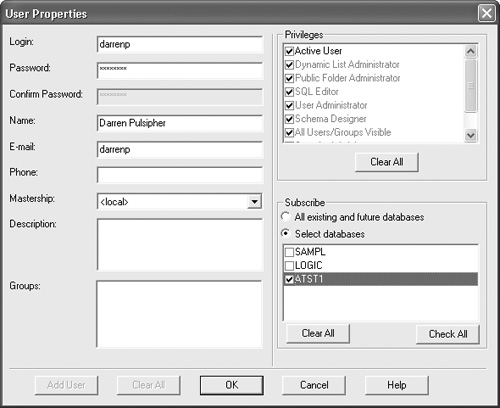
This brings up a dialog box you use to fill in the relevant information for each user you need to add to ClearQuest (Figure 7-4). As you can see, this is time consuming: It can take each of several people several days for a large organization.
The last option we’ll discuss, which is the one that offers the most control—and, unfortunately, calls for the most work—involves adding all of the users that will be using ClearQuest to specific groups that match the actors from the results of your use case analysis. Since it is very time consuming to do this all by hand, using ClearQuest’s API is a good option to consider.
[S.7.6] Before writing the script to automatically create all of the users, start by creating all of the groups. To create a group, select User Action → Add Group. The dialog box shown in Figure 7-5 will appear.

The name of each group should match that of an actor from your use case model. If you have already added users, you can add the users to each group you create. When you are done, click OK.
Now that you have all of your actors represented by groups in the system, you can write a script that will add all of the users from your Windows active directory to ClearQuest. There are several script examples available on the IBM Rational website. Peter Vogel provides a script designed to synchronize the ClearQuest user database with NT users at http://www-128.ibm.com/developerworks/rational/library/3934.html/.
If you choose to work with a schema from the default selector, you have to choose one. See the earlier section about the different schemas for information on how to select the best schema for you.
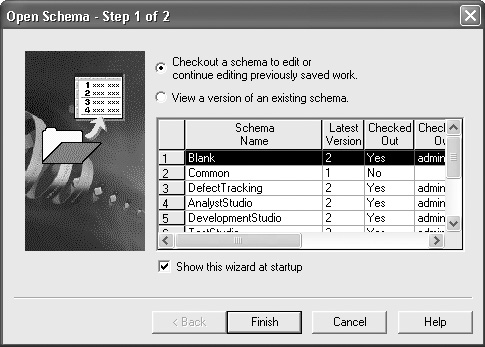
Before clicking Finish in the Open Schema window, make sure you choose a schema to check out or view, as shown in Figure 7-6. If you actually want to work on changing the schema, you will need to check it out. (Don’t worry about the mechanics of ClearCase checkouts; ClearQuest has its own little version control system.)
If you want to open and work with another schema, you can use the File → Open Schema menu option.
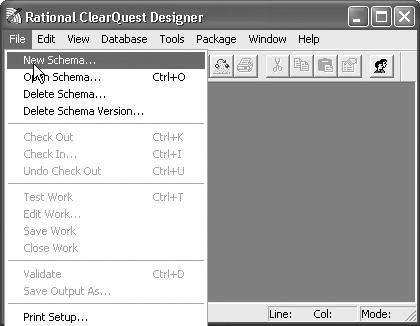
If you want to create a new schema, select the File → New Schema menu option (Figure 7-7).
ClearQuest will present a list of schemas on which you can base your new schema (Figure 7-8).
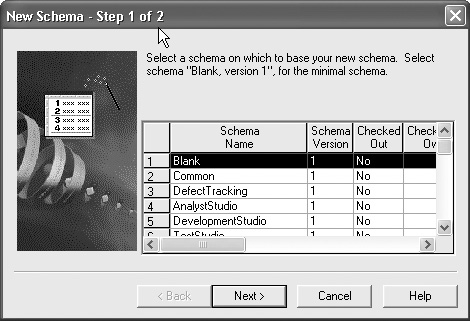
Once you have chosen a schema, ClearQuest prompts you to name your schema and also to provide a comment (Figure 7-9). Make sure that your schema has a descriptive name (e.g., not JoesTest or MyProduction).

After you have named your schema, ClearQuest will ask if you want to associate a database with the schema (Figure 7-10). This is typically a good idea. It will first ask for a logical database name and a comment.

Database names can be between one and five characters in length. The first character of the name must be a letter (uppercase or lowercase).
Next, you need to decide what type of database software you will be using and select it in the dropdown Vendor menu (Figure 7-11).
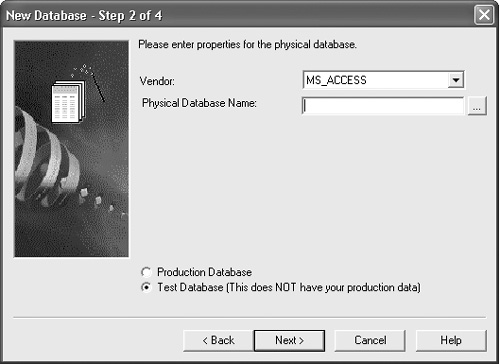
Earlier in the chapter, we discussed the different options and which tool would be best to use. Note that this step involves selecting the vendor, entering the name of the database, and indicating whether the database is a production or test database. (Starting with a test database first will allow you to test your database before moving it into production.)
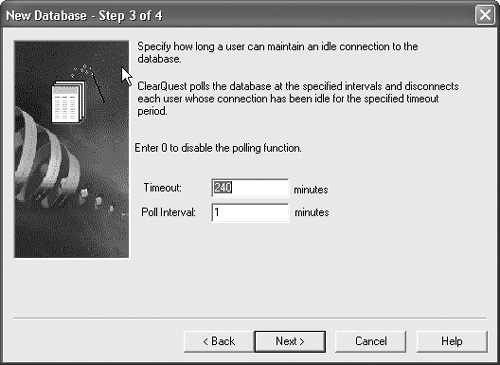
[A.7.4] The next step has to do with responsiveness and use of licenses. If you set the polling interval to too small a value, it can result in decreased performance. Additionally, if you change the timeout variable to a number lower than the default, as shown in Figure 7-12, you can share licenses more easily, but you could block someone from using the tool if he or she were idle for even a short period of time.
[S.7.7] The last step is to select the schema with which to associate the database (Figure 7-13). This should be the schema you just created.

The previous section describes the steps involved in creating a database. The next step in working with a new database involves different options depending on the type of database you select. The following subsections address how to set up the options specific to each type of database.
First off: If you are going to use the ClearQuest Web interface or ClearQuest MultiSite, you cannot use Microsoft Access. Access is useful for playing around with data exported from ClearQuest but is not recommended for enterprise data or particularly critical data.
If you do want to use Access, you need to make sure that you have a shared unified naming convention (UNC) path available on which to put your database, such as \CQMasterdatabases, as shown in Figure 7-14. (UNC is a Windows path-naming convention.) If not, then you will basically be creating a database that can be used only on the machine you’re working on.
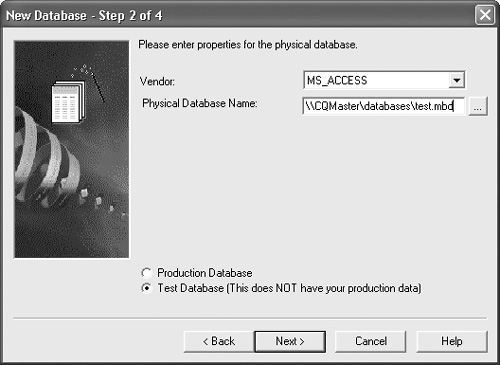
In the Physical Database Name box, you need to enter the name for the schema repository and the full path to the schema repository file using a UNC-style path (e.g., \DevServerProjectShareCQ_DBSschema_repo.mdb).
You can browse to the directory containing the database. Be sure to browse using Network Neighborhood to preserve the UNC-style path name. When is this useful? When you’re first starting to prototype your schemas and your databases, this is perfectly fine to use. Just remember that you will probably need to create production databases using one of the other options.
SQL Server is the most likely candidate if you are using Windows-only solutions. This option requires setup on the SQL Server side, as well as the ClearQuest (client) side.
Let’s first look at the ClearQuest side. You will need to add values in several fields. Table 7-2 describes the fields, which are shown in Figure 7-15.

The next step is to enter the database name for the SQL Server schema repository and then enter the name of the database server. One thing to remember: Each ClearQuest native client must be able to access this server host name exactly as it appears in this entry, so be case sensitive, and make sure your naming conventions adhere to any native client restrictions.
Next, enter the database owner user name (e.g., dbo or Administrator) in the Administrator Name box. Then enter the password for the database owner and add the general-purpose user name, followed by the password for the general-purpose user name.
Table 7-2. Database Fields
Field Name | Field Purpose | Example |
|---|---|---|
Physical Database Name | The physical database name for the schema database | Schemas |
Database Server Name | The database server name, by which all ClearQuest clients must be able to access this host | ClearQuestProduction |
Administrator Name | The name of the owner of the database | dbo |
Administrator Password | The password of the owner of the database | |
Connect Options | Any additional SQL Server connection options |
Finally, enter the schema repository or read-only user name in the Read-Only User Name box, and then the password for the schema repository or read-only user name.
Another database option is SQL Anywhere (Figure 7-16). The process of setting the database options is much the same for SQL Anywhere as for Microsoft Access. In the Physical Database Name box, enter the name for the schema repository and the full path to the schema repository file using a UNC-style path (e.g., \DevServerProjectShareCQ_DBSschema_repo.mdb).
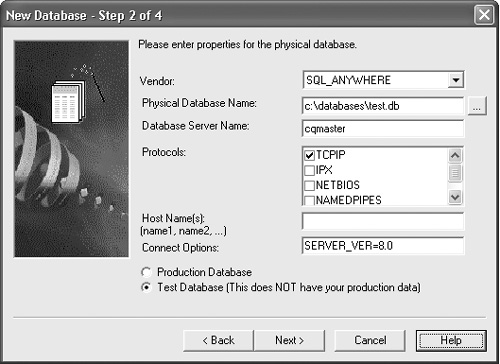
You can browse to the directory containing the database by using Network Neighborhood, which preserves the UNC-style path name.
Enter the properties for the physical database as follows: First, add the name of the database server; then, select the protocols used to communicate with the SQL Anywhere server. Enter the database host name in the Host Name(s) box. (Host Name(s) is a required field.) For TCP/IP, this can also be the IP address. Alternatively, if you are using TCP/IP as your network protocol, you can specify the IP address of the physical database server in the Host Name(s) box. Please note that the database host machine must be visible to the client machines using network share and using one or more of the communication protocols.
Next, enter the version of SQL Anywhere that you are using in the Connect Options box. For SQL Anywhere 5.0, enter SERVER_VER= 5.0. For SQL Anywhere 8.0, enter SERVER_VER=8.0. If you leave the field blank, the ClearQuest Maintenance Tool will default to SQL Anywhere 5.0.
Still another option is Oracle. Add the Oracle user name you created for the schema repository, and then enter the password for the user name in the Password box (Figure 7-17).

As shown in the ClearQuest Designer’s Guide, the following options (described in Table 7-3) need to be typed in the Connect Options box, separated by semicolons. For example:
Host=name; SID=name; Server_ver=8.1; Client_ver=8.1;
Lob_type=LONG or CLOB
Table 7-3. Oracle Connect Options
Option | Definition |
|---|---|
HOST | The name of the database server host. (If your ClearQuest environment includes UNIX and Windows clients, this name is mandatory.) |
SID | The name of the database instance. (If your ClearQuest environment includes UNIX and Windows clients, this name is mandatory.) On UNIX, the SID is case-sensitive. |
SERVER_VER | The version of the Oracle server you are using. (For Oracle 8i, use 8.1.) |
CLIENT_VER | The version of the Oracle client software you are using. (For Oracle 8i, use 8.1.) If ClearQuest client users want to use a different Oracle client version than what the administrator enters here, they’ll need to override the set options manually. The default setting is 8.1. |
LOB_TYPE | The type of data you will be using. The valid data types are either LONG or CLOB. If your existing databases default to LONG, do not change them to CLOB. Databases already implemented with the LONG LOB_TYPE property are incompatible with CLOB. However, there are limitations using the CLOB data type. For more information on restrictions and guidelines, consult the Release Notes for ClearQuest. |
Remember that all ClearQuest users must use the same alias or net service name (TNS name), database instance (system ID or SID), TCP/IP protocol, and host name (Oracle server host).
[A.7.5] Your final option is to use IBM’s DB2. Enter the database alias name (the name of the alias pointing to the DB2 database) for the schema repository in the Database Alias box, then add the DB2 user name created for the schema repository. Finally, enter the password for the user name (Figure 7-18).

Worth noting is that with DB2, ClearQuest can point to a single, physical database server—as long as each ClearQuest database uses a unique login name. You do not have to create an alias for each DB2 client.
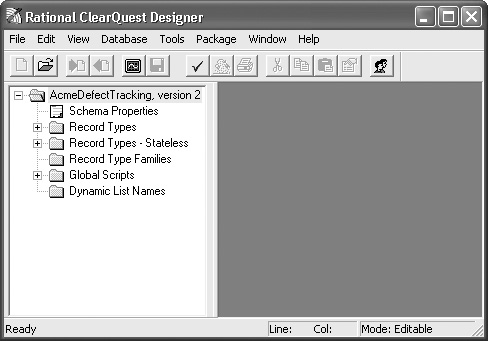
[A.7.6, A.7.7] Once you’ve created a schema, you can start changing aspects of it. First, select Schema Properties in the browser window on the left, as shown in Figure 7-19.
[S.7.8] You really have only two options, BASIC or Perl, to use as your scripting language for Windows. Here we will show our bias toward consistency. If you’re working with a cross-platform implementation, we suggest using Perl for Windows as well as UNIX. It will make your life much easier. If you are just doing a Windows installation, and you don’t know Perl, then use what you know. There’s nothing worse than learning a new tool and a new language at the same time.