[A.12.1] Development projects are being increasingly spread across geographical boundaries, with most teams experiencing some degree of “virtual team” or multisite development. Components may be outsourced; developers may log on from home; partners or other engineering teams could have been added to the project through acquisition. Taking all of this into account, when is it appropriate to use ClearQuest MultiSite?
Increasingly, development teams span multiple, geographically dispersed sites, work on different platforms, and encompass a variety of different roles. Rational ClearQuest MultiSite, an optional add-on for Rational ClearQuest, provides full ClearQuest functionality to all team members, regardless of location. Based on the proven technology in Rational ClearCase MultiSite, Rational ClearQuest MultiSite provides the safest, most reliable means to share change request information with geographically dispersed team members. ClearQuest MultiSite helps distributed project teams efficiently work together by providing local access to replicated defect and change tracking data and by enabling automatic synchronization of that data at any time. When combined with Rational ClearCase and ClearCase MultiSite, it provides a complete, distributed software configuration management solution.[1]
[S.12.1] Clearly, the timing for moving to ClearQuest MultiSite depends on your deployment model and the needs of your team. Whether your plans include an immediate multisite deployment or a long-term strategy to move over once your organization demands the move, it is critical that you understand what is involved so that you can plan appropriately.
[S.12.2] ClearQuest has different concepts that are unique to its multisite implementation. These concepts give ClearQuest flexibility to design your configuration to work with other tools in an integrated manner.
[A.12.2] Remember that a ClearQuest installation consists of a set of databases. When you are exploring a multisite deployment, you must make sure that all of the databases in the set are replicated and transported together. Sending the schema repository together with the user databases allows you to move the schema around, applying it to any user database. If just the user database is replicated, the data cannot be accessed, and no actual data about your product development will be available at remote sites. In other words, the schema repository is required to access the user database data.
Table 12-1 explains some terminology used in the sometimes-confusing world of multisite development.
Table 12-1. ClearQuest MultiSite Terminology
Definition | |
|---|---|
Replica | A copy of a user database or a schema repository. To refer to a replica, use the site name and family name (see below). |
Family | All of the replicas of a specific user database or all of the replicas of a specific schema repository. The family name of a user database replica is the database name of the originating database. The family name of a schema repository is always MASTR. |
Site | A schema repository replica and its user database replicas. |
Clan | All of the replicas of a schema repository and all of the replicas of the associated user databases. Replicas originating from the same database set use the same clan name, which is specified when the database set is activated. |
Host (also synchronization server) | The LAN name or IP address of the network node that handles packets for a site. This host must have the ClearQuest shipping server installed on it. |
These three terms—clans, families, and sites—describe different aspects of multisite development.
At first glance, it might appear that a clan consists of all of the families, but it is not obvious where the site fits in. In reality, the clan is defined as all of the replicas of all of the data, across all locations. A family consists of all of the replicas of a single database across all sites. A site consists of all of the databases required to run ClearQuest (the schema repository and the appropriate user databases).
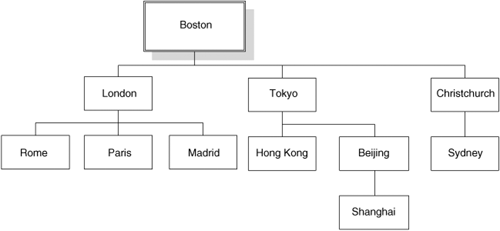
To help you understand these terms, let’s use a real-life example. Assume we have a development team spread over three locations: Hong Kong, Boston, and Paris. Let’s also assume that there are two user databases, named SRC and DOC. Of course, there must also be a schema repository; by default, this has the name MASTR.
Figure 12-1 shows the clan that represents the multisite installation.
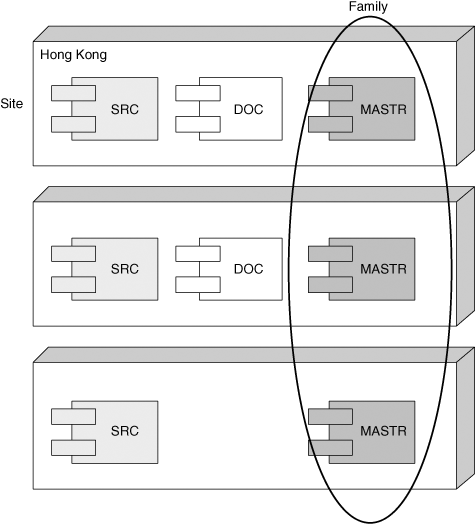
As you can see, there are three sites, but not all of the sites have replicas of all of the databases. There are three families: SRC, DOC, and MASTR. Notice in the DOC family that there are only two database replicas, while the others have three. In this example, the Paris location does not need to have access to the DOC user database.
The term replica has appeared a few times without any discussion. So let’s define it now.
A replica is a copy of a database, with information about the database location(s) and a timestamp of when the copies were made. In order to keep the sites synced, information about the replicas is stored at each location where the database resides. Each replica is recorded in a table in the schema repository database. This table, which is also replicated, includes critical information about the replica, such as the name of the associated synchronization server. In addition, each schema repository database contains information about how to connect to each database in its database set. This information is not replicated.
To facilitate the multisite synchronization, most information stored in ClearQuest databases is replicated, except for checked-out copies of schemas and the schemas of user databases. (Local administrators must choose when to upgrade user databases.)
Synchronization is the act of making sure that copies of the database have the same information. As just mentioned, information about each replica is stored in a table in the schema repository. Because of this, information about the replicas is stored in the database and is constantly changing. The replicas tend to diverge and typically will never be in sync.
To keep things in sync, a replica will send information to one or more other replicas in the family. Updating a user database replica may change both its database and its schema repository to reflect the activity that has taken place in one or more other replicas.
Information is exported from one site to other sites in packets. A packet contains all of the information needed to create or update a replica. Since export and transport mechanisms can be varied and are fundamentally unreliable, logical packets can be broken into smaller physical packets as well.
Packets are created using one of two ClearQuest commands, mkreplica or syncreplica, invoked with the –export option. The packet is then sent to the remote location. It is processed on the other side by the ClearQuest mkreplica or syncreplica commands with the –import option. This basically imports the records, tables, and data into the remote site databases, as shown in Figure 12-2.
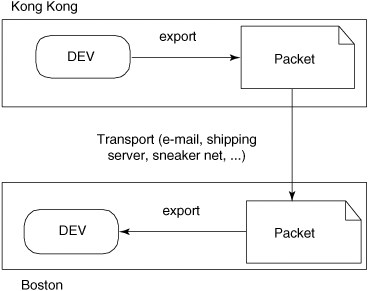
In this example, Hong Kong calls syncreplica –export, and then, using e-mail, the ClearQuest shipping server. The company may even mail CDs from Hong Kong to Boston; the point is to deliver the data. Once the packets get to Boston from Hong Kong (it doesn’t matter how or how long it takes), syncreplica –import is called on the package, and the Boston site’s DEV database is updated.
Synchronization can happen at the family level. This means that you can sync a given family at a different interval than another database’s family. A good example of this might be syncing a DEV family every hour and syncing a DOC family once a day, depending on how often things are changing in the environment.
[S.12.3, S.12.4] Changes at the multiple sites are done independently of each other. Because of this restriction, there is a healthy chance that you may encounter conflicts. For example, two people or two software applications could update the same object at the same time.
[T.12.1] For this reason, the concept of mastership has been defined. Essentially, mastership determines which site owns and can change an object. The mastership can be transferred from one site to another site, as needed.
Each of the following objects has a mastership replica:
Records
Users and groups
Workspace items (queries, reports, charts, and folders)
Schema repositories
For user database records, mastership information is stored as a field value in a record. Users can change the value of the Mastership field to transfer mastership to another replica. Mastership of the record is sent to the new master replica during the next synchronization. For all other database objects, an administrator must change the mastership.
It’s very important to teach your users the mastership concept; it will fundamentally change the way they work. Here’s a common team workflow example: A team in Hong Kong is testing a product and enters a defect against the product into ClearQuest. The mastership of the defect is in Hong Kong, which means that no other site can change the object. If the team fixing the defect is in Boston, then the team in Hong Kong must set the mastership to Boston so they can make changes to the defect record within the database.
If you have your sites set up to handle specific aspects of development (e.g., Boston owns the user interface, while Paris owns the back-end transaction portion of your solution), you can design your mastership policy for automation with scripting hooks. In the previous example, if all of the testing takes place in Hong Kong but all of the development is done in Boston, then a submission hook can be written to transfer mastership to the Boston development team automatically.
Designing your mastership migration can be just as important as the records themselves. If the tool gets in the way of users doing effective work, then the users will revolt and find ways around the tool.
Sometimes two objects, such as user objects, are created at different sites but with the same name. A good way to prevent this from happening is to create and enforce a naming convention at each site and for each replica family. For example, for site-specific objects (e.g., workspace objects and stateless records), you can include the site name in the name of the object. For objects used in multiple sites, choose a single site where that type of object is created and then replicated to all of the other sites.
Internally, ClearQuest ensures that some records and workspace names are unique.
For record types that use states, ClearQuest uses database ID numbers to ensure uniqueness.
For stateless record types (including users and groups), ClearQuest uses unique keys and stores the name of the originating site or keysite.
For workspace items, ClearQuest stores the name of the originating site or keysite and the name of the workspace item.
So, if ClearQuest guarantees uniqueness of all of the objects in the database, why should you care if you have two objects with the same name? The confusion comes when you try to access the object from ClearQuest Web or from a different site. You will get only one of the objects, and in the case of ClearQuest Web, it can be indeterminate.
A worst-case scenario is that you make changes to an object on one site, and then you don’t see the changes at another site after syncing your systems. Your users will then complain that your defecttracking system doesn’t work, and they’ll refuse to use it because they think it’s losing information.
A simple example of this is creating defects with the same title. Why would someone do this? Because it can be done. Or you may have two teams at different locations doing similar work. At first, your users will complain that the system is duplicating defects, but it will actually be two objects with different unique IDs. Most people understand this issue and can avoid the pitfall.
Something less intuitive is creating an object that most users don’t use, using the unique ID (e.g., the release or the product name) as the primary way to refer to the object. If you have releases and products as objects in your system, and each unique ID is not the name commonly used by the users when referring to them, it can become very confusing.
Hopefully you’re starting to see a theme here: Most development organizations are very temperamental when it comes to their tools. They want them to work correctly the first time out, so understanding each of these issues and planning accordingly is critical.
When you detect a situation like this, it’s best to fix it as soon as possible. The easiest way to solve this problem is to rename one of the records or just remove one of the records (make sure it’s not the one your engineer just updated!). If there is information in one of the records that you wish to keep, you will need to merge the information from one record to the other.
This is a manual process, as ClearQuest doesn’t have a merge tool for records. However, there are a variety of tools for changing the different types of objects in the database. These object types are described in the following subsections.
To change workspace objects, just rename one of the objects so that both show up in the ClearQuest Client and ClearQuest Web applications. You must go to the site that has mastership of the object, then right-click on the object and select Rename from the context menu. Make sure that you don’t name it something that already exists, or you’ll just create another naming conflict.
First, find the record that has a naming conflict. The easiest way to find these records is to query and filter using the ratl_keysite field. If you have two records with the same name and different ratl_keysite values, then you have a naming conflict. Second, make sure that you are at the site that has mastership of the record, and rename the record. Of course, also make sure that you don’t create another conflict.
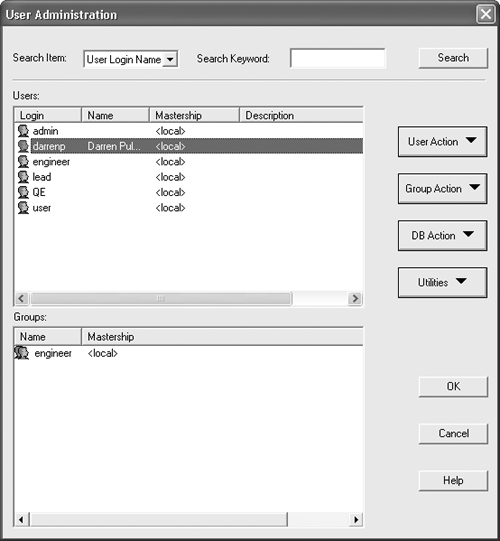
[S.12.5] User objects need to be resolved in a very similar way, but there are some small differences. First, if you log in as an ambiguous user, you will receive the following error: "User name 'xxx' is ambiguous; rename or qualify with '<'SITE'>' to proceed." To change the name of the user, you must use the ClearQuest Designer tool. Go to the menu item Tools → User Administration to open the User Administration window (Figure 12-3). Double-click on the user name you want to modify.
Now, edit the user name by right-clicking on it and then selecting Edit User. You should see the dialog box shown in Figure 12-4.
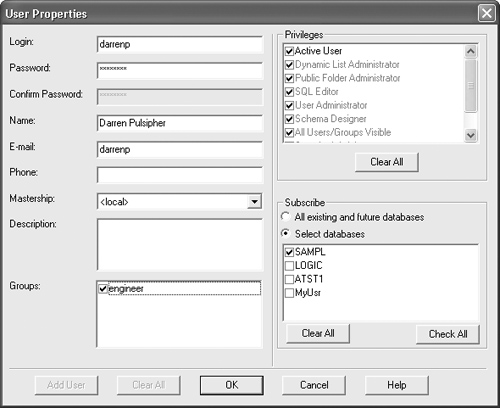
Change the user name, and then click OK.
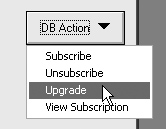
Next, you need to update the database by selecting DB Action → Upgrade (Figure 12-5).
Once you have finished, you will need to synchronize the sites for all of the changes to take effect.
Now that you understand the basics of ClearQuest MultiSite, it’s time to make some decisions. You need to design your multisite deployment. A multisite deployment affects not only sites, families, and clans, but also the way people work together. Having a well-planned design is important. The key aspects to think about are described in the following subsections.
The key to designing mastership is to make it as automated as possible. The fewer times a human needs to change mastership, the fewer times mistakes and bottlenecks in the workflow will occur. So, automating the mastership is the best way to go. Even better is to avoid mastership changes, if at all possible. We can’t stress this point enough: The fewer times you need to change mastership, the better off you will be.
Remember that all operations on an object are happening at the site, as in these examples.
[S.12.6] Hooks that modify records or field values can run only if the current replica masters the record.
You must modify users and groups at the replica that masters the user or group.
You must edit workspace items (queries, reports, and report formats) at the master replica.
You can modify or customize schemas only at the working schema repository.
Typically, automated mastership changes happen with record objects and are tied to the workflow that you have designed. If you have to change mastership, here are two areas to consider where they can happen automatically.
[S.12.7] Action hooks: Look at your workflow and determine where the mastership should be, depending on the state of an object and the action that needs to be performed. It’s best to move the mastership before someone at another site needs the object. Don’t change mastership on demand; it can be slow, and the user may rebel against the tool. Rely on your synchronization timing to sync the mastership changes.
Periodic updates: You can do this by using a scheduled mastership change that looks through the records at a site, changes the mastership of records as needed (based on record type, state, and field values), and then calls
syncreplica –export. This method is actually very useful because you know when things will be sent over. It also gives a grace period for a record if the current mastership site needs to make additional—and unexpected—changes. The downside is that mastership can be changed out from underneath someone using the object.
A synchronization strategy determines how often the sites will be synced and how they will be synced together. There are several different strategies for syncing sites. The main questions to ask yourself about sync strategies are as follows.
The first question is the most important. If you implement a sync strategy and find out later that your organization can actually get along without syncing any families, you just wasted time and money, so start by deciding what really needs to be synced. Remember that a family is basically all of the replicas at all of the sites for a particular database. It’s good to understand the type of database, the uses of the database, and the users of the database family. This information will help answer the other questions.
The answer to the second question should be determined by how up-to-date you need your sites to be and how much potential data will be moving back and forth among the different sites for the family. If your sites are 3,000 miles and eight time zones from each other, then syncing every 15 minutes is probably not warranted. However, if they’re one time zone away, and there is significant overlap in working hours, then syncing every 15 minutes may be valid. Additionally, if you are sending really large packets of information, then the export-transport-import mechanism may take longer than the sync interval. Therefore, you may want to decrease the sync time to decrease the amount of data for each sync operation.
How you answer the third question can play an important role in how often the family needs to be synced. You should consider mastership in your sync design. The answer will also help determine the sync configuration for your family.
[S.12.8] The fourth question may seem kind of funny, but you may not want all of your databases synced to all of your sites. Why not? It could be disk space constraints, security issues, or network transport bandwidth. It could be a number of reasons. The first thought in most of our minds is to sync everywhere, but you may want to take some time on this question. Only sync to the locations that you know need the information. Things can be added later if needed, but it is harder to take things away.
The fifth question is also not so obvious. Your first thought is most likely over the Internet or through your intranet. However, that’s not sufficient. Are you going to use the ClearQuest shipping server, FTP, HTTP, or some secure network protocol? Consider that it may be faster to use what some call the FedEx network. Shipping a tape or CD in the mail may be more secure, faster, and more reliable. You never know. Find out the best mechanism for your organization, and include the details in your plan.
The final question is all about how you are going to back up your databases. Disaster recovery is a critical issue. If you have your backups in the same location as your master databases, that’s a mistake. You need to have some location that is not physically close to the other sites that is dedicated to performing backups. This gives you the ability to recover in case of natural or manmade disasters.
Once you have answered all of these questions, you can begin to look at the various synchronization strategies. There are several different configurations to sync between sites. The key is to use the best combination for your environment. The answers to the questions should help you choose one of the configurations described in the following subsections.
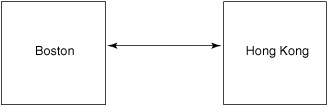
This method is used to sync two sites, and only two sites (Figure 12-6).
Most other configurations have some type of one-to-one synchronization.
Ring synchronization consists of, well, syncs in a ring. Not all of the sites talk to teach other—they talk only to their neighbors (Figure 12-7).
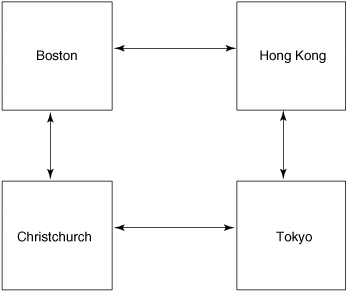
This configuration is good for small multisite configurations.
When the number of sites in a configuration increases, you will probably want to move to a hub configuration (Figure 12-8).

This will limit the number of connections and time spent syncing sites. The bonus to this method is less time for syncups than a ring configuration. However, if the hub goes down, all sites are no longer being synced.
As the number of sites increases, you will need to add more sites to your central hub. This will slow down the hub dramatically and might make your syncups take longer than the prescribed sync interval. Another option is to add another hub and perform a one-to-one sync between the hubs (Figure 12-9).

Again, if one of the hubs goes down, then all spokes to the hub will not be synced.
The tree sync is primarily used for syncs that must be very fast. It takes the hub idea and expands it further (Figure 12-10).
The downside to using a tree sync is that if one of the sites is down, it will affect all of the sites underneath.
This is the most redundant way to keep all of the sites synced together (Figure 12-11). The downside to this method is that it can take a long time to do all of the syncups.
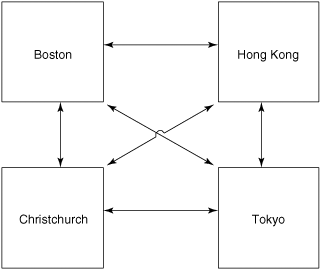
If you have a lot of data, you should avoid this method.
Once you have your sync configuration and your mastership scheme selected, it’s time to start looking at your workflow to understand what changes, if any, will occur in the way your team works.
Specifically, you should look at where things are created in your model, where the various objects are owned, and how mastership and ownership of the different records change during the workflow. Take the following example: If you have a development team that is spread across Paris and Boston, where the team in Paris is primarily customer-facing and a testing organization, and the Boston team basically fixes the problems that the Paris team finds, then you may have a state net for a defect record that looks something like Figure 12-12.

Notice that the mastership changes between Paris and Boston. When the Boston team is done working on the defect, the mastership goes back to Paris.
This sort of workflow design needs to happen for all of the records in your system that will span more than one site. If a site just needs to look at a record and will not change any field or the state of the record, then mastership does not need to be changed.
Another aspect of multisite design is administration. You need to make sure you design the ability to handle multisite administration into your schema. Some people may provide the administrator with a table that contains valuable information such as the last sync of a family, the size and amount of time that it took to sync, and so forth. Here’s a hint: Check the ClearQuest MultiSite manual for the types of records that are already created for a multisite replica, and add additional fields as necessary.
[S.12.9] Using only ClearQuest in multisite mode within a system that has other integrated tools is a mistake. You need to configure all tools within the integration to work in multisite mode. If multisite capabilities are not available, then you should make sure that the integration is loosely coupled with these tools to avoid causing problems at other sites.
Just as with your ClearQuest MultiSite design, you need to determine when, what, how often, where, and how multisite usage of these other tools will happen. It’s best to try to sync the ClearQuest data and the other tool data at the same time, if possible.
An example of synchronizing tools that are integrated is ClearQuest and ClearCase. In the example case we’ve been using, you could easily sync the ClearQuest family for DEV and the source VOBs for development at the same time. By using this method, changes that are made to the states of records for a defect or change request can have the source code synced at the same time.
You need to be mindful of errors here. In fact, we suggest having some centralized reporting structure to handle reporting errors in any of the systems, to alert you immediately when something fails. One thing to watch for is when one of the tools syncs successfully while another tool fails its synchronization (Figure 12-13); this leads to both tools being out of sync, as one is out of sync with the other locations while the other is out of sync with its integrated tool.

In this example, a sync of ClearCase fails in the second export from Paris. The ClearQuest sync should not fire again until the ClearCase sync is successful. If the ClearQuest sync is allowed to happen, then the Boston site’s ClearQuest instance will be out of sync with its ClearCase instance.
What’s needed is a mechanism to delay the ClearQuest sync until the ClearCase sync is successful. This policy is not the only way to handle situations like this, of course. You could always just go on syncing and not enforce tight synchronization between tools, but this can be very dangerous if your integration is bidirectional. In other words, if your systems need to share data back and forth, any sync issues will challenge the integrity of the overall system.
The key here is to come up with a policy and stick with it. Remember the problems that could occur should you just ignore the synchronization between tools and their integrations. Plan accordingly.
Before starting your multisite implementation, you should back up everything. Save this copy in several easily accessible locations and also in hard copy (CD or tape). It’s unlikely that you’ll get everything right the first time; having a backup copy is always a good idea.
Once you have a backup, the first thing you should do is work on your documentation. You need to make sure you have the following documented:
Once you have documented these things, you’re ready to start implementing the design. For best results, you should adhere to the following steps to create your replicas and start multisite syncups.
Store-and-forward configuration: If you will use store-and-forward, you must configure the shipping.conf file (UNIX) or MultiSite Control Panel (Windows) at the exporting and importing replicas. Look at the MultiSite installation manual for more information about the shipping.conf file.
Export: Enter an
mkreplica –exportcommand, which creates a new replica object and a replica creation packet.Transport: Send the replica creation packet to one or more other sites.
Database creation: At the location where the new replica is to be created, create empty vendor databases for the schema repository and each user database replica.
[S.12.10] Import: At the location where the new replica is to be created, import the replica creation packet by using
mkreplica –import.
If you have not already activated the database set, then you will need to do so at this time. Remember that the database set includes the schema repository and all of the user databases.
To activate the database set, use the activate command. (See the ClearQuest Command manual for more information about this command.)
ClearQuest has tools that allow for the export of information necessary for creating a replica for a remote site. The command to use to create the replica is mkreplica –export.
Before using this command to make a replica, do the following.
Make sure that all of the users are logged out of the database.
Make sure that all of the user databases are updated to the latest version of the schema.
Make sure that the data code pages are the same at all sites.
In the following example, a replica of the DEV user database and its schema repository is created from the Boston site. The target site is named paris; it uses the machine triumph. This example uses store-and-forward to ship the replica creation packets. The clan of the multisite is named bloqs.
multiutil mkreplica –export –clan bloqs –site boston
  –family DEV
–user dallin –password passwd –maxsize 50m –fship
–workdir c:	emppackets –sclass cq_default triumph:paris
For more information on creating replicas, see the ClearQuest Command manual for several examples on creating mechanisms.
Before calling the import of the packets that have been transported from the creation site to the target site, you must create the vendor database for the information to be imported. Do not create the databases with ClearQuest Designer. If you do this, the import will fail. Creating the databases with ClearQuest Designer or the Administration tool will cause an import failure. You are only required to create the vendor databases. See the ClearQuest Administration manual for the creation of vendor databases.
Now that you have created the vendor databases and the packets have been transported to the remote target location, you need to log into the remote location and call mkreplica –import. The following example shows how to import the packets that were created earlier.
multiutil mkreplica -import -site paris -repository paris
  _schemarepo
-vendor SQL_SERVER -server triumph -dbologin dallin passwd
-rwlogin dallin passwd -rologin dallin passwd -database
  paris_dev
-vendor SQL_SERVER -dbologin dallin passwd -rwlogin dallin
  passwd
The packets will be imported into the SQL_server database on the machine triumph. Two databases, paris_schemarepo and paris_dev, will be used to import the data contained in the packets. For more information about importing replicas, look at the ClearQuest Command manual.
[S.12.11] Once the replicas for the families have been created and things are set up, you need to set up the synchronization rules and set the times at which the locations need to sync. Remember, the basic flow of syncing replicas in a family is as follows:
Export: Use
syncreplica –exportat the local site.Transport: Packets are sent to one or more sites.
Import: Use
syncreplica –importat the remote site.
Use this basic mechanism to implement the synchronization configuration you have designed. You need to either set up a crontab or use the Rational Scheduler to set up how often the sites will be synced.
Adding some kind of reporting system to your syncing mechanism can make things easier to see and monitor over time. You’ll be able to find errors that occur in any one of the steps. For more information on these individual steps, see the ClearQuest Command manual for information on syncreplica.
ClearQuest keeps track of the changes made to each replica through a mechanism called epoch numbers. To minimize the data that needs to be transported, ClearQuest sends only the changes that have been made to each replica. This information is kept in oplogs (operation logs). The oplogs contain the number of changes as counted by epoch numbers.
ClearQuest keeps track of the following epoch numbers.
Changes made in the current replica: This one is obvious: All changes to the current replica need to be accounted for. This is used when ClearQuest is determining what needs to be shipped to the sibling replicas.
Changes to sibling replicas that have been imported into the current replica: This epoch number is important in determining how much has already been synced to the current replica. This gives ClearQuest the information it needs to make sure that duplicate operations from the oplogs have not been replicated to the current replica. It is also used to make sure that all of the entries in the oplogs have been processed.
Estimates of the states of other replicas: This epoch number corresponds to the number exported to remote sibling replicas. It makes the assumption that the sibling replica has imported all operations in the oplog successfully. This prevents ClearQuest from sending more information than it needs to send to keep things in sync.
Epoch tables and oplogs can get confusing very quickly. The key is to remember where you are—in other words, what machine, what location, and what replica you’re working with—when you look at the epoch table.
In the following example, we have two replicas, lehi_site and tokyo_site.
Each time work occurs in the
lehi_sitereplica, ClearQuest increments its associated epoch number.When the
lehi_sitereplica imports updates fromtokyo_site, ClearQuest updates its associated row and the row associated withtokyo_sitein the epoch table.When the
lehi_sitereplica exports changes to be sent totokyo_site, ClearQuest changes thetokyo_siterow in the epoch table.
The best way to see this is to look at an example of an epoch table (Table 12-2) and see what happens in each case. Remember that each replica records the number of changes it has made to itself, the changes it has received from another replica, and the changes it has sent to another replica. (This example is on the machine that hosts the lehi_site replica.)
Note that the values in the table are obtained from running the lsepoch command on the machine that hosts the lehi_site replica:
Multiutil lsepoch –clan xango –site lehi_site –family FNDRY
–user admin –password foobar

Multiutil: Estimates of the epochs from each site
replayed at site 'lehi_site' (@mangosteen):
lehi_site: 875
tokyo_site: 408
Multiutil: Estimates of the epochs from each site
replayed at site 'tokyo_site' (@samida):
lehi_site: 862
tokyo_site: 408
This basically says that lehi_site is out of sync with tokyo_site. Why? Because tokyo_site has an epoch number of 862 for lehi_site, while the lehi_site epoch number is really at 875. This means that when syncreplica –export is run from lehi_site, ClearQuest will put together a packet(s) containing the changes from 862 to 875.
Once the syncreplica –export command has been called, ClearQuest will update the epoch table for the lehi_site replica as follows:
Multiutil lsepoch –clan xango –site lehi_site –family FNDRY
–user admin –password foobar

Multiutil: Estimates of the epochs from each site replayed
  at site 'lehi_site' (@mangosteen):
lehi_site: 875
tokyo_site: 408
Multiutil: Estimates of the epochs from each site replayed
  at site 'tokyo_site' (@samida):
lehi_site: 875
tokyo_site: 408
Note that the tokyo_site row with the lehi_site entry now has 875, stating that both replicas are in sync. However, this offers a false sense of success. This is what the lehi_site replica thinks, but it’s not necessarily what the tokyo_site has received. The epoch has actually been updated only on the lehi_site replica so far, because the tokyo_site replica has not received the packet yet and the import has not been done. So if you go to the machine that hosts the tokyo_site replica, it will show that the changes have not been made yet.
Before the tokyo_site epoch numbers are updated in the tokyo_site replica, the packet from the lehi_site replica must be imported using the Multiutil–import command. If the import is successful, then it will update the number.
You’re probably thinking, “Why in the world would ClearQuest do this? Epoch numbers here and there, what machine am I on? I’m getting ready to pull my hair out!” The epoch numbers on the import side of the transaction serve as a check to ensure that all operations are coming into the receiving replica in the correct order and not more than once. The tokyo_site replica will log an error if the packet it receives does not start with the epoch number it is expecting. It will then set the epoch number to the last epoch number in the import. This mechanism protects against data corruption between replicas.
When your users complain that they cannot see a change made at one location on all of the other locations, the Multiutil -lsepoch command is the right place to start. It will not tell you what’s wrong, but it can tell you the state that things are in. Most of the time, replicas get out of sync due to the transport of the packets from one site to another. So, start looking at disk space or network connectivity if you see things out of sync.
With the Multiutil –lsepoch command, ClearQuest can give you an idea that things are out of sync. Also, plowing through logs can help you determine why syncs are not happening. The following are the typical reasons for replicas to get out of sync.
ClearQuest cannot find the oplog entry.
Packets accumulate in outgoing storage and incoming storage.
Transportation configuration problems occur.
A packet has an invalid destination.
Delivery of a packet fails due to a network connectivity problem.
There is not enough disk space to generate a packet on the export or import side.
The shipping server goes down.
The shipping order expires.
Packets are processed slowly on the import or export side.
Solar flares on the sun knock out satellite communication between sites.
The following subsections explore your options for recovering from syncup problems.
Now that you know you have a problem, what do you do? This is why you get paid the big bucks: You have to figure out what’s not in sync and then fix it. We suggest the following steps.
Tell your boss that it is a very complex and convoluted process and that only experts like you can fix it.
Find out where things are not in sync. Run the
Multiutil –lsepochcommand on each of the machines of the replicas and find out which one is out of sync.Run the
Multiutil recoverpacketcommand on the machine that is sending packets to the sibling replica. This command resets the estimates for a remote replica within the current replica’s epoch table. It can be set to a date/time or to the current value on the remote replica. In the following example, ClearQuest resets the epoch number back to the value as of April 17, 2005:
Multiutil recoverpacket –clan xango –site lehi_site
  –family
FNDRY –user admin –password foobar –since 17-April-2005
  tokyo_site

Multiutil: Using epoch information from 17-Apr-2005
  .00:00:00.
Multiutil: Epoch estimates for replica ‘tokyo_site’
  successfully reset.

TOKYO_SITE: 430
Now the lehi_site epoch table has an entry for tokyo_site at 430. So, the next time export is run, it will generate a packet for all oplogs entries starting at 430 until the present.
If you’re reading this section, either you have a general interest in the tool or you are neck deep in a disaster and you need to get your replicas back. If you start down this road, you have probably had a major catastrophe; we feel your pain. It’s probably 2:30 A.M., so the parking lot should be deserted. (If not, use your own judgment with regard to what we say next.) The best thing to do right now is to set this book down and go out into the parking lot and scream at the top of your lungs. Get out all of that frustration. It doesn’t matter at whom you are frustrated—the replicas need to be recovered.
Now that you have a clearer head, let’s get down into what to do if you have a completely corrupt or lost replica.
First, check your backups. (If you don’t have backups—in other words, if you haven’t been following our advice, for some reason—you can back up from another replica. Just keep in mind that you will lose information from the replica you’re trying to restore if it has not been backed up or synced with another replica. So, if you synced three hours ago, you will have lost “only” three hours’ worth of work.)
Now that you have selected your replica or backup, it’s time to clean up the mess that is before you.
First, restore the database backup with your database restore utility. This varies with the database vendor that you’re using.
Use the
restorereplicacommand to start the restoration procedure.Verify that all update packets have been processed at their destination replicas.
Generate update packets for all other replicas in the family using the
syncreplica–exportcommand.Make sure that each replica in the family has sent an update packet to the restored replica.
Process all incoming packets with the command
syncreplica–import.
The ClearQuest Command manual pages offer more detailed information, under restorereplica.
If you have kept your replicas updated frequently, another option is to destroy the bad replica and create a new one. The only downside to this is that if you have a very large database, it could take a while to create the new replica. The next subsection describes how to remove a broken replica. Once you have done that, you can create a new replica as described earlier in this chapter.
Sometimes a database is broken beyond repair and needs to be removed. It can be recreated at a later time or just removed for good.
In the following example, the sojo_site replica will be removed from the FNDRY family. tokyo_site and lehi_site are part of the same clan as the sojo_site replica.
Change the mastership of all objects from the broken replica to another replica.
At
lehi_site(schema repository site), run this command:
Multiutil chmaster –clan xango –site lehi_site –family
FNDRY –user admin –password foobar lehi_site –all –force
  sojo_site
Note that the –family is FNDRY.
The next step changes the mastership on MASTR.
Force transfer of mastership for all users and groups.
At
lehi_site(schema repository site), run this command:
Multiutil chmaster –clan xango –site lehi_site –family
MASTR –user admin –password foobar lehi_site –all –force
  sojo_site
Multiutil rmreplica –clan xango –site lehi_site –family
FNDRY –user admin –password foobar sojo_site
Make sure that the last argument is the replica that you are removing.
Multiutil rmreplica –clan xango –site lehi_site –family
MASTR –user admin –password foobar sojo_site
Make sure that the last argument is the replica that you are removing.
Multiutil syncreplica –export –clan xango –site lehi_site
  –family
FNDRY –user admin –password foobar –fship tokyo_site
Multiutil syncreplica –import –clan xango –site tokyo_site
–family FNDRY –user admin –password foobar –receive
One of the most important things you can do to keep your ClearQuest MultiSite system maintained involves documenting what you have done. Every time you create a new site, make sure to update your design document. Make sure that your documentation reflects the architecture you originally put together. There’s nothing more frustrating than trying to find out what’s happening with a dynamic system when you have not documented the static (stable) system.
Another great tool that most people overlook is a maintenance log. Buy a bound notebook (the kind they made you have in school). Page numbers are good but not necessary. Make sure that any maintenance or changes you make to the system are logged in this book. The best place to keep it is where your team can access it. Although archaic, this tool is invaluable when trying to figure out what has happened.
Note:
Do not keep this maintenance log online. As you know, machines have a tendency to go down, and data gets lost.
Finally, have an outlet for frustration and get a sense of humor. Dealing with multisite systems is not a trivial task, and you are typically dealing with multiple time zones and communication problems that range from language idioms and accents to static on the line. On those long, lonely nights in the computer lab, just remember that there are hundreds if not thousands of others, just like you, trying to get things ready for the software development masses first thing in the morning.