
The registry represents one possible location for an application to store database connection strings. Although individual registry keys can be secured with Windows access control lists (ACLs), for added security you should store encrypted connection strings.
This How To describes how to store an encrypted database connection string in the registry and retrieve it from an ASP.NET Web application. It uses the generic encryption and decryption managed class library created in "Appendix ," which can be found in Reference section of this book.
If you have not already created the encryption class library assembly, do so before continuing with the current How To.
For more information about other locations and ways of securely storing database connection strings, see "Storing Database Connection Strings Securely" in Chapter 12.
The connection string, initialization vector and key used for encryption will be stored in the registry as named values beneath the following registry key.
HKEY_LOCAL_MACHINESoftwareTestApplication
The initialization vector and key must be stored in order to allow the connection string to be decrypted.
The following items describe the recommended hardware, software, network infrastructure, skills and knowledge, and service packs you will need.
Microsoft® Windows® 2000 operating system
Microsoft Visual Studio® .NET development system
The procedures in this article also require that you have knowledge of the Microsoft Visual C#™ development tool.
This How To includes the following procedures:
This procedure creates a Windows application that will be used to encrypt a sample database string and store it in the registry.
▸ To store the encrypted data in the registry
Start Visual Studio .NET and create a new C# Windows project called EncryptionTestApp.
Add an assembly reference to the Encryption.dll assembly.
To create this assembly, you must perform the steps described in "Appendix " in the Reference section of this book.
Add the following using statements to the top of Form1.cs beneath the existing using statements.
using Encryption;
using System.Text;
using Microsoft.Win32;
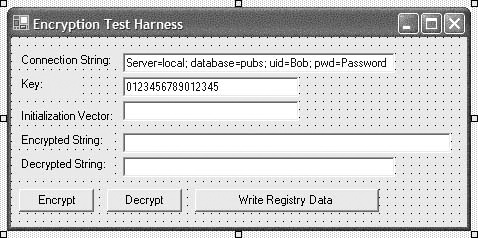
Add the controls in Table 1 to Form1 and arrange them as illustrated in Figure 1.
Table 1. EncryptionTestApp controls
Control
Text
ID
Label
Connection String:
TextBox
txtConnectionString
Label
Key:
TextBox
txtKey
Label
Initialization Vector:
TextBox
txtInitializationVector
Label
Encrypted String
TextBox
txtEncryptedString
Label
Decrypted String
TextBox
txtDecryptedString
Button
Encrypt
btnEncrypt
Button
Decrypt
btnDecrypt
Button
Write Registry Data
btnWriteRegistryData
Set the Text property of txtConnectionString to
"Server=local; database=pubs; uid=Bob; pwd=Password"
Set the Text property of txtKey to
"0123456789012345"
The key length is 16 bytes to suite the Triple DES encryption algorithm.
Set the Text property of Form1 to
"Encryption Test Harness"
8. Double-click the Encrypt button to create a button click event handler and add the following code to the event handler.
try
{
  // Create the encryptor object, specifying 3DES as the
  // encryption algorithm
  Encryptor enc = new Encryptor(EncryptionAlgorithm.TripleDes);
  // Get the connection string as a byte array
  byte[] plainText = Encoding.ASCII.GetBytes(txtConnectionString.Text);
  byte[] key = Encoding.ASCII.GetBytes(txtKey.Text);
  // Perform the encryption
  byte[] cipherText = enc.Encrypt(plainText, key);
  // Store the intialization vector, as this will be required
  // for decryption
  txtInitializationVector.Text = Encoding.ASCII.GetString(enc.IV);

  // Display the encrypted string
  txtEncryptedString.Text = Convert.ToBase64String(cipherText);
}
catch(Exception ex)
{
  MessageBox.Show("Exception encrypting: " + ex.Message,
                  "Encryption Test  Harness");
}
Return to Form1 in Designer mode and double-click the Decrypt button to create a button click event handler.
Add the following code to the Decrypt button event handler.
try
{
  // Set up the Decryptor object
  Decryptor dec = new Decryptor(EncryptionAlgorithm.TripleDes);

  // Set the Initialization Vector
  dec.IV = Encoding.ASCII.GetBytes(txtInitializationVector.Text);

  byte[] key = Encoding.ASCII.GetBytes(txtKey.Text);
  // Perform the decryption
  byte[] plainText = dec.Decrypt(Convert.FromBase64String(
                                 txtEncryptedString.Text),
                                 key);

  // Display the decrypted string.
  txtDecryptedString.Text = Encoding.ASCII.GetString(plainText);
}
catch(Exception ex)
{
  MessageBox.Show("Exception decrypting. " + ex.Message,
                  "Encryption Test Harness");
}
Return to Form1 in Designer mode and double-click the Write Registry Data button to create a button click event handler.
Add the following code to the event handler.
// Create registry key and named values
RegistryKey rk = Registry.LocalMachine.OpenSubKey("Software",true);
rk = rk.CreateSubKey("TestApplication");
// Write encrypted string, initialization vector and key to the registry
rk.SetValue("connectionString",txtEncryptedString.Text);
rk.SetValue("initVector",Convert.ToBase64String(
              Encoding.ASCII.GetBytes(txtInitializationVector.Text)));
rk.SetValue("key",Convert.ToBase64String(Encoding.ASCII.GetBytes(
                                         txtKey.Text)));
MessageBox.Show("The data has been successfully written to the registry");
Run the application, and then click Encrypt.
The encrypted connection string is displayed in the Encrypted String field.
Click Decrypt.
The original string is displayed in the Decrypted String field.
Click Write Registry Data.
In the message box, click OK.
Run regedit.exe and view the contents of the following key.
HKLMSoftwareTestApplication
Confirm that encoded values are present for the connectionString, initVector and key named values.
Close regedit and the test harness application.
This procedure develops a simple ASP.NET Web application that will retrieve the encrypted connection string from the registry and decrypt it.
▸ To create an ASP.NET application
Create a new Visual C# ASP.NET Web Application called EncryptionWebApp.
Add an assembly reference to the Encryption.dll assembly.
To create this assembly, you must perform the steps described in "Appendix " in the Reference section of this book.
Open Webform1.aspx.cs and add the following using statements at the top of the file beneath the existing using statements.
using Encryption;
using System.Text;
using Microsoft.Win32;
Add the controls listed in Table 2 to WebForm1.aspx.
Double-click the Get Connection String button to create a button click event handler.
Add the following code to the event handler.
RegistryKey rk = Registry.LocalMachine.OpenSubKey(
                                          @"SoftwareTestApplication",false);
lblEncryptedString.Text = (string)rk.GetValue("connectionString");

string initVector = (string)rk.GetValue("initVector");
string strKey = (string)rk.GetValue("key");

Decryptor dec = new Decryptor(EncryptionAlgorithm.TripleDes );
dec.IV = Convert.FromBase64String(initVector);

// Decrypt the string
byte[] plainText = dec.Decrypt(Convert.FromBase64String(
                               lblEncryptedString.Text),
                               Convert.FromBase64String(strKey));

lblDecryptedString.Text = Encoding.ASCII.GetString(plainText);
On the Build menu, click Build Solution.
Right-click Webform1.aspx in Solution Explorer, and then click View in Browser.
Click Get Connection String.
The encrypted and decrypted connection strings are displayed on the Web form.
For more information, see "Appendix " in the Reference section of this book.