
Introduction to systemverilog assertions
In Chapter 3, we describe the basics of the System Verilog Assertion (SVA) language, which is the current industry standard for verification statements that describe properties of an RTL design. Using a simple arbiter as an example verification target, we introduce each of the basic concepts of SVA. First we define the three types of verification statements: assertions, facts that are claimed to be true; assumptions, axioms used to prove the assertions; and cover points, which specify interesting test conditions. There are two major types of assertion statements that we describe in detail: immediate, or unclocked, and concurrent, or clocked, assertion statements. We then continue by describing useful SVA building blocks including sequences and properties. Finally we provide some practical advice on writing useful assertions.
Keywords
SVA; assertion; assumption; sequence; property; cover point; concurrent; immediate
Assertion-based design verification is an absolute necessity in today’s large, complex designs … Every design engineer should be adding assertion checks to his design!
—Ben Cohen et al, SystemVerilog Assertions Handbook
In order to leverage the power of formal verification (FV) to prove correctness of your design, you must first have a way to express what it means for your design to be correct. The most popular way to do this is through properties, specified in assertions, using the SystemVerilog Assertions (SVA) language. Although there are numerous specification methods in the industry and academia, such as the Property Specification Language (PSL) language and the Open Verification Library (OVL) assertion library that we mentioned briefly in Chapter 1, SVA has effectively become the industry standard over the last decade for specifying register transfer level (RTL) assertions.
Thus, before we explore FV techniques in detail, we need to start by learning the SVA language. The discussion in this chapter assumes you are already familiar with the SystemVerilog modeling language in general. In keeping with the theme of this book, our emphasis will be on assertion constructs that are most relevant to FV, though SVA assertions are also very useful in a simulation context. This will also be a very brief introduction, emphasizing the most useful features of the language and giving you just enough information and examples to effectively use them. If you want to know the full syntax definitions, every available language feature, or other details, there have been some excellent full-length books written entirely on SVA, including [Coh13] and [Cer14]. We do believe, however, that the information in this chapter will be sufficient to enable your productive use of SVA assertions.
In this chapter, we will be describing the SVA language as described in SystemVerilog Language Reference Manual (LRM) IEEE Standard 1800–2012. For brevity and clarity, in the remainder of this chapter we will refer to this document simply as the LRM.
Basic Assertion Concepts
To clarify our discussion for this chapter, we will use a concrete target model to describe the concept and usage of SVA assertions. Once we describe such a concrete model, it is much easier to introduce concepts such as the basic types of verification statements.
A Simple Arbiter Example
The model we use is a simple arbiter design, as shown in Figure 3.1.

This is an arbiter that has four requesting agents, each able to request a shared resource using one bit of the req signal. The gnt signal indicates which agent is currently authorized to use the resource. There is also an opcode input, allowing certain commands that override the normal behavior of the arbiter, such as forcing a particular agent to get priority, or cutting off all access to the resource for a period of time. There is an error output as well, to signify that a bad opcode or illegal sequence of opcodes has been sent. The interface code for a top-level System Verilog (SV) module implementing this design is shown below.
typedef enum logic[2:0] {NOP,FORCE0,FORCE1,FORCE2,
FORCE3,ACCESS_OFF,ACCESS_ON} t_opcode;
module arbiter(
input logic [3:0] req,
input t_opcode opcode,
input logic clk, rst,
output logic [3:0] gnt,
output logic op_error
);
What are Assertions?
At the most basic level, an assertion is a statement about your design that you expect to always be true. In the case of our arbiter, a simple example might be the fact that you never expect a grant to agent 0 when it was not requested:
check_grant: assert property (!(gnt[0] && !req[0])) else $error(“Grant without request for agent 0!”);
As we will see in the discussions below, assertions can get much more complex than the simple Boolean expression above, involving logical implications and potential statements about values changing over time.
When running a simulation on a model, your simulator will usually flag an error when it detects that any SVA assertion in your code is not true. In the above example, if we ever see gnt[0] == 1 and req[0] == 0 in simulation, the message Grant without request for agent 0! will be displayed.
When running a formal property verification (FPV) tool, assertions are treated as proof targets: the goal of the tool is to mathematically prove that your RTL model can never violate this assertion.
There are two other types of properties we should understand before diving into the technical details: assumptions and cover points.
What are Assumptions?
Assumptions are similar to assertions, but rather than specifying the behavior of a device under test, they usually specify conditions that are intended to represent constraints on the verification environment. Often these represent conditions that are externally guaranteed to be true, due to inputs or other environmental factors. For example, perhaps we expect that our arbiter will only see legal non-NOP opcodes arrive at its opcode input:
good_opcode: assume property (opcode inside {FORCE0,FORCE1,FORCE2,FORCE3,ACCESS_OFF,ACCESS_ON}) else $error(“Illegal opcode.”);
For simulation, an assumption is treated in exactly the same manner as an assertion: the simulator checks to see whether the current simulation values violate the specified condition, flagging a violation and printing the message if not. But keep in mind that the conceptual meaning is still somewhat different from an assertion failure: a failed assumption usually means something is wrong in the testing environment, testbench code, or a neighboring design module, while a failed assertion usually indicates a problem in the design under test. (This is not strictly required though, as it is legal to have an assumption involving internal design nodes, a situation we will discuss in more detail in future chapters.) In the example good_opcode above, it would indicate that the testbench is incorrectly driving an illegal opcode into the design.
In FV, there is a major difference between assumptions and assertions. Just like its name implies, an assumption is something that the tools assume to be true. An assumption is taken as an axiom and used to prove the truth of the assertions. Without assumptions, FV tools start by allowing any possible values to arrive at the inputs of the model they are analyzing; the assumptions are the primary method by which the user guides these values toward allowable behaviors. In most cases, a good set of assumptions is a requirement in order to eliminate consideration of unrealistic behaviors and correctly prove the assertions on a design.
What are Cover Points?
An SVA cover point is specified in a similar way to assertions and assumptions, but it has a somewhat different meaning. While assertions or assumptions are expected to always be true, a cover point is something that is only occasionally true: it is specifying some kind of interesting condition that we want to make sure we are testing. For example, in our arbiter, we probably want to make sure that we are testing the possibly challenging case where all our agents are requesting the resource at once:
cover_all_at_once: cover property
(req[0]&&req[1]&&req[2]&&req[3]);
In simulation, most users check cover points collectively: the tool or scripts save information to a database whenever a cover point is hit, and in the end the user can examine the total coverage after running all the simulation tests in their test suite. You usually want to make sure that each of your cover points is hit at least once; if not, this reveals a potential hole in your testing.
For FV, cover points also play an important role. Although FV theoretically covers all possible behaviors of your system, remember that you can specify assumptions or other input requirements that limit the possible traffic considered. This leads to a danger of overconstraint: you may accidentally specify assumptions that rule out interesting classes of traffic to your system. As a result, making sure that your FPV environment is able to reach all your cover points is a critical step in FV. We will discuss this more in the upcoming chapters on FPV.
Clarification on Assertion Statements
As you may have noticed in the examples above, assertions, assumptions, and cover points are all specified with basically the same mechanisms in SVA. Thus, most of the mechanics of defining them are the same for all three types of constructs. For clarity, we concentrate on assertions in the remaining text of this chapter; keep in mind, however, that most of our discussion applies to assumptions and cover points as well. You should be able to use the techniques described in the remainder of this chapter equally for describing all three types of constructs. The term assertion statement, used here the same way it is defined in the LRM [IEE12], can equally refer to assertions, assumptions, or cover points.
SVA Assertion Language Basics
The SVA assertion language can be viewed as several layers of increasing complexity, as shown in Figure 3.2.

• Booleans are standard SystemVerilog Boolean expressions. A Boolean expression may be a single logic variable or a formula such as (req[0]&&req[1]&&req[2]&&req[3]) in the cover point example above.
• Sequences are statements about Boolean values (or other sequences) happening over time. They are dependent on a clearly defined clocking event to define time passing. For example, the following sequence represents a request followed by a grant in two clock cycles:
req[0] ##2 gnt[0]
• Properties combine sequences with additional operators to show implication and similar concepts, to express some behavior expected to hold in a design. For example, a property might state that if we receive a request followed two cycles later by a grant, it implies that the grant will de-assert at the next cycle:
req[0] ##2 gnt[0] |-> ##1 !gnt[0]
• Assertion Statements are statements using one of the keywords assert, assume, or cover, causing an SVA property to be checked as an assertion, assumption, or cover point. A property has no effect unless it is used in some kind of an assertion statement. For example, an assertion statement that causes the property above to be checked might read:
gnt_falls: assert property(req[0] ##2 gnt[0] |->
##1 !gnt[0]);
We will discuss sequences, properties, and assertion statements in more detail in the remainder of this chapter. But before we move on, there is one more key concept we need to introduce: immediate and concurrent assertions.
• Immediate assertion statements are simple assertion statements that are checked whenever they are visited in procedural code. They allow only Boolean arguments, have no mechanisms for clocking or reset, and do not support many advanced property operators. As a result, they cannot check conditions that require awareness of the passage of time. In SVA, an immediate assertion is indicated by an assertion without the keyword property, as in:
imm1: assert (!(gnt[0] && !req[0]))
• Concurrent assertion statements are always evaluated relative to one or more clocks and can describe behavior that spans time, and allow numerous additional operators that support advanced statements about logical implication over time intervals. As a result, they are much more generally useful than immediate assertion statements. In SVA, a concurrent assertion is indicated by including the keyword property in the assertion, as in:
conc1: assert property (!(gnt[0] && !req[0]))
Although concurrent assertion conc1 looks similar to immediate assertion imm1, their evaluations have some important differences. While the immediate assertion is evaluated whenever it is visited in procedural code, the concurrent assertion is only evaluated at edges of a well-defined clock. This will become clearer as we describe the two assertion types in more detail.
Immediate Assertions
Immediate assertions are the simplest kinds of assertion statements. They are generally considered part of SystemVerilog procedural code and are evaluated whenever they are visited during code evaluation. They have no concept of clocks or reset (aside from any clock/reset that may control their enclosing procedural block) and thus are incapable of verifying behavior that spans over time. They are also vulnerable to the usual hazards of SystemVerilog procedural code, including “delta-time” glitches, where they can be affected by temporary values in the middle of a time step, due to multiple evaluations of procedural (always or always_*) blocks.
In general, we recommend using concurrent assertions instead of immediate assertions whenever possible. There are several reasons for this recommendation:
• Using assertions that are relative to known clocks, a feature directly supported by concurrent assertions, helps to keep the expected behavior clear and well understood.
• The delta-time hazard, where immediate assertions may report on temporary values that will change by the end of a time step, can result in invalid reports of failures and make debugging more difficult.
• Since immediate assertions are not stated relative to a clock unless located in a clocked procedural block, changes in your model or testbench’s timing behavior can create unpredictable results.
However, there are certain cases where immediate assertions are required:
• In functions or other truly unclocked structures: you may want to add an immediate assertion inside a function; for example, to check the safety of its arguments or check a calculation.
• For state-matching formal equivalence verification (FEV) tools: As we will see in Chapter 8, state-matching FEV tools break the logic into combinational logic cones, and thus many of them can handle only unclocked assumptions for proving equivalence.
For these reasons, we are describing immediate assertions here rather than skipping them altogether. But keep in mind that they must be used with caution and are recommended only in the above cases.
Writing Immediate Assertions
While immediate assertions should usually only be used in cases we have described above, it is important that you use them correctly when you do need them. We recommend that you always use the variant of immediate assertions known as final deferred immediate assertions. A final deferred immediate assertion statement is relatively simple to describe: just use assert final followed by any Boolean expression, with an optional label before and failure message after. (If you are working with Electronic Design Automation (EDA) tools that have not yet adopted the latest LRM, you may need to use the observed deferred immediate assertion assert #0 instead, which behaves the same in most common cases. See LRM clause 16.4 for more details on these constructs.) So if we want to write an immediate assertion to check that we are not granting access to agent 0 when they did not request it, we could write this statement:
grant0_ok: assert final (!(gnt[0] && !req[0])) else
$error(“Grant without request for agent 0.”);
The label grant0_ok is an optional name for the assertion; most EDA tools will auto-generate a name if no label is present, but we recommend always including one.
The action block else $error ... is also optional, with most simulation tools generating default messages for assertion failures if it is not present. But we recommend always including something meaningful here, for aid in simulation debug.
This assertion could be placed within an always block in any module where the gnt and req signals are visible, or inside a function with access to these signals. We could also place it outside an always block within a module; in this case, it is treated as if in an implicit always_comb block. Whenever its procedural code is executed, the assertion will be checked.
Complications of Procedural Code and Motivation for Assert Final
The way that procedural code, mainly always blocks, is executed in SystemVerilog can be a surprise to many users—even some who have been designing in the language for years. What you need to keep in mind are three key concepts:
• Within a single always block, statements are executed in the order in which they appear, like software code.
• There is no guaranteed ordering for multiple always blocks; they can be executed in any order.
• If a signal in the sensitivity list of an always block changes (due to the execution of another always block or other type of assignment), it is executed again during the same time step.
These can result in some behaviors for immediate assertions that will surprise users without a detailed familiarity with the LRM. This is why the more recent versions of the language introduced the concept of deferred assertions. These are a form of immediate assertion that follows a special rule: if the procedure in which they exist is executed multiple times during a single simulation time step, only the result of the final execution will be reported. (The actual rule is a little more complicated, involving the concept of SystemVerilog “simulation regions,” but rather than getting sidetracked with a full description of SV, we’ll refer you to the LRM for the details.)
To make this clearer, here is an example of a very poorly written fragment of RTL code, which uses non-deferred immediate assertions:
always_comb begin : add_1_to_evens
if (f_even(i) && i<9) begin
i=i+1;
a1: assert (i>=10) else $error(“i is %0d”,i);
end
end
always_comb begin : add_1_to_odds
if (f_odd(i) && i<10) begin
i=i+1;
a2: assert (i>=10) else $error(“i is %0d”,i);
end
end
Let’s assume that f_even correctly returns true for even numbers, and f_odd correctly returns true for odd numbers, as their name implies. If i somehow was assigned a value less than 10 somewhere, the above pair of always blocks would together be executed over and over, alternately increasing i by 1 each time, and we would see an assertion failure each time i is incremented but not yet at its maximum:
Assertion failure in myfile.v:40: i is 4
Assertion failure in myfile.v:34: i is 5
Assertion failure in myfile.v:40: i is 6
Assertion failure in myfile.v:34: i is 7
Assertion failure in myfile.v:40: i is 8
Assertion failure in myfile.v:34: i is 9
The user would find the above messages very confusing, since at the end of any time step in their simulator, they would see that i is always at least 10. The intermediate values that were changing during the time step triggered these assertions. This is why deferred assertions were introduced: for a deferred assertion, in any simulation time step, only the result of the final execution of each assertion in a given procedure is reported. In the case of the example above, if each assert were replaced with an assert final, then we would see no violations: at the final execution of each procedure for any given time step, either i would have a legal value, or no assertion would be checked.
For this reason, we recommend that whenever you do use immediate assertions, you use the deferred variety.
Location in Procedural Blocks
There is one more complication of immediate assertions that we should discuss. An immediate assertion operates on whatever values its variables hold at the time its line is executed. This may differ from the values the signals settle upon at the end of the procedure. Here is an example of a procedure with a poorly placed immediate assertion:
always_comb begin
gnt = 4’b0;
no_conflict: assert final ($onehot0(gnt));
if (|req)
gnt = f_compute_grant (req);
end
In this example, the assertion no_conflict has been written to check that there is always at most one grant. But because it was placed before the f_compute_grant call, it will actually never detect a failure, even if there is an error in the f_compute_grant function: at the time the assertion line is reached, the value of gnt will always be the 0 assigned on the line before. The following version makes much more sense:
always_comb begin
gnt = 4’b0;
if (|req)
gnt = f_compute_grant (req);
no_conflict: assert final ($onehot0(gnt));
end
You need to keep in mind that the final qualifier for an immediate assertion only signifies the use of the final execution of its enclosing always block during each time step; it does not indicate that it detects the final value for its variables. If you find this confusing, there is no need to worry: you can sidestep the issue in most cases by simply following a rule of thumb to put any immediate assertions at the end of the procedure or function.
Boolean Building Blocks
Before we close our discussion of immediate assertions, we should examine the various Boolean building blocks provided by the SystemVerilog language. These are not strictly for assertions, but are useful shorthand that can enable us to write clearer and more succinct assertions for common situations. They are especially useful in that they can be applied to both immediate and concurrent assertions. In most cases, their meanings are relatively self-explanatory, so rather than explain them in detail here, we will just supply Table 3.1 to summarize the constructs that we have found most useful in assertion contexts.
Table 3.1
Useful Boolean Building Blocks in the SystemVerilog Language
| Construct | Meaning | Usage example |
| $countbits(expression, val1, val2, …) | Count occurrences of specified bit | num_gnts = $countbits(gnt, 1’b1) |
| $countones(expression) | Count bits that are equal to 1 | num_gnts = $countones(gnt) |
| $onehot(expression) | Return true iff precisely one bit is 1 | safe_gnts = $onehot(gnt) |
| $onehot0(expression) | Return true iff no bits are 1, or precisely one bit is 1 | safe_or_no_gnts = $onehot0(gnt) |
| expression inside list | Return true iff expression is in list | safe_opcode = opcode inside {ADD,SUB,MUL} |
Concurrent Assertion Basics and Clocking
As we discussed in the last section, most of the assertions that you write for FPV purposes will be concurrent assertions. These assertions support clear specification of clocks and resets, and are capable of examining the behavior of values over time. Before we discuss the more complex sequence and property concepts, which allow us to specify complex behaviors over a period of time, we will begin by introducing concurrent assertions on simple Boolean expressions, so we can discuss the basics of how their timing works. Here is an example of a concurrent assertion for checking that, at any rising edge of the clock clk outside reset, we have an acceptable non-NOP opcode:
safe_opcode: assert property (
@(posedge clk)
disable iff (rst)
(opcode inside {FORCE0,FORCE1,FORCE2,FORCE3,ACCESS_OFF,ACCESS_ON}))
else $error(“Illegal opcode.”);
From this example, we can see that the syntax for concurrent assertions differs from immediate assertions in several obvious ways:
• The assertion statement is declared with the keywords assert property.
• We include an optional clock specification, with a relevant edge.
• We include an optional reset specification, using the keywords disable iff.
In this example, we are checking a simple Boolean formula. Functionally, the key difference between this assertion and a similar immediate assertion is that this one is checked only at the given clock edge, and that this one is ignored during its reset (disable iff) condition.
We should also note that because a concurrent assertion can define its own clocking and reset, concurrent assertions usually make the most sense to use outside procedural code, separate from an always block. You can include them in procedural code as well, but we recommend avoiding this usage, as it can introduce complex relationships between assertion and procedure timing. (See LRM section 16.14.6 if you want to learn the full details of this usage.)
Before we go into greater depth on the many ways to implement more powerful concurrent assertions, we should carefully examine the clock and reset conditions: it is important you understand these in order to fully comprehend what a concurrent assertion is checking.
Sampling and Assertion Clocking
Concurrent assertions operate on what is known as the sampled value of their arguments. Essentially, at any simulation time step, the sampled value of each variable is the value that variable attained at the end of the previous simulation time step.
In Figure 3.3, we see a signal sig1 with values that change at various times, and a concurrent assertion:

sig1_off: assert property (@(posedge clk1) !sig1);
At first glance, the reported values for the assertion might seem strange, because a naïve reader would think that the assertion should simply be true whenever sig1 is false. But actually, the assertion results are only calculated at each positive edge of the clock, and as we stated above, they always examine the value sampled at the end of the previous time step, just before that edge. So we see results indicating:
• At phase 4, sig1 has just gone to 0, but it was 1 before the rising edge of clk1, so the assertion uses the value of 1 and fails.
• At phase 6, sig1 has just gone to 1, but it was 0 before the rising edge of clk1, so the assertion uses the value of 0 and passes.
• At phase 8, sig1 was 1 before the clock edge as well as after, so the assertion uses the value of 1 and fails.
• At phase 10, sig1 went to 0 in plenty of time before the rising clock edge, so the assertion uses the value of 0 and passes.
Although this might be disconcerting at first, a few minutes of reflection will reveal that this will, at worst, lead to off-by-one reporting of assertion failures; as long as this sampling rule is consistent for all values used in the concurrent assertion, any failures defined by its logic should behave as expected, as long as the failing values are visible just before an edge of the relevant clock. We should also note that many EDA tools compensate for this inherent off-by-one behavior in their output, so the particular tool you are using may or may not actually report failures after the signal transitions in this way. But if they are compliant with the rules of the language, they will consistently use these sampled values to calculate assertion results.
The place where this sampling behavior can lead to trouble is if you put concurrent assertions in procedural code or include terms that use unclocked elements, such as software calls, and create situations where sampled and non-sampled values might be combined in one assertion. This is another reason for our earlier tip to put your concurrent assertions outside procedural code.
Sampled Value Functions
As helpful building blocks to construct concurrent assertions, SVA also provides a set of sampled value functions, built-in functions that operate on sampled values in the same way as concurrent assertions. For example, suppose we want to make sure that whenever there is no grant, there was no request on the previous cycle. We could write the assertion like this:
no_grant_ok: assert property (@(posedge clk)
(|gnt) || !$past(|req));
This assertion checks the desired condition. Both the req and gnt values are sampled just before the positive edge of clk, and the $past function examines the value of its argument one cycle earlier. These functions all inherit the clock of the assertion statement, sequence, or property where they are used, though they may also be passed explicit clock arguments.
The most useful sampled value functions, with summaries and usage examples, are shown in Table 3.2. Here we show the simple forms that are most commonly used: refer to LRM section 16.9.3 for the details and full set of options.
Table 3.2
The Most Useful Sampled Value Functions
| Function | Description |
| $past(expr) | Sampled value of expression one clock earlier |
| $past(expr,n) | Like $past(expr), but look n clocks earlier instead of one |
| $rose(expr) | Returns 1 iff LSB* of sampled value of expression is 1, and one clock earlier it was non-1 |
| $fell(expr) | Returns 1 iff LSB of sampled value of expression is 0, and one clock earlier it was non-0 |
| $stable(expr) | Returns 1 iff sampled value of expression equals value at previous edge |
| $changed(expr) | Returns 1 iff sampled value of expression does not equal value at previous edge |
*LSB stands for Least Significant Bit.
One slight wrinkle to watch for when using these functions is the issue of X or Z values. Many modern simulators support 4-valued runs that include these values, and this feature has been added to some FV tools. According to the LRM, a transition from X to 1 counts as a rise for $rose, and from X to 0 counts as a fall for $fell. If you are targeting a validation environment that allows these values and you do not want transitions from X/Z to count as a rise or fall, you should probably be using sequence notation, as described in the next section, rather than these shorthand functions.
Concurrent Assertion Clock Edges
As you have probably inferred from the discussion in the previous sections, the clock to be used by a concurrent assertion is an important consideration when creating the concurrent assertion. This clock is expressed with a clock specifier such as @(posedge clk1). The clock expression is what determines which values are sampled, and can create unexpected behavior if the wrong clock is used. A common mistake is to omit an edge and use an expression like @(clk1): this makes an assertion act on positive and negative clock edges, effectively examining each phase rather than each cycle. For a latch-based design, this may sometimes be the true user intent, but more commonly, a posedge is really needed. If a slow clock is passed in to an assertion, it may be ignoring short-term values that last only a single phase of a faster clock. If sampled value functions such as $past are used, or sequence delays (which we will describe in the next section) are used, choosing a different clock can actually change the number of cycles that are counted.
In Figure 3.4 we can see the different behaviors of an assertion with the same logical expression, !sig1, but with different clocks passed in.
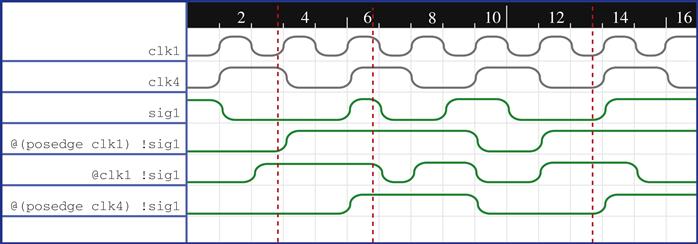
check_posedge: assert property (@(posedge clk1) !sig1);
check_anyedge: assert property (@(clk1) !sig1);
check_posedge4: assert property (@(posedge clk4) !sig1);
• At phase 4, the check_posedge and check_anyedge assertions have detected the zero value of sig1, but the check_posedge4 assertion has not, since we do not yet have a positive edge of clk4.
• At phase 7, the check_anyedge assertion has detected the one-phase glitch of sig1, but neither of the other two detects it, since this pulse does not persist until any positive clock edge.
• At phase 14, we see that all three assertions are passing, since sig1 had a value of 0 before positive edges of both clocks.
Ultimately, the key lesson here is that you should be sure to understand what clocks you are using for your assertions, and why. Do you want to detect one-phase “glitch” values, or ignore them? Do you want to look for every change relative to your fastest clock or really only care about some slower clock used to sense outputs?
Concurrent Assertion Reset (Disable) Conditions
In addition to clocks, concurrent assertions also allow you to specify reset conditions using disable iff. The main goal here is to shut off assertion checking during reset: on most modern designs, you can expect some level of arbitrary “garbage” values in your design at reset, and you probably do not want to deal with the noise of invalid assertion failures due to these arbitrary values. So an assertion is considered to be trivially passing whenever its disable condition is true.
A complication with assertion resets is that they are an exception to the sampling behavior described in the past few sections: assertion reset is asynchronous, with an assertion being shut off immediately any time its disable condition is met. The consequence of this is that you should not try to be clever and insert miscellaneous logic within your disable clause: because this is timed differently from the rest of the assertion, you are likely to get confusing and unintended results. For example, consider the following two assertions, both trying to state that outside of reset, if you have at least one grant, you should have a request:
bad_assert: assert property (@(posedge clk)
disable iff
(real_rst || ($countones(gnt)==0))
($countones(req)>0));
good_assert: assert property (@(posedge clk)
disable iff (real_rst)
(($countones(req)>0) ||
($countones(gnt)==0)));
At first glance, these might look logically equivalent: both are assertions that say you must either not have any grants, or you must have at least one request currently high. But because bad_assert puts the gnt signal in the disable condition, which is not sampled, it will actually be looking at gnt values one cycle earlier than the req values, causing a failure to be missed on the waveform shown in Figure 3.5.

In Figure 3.5, there is clearly a problem in phase 6, where there is a grant with no request. The assertion good_assert will report this failure on phase 8, using the sampled values from just before the relevant rising edge of clk1. The assertion bad_assert is disabled for every phase except 6. The sampled values just before the phase 8 rising edge show |req false, but the current value of gnt (used instead of the sampled value, due to the disable clause) disables the checking of this assertion.
Setting Default Clock and Reset
As we conclude our examination of SVA clocking and reset for concurrent assertions, there is one more important language feature to discuss. You have probably noticed from our examples so far that specifying the clock and reset of an assertion can seem a bit wordy:
good_assert: assert property @(posedge clk)
disable iff (rst)
(|req || !(|gnt)) else $error(“Bad gnt.”);
safe_opcode: assert property (
@(posedge clk)
disable iff (rst)
(opcode inside {FORCE0,FORCE1,FORCE2,FORCE3,ACCESS_OFF,ACCESS_ON}))
else $error(“Illegal opcode.”);
Fortunately, SVA offers a way to set a global clock and reset for the concurrent assertions in a module, so they can be written once and cover multiple assertions. You declare a default clock with a default clocking statement and a default reset with a default disable iff statement. If these defaults are declared, they apply to all assertion statements in the current module, except those that explicitly include a different clock or reset. Thus, the following code is equivalent to the two assertions above:
default clocking @(posedge clk); endclocking
default disable iff (rst);
good_assert: assert property
(|req || !(|gnt)) else $error(“Bad gnt.”);
safe_opcode: assert property (
(opcode inside {FORCE0,FORCE1,FORCE2,FORCE3,ACCESS_OFF,ACCESS_ON}))
else $error(“Illegal opcode.”);
The asymmetric syntax between the default clocking and default disable iff statements above is not a typo: default clocking requires an endclocking, while default disable iff does not. (Don’t ask us why, it’s a quirk from the initial language design that we’re now stuck with.) In the common case where you have many assertions that use the same clocks and resets, declaring these defaults in each assertion-containing module can significantly improve readability of your assertion code and also prevent the mistakes we have seen in the past few sections from misuse of clock and reset.
By the way—now that we have described the usage of these default constructs, coding examples in this chapter and the following chapters will usually not bother to specify the explicit clock and reset for each assertion. When reading any code fragment in the remainder of this text, you should assume an appropriate default clocking and default disable iff are in effect. This way, we can write our examples much more cleanly, without redundant details of clocking and reset visible in every assertion line.
Sequences, Properties, and Concurrent Assertions
Now that we have introduced the basics of concurrent assertions and showed how their clocking works, we can finally get to the most powerful aspect: the ability to state behaviors happening over time and to use the multiple layers of the language to build up complex sequences and properties.
Sequence Syntax and Examples
A sequence is a specification of a set of values occurring over a period of time. The basic operation used to build a sequence is a delay specifier, in the form ##n (for a specific number of clocks) or ##[a:b] (indicating a variable delay between a and b clocks.) The special symbol $ can be used for the upper bound of a sequence, specifying a potentially unlimited number of cycles. A sequence is said to be matched when its specified values have all occurred. A sequence with a variable delay may have multiple overlapping matches during any execution trace. Figure 3.6 shows a few examples of simple sequences.

Another common sequence operation is the repetition operator [*m:n]. This indicates that a subsequence is to be repeated a certain number of times. Again, the upper bound may be $, indicating a potentially unlimited number of repetitions. Figure 3.7 shows some illustrations of using this operator.

Sequences may be logically combined using the and or or operators. (Note that these are distinct from SystemVerilog’s || and && operators, which provide logical ANDing or ORing for Boolean expressions.) When using the and operator, we are indicating that both sequences are starting at the same time, though their endpoints may mismatch. For the or operator, one of the two sequences must be matched. Also useful are the throughout operator, which checks that some Boolean expression remains true for the whole execution of a sequence, and the within operator, which checks that one sequence occurs within the execution of another. Figure 3.8 shows some examples using these operators.
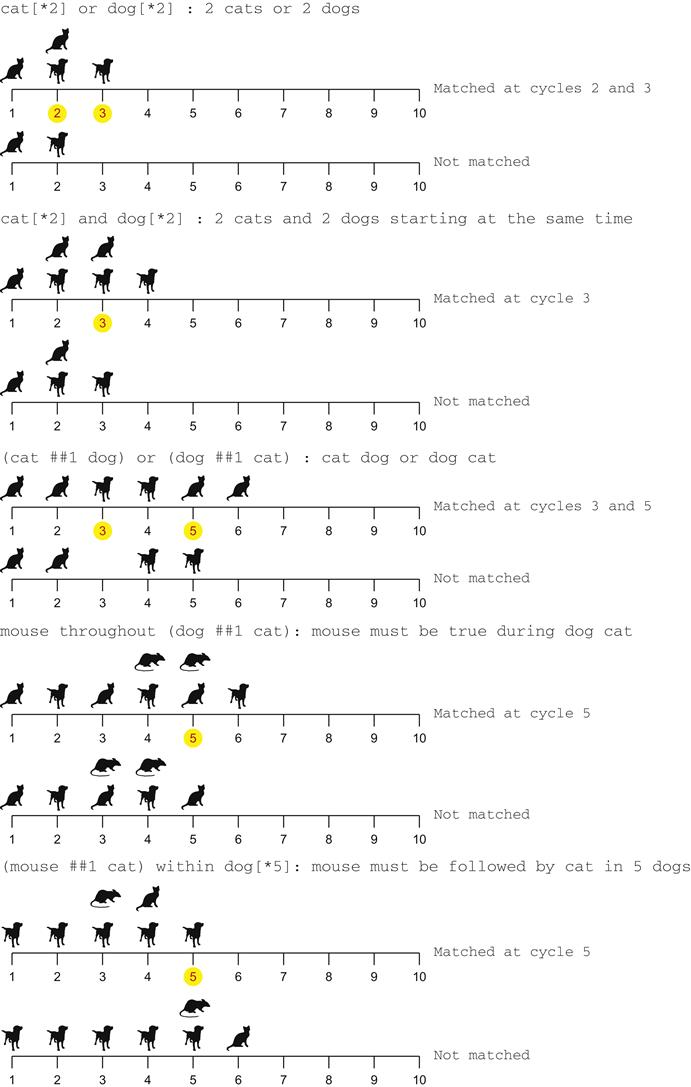
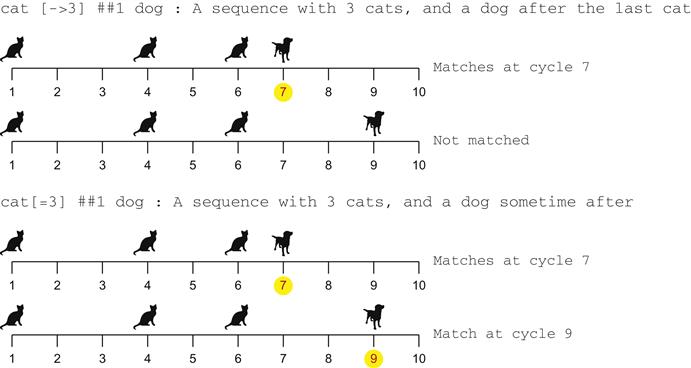
A final set of sequence operators that is commonly useful are the goto repetition operators, [->n] and [=n]. These indicate that some value occurs exactly n times in the sequence, though these occurrences may be nonconsecutive and have arbitrary other activity in between. The simple goto [->n] matches at the final occurrence of the value, while the nonconsecutive goto [=n] allows an arbitrary amount of additional time after the last occurrence. Figure 3.9 shows some examples of these.
Remember that sequences are not useful unless part of an assertion statement; the simple examples above are technically code fragments, not useful statements. Asserting a sequence as an assertion or assumption is not usually meaningful (we will discuss this more in the next subsection on properties), but sequences are very useful for building a cover property. Here are some examples of cover assertion statements that might be useful in our arbiter example:
// cover case where agent 0 req gets granted in 1 cycle
c1: cover property (req[0] ##1 gnt[0]);
// cover case where agent 0 req waits >5 cycles
c2: cover property ((req[0] && !gnt[0])[*5:$]
##1 gnt[0]);
// cover case where we see a FORCE1 arrive sometime
// while req0 is waiting
c3: cover property (opcode==FORCE1) within
((req[0] && !gnt[0])[*1:$]);
Using sequences instead of $rose/$fell
When describing sampled value functions in the last section, we mentioned that if you want to check for rising or falling values without counting transitions from X, you could use sequence notation instead of $rose or $fell. The sequence expression (!mysig ##1 mysig) is similar to $rose(mysig), except that it will not trigger on a transition from X to 1: it strictly checks that mysig is 0 for a clock, then 1 for the next clock. Similarly, you can use (mysig ##1 !mysig) instead of $fell(mysig), to avoid triggering on transitions from X to 0.
Property Syntax and Examples
The most common types of properties are created using triggered implication constructs, sequence |-> property and sequence |=> property. The left hand side, or antecedent, of an implication must be a sequence. The right hand side, or consequent, can be a sequence or a property. The difference between the two operators is that |-> checks the property on the same clock tick when the sequence is matched, while the |=> operator checks one tick later. Triggered properties are vacuously true (that is, true for trivial reasons) on cycles where their triggering sequence is not matched. Figure 3.10 shows some examples of simple properties and traces where they are true and false at various times.

We should also make an important point here about these triggered implication properties: they provide a very important advantage for validation, as opposed to other ways to write logically equivalent properties. This is because many EDA tools take advantage of the information about the triggering condition. For example, an overlapping |-> operation is often logically equivalent to a simple Boolean operation, as in the example below:
a1_boolean: assert property (!cat || dog);
a1_trigger: assert property (cat |-> dog);
However, with the triggered version, EDA tools can provide an advantage in numerous ways, to provide improved debug features.
• Simulation debug tools can indicate cycles when the assertion was triggered, as well as when it passed or failed.
• FV tools can generate an implicit cover point to check whether the triggering condition is possible. This also allows them to automatically report when an assertion is proven vacuously: it cannot be violated because the triggering condition cannot be met.
Thus, we recommend that whenever you have multiple potential ways to write a property, you try to state it as a triggered implication if possible.
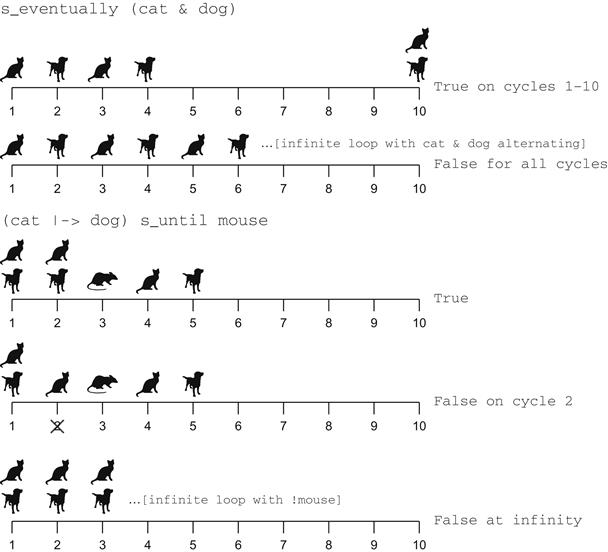
Another set of useful tools for constructing properties are the linear temporal logic (LTL) operators. A full discussion of LTL operators is probably more detail than you need at this point, so we will refer you to LRM section 16.12 if you wish to learn the full story. But LTL operators are critical if you want to create “liveness properties”: properties that specify aspects of potentially infinite execution traces. Probably the most useful LTL operators in practice are s_until and s_eventually. For the most part, these operators are exactly what they sound like: s_until specifies that one property must be true until another property (which must occur) is true, and s_eventually specifies that some expression must eventually be true. The s_ prefix on these operators stands for “strong,” indicating that in an infinite trace the specified conditions must happen at some point. (You can omit the s_ prefix to get “weak” versions of these operators, which means that an infinite trace that never hits the condition is not considered a violation.) Infinite traces may sound odd if you are used to simulation, but they can be analyzed by FV tools; we will discuss this issue more in upcoming chapters. Figure 3.11 shows some examples of these LTL operators.
One more very useful class of properties is negated sequences. SVA sequences have a not operator, to enables us to check cases when the sequence is not matched. We did not include this in the sequence section above because technically a negated sequence is a property object, not a sequence object. This means that it cannot be used as the left-hand side of an implication operator. However, a negated sequence is often very useful as a property to check that some unsafe condition never occurs. Here are some examples of negated sequences used as properties. Figure 3.12 shows some examples of these.

Like sequences, properties are not actually meaningful unless included in an assertion statement; once again, the examples above are just fragments at this point. Here are some examples of assertion statements that might be useful in our arbiter model.
// assume after gnt 0, req 0 falls within 5 cycles
req0_fall_within_5: assume property
($rose(gnt[0]) |=> ##[1:5] $fell(req[0]));
// assert that any request0 is granted within 20 cycles
gnt0_within_20: assert property
($rose(req[0]) |-> ##[1:20] gnt[0])
// assert that any grant on 0 is eventually withdrawn
gnt0_fall: assert property
($rose(gnt[0]) |-> s_eventually (!gnt[0]));
Named Sequences and Properties
Until now, we have been using sequences and properties directly in assertion statements, which is the most common mode of use. But sometimes you might want to encapsulate an advanced set of behaviors as a named object for more convenient reuse. SVA provides the ability to create named sequence and property objects for this purpose. These are similar to module declarations, but they take an optional set of untyped arguments. To define a named sequence, you just need the keyword sequence followed by its list of formal arguments, then the expression of the sequence, followed by an endsequence. Similarly for properties, you just need the keyword property followed by its list of formal arguments, then the expression of the property, followed by an endproperty. The property or sequence can then be instantiated in an assertion statement, or in another property/sequence, by using its name and passing in appropriate arguments. Here are some simple examples of a named sequence and property and how they might be used:
sequence within_5_cycles(sig);
##[1:5] sig;
endsequence
property b_within_5_after_a(a,b);
a |-> within_5_cycles(b);
endproperty
// assertions a1 and a2 below are equivalent
a1: assert property (gnt[0] |-> ##[1:5] !req[0]);
a2: assert property (b_within_5_after_a(gnt[0],!req[0]));
Assertions and Implicit Multithreading
Now that you know how to describe complex behaviors that happen over time, a question has probably occurred to you: what happens if multiple behaviors overlap? For example, suppose we implement a version of the arbiter that accepts each request as a one-cycle pulse and expects a grant precisely 10 cycles after any request. Here is an example assertion describing this behavior for agent 0:
delayed_gnt: assert property (req[0] |-> ##10 gnt[0]);
Due to the 10-cycle gap between the request and the grant, though, it is possible that another request will arrive within that window. That second request should also get a grant precisely 10 cycles after it arrived. So in effect, we need two overlapping evaluations of this assertion. Fortunately, SVA assertions provide built-in multithreading: multiple instances of an assertion or sequence may be in progress at any given time, with a new one triggered each time its starting conditions are met. The waveform shown in Figure 3.13 illustrates how this happens.

In Figure 3.13, we can see that the first evaluation thread is launched after the request pulse on req[0] in cycle 1, and completes when the corresponding grant is seen in cycle 11. Similarly, the second thread is launched after the request in cycle 5, and ends after seeing the corresponding grant in cycle 15. Even though these two evaluations of the assertion are happening at the same time, they do not interfere with each other: if the grant had failed to arrive at cycle 11 or at cycle 15, a failure would have been reported.
Of course, like many powerful language features, this implicit multithreading is a double-edged sword: be careful not to create assertions with a triggering condition that happens often, or you risk creating a situation where the system must potentially analyze new threads created every single cycle, significantly impacting both FV and simulation performance. For example, the following assertion would have ended up creating new threads on nearly every cycle (all except cycles 1 and 5) in Figure 3.13:
notreq: assert property (!req[0] |-> ##10 !gnt[0]);
Writing the Properties
At this point, you know enough about the basics of assertions to write a wide variety of useful assertion statements. But in practice, how do you decide when and how to write assertions? In this final section of this chapter, we give you some general guidelines on adding assertions to your RTL models. This initial discussion is fairly general; in future chapters, we will return more specifically to examples of assertions that are especially useful in FV. There are three main project phases when you would typically define assertion statements needed in your code: during design specification, during RTL development, and during validation.
Planning properties at the specification phase
You should begin thinking about assertion statements when you are generating the high-level specifications for your design. Whenever you are describing a concrete requirement that will describe the behavior of signals in your design, think about whether it is something that you could potentially write as an assertion. Actually coding an RTL assertion at this early phase might not make sense, but you should find some way to indicate in your specification that you are at a point where an assertion is appropriate, so the correct assertion can later be inserted by an RTL developer or validator when the code is available. This can be as simple as a comment “ASSERTION” at the start of relevant paragraphs.
Also remember to think about potential cover points at this stage: both typical conditions that will be useful as a general sanity check on your validation, as well as interesting corner cases that you are worried your validation might miss.
Embedded properties during RTL development
During RTL development, you have a critical opportunity to capture your own thought processes in a permanently reusable way. Most commonly, RTL authors add comments to their code to describe why they are implementing it in a certain way. Assertions, however, can be thought of as “executable comments”—while they help to clarify the code, they also provide checks, during both simulation and FV, that the original intentions remain accurate. For example, compare the following two fragments of code:
// Fragment 1
// We expect opcode to be in the valid range; bad
// opcode would result in bypassing these lines.
// Also, don’t forget to test each possible value.
assign forced_nodes = f_get_force_nodes(opcode);
// Fragment 2
op_ok: assert property
((opcode>=NOP)&&(opcode<=ACCESS_OFF));
generate for (i=NOP;i<=ACCESS_OFF;i++) begin: b1
test_opcode: cover property (opcode == i);
end
endgenerate
assign forced_nodes = f_get_force_nodes(opcode);
You can see that while both convey the idea that we expect opcodes in a valid range, and both demand us to test each possible opcode value, only Fragment 2 does these in an enforceable way. When the RTL is passed on to a future project for reuse, virtually a certainty in today’s world of System-On-Chip (SOC) design, the new users will see assertion failures in simulation or FV if they use it in a way that violates the original author’s assumption. And if the new user accidentally disables some opcodes that were available in the original design, the new validation team will discover some cover points that are not hit.
One other aspect of embedded assertion writing that is important to point out here is the use of assertions rather than assumptions. In general, you need to be careful about writing assumptions: because they constrain the space of possible values used for FV, a poorly chosen assumption can be counterproductive or dangerous. Whether a particular statement needs to be an assertion or an assumption depends on the hierarchy level where you are running FV, and most modern FV tools allow you to dynamically change a particular set of assertions to assumptions at the tool level. Also, assertions and assumptions are equivalent during simulation. Thus, we recommend that when writing embedded assertion statements during RTL development, you just write assertions and cover points, rather than assumptions.
Validation-focused properties
The other major project phase when you will typically be writing assertions is for validation purposes. This is typically the style of property writing that you will do for focused FV efforts, as we will see in upcoming chapters. When your focus is on validation, use the specification for your block as a starting point, and write assertions that restate the specification in an SVA format. For example, here is a possible specification of our arbiter block:
• When opcode == FORCEn, agent n gets the grant.
• When opcode == ACCESS_OFF, nobody gets a grant.
• The op_error signal is 1 if opcode is invalid, otherwise it is 0.
• When opcode == NOP, arbitration works as follows:
– If nobody has a grant, the lowest-numbered requesting agent (0, 1, 2, 3) gets the grant.
– When the grant holder lifts the request, the next agent that requested gets the grant.
When we have such a specification, we should usually try to write “end-to-end” assertions that will specify how our design’s outputs look in terms of its inputs. These will be the most effective in helping to find if some unexpected or overlooked part of our design causes incorrect behavior. While white-box assertions based on internal nodes can also be useful validation and debug aids, using these exclusively can be dangerous because they focus on the designer’s low-level thought processes instead of the overall design intent.
Also, depending on the complexity of our design, we need to keep in mind that it is often the case that a simple set of assertions may be difficult to write; we may also need some SystemVerilog modeling code to track the state or compute intermediate values. This is fine: don’t be afraid to add queues, state machines, or similar modeling along with your assertions, to enable you to properly track design behavior. At the same time, be careful about cases where the modeling gets complex enough to add noticeable simulation cost: you may need to use ifdefs to mark some code as formal-only if this becomes an issue.
Now let’s look at the actual assertions we would write for our arbiter, based on each of the specification conditions.
This one seems very straightforward—but even with this simple requirement, we can see an initial ambiguity. Does our arbiter provide grants instantaneously, or is there a delay? We should probably improve our specification to state this directly. For now, we will expect a one-cycle delay between a request/opcode and a grant. We also need to be careful to include the implicit requirement here that other agents do not get the grant. We should also add appropriate cover points to make sure we validate cases where we use this functionality: many EDA tools will generate automatic covers for the direct triggering condition, but we may also want to add an explicit check that we can see cases where the force request is active and we get the grant. Thus, this requirement leads to the following assertion statements:
parameter t_opcode fv_forces[3:0] =
{FORCE3,FORCE2,FORCE1,FORCE0};
generate for (i=0; i<=3;i++) begin: g1
forcei: assert property (
(opcode == fv_forces[i]) |=>
(gnt[i] == 1) && ($onehot(gnt))) else
$error(“Force op broken.”);
cover_forcei: cover property (
(opcode==fv_forces[i])
&& (gnt[i] == 1));
end
endgenerate
Now for the next two requirements:
• When opcode == ACCESS_OFF, nobody gets a grant.
• The op_error signal is 1 if opcode is invalid, otherwise it is 0.
These two are fairly straightforward. But be careful on the error condition: we need to not only assert that invalid opcodes give us an error, but also that valid opcodes do not give us an error. To make this easier we create an instrumentation signal fv_validop as shown below. We also add some related cover points.
accessoff: assert property (
(opcode == ACCESS_OFF) |=>
(|gnt == 0)) else
$error(“Incorrect grant: ACCESS_OFF.”);
logic fv_validop;
assign fv_validop = (opcode inside {FORCE0,FORCE1,FORCE2,
FORCE3,ACCESS_OFF,ACCESS_ON});
error0: assert property (fv_validop |=> !op_error);
error1: assert property (!fv_validop |=> op_error);
cover_nognt: cover property (|gnt == 0);
cover_err: cover property (!fv_validop ##1 !op_error);
The final set of requirements form the core of the arbiter operation.
• When opcode == NOP, arbitration works as follows:
– If nobody has a grant, the lowest-numbered requesting agent (0, 1, 2, 3) gets the grant.
– When the grant holder lifts the request, the next agent that requested gets the grant.
Here we will illustrate the use of some instrumentation functions, simple SystemVerilog function statements, to determine the next agent in the round robin ordering for the assertion. Note that this is probably redundant with some logic in the design; this is fine, since we are trying to double-check our critical implementation logic.
// Return which bit of a one-hot grant is on
function int fv_which_bit(logic [3:0] gnt);
assert_some_owner: assert final ($onehot(gnt));
for (int i=0; i<4; i++) begin
if (gnt[i] == 1) begin
fv_which_bit = i;
end
end
endfunction
// Compute next grant for round-robin scheme
function logic [3:0] fv_rr_next(logic [3:0] req,
logic [3:0] gnt);
fv_rr_next = 0;
for (int i=1; (i<4); i++) begin
if (req[(fv_which_bit(gnt)+i)%4]) begin
fv_rr_next[(fv_which_bit(gnt)+i)%4] = 1;
break;
end
end
endfunction
// If nobody has the current grant, treat as if agent 3 had it (so agent 0,1,2 are next in priority).
rr_nobody: assert property (((opcode == NOP) &&
(|gnt == 0) && (|req == 1)) |=>
(gnt = fv_rr_next(req,4’b1000))) else
$error(“Wrong priority for first grant.”);
// If ANDing req and gnt vector gives 0, req is ended.
rr_next: assert property (((opcode == NOP) &&
(|gnt == 1) && (|req == 1) && (|(req&gnt)==4’b0)) |=>
(gnt == fv_rr_next(req,gnt))) else
$error(“Violation of round robin grant policy.”);
We would also generate some related cover points for the above example, checking that grants to each of the agents are possible, but for the sake of brevity we do not describe them in detail here.
Before we finish with the assertions to implement on this block, it is also a good idea to take a step back, look at the specification, and see if there are any unstated safety conditions that were so obvious that nobody bothered to state them. This is a common problem in specifications: there are often implicit notions about a particular type of design that are so well understood by the engineering community that we “do not need” to state them. In this case, you may have already spotted that in this detailed arbiter specification, we have never mentioned one core safety property that should be true of any arbiter:
This one is easy to state as an assertion, so we should go ahead and do it. Our other assertions might imply it at some level, but there is really no downside to formally stating such a clear and direct requirement.
safety1: assert property ($onehot0(gnt)) else
$error(“Grant to multiple agents!”);
Remember to review your plans for such missing requirements whenever writing a set of assertions for a new model.
Connecting the properties to your design
Once you have written your assertions and cover points, you must insert them into your RTL model. The most direct way to do this is simply to paste them inside the code of your top-level module. If you are writing embedded assertions as you design the code, inserting them in the actual RTL as you write it does make the most sense. However, if you are writing assertions later for validation purposes, you may not want to touch the original RTL code directly.
SystemVerilog provides a nice feature to enable you to connect externally written code inside a module: the bind statement. Binding allows you to separate design code from verification code. A bind essentially forces a remote module to instantiate another module inside it, and be treated just like any other submodule instance. This enables you to put a set of validation assertions in a standalone module and then connect it to your model. To illustrate the use of bind statements, the following two code fragments are equivalent:
// Fragment 1: Directly instantiate FV module
module arbiter(...);
...
fv_arbiter fv_arbiter_inst(clk,rst,
req,gnt,opcode,op_error);
endmodule
// Fragment 2: Bind FV module
module arbiter(...);
...
endmodule
// This line may be below or in another file
bind arbiter fv_arbiter fv_arbiter_inst(clk,rst,
req,gnt,opcode,op_error);
Thus, the original RTL code may be cleanly maintained, while validation code is written independently and connected later.
Summary
In this chapter, we introduced the basics of SVA. We learned about the three types of assertion statements: assertions, which state a requirement of your design; assumptions, which state an expectation from a design’s external environment; and cover points, which describe expected testing conditions for a design. We then discussed the major features of the SVA language that are most likely useful for FV, including:
• Immediate assertions, which are useful in unclocked situations and for FEV tools.
• Boolean building blocks including $countones, $countbits, $onehot, $onehot0, and the inside operator.
• Concurrent assertions, clocked assertions that are the most useful for FPV. These are timed using well-defined “sampling” behavior that can be tricky for beginners.
• Clocking and reset for concurrent assertions, including the ability to set default clock and reset values using default clocking and default disable iff.
• Sequence operations, including ##[m:n] delay operators, [*n], [->n], and [=>n] repetition operators, and the and, or, and throughout operators.
• Property operations, including triggered implications |-> and |=>, LTL operators s_until and s_eventually, and negated sequences as properties.
• Sampled value functions, including $past, $rose, $fell, $stable, and $changed.
We then introduced the two main phases of a project where you are most likely to be writing assertions: during RTL development, when you want to use assertions as a type of executable comment, and during validation, when you should emphasize end-to-end specification-based assertions. We created a set of specification-based assertions for our arbiter example and showed how it might be connected to a model using SystemVerilog’s bind feature.
Now that you know the basics of assertions, in the next few chapters we will introduce their most powerful application: FPV.
Practical Tips from this Chapter
3.1 Use concurrent rather than immediate assertions, unless you are in a truly unclocked context such as a function, or you are specifically writing assumptions to aid state-matching FEV tools.
3.2 If you must use an immediate assertion, make it a deferred immediate assertion, by using assert final, or by using assert #0 if your tools do not yet support the p1800–2012 standard.
3.3 In cases where you need to use an immediate assertion, put it at the end of the procedure or function that calculates its key values.
3.4 Concurrent assertions are best placed outside your procedural code (that is, outside of your always blocks) to avoid confusion about which values are checked.
3.5 Don’t worry if reports of concurrent assertion failure times in some EDA tools seem to be one cycle later than the failure-causing values. This is a consequence of SVA’s definition of sampling.
3.6 Think carefully about the proper clock for your assertions and be sure to include the posedge or negedge qualifier if applicable.
3.7 In the reset (disable iff) of an SVA assertion, only use actual resets: signals that globally shut off major parts of the model for long periods of time. Using miscellaneous logic in the reset term can give confusing results due to the asynchronous behavior.
3.8 When you are writing many assertion statements that use the same clocks and resets, be sure to use default clocking and default disable iff statements to declare the clocks and resets once, instead of including them in every individual assertion.
3.9 Use triggered properties (|->, |=>) in preference to other forms of properties when possible. This enables many EDA tools to provide specialized visualization and debug features.
3.10 If you are including a nontrivial amount of logic in any assertion statement, consider defining named sequences and properties to enable cleaner and more modular code.
3.11 Begin thinking about potential assertions in your specification/requirements phase, and mark potential assertions in the documents you create before RTL development.
3.12 As you are developing RTL, whenever you are about to write a comment about expected values or behavior of signals, think about whether it can be stated as an SVA assertion. If so, write the assertion, thinking of it as an “executable comment” for better long-term enforcement of your expectations.
3.13 As you are developing RTL, whenever you are about to write a comment about kinds of testing that need to be done, think about whether it can be stated as an SVA cover statement. If so, write the cover statement, thinking of it as an “executable comment” for better long-term enforcement of your expectations.
3.14 When writing embedded SVA statements, use assertions rather than assumptions. If a statement truly needs to be an assumption, this can be changed later dynamically in your FV tool.
3.15 For validation, write high-level “end-to-end” assertions, based on your specification, that say how the outputs will behave depending on the inputs.
3.16 When writing high-level assertions based on your specification, be sure to add modeling code when appropriate. However, also pay attention to simulation profiling reports to detect cases where complex modeling is starting to have a noticeable simulation cost, and consider restricting such modeling and related assertions to only be used in FPV.
3.17 When writing end-to-end assertions for validation, it is okay to write instrumentation code that mimics some calculation in your design. If doing this, we recommend keeping the validation code in a separate file and using some naming convention like a fv_ prefix before all FV objects to avoid confusion between the real design and instrumentation logic.
3.18 When you write specification-based validation assertions, also think about high-level unstated safety conditions that may be implicitly part of the design intent.
3.19 If you want to add validation assertions without touching the original RTL code, take advantage of SystemVerilog’s bind statement.