8. Managing Your iTunes Library
You put a lot of time and effort into building your iTunes library. Make sure it’s well managed so you can enjoy it to the utmost.
As you add music and video to your iTunes library, that library grows in both value and size. To get the most out of it, pay some attention to the library as a whole. In this chapter, you’ll learn how to back up all or part of your library. Whether you want to burn your favorite playlist to a CD or back up the whole thing, it’s always a good idea to have copies of your files in case you need to restore those files someday.
Media files can crowd your hard drive, taking up space on your computer and affecting its performance. This chapter shows you how to move the folder that contains your iTunes library to a different hard drive (this can be a different drive in your system or an external hard drive) and use it from there.
Finally, because different people have different tastes, you’ll see how to create multiple iTunes libraries for a single account. You’ll never have to sort through your spouse’s jazz albums to find your favorite country music again (or vice versa).
Burning a CD or DVD
When you transfer copies of your iTunes files to a CD or DVD, it’s called burning a disc. This can be a good way to save your playlists (and listen to them on a CD player) or back up an album you purchased through the iTunes Store. You can even back up your entire iTunes library on DVD.
Tell Me More: Media 8.1—Copyright and Fair Use
![]()
Access this audio recording through your registered Web Edition at my.safaribooksonline.com/9780132660273/media.
Do You Have the Right Equipment?
Before you start burning CDs and DVDs from your iTunes library, make sure you have the equipment you need:
• A computer with a disc drive that’s capable of recording to CDs and DVDs—If your computer has an internal recordable disc drive, you should be all set. Some, but not all, external disc drives (the kind you connect to your computer via a cable) can do this.
• A blank recordable disc—Make sure you have a disc that you can record to. You can purchase discs at an office supply store (or in the office supply section of your favorite discount store). You’ll find a bewildering number of options. Here’s what they mean:
• CD-R—This is a compact disc that allows you to record music and other data files (the R stands for recordable). It’s a good bet for recording music, because most CD players know how to read this type of disc. Each disc can be used only once for recording.
• CD-RW—This is a rewritable compact disc; it can be erased and reused. Unlike CD-R discs, though, these may not play in some stereos and computers.
• DVD-R—This is a recordable digital versatile disc (sometimes DVD stands for digital video disc, but these discs can hold other kinds of data, not just video). After you’ve burned data to a DVD-R, you’re done—you can’t record over that data. As you’ll read in the next section, DVDs have a much greater storage capacity than CDs.
• DVD-RW—This is a rewritable DVD. You can erase its contents and rerecord it up to a thousand times. If you’re using DVDs to back up your library, this is a good choice because you can use the same discs for periodic backups.
To find out which kind of disc you’re using, check the packaging it came in.
How Much Data Can You Fit on a Disc?
When you’re planning to burn a CD or DVD, it’s helpful to know how many songs and other media files you can fit on a disc—you don’t want to run out of space before your playlist runs out of songs.
Start by creating the playlist you want to copy (this is a necessary step in burning a disc). When you know the size of your playlist, you’ll be able to estimate whether it will fit on a single disc—or whether you’ll need more than one to hold it.
![]() To read how to set up a playlist in iTunes, see “Creating a Playlist” (in Chapter 5, “Playing with Playlists”).
To read how to set up a playlist in iTunes, see “Creating a Playlist” (in Chapter 5, “Playing with Playlists”).
Next, understand how the kind of disc you’re using and the kind of files you’re copying affect how much you can burn onto a disc. Different kinds of disc have different storage capacities:
• CD-R and CD-RW—The standard size for compact discs is 12cm across (although 8cm mini-discs are also available). Twelve-centimeter CDs come in two storage capacities (check the packaging to see how much data your disc can hold):
• 650MB—Holds up to 74 minutes of audio
• 700MB—Holds up to 80 minutes of audio
• DVD-R and DVD-RW—A typical DVD has a storage capacity of 4.7GB (that’s about five to six times the storage space a CD offers).
The kind of files you’re copying also affects how much music or other data a disc can hold:
• Lossless audio files—If you’re burning a CD to play its music in a CD player, you get the best sound quality with lossless files, which retain all the data of the original recording. But this also makes the files bigger. Files you import into iTunes using the AIFF (for Macs) or WAV (for Windows) format have the best-quality sound when you burn those files to a CD.
![]() To choose the right audio format for your purposes when you import music into iTunes, see “Adjusting Your CD Import Settings” (in Chapter 2, “Getting Content into iTunes”).
To choose the right audio format for your purposes when you import music into iTunes, see “Adjusting Your CD Import Settings” (in Chapter 2, “Getting Content into iTunes”).
• MP3 files—These compressed files are lossy, which means they take up less space than lossless files, but at the cost of some sound quality. That said, most listeners find MP3s perfectly acceptable for listening. MP3 files require about 1MB of disc space per minute of music, which means you can fit hundreds of songs in this format onto a single disc—about 12 hours’ worth of music!
• Video files—A two-hour movie takes up about 1.5GB of space.
To estimate whether your playlist will fit on one disc, open the playlist by clicking its name in the left source list. Look at the bottom of the track list. As Figure 8.1 shows, you can see both the playing time and the size (in megabytes or gigabytes) of the playlist. Use this information to determine how many discs you’ll need to record the whole playlist (or whether you want to trim the playlist to fit on a single disc):
Figure 8.1. Checking a playlist’s size
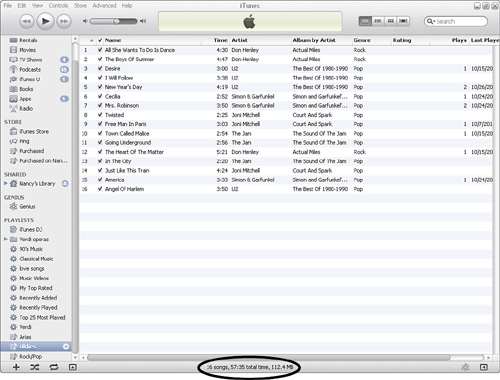
• If you’re recording an audio CD—Use the playlist’s length (how many hours, minutes, and seconds of music) to determine whether it will fit on a single CD: either 74 or 80 minutes. Check your CD packaging to see the capacity of your disc.
• If you’re recording an MP3 CD or a back-up DVD—Look at the size of the playlist in megabytes or gigabytes to figure out how many files you can fit onto the disc. If you’re recording to a compact disc, the disc can hold up to either 650MB or 700MB. If you’re recording to a DVD, it can hold about 4.7GB.
If your playlist has more music than will fit onto a single CD, iTunes pauses during the burn process and asks whether you want to burn the playlist onto multiple CDs. If that’s what you want, click Audio CDs to continue. iTunes fits as many complete songs as possible onto the first disc. When that disc is full, it asks you to insert another disc to continue recording.
![]() For a step-by-step account of the process of burning a CD, see “Burning an Audio CD” (later in this chapter).
For a step-by-step account of the process of burning a CD, see “Burning an Audio CD” (later in this chapter).
Which Disc Format Should You Choose?
When you select File, Burn Playlist to Disc to burn a CD or DVD, iTunes asks you to choose a format (see Figure 8.2). It’s best to know which format you want before you begin the process. This list gives you the best format choices for different purposes:
• If you’ll be listening to the CD using a standard CD player—Choose Audio CD. This is the format to use if you plan to listen to the disc in your car or on most stereos (or if you’re not sure what kind of CD player you’ll use—this format is compatible with just about all players).
• If you’ll be listening to the CD using a computer or an MP3-compatible CD player—Choose MP3 CD. The advantage to burning songs in MP3 format is that a standard CD can hold a lot more music. When you choose this format, iTunes burns only those songs in the playlist that are in MP3 format—any playlist songs in a different format get skipped.
• If you’re backing up your music library—Choose Data CD. This option burns all files on the playlist, no matter what their format. It also lets you record to a high-capacity DVD.
Figure 8.2. Choosing burn settings
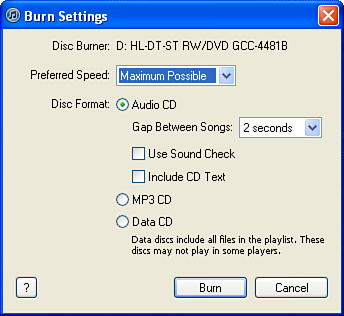
What’s the Best Recording Speed?
Another setting to consider before you burn a disc is the speed at which the disc will record. You select this from the Preferred Speed drop-down list in the Burn Settings dialog box (see Figure 8.2). How fast you can burn a CD depends on the discs you’re using, the speed of your recorder, and how much data you’re recording. At single speed (1X), a recorder writes about 176KB of audio data per second to the CD. For each increment above that, multiply 176KB by the writing speed. So 2X writes 352KB of data per second, 4X writes about 704KB of data per second, and so on, all the way up to 24X, which writes about 4.2MB of data per second—or about three minutes to fill up an 80-minute disc.
Most of the time, Maximum Possible (the default) is the setting you want you want in the Preferred Speed drop-down list. When you select this recording speed, iTunes checks the blank CD’s rating and picks the optimal recording speed for that rating. But if you’re having trouble recording a CD, you might try a slower speed. (Check the packaging to see the speed your disc is rated for.)
Creating a Playlist
Before you burn a CD or DVD, you must create an iTunes playlist that holds the files you want to copy. Make sure that each song you want to record has a check mark to the left of its name.
![]() Not sure how to set up a playlist in iTunes? See “Creating a Playlist” (in Chapter 5).
Not sure how to set up a playlist in iTunes? See “Creating a Playlist” (in Chapter 5).
Copying Files to a CD or DVD
Now that you’ve done all the prep work and created a playlist, you’re ready to burn that playlist to a disc.
Show Me: Media 8.2—Saving an iTunes Playlist to an Audio CD
![]()
Access this video file through your registered Web Edition at my.safaribooksonline.com/9780132660273/media.
Burning an Audio CD
To copy a playlist’s files to an audio CD, take these steps:
- In iTunes, go to the Playlists section of the left source list and select the playlist you want to save to a disc.
- Insert a blank disc into your computer’s CD drive.
- Select File, Burn Playlist to Disc.
- In the Burn Settings dialog box, shown in Figure 8.2, choose Audio CD as the Disc format.
- Choose your settings:
• Preferred Speed—You probably want the default of Maximum Possible here.
• Gap Between Songs—The default is a two-second pause between the end of one song and the beginning of the next. You can pick no gap or add a gap of from one to five seconds.
• Use Sound Check—Songs are recorded at different volumes, but you don’t want your playlist to be too loud for one song and too soft for the next. Put a check mark in the Use Sound Check box to even out the volume of the songs on your playlist.
• Include CD Text—Some CD players can display the artist and song title for the track currently playing. If you want that info to show on the player, turn on this check box.
- Click Burn. The recording process can take several minutes.
- When iTunes has finished recording, eject the CD from your computer.
After you’ve burned an audio CD, test it by playing it in a CD player.
![]() LET ME TRY IT
LET ME TRY IT
Burning an MP3 CD
The process for burning a CD of MP3 files is almost identical to the process for burning an audio CD, except that you have fewer settings to choose from. When you’re creating a playlist to save as an MP3 CD, keep in mind that iTunes skips any songs that aren’t in MP3 format as it copies files to the CD.
To burn an MP3 CD, follow these steps:
1. In iTunes, go to the Playlists section of the left source list and select the playlist you want to save to a disc.
2. Insert a blank disc into your computer’s CD drive.
3. Select File, Burn Playlist to Disc.
4a. In the Burn Settings dialog box, shown in Figure 8.2, choose MP3 CD as the Disc format. (When you select this option, the settings specific to audio CDs become inactive.)
4b. If you want, choose a recording speed from the Preferred Speed drop-down list. In most cases, the default (Maximum Possible) is the best choice.
5. Click Burn. The recording process can take several minutes.
6. When iTunes has finished recording, eject the CD from your computer and test it in an MP3-compatible CD player.
![]() LET ME TRY IT
LET ME TRY IT
Burning a Data CD or DVD
You can use iTunes to create data discs that contain all the files in a playlist, no matter what kinds of files they are. Be aware, though, that data CDs and DVDs may not play in some disc players. These are best used for backup.
Here’s how to burn a data disc of an iTunes playlist:
1. In iTunes, go to the Playlists section of the left source list and select the playlist you want to save to a disc.
2. Insert a blank disc into your computer’s CD/DVD drive.
3. Select File, Burn Playlist to Disc.
4a. In the Burn Settings dialog box, shown in Figure 8.2, choose Data CD or DVD as the Disc format. (When you select this option, the settings specific to audio CDs become inactive.)
4b. If you want, choose a recording speed from the Preferred Speed drop-down list. In most cases, the default (Maximum Possible) is the best choice.
5. Click Burn. The recording process can take several minutes.
6. When iTunes has finished recording, eject the CD from your computer.
Troubleshooting Disc Burning
Having difficulty burning your playlist to a disc? Try these troubleshooting tips:
• Make sure you’re burning a playlist—You can burn only a playlist of songs. You can’t burn a disc from your iPod, your library, or the radio.
• Check your playlist—Make sure that all the songs you want to burn have a check mark beside them.
• Shorten your playlist—If your playlist is too long to fit on a single disc, iTunes warns you and gives you the option of canceling the burn. If you want the playlist on one disc, delete songs until its length (indicated at the bottom of the screen) is either 73 or 79 minutes or less, depending on the kind of CD you’re using.
• Choose the correct format—If you try to burn songs in a format other than MP3 to an MP3 CD, iTunes just skips those songs.
• Upgrade your songs—If you’re using older, DRM-protected versions of songs that your purchased from the iTunes Store before January 2009, those songs have copying restrictions. For pre–iTunes Plus songs, you can burn an unchanged playlist only up to seven times, no more.
• Slow down the burn speed—iTunes knows that you’re impatient and tries to choose the fastest possible burn speed. But if your burner or the disc in it can’t handle that speed, the burn could fail.
Backing Up Your iTunes Library
Everyone who works with computers has heard it a million times: Back up your data. Good advice—but do you follow it?
You should, especially with your iTunes library, which probably represents a significant investment of your time and money. If your computer crashed tomorrow and you lost your iTunes library, how much would it cost to replace all your music and videos? How much time would it require to reconstruct your library? Back up now, and you won’t have to worry about answering those questions.
Saving Your Library to CDs or DVDs
One way to back up your iTunes library is to save it to disc—or to a whole stack of discs, if your library is large. Label the discs and store them in a place where you can easily find them if you need them.
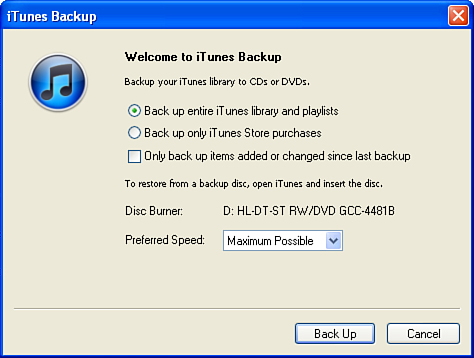
In iTunes, select File, Library and choose Back Up to Disc from the fly-out menu. This opens the iTunes Backup Wizard, shown in Figure 8.3. The wizard walks you through the process of backing up your files to discs. It offers these choices:
• Back Up Entire iTunes Library and Playlists—This option saves your whole library on discs: stuff you’ve bought through the iTunes Store, songs you’ve ripped from CDs or imported from a band’s website—everything. If you have a lot of media files, backing up your whole library on CDs or DVDs can take a tower of discs and a good amount of time. But if you don’t have an external hard drive or other high-capacity storage medium, it’s worth the effort to make sure you have backups.
• Back Up Only iTunes Store Purchases—This option finds songs, albums, and other content that you’ve bought from the iTunes Store and saves only those files to the CDs or DVDs you’re burning. You might choose this option if your iTunes library contains a lot of songs that you ripped from CDs and you still have those CDs.
• Only Back Up Items Added or Changed Since Last Backup—This is called an incremental backup, and it can save you time. iTunes checks for new files and copies only those that have arrived in your library since your last backup. You can use this option (select its check box) whether you’re backing up the whole library or just iTunes Store purchases.
• Preferred Speed—As with other disc-burning methods, you probably want to let iTunes handle this option. Leaving Maximum Possible for this setting lets iTunes determine the best recording speed for your equipment.
Figure 8.3. The iTunes Backup wizard
After you’ve selected what you want to back up, insert a blank disc in your CD/DVD drive and click the Back Up button. When that disc is full and you need to insert another, iTunes pauses and lets you know.
Backing Up Your Library on a Different Hard Drive
If you don’t want to sit at your computer all day inserting and ejecting discs to back up your iTunes library, you can save a backup to another hard drive—either a different drive on your computer or an external hard drive that’s connected to your computer.
![]() LET ME TRY IT
LET ME TRY IT
Backing Up to a Different Hard Drive
Performing this kind of backup is simple. If you’re using an external hard drive, first make sure that it’s connected to your computer. Then take these steps:
- In Windows Explorer or the Finder, locate your iTunes folder.
 If you’re not sure where to find your iTunes folder on your computer, see “Finding Music You’ve Imported” (in Chapter 2).
 - Locate the drive where you want to store your backup.
- Drag the iTunes folder to the other drive and drop it there.
Your computer copies the iTunes folder—and all its contents—to the drive where you dropped it. If your iTunes library is large, the backup may take a while. Be patient. You want to make sure that all your files and playlists are copied.
Restoring Your Library from a Backup
If a computer catastrophe strikes, you may need to restore all those files you backed up. (That’s why you backed them up in the first place, right?) Or you may want to transfer your library to a new computer. Whether you backed up your library on discs or on a different hard drive, restoration is easy.
Restoring Your Library from Backup CDs or DVDs
To restore your library from your backup discs, open iTunes and insert the first disc into your computer’s CD/DVD drive. A message appears asking whether you want to restore your library. Select Overwrite Existing Files and click Restore to start the process. Just as it took some time to back up your library to discs, it takes time to copy your backed-up files from the discs to the computer.
![]() LET ME TRY IT
LET ME TRY IT
Restoring Your Library from a Backup on Another Hard Drive
When you’ve stored a backed-up library on another hard drive, here’s how to restore your library in iTunes:
- If iTunes is open, close it.
- Find your iTunes folder on your computer and open it.
To find where your iTunes folder is stored on your computer, see “Finding Music You’ve Imported” (in Chapter 2).
- In your iTunes folder, select the file iTunes Music Library.xml and drag it to your computer’s Desktop.
- In your iTunes folder, select the following file and drag it to your computer’s Recycle Bin (Windows) or Trash (Mac):
• In Windows: iTunes Library.itl
• On a Mac: iTunes Library
- Start up iTunes.
- Select Files, Library and choose Import Playlist from the fly-out menu.
- In the Import dialog box, shown in Figure 8.4, navigate to your computer’s Desktop and select iTunes Music Library.xml.
Figure 8.4. The Import dialog box
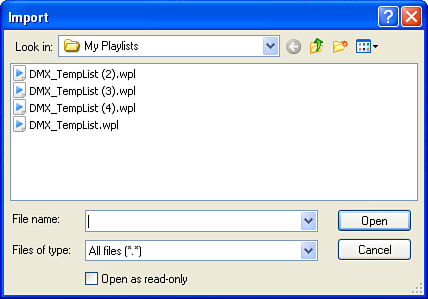
- Click Open (Windows) or Choose (Mac).
iTunes re-creates your library. The next time you sync your iPod or other portable device with iTunes, the device completely resyncs with your restored library (so the operation could take some time).
![]() To read more about getting your portable device and iTunes in sync, see “Syncing Your iPod, iPhone, or iPad with iTunes” (in Chapter 9, “Syncing and Sharing”).
To read more about getting your portable device and iTunes in sync, see “Syncing Your iPod, iPhone, or iPad with iTunes” (in Chapter 9, “Syncing and Sharing”).
![]() LET ME TRY IT
LET ME TRY IT
Restoring Podcasts to Your Library
If you go through the steps to restore your iTunes library and notice that the podcasts you saved are missing, here’s how to fix the problem:
- In iTunes, select File, Add Folder to Library (in Windows) or File, Add to Library (on a Mac).
- In the dialog box that opens, browse to find your iTunes folder and click the folder to open it.
- Inside the iTunes folder, find the iTunes Music folder and click to open it.
- Inside the iTunes Music folder, find and select the Podcasts folder.
- Click OK (in Windows) or Choose (on a Mac) to restore your podcasts.
Moving Your iTunes Media Folder
When you install iTunes, the installer creates a system of folders on your computer to hold your iTunes library. The iTunes folder holds a number of nested subfolders to organize the different kinds of content you have in your library. In iTunes 9 and later, your iTunes folder contains these subfolders:
• iTunes Media
• Audiobooks
• Automatically Added to iTunes
• Books
• iPod Games
• iTunes U
• Mobile Applications
• Movies
• Music
• Podcasts
• Ringtones
• TV Shows
• Voice Memos
You can choose where you store your iTunes Media folder. This can be helpful when your hard drive is full of all those media files you’ve imported and you want to move them to a different hard drive on your system to free up space on the main drive.
When you move your iTunes Media folder to a different location, you can keep your playlists, ratings, and play history intact. Doing so requires two steps:
• Telling iTunes to keep your iTunes Media folder organized—iTunes organizes your music by artist. Every album and track by the same artist goes into a folder labeled with that artist’s name. Folders also exist for compilation albums and unknown artists. Turning on this option ensures a smooth move to the Media folder’s new home.
![]() When you let iTunes handle the organization of your iTunes Media folder, you can focus on organizing your collection through tags. See “Organizing Your iTunes Library” (in Chapter 7, “Organizing Your Content”) for more information about tags.
When you let iTunes handle the organization of your iTunes Media folder, you can focus on organizing your collection through tags. See “Organizing Your iTunes Library” (in Chapter 7, “Organizing Your Content”) for more information about tags.
• Moving the folder—The methods are slightly different for Windows and Mac users because of differences in how the operating systems work.
Show Me: Media 8.3—Moving Your iTunes Media Folder
![]()
Access this video file through your registered Web Edition at my.safaribooksonline.com/9780132660273/media.
The next three sections walk you through the process of moving your iTunes Media folder.
![]() LET ME TRY IT
LET ME TRY IT
Preparing to Move Your iTunes Media Folder
Before you can move your iTunes Media folder, take these steps to prepare your library for the move:
- In iTunes, select Edit, Preferences (in Windows) or iTunes, Preferences (on a Mac).
- Click Advanced (see Figure 8.5).
Figure 8.5. Keeping the iTunes Media folder organized in preparation of moving it
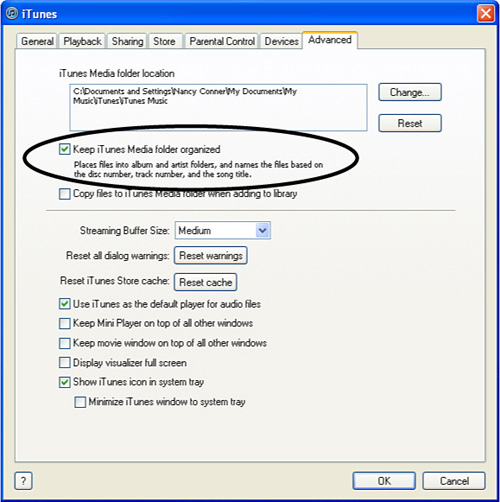
- Select the box labeled Keep iTunes Media Folder Organized.
- Click OK.
That gets your iTunes Media folder set up. How you proceed depends on whether your computer runs on Windows or Mac OS X.
Moving Your iTunes Media Folder: Windows
If your computer uses Windows as its operating system, follow these steps to move your iTunes Media Folder to a different hard drive:
- In iTunes, select Edit, Preferences.
- Click the Advanced tab, shown in Figure 8.5.
- At the top of the dialog box, you can see the current location of your iTunes Media folder. Click the Change button to its right.
- A dialog box opens that lets you browse the folders on your computer. Navigate to the location where you want to move your iTunes Media folder (such as a different hard drive).
- Click Make New Folder.
- Windows creates a new folder; type in the name for your new iTunes Media folder.
- Click OK to save the new folder.
- Back in iTunes, the Advanced tab shows a new location for your iTunes Media folder. Click OK.
- Still in iTunes, select File, Library, Organize Library.
- In the Organize Library dialog box, put a check mark in the Consolidate Files box.
- Click OK.
- Wait while your iTunes Media folder gets copied to its new location. When the copy operation has finished, drag the original iTunes Media folder to your computer’s Recycle Bin.
The next time you empty the Recycle Bin, Windows deletes the old iTunes Media folder and all its contents. Before you do that, it’s a good idea to make sure that iTunes is working properly with the iTunes Media file in its new location.
![]() LET ME TRY IT
LET ME TRY IT
Moving Your iTunes Media Folder: Mac
If you use a Mac, these instructions are for you. Open iTunes and then follow these steps:
- Select iTunes, Preferences.
- In the Preferences window, click Advanced.
- At the top of the Advanced window, find the current location of your iTunes Media folder. Click the Change button to its right.
- The Change Media Folder Location window opens. Browse to the location where you want your new iTunes Media folder.
- Click New Folder.
- The New Folder window opens; type in the name for new iTunes Media folder.
- Click Create to create the new folder.
- Back in the Change Media Folder Location window, click Choose.
- Back in the Advanced window, click OK.
- In iTunes, select File, Library, Organize Library.
- In the Organize Library dialog box, put a check mark in the Consolidate Files box.
- Click OK.
- Wait while your iTunes Media folder gets copied to its new location. When the copy operation has finished, drag the original iTunes Media folder to the Trash.
The next time you empty the Trash, your computer deletes the old iTunes Media folder and all its contents. Before you do that, it’s a good idea to make sure that iTunes is working properly with the iTunes Media file in its new location.
Working with Multiple Libraries
When several people share a computer, it doesn’t mean they share musical tastes. You might be a country music fan, for example, but your spouse is crazy about opera, your daughter loves alternative rock, and your son listens to nothing but hip-hop. When you all store your music in a single iTunes library, that kind of variety can get unwieldy. One solution is to create multiple iTunes libraries—one for each user to store his or her tunes. You can name your new iTunes library (the folder containing all of your iTunes content and the iTunes Library file) whatever you like and store it wherever you like.
Show Me: Media 8.4—Creating a New iTunes Library
![]()
Access this video file through your registered Web Edition at my.safaribooksonline.com/9780132660273/media.
Creating Multiple Libraries
Here’s how to create a new library for your iTunes account:
- If iTunes is open, close it.
- Hold down the Shift key (in Windows) or the Opt key (on a Mac) while you start up iTunes. Keep holding down the key until you see the dialog box shown in Figure 8.6.
Figure 8.6. Creating a new iTunes library
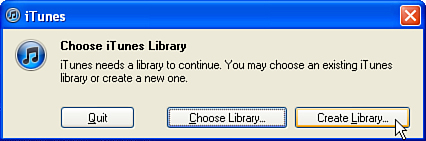
- Click Create Library.
- In the New iTunes Library dialog box, shown in Figure 8.7, navigate to the folder where you want to store the new library.
Figure 8.7. Locating and naming a new iTunes library
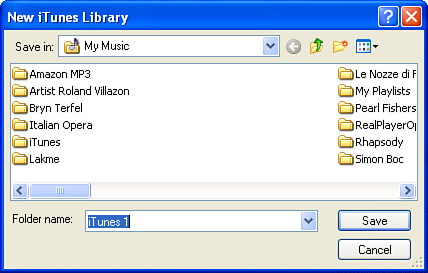
- Type a name for your library, such as Moms Music or Holiday Favorites, the File Name field.
- Click Save (in Windows) or OK (on a Mac).
iTunes creates your new library, giving it the name you assigned, and opens to that library. Now you can add content to that library.
![]() See Chapter 2 for everything you need to know about adding audio and video to your iTunes library.
See Chapter 2 for everything you need to know about adding audio and video to your iTunes library.
![]() Now that you’ve created a new library, you can share it over a network; see “Sharing Your iTunes Library” (in Chapter 9) to learn how.
Now that you’ve created a new library, you can share it over a network; see “Sharing Your iTunes Library” (in Chapter 9) to learn how.
![]() LET ME TRY IT
LET ME TRY IT
Choosing a Library
When you have more than one library associated with your iTunes account, iTunes opens to the library you used most recently. The name of the current library appears at the top of the iTunes window.
If you want to switch to a different library, you have to close iTunes and open it again, following these steps:
- Hold down the Shift key (in Windows) or the Opt key (on a Mac) while you start up iTunes. Keep holding down the key until you see the dialog box shown in Figure 8.6.
- Click Choose Library.
- In the dialog box that opens, shown in Figure 8.8, find and open the folder that contains the library you want. Inside the folder, select the iTunes library file.
Figure 8.8. Choosing a library to open
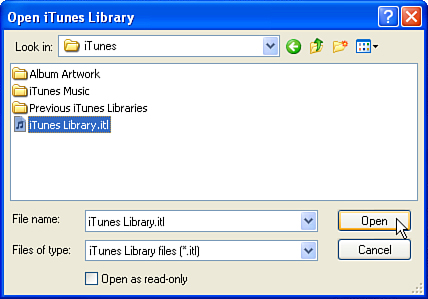
- Click Open (in Windows) or OK (on a Mac).