
8. NetBeans Platform Window System
A typical desktop application requires top-level containers that are managed by a window system. What do we mean when we use the term “window system”? First, a window system includes a window manager that responds to user actions such as dragging, undocking, selecting, or minimizing windows to manage work space. Secondly, a window system should include a persistence mechanism so users aren’t required to configure the application with each restart. Thirdly, a window system should provide a way to specify the window layout of an application and a way to group windows for common behavior. Finally, with a window system, you should be able to create multiple perspectives of an application so you can assign roles to different window configurations.
In this chapter you will explore the NetBeans Platform Window System. Significantly, the chapter includes many examples with various windows and operations on those windows. However, these windows, for the most part, lack any significant content.1 In this chapter, we are concerned with window management—opening, closing, window layouts, groupings, floating, maximizing, and resizing. After you have explored the window system itself, subsequent chapters build on examples presented earlier and show you how to manipulate window content.
1. The NetBeans Platform has a powerful selection mechanism in which the Window System participates. When users select a window, for example, objects in the selected window’s Lookup provide a global context for behaviors. We introduced Lookup and selection in “Lookup as an Object Repository” on page 225 and “Tracking Global Selection” on page 240. We further explore Lookup in “Actions and Lookup” on page 421.
• Explore TopComponent basics, persistence, and client properties.
• Create non-singleton TopComponents.
• Understand the window system life cycle extension points.
• Explore window system modes.
• Use window groups in your application.
• Customize your application’s window layout.
• Incorporate window layout roles in your application.
8.1 Window Framework Overview
Neither Swing nor JavaFX offers a framework with window management features. Developers can, of course, build a window management system themselves, but it takes a tremendous effort to create such a feature-rich system. The NetBeans Platform Window System provides this functionality. And, the window system is mostly configurable with Java annotations. Furthermore, you can specify many configuration parameters with the New Window wizard that NetBeans IDE provides.
Freed from having to provide such a sophisticated system (and re-inventing the wheel), developers can instead focus on building their business logic. In other words, they can concentrate on their domain issues and let the NetBeans Platform provide the window system.
We’ll begin with a quick tour of the NetBeans Platform Window System and some of its terminology before delving into how to leverage its many features.
Window Layout
Let’s use the NetBeans IDE itself to examine the framework’s window system. Figure 8.1 shows a typical window layout within the NetBeans IDE. The application framework includes a top-level menu bar and a toolbar, which are not part of the window system.

The remainder of the frame is the window layout. Here, a main editor-type window is surrounded by helper windows. In this example, the main editor window has three views with the Design view currently active. The Palette and Properties windows (on the right) help a user select components to configure or add to the GUI. The Navigator window (lower left) displays a hierarchical view of the design window’s components.
When you click the Source button and switch views to examine the source code, the Palette and Properties windows automatically close, leaving a larger work area for the Java source editor, as shown in Figure 8.2. The Palette and Properties windows form a window group with the Design view. That is, these three windows automatically open and close together. (Note that the Navigator window doesn’t close, but its contents change when the view is switched to Source.)

On the left is the explorer area, currently containing three windows. The Projects window is visible and provides file-level information on each opened NetBeans project. You can make the other windows visible by clicking their tabs (Files and Services windows in Figure 8.2). All three windows occupy the same area (mode).
The Output and Tasks windows appear below the editor. Finally, a single status line (which is not a window) occupies the very bottom edge of the application.
Figure 8.3 shows a detailed view of the editor window, which currently contains a Java source file with the Design view active (a GUI form editor). MultiView buttons let a user select among multiple views of the same file or other data.

MultiView Windows
MultiView windows are used with editor windows, which we cover in Chapter 14 (see “Working with MultiView Windows” on page 697).
Window tabs let a user select different windows in the same area (mode). Window selection controls in the editor area let the user cycle through window tabs when all the window tabs are not visible. The Design view controls are specific to the GUI form editors.
Window Modes
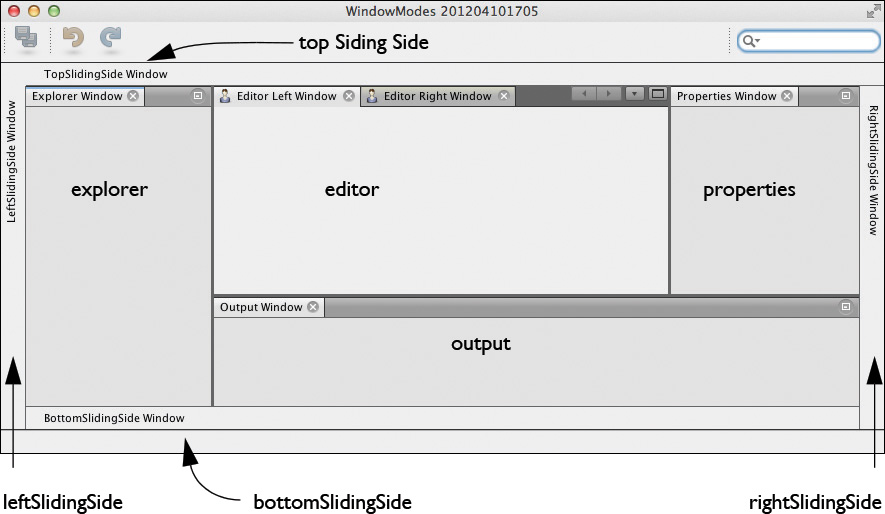
The location and behavior of an application’s window is defined by its window position, or mode, a container for windows. The NetBeans Platform Window System defines standard modes that you can use in your applications. Figure 8.4 shows these standard modes and their relative placement.

There are three types of window modes: editor (typically for holding documents), view, and sliding. The editor mode is the default and provides specialized behaviors, such as window selection controls shown in Figure 8.3. By default, the editor mode always takes up at least part of the window frame. Editor mode windows cannot be minimized. The sliding modes are containers for holding minimized windows. The view modes hold helper windows and are generally placed around the main editor mode window.
The window system configures the standard (non-sliding) modes with XML configuration files. You can create your own modes or modify standard modes using these configuration files. We show you how to do this in “Window Layout” on page 387.
TopComponents
The NetBeans Platform Window System manages windows that extend the TopComponent class. TopComponent, in turn, extends JComponent (a Swing-based container). With TopComponent, all application windows automatically integrate into the window system. That is, they are managed by the NetBeans Platform Window Manager and support a rich set of window operations.
Window Operations
Docking, floating, sliding, moving, opening, and closing are some of the many window operations the NetBeans Platform Window System provides. With drag and drop, you can move windows around and customize a window layout. Click the mouse on the window’s tab and drag it to a new location. Figure 8.5 and Figure 8.6 show a before and after window layout in a sample application. Here, we move the Explorer window to the same location as the Properties window.

The reconfiguration is automatically saved between application restarts during development unless you perform a clean and rebuild of your application.
A right click inside a window’s tab displays a context menu for additional window operations. You can also access the context menu through the top-level menu Window | Configure Window. Here are the available options. Note that the exact end result of a window operation would depend on the application’s current window layout.
• Float detaches a window from the main window frame. This lets you move a window around independently of the application. You can float a single window or a window group. Once you float a window, you can then dock (reattach), resize, maximize, move, or close the window. Float is particularly useful when using multiple monitors. Figure 8.7 shows a floating Explorer window detached from the main window frame.

• Minimize hides a window or window group, creating a tab (or handle) at the nearest edge. This puts the window into one of the sliding modes at the edge of the application frame. You cannot minimize an editor window. With minimize, you can subsequently view a window by hovering over this tab. You can restore the window or window group by docking it or clicking the restore all button in the sidebar, which restores all windows in that group. Figure 8.8 shows two minimized windows, Explorer window and Properties window. The Explorer window is temporarily viewable by hovering the mouse over its tab.

• Dock reattaches a floating window or window group. It also restores a minimized window.
• Maximize is a toggle. If the window is docked, maximize enlarges the window so it takes up the entire application window frame. The other windows are then minimized along the nearest sides, but the status bar remains visible. If a window is floating, maximize enlarges the window so that it takes up the entire monitor space (except for the top-level menu bar). When deselected, maximize restores the window to its previous size. To restore a floating maximized window to its docked size, re-dock the window.
You can also double click a window’s tab to toggle the maximize operation.
• Close removes a window or window group from the window frame. Depending on the application, you may be prompted to save any unsaved data before the window closes. Again (if the window is configured with an open menu item), you can reopen a closed window by selecting Window in the top-level menu and selecting the window’s name.
• Size Group lets you view the current dimensions of the selected window group.
Documents are TopComponents in the editor mode. Here are several window actions that apply exclusively to documents.
• Clone duplicates a window and its contents for viewing. That is, whatever changes you make to one copy are duplicated in the second copy. Only one copy of a document is persisted. You can make a window cloneable by extending CloneableTopComponent instead of TopComponent.
• New Document Tab Group creates a separate area or mode for the selected document or documents. This action can be applied when a document window contains at least two tabbed windows.
• Collapse Document Tab Group combines two or more documents into a single tabbed document area.
From the top level menu, Window | Reset Windows returns the window configuration to its default settings.
Limiting the Window System’s Behavior
You can limit the window system’s behavior in your application through Branding Customization, as follows.
1. Select your NetBeans Platform application node in the Projects window, right click, and select Branding . . . .
2. When the Branding dialog appears, select the Window System tab.
3. By default, all behaviors are selected. De-select any standard behaviors that you want to remove and click OK, as shown in Figure 8.9.

You can also limit the behavior for any individual window (TopComponent) by selecting specific limitations during the New Window wizard, as shown in Figure 8.14 on page 354, or via client properties in the TopComponent constructor. See “TopComponent Client Properties” on page 363 for option details.
Window Switching
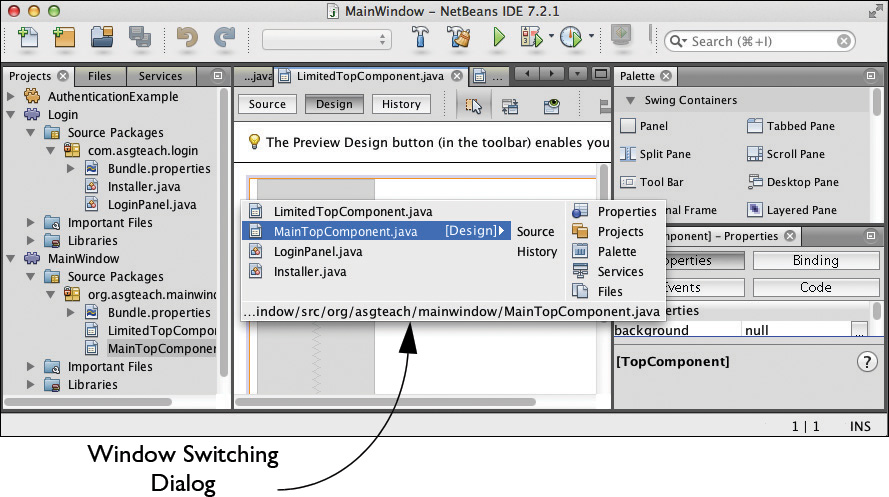
At most one window is active (has focus) in a NetBeans Platform application. You can use the key stroke combination CTRL-TAB to cycle through all open windows to select a different open window, including non-document windows, as shown in Figure 8.10
Window Tab Customization
You can configure editor tab placement in the Tools/Options (Windows) or NetBeans Preferences dialog (Mac OS X) under Miscellaneous/Windows, as shown in Figure 8.11. Select the desired Tabs placement radio button and/or the Multi-row tabs checkbox. (Note that the multi-row option doesn’t provide multi-row behavior in the Mac OSX environment.)

Window Manager
The NetBeans Platform Window System includes a window manager that keeps track of an application’s windows, modes, window groups, and roles. Providing your own window manager is possible, but most application developers use the standard window manager.
Table 8.1 lists several useful methods for finding modes, TopComponents, TopComponentGroups, and opened TopComponents. We’ll show examples using some of these methods later in the chapter.

8.2 TopComponent Basics
Let’s begin our exploration of the NetBeans Platform Window System with its most basic unit—the TopComponent. Each window that you see in Figure 8.1 on page 343 is a TopComponent. Indeed, any window in your application will be a TopComponent (except for Dialogs and Wizard visual panels). At its most basic form, a TopComponent is straightforward to create and easy to use because most of the work of managing it is handled by the NetBeans Platform Window Manager.
To build the example for this and several other sections, create a new NetBeans Platform application called WindowSystemApp. Then create a new NetBeans module called PersonEditor, as shown in Figure 8.12.

Use the New Window wizard to create a TopComponent using the following steps.
1. Select the target module’s source code package (com.asgteach.personeditor in our example), right click, and select New | Other.
2. The New File wizard displays the Choose File Type dialog. Under Categories select Module Development and under File Type select Window. Select Next, as shown in Figure 8.13.

The New Window wizard next requires details on the basic characteristics of your window. The Window Position refers to its mode; choose from the available modes in the drop down selection. The Redefine button lets you create new modes and customize a layout design. We’ll examine modes and layout design later in the chapter.
The remaining options let you specify your window’s behaviors. You can choose to disable any number of these standard features, such as whether the window can be maximized, whether sliding is allowed, and other behaviors listed in the dialog. We discuss these features in more detail in “TopComponent Client Properties” on page 363.
3. For the Window Position, select mode editor. When you select editor, the options that refer to sliding are disabled, since editor mode windows cannot slide (be minimized).
4. For the remaining options, leave all of them unchecked except Open on Application Start, which should be checked, as shown in Figure 8.14. Click Next.

5. The New Window wizard displays the Name, Icon and Location dialog. Specify Person for Name. For Icon, optionally provide a suitable 16 x 16 GIF or PNG graphic. Make sure that Project is PersonEditor and Package is com.asgteach.personeditor. Click Finish, as shown in Figure 8.15.

You aren’t restricted to a 16 x 16 graphic for the icon, but larger formats don’t fit the size constraints of the component tab and menu item as well. Use file personIcon.png found in the download bundle for this book.
When the wizard completes, a new GUI component file PersonTopComponent.java appears in the project window of your module. This file opens in the Form Design editor.
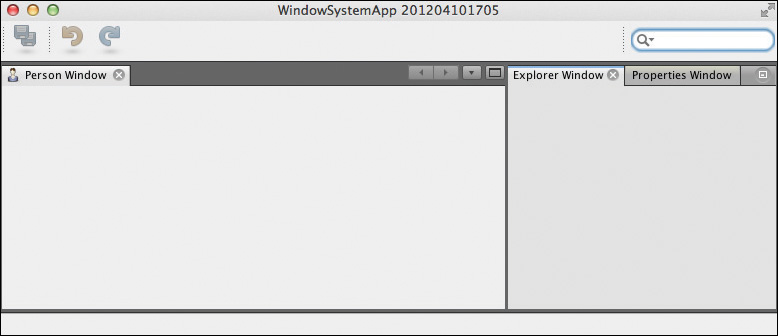
Run the WindowSystemApp now and you’ll see an application with a single window called Person window (with an icon on the tab), as shown in Figure 8.16. Open the top-level Window menu and you’ll see the Person window (with its icon) included in the list of windows you can open.

Note that if you select Person from the Window menu now, nothing happens, since the Person window is already opened. By default, the New Window wizard creates a TopComponent singleton; that is, at most one window of that type will exist at any given time.
Close the Person window. Now select Person from the Window menu and you’ll see that the Person window reopens in the window frame.
TopComponent Java Code
Return to PersonTopComponent.java and open the code in the Source view (select button Source at the top of the Java editor). Listing 8.1 shows the first part of the Java source created for this TopComponent, which includes the annotations that configure the window. Note that this is the default code generated by the New Window wizard. We describe these annotations in detail below.
TopComponent Tip
The New Window wizard creates a singleton TopComponent and the annotations assume a singleton TopComponent. To create a non-singleton TopComponent, see “Creating Non-Singleton TopComponents” on page 364.
Listing 8.1 PersonTopComonent.java—Part I (Annotations)
import org.netbeans.api.settings.ConvertAsProperties;
import org.openide.awt.ActionID;
import org.openide.awt.ActionReference;
import org.openide.util.NbBundle.Messages;
import org.openide.windows.TopComponent;
@ConvertAsProperties(dtd = "-//com.asgteach.personeditor//Person//EN",
autostore = false)
@TopComponent.Description(preferredID = "PersonTopComponent",
iconBase = "com/asgteach/personeditor/personIcon.png",
persistenceType = TopComponent.PERSISTENCE_ALWAYS)
@TopComponent.Registration(mode = "editor", openAtStartup = true)
@ActionID(category = "Window",
id = "com.asgteach.personeditor.PersonTopComponent")
@ActionReference(path = "Menu/Window", position = 333)
@TopComponent.OpenActionRegistration(displayName = "#CTL_PersonAction",
preferredID = "PersonTopComponent")
@Messages({
"CTL_PersonAction=Person",
"CTL_PersonTopComponent=Person Window",
"HINT_PersonTopComponent=This is a Person window"
})
public final class PersonTopComponent extends TopComponent {
. . . class code, see Listing 8.2 . . .
}
The annotations provided by the New Window wizard configure the window. This includes specifying its persistence, assigning the window to a mode, providing an ID, and creating and registering an action to open the window. This configuration assumes that the TopComponent is a singleton.
@ConvertAsProperties
The ConvertAsProperties annotation specifies that a TopComponent supports persisting TopComponent settings. Element dtd identifies a Document Type Definition (DTD) and must be a unique namespace. (You don’t need to define the DTD.) With this annotation, you provide code for the readProperties() and writeProperties() methods (the New Window wizard generates these methods). Use the read/write methods to persist customized settings associated with this TopComponent. You should persist the information you need to properly reconstruct your component on a restart. “TopComponent Persistence” on page 361 includes a TopComponent persistence example.
The window manager invokes writeProperties() when the application shuts down and readProperties() when the application restarts.
When using ConvertAsProperties, be sure to set TopComponent.Description element persistenceType to TopComponent.PERSISTENCE_ALWAYS or TopComponent.PERSISTENCE_ONLY_OPENED, discussed next.
@TopComponent.Description
The TopComponent.Description annotation includes required element preferredID and optional elements iconBase and persistenceType. Within the window manager, you can find or identify a TopComponent using its preferredID. Element preferredID (String) sets the TopComponent’s ID. Element iconBase (String) provides the pathname for a TopComponent’s icon. This graphic should be a 16 by 16 PNG or GIF file. Element persistenceType (int) specifies the TopComponent’s persistence behavior.
If you always want persistence across restarts—even if the window is never opened—use TopComponent.PERSISTENCE_ALWAYS. This is the default setting and should only be used for singleton TopComponents. If you do not want any persistence, use TopComponent.PERSISTENCE_NEVER. With this setting, you should delete the annotation @ConvertAsProperties and methods readProperties() and writeProperties() . Finally, use TopComponent.PERSISTENCE_ONLY_OPENED to persist TopComponent settings across restarts when the window is open. A TopComponent should not change its persistence setting dynamically.
@TopComponent.Registration
The TopComponent.Registration annotation registers the TopComponent into one of the existing window modes with elements mode (String) and openAtStartup (boolean). Optional element position (int) specifies the relative position of a window within a mode. That is, if more than one TopComponent opens in the same mode, use element position to control the window placement within the mode. A lower position value places the window on the left. Element roles (String[]) provides a comma separated list of roles. “Window Layout Roles” on page 401 includes an example with window layout roles.
@ActionID
Annotations ActionID and ActionReference are not specific to TopComponents but are annotations that let you define actions within your application. In this case, the action defined is opening the window. Annotation TopComponent.OpenActionRegistration also relates to the action of opening the window. If you don’t want your window opened via the top-level menu bar, remove these annotations from your TopComponent Java code.
Annotation ActionID requires element category (“Window”) and id, which should be unique within the category.
@ActionReference
The ActionReference annotation assigns an action identified by @ActionID using element path and optional element position. Element path is set to " by the New Window wizard, meaning the Window menu of the top-level menu bar. Other possibilities are Menu/Window"" or Toolbar/Edit"" with Shortcuts"name=" to specify a keyboard shortcut (for example). Element key_sequence"position refers to the placement of the menu item in the specified window or toolbar. You can also specify menu item separators with optional elements separatorBefore and separatorAfter.
@TopComponent.OpenActionRegistration
Annotation TopComponent.OpenActionRegistration is used along with @ActionID and @TopComponent.Description to create an action that opens a window. Required element displayName is the displayed action name (the menu item), and optional element preferredID should match element preferredID in @TopComponent.Description.
@Messages
Use the Messages annotation when you have text to display to a user. This ensures that your application can be easily internationalized and localized. With TopComponent, @Messages are used for the menu item text, the window display name, and the tooltip text. You can customize these as needed.
TopComponent Tip
If you make configuration changes to your TopComponent, perform a Clean All and Build All before running your application, since the Build process generates component configuration files. This ensures that your component is correctly configured. Alternatively, from the Files window, delete the directory build/testuserdir/config in your application’s directory.
Listing 8.2 shows the rest of the generated Java code for a TopComponent, discussed below.
Listing 8.2 PersonTopComonent.java—Part II (TopComponent Java Code)
. . . annotations omitted, see Listing 8.1 . . .
public final class PersonTopComponent extends TopComponent {
public PersonTopComponent() {
initComponents();
setName(Bundle.CTL_PersonTopComponent());
setToolTipText(Bundle.HINT_PersonTopComponent());
}
private void initComponents() {
. . . code omitted . . .
}
@Override
public void componentOpened() {
// TODO add custom code on component opening
}
@Override
public void componentClosed() {
// TODO add custom code on component closing
}
void writeProperties(java.util.Properties p) {
// better to version settings since initial version as advocated at
// http://wiki.apidesign.org/wiki/PropertyFiles
p.setProperty("version", "1.0");
// TODO store your settings
}
void readProperties(java.util.Properties p) {
String version = p.getProperty("version");
// TODO read your settings according to their version
}
}
Note that a TopComponent has a public default constructor, so that the system can create a TopComponent instance.
Method initComponents() is generated for any GUI component created with the Matisse design editor. This code cannot be edited in the Java editor, but you can configure components and provide other customization code using the GUI component palette and properties window.
Method componentOpened() and componentClosed() are two of the TopComponent life cycle methods. A common use for these is adding event listeners in componentOpened() and removing them in componentClosed(). Other life cycle methods are componentActivated(), componentDeactivated(), componentHidden(), and componentShowing(). We discuss these methods in detail in “Window System Life Cycle Management” on page 369.
Finally, methods readProperties() and writeProperties() persist your window’s settings according to its configured persistence type, discussed next.
Window Header Animated Notifications
A TopComponent’s window header (its tab) contains an optional icon and the window’s display name. You can display an animated notification that the window is currently busy (for example, window content is being loaded) with TopComponent method makeBusy(true). Use makeBusy(false) to turn off the animated notification. Figure 8.17 shows a TopComponent with an animated “wait” icon in its header.

8.3 TopComponent Persistence
Annotations control the persistence behavior of your TopComponent. For singleton TopComponents, define annotation @ConvertAsProperties and set the persistence type to either PERSISTENCE_ALWAYS or PERSISTENCE_ONLY_OPENED, as discussed in “@ConvertAsProperties” and “@TopComponent.Description” on page 357. With persistence, the NetBeans Platform saves your window configuration (its size, mode, and whether or not the window is opened). You can also persist additional String data specific to your TopComponent instance with methods writeProperties() and readProperties().
To demonstrate, let’s add a label and textfield to the PersonTopComponent and persist the textfield’s entered text. Whatever String a user enters in the textfield will now persist across restarts. Figure 8.18 shows the added JLabel and JTextField in the component’s Design view.

The text of the JTextField (whose variable name is nameTextField) is persisted as property "name" and subsequently restored, as shown in Listing 8.3. The added code is shown in bold.
Listing 8.3 Methods writeProperties() and readProperties()
public final class PersonTopComponent extends TopComponent {
. . . omitted code . . .
void writeProperties(java.util.Properties p) {
// better to version settings since initial version as advocated at
// http://wiki.apidesign.org/wiki/PropertyFiles
p.setProperty("version", "1.0");
p.setProperty("name", nameTextField.getText());
}
void readProperties(java.util.Properties p) {
String version = p.getProperty("version");
nameTextField.setText(p.getProperty("name"));
}
}
Now on a restart, instead of being blank, the textfield will include the String entered previously by the user, as shown in Figure 8.19.

TopComponent Tip
Note that methods writeProperties() and readProperties() manipulate a java.util.Properties stream. Each key and its corresponding value in the property list is a String.
Where does NetBeans store user data? NetBeans stores component data in the application’s user configuration file system in config/Windows2Local/Components. For our application, the window system creates XML file PersonTopComponent.settings. Listing 8.4 shows its contents for our example. Here, property "name" has value "Joe Smith".
Listing 8.4 PersonTopComponent.settings
<?xml version="1.0" encoding="UTF-8" ?>
<!DOCTYPE properties PUBLIC "-//com.asgteach.personeditor//Person//EN"
"http://www.netbeans.org/dtds/properties-1_0.dtd">
<properties>
<property name="version" value="1.0"/>
<property name="name" value="Joe Smith"/>
</properties>
Windows2Local Folder
During development, configuration data is generated and stored in your project’s build directory under build/testuserdir/config. Therefore, the PersonTopComponent.settings file is located at Your_Application_Name/build/testuserdir/config/Windows2Local/Components. However, when you package your application for distribution, the location of this user directory depends on the underlying operating system and the distribution method. On a Mac OS X using a zip file distribution, the user directory is at User_Home_Directory/Library/Application Support/Your_Application_Name/dev/config. On a Windows system using a zip file distribution, the user directory can be found at User_Home_Directory/.Your_Application_Name/dev/config. We discuss branding and application distribution in more detail in Chapter 17.
8.4 TopComponent Client Properties
When you create a new window using the New Window wizard, you can select behavior limitations that apply to that window. This generates client property settings in the window’s TopComponent constructor, as shown in Listing 8.5. You can always edit the TopComponent constructor later and add or remove any client property settings.
Listing 8.5 TopComponent Client Property Settings
public final class LimitedTopComponent extends TopComponent {
public LimitedTopComponent() {
initComponents();
setName(Bundle.CTL_LimitedTopComponent());
setToolTipText(Bundle.HINT_LimitedTopComponent());
putClientProperty(TopComponent.PROP_CLOSING_DISABLED, Boolean.TRUE);
putClientProperty(TopComponent.PROP_DRAGGING_DISABLED, Boolean.TRUE);
putClientProperty(TopComponent.PROP_MAXIMIZATION_DISABLED,
Boolean.TRUE);
putClientProperty(TopComponent.PROP_SLIDING_DISABLED, Boolean.TRUE);
putClientProperty(TopComponent.PROP_UNDOCKING_DISABLED, Boolean.TRUE);
putClientProperty(TopComponent.PROP_KEEP_PREFERRED_SIZE_WHEN_SLIDED_IN,
Boolean.TRUE);
}
. . . omitted code . . .
}
Table 8.2 describe these configurable TopComponent behaviors.

8.5 Creating Non-Singleton TopComponents
By default, the New Window wizard creates a TopComponent singleton, and the annotations that the wizard generates assume a singleton TopComponent. However, it is quite common for an application to require non-singleton TopComponents.
A common use case for non-singleton TopComponents is some sort of editor window where a user opens a file or domain object for editing. In this case, a user typically selects the domain object (or file), right clicks, and chooses Open from a context menu. Or, a user may double click the domain object (or file) and have the selected object open in an editor.
However, to properly illustrate this use case, we’ll need several NetBeans Platform features we haven’t discussed yet, such as conditionally-enabled Actions. So for now, let’s show you how to create non-singleton windows with a simple example. (For a well-developed example of opening a domain object in an editor, see “Implementing Update” on page 488 in Chapter 10.)
Let’s continue with the WindowSystemApp example that contains PersonTopComponent in module PersonEditor. In the previous section, we created a singleton TopComponent.
Listing 8.6 shows the changes that create a non-singleton TopComponent. When you decide to create a non-singleton TopComponent, you must also select a persistence behavior. You have two choices.
1. Specify PERSISTENCE_NEVER in annotation @TopComponent.Description. In this case, remove annotation @ConvertAsProperties and methods writeProperties() and readProperties(). With this persistence type, your window settings will not be saved across restarts.
2. Specify PERSISTENCE_ONLY_OPENED in annotation @TopComponent.Description. With this setting, you retain annotation @ConvertAsProperties as well as methods writeProperties() and readProperties(). Only the windows that are open when the application shuts down will be saved and restored across restarts. This means that if a window is closed before application shutdown, the window will not appear in the next restart, even if it was previously persisted.
TopComponent Tip
Never specify PERSISTENCE_ALWAYS for non-singleton TopComponents. Otherwise, every instance of the TopComponent that is ever created will be persisted on shutdown, even if the associated domain object or file has been deleted. The saved windows accumulate over time, wasting disk space and slowing startup time.
In Listing 8.6 we specify PERSISTENCE_ONLY_OPENED and therefore retain annotation @ConvertAsProperties as well as methods writeProperties() and readProperties().
Listing 8.6 PersonTopComponent.java—Non-Singleton Window
@ConvertAsProperties(dtd = "-//com.asgteach.personeditor//Person//EN",
autostore = false)
@TopComponent.Description(preferredID = "PersonTopComponent",
iconBase = "com/asgteach/personeditor/personIcon.png",
persistenceType = TopComponent.PERSISTENCE_ONLY_OPENED)
@TopComponent.Registration(mode = "editor", openAtStartup = false)
@ActionID(category = "Window",
id = "com.asgteach.personeditor.PersonTopComponent")
@ActionReference(path = "Menu/Window", position = 333)
@TopComponent.OpenActionRegistration(displayName = "#CTL_PersonAction"
//,preferredID = "PersonTopComponent"
)
@Messages({
"CTL_PersonAction=Person",
"CTL_PersonTopComponent=Person Window",
"HINT_PersonTopComponent=This is a Person window"
})
public final class PersonTopComponent extends TopComponent {
. . . code omitted . . .
}
Note that we changed attribute openAtStartup to false in annotation @TopComponent.Registration. You will normally specify this setting, since a non-singleton TopComponent typically opens in conjunction with a specific domain object or file action.
In Listing 8.6 we also kept the annotations to create the Windows menu item and action that opens the window. We did this so you could easily open multiple PersonTopComponent windows without writing code to specifically open the window. But, to enable opening multiple windows, you must remove attribute preferredID from annotation @TopComponent.OpenActionRegistration.
Figure 8.20 shows the non-singleton WindowSystemApp running with three open PersonTopComponent windows. Each window has a different textfield value, which persists across restarts. When the application restarts, not only will the same windows open, but they will have their previously specified text in the textfield component. However, once you close a window, its data will not be persisted and the window won’t open with the next restart.

Since PersonTopComponent is no longer a singleton TopComponent, how does the window system persist each window’s data? Recall that PersonTopComponent persistent data is stored in Application/build/testuserdir/config/Windows2Local/Components/PersonTopComponent.settings using the TopComponent’s preferredID to generate the XML .settings file. With multiple instances of the same TopComponent, the persistent data is stored in PersonTopComponent_1.settings, PersonTopComponent_2.settings, and so on.
Opening Windows from User Code
Now let’s show you how to open the non-singleton TopComponent within your own code; that is, not from the top-level Windows menu. First, remove annotations @ActionID, @ActionReference, and @TopComponent.OpenActionRegistration, which all support the Open action in the top-level Windows menu. Listing 8.7 shows the updated PersonTopComponent code with these annotations removed.
Listing 8.7 PersonTopComponent.java—Annotations for Open Removed
@ConvertAsProperties(dtd = "-//com.asgteach.personeditor//Person//EN",
autostore = false)
@TopComponent.Description(preferredID = "PersonTopComponent",
iconBase = "com/asgteach/personeditor/personIcon.png",
persistenceType = TopComponent.PERSISTENCE_ONLY_OPENED)
@TopComponent.Registration(mode = "editor", openAtStartup = false)
@Messages({
"CTL_PersonAction=Person",
"CTL_PersonTopComponent=Person Window",
"HINT_PersonTopComponent=This is a Person window"
})
public final class PersonTopComponent extends TopComponent {
. . . code omitted . . .
}
Now let’s create another (singleton) TopComponent with a button that opens a PersonTopComponent window. Follow these steps.
1. Create a new window with the New Window wizard. Specify Window Position explorer, select Open on Application Start, and click Next.
2. Specify Open for Class Name Prefix. Project should be PersonEditor and package should be com.asgteach.personeditor.
3. Click Finish. Application WindowSystemApp now contains two TopComponents in module PersonEditor as shown in Figure 8.21.

4. Bring up OpenTopComponent in the Design view and drop a JButton component with label Open Person Window, as shown in Figure 8.22.

5. Select the button and click tab Code in the Properties window. This brings up the Code Generation tab for the button.
6. Change the button’s Variable Name to openPersonButton.
7. Now double click the button, which creates method openPersonButtonActionPerformed() (this method will be invoked when a user clicks the button). NetBeans now switches to the Source view for OpenTopComponent.
8. Provide the following code for method openPersonButtonActionPerformed(), as shown in Listing 8.8.
Listing 8.8 Method openPersonButtonActionPerformed
private void openPersonButtonActionPerformed(
java.awt.event.ActionEvent evt) {
TopComponent tc = new PersonTopComponent();
tc.open();
tc.requestActive();
}
Run application WindowSystemApp again. Click the Open Person Window button several times. Provide text in each window’s textfield and then shut down the application. Run the application again and you’ll see that the windows you previously created now reappear with the persisted textfield data. Figure 8.23 shows a sample run.

8.6 Window System Life Cycle Management
Let’s continue our exploration of the window system by looking at the TopComponent life cycle methods. Table 8.3 lists these life cycle methods, which you can override in your TopComponent Java code.

The New Window wizard generates methods componentOpened() and componentClosed(). You typically place initialization/cleanup code here. (For example, include code that adds and removes event listeners.)
Method canClose() is invoked before a window closes. This is a convenient place for code that checks to see if it’s okay to close a window. For example, if your window is an editor and changes have been made to a file or domain object but have not been saved, you can confirm closing with a user here and return true or false based on the user’s response.
As you can see, the NetBeans Platform Window System makes a distinction between activation and hidden/showing. A window is activated when the window has focus. You can deactivate a window by selecting another window. When there are multiple windows in the same window container, you can hide a window by selecting another window in the same mode.
Let’s experiment a bit with these methods. Modify PersonTopComponent in the same WindowSystemApp applications as follows.
1. Open PersonTopComponent in the Java editor and select Source to manipulate the Java code.
2. Place the cursor after method componentClosed(), right click, and select Insert Code . . . .
3. When the context menu appears, select Generate Override Method . . .
4. A dialog appears that lets you select which methods to override. Select methods canClose(), componentActivated(), componentDeactivated(), componentHidden(), and componentShowing(), as shown in Figure 8.24.

5. Click Generate. NetBeans will generate stub methods for the methods you select.
6. Provide code for these methods as well as methods componentOpened() and componentClosed(), as shown in Listing 8.9. Note that we retain calls to these methods’ superclass with super when NetBeans generates the superclass calls.
Listing 8.9 Overriding TopComponent Methods
@Override
public void componentOpened() {
System.out.println(nameTextField.getText() + " opened");
}
@Override
public void componentClosed() {
System.out.println(nameTextField.getText() + " closed");
}
@Override
public boolean canClose() {
return !nameTextField.getText().toLowerCase().endsWith("guru");
}
@Override
protected void componentActivated() {
super.componentActivated();
System.out.println(nameTextField.getText() + " activated");
}
@Override
protected void componentDeactivated() {
super.componentDeactivated();
System.out.println(nameTextField.getText() + " deactivated");
}
@Override
protected void componentHidden() {
super.componentHidden();
System.out.println(nameTextField.getText() + " hidden");
}
@Override
protected void componentShowing() {
super.componentShowing();
System.out.println(nameTextField.getText() + " showing");
}
7. Clean All the application; then Run.
Experiment by running the application and examine the NetBeans IDE output window where the results of the System.out.println statements appear. For example, open several Person windows and provide names Amy, Bob, and Charlie. Figure 8.25 shows the application with Amy in the visible Person window.

Selecting different Person window tabs lets you see the order of the life cycle methods. Suppose the Person window with Charlie is activated and showing. Here is what happens when you then select the tab corresponding to Bob. First, componentShowing() is invoked for Bob followed by componentHidden() and componentDeactivated() for Charlie,” and finally componentActivated() for Bob.
Charlie activated
Bob showing
Charlie hidden
Charlie deactivated
Bob activated
Now select the Open Window tab. Note that this deactivates the Person window but does not affect its hidden/showing status.
Charlie activated
Bob showing
Charlie hidden
Charlie deactivated
Bob activated
Bob deactivated
Close several Person windows and note that method componentClosed() is invoked. Now open a Person window with text Component Guru. Note that you cannot close this window because the code you provided in method canClose() disallows closing windows with a nameTextField text property that ends with String guru (converted to lowercase letters).
Finally, if you shut down the application and restart it, you’ll see that the window manager opens the Person windows that were previously opened. In our example, a restart provided the following output.
Bob opened
Component Guru opened
Bob showing
Bob activated
Using the Window Manager
Let’s now show you some of the window manager methods that manipulate TopComponents. Follow these steps to add a second button to OpenTopComponent. This button lets a user close the top Person window shown in the editor mode.
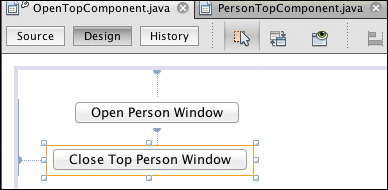
1. Bring up OpenTopComponent in the Design view and drop a second JButton component with label Close Top Person Window, as shown in Figure 8.26.
2. Select the button. In the Properties window, click tab Code. This brings up the Code Generation tab for the button.
3. Change the button’s Variable Name to closeTopPersonButton.
4. Now double click the button, which creates method closeTopPersonButtonActionPerformed(). You are now switched to the Source view for OpenTopComponent.
5. Provide the following code for method closeTopPersonButtonActionPerformed(), as shown in Listing 8.10.
Listing 8.10 Method closeTopPersonButtonActionPerformed
private void closeTopPersonButtonActionPerformed(
java.awt.event.ActionEvent evt) {
WindowManager wm = WindowManager.getDefault();
Mode editorMode = wm.findMode("editor");
for (TopComponent tc : wm.getOpenedTopComponents(editorMode)) {
System.out.println("found " + tc.getName());
if (tc.isShowing() ) {
if (tc instanceof PersonTopComponent) {
tc.close();
}
break;
}
}
}
Let’s discuss how method closeTopPersonButtonActionPerformed() closes the top Person window.
The first step is to get a WindowManager instance by invoking the static WindowManager method getDefault(). Using the window manager, method findMode() returns the editor Mode object. The next step calls getOpenedTopComponents(), which provides a list of all opened TopComponents for that mode. The for loop looks for the one TopComponent in which isShowing() is true. When we find it, we close the TopComponent and exit the loop.
Note that this method also checks that the component that’s showing is indeed a PersonTopComponent. A bit of defensive programming is not a bad idea here, just in case we later add another (different) TopComponent to the editor window position.
Now run application WindowSystemApp again and make sure you have several Person windows open. Click the Close Top Person Window button. You’ll see that the top Person window closes. Figure 8.27 shows a sample run.

Using @OnShowing
Similar to the Module System API @OnStart and @OnStop annotations (see “Module Life Cycle Annotations” on page 242), the Window System API provides the @OnShowing annotation. You place the @OnShowing annotation on a class that implements Runnable and has a default constructor. You implement the run() method, which is invoked as soon as the window system is shown. Note that @OnShowing Runnables are invoked on the EDT. Therefore, if you configure more than one, they run consecutively.
Let’s add a Runnable with @Showing to the WindowSystemApp. The Runnable displays a custom information dialog, which the user dismisses with either Cancel or OK. The dialog displays after the window system is showing, as shown in Figure 8.28. We can safely perform UI work, since the Runnable executes on the EDT.

Here are the steps.
1. Build a dialog with a custom inner panel (see “Custom Dialogs” on page 533). In the PersonEditor module, right click on the Source Packages package, and select New | Other. In the Choose File Type dialog, under Categories select Swing GUI Form and under File Types select JPanel Form. Click Next.
2. In the Name and Location Dialog, for Class Name specify Money. Click Finish.
3. NetBeans creates a new Java class Money.java with a top-level JPanel in the Matisse form designer. Add a Label component and specify coins128.png (or any .PNG or .GIF format file) for the label’s icon property from the provided example code.
4. Since we’ll use the standard DialogDisplayer, add a module dependency on the Dialogs API. In the PersonEditor module, select the Libraries node, right click, and select Add Module Dependency . . . from the context menu. In the Add Module Dependencies dialog, select Dialogs API. Click OK.
5. In the same package, create a new Java file called ShowMeTheMoney. Implement Runnable, provide annotation @OnShowing, and implement the run() method, as shown in Listing 8.11. Here we create and display a custom dialog. The dialog blocks until dismissed by the user.
Listing 8.11 ShowMeTheMoney.java—Using @OnShowing
package com.asgteach.personeditor;
. . . imports omitted . . .
@OnShowing
public final class ShowMeTheMoney implements Runnable {
private final Money money = new Money();
@Override
public void run() {
DialogDescriptor dd = new DialogDescriptor(money, "Here is the Money");
DialogDisplayer.getDefault().notify(dd);
}
}
8.7 TopComponent Modes
TopComponent modes define positions in the window layout of your application. These positions are basically window containers. The NetBeans Platform defines several default modes whose layout is shown in Figure 8.29. This layout is fluid, however. The window manager typically extends other windows to fill the window frame when you close a window.
Note that this layout includes two different TopComponents in editor mode, Editor Left and Editor Right. You control the relative position of different windows in the same mode with element position in the @TopComponent.Registration annotation, as described in “@TopComponent.Registration” on page 358.
You can also use the resizing handles on the window frame to resize the entire window, resize individual windows, or change the window layout by dragging and dropping windows. Each mode affects how the overall window layout is resolved.
There are three basic mode types: editor, view, and sliding. Every window layout has a position of type editor, even when there are no editor windows opened. As you resize the window frame, the empty editor area is always present. (If you need to remove the editor area, see “A View-Only Window Layout” on page 395.)
Let’s have some fun exploring modes. First, we create another window called MyMode. We make it a singleton (the default), and assign it to the explorer window position in application WindowSystemApp.
Next, we define another button in window OpenTopComponent that cycles window MyMode through all of the standard modes, re-docking the window in each mode and updating the status line with the old and new modes. MyModeTopComponent also updates its own label component with its current mode.
You may already have an idea of how to do this. If so, follow along with these steps. If not, use these steps as a guide to add the Change Mode functionality to this application.
1. Create and configure a new TopComponent with the WindowSystemApp we’ve built throughout this chapter (use New | Window).
2. Specify Window Position explorer, select Open on Application Start, and specify Class Name Prefix as MyMode.
3. NetBeans brings up the new TopComponent in the Design view. Add a JLabel component to the UI. Select tab Code in the Properties window and change property Variable Name to title.
4. Select tab Properties in the Properties window and set property text to MyMode as a placeholder. Figure 8.30 shows the configured MyModeTopComponent in the Design view.

5. Select the Source button to bring up MyModeTopComponent in the Java editor.
6. Right click inside the file and select Insert Code and override method componentActivated(). Select Generate to insert the generated code.
7. Add code to method componentActivated() as shown in Listing 8.12 in bold. Note that we use the system Window Manager to find this TopComponent’s mode and set its label (variable name title) text to the mode’s name.
This added code updates MyModeTopComponent’s label to display the current mode. As you’ll see next in Listing 8.13, the code that implements the TopComponent’s mode change invokes both open() and requestActive(). The window manager then invokes componentActivated(), making this method a logical place to update the label.
Listing 8.12 MyModeTopComponent Method componentActivated()
@Override
protected void componentActivated() {
super.componentActivated();
WindowManager wm = WindowManager.getDefault();
title.setText(wm.findMode(this).getName());
}
Now let’s add another button to OpenTopComponent that changes the mode of MyModeTopComponent. Follow these steps.
1. Bring up OpenTopComponent in the Design view and place a third JButton component with label Change Mode, as shown in Figure 8.31.

2. Select the button. In the Properties window, click tab Code. This brings up the Code Generation tab for the button.
3. Change the button’s Variable Name to changeModeButton.
4. Now double click the button, which creates method changeModeButtonActionPerformed(). This switches you to the Source view for OpenTopComponent.
5. Provide the following code for method changeModeButtonActionPerformed(), as shown in Listing 8.13.
Listing 8.13 Method changeModeButtonActionPerformed()
private void changeModeButtonActionPerformed(
java.awt.event.ActionEvent evt) {
WindowManager wm = WindowManager.getDefault();
TopComponent tc = wm.findTopComponent("MyModeTopComponent");
if (tc != null) {
Mode currentMode = wm.findMode(tc);
Set<? extends Mode> modes = wm.getModes();
int nextModeIndex = 0;
Mode[] modeArray = modes.toArray(new Mode[modes.size()]);
for (int i = 0; i < modeArray.length; i++) {
// find current mode
if (currentMode == modeArray[i]) {
nextModeIndex = i + 1;
if (nextModeIndex == modeArray.length) {
nextModeIndex = 0;
}
break;
}
}
Mode nextMode = modeArray[nextModeIndex];
String nextModeName = nextMode.getName();
String currentModeName = currentMode.getName();
nextMode.dockInto(tc);
tc.open();
tc.requestActive();
StatusDisplayer.getDefault().setStatusText("Docking from " +
currentModeName + " into " + nextModeName);
}
Method changeModeButtonActionPerformed() obtains a WindowManager instance by invoking the static WindowManager method getDefault(). Using the window manager, we find TopComponent “MyModeTopComponent” (its preferredID) and this TopComponent’s mode.
We then get a set of all the modes currently in the system and convert the set to an array. The method then searches the array to find the current mode and assigns the TopComponent to the next mode using the next array index value. We cycle back to the beginning of the array if we’ve reached the end.
With the current mode and the next mode determined, the next step is to dock the TopComponent into the next mode, open it, and invoke TopComponent method requestActive(). This is the usual sequence of methods you’ll invoke for opening a window programmatically. Method open() opens the window (if not already opened), and requestActive() brings it to the front if hidden or shows the window if minimized (applicable to the sliding modes).
Since we invoke requestActive(), the window manager calls MyModeTopComponent method componentActivated(), which updates that component’s label to display the current mode (see Listing 8.12 on page 379).
Finally, we display the old and new modes in the status line using the NetBeans Platform standard StatusDisplayer instance.
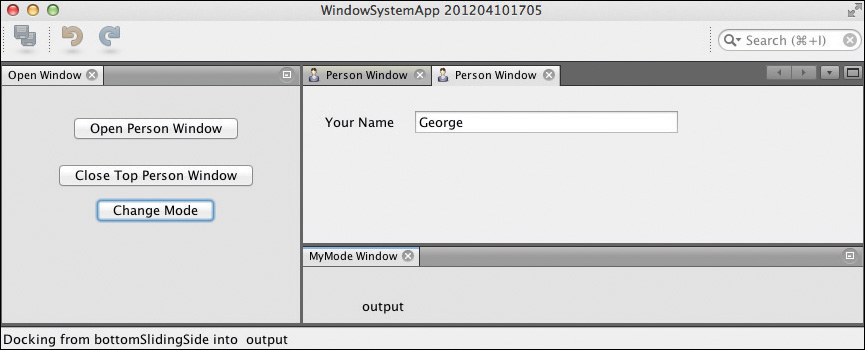
Figure 8.32 shows the application running. Here, MyModeTopComponent is docked into the output mode. Its label displays “output,” and the status line displays “Docking from bottomSlidingSide into output.”
8.8 Window Groups
Window groups let you specify TopComponents that open and close as a group. You are familiar with this use case if you have ever used the NetBeans IDE to design a GUI component (such as a TopComponent). When the TopComponent is open in Design view, you see related helper windows open, including the component palette, the TopComponent properties window, and a TopComponent navigator window. As soon as you switch to Source mode, the component palette and properties windows disappear and the navigator window content relates to the Java source code instead of the visual components. Thus, you have a Design mode window group that opens and closes in conjunction with the TopComponent’s Design mode. Figure 8.33 shows the Design view for PersonTopComponent.java in the NetBeans IDE and the related Palette and Properties windows. Switching to the PersonTopComponent.java Source view closes these windows.

However, window group opening and closing behavior is more nuanced. A TopComponent that belongs to a window group does not open the next time the group opens if it was specifically closed by a user when the group was last opened. Similarly, a TopComponent that belongs to the window group does not close the next time the group closes if the window was already open when the group opens.
To further customize a window group TopComponent’s behavior, you can specifically exclude a particular TopComponent from either opening or closing (or both) when the group opens and closes.
The good news is that you can use this window group feature in your NetBeans Platform applications with little effort. Once you create the TopComponents that comprise the window group, you specify XML configurations in your module, as shown in the following general steps.
1. Create a window system group definition file (.wsgrp) to define the window group.
2. For each TopComponent in the window group, create a Wstcgrp.xml file.
3. Add the group configuration information to the module’s layer.xml file. If the layer.xml file doesn’t exist, create it using a New | Layer File wizard.
4. Add Java code that opens and closes the window group.
We show an example in the next section.
Window Group Example
Let’s begin with the application WindowSystemApp from the previous section (shown running in Figure 8.32 on page 381). This application has a non-singleton PersonTopComponent that opens with an Open Person Window button. You close the window with either the built-in close button on the window or the Close Top Person Window button.
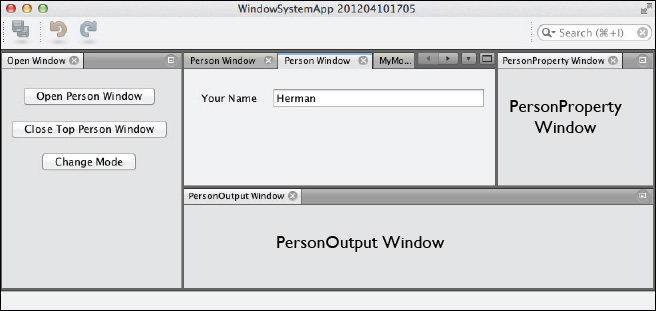
Two TopComponent helper windows open when a PersonTopComponent window becomes visible and close when the window is hidden or closes. Figure 8.34 shows the application running with two PersonTopComponent windows open and the unrelated hidden MyMode window docked in the editor mode. You see PersonProperty and PersonOutput windows open.
When the visible PersonTopComponent with name “Herman” closes or is obscured, MyModeTopComponent becomes visible in the editor mode and both PersonProperty and PersonOutput windows close. The result is shown in Figure 8.35.

Here are the steps to add a Person window group to the WindowSystemApp application.
1. In module PersonEditor, create two new TopComponents using the New | Window wizard. Select window position properties for PersonPropertyTopComponent and window position output for PersonOutputTopComponent. De-select Open on Application Start for both windows. This creates files PersonPropertyTopComponent.java and PersonOutputTopComponent.java in module PersonEditor source package.
2. In the same source package, create file persongroup.wsgrp. Right click the package name and select New | Empty File. In the Name and Location dialog, specify persongroup.wsgrp for File Name. Project should be PersonEditor and Folder should be src/com/asgteach/personeditor. Click Finish.
3. Provide the following XML code for file persongroup.wsgrp, as shown in Listing 8.14.
Listing 8.14 persongroup.wsgrp
<?xml version="1.0" encoding="UTF-8"?>
<!DOCTYPE group PUBLIC
"-//NetBeans//DTD Group Properties 2.0//EN"
"http://www.netbeans.org/dtds/group-properties2_0.dtd">
<group version="2.0">
<name unique="persongroup" />
<state opened="false" />
</group>
Element name with attribute unique must match the case sensitive filename. Element state with attribute opened="false" specifies that this group should not be open at application start.
4. Create a window system TopComponent group configuration file for each of the group’s windows. Use New | Empty File and provide PersonPropertyTopComponentWstcgrp.xml for File Name (again, the name is case sensitive). Listing 8.15 shows the XML configuration for this file.
Listing 8.15 PersonPropertyTopComponentWstcgrp.xml
<?xml version="1.0" encoding="UTF-8" ?>
<!DOCTYPE tc-group PUBLIC "-//NetBeans//DTD Top Component in Group
Properties 2.0//EN" "http://www.netbeans.org/dtds/tc-group2_0.dtd">
<tc-group version="2.0">
<module name="com.asgteach.personeditor" spec="1.0"/>
<tc-id id="PersonPropertyTopComponent" />
<open-close-behavior open="true" close="true" />
</tc-group>
The window system TopComponent group configuration file specifies the module that contains the TopComponent, the TopComponent ID (its preferredID), and the open and close default behavior for this TopComponent (normally these are both set to true).
5. Repeat this step and create window system TopComponent group configuration file for PersonOutputTopComponent, as shown in Listing 8.16.
Listing 8.16 PersonOutputTopComponentWstcgrp.xml
<?xml version="1.0" encoding="UTF-8" ?>
<!DOCTYPE tc-group PUBLIC "-//NetBeans//DTD Top Component in Group
Properties 2.0//EN" "http://www.netbeans.org/dtds/tc-group2_0.dtd">
<tc-group version="2.0">
<module name="com.asgteach.personeditor" spec="1.0"/>
<tc-id id="PersonOutputTopComponent" />
<open-close-behavior open="true" close="true" />
</tc-group>
Note that the files are the same except for element <tc-id>, which matches each TopComponent’s preferredID.
6. Create a Layer File for this module. Use New | XML Layer . . . . (If your module already has a Layer file, then you will instead edit the existing layer.xml file.)
XML Layer File
Often you do not need a module Layer file since Java annotations help you specify many configuration options. During the build process, NetBeans generates layer.xml file for you. If you define a Layer file in your module (as you will here by using window groups), the build process will process and combine this configuration information with any annotations when generating the application’s master layer.xml file.
7. Add the following XML configuration to layer.xml, as shown in Listing 8.17.
<?xml version="1.0" encoding="UTF-8"?>
<!DOCTYPE filesystem PUBLIC "-//NetBeans//DTD Filesystem 1.2//EN" "http://
www.netbeans.org/dtds/filesystem-1_2.dtd">
<filesystem>
<folder name="Windows2">
<folder name="Groups">
<file name="persongroup.wsgrp" url="persongroup.wsgrp"/>
<folder name="persongroup">
<file name="PersonOutputTopComponent.wstcgrp"
url="PersonOutputTopComponentWstcgrp.xml"/>
<file name="PersonPropertyTopComponent.wstcgrp"
url="PersonPropertyTopComponentWstcgrp.xml"/>
</folder>
</folder>
</folder>
</filesystem>
This Layer file registers the persongroup window group and specifies the TopComponent configuration files. If you create a new layer.xml file in the previous step, copy the entire XML code shown in Listing 8.17.
If your module already has a Layer file that includes folder Windows2, add the folder Groups to folder Windows2, leaving other subfolders intact.
8. The final steps add Java code to open and close the persongroup window group. In our previous description we open the window group when the PersonTopComponent is visible and close the window group when the PersonTopComponent is closed or hidden. Thus, we must add the code that opens the window group to the PersonTopComponent life cycle method componentShowing(), as shown in Listing 8.18.
Listing 8.18 PersonTopComponent componentShowing() Method
@Override
protected void componentShowing() {
super.componentShowing();
TopComponentGroup personGroup =
WindowManager.getDefault().findTopComponentGroup("persongroup");
if (personGroup != null) {
personGroup.open();
}
}
The window manager finds our TopComponentGroup persongroup and, if found, opens the group, which in turn, opens windows PersonPropertyTopComponent and PersonOutputTopComponent. The application should look something like Figure 8.34 on page 383.
9. Now comes the tricky part. Simply closing the group in method componentHidden() won’t provide the desired behavior because of the order among the different PersonTopComponent life cycle methods. In other words, if the opening window’s method componentShowing() is invoked before the closing window’s method componentHidden(), then the window group closes incorrectly.
To handle this situation, we use the window manager TopComponent registry to find all open TopComponents. If one of them is a PersonTopComponent that is visible (isShowing() is true), we return and don’t close the window group. If no PersonTopComponent is visible (even if one is open), we can safely close the window group. Listing 8.19 shows the code.
Listing 8.19 PersonTopComponent componentHidden() Method
@Override
protected void componentHidden() {
super.componentHidden();
WindowManager wm = WindowManager.getDefault();
TopComponentGroup personGroup =
wm.findTopComponentGroup("persongroup");
for (TopComponent tc : wm.getRegistry().getOpened()) {
if (tc.isShowing() && tc instanceof PersonTopComponent) {
return;
}
}
if (personGroup != null) {
personGroup.close();
}
}
Testing the Window Group Behaviors
You are now ready to fully test the behavior of the new persongroup window group. Be sure to Clean All before running the application. After creating several PersonTopComponent windows, use the Change Mode button to move window MyMode into the editor position. Experiment with activating and hiding several of the windows to see how window group persongroup correctly opens and closes, depending on whether a PersonTopComponent is visible.
You can also move (drag and drop) a PersonTopComponent to another window position. As long as a PersonTopComponent is visible, the persongroup window group remains open.
When you close one of the windows in the persongroup window group and the window group opens the next time, the closed window remains closed. Similarly, if you open one of the windows in persongroup window group when the group is closed (using the top menu Windows | PersonOutput, for example), the opened window remains open when the window group next closes.
8.9 Window Layout
You have a great idea for a NetBeans Platform application, but you don’t want to use any of the standard window system modes (see Figure 8.29 on page 377). Rather, you want to create your own custom window layout and perhaps specify one or more new window positions (modes).
In previous versions of the NetBeans Platform, creating a new mode required customizing a module’s Layer file. You also had to create a mode configuration file, which is an XML file with wsmode extension. Furthermore, determining the settings of the wsmode elements, especially the constraints and path elements, is challenging for the casual (and quite often the not-so-casual) NetBeans Platform developer. This is all still true, but NetBeans now has a Layout of Windows wizard to help customize a window layout. In this section we hope to dispel some of the mystery and challenge of creating custom window layouts.
Let’s first show you the NetBeans Layout of Windows wizard, which we’ll use to create a custom layout for a new application. This window layout will look like the application as shown in Figure 8.36. Here you see three windows: TopBanner (in mode topbanner), LeftSide, and RightSide.

The TopBanner window spans the entire window frame and takes up about 25 percent of the vertical space. The remaining area is divided horizontally into two areas. The leftside mode consumes approximately 30 percent, and the rightside takes up the remaining 70 percent.
The rightside mode type is editor, whereas topbanner and leftside mode types are view. You can distinguish these types because the editor type mode has a darker line at the top and additional window control buttons at the top right of the window area. Furthermore, the window system treats an editor area differently than view-type modes. Even if no windows are open in your application, a small editor area remains, which grows if you resize your application. Depending on your own window layout, you may need to hide an empty editor area. We’ll show you how to do this later in this section.
Here are the steps. To follow along, create a new NetBeans Platform application called ModeApp and create a new module called Modes1. We’ll create our custom layout using module Modes1. The first step is to run the Layout of Windows wizard, as follows.
1. Expand project Modes1 and select the package name com.asgteach.modes1, right click, and select New | Other.
2. NetBeans displays the New File dialog. Under Categories, select Module Development and for File Types, select Layout of Windows. Click Next as shown in Figure 8.37.

3. The Layout of Windows wizard lets you know that it will start your application in a special mode that lets you adjust the window layout. Click Next as shown in Figure 8.38.

4. Your application starts and displays a window layout with the default modes defined.
5. Click the New Mode icon (upper left below the application title). A new window that represents a mode is created in the editor position.
6. Reposition this window to the top of the application. Adjust the window until the red guidelines show a horizontal window that spans the application frame. Specify new Mode Name topbanner in the provided textfield.
7. Delete all the remaining non-minimized modes except the editor mode.
8. Now create a new mode and position it to the left of the editor mode. NetBeans will divide the area in half. Rename this new mode on the left to leftside.
9. Rename the editor mode to rightside. Resize the leftside and rightside modes so that their relative size is approximately 30-70. Figure 8.39 shows the new window layout with modes topbanner, leftside, and rightside.

10. When you’re finished customizing the window layout, close the application. This takes you to the wizard’s next step.
Here are some tips for working with the Layout of Windows wizard.
Window Layout Tip
You may find it difficult to place the new “banner” mode so it spans the entire application. By placing the cursor actually outside the top window, we were able to define the new mode so that it is truly a banner and not partitioned horizontally.
Window Layout Tip
Be sure to rename a new mode after you reposition it, not before.
After you exit the launched application, the Layout of Windows wizard continues.
11. The wizard displays the Found Modes list. Select only the new modes you created, as shown in Figure 8.40. Click Next.

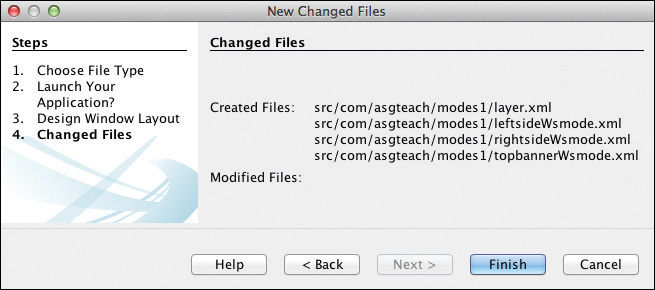
12. NetBeans displays a list of created files. Here you see file layer.xml and Wsmode.xml files for each selected mode. Click Finish as shown in Figure 8.41.
You can now use these new modes by creating TopComponents and selecting the new window position. However, let’s first look at the configuration files. By familiarizing yourself with these files, you’ll be able to tweak your window design and perhaps even add new modes without re-running the Layout of Windows wizard.
Layout of Windows Wizard Tip
Note that even though you did not select any of the default modes in Figure 8.40, the default modes are still present in the window system. If you plan on using any of the default modes and want their layout to conform to the new window layout that you specified in the Layout of Windows wizard, you should check these default modes along with any new modes you created.
Listing 8.20 shows the Layer file. This file contains the declaration of the module’s modes with a link to each mode’s definition. The build process reads the Layer file and mode definition files and generates the Windows2 file structure that defines your application’s modes.
<?xml version="1.0" encoding="UTF-8"?>
<!DOCTYPE filesystem PUBLIC "-//NetBeans//DTD Filesystem 1.2//EN" "http://
www.netbeans.org/dtds/filesystem-1_2.dtd">
<filesystem>
<folder name="Windows2">
<folder name="Modes">
<file name="leftside.wsmode" url="leftsideWsmode.xml"/>
<file name="rightside.wsmode" url="rightsideWsmode.xml"/>
<file name="topbanner.wsmode" url="topbannerWsmode.xml"/>
</folder>
</folder>
</filesystem>
The mode definition file specifies a mode’s configuration. Element name with attribute unique must match the mode.wsmode file as listed in layer.xml. Element kind with attribute type is "view", "editor", or "sliding". (Attribute value "sliding" refers to minimized modes.) Element state with attribute type is "joined" (meaning docked into the main window frame as opposed to "separated"), and element constraints determine how the windows in the mode are sized in relation to other opened windows and modes.
The constraints element provides one or more path elements that split the window frame recursively. When attribute orientation is "vertical", the area is split into rows (cells are defined from top to bottom). When attribute orientation is "horizontal", the area is split into columns (cells are defined from left to right). Attribute number specifies the relative position of that mode in the split area, with 0 being the topmost or leftmost and the highest number used being the bottommost or rightmost.
If you use numbers such as 0, 20, 40, another module provider can specify a mode that appears in between any already-defined modes.
For a specific mode, attribute weight specifies the relative size each window should consume for a given cell within the frame. If all modes are weighted .5, then they will all take up the same space, even as the window frame is resized.
The simplest window layout contains a single frame and its constraints element is empty.
Listing 8.21 shows the mode definition file for topbanner. Here mode topbanner specifies one path element in position 0 (which will always be the first slot in a split cell). The mode consumes 25 percent of the vertical space. It does not share (split) space horizontally; thus it will take up the entire horizontal space providing the banner effect.
You should set element empty-behavior attribute permanent to "true". Otherwise, if the mode is empty (because you floated a window for example), the window system will dynamically delete that mode.
Listing 8.21 topbannerWsmode.xml
<?xml version="1.0" encoding="UTF-8"?><mode version="2.4">
<name unique="topbanner"/>
<kind type="view"/>
<state type="joined"/>
<constraints>
<path orientation="vertical" number="0" weight="0.25"/>
</constraints>
<bounds x="0" y="0" width="0" height="0"/>
<frame state="0"/>
<empty-behavior permanent="true"/>
</mode>
Listing 8.22 shows the mode definition file for mode leftside. It specifies a horizontal split (meaning columns), position number 0 (leftmost) and weight .3.
Listing 8.22 leftsideWsmode.xml
<?xml version="1.0" encoding="UTF-8"?><mode version="2.4">
<name unique="leftside"/>
<kind type="view"/>
<state type="joined"/>
<constraints>
<path orientation="horizontal" number="0" weight="0.3"/>
</constraints>
<bounds x="0" y="0" width="0" height="0"/>
<frame state="0"/>
<empty-behavior permanent="true"/>
</mode>
Listing 8.23 also specifies a horizontal split, using position number 1 and weight .7. It will therefore be to the right of the previous mode and take up about .7 of the space. Mode rightside is of type "editor", whereas the other two are of type "view".
Listing 8.23 rightsideWsmode.xml
<?xml version="1.0" encoding="UTF-8"?><mode version="2.4">
<name unique="rightside"/>
<kind type="editor"/>
<state type="joined"/>
<constraints>
<path orientation="horizontal" number="1" weight="0.7"/>
</constraints>
<bounds x="0" y="0" width="0" height="0"/>
<frame state="0"/>
<empty-behavior permanent="true"/>
</mode>
Creating TopComponents
Let’s test out the new window layout by creating TopComponents, one for each new mode.
1. Inside module Modes1, select the source package com.asgteach.modes1 and select New | Window. NetBeans displays the Basic Settings dialog, as shown in Figure 8.42. The drop down corresponding to Window Position now contains the new modes. Select Window Position topbanner and check Open on Application Start. Click Next.
Note that button Redefine lets you customize the Window Layout using the exact same procedure as the Window Layout wizard we just showed you.

2. NetBeans displays the Name, Icon and Location dialog. Specify TopBanner for Class Name Prefix and accept the defaults for Project and Package. Leave Icon blank. Click Finish.
3. Repeat these steps and add windows LeftSideTopComonent at window position leftside and RightSideTopComponent with window position rightside.
Run application ModeApp (be sure to Clean All first). Its layout should resemble Figure 8.36 on page 388. Perform several window operations (floating, maximizing, closing) to see how the layout resizes. The windows will retain their relative sizes.
A View-Only Window Layout
We’ll now go through a second custom window layout example. This example is from a document that describes the NetBeans Platform Window System API Changes (see http://core.netbeans.org/windowsystem/changes.html). This document contains an excellent explanation of the mode definition file elements.
The example defines four new modes, m1, m2, m3, and m4. All modes are type “view” and are shown in a running application in Figure 8.43.

Here are the steps to create the above custom window layout.
1. Create a new NetBeans Platform application called ModeApp2.
2. Create a new module in ModeApp2 called Modes2 with package name com.asgteach.modes2.
3. Expand module Modes2 Source node. Right click on package name com.asgteach.modes2 and select New | Layout of Windows from the context menu.
4. When the wizard launches the application, create four new modes (named m1, m2, m3, and m4) positioned as shown in Figure 8.44. Exit the application.
5. When the wizard displays the Found Modes dialog, select only the new modes: m1, m2, m3, and m4 and complete the rest of the wizard.

The Layout of Windows wizard creates file layer.xml and a mode definition Wsmode.xml file for each mode, which we show in Listing 8.24 through Listing 8.27.
These mode definition files may look slightly different from yours, depending on how you sized the windows in the Window Layout Design view. Feel free to tweak your files to match the following listings. Make sure that each mode is type "view" and element empty-behavior attribute permanent is set to "true".
Look at element constraints for each mode. Note that modes m1, m2, and m3 all have the first path element set to orientation="vertical" and attribute number="0". Mode m4 has path element set to orientation="vertical" and attribute number="1". This splits the desktop into two vertical cells (rows) with the top cell accounting for .7 space and the bottom cell .3 space.
Next m1 and (m2 and m3) divide the top cell into two horizontally (two columns) with each part having equal space. Mode m1 has number "0" (the left side) of this horizontal division, and modes m2 and m3 are both positioned in the right side (with number "1").
Finally, modes m2 and m3 divide the right column into two vertical spaces, giving each mode equal space.
Listing 8.24 shows the mode definition file for mode m1.
<?xml version="1.0" encoding="UTF-8"?><mode version="2.4">
<name unique="m1"/>
<kind type="view"/>
<state type="joined"/>
<constraints>
<path orientation="vertical" number="0" weight=".7" />
<path orientation="horizontal" number="0" weight="0.5"/>
</constraints>
<bounds x="0" y="0" width="0" height="0"/>
<frame state="0"/>
<empty-behavior permanent="true"/>
</mode>
Listing 8.25 shows the mode definition file for mode m2.
<?xml version="1.0" encoding="UTF-8"?><mode version="2.4">
<name unique="m2"/>
<kind type="view"/>
<state type="joined"/>
<constraints>
<path orientation="vertical" number="0" weight=".7" />
<path orientation="horizontal" number="1" weight="0.5"/>
<path orientation="vertical" number="0" weight="0.5" />
</constraints>
<bounds x="0" y="0" width="0" height="0"/>
<frame state="0"/>
<empty-behavior permanent="true"/>
</mode>
Listing 8.26 shows the mode definition file for mode m3.
<?xml version="1.0" encoding="UTF-8"?><mode version="2.4">
<name unique="m3"/>
<kind type="view"/>
<state type="joined"/>
<constraints>
<path orientation="vertical" number="0" weight=".7" />
<path orientation="horizontal" number="1" weight="0.5"/>
<path orientation="vertical" number="1" weight="0.5" />
</constraints>
<bounds x="144" y="557" width="576" height="164"/>
<frame state="0"/>
<empty-behavior permanent="true"/>
</mode>
Finally, Listing 8.27 shows the mode definition file for mode m4.
<?xml version="1.0" encoding="UTF-8"?><mode version="2.4">
<name unique="m4"/>
<kind type="view"/>
<state type="joined"/>
<constraints>
<path orientation="vertical" number="1" weight="0.3"/>
</constraints>
<bounds x="0" y="0" width="0" height="0"/>
<frame state="0"/>
<empty-behavior permanent="true"/>
</mode>
Next, create four TopComponent windows, one for each new mode using code prefix M1, M2, M3, and M4. Clean All and Run the application. A small sliver will appear, which is the empty editor window. Resize the application (make it smaller and then larger). Figure 8.45 shows that the empty editor area has grown.

Follow these steps to hide an empty editor area. You’ll add an @OnStart Runnable (see “Using @OnStart” on page 242). Note that you can still open a window in the editor area, but if the editor area is empty, other windows will completely fill in the space.
1. The @OnStart annotation requires a dependency on the Module System API. In the Modes2 module Libraries node, right click, and select Add Module Dependency . . . from the context menu. In the Add Module Dependencies dialog, select Module System API from the list of modules. Click OK.
2. In the Modes2 module, right click on the package name com.asgteach.modes2, and select New | Java Class . . . from the context menu.
3. NetBeans displays the New Java Class dialog. For Class Name, specify Installer (any name is fine) and click Finish.
4. NetBeans adds the Installer.java class. Make the Installer class implement Runnable, add the @OnStart annotation, and implement the run() method, as shown in Listing 8.28.
Listing 8.28 Installer.java—Provide Module Life Cycle Methods
package com.asgteach.modes2;
import org.openide.modules.OnStart;
@OnStart
public class Installer implements Runnable {
@Override
public void run() {
System.setProperty("netbeans.winsys.hideEmptyDocArea", "true");
}
}
5. Alternatively, you can configure the following runtime argument in your modules platform.properties file (under Modes2/Important Files/Project Properties).
run.args.extra=-J-Dnetbeans.winsys.hideEmptyDocArea=true
Now when you run application ModeApp2 again, you’ll see no empty document area, even when resizing (as shown in Figure 8.43 on page 396).
No Mode Is an Island
Once you begin experimenting with your own modes, you’ll discover that the window layout of your system depends on the interactions of all the modes in use and the actions of the user as the window frame is resized or windows are repositioned, floated, opened, and closed. Indeed, no mode is isolated from this behavior. Here are a few additional strategy hints you may find helpful as you experiment with your own window layout.
1. Use the Layout of Windows wizard first. Then fine tune your window layout if necessary by tweaking the generated wsmode files.
2. Try simplifying the constraints element as much as possible.
3. Make sure element empty-behavior attribute permanent is set to "true".
4. We found it easier to create all new modes for a window layout instead of mixing new modes with default modes. If you do mix modes, retain the mode definition files of any default modes that you use (check them in the Found Modes dialog of the Layout of Windows wizard).
5. Experiment with window layouts by dragging and dropping windows into new positions and resizing. When you shut down the application, the most recent window layout will be preserved in directory Windows2Local/Modes under build/testuserdir/config directory in your application directory.
8.10 Window Layout Roles
The NetBeans Platform lets you define different window layouts based on roles. A common use case is to provide distinct role-based perspectives for an application. The Window Manager keeps track of roles that you define and persists a separate Windows2Local hierarchy under build/testuserdir/config in your application directory for each role that you use.
A role comes into existence by invoking WindowManager method setRole("ModeName"). TopComponents can be restricted to one or more named roles. Otherwise, any TopComponent can appear within any role.
If a TopComponent has one or more roles assigned to it, the TopComponent will only open if one of its roles is active. If a TopComponent has no roles assigned to it, it is eligible to open with any role.
When an application starts up, the default role is in effect. You can switch to the default role by invoking the WindowManager setRole() method with argument null. If you want your application to start up in a specific (non-default) role, then invoke the WindowManager method setRole("MyRole") in an @OnStart annotated Runnable.
Normally, when a user manipulates the window frame, resizes windows, or invokes other window operations, the window system saves these changes when the application shuts down. When using roles, the window system saves the window layout separately for each role. Thus, changes a user makes to the window layout in one role do not affect the window layout of any other roles.
Let’s show you a role-based example with an application called RoleExample. This application has three roles: the default role, User, and Admin. The User and Admin roles each have TopComponents assigned specifically to these roles. When you run the application and the User role is active, you see one set of components. Similarly, when you run the application with the Admin role active, you see a distinct set of components.
Application RoleExample also has a LoginTopComponent that has no roles assigned to it. This means that LoginTopComponent can open in the default role and remain open when a new role becomes active.
The LoginTopComponent acts as a gatekeeper, requesting a username and password from a user. When the user clicks the Login button, an event handler looks up the username and password to find the corresponding role for that username. The role is then changed to either User or Admin depending on the username. No role change occurs if the login fails.
Figure 8.46 shows the RoleExample application running with the default role active. There is a single window open (LoginTopComponent) with the username and password fields filled in. As it turns out, Joe is in our data store with role User.

When the Login button is clicked and Joe’s credentials check out, the application invokes WindowManager method setRole("User"). The LoginTopComponent remains open and you see two additional windows: UserExplorer and UserEditor, as shown in Figure 8.47. These two TopComponents have role User assigned to them.

If at this point, Joe resizes the window frame, changes are persisted when the application switches roles or at application shutdown. The default role and Admin role are not affected by Joe’s window operations.
Since the LoginTopComponent is open, another user can log in. Let’s suppose we have a second user Meg with role Admin. When Meg logs in, the application switches to role Admin, as shown in Figure 8.48. With this switch, the User-specific windows UserEditor and UserExplorer close and two different windows open: AdminEditor and AdminOutput. Again, LoginTopComponent remains open. Note that the Admin window layout is different from the User window layout, and its windows are docked into different modes.

If at any time a user provides invalid information in the Login window, the application switches to the default role. This returns the application to the window layout you see in Figure 8.46 on page 402 with a single LoginTopComponent open (and an error message indicating that the login was incorrect). All other TopComponents are closed.
RoleExample Application and Role-Based TopComponents
Let’s build this example now with the following steps. You’ll first create the application, modules, and role-based TopComponents.
1. Create a new NetBeans Platform application called RoleExample.
2. Create three new modules in RoleExample: AdminModule, UserModule, and RoleModel. Module RoleModel contains the User and UserRole classes that implement the credential checking and role assignments. Modules AdminModule and UserModule contain role-specific TopComponents.
3. Create two TopComponents inside module AdminModule called AdminEditorTopComponent and AdminOutputTopComponent. For AdminEditor, select window position editor and select Open at Application Start.
4. For AdminOutput, select window position output and select Open at Application Start. Assign role “Admin” to both windows by editing the @TopComponent.Registration annotation in the TopComponent source code using element roles.
5. Remove the Action annotations for both components.
Listing 8.29 shows the annotation settings for AdminEditorTopComponent, and Listing 8.30 shows the annotations for AdminOutputTopComponent.
Listing 8.29 AdminEditorTopComponent.java (Annotations)
@ConvertAsProperties(dtd = "-//com.asgteach.adminmodule//AdminEditor//EN",
autostore = false)
@TopComponent.Description(preferredID = "AdminEditorTopComponent",
persistenceType = TopComponent.PERSISTENCE_ALWAYS)
@TopComponent.Registration(
roles = {"Admin"},
mode = "editor",
openAtStartup = true)
@TopComponent.OpenActionRegistration(displayName = "#CTL_AdminEditorAction",
preferredID = "AdminEditorTopComponent")
@Messages({
"CTL_AdminEdAction=AdminEditor",
"CTL_AdminEdTopComponent=AdminEditor Window",
"HINT_AdminEdTopComponent=This is a AdminEditor window"
})
public final class AdminEditorTopComponent extends TopComponent {
. . . code omitted . . .
}
Listing 8.30 AdminOutputTopComponent.java (Annotations)
@ConvertAsProperties(dtd = "-//com.asgteach.adminmodule//AdminOutput//EN",
autostore = false)
@TopComponent.Description(preferredID = "AdminOutputTopComponent",
persistenceType = TopComponent.PERSISTENCE_ALWAYS)
@TopComponent.Registration(
roles = {"Admin"},
mode = "output",
openAtStartup = true)
@TopComponent.OpenActionRegistration(displayName = "#CTL_AdminOutputAction",
preferredID = "AdminOutputTopComponent")
@Messages({
"CTL_AdminOutputAction=AdminOutput",
"CTL_AdminOutputTopComponent=AdminOutput Window",
"HINT_AdminOutputTopComponent=This is a AdminOutput window"
})
public final class AdminOutputTopComponent extends TopComponent {
. . . code omitted . . .
}
6. Add two TopComponents to module UserModule using code prefix UserEditor and UserExplorer. Specify window position editor and explorer, respectively. Select Open at Application Start for both TopComponents.
7. Assign role “User” to both windows by editing the @TopComponent.Registration annotation in the TopComponent source code using element roles. (Refer to Listing 8.29 and Listing 8.30 but specify role “User” instead of “Admin.”)
8. Remove the Action annotations for both components.
Credential Checking and Role Assignments
Now let’s implement the credential checking and role assignments. We’ll set up a bare-bones map-based collection to store users and roles.
1. In the RoleModel module, create Java interface UserRole in package com.asgteach.rolemodel.api, and provide the abstract methods, as shown in Listing 8.31.
Listing 8.31 Interface UserRole
package com.asgteach.rolemodel.api;
public interface UserRole {
public User findUser(String username, String password);
public User storeUser(User user);
public String[] getRoles();
public boolean storeRole(String role);
}
2. In the same package, create Java class User, as shown in Listing 8.32.
package com.asgteach.rolemodel.api;
public class User {
private String username;
private String password;
private String role;
public String getPassword() {
return password;
}
public void setPassword(String password) {
this.password = password;
}
public String getRole() {
return role;
}
public void setRole(String role) {
this.role = role;
}
public String getUsername() {
return username;
}
public void setUsername(String username) {
this.username = username;
}
@Override
public String toString() {
StringBuilder sb = new StringBuilder(this.getUsername()).append("-");
sb.append(this.getPassword()).append("-");
sb.append(this.getRole());
return sb.toString();
}
}
3. Add Lookup API dependency to module RoleModel and make package com.asgteach.rolemodel.api public under API Versioning. Create Java class SimpleUserRole in package com.asgteach.rolemodel with the implementation shown in Listing 8.33. Note that we use annotation @ServiceProvider with class UserRole.
Besides providing a map-based lookup for username and password data, SimpleUserRole also initializes the map with user and role values. Here you see data for our test case Joe and Meg.
@ServiceProvider(service = UserRole.class)
public class SimpleUserRole implements UserRole {
private Map<String, User> userMap = new HashMap<>();
private List<String> roles = new ArrayList<>();
public SimpleUserRole() {
initialize();
}
private void initialize() {
User user1 = new User();
user1.setUsername("Joe");
user1.setPassword("Joe");
user1.setRole("User");
storeUser(user1);
storeRole("Admin");
User user2 = new User();
user2.setUsername("Meg");
user2.setPassword("Meg");
user2.setRole("Admin");
storeUser(user2);
}
@Override
public User findUser(String username, String password) {
User user = userMap.get(username);
if (user != null && user.getPassword().equals(password)) {
return user;
}
return null;
}
@Override
public User storeUser(User user) {
if (user.getRole() == null || user.getRole().isEmpty()) {
user.setRole("User");
}
storeRole(user.getRole());
return userMap.put(user.getUsername(), user);
}
@Override
public String[] getRoles() {
return roles.toArray(new String[roles.size()]);
}
@Override
public boolean storeRole(String role) {
if (!roles.contains(role)) {
return roles.add(role);
}
else return false;
}
}
LoginTopComponent
Next, implement the Login process using these steps.
1. In module AdminModule, add dependencies to the Lookup API and to module RoleModel to access the service provider for UserRole.
2. Still in module AdminModule, create LoginTopComponent. Specify window position editor and select Open at Application Start.
3. Configure the GUI. Add three JLabels, a JTextField, a JPasswordField, and a JButton, arranged as shown in Figure 8.49. Rename the variable names for the components as listed in the figure.

4. From the Design view, double click the Login button and provide the following button event handling code. Add a new entry into the @Messages list for the incorrect login error message, as shown in Listing 8.34.
Listing 8.34 LoginTopComponent loginButtonActionPerformed() Method
@Messages({
"CTL_LoginAction=Login",
"CTL_LoginTopComponent=Login Window",
"HINT_LoginTopComponent=This is a Login window",
"ERROR_IncorrectLogin=Incorrect login for user "
})
. . . code omitted . . .
private void loginButtonActionPerformed(
java.awt.event.ActionEvent evt) {
errorLabel.setText("");
UserRole userRole = Lookup.getDefault().lookup(UserRole.class);
if (userRole != null) {
User thisUser = userRole.findUser(usernameTextField.getText(),
new String(passwordField.getPassword()));
WindowManager wm = WindowManager.getDefault();
if (thisUser != null) {
// switch to new role
wm.setRole(thisUser.getRole());
} else {
errorLabel.setText(Bundle.ERROR_IncorrectLogin()
+ usernameTextField.getText());
if (wm.getRole() != null) {
// put it back to the default role
wm.setRole(null);
}
}
}
}
The button event handler is invoked when the user clicks the Login button. The code first clears errorLabel. After instantiating userRole with a UserRole instance (obtained through the Lookup), the handler calls findUser() with the submitted username and password. If the return is not null, the login is valid and the handler switches roles by invoking WindowManager method setRole() with the user’s assigned role.
The submitted username and password are not valid if the return from findUser() is null. In this case, the handler displays an error message and switches to the default role (unless the default role is already active).
Our application is now ready to build and run. Even though the role-specific TopComponents have attribute openAtStart = true, these windows will not open until their assigned roles are active in the window system.
By default, when the window system switches roles, it first hides the main window, persists the current window layout, loads the window layout of the new role, and then makes the main window visible. This hiding/showing may produce a flicker. To make the switch smoother, you can modify a branding property associated with the application, as follows.
1. Right click the RoleExample application node and select Branding from the context menu.
2. NetBeans displays the RoleExample Branding dialog. Select tab Resource Bundles and type WinSys.Show in the Search Box.
3. Change the value of property WinSys.Show.Hide.MainWindow.While_Switching.Role to false as shown in Figure 8.50. Click OK.

Run the application again. You’ll notice a smoother, flicker-free experience when switching roles.
See “Putting It All Together” on page 544 for an application Login dialog that sets the window system role via login at startup time.
8.11 Key Point Summary
The NetBeans Platform Window System provides standard window features for desktop applications. This includes drag-and-drop reconfiguration and window resizing, docking, maximizing, minimizing, opening, and closing. The window system also provides the following key features.
• Developers create windows by extending class TopComponent, allowing windows to automatically integrate into the NetBeans Platform Window System.
• The default configuration for a TopComponent provides a unique, singleton window, persistence between application restarts, and a registered action to open the window.
• Modes define window containers and specify a window’s relative size and position as a user runs an application or resizes and reconfigures the window frame.
• The windows system provides default modes and you can also define new ones.
• A TopComponent is opened in a mode. The windows system opens a TopComponent in the editor mode if the TopComponent’s mode is not defined or no mode has been assigned.
• There are three mode types: editor, view, and sliding. The editor mode type holds document windows that cannot be minimized. View type modes usually hold helper windows. Minimized windows are put into sliding modes.
• The window system defines TopComponent annotations that specify a window’s configuration. This includes an assigned mode, persistence type, title and tooltip text, and an open action registration.
• TopComponents have three persistent options: PERSISTENCE_ALWAYS, PERSISTENCE_ONLY_OPENED, and PERSISTENCE_NEVER. You can also persist String data for your TopComponent by implementing methods writeProperties() and readProperties().
• Create non-singleton TopComponents by removing element preferredID in annotation @TopComponent.OpenActionRegistration. With non-singleton TopComponents use persistence type PERSISTENCE_NEVER or PERSISTENCE_ONLY_OPENED.
• Override TopComponent methods to customize behavior at certain points in a TopComponent’s life cycle. This includes at component opening, closing, activating, deactivating, hiding, and showing. You can also override method canClose() to dynamically allow or disallow TopComponent closing.
• Set client properties in a TopComponent’s constructor to customize (that is, limit) a window’s behavior.
• A window manager provides programmatic access to useful window operations, such as finding open windows, finding modes, finding TopComponent groups, setting roles, and accessing the current TopComponent registry. With access to a TopComponent instance or a Mode instance, you can open, close, activate, or hide a TopComponent and dock a TopComponent into different modes.
• Window groups let you specify TopComponents that should open and close as a group. Specify and configure groups with a window system group definition file (.wsgrp) and a window system TopComponent group file for each TopComponent in the group.
• NetBeans IDE provides a Layout of Windows wizard to customize window layouts for your applications. This wizard lets you define new modes, redefine standard modes, or rename standard modes.
• You can define different window layouts based on roles and specify TopComponents that belong to certain roles. The window manager keeps track of roles you define and persists a separate Windows2Local hierarchy for each role you use.
• TopComponents with no role configuration can open in any role.
• Switch roles with window manager method setRole() with a String role name. Use role name null for the default window layout, meaning no currently active role.