1. A Tour of the NetBeans Platform
Welcome to JavaFX Rich Client Programming on the NetBeans Platform.
Swing and JavaFX both have sophisticated component libraries for creating rich client applications. While Swing is stable and well-entrenched, the newer JavaFX API offers an improved rich media solution. However, both libraries lack a framework. That is, both lack an out-of-the-box solution with a window management system and modular framework that sophisticated desktop applications require.
This chapter is a big picture description of what the NetBeans Platform offers application developers and an executive summary of what you can expect to learn in the rest of the book. We also show you how JavaFX fits into the world of modular desktop application development.
What You Will Learn
• How Swing and JavaFX fit into the NetBeans Platform programming model.
• The main NetBeans Platform systems and APIs.
• Where to find detailed information in this book about the different NetBeans Platform systems.
• Examples of why you might want to incorporate JavaFX into your NetBeans Platform application.
• Where to find the latest JDK software, NetBeans software, and examples for this book.
1.1 Background Basics
Let’s begin our tour of the NetBeans Platform by looking at the Java technology used by application developers. The NetBeans Platform makes use of fundamental Java architecture principles. Before we show you the NetBeans Platform, Chapter 2 takes a brief tour of some of the background basics Java programmers use to create desktop applications. These include
• JavaBeans and JavaBeans Properties.
• Property Change Events and Listeners.
• Swing basics and common Swing components.
• Swing component events and listeners.
• Logging.
• Background threads and thread safety to keep the UI responsive.
In exploring these topics, we’ll build a small desktop Swing application. Later in the book, we break this application into cohesive modules and port it to the NetBeans Platform.
JavaFX Integration
The NetBeans Platform is built with Swing, a well-established single-threaded GUI system in the Java world. JavaFX is a newer GUI system (also single threaded) that offers significant improvements and features.
JavaFX is based on a scene graph model that is different than models used with Java 2D or Swing. With JavaFX, you define objects in terms of a scene graph hierarchy and specify transforms to position these objects relative to one another. Animation is easy to achieve with transforms and effects.
JavaFX is bundled with the JDK and is accessible in NetBeans Platform applications. The modular nature of the NetBeans Platform lets you pick and choose which parts of your application are best fits for JavaFX.
Chapter 3 introduces JavaFX and provides a first look at this relatively new technology. In Chapter 4, we show you how to build desktop applications with JavaFX. You’ll learn how to use observable collections and create JavaFX properties. We also port the Swing application introduced in Chapter 2 to JavaFX. If you have a background in Swing, this chapter shows you how to migrate to JavaFX.
After you learn how to create a basic NetBeans Platform application in Chapter 5, we’ll show you how to integrate JavaFX content into NetBeans Platform applications. We discuss how to structure modules that contain JavaFX and how to make sure you access JavaFX scene graph structures on the JavaFX Application Thread and Swing components on the Event Dispatch Thread (EDT). These communication strategies are necessary whenever you integrate JavaFX content in NetBeans Platform windows.
We’ll also provide an example application that uses the JavaFX Charts package in Chapter 15 and a reference application (briefly described in this chapter).
1.2 The NetBeans Platform: The Big Picture
Now let’s give you a big-picture description of the NetBeans Platform and describe several of its major systems and APIs. Along with the description of each part, we’ll also tell you where you can find more information on these topics in this book. This, then, is the executive summary. If you’re considering developing an application based on the NetBeans Platform, the following descriptions will give you a general idea of your application’s architecture and what the NetBeans Platform offers.
Module System API
Perhaps the most important feature of the NetBeans Platform is the module system, which provides a way to divide your application into cohesive parts. The NetBeans Platform includes a Runtime Container that manages all of the modules in your application. These modules include those contributed by the NetBeans Platform and ones that you create yourself. The module system helps you build loosely-coupled applications that can evolve without breaking. Specifically, the module system
• Provides a way to break up an application into cohesive parts.
• Lets you specify dependencies between modules so these dependencies are deliberate and non-cyclical. This helps keep your modules loosely coupled.
• Lets you add and remove features without breaking your application.
Modules are basically JAR files, but they include meta information that enables the Runtime Container to manage them. When a module uses classes contained in another module, you must explicitly set a dependency on that module. Furthermore, the packages that contain these classes must be declared public. The Runtime Container makes sure any packages in a dependency declaration are available. In this way, you can break up applications into cohesive parts with explicit contracts between modules. This approach lets you design applications with high cohesion and low coupling.
Chapter 5 discusses the Module System and shows you how to break up a Swing application into modules. You’ll learn how to port the example presented in Chapter 2 and create a modular NetBeans Platform application.
All modules have a life cycle, which you can hook into via annotations. Thus, you can execute code when a module starts, shuts down, and when the window system initializes. See “Module Life Cycle Annotations” on page 242 for the module life cycle hooks and “Using @OnShowing” on page 374 for the window system initialization hook.
And What About OSGi Bundles?
The OSGi Framework is an industry standard supported by the OSGi Alliance and described by JSR-291. The OSGi Framework provides a modular runtime environment. An OSGi bundle is comparable to a NetBeans Platform module. You can add dependencies between OSGi bundles and NetBeans Platform modules. Furthermore, the NetBeans Platform has been extended to support OSGi bundles in the following ways.
• Using the Add New Module wizard, you can create new modules that are OSGi bundles in your NetBeans Platform application, as shown in Figure 1.1.

• You can add existing OSGi bundles to your NetBeans Platform application—https://platform.netbeans.org/tutorials/nbm-osgi-quickstart.html (shows how to integrate OSGi bundles into a NetBeans Platform application).
• You can build an OSGi-only application by executing NetBeans module code natively as OSGi bundles—http://wiki.netbeans.org/NetBeansInOSGi.
Lookup API
Module systems let you break up your application into loosely coupled parts. These modules must have, however, a way to communicate with each other. This is where you use the Lookup API, as described in the following two related scenarios.
1. In client modules you look up service providers based on an interface or abstract class. The Lookup API returns one or more service providers. The client module must explicitly declare a dependency on the module that defines the interface/abstract class, but no dependencies are required on any service provider modules. With dynamically installed modules, applications have the ability to acquire new features and evolve without breaking.
2. NetBeans Platform objects (such as windows) implement context sensitivity with Lookups. A Lookup is basically a map where the key is an interface, abstract class, or class. The value is an implementation of the interface, an extension of the super class, or a class object.
When a window puts an object in its Lookup, the window instantly acquires the capability that object implements. Another module can listen for the presence of a particular capability in an exposed Lookup and invoke that capability.
Neither the window nor the interested listener has any direct dependencies. There are only dependencies on the module that defines the interface or class represented by the key.
“Registering a Service Provider” on page 214 shows how to use service providers as described above. “Configuring a Window for Selection” on page 219 shows how a window uses a Lookup. “Context-Aware Actions” on page 428 describes how Lookup dynamically enables and disables actions. Furthermore, “Implement Openable and SavablePersonCapability” on page 500 describes the power of capabilities and module communication. Context sensitivity can also apply to selection management, which we explore in “Creating a Selection History Feature” on page 332.
Window System API
Desktop applications need windows to display components and a GUI to let users interact with the application. The NetBeans Platform Window System lets modules create and manipulate application windows.
The Window System provides default behaviors for windows, which you can optionally limit. The default behaviors include opening, closing, floating, docking, minimizing, maximizing, acquiring focus, and moving to different locations. You can also persist the state of each window between restarts and reset the windows to their default state and position.
The NetBeans IDE has a wizard to create and configure application windows. The NetBeans Platform window extends the TopComponent class. TopComponent itself extends JComponent, and therefore is a Swing container. You can create UI content using the NetBeans IDE Matisse designer. Additionally, you can integrate JavaFX content into a TopComponent with the JFXPanel control. Using FXML markup, you build JavaFX content with the stand-alone Scene Builder application.1
1. You can download Scene Builder for free at www.oracle.com.
The NetBeans Platform also includes a Window Manager that manages all of your application’s windows. You can access this Window Manager for programmatic window control.
We discuss the NetBeans Platform Window System in Chapter 8 and JavaFX integration with a NetBeans Platform application window in Chapter 6.
As an example, Figure 1.2 shows the SmartPhoneDataApp from Chapter 15 with windows both docked and floating (separately or in a group). All floating windows can be moved independently, possibly for displaying in a separate monitor. This application uses the JavaFX Charts API and a Swing JTable together.

File System API
The File System is part of the basic runtime system of a NetBeans Platform application and provides a hierarchical view of configuration information. The File System is made up of folders, files, and data and lets you access a file system in the traditional sense. That is, you can create, read, update, and delete files and folders within the user’s local file system. Each application also stores configuration information in a special file system called the System File System. Here you find folders with names like “Actions” and “Menu Bar” that in turn contain subfolders like “Edit” or “File.” Each of these folders in turn contains files that describe objects through attributes.
Any module can modify the System FileSystem and contribute data or configuration information to the application with a module configuration file, known as the Layer file. When an application runs, all module configuration data is merged into a single configuration.
Importantly, this means that the File System provides a mechanism by which modules can communicate with each other. The File System complements the Lookup API discussed earlier for inter-module communication. That is, one module can register folders and files in a module configuration file that other modules can access without creating dependencies.
We discuss the File System API in Chapter 13, which includes file-oriented operations, installing and accessing files in modules, and accessing and modifying artifacts in the application’s configuration. We show you how to include the Favorites window in a NetBeans Platform application to access the local file system within the UI. “Using the Layer File for Inter-Module Communication” on page 665 uses the File System and Layer file for communication between modules in a NetBeans Platform application.
Nodes and Explorer Views
The Nodes API and Explorer and Property Sheet API go together. In a NetBeans Platform application, nodes provide a model for your business objects. Nodes wrap the business object and have a Lookup. Furthermore, nodes have a context menu with actions that users can invoke.
The Explorer Manager is a controller class that manages a node hierarchy. Explorer Views are Swing-based UI components that display a node hierarchy by accessing an Explorer Manager. You add Explorer Views to NetBeans windows. The NetBeans Platform provides several different Explorer Views with different looks (tree, table-based, icon, property-based, master-detail). Explorer Views are interchangeable because they use the same node-based model.
Finally, because nodes and Explorer Managers both implement selection management, selected nodes and their wrapped objects become available to other modules transparently and without defining dependencies on the modules with Explorer Views. Architecturally, these APIs support the NetBeans Platform concepts of loosely-coupled modules.
We show you how to use nodes, Explorer Views and Property Sheets, and the Explorer Manager in Chapter 7 (“Nodes and Explorer Views”).
But Wait . . . There’s More
The APIs and systems we’ve described in the previous section constitute the central parts of all NetBeans Platform applications. But there are additional modules and APIs in the NetBeans Platform.
Action Framework
An application performs work with menu, toolbar, or keyboard shortcut selections. Chapter 9 introduces the NetBeans Platform Action framework. Because the Action framework registers actions through configuration (with annotations), you’ll learn how to easily add and remove actions to an application. The framework also lets you dynamically enable and disable actions and customize behavior based on selectable context.
CRUD-Based Applications
Chapter 10 explores the concepts of capabilities within the Action framework to create context-aware actions. The example builds a CRUD-based application with a database for persistence. We apply the concepts introduced in Chapter 2 to keep the UI responsive using background threads.
Dialogs and Wizards
Chapter 11 explores the NetBeans Platform Dialogs API that lets you create, display, and obtain input from dialogs. You can build custom dialogs with Swing or even integrate JavaFX in a dialog panel.
The Wizard framework lets you create multi-step processes within your application that users invoke to build application artifacts. The NetBeans IDE uses the Wizard framework for many of its tasks, such as creating projects, windows, files, RESTful web clients, and so forth. You can use JavaFX with visual wizard panels, as well. Chapter 12 discusses the Wizard framework.
Data System API
The Data System API is an important bridge between nodes and files. The Data System lets you integrate new file types into your application. Chapter 14 shows you how to create a new file type, use the NetBeans Platform text editor in an application, and integrate the NetBeans Platform XML editor. We also discuss creating editors with MultiView elements, using both the Visual Library API and JavaFX to build synchronized views in a MultiView editor.
JavaFX Charts
Chapter 15 shows how to build a NetBeans Platform application with JavaFX Charts to visualize data. Long missing from Swing-based applications, JavaFX provides an integrated Chart package with many supported chart types, as shown in Figure 1.3. This example application shows you how to print a TopComponent window, save a chart window (or any window with JavaFX content) to a PNG format file, use binding to keep JavaFX content synchronized, and add special effects (such as animating a pie slice).

We apply the design concepts discussed earlier to make the application highly modularized. You can remove any of the Chart modules or easily add modules.
Using Web Services
Chapter 16 explores creating a RESTful web service client within a NetBeans Platform application. Additionally, the application has a JavaFX-based UI for its windows and uses the JavaFX concurrency framework for background services. This example application applies the concepts presented in Chapter 4 (JavaFX background threads), Chapter 6 (JavaFX integration), and Chapter 15 (JavaFX Charts) to create a web service client application.
Branding, Distribution, and Update
Branding helps you customize your application. Chapter 17 shows you how to configure your application’s title, name, and splash screen (or have no splash screen at all). Chapter 17 also discusses how to distribute your application and make updates available to users. Importantly, “Enable Updates of Your Application” on page 857 shows how to integrate the NetBeans Platform Plugin UI into your application. “Create an Update Center” on page 858 explains how to build an update center. We also show you how to dynamically add and remove plugins (modules) in a running application. You can customize any of the text in a NetBeans Platform module (see “Branding and Resource Bundles” on page 854).
Internationalization and Localization
The NetBeans Platform supports internationalization and localization of NetBeans Platform applications. To do this, you isolate target text using the @Messages annotation and provide translated text in Properties files. Chapter 17 describes these steps and shows you how to localize the NetBeans Platform-provided UI components. Figure 1.4 shows a Portuguese version of an application with localized content and a localized menu bar and menu items from the NetBeans Platform.

1.3 FamilyTreeApp Reference Application
Throughout this book, you’ll see examples illustrating various NetBeans Platform features. As we researched how to create a book about the NetBeans Platform, we built an example application. This reference application lets you manage a Family Tree by documenting relationships among family members through life events such as marriage, birth, divorce, and death. We embraced the Homer and Marge Simpson family of the popular TV show for our example and created a CRUD-based database application called FamilyTreeApp.
You can find the source for this application at https://java.net/projects/nbfamilytreeapp. This project illustrates many of the features of a modular NetBeans Platform application. The examples we present in this book, however, have been greatly simplified from this application to concentrate on specific NetBeans Platform features.
Nevertheless, this reference application provided many of the insights we gained, especially integrating JavaFX into NetBeans Platform applications. We wanted to explore not only best practices for designing modular desktop applications with the NetBeans Platform, but how to best incorporate JavaFX for a great look and added functionality. We encourage our readers to access the NetBeans Platform FamilyTreeApp to explore a well-developed example.
FamilyTreeApp and JavaFX
Let’s show you a few NetBeans Platform / JavaFX features illustrated in this application. Figure 1.5 shows the application running. The left window is an Explorer View providing a list of Persons and their Events. The right window is a similar Explorer View, providing a list of only Persons. Both of these windows use the NetBeans Platform Explorer Views and Nodes API. (Chapter 7 describes this important topic.) You can select nodes (Person or Event objects), expand nodes, and right click to see a context menu. A double click opens the selected object for editing.

The FamilyTreeApp includes a Welcome window, which is a great place to incorporate JavaFX. Here, we use a radial gradient for the background, put drop shadows around the question marks, and initiate a fade animation when the user clicks anywhere in the window’s background.
The Person Timeline window (shown in the lower portion in Figure 1.5 and in Figure 1.6) displays the selected person’s events chronologically. Each event fades in sequentially using animation. The Timeline window displays changes through the powerful NetBeans Platform selection mechanism and updates a person’s event details with property change listeners.

We also installed roll-over animations to scale up events as the user passes over an event with the mouse. (The last event is scaled up in Figure 1.6). This technique is not just eye candy. The scale-up animation is useful during presentations to highlight an artifact within a window.
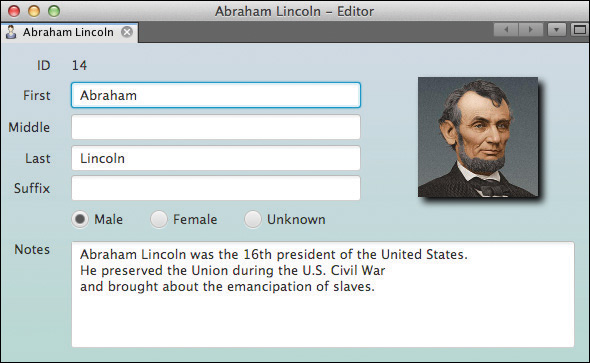
We’ve used JavaFX to build the Person Editor, shown in Figure 1.7, creating the JavaFX content using Scene Builder (see “Scene Builder and FXML” on page 155). We added a linear gradient to the background, a drop shadow on the image, and JavaFX controls for textfields, radio buttons, and the text area.
Similarly, Figure 1.8 shows the Event Editor, which uses JavaFX for the UI controls. Here, we also used Scene Builder to create the UI.

The NetBeans Platform provides a powerful and flexible Wizard framework that lets you create multi-step processes for building application artifacts (projects, data objects, special files). You can implement each visual Wizard panel with JavaFX, as shown in Figure 1.9. The panel (with JavaFX content) is incorporated into the Swing-based Wizard panel. (Chapter 12 covers wizards.)

You can similarly use JavaFX with the NetBeans Platform dialogs or incorporate the JavaFX File Chooser, Color Picker, or Date Picker controls into your application. Figure 1.10 shows the JavaFX File Chooser control, which implements the FamilyTreeApp Add Picture action.
JavaFX 3D Integration Possibilities
You can incorporate JavaFX 3D content into NetBeans Platform applications. As JavaFX evolves and graphics processing units (GPUs) become faster and more advanced, 3D will no longer be a specialized visualization technique but a common look in many applications.
You use JavaFX 3D by creating a JavaFX Scene with Depth Buffering capabilities (also called Z-buffering) and a perspective camera. This sets up the underlying hardware pipelines to transform pixels into the proper perspective. As an example, Figure 1.11 shows several JavaFX (2D) shapes with different Z values (in 3D, the Z value provides depth to an otherwise two-dimensional XY coordinate system). This is a floating window from a NetBeans Platform application. (The source for this example is available in the book’s download bundle.) The shapes in Figure 1.11 overlap, but you can’t really discern their relative depth.

However, as you rotate the enclosing group, as shown in the second image, you see their relative depth. This rendering is only possible with a perspective camera and 3D capabilities.
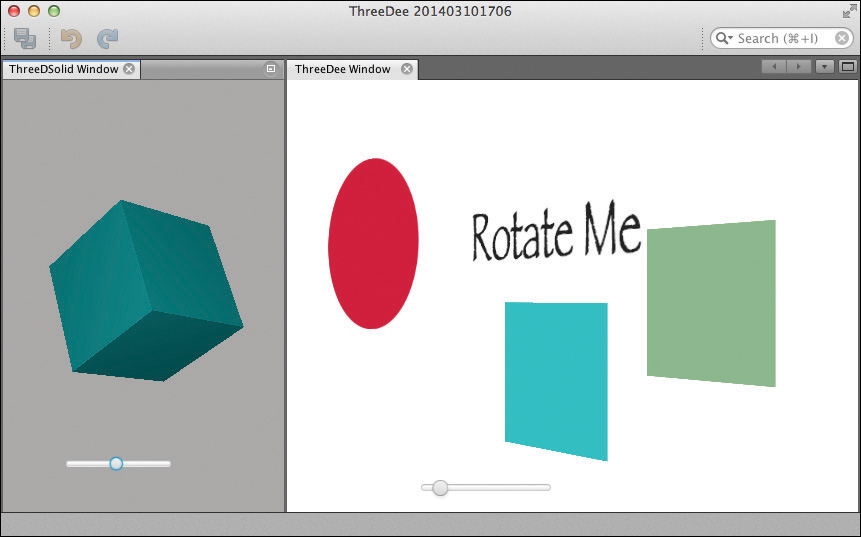
Of course, these are 2D shapes being manipulated within a 3D space. A more compelling example shows actual 3D shapes, such Box, Cylinder, and Sphere primitives. Figure 1.12 shows a second window (and module) added to the ThreeDee example application with a rotating cube built with the Box primitive. Although we don’t specifically cover 3D in this book, you can still leverage all of the best of JavaFX capabilities in your NetBeans Platform applications, including 3D.
1.4 Documentation
While you’re developing NetBeans Platform applications, you’ll want access to the NetBeans Platform API documentation. The APIs are available online at http://bits.netbeans.org/dev/javadoc/, but you can also install them in the IDE, as follows.
1. From the NetBeans IDE top-level menu, select Tools | PlugIns.
2. NetBeans displays the PlugIns dialog. Select the Available PlugIns tab.
3. In the list of PlugIns, select NetBeans API Documentation, as shown in Figure 1.13, and click Install.

4. NetBeans runs the installer, which will download the selected Plugin and install it.
After restarting the IDE, you’ll have access to the NetBeans API Documentation. For example, you can select a Java class in the NetBeans Platform API, right click, and select Show Javadoc to display the relevant documentation in your browser.
1.5 How to Get Java and the NetBeans Platform Software
Download the latest JDK at http://www.oracle.com/technetwork/java/javase/downloads/index.html. Note that the JDK includes JavaFX.
When you download the NetBeans IDE software, you automatically receive all of the modules you’ll need to build a NetBeans Platform application. Download the NetBeans IDE at https://netbeans.org/downloads/. If you select a language other than English, the localized property files for the officially supported languages are included. Also, note that you can add or remove software bundles later using the IDE’s Plugin Manager (Tools | Plugins).
1.6 Example Software Bundle
You can download the source for the reference application (described above in “FamilyTreeApp Reference Application” on page 10) at https://java.net/projects/nbfamilytreeapp. You can download the remaining examples and projects described in this book at http://www.asgteach.com/NetBeansPlatformBook/.
1.7 Key Point Summary
The NetBeans Platform offers a rich desktop programming environment that supports building complex, modular applications.
We’ve described the main features of the NetBeans Platform application framework and provided you with a road map to begin your exploration of this framework. We hope you enjoy your journey.