
12. Wizards
A common scenario in desktop applications is to gather user input to build an object—a new customer, file, Family Tree event, or number sequence, for example. When the building process has multiple steps with multiple options, you need a carefully crafted process to walk a user through the steps. A process that provides this sequence of input panels is called a wizard.
The NetBeans Platform wizard is a multi-class framework that lets you construct such a process. This wizard framework lets a developer specify the graphical components for user input, validate input, store each panel’s state, and dynamically manipulate the wizard step sequence. When the wizard finishes, your application has access to the validated, user-provided input to then construct the target artifact (such as a file, a series of files, or one or more new data objects).
What You Will Learn
• Create and configuring wizards.
• Register wizard actions.
• Store and retrieve wizard properties.
• Validate a wizard’s user input.
• Coordinate validation between wizard steps.
• Use the Simple Validation API.
• Perform asynchronous validation.
• Use dynamic sequence wizards.
• Use instantiating iterators.
• Integrate a progress bar into a wizard.
12.1 Wizard Overview
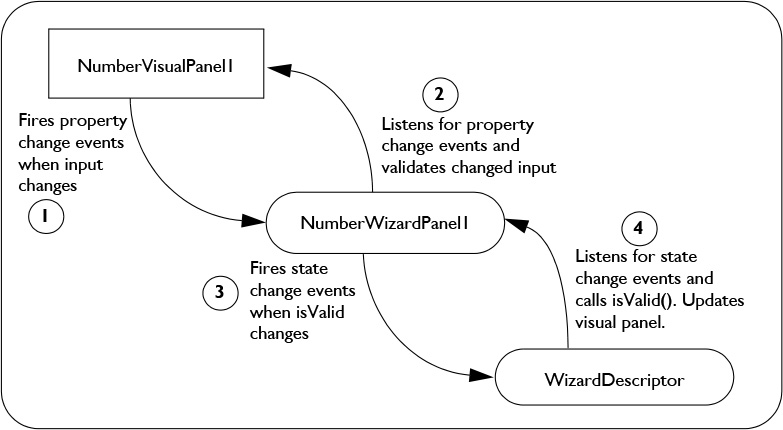
Figure 12.1 shows the general architecture of a NetBeans Platform wizard example that has three steps. The WizardDescriptor class is the main controller, controlling wizard panels that are in turn controllers for each step that the wizard performs. The wizard panels instantiate visual panels (the views) that solicit input from users. Not shown here is the wizard action class, which starts the wizard process and creates wizard panels and the WizardDescriptor.
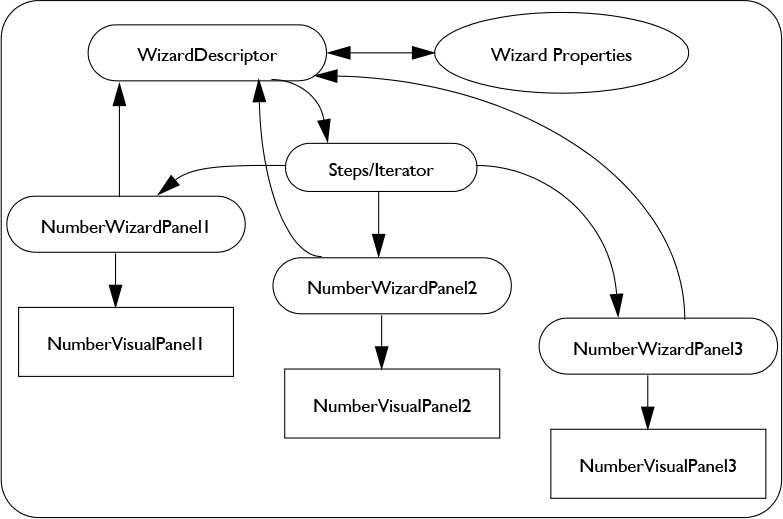
Our three-step wizard in Figure 12.1 is called Number. This wizard guides a user through the steps to create a number sequence. Each wizard panel controls a specific step and creates its own visual panel. The panel class extends JPanel and holds the user interface components needed for input.
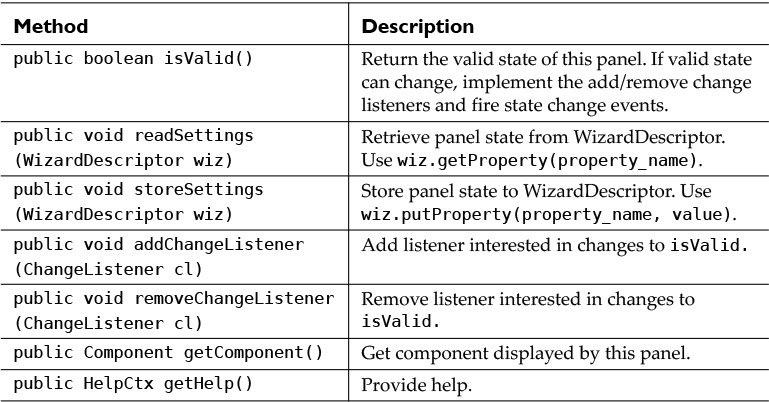
To work with the WizardDescriptor, wizard panel classes override WizardDescriptor.Panel methods that the WizardDescriptor invokes. Table 12.1 lists these methods.
The WizardDescriptor has three main responsibilities:
1. The WizardDescriptor iterates through the collection of wizard panels, proceeding to the next panel when the user clicks Next (or Finish).
2. The WizardDescriptor stores properties needed by wizard panels. It invokes wizard panel methods readSettings() and storeSettings() at the beginning and ending, respectively, of each step.
3. The WizardDescriptor responds to change events fired from the wizard panel class. Typically, these events signal changes to the isValid() and isFinishPanel() methods, but the WizardDescriptor responds to changes in the step sequence as well. Depending on the return values of these methods, the WizardDescriptor enables or disables the Next and/or Finish buttons on the current visual panel.
Wizard Tip
If a wizard panel is always valid, method isValid() returns true and there’s no need to fire change events from the wizard panel. However, if a wizard panel’s valid status depends on user input, the wizard panel must implement addChangeListener() and removeChangeListener() and fire state change events to its ChangeListeners. This makes the WizardDescriptor invoke isValid() and subsequently enable or disable Next and Finish. “Wizard Validation” on page 565 shows you how to do this.
Wizard Tip
Method isFinishPanel() is defined in class WizardDescriptor.FinishablePanel for panels that dynamically enable the Finish button. See “Finishing Early Option” on page 587 for an example of this option.
You can see from Figure 12.1 that each wizard panel class is completely independent from the other wizard panel classes. The wizard panel creates the visual panel that it controls, gets user data from the visual panel components, and provides validation. The wizard panel also uses the WizardDescriptor to store state data. Other wizard panels and the wizard’s action event handler can access this data to build the target artifact.
Let’s look at the Number example now and show you how these wizard panels coordinate with visual panels and let the WizardDescriptor do its job.
12.2 The Wizard Wizard
The NetBeans IDE provides a Wizard wizard—that is, a wizard that helps you create wizards. Let’s now create a wizard for something called New Number Sequence. This example wizard solicits a three-number sequence from the user in three separate steps.
Build the Example
To build the example, create a new NetBeans Platform application called WizardExample. Then create a new NetBeans module called Sequence, as shown in Figure 12.2.

To create a new wizard, select the target module (Sequence in our example). Right-click and select New | Other. Start with Figure 12.3. As you proceed through each step, pay attention to the panels with which you interact. The wizard has a title New File, and the steps are listed on the left. The main panel requests information.

A Bare-Bones Wizard
In Figure 12.3, specify Module Development under Categories and Wizard under File Types. After you’ve made these selections, the Next button is enabled, and the Help, Back, and Finish buttons are all disabled.
After you select Next, the wizard proceeds to the next panel. Here you see Registration Type (Custom or New File), Wizard Step Sequence (Static or Dynamic), and Number of Wizard Panels. Select Custom, Static, and 3, as shown in Figure 12.4.

In this chapter, you’ll use Registration Type Custom, the wizard registration type that creates arbitrary artifacts (such as domain objects or a directory structure with multiple files) for your application. New File Registration pertains to wizards that create files using a File Type template.
The Wizard Step Sequence provides two options. Static means your wizard always uses the same steps in the same order. Dynamic lets your wizard alter the sequence and the number of steps. We’ll show you an example of a Dynamic Step Sequence wizard later in this chapter (see “Dynamic Sequence Wizards” on page 598).
The Number of Wizard Panels is where you specify the number of steps in your wizard. For Static Step Sequence, this is the total number of steps. For Dynamic Step Sequence, specify the maximum number of different panels your wizard requires, even if a given execution of the wizard uses less.
Note that as you complete this dialog, the wizard provides feedback when there are errors or omissions. When the input is error-free, the Next button is enabled. Again, select Next.
The wizard now displays the final panel: Name and Location, as shown in Figure 12.5. Specify Number for the Class Name Prefix. Make sure the selected Project is Sequence and the package name matches the selected project. NetBeans displays the files the wizard creates for your New Number Sequence wizard. Note that the Finish button is now enabled. Click Finish and the wizard is complete.

Wizard Tip
We won’t rename the classes in this example, but you will typically provide more meaningful names for the wizard and visual panel classes in your wizard. To do this, select the Java source file in the Projects window and click Refactor | Rename in the NetBeans main menu (or select the Java source file and use key sequence Control-R).
You now have a bare-bones wizard consisting of three visual panels, three wizard controllers, and a wizard action class. NetBeans has created these seven files for you, as shown in Figure 12.6.
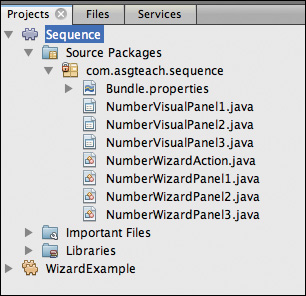
For each wizard panel that you specify in the wizard creation dialog, NetBeans creates a visual panel1 (for building your graphical user interface) and a wizard panel (for validating the user input and saving state). NetBeans also creates a wizard action class (to initiate your wizard and build the wizard’s target artifact).
1. The visual panel extends the JPanel Swing component. You can integrate JavaFX content using Swing JFXPanel. The Reference Application has an example of a NetBeans Platform wizard with JavaFX-integrated content. See “FamilyTreeApp Reference Application” on page 10.
The NetBeans Platform sets the following module dependencies for this project.
Dialogs API - Handles the dialog and wizard infrastructure
UI Utilities API - Helper methods for various UI related tasks
Utilities API - Various helper methods and basic concept definitions
Registering a Wizard’s Action
To invoke this newly created wizard, you must register the wizard action so that it appears either in the menu or toolbar, or both. Here, we register the New Number Sequence action in the top-level menu under Tools by providing the following action-based annotations, as shown in Listing 12.1. The modified code is in bold; the rest is generated by NetBeans. Chapter 9 discusses actions and how to register them (see “Always-Enabled Actions” on page 414).
As you examine this code, note that method actionPerformed() instantiates an ArrayList to hold the wizard panels, configures the visual panels (accessed through getComponent()), and instantiates WizardDescriptor. When WizardDescriptor finishes, the complete and validated user data is available.
Wizard Tip
Class WizardDescriptor is a subclass of DialogDescriptor. Like classes DialogDescriptor and NotifyDescriptor, you display the wizard and block the application with DialogDisplayer method notify(). We discuss dialogs in detail in Chapter 11.
Listing 12.1 NumberWizardAction.java
@ActionID(category = "Tools",
id = "org.asgteach.sequence.NumberWizardAction")
@ActionRegistration(
displayName = "#CTL_NumberWizardAction")
@ActionReferences({
@ActionReference(path = "Menu/Tools",
position = 0, separatorAfter = 50)
})
@NbBundle.Messages({
"CTL_NumberWizardAction=New Number Sequence",
"CTL_NumberDialogTitle=Create New Number Sequence"
})
public final class NumberWizardAction implements ActionListener {
@Override
public void actionPerformed(ActionEvent e) {
List<WizardDescriptor.Panel<WizardDescriptor>> panels =
new ArrayList<WizardDescriptor.Panel<WizardDescriptor>>();
panels.add(new NumberWizardPanel1());
panels.add(new NumberWizardPanel2());
panels.add(new NumberWizardPanel3());
String[] steps = new String[panels.size()];
for (int i = 0; i < panels.size(); i++) {
Component c = panels.get(i).getComponent();
// Default step name to component name of panel.
steps[i] = c.getName();
if (c instanceof JComponent) { // assume Swing components
JComponent jc = (JComponent) c;
jc.putClientProperty(
WizardDescriptor.PROP_CONTENT_SELECTED_INDEX, i);
jc.putClientProperty(
WizardDescriptor.PROP_CONTENT_DATA, steps);
jc.putClientProperty(
WizardDescriptor.PROP_AUTO_WIZARD_STYLE, true);
jc.putClientProperty(
WizardDescriptor.PROP_CONTENT_DISPLAYED, true);
jc.putClientProperty(
WizardDescriptor.PROP_CONTENT_NUMBERED, true);
}
}
WizardDescriptor wiz = new WizardDescriptor(
new WizardDescriptor.ArrayIterator<WizardDescriptor>(panels));
// {0} will be replaced by
// WizardDesriptor.Panel.getComponent().getName()
wiz.setTitleFormat(new MessageFormat("{0}"));
wiz.setTitle(Bundle.CTL_NumberDialogTitle());
if (DialogDisplayer.getDefault().notify(wiz) ==
WizardDescriptor.FINISH_OPTION) {
// do something after the wizard has successfully finished
}
}
}
The code inside the braces
if (DialogDisplayer.getDefault().notify(wiz) ==
WizardDescriptor.FINISH_OPTION) {
// do something after the wizard has successfully finished
}
only executes if the wizard finishes normally. It does not execute if the user clicks Cancel.
Deploy and run the WizardExample application now. Note that with only minimal Java annotations, you can invoke our bare-bones wizard, accessed from Menu | Tools, as shown in Figure 12.7.

Initially, the wizard displays the first panel, as shown in Figure 12.8. Of course, there aren’t any components yet, so you just see the standard elements that the NetBeans wizard defines: the title, a list of steps, the title of this panel (Step #1), and control buttons: Help, Back, Next, Finish, Cancel.

Help is not enabled because we haven’t configured any Help, Back is not enabled since this is the first panel, and Finish is not enabled because we still have two more panels to work through. Interestingly, Next is enabled because the default behavior for a wizard panel is a valid status, allowing the user to proceed to the next panel.
Select Next and the wizard displays the second panel. The panel title now displays Step #2 (which is also in bold under the list of steps on the left). The Back button is now enabled, but Finish is still disabled.
Select Next again and Step #3 appears, the final and third panel. The Finish button is now enabled.
Select Finish. At this point the wizard is complete and control is returned to the actionPerformed() method, as shown here.
if (DialogDisplayer.getDefault().notify(wiz) ==
WizardDescriptor.FINISH_OPTION) {
// do something
}
The actionPerformed() method gathers any data that the wizard collects (there is no data yet!) and carries out its task (whatever it may be). That’s all fine and good, but our New Number Sequence wizard should do more. Let’s build a simple GUI next and show you how each panel’s wizard gathers information from the user.
12.3 Wizard Input
Our wizard is simple. It prompts for a sequence of three numbers whose values are not important. In this first version, we don’t even verify if the input is actually a number.
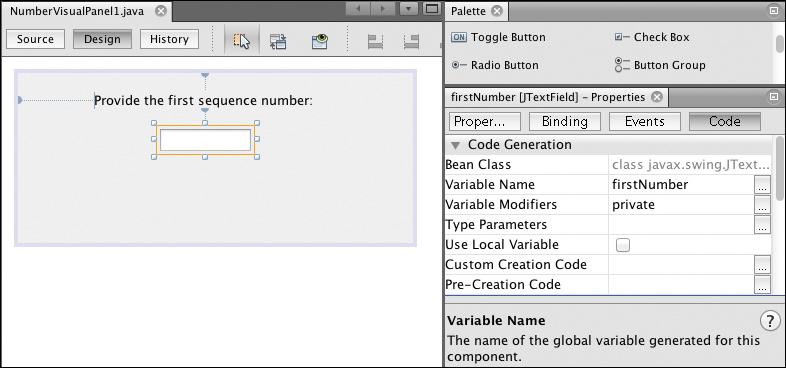
For each of the three visual panels, use the NetBeans Form designer to add a label and textfield to each panel. Name the JTextField components firstNumber, secondNumber, and thirdNumber, respectively. Figure 12.9 shows the Form designer for the first visual panel.
Now, run the application again and choose menu Tools | New Number Sequence. You will see a field in each panel where you can provide a number. At this point, there is no code that reads the value or determines if the input is actually a number.
Next, let’s read each value and display the number sequence inside the actionPerformed() method using a predefined Information dialog provided by the NetBeans Platform (see “Standard Dialogs” on page 527). This important first step shows how to read user input and make the data accessible within the actionPerformed() method. Perform the following steps for each panel.
1. Create a property name for each value that you want to save. This will be a public static final String in the visual panel class.
2. Create a public getter to access the user input from each visual panel.
3. Store each property value with the WizardDescriptor to make the data accessible within the actionPerformed() method.
Listing 12.2 shows the changes for NumberVisualPanel1.java, shown in bold. You’ll make comparable changes to NumberVisualPanel2.java and NumberVisualPanel3.java.
1. Define public static final String PROP_FIRST_NUMBER.
2. Define public method getFirstNumber() to return the text value of the JTextField component.
Listing 12.2 NumberVisualPanel1.java
public final class NumberVisualPanel1 extends JPanel {
// Create property names for each piece of data that
// we want to collect
public static final String PROP_FIRST_NUMBER = "firstNumber";
public NumberVisualPanel1() {
initComponents();
}
@Override
public String getName() {
return "Step #1";
}
public String getFirstNumber() {
return firstNumber.getText();
}
// Generated code
. . .
// Variables declaration - do not modify
private javax.swing.JTextField firstNumber;
private javax.swing.JLabel jLabel1;
// End of variables declaration
}
Now, inside the wizard panel, save the property value in method storeSettings(). This stores the value in the WizardDescriptor’s cache of properties. Listing 12.3 shows method storeSettings() for NumberWizardPanel1.java.
The WizardDescriptor invokes method storeSettings() when the wizard panel’s step has finished. This is where you store property values in the WizardDescriptor’s property cache. With the WizardDescriptor property cache, you can share data among any of your wizard panels and the wizard action class.
Similarly, the WizardDescriptor invokes method readSettings() at the beginning of a wizard panel’s step. This is where you read properties from the WizardDescriptor’s property cache. You can also put any “step initialization code” in method readSettings()—code that executes at the beginning of the wizard panel’s step. As we continue to develop our Number wizard, you’ll see why these two step life cycle methods are important.
Listing 12.3 NumberWizardPanel1.java
public class NumberWizardPanel1 implements
WizardDescriptor.Panel<WizardDescriptor> {
private NumberVisualPanel1 component;
@Override
public NumberVisualPanel1 getComponent() {
if (component == null) {
component = new NumberVisualPanel1();
}
return component;
}
. . . code omitted . . .
@Override
public void storeSettings(WizardDescriptor wiz) {
// use wiz.putProperty to remember current panel state
wiz.putProperty(NumberVisualPanel1.PROP_FIRST_NUMBER,
getComponent().getFirstNumber());
}
}
Make similar modifications to NumberWizardPanel2.java and NumberWizardPanel3.java to store values for properties NumberVisualPanel2.PROP_SECOND_NUMBER and NumberVisualPanel3.PROP_THIRD_NUMBER, respectively.
The actionPerformed() method in NumberWizardAction performs two steps. First, it displays a finish message in the status bar of the application with NetBeans Platform utility StatusDisplayer. Second, it displays the new number sequence using a NetBeans Platform predefined Information dialog. Note that the sequence numbers are available because we stored each one in the WizardDescriptor’s property cache in storeSettings(). The WizardDescriptor method getProperty() retrieves each number.
All of the code in actionPerformed() (see Listing 12.4) is generated by NetBeans, except for the code in bold that performs these two tasks.
Listing 12.4 Method actionPerformed—Version I
@Override
public void actionPerformed(ActionEvent e) {
. . . code is unchanged . . .
WizardDescriptor wiz = new WizardDescriptor(
new WizardDescriptor.ArrayIterator<WizardDescriptor>(panels));
// {0} will be replaced by
// WizardDesriptor.Panel.getComponent().getName()
wiz.setTitleFormat(new MessageFormat("{0}"));
wiz.setTitle(Bundle.CTL_NumberDialogTitle());
if (DialogDisplayer.getDefault().notify(wiz) ==
WizardDescriptor.FINISH_OPTION) {
StatusDisplayer.getDefault().setStatusText("Wizard Finished");
// retrieve and display the numbers
StringBuilder message = new StringBuilder("Number Sequence =
(");
message.append(wiz.getProperty(
NumberVisualPanel1.PROP_FIRST_NUMBER)).append(", ");
message.append(wiz.getProperty(
NumberVisualPanel2.PROP_SECOND_NUMBER)).append(", ");
message.append(wiz.getProperty(
NumberVisualPanel3.PROP_THIRD_NUMBER)).append(")");
DialogDisplayer.getDefault().notify(
new NotifyDescriptor.Message(message.toString()));
}
}
Figure 12.10 shows the result when you run the New Number Sequence wizard again with the numbers 15, 25, and 44.

12.4 Wizard Validation
Now that you have learned how to read user input and make it available to the actionPerformed() method, let’s add validation to the New Number Sequence wizard. For each panel input, we’ll make sure the number field is not empty and that it is a non-negative integer.
To perform this validation, we install property listeners to inform the wizard panel of any updates from a user.
Note that validation occurs in the wizard panel and not in the visual panel. The WizardDescriptor oversees the wizard’s progress and is responsible for maintaining the correct status of the Back, Next, Cancel, and Finish buttons in the visual panels, since these buttons are affected by the status of each panel. To maintain this visual status, the WizardDescriptor responds to state change events (from the wizard panel) by invoking wizard panel method isValid().
Here are the general changes to the Number Sequence wizard for validation.
1. Implement document listeners in each visual panel to detect changes in the textfield and fire property change events when input changes.
2. Add property listeners to each wizard panel and react to property changes in the visual panel as user input changes.
3. Write a propertyChange() method in each wizard panel that validates input. When a change in validation occurs, fire state change events. The WizardDescriptor class updates the visual panel’s wizard control buttons (Next, Finish) based on the panel’s validation. That is, if the current panel is not valid, then its Next (or Finish) button is disabled.
Listing 12.5 shows the code changes in bold for the first visual panel, NumberVisualPanel1.java. Make similar changes to NumberVisualPanel2.java and NumberVisualPanel3.java.
1. Add DocumentListener to the firstNumber text field component.
2. Override document listener methods insertUpdate(), removeUpdate(), and changedUpdate().
3. Provide a more descriptive name for the panel with method getName().
Listing 12.5 NumberVisualPanel1.java—Implementing Validation
public final class NumberVisualPanel1 extends JPanel {
// Create property names for each piece of data that
// we want to collect
public static final String PROP_FIRST_NUMBER = "firstNumber";
public NumberVisualPanel1() {
initComponents();
// add a document listener to the textfield component
firstNumber.getDocument().addDocumentListener(new DocumentListener() {
@Override
public void insertUpdate(DocumentEvent de) {
fireChange(de);
}
@Override
public void removeUpdate(DocumentEvent de) {
fireChange(de);
}
@Override
public void changedUpdate(DocumentEvent de) {
fireChange(de);
}
private void fireChange(DocumentEvent de) {
if (firstNumber.getDocument() == de.getDocument()) {
firePropertyChange(PROP_FIRST_NUMBER, 0, 1);
}
}
});
}
// Create localized text for the panel
@NbBundle.Messages({
"CTL_Panel1Name=Provide Sequence Initial Value"
})
@Override
public String getName() {
return Bundle.CTL_Panel1Name();
}
public String getFirstNumber() {
return firstNumber.getText();
}
private void initComponents() {
jLabel1 = new javax.swing.JLabel();
firstNumber = new javax.swing.JTextField();
. . . code omitted . . .
}
}
Now make related changes to the wizard panel. The wizard panel becomes a property change listener and validates user input when changes are detected. The wizard’s valid status must initially be false since the wizard requires user input. Here are the changes, which are shown in Listing 12.6.
1. Implement PropertyChangeListener interface and override method propertyChange().
2. Create an Integer field variable called firstNumber to store validated user input for the first number. Use firstNumber instead of getComponent().getFirstNumber() in method storeSettings().
3. Create field variable WizardDescriptor wizard. Set its value inside method readSettings().
4. Use EventListenerList to build ChangeListener support in the wizard panel and override methods addChangeListener() and removeChangeListener(). The WizardDescriptor invokes these to add itself as a ChangeListener; EventListenerList is a standard Swing class that manages listener lists.
5. Add a property change listener for the visual panel in getComponent(). Adding the listener in the conditional block that instantiates the visual panel guarantees that the listener is added just once.
6. Create method checkValidity() to implement any validation required of the user input. Create appropriate error messages for the WizardDescriptor to display.
7. In method propertyChange(), invoke checkValidity() and fire a state change event with method fireChangeEvent(). This notifies the WizardDescriptor (a ChangeListener) that the wizard panel’s state has changed. The WizardDescriptor will invoke isValid() and update the control buttons Next and/or Finish.
Listing 12.6 NumberWizardPanel1.java—Implementing Validation
public class NumberWizardPanel1 implements
WizardDescriptor.Panel<WizardDescriptor>, PropertyChangeListener {
private NumberVisualPanel1 component;
private WizardDescriptor wizard = null;
private boolean isValid = false;
private Integer firstNumber;
. . .
@Override
public boolean isValid() {
return isValid;
}
@Override
public NumberVisualPanel1 getComponent() {
if (component == null) {
component = new NumberVisualPanel1();
this.component.addPropertyChangeListener(this);
}
return component;
}
private final EventListenerList listeners = new EventListenerList();
@Override
public void addChangeListener(ChangeListener l) {
listeners.add(ChangeListener.class, l);
}
@Override
public void removeChangeListener(ChangeListener l) {
listeners.remove(ChangeListener.class, l);
}
@Override
public void readSettings(WizardDescriptor wiz) {
this.wizard = wiz;
}
@Override
public void storeSettings(WizardDescriptor wiz) {
// use wiz.putProperty to remember current panel state
// Method storeSettings() is called when the step finishes
wiz.putProperty(NumberVisualPanel1.PROP_FIRST_NUMBER, firstNumber);
}
@Override
public void propertyChange(PropertyChangeEvent event) {
if (event.getPropertyName().equals(
NumberVisualPanel1.PROP_FIRST_NUMBER)) {
boolean oldState = isValid;
isValid = checkValidity();
fireChangeEvent(this, oldState, isValid);
}
}
private void setMessage(String message) {
wizard.getNotificationLineSupport().setErrorMessage(message);
}
@NbBundle.Messages({
"CTL_Panel1NegativeNumber= Number must be non-negative",
"CTL_Panel1InputRequired= Number field input is required",
"CTL_Panel1BadNumber= Bad number format"
})
private boolean checkValidity() {
if (getComponent().getFirstNumber().isEmpty()) {
setMessage(Bundle.CTL_Panel1InputRequired());
return false;
}
try {
firstNumber = Integer.parseInt(getComponent().getFirstNumber());
if (firstNumber < 0) {
setMessage(Bundle.CTL_Panel1NegativeNumber());
return false;
}
setMessage(null);
return true;
} catch (NumberFormatException e) {
setMessage(Bundle.CTL_Panel1BadNumber());
return false;
}
}
protected final void fireChangeEvent(Object source, boolean oldState,
boolean newState) {
if (oldState != newState) {
ChangeEvent ev = new ChangeEvent(source);
for (ChangeListener listener :
listeners.getListeners(ChangeListener.class)) {
listener.stateChanged(ev);
}
}
}
}
Make similar changes to the second and third panels, NumberWizardPanel2.java and NumberWizardPanel3.java.
Figure 12.11 shows how each visual panel fires a property change event when user input changes. The wizard panel, in turn, re-validates input when it receives the property change event. If the isValid state of the panel changes, the wizard panel fires a state change event. The WizardDescriptor responds to state change events by invoking the wizard panel’s isValid() method. This updates the Next and/or Final buttons on the visual panel accordingly.
Run the application again and invoke the New Number Sequence wizard. Figure 12.12 and Figure 12.13 show examples of error messages for missing input and negative numbers, respectively. An error message appears when input is required. Note that the Next button is disabled when there are errors.


Likewise, an error message appears when the number is negative.
When input is valid, the WizardDescriptor enables the Next button and no error message appears, as shown in Figure 12.14.

Coordinating Input with Other Panel Wizards
Once you make these changes to each visual panel and each wizard panel, all three sequence numbers will be well formed and non-negative. Suppose, however, that in addition to this validation, you’d also like to verify that each successive number is larger than the previous one. To do this, wizard panels 2 and 3 must access validated input from the previous panels.
Fortunately, this is straightforward. You read the previous panel’s input value in method readSettings() and check its value with the current input value in the checkValidity() method. Helper method updatePanel() encapsulates the updating chores for input validation. (Remember, the WizardDescriptor invokes readSettings() at the beginning of a panel’s step, so this is where you put step initialization code.)
You must validate the panel in readSettings() since the current input may be invalid. Using the Back button, a user can change the previous panel’s value and, as a side effect, invalidate the current panel’s number.
Listing 12.7 shows the changes (in bold) to wizard panel 2 to ensure that a user supplies a number greater than the value supplied in panel 1. Make similar changes to wizard panel 3, which checks the input provided in panel 2.
Listing 12.7 NumberWizardPanel2—Modifications for Additional Validation
public class NumberWizardPanel2 implements
WizardDescriptor.Panel<WizardDescriptor>,
PropertyChangeListener {
private Integer firstNumber;
private Integer secondNumber;
. . . code omitted . . .
@Override
public void readSettings(WizardDescriptor wiz) {
// use wiz.getProperty to retrieve previous panel state
this.wizard = wiz;
firstNumber = (Integer) wizard.getProperty(
NumberVisualPanel1.PROP_FIRST_NUMBER);
updatePanel();
}
@Override
public void propertyChange(PropertyChangeEvent event) {
if (event.getPropertyName().equals(
NumberVisualPanel2.PROP_SECOND_NUMBER)) {
updatePanel();
}
}
private void updatePanel() {
boolean oldState = isValid;
isValid = checkValidity();
fireChangeEvent(this, oldState, isValid);
}
@NbBundle.Messages({
"# {0} - previous sequence number",
"CTL_Panel2BadSequence= Number must be greater than {0}."
})
private boolean checkValidity() {
if (getComponent().getSecondNumber().isEmpty()) {
setMessage(Bundle.CTL_Panel1InputRequired());
return false;
}
try {
secondNumber = Integer.parseInt(getComponent().getSecondNumber());
if (secondNumber < 0) {
setMessage(Bundle.CTL_Panel1NegativeNumber());
return false;
}
if (secondNumber <= firstNumber) {
setMessage(Bundle.CTL_Panel2BadSequence(firstNumber));
return false;
}
setMessage(null);
return true;
} catch (NumberFormatException e) {
setMessage(Bundle.CTL_Panel1BadNumber());
return false;
}
}
}
Figure 12.15 shows the second panel when the first number is 25 and the user provides number 22.

Visual Panel Updates
Displaying data from previous panels on the current panel provides helpful visual feedback and shows how a wizard is progressing. Let’s modify our New Number Sequence example to display the numbers from the previous panels. This shows users the minimum value required for the current panel.
To provide this visual feedback, modify visual panels 2 and 3. Add a JLabel, JTextArea, or JTextField component to display the data. We use a JLabel and place it below the JTextField component. We also provide a setter so that the wizard panel can update the JLabel component.
Here are the changes to visual panels 2 and 3.
1. Use the Form designer to add a JLabel component under the JTextField component. Change the JLabel variable name to currentSequence.
2. Provide public method setCurrentSequence(String text) to update the JLabel component.
Listing 12.8 shows the code with the changes in bold for visual panel 3.
Listing 12.8 NumberVisualPanel3.java—Provide JLabel for Feedback
public final class NumberVisualPanel3 extends JPanel {
public static final String PROP_THIRD_NUMBER = "thirdNumber";
. . . code omitted . . .
public void setCurrentSequence(String text) {
currentSequence.setText(text);
}
. . . code omitted . . .
// Variables declaration - do not modify
private javax.swing.JLabel currentSequence;
private javax.swing.JLabel jLabel1;
private javax.swing.JTextField thirdNumber;
// End of variables declaration
. . . code omitted . . .
}
Next, update wizard panels 2 and 3, as follows.
1. Get all the previously supplied user data. This requires reading the value for the first number and the second number in wizard panel 3.
2. Invoke setCurrentSequence() to set the text of the JLabel component with the current sequence.
3. After invoking checkValidity(), update the current sequence. Include the current user input if the input is valid.
Listing 12.9 shows the added Message bundle to NumberWizardPanel2.java, and Listing 12.10 displays the changes to NumberWizardPanel3.java shown in bold. Make the corresponding changes to NumberVisualPanel2.java.
Listing 12.9 NumberWizardPanel2.java—Providing Visual Feedback
public class NumberWizardPanel2 implements
WizardDescriptor.Panel<WizardDescriptor>, PropertyChangeListener {
. . . code omitted . . .
@NbBundle.Messages({
"# {0} - current sequence string",
"CTL_Panel2CurrentSequence= Current Sequence: {0}."
})
Listing 12.10 NumberWizardPanel3.java—Providing Visual Feedback
public class NumberWizardPanel3 implements
WizardDescriptor.Panel<WizardDescriptor>,
PropertyChangeListener {
private NumberVisualPanel3 component;
private WizardDescriptor wizard = null;
private boolean isValid = false;
private Integer firstNumber;
private Integer secondNumber;
private Integer thirdNumber;
. . . code omitted . . .
@Override
public void readSettings(WizardDescriptor wiz) {
this.wizard = wiz;
firstNumber = (Integer) wiz.getProperty(
NumberVisualPanel1.PROP_FIRST_NUMBER);
secondNumber = (Integer) wiz.getProperty(
NumberVisualPanel2.PROP_SECOND_NUMBER);
updatePanel();
}
private void updatePanel() {
boolean oldState = isValid;
isValid = checkValidity();
if (isValid) {
getComponent().setCurrentSequence(
Bundle.CTL_Panel2CurrentSequence(
firstNumber + ", " + secondNumber + ", " + thirdNumber));
} else {
getComponent().setCurrentSequence(
Bundle.CTL_Panel2CurrentSequence(
firstNumber + ", " + secondNumber));
}
fireChangeEvent(this, oldState, isValid);
}
}
Now run the application again and invoke the New Number Sequence wizard. Figure 12.16 shows panel 3 when the user supplies invalid data.

When user input is valid, the current sequence includes the current panel’s input number, as shown in Figure 12.17.

12.5 Simple Validation API
Panels that have textfields (like those shown in the previous section) often require repetitive and tedious validation code. For example, in Listing 12.11 the checkValidity() method validates the second sequence number in NumberWizardPanel2 using several steps. First, the method verifies the input is not empty. Second, it converts the input to an integer (making sure the integer is well-formed), Third, it verifies the number is non-negative. And finally, it checks the input value against the first sequence number.
Listing 12.11 Validate Second Sequence Number (NumberWizardPanel2)
private boolean checkValidity() {
if (getComponent().getSecondNumber().isEmpty()) {
setMessage(Bundle.CTL_Panel1InputRequired());
return false;
}
try {
secondNumber = Integer.parseInt(getComponent().getSecondNumber());
if (secondNumber < 0) {
setMessage(Bundle.CTL_Panel1NegativeNumber());
return false;
}
if (secondNumber <= firstNumber) {
setMessage(Bundle.CTL_Panel2BadSequence(firstNumber));
return false;
}
setMessage(null);
return true;
} catch (NumberFormatException e) {
setMessage(Bundle.CTL_Panel1BadNumber());
return false;
}
}
Wouldn’t it be nice to reduce this validation code? Fortunately, a general-purpose validation library is available for exactly this kind of input validation. Created by Tim Boudreau of NetBeans fame, this library is called Simple Validation API and is open-sourced and included in the NetBeans distribution. In this section, we’ll show you how to use the validation library within a NetBeans Platform application. As an example, we’ll use the library with the New Number Sequence wizard.
Prepare to Use the Validation Library
To use the Simple Validation API in a NetBeans Platform application, you need to create a library wrapper for the JAR file. NetBeans will do this for you when you add the JAR file to your application, as follows.
1. In the Projects window, select application WizardExample, right-click, and choose Add Existing Library . . . .
2. In the Select Library dialog, click Browse. Navigate to NetBeans/ide/modules/ext/ValidationAPI.jar and click Select. Back in the Select Library dialog, click Next as shown in Figure 12.18.

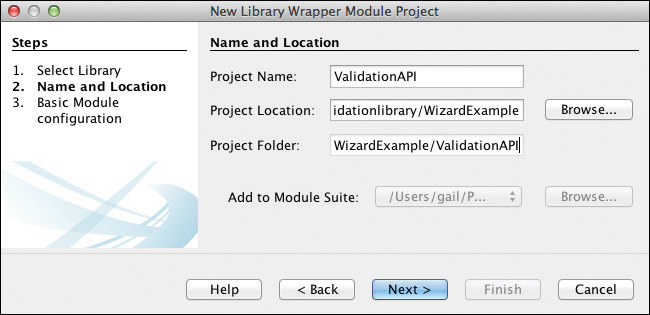
3. In the Name and Location dialog, make sure the Project Name and directory locations are correct and click Next, as shown in Figure 12.19.
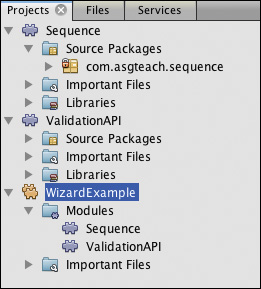
4. Provide a Code Name Base in the Basic Module Configuration dialog and click Finish. NetBeans creates module ValidationAPI and adds it to your project, as shown in Figure 12.20.
5. Add a new dependency on the Validation API in module Sequence. Now you can use the library in this module.
Extend the Swing component palette, as follows.
1. In the NetBeans IDE, make sure the component design palette is open. Right-click inside the design palette and choose Palette Manager from the context menu.
2. Choose button Add from JAR, and browse to the same ValidationAPI.jar. Click Next.
3. Select ValidationPanel from the list of components and click Next.
4. Choose Swing Containers and click Finish. This adds the Validation Panel component to your palette under category Swing Containers. With this extension, you can drag and drop Validation Panels to a Swing UI.
Using the Simple Validation API Library
To use the Validation library, you must add a Validation Panel component to your Swing UI. Validation Panels let you specify which validators should apply to which input components. They also provide a convenient way to display error messages. Typically, you’ll use Validation Panels to validate JTextField component input.
Table 12.2 shows ten useful validators from the Validation library (there are more). When you specify one or more validators for a specific component, validation proceeds in the order that you add them. For example, to validate input for an integer, you chain together REQUIRE_NON_EMPTY_STRING, NO_WHITESPACE, and REQUIRE_VALID_INTEGER. Note that the order is significant. Each validator is invoked until a problem occurs or the list is exhausted. Checking for empty strings first makes error messages clearer for the user.

In situations where these validators aren’t suitable, you can build a custom validator. We’ll show you how to do this shortly.
Let’s begin by adding validation to the firstNumber textfield in the first visual panel, NumberVisualPanel1.
1. Open NumberVisualPanel1 in the Design view.
2. Select ValidationPanel from the palette and drag and drop it on the visual panel under the JTextField. This adds component validationPanel1.
3. Go to Source view and add the code as shown in Listing 12.12 to NumberVisualPanel1.java.
Validation configuration starts with validationPanel1. From validationPanel1 we first obtain a ValidationGroup object. We then assign a target component for validation and add validators. Here, we add validators to verify that input is not empty, contains no white space, is a valid integer, and is a non-negative number. We also make sure the integer is within the specified minimum and maximum values.
We’ve modified the DocumentListener for firstNumber to invoke method checkValidation(), which includes a call to group.validateAll().
We also override method isValid() so that NumberWizardPanel1 knows if the input is valid. We still fire a property change event whenever input changes.
Listing 12.12 Add Validation to NumberVisualPanel1
public final class NumberVisualPanel1 extends JPanel {
public static final String PROP_FIRST_NUMBER = "firstNumber";
public static final Integer MAX_SEQUENCE_NUMBER = 10000; // arbitrary
private ValidationGroup group = null;
private boolean isValid = false;
public NumberVisualPanel1() {
initComponents();
firstNumber.setName(Bundle.CTL_Panel1FieldName());
group = validationPanel1.getValidationGroup();
group.add(firstNumber,
Validators.REQUIRE_NON_EMPTY_STRING,
Validators.NO_WHITESPACE,
Validators.REQUIRE_VALID_INTEGER,
Validators.REQUIRE_NON_NEGATIVE_NUMBER,
Validators.numberRange(0, MAX_SEQUENCE_NUMBER-2));
firstNumber.getDocument().addDocumentListener(new DocumentListener() {
@Override
public void insertUpdate(DocumentEvent e) {
checkValidation();
}
@Override
public void removeUpdate(DocumentEvent e) {
checkValidation();
}
@Override
public void changedUpdate(DocumentEvent e) {
checkValidation();
}
private void checkValidation() {
Problem validateAll = group.validateAll();
isValid = !validateAll.isFatal();
firePropertyChange(PROP_FIRST_NUMBER, 0, 1);
}
});
}
@Override
public boolean isValid() {
return isValid;
}
. . . code omitted . . .
}
Since validation now takes place within the visual panel, the wizard panel no longer performs validation. However, the wizard panel must still store Integer firstNumber and keep the WizardDescriptor informed of the panel’s valid status. (Remember, the WizardDescriptor must update the Next/Finish buttons as input changes.) Listing 12.13 shows the modified method checkValidity() in NumberWizardPanel1. Note that a NumberFormatException should not occur since the component returns already-validated text.
Listing 12.13 NumberWizardPanel1: Method checkValidity()
private boolean checkValidity() {
if (getComponent().isValid()) {
try {
firstNumber = Integer.parseInt(getComponent().getFirstNumber());
setMessage(null);
return true;
} catch (NumberFormatException e) {
setMessage(Bundle.CTL_Panel1BadNumber());
return false;
}
}
return false;
}
Using a Custom Validator
Now that we’ve implemented validation with the Validation API for the first panel, we can apply similar changes to the second and third panels. In this case, however, we must set the minimum value for the range validator through the wizard panel method readSettings(), since this minimum depends on the previous panel’s number.
We must also be able to change the minimum range when a user clicks the Back button, changes the previous number, and returns to the second and third panels.
The general model for the built-in validators makes them immutable. In other words, you can’t change a validator’s parameters once you set them. While some might see this as less than ideal, mutable state validators are more complex. These validators are simple (hence the name) and easy to use.
The solution to the immutable validator restriction is to create a custom validator. To do this, implement the Validator interface and override method validate(). With a custom validator, we can delegate validation to a standard range validator created at validation time and thus achieve dynamic range validation.
With a bona fide motivation to create our own validator, let’s do that now. Listing 12.14 shows CustomRangeValidator, a validator that lets you modify a validator’s minimum and maximum range values.
Two setters configure the validator’s range. In method validate(), we create a number range validator (using the built-in static numberRange() method) with range parameters minVal and maxVal. We then invoke validate() using the newly created delegate validator.
Listing 12.14 CustomRangeValidator
public class CustomRangeValidator implements Validator<String> {
private Integer minVal = new Integer(0);
private Integer maxVal= new Integer(0);
public void setMaxVal(Integer maxVal) {
this.maxVal = maxVal;
}
public void setMinVal(Integer minVal) {
this.minVal = minVal;
}
@Override
public boolean validate(Problems prblms, String string, String t) {
Validator<String> rangeDelegate =
Validators.numberRange(minVal, maxVal);
return rangeDelegate.validate(prblms, string, t);
}
}
Listing 12.15 shows the corresponding changes to the visual panel. Note that we create a new class variable customrange for our CustomRangeValidator. Public method setMinRange() configures the minimum range value. The list of validators added to the ValidationGroup is the same, except we use the custom range validator instead of the built-in range validator.
We also define a public method updateValidation() that lets the wizard panel check validation from readSettings(). This is necessary to ensure correct behavior when the Back button is used to change the previous panel’s value.
Listing 12.15 Add Validation to NumberVisualPanel2
public final class NumberVisualPanel2 extends JPanel {
public static final String PROP_SECOND_NUMBER = "secondNumber";
private boolean isValid = false;
private CustomRangeValidator customrange = new CustomRangeValidator();
private ValidationGroup group = null;
public NumberVisualPanel2() {
initComponents();
secondNumber.setName(Bundle.CTL_Panel1FieldName());
// setup validation
group = validationPanel1.getValidationGroup();
customrange.setMaxVal(NumberVisualPanel1.MAX_SEQUENCE_NUMBER - 1);
customrange.setMinVal(0);
group.add(secondNumber,
Validators.REQUIRE_NON_EMPTY_STRING,
Validators.NO_WHITESPACE,
Validators.REQUIRE_VALID_INTEGER,
Validators.REQUIRE_NON_NEGATIVE_NUMBER,
customrange);
secondNumber.getDocument().addDocumentListener(new DocumentListener() {
@Override
public void insertUpdate(DocumentEvent de) {
checkValidation();
}
@Override
public void removeUpdate(DocumentEvent de) {
checkValidation();
}
@Override
public void changedUpdate(DocumentEvent de) {
checkValidation();
}
private void checkValidation() {
updateValidation();
firePropertyChange(PROP_SECOND_NUMBER, 0, 1);
}
});
}
public void setMinRange(Integer minNumber) {
customrange.setMinVal(minNumber);
}
public void updateValidation() {
Problem validateAll = group.validateAll();
isValid = !validateAll.isFatal();
}
. . . code omitted . . .
}
Listing 12.16 shows the changes required to NumberWizardPanel2 methods. Now, if a user clicks the Back button, changes the first sequence number, and then returns to the second panel, the range validator is configured with a new minimum range.
Listing 12.16 NumberWizardPanel2 methods
@Override
public void readSettings(WizardDescriptor wiz) {
this.wizard = wiz;
firstNumber = (Integer) wizard.getProperty(
NumberVisualPanel1.PROP_FIRST_NUMBER);
if (firstNumber == null) {
firstNumber = 0;
}
getComponent().setMinRange(firstNumber + 1);
updatePanel();
}
. . . code omitted . . .
private void updatePanel() {
boolean oldState = isValid;
getComponent().updateValidation();
isValid = checkValidity();
if (isValid) {
getComponent().setCurrentSequence(
Bundle.CTL_Panel2CurrentSequence(
firstNumber + ", " + secondNumber));
} else {
getComponent().setCurrentSequence(
Bundle.CTL_Panel2CurrentSequence(firstNumber));
}
fireChangeEvent(this, oldState, isValid);
}
Make the corresponding changes to NumberVisualPanel3 and NumberWizardPanel3 to implement a dynamic range validator for the third panel. Figure 12.21 shows the error message when a number is outside the required range.

12.6 Finishing Early Option
The NetBeans Platform wizard lets you provide users with an option to finish a wizard early. Finishing early is always only an option, however, and not a requirement. The user is still able to proceed to the next panel by selecting Next.
This distinction is important. If you want to create a dynamic use case, where the user works through different panels depending on their selections, or the wizard ends early because of a user selection, then select the Dynamic Wizard Step Sequence instead of the Static Wizard Step Sequence when creating your wizard. (See “Dynamic Sequence Wizards” on page 598.)
Returning to our New Number Sequence wizard, let’s say that if the second number is greater than 500, the user has the option of specifying only two numbers for the sequence instead of three. That is, in the second panel, we enable the Finish button so the user can optionally finish after providing valid input if the second number is greater than 500.
To implement this behavior, we store the number selections in an ArrayList, which simplifies the coding for sequences of different sizes. With an ArrayList, it’s more convenient to retrieve all the numbers in the actionPerformed() method.
First, let’s look at the modifications to store and retrieve the numbers using an ArrayList. Listing 12.17 shows the changes to NumberWizardPanel1 in bold.
Array mynumbers holds the numbers. In method storeSettings(), we put the ArrayList property into the WizardDescriptor’s property cache.
Listing 12.17 NumberWizardPanel1.java—Using ArrayList Property
public class NumberWizardPanel1 implements
WizardDescriptor.Panel<WizardDescriptor>,
PropertyChangeListener {
private NumberVisualPanel1 component;
private WizardDescriptor wizard = null;
private boolean isValid = false;
private Integer firstNumber;
private List<Integer> mynumbers = new ArrayList<Integer>();
public final static String PROP_NUMBER_LIST = "mynumbers";
@Override
public void storeSettings(WizardDescriptor wiz) {
wiz.putProperty(NumberVisualPanel1.PROP_FIRST_NUMBER, firstNumber);
mynumbers.clear();
mynumbers.add(firstNumber);
wiz.putProperty(PROP_NUMBER_LIST, mynumbers);
}
. . . code omitted . . .
}
Make similar changes to NumberWizardPanel2 and NumberWizardPanel3. Listing 12.18 shows the code for NumberWizardPanel3. Note that here we must retrieve the mynumbers ArrayList in readSettings() as well as save it in storeSettings().
Listing 12.18 NumberWizardPanel3.java—Using ArrayList Property
public class NumberWizardPanel3 implements
WizardDescriptor.Panel<WizardDescriptor>,
PropertyChangeListener {
private NumberVisualPanel3 component;
private WizardDescriptor wizard = null;
private boolean isValid = false;
private Integer firstNumber;
private Integer secondNumber;
private Integer thirdNumber;
private List<Integer> mynumbers;
. . . code omitted . . .
@Override
public void readSettings(WizardDescriptor wiz) {
this.wizard = wiz;
firstNumber = (Integer) wiz.getProperty(
NumberVisualPanel1.PROP_FIRST_NUMBER);
secondNumber = (Integer) wiz.getProperty(
NumberVisualPanel2.PROP_SECOND_NUMBER);
mynumbers = (List<Integer>) wizard.getProperty(
NumberWizardPanel1.PROP_NUMBER_LIST);
updatePanel();
}
@Override
public void storeSettings(WizardDescriptor wiz) {
wiz.putProperty(NumberVisualPanel3.PROP_THIRD_NUMBER, thirdNumber);
mynumbers.clear();
mynumbers.add(firstNumber);
mynumbers.add(secondNumber);
mynumbers.add(thirdNumber);
wiz.putProperty(NumberWizardPanel1.PROP_NUMBER_LIST, mynumbers);
}
. . . code omitted . . .
}
Now in NumberWizardAction’s method actionPerformed(), we retrieve the numbers from property NumberWizardPanel1.PROP_NUMBER_LIST to display the new sequence, as shown in Listing 12.19.
Listing 12.19 Method actionPerformed—Version II
@Override
public void actionPerformed(ActionEvent e) {
. . . code omitted . . .
if (DialogDisplayer.getDefault().notify(wiz) ==
WizardDescriptor.FINISH_OPTION) {
StatusDisplayer.getDefault().setStatusText("Wizard Finished");
// retrieve and display the numbers
StringBuilder message = new StringBuilder("Number Sequence =
(");
List<Integer> numbers = (List<Integer>) wiz.getProperty(
NumberWizardPanel1.PROP_NUMBER_LIST);
for (int i = 0; i < numbers.size()-1; i++) {
message.append(numbers.get(i)).append(", ");
}
message.append(numbers.get(numbers.size()-1)).append(")");
DialogDisplayer.getDefault().notify(
new NotifyDescriptor.Message(message.toString()));
}
}
With that bit of housekeeping out of the way, let’s return to NumberWizardPanel2. This is the panel we’ll make “finishable.”
To make a panel with a Finish button that is optionally enabled—finishable—the panel implements WizardDescriptor.FinishablePanel<WizardDescriptor> and overrides method isFinishPanel(). That’s it. However, when the status of method isFinishPanel() changes, you must fire a state change event to the panel’s listeners just like you do with method isValid(). This allows the WizardDescriptor to update the Finish button as the user input changes. Listing 12.20 shows how NumberWizardPanel2 implements FinishablePanel.
The boolean field isFinishPanel is updated whenever this class receives a property change event from the visual panel as the user provides input. After performing the normal validation check, we update isFinishPanel. If its status has changed, method fireChangeEvent() fires a state change event. This in turn causes the WizardDescriptor to invoke method isFinishPanel() and update the Finish button accordingly. Even if isFinishPanel() returns true, the Finish button is not enabled unless isValid() also returns true.
Listing 12.20 NumberWizardPanel2.java—Implementing a Finish Early Option
public class NumberWizardPanel2 implements
WizardDescriptor.FinishablePanel<WizardDescriptor>,
PropertyChangeListener {
private NumberVisualPanel2 component;
private WizardDescriptor wizard = null;
private boolean isValid = false;
private boolean isFinishPanel = false;
private Integer firstNumber;
private Integer secondNumber;
private List<Integer> mynumbers;
private static final int FINISH_LIMIT = 500;
. . . code omitted . . .
@Override
public void propertyChange(PropertyChangeEvent event) {
if (event.getPropertyName().equals(
NumberVisualPanel2.PROP_SECOND_NUMBER)) {
updatePanel();
}
}
private void updatePanel() {
boolean oldState = isValid;
isValid = checkValidity();
if (isValid) {
getComponent().setCurrentSequence(
Bundle.CTL_Panel2CurrentSequence(
firstNumber + ", " + secondNumber));
} else {
getComponent().setCurrentSequence(
Bundle.CTL_Panel2CurrentSequence(firstNumber));
}
fireChangeEvent(this, oldState, isValid);
oldState = isFinishPanel;
if (secondNumber != null) {
isFinishPanel = secondNumber > FINISH_LIMIT;
fireChangeEvent(this, oldState, isFinishPanel);
}
}
@Override
public boolean isFinishPanel() {
return isFinishPanel;
}
}
Run the WizardExample application again and invoke the New Number Sequence wizard. You’ll see that if the second number is greater than 500, you can click Finish early and provide a number sequence of just two numbers, as shown in Figure 12.22. (Note that the Next button is also enabled.)

After clicking Finish in the panel above, the new number sequence (consisting of only two numbers) shows in the Information window shown in Figure 12.23.

12.7 Asynchronous Validation
The example you’ve seen so far includes validation that doesn’t take much time—that is, the visual panel responds to a document change in the graphical user component. That in turn fires a property change event to the wizard panel which re-validates the input. What happens, however, if validation requires a longer process, such as a web service call or a database access? In this case, you don’t want to block the user interface (and prevent the user from clicking the Cancel button). Instead, you provide asynchronous validation after the user clicks the Next button. This means the WizardDescriptor does not proceed to the next panel until the validation is complete, but the Cancel button is still active.
Let’s show you how to implement asynchronous validation with a somewhat contrived example. Suppose the new number sequence must begin with a unique number; that is, a number that hasn’t been previously used for the initial number. In our case, we assume that this check could take some time, so we want to perform the validation asynchronously.
Here are the general steps we’ll follow to implement asynchronous validation in our example. We’ll provide detailed descriptions of each step following this list.
1. Let’s mimic a database call by providing a separate module (SequenceStore) that stores each initial sequence number and a method that lets a client validate a new number sequence. We must therefore create this new module, make its API package public, and add the module as a dependency to the Sequence module.
2. We add a JLabel component to the visual panel with public method setStatus() and make the JTextField component (the number input component) accessible from the wizard panel. (This is just to provide visual feedback to the user.)
3. The wizard panel implements WizardDescriptor.AsynchronousValidatingPanel<WizardDescriptor> instead of WizardDescriptor.Panel<WizardDescriptor>. In our example, we make this change to NumberWizardPanel1.
4. Override method prepareValidation(), which is invoked synchronously and performs any pre-validating access to the visual panel. Note that the asynchronous validation method should not access the components in the visual panel.
5. Override method validate(). This method is invoked in a separate thread. If validation fails, throw WizardValidationException (of course!). The WizardDescriptor handles the WizardValidationException, displays the provided error message, and prevents the user from proceeding to the next panel.
6. After the wizard finishes, store the initial sequence number in the SequenceStore module.
Another option is to perform synchronous validation when between-panel validation is not time-critical. To do this, implement interface WizardDescriptor.ValidatingPanel<WizardDescriptor> and override method validate() , which the WizardDescriptor invokes synchronously. See Listing 12.28 on page 610 for an example.
Let’s begin our asynchronous validation example by creating a new module in the WizardExample application. Call the new module SequenceStore. In the SequenceStore module, create Java interface NumberStore in package com.asgteach.sequencestore.api and provide abstract methods store() and isUnique(), as shown in Listing 12.21.
Listing 12.21 NumberStore.java
package com.asgteach.sequencestore.api;
public interface NumberStore {
public boolean isUnique(Integer num);
public boolean store(Integer num);
}
Add Lookup API dependency to module SequenceStore and make package com.asgteach.sequencestore.api public in API Versioning. Now create new Java class SimpleNumberStore in package com.asgteach.sequencestore with the implementation shown in Listing 12.22. Note that we use annotation @ServiceProvider for class NumberStore.
Listing 12.22 SimpleNumberStore.java—A NumberStore Service Provider
package com.asgteach.sequencestore;
import com.asgteach.sequencestore.api.NumberStore;
import java.util.HashSet;
import java.util.Set;
import org.openide.util.lookup.ServiceProvider;
@ServiceProvider(service = NumberStore.class)
public class SimpleNumberStore implements NumberStore {
private Set<Integer> numberSet = new HashSet<Integer>();
@Override
public boolean isUnique(Integer num) {
return !numberSet.contains(num);
}
@Override
public boolean store(Integer num) {
// add returns true if the collection changed
// (if num was not already present)
return numberSet.add(num);
}
}
Add a JLabel component to the Design view of NumberVisualPanel1 and change the JLabel’s Variable Name property to status, as shown in Figure 12.24. (Remove the text from the label’s text property.)

Listing 12.23 shows the changes required for the visual panel, NumberVisualPanel1.java. We add getNumberComponent() and setStatus() public methods, as shown in bold.
Listing 12.23 NumberVisualPanel1.java
public final class NumberVisualPanel1 extends JPanel {
. . . code omitted . . .
public JTextField getNumberComponent() {
return firstNumber;
}
public void setStatus(String text) {
status.setText(text);
}
. . . code omitted . . .
// Variables declaration - do not modify
private javax.swing.JTextField firstNumber;
private javax.swing.JLabel jLabel1;
private javax.swing.JLabel status;
// End of variables declaration
. . .
}
Now turn your attention to NumberWizardPanel1, the wizard panel that provides the asynchronous validation (see Listing 12.24). First, add dependencies to the Lookup API and module SequenceStore to access the service provider for NumberStore. Note that we still validate user input here to make sure the input is a valid, non-negative number. After this validation succeeds and the user clicks Next, the WizardDescriptor initiates the asynchronous validation by invoking prepareValidation() followed by validate(). These methods are required with interface WizardDescriptor.AsynchronousValidatingPanel, and we provide implementations of them in NumberWizardPanel1.
Method prepareValidation() performs any GUI-related functions required by the validation. Here, we write a status message to the visual panel and get a reference to the JTextField component. This component is needed for the WizardValidationException.
Method validate() performs the actual number sequence validation in a separate thread. First, we obtain a reference to the NumberStore service provider via the Global Lookup. We invoke method isUnique() to determine whether or not the initial number is unique. If it is, we return and the validation succeeds. If not, we throw WizardValidationException. The exception arguments include the input component from the visual panel that is responsible for the data and error messages that the WizardDescriptor displays.
Listing 12.24 NumberWizardPanel1.java—Asynchronous Validation
public class NumberWizardPanel1 implements
WizardDescriptor.AsynchronousValidatingPanel<WizardDescriptor>,
PropertyChangeListener {
private NumberVisualPanel1 component;
private WizardDescriptor wizard = null;
private boolean isValid = false;
private Integer firstNumber;
private JComponent numberComponent = null;
. . . Code unchanged . . .
@Override
public void prepareValidation() {
getComponent().setStatus(Bundle.CTL_Panel1_CheckUnique(firstNumber));
numberComponent = getComponent().getNumberComponent();
}
@NbBundle.Messages({
"# {0} - current sequence number",
"CTL_Panel1_DuplicateNumErr= {0} is not unique.",
"CTL_Panel1_BadLookup=Can't get NumberStore",
"# {0} - current sequence number",
"CTL_Panel1_CheckUnique= Checking for {0} uniqueness . . ."
})
@Override
public void validate() throws WizardValidationException {
NumberStore numStore = Lookup.getDefault().lookup(NumberStore.class);
if (numStore == null) {
throw new WizardValidationException(numberComponent,
Bundle.CTL_Panel1_BadLookup(),
Bundle.CTL_Panel1_BadLookup());
}
// we don't store the first sequence number
// until after the wizard finishes (so Back button doesn't bite us)
if (!numStore.isUnique(firstNumber)) {
throw new WizardValidationException(numberComponent,
Bundle.CTL_Panel1_DuplicateNumErr(firstNumber),
Bundle.CTL_Panel1_DuplicateNumErr(firstNumber));
}
}
}
When the asynchronous validation succeeds and the user proceeds through the remaining panels to complete the wizard, we store the new initial sequence number using the NumberStore service provider. Listing 12.25 shows the update to NumberWizardAction.java and method actionPerformed(). Once again, we get a reference to the NumberStore service provider through the Global Lookup and invoke numStore.store() to store the initial sequence number.
Listing 12.25 NumberWizardAction.java—Store the Initial Sequence Number
@ActionID(category = "Tools",
id = "org.asgteach.sequence.NumberWizardAction")
. . . code omitted . . .
public final class NumberWizardAction implements ActionListener {
@Override
public void actionPerformed(ActionEvent e) {
List<WizardDescriptor.Panel<WizardDescriptor>> panels =
new ArrayList<WizardDescriptor.Panel<WizardDescriptor>>();
. . . code omitted . . .
WizardDescriptor wiz = new WizardDescriptor(
new WizardDescriptor.ArrayIterator<WizardDescriptor>(panels));
wiz.setTitleFormat(new MessageFormat("{0}"));
wiz.setTitle(Bundle.CTL_NumberDialogTitle());
if (DialogDisplayer.getDefault().notify(wiz) ==
WizardDescriptor.FINISH_OPTION) {
// Store the number
NumberStore numStore =
Lookup.getDefault().lookup(NumberStore.class);
if (numStore != null) {
numStore.store((Integer) wiz.getProperty(
NumberVisualPanel1.PROP_FIRST_NUMBER));
}
// Retrieve and display the numbers
StringBuilder message = new StringBuilder("Number Sequence =
(");
List<Integer> numbers = (List<Integer>) wiz.getProperty(
NumberWizardPanel1.PROP_NUMBER_LIST);
for (int i = 0; i < numbers.size()-1; i++) {
message.append(numbers.get(i)).append(", ");
}
message.append(numbers.get(numbers.size()-1)).append(")");
DialogDisplayer.getDefault().notify(
new NotifyDescriptor.Message(message.toString()));
}
}
}
Figure 12.25 shows the first panel after it performs the asynchronous validation and finds a duplicate first sequence number. The user must now provide a new number and click Next again to validate the new input.
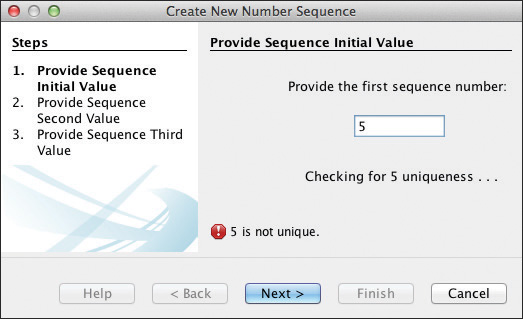
If the validation succeeds, the user automatically proceeds to the second panel. However, we don’t store the first sequence number in NumberStore until after the wizard finishes. This lets a user click the Back button and use the same initial number without causing a validation error.
12.8 Dynamic Sequence Wizards
With a NetBeans Platform wizard, the steps you take are not always the same. User input in one panel may affect the next panel you see. To handle this use case, you need a wizard with a dynamic step sequence.
To illustrate, let’s create an example wizard that takes a user through a multi-step process to order a pizza. In the first step, the user provides a customer name. If the customer is new, the next panel asks for additional customer details. For returning customers, the user skips the new customer panel and goes directly to ordering a pizza. Here the customer selects a pizza size and toppings and whether the pizza is for pickup or delivery. If the user selects delivery, the next step requests an address, telephone number, and credit card number. If the user selects pickup, the user skips the delivery information panel and goes directly to the order confirmation panel.
Note that this wizard has five steps, but, depending on the input, the user sees either three, four, or five steps. Figure 12.26 shows an activity diagram depicting this pizza ordering sequence flow.

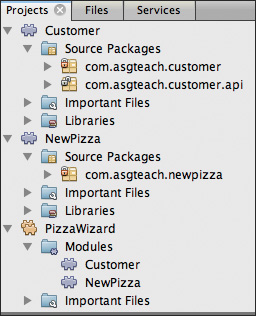
Figure 12.27 shows the PizzaWizard application. This application consists of two modules: Customer, which provides a very simplistic customer storage mechanism using a map, and NewPizza, the module that contains the OrderPizza wizard.
PizzaWizard Example Application
For this example that shows how to create a dynamic step wizard, we’ll show you only partial code for each visual and wizard panel. You can obtain the complete source code for the PizzaWizard example application in the book’s download bundle.
In this application, the visual and wizard panel classes are very similar to the code we showed you with the New Number Sequence wizard. That is, the visual panels consist of graphical components that gather input. If the input requires validation, the visual panels set up listeners to detect user input changes and fire property change events. The wizard panels become property listeners for the visual panels and validate input when it changes. A change in validation status makes the wizard panels fire state change events to the listening WizardDescriptor. The WizardDescriptor then invokes the wizard panel’s isValid() method and updates the Next and/or Finish buttons accordingly.
If the user selects Next, the WizardDescriptor increments the index value of the panels collection. If the user selects Back, the WizardDescriptor decrements the index value of the panels collection.
When you build a dynamic step wizard, the NetBeans Platform provides a WizardIterator class that includes iteration methods current() (provide the current panel), hasNext() (true if there are more panels), hasPrevious() (true if there are previous panels), nextPanel() (increment the panels index number), and previousPanel() (decrement the panels index number). The WizardDescriptor calls these methods to work its way through the wizard process. The WizardIterator maintains an ArrayList of panels and can dynamically add or remove panels (i.e., steps) from this ArrayList. It also maintains a separate String array that holds the name of each step.
Consistent with how NetBeans Platform wizards behave, the WizardIterator adjusts the panels ArrayList when it receives a property change event from one of its wizard panels. When the WizardIterator makes adjustments to the panels ArrayList, it notifies the WizardDescriptor. The WizardDescriptor then makes its adjustments (such as displaying a different panel when the user clicks Next).
Building the Dynamic Step Wizard
Let’s begin with the dynamic Pizza wizard. First, invoke the New Wizard by selecting the target module (NewPizza in this example), right-click, and select New | Other. Under Categories select Module Development and for File Type select Wizard. Click Next.
NetBeans displays the Wizard Type panel. For Registration Type, select Custom, for Wizard Step Sequence select Dynamic, and for Number of Wizard Panels specify 5.
Wizard Tip
When you select Dynamic for the Step Sequence, the number of panels is the maximum number of panels you need for your wizard, even if a given sequence uses fewer panels. You can always add more visual and wizard panel classes manually if you later determine that you need more steps.
Click Next. Specify the Class Name Prefix (Pizza) and verify that the Project and Package names are correct. Click Finish.
As before, NetBeans creates two classes (a view and a controller) for each panel. Because you selected Dynamic Step Sequence, NetBeans also creates a WizardIterator class. Rename (refactor) the visual and wizard classes and give them meaningful class names. Note that NetBeans does not create the action class that invokes the wizard, but it does provide the code (with comments) to build your own action class.
Wizard Tip
When specifying a Dynamic Step Sequence, don’t give visual and wizard panel classes names with step numbers because the number will not be consistent. Instead, give descriptive names to these classes, as we have done in Table 12.3. Note that each class name corresponds to an activity in Figure 12.26 on page 599.

Let’s show you the OrderPizza wizard in action now with sample input. We’ll describe each panel in general terms and show partial code for each visual and wizard panel.
The wizard begins with the IdentifyCustomer panel. This panel asks for a customer name (Figure 12.28). The visual panel implements DocumentListener to detect changes in the name textfield. The wizard panel listens for property change events to make sure the textfield is not empty. The IdentifyCustomer wizard panel implements AsynchronousValidatingPanel. Therefore, when a user clicks Next, the wizard panel verifies if the provided name represents a new or returning customer. If the customer is returning, the next step is skipped. Otherwise, the user proceeds to the New Customer panel.

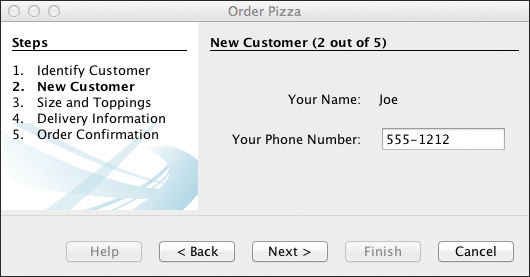
The New Customer panel (Figure 12.29) asks for a phone number (the name is filled in from the previous panel). Again, a DocumentListener on the phone number textfield component notifies the New Customer wizard panel when the input changes. The wizard panel provides validation to make sure the textfield is not empty.
After clicking Next, the WizardDescriptor proceeds to the Size and Toppings panel (the BuildPizza step).
The Size and Toppings panel (Figure 12.30) has no validation, but the visual panel updates the Total field based on the size, toppings, and delivery selections. The BuildPizza visual panel therefore has change listeners for the various components, but it does not fire property change events. Instead, it simply updates Total. If the user selects Delivery, the wizard proceeds to the Delivery Information panel. The Pickup option skips this step and goes directly to the Order Confirmation step.

The Delivery Information panel (Figure 12.31) requests address, phone number, and credit card information from the user. Once again, this panel uses DocumentChangeListeners to monitor input and fires property change events to the listening wizard panel when input changes. Validation consists only of making sure the textfields are not empty. More realistic applications would likely provide phone and credit card number validation and make sure the address is within a certain proximity to the pizza shop.

The final panel is Order Confirmation (Figure 12.32). When the user checks the Order Is Confirmed checkbox, the Finish button is enabled. The ConfirmOrder visual panel listens for changes to the checkbox and fires a property change event. The wizard panel considers the panel valid if the checkbox is checked. Usually, panel component settings are maintained when the user clicks Back and then returns. In this case, the checkbox is reset each time, forcing the user to re-confirm the order.

Use the wizard panel’s readSettings() method to reset a component’s value. The WizardDescriptor invokes this method before it displays the visual panel.
@Override
public void readSettings(WizardDescriptor wiz) {
. . .
// Reset the confirmCheckBox component each time
getComponent().getConfirmCheckBox().setSelected(false);
}
The PizzaWizardIterator
Now let’s examine the PizzaWizardIterator, as shown in Listing 12.26. Recall that the NetBeans Platform wizard generates this class for you when you select Dynamic Steps. We show the modifications for the Order Pizza example in bold and describe these modifications here.
1. Class PizzaWizardIterator implements PropertyChangeListener and becomes a listener for wizard panels IdentifyCustomerController and BuildPizzaController. These panels collect input that affect the wizard’s sequence flow.
2. Create wizard panel class fields for each wizard panel so that you can access them. Note that we add all panels to the ArrayList, but you could just add a subset, depending on how you want your “standard beginning list of steps” to appear.
3. Create method updateSteps(), which builds a steps String array containing each step name. All step names are displayed in the left hand portion of each panel. We extracted this code from method getPanels() so that we can invoke it separately as the step sequence changes.
4. Implement methods addChangeListener() and removeChangeListener() so that the WizardDescriptor is notified when a step sequence changes.
5. Implement method propertyChange(). If the source event property name is IdentifyCustomerController.PROP_IS_NEW_CUSTOMER, we either add or remove the NewCustomer panel. If the source event property name is BuildPizzaController.PROP_IS_PICKUP, we either add or remove the DeliveryInformation panel. Note that method add() uses relative positioning for the DeliveryInformation panel (it will always be the next to last panel). Thus, the ArrayList remains consistent without regard to which panels are currently in the collection when you add to the list.
6. Implement method fireChangeEvent(). This lets the WizardDescriptor know that the sequence list changed.
Listing 12.26 PizzaWizardIterator.java—Control the Wizard’s Steps
public final class PizzaWizardIterator implements
WizardDescriptor.Iterator<WizardDescriptor>,
PropertyChangeListener {
private int index;
private List<WizardDescriptor.Panel<WizardDescriptor>> panels;
// give panels variable names so we can add/remove them as needed
IdentifyCustomerController icc = new IdentifyCustomerController();
NewCustomerController ncc = new NewCustomerController();
BuildPizzaController bpc = new BuildPizzaController();
DeliveryInfoController delic = new DeliveryInfoController();
ConfirmOrderController confoc = new ConfirmOrderController();
private List<WizardDescriptor.Panel<WizardDescriptor>> getPanels() {
if (panels == null) {
panels = new ArrayList<WizardDescriptor.Panel<WizardDescriptor>>();
panels.add(icc);
panels.add(ncc);
panels.add(bpc);
panels.add(delic);
panels.add(confoc);
// Become a ChangeListener for IdentifyCustomerController and
// BuildPizzaController
icc.addPropertyChangeListener(this);
bpc.addPropertyChangeListener(this);
updateSteps();
}
return panels;
}
private void updateSteps() {
String[] steps = new String[panels.size()];
for (int i = 0; i < panels.size(); i++) {
Component c = panels.get(i).getComponent();
// Default step name to component name of panel.
steps[i] = c.getName();
if (c instanceof JComponent) { // assume Swing components
JComponent jc = (JComponent) c;
jc.putClientProperty(
WizardDescriptor.PROP_CONTENT_SELECTED_INDEX, i);
jc.putClientProperty(
WizardDescriptor.PROP_CONTENT_DATA, steps);
jc.putClientProperty(
WizardDescriptor.PROP_AUTO_WIZARD_STYLE, true);
jc.putClientProperty(
WizardDescriptor.PROP_CONTENT_DISPLAYED, true);
jc.putClientProperty(
WizardDescriptor.PROP_CONTENT_NUMBERED, true);
}
}
}
@Override
public WizardDescriptor.Panel<WizardDescriptor> current() {
return getPanels().get(index);
}
@Override
public String name() {
return index + 1 + " out of " + getPanels().size();
}
@Override
public boolean hasNext() {
return index < getPanels().size() - 1;
}
@Override
public boolean hasPrevious() {
return index > 0;
}
@Override
public void nextPanel() {
if (!hasNext()) {
throw new NoSuchElementException();
}
index++;
}
@Override
public void previousPanel() {
if (!hasPrevious()) {
throw new NoSuchElementException();
}
index--;
}
private final EventListenerList listeners = new EventListenerList();
@Override
public void addChangeListener(ChangeListener l) {
listeners.add(ChangeListener.class, l);
}
@Override
public void removeChangeListener(ChangeListener l) {
listeners.remove(ChangeListener.class, l);
}
@Override
public void propertyChange(PropertyChangeEvent pce) {
if (pce.getPropertyName().equals(
IdentifyCustomerController.PROP_IS_NEW_CUSTOMER)) {
if (icc.isIsNewCustomer()) {
panels.add(1, ncc);
} else {
panels.remove(ncc);
}
updateSteps();
fireChangeEvent(this, 0, 1);
} else if (pce.getPropertyName().equals(
BuildPizzaController.PROP_IS_PICKUP)) {
if (bpc.isIsPickup()) {
panels.remove(delic);
} else {
panels.add(panels.size()-1, delic);
}
updateSteps();
fireChangeEvent(this, 0, 1);
}
}
protected final void fireChangeEvent(Object source, int oldState,
int newState) {
if (oldState != newState) {
ChangeEvent ev = new ChangeEvent(source);
for (ChangeListener listener : listeners.getListeners(
ChangeListener.class)) {
listener.stateChanged(ev);
}
}
}
}
Wizard Tip
The code in the propertyChange() method (Listing 12.26) reflects the activity diagram in Figure 12.26 on page 599, where panels are added or removed based on user input. Your dynamic sequence wizard, however, may dictate a different flow, such as two or more completely separate collections of steps. In this case, define separate panel collections and activate the appropriate collection in propertyChange().
IdentifyCustomer Panel
The IdentifyCustomer panel dynamically changes the step sequence. Let’s show you how this controller class participates in the step sequence change.
Class IdentifyCustomerController implements WizardDescriptor.AsynchronousValidatingPanel. When the user clicks Next, method validate() determines whether or not the provided customer name represents a returning customer or a new customer. Since this affects the sequence, method validate() sends a property change event to the PizzaWizardIterator.
Listing 12.27 shows the code in IdentifyCustomerController that performs this check. Method prepareValidation() fetches the customer name from the visual panel. Method validate() then uses the Global Lookup to access the service provider for CustomerStore. CustomerStore method findCustomer() returns null if the customer does not exist. Method setIsNewCustomer() fires a property change event to the PizzaWizardIterator, which responds by adjusting the panels ArrayList.
Listing 12.27 IdentifyCustomerController.java—New Customer?
public class IdentifyCustomerController implements
WizardDescriptor.AsynchronousValidatingPanel<WizardDescriptor>,
PropertyChangeListener {
private IdentifyCustomerVisual component;
. . . code omitted . . .
private String customerName;
private Customer customer;
public static final String PROP_CUSTOMER = "customer";
private boolean isNewCustomer = true;
private PropertyChangeSupport propChangeSupport;
public static final String PROP_IS_NEW_CUSTOMER = "isNewCustomer";
. . . code omitted . . .
public void setIsNewCustomer(boolean isNewCustomer) {
boolean oldValue = this.isNewCustomer;
this.isNewCustomer = isNewCustomer;
this.propChangeSupport.firePropertyChange(
PROP_IS_NEW_CUSTOMER, oldValue, isNewCustomer);
}
@Override
public void prepareValidation() {
customerName = getComponent().getCustomerName();
}
@Override
public void validate() throws WizardValidationException {
CustomerStore custStore = Lookup.getDefault().lookup(
CustomerStore.class);
if (custStore != null) {
customer = custStore.findCustomer(customerName);
wizard.putProperty(PROP_CUSTOMER, customer);
setIsNewCustomer(customer == null);
}
}
}
BuildPizza Panel
The BuildPizza step also affects the wizard’s step sequence. Class BuildPizzaController collects the input required to create a PizzaOrder object. No validation is necessary since all input choices are either checkboxes or radio buttons. However, BuildPizzaController must determine if the pizza is for pickup or delivery. If the pizza is for delivery, the next panel is DeliveryInformation; otherwise the next panel is ConfirmOrder.
There are two approaches we can take here and the resulting wizard behavior is slightly different with each implementation. We’ll show you both approaches. The first approach is to make BuildPizzaController implement WizardDescriptor.ValidatingPanel and override method validate(). In this case, the user doesn’t see a change in the sequence flow until after clicking Next. This is the same behavior you see with the IdentifyCustomer panel. Listing 12.28 shows the code for this approach.
Recall that WizardDescriptor.ValidatingPanel provides synchronous validation after the user clicks Next. Synchronous validation is appropriate here because the code in method validate() does not take a long time. Method validate() gets PizzaOrder from the visual panel and invokes setIsPickup(), which fires a property change event if property PROP_IS_PICKUP has changed. Again, the PizzaWizardIterator listens for property change events, adjusts the panels ArrayList, and notifies the WizardDescriptor if the step sequence changes.
Listing 12.28 BuildPizzaController—Pickup or Delivery? First Approach
public class BuildPizzaController implements
WizardDescriptor.ValidatingPanel<WizardDescriptor> {
private BuildPizzaVisual component;
private PizzaOrder pizzaOrder;
private boolean isPickup;
private PropertyChangeSupport propChangeSupport;
. . . code omitted . . .
public void setIsPickup(boolean isPickup) {
boolean oldValue = this.isPickup;
this.isPickup = isPickup;
this.propChangeSupport.firePropertyChange(
PROP_IS_PICKUP, oldValue, isPickup);
}
@Override
public void validate() throws WizardValidationException {
pizzaOrder = getComponent().getPizzaOrder();
setIsPickup(pizzaOrder.isPickup());
}
}
The second approach does not use WizardDescriptor.ValidatingPanel for class BuildPizzaController. Instead, BuildPizzaController detects changes to the Pickup / Delivery option. In its propertyChange() method, BuildPizzaController immediately fires a property change event to PizzaWizardIterator.
This approach makes the sequence change happen as soon as the user changes the Pickup / Delivery option, providing a more dynamic and immediate effect. Listing 12.29 shows the code to implement the second approach.
Listing 12.29 BuildPizzaController—Pickup or Delivery? Second Approach
public class BuildPizzaController implements
WizardDescriptor.Panel<WizardDescriptor>, PropertyChangeListener {
private BuildPizzaVisual component;
private PizzaOrder pizzaOrder;
private Customer customer;
public static final String PROP_PIZZA_ORDER = "pizzaOrder";
public static final String PROP_IS_PICKUP = "isPickup";
private boolean isPickup;
private PropertyChangeSupport propChangeSupport;
. . . code omitted . . .
@Override
public BuildPizzaVisual getComponent() {
if (component == null) {
component = new BuildPizzaVisual();
this.component.addPropertyChangeListener(this);
}
return component;
}
public void setIsPickup(boolean isPickup) {
boolean oldValue = this.isPickup;
this.isPickup = isPickup;
this.propChangeSupport.firePropertyChange(
PROP_IS_PICKUP, oldValue, isPickup);
}
@Override
public void propertyChange(PropertyChangeEvent pce) {
if (pce.getPropertyName().equals(BuildPizzaVisual.PROP_IS_PICKUP)) {
pizzaOrder = getComponent().getPizzaOrder();
setIsPickup(pizzaOrder.isPickup());
}
}
}
Wizard Tip
Having the WizardIterator fire a state change event (see Listing 12.26 on page 606) is only really necessary when the WizardDescriptor updates the step sequence as soon as the user modifies panel input. If all checks for panel changes occur when the user clicks Next, the WizardDescriptor will automatically grab the updated step panels. However, since the WizardIterator is not aware of when each wizard panel checks for changes, the safest approach is to have the WizardIterator always fire state change events, as we show in Listing 12.26.
Create the OrderPizzaAction
Our final step is to create the OrderPizzaAction to initiate the Order Pizza wizard. Listing 12.30 shows class OrderPizzaAction, an action registered under Tools in the main menu bar. Method actionPerformed() instantiates PizzaWizardIterator, which builds the five wizard panels and the WizardDescriptor. When the wizard completes, method actionPerformed() obtains the Customer and PizzaOrder objects from the WizardDescriptor property cache.
Method actionPerformed() also stores the Customer (using CustomerStore from the Global Lookup) and builds the Information message dialog.
Listing 12.30 OrderPizzaAction.java—Always Enabled Action
@ActionID(category = "Tools",
id = "com.asgteach.newpizza.OrderPizza")
@ActionRegistration(displayName = "#CTL_OrderPizza")
@ActionReferences({
@ActionReference(path = "Menu/Tools", position = 150)
})
@Messages("CTL_OrderPizza=Order Pizza")
public final class OrderPizzaAction implements ActionListener {
@Override
public void actionPerformed(ActionEvent e) {
WizardDescriptor wiz = new WizardDescriptor(new PizzaWizardIterator());
wiz.setTitleFormat(new MessageFormat("{0} ({1})"));
wiz.setTitle(Bundle.CTL_OrderPizza());
if (DialogDisplayer.getDefault().notify(wiz) ==
WizardDescriptor.FINISH_OPTION) {
// Store the customer with module CustomerStore
CustomerStore custStore = Lookup.getDefault().lookup(
CustomerStore.class);
if (custStore != null) {
Customer customer = (Customer) wiz.getProperty(
IdentifyCustomerController.PROP_CUSTOMER);
custStore.storeCustomer(customer);
PizzaOrder p = (PizzaOrder) wiz.getProperty(
BuildPizzaController.PROP_PIZZA_ORDER);
// Access the PizzaOrder and build an Information Dialog
StringBuilder sb = new StringBuilder();
sb.append("Thank you, ").append(customer.getName()).append(
", for your order!
");
sb.append(p.getPizzaSize());
sb.append(" Pizza
");
if (!p.getToppings().isEmpty()) {
sb.append("With ");
for (String topping : p.getToppings()) {
sb.append(topping).append(", ");
}
sb.append("
");
}
if (p.isPickup()) {
sb.append("For Pickup");
} else {
sb.append("For Delivery");
}
DialogDisplayer.getDefault().notify(
new NotifyDescriptor.Message(sb.toString()));
}
}
}
}
Figure 12.33 shows the Information dialog that the OrderPizza wizard displays upon completion.

12.9 Wizard Instantiating Iterators
When you select Dynamic Step Sequence to build your wizard, as we did in the previous section, NetBeans provides a WizardIterator class for you that implements WizardDescriptor.Iterator<WizardDescriptor>. As you saw with PizzaWizardIterator, this class provides iterator methods and builds an ArrayList of your wizard panel objects. Property listeners adjust panel sequences as needed according to user input.
The NetBeans Platform has alternatives to this standard iterator class that let you build target artifacts when a wizard completes. Let’s discuss these instantiating iterators and show you an example of how they work.
Wizard Tip
You may want to use one of the instantiating iterators even if you don’t dynamically alter your wizard step sequence. In this case, choose Dynamic Step Sequence during the New Wizard wizard and replace WizardDescriptor.Iterator with one of the instantiating iterators we discuss in this section.
WizardDescriptor.InstantiatingIterator
All the iterator classes are alternatives to WizardDescriptor.InstantiatingIterator, which extends WizardDescriptor.Iterator. To use them, replace WizardDescriptor.Iterator in your code with one of the alternative classes and override the necessary methods.
All instantiating iterator classes include method instantiate() that lets an iterator class build artifacts from the wizard process. The WizardDescriptor invokes instantiate() after the wizard successfully completes and (in most cases) blocks the wizard until this method completes.
Inside instantiate(), you build (instantiate) any objects that your wizard should create. A typical use case is the New Project wizard in the NetBeans IDE. Here, the IDE creates many files and directories in the target user directory according to the project type and the input provided by a user.
When the wizard completes with status WizardDescriptor.FINISH_OPTION in the invoking method, instantiate() has already executed. You can access the instantiated objects with WizardDescriptor method getInstantiatedObjects().
If instantiate() fails for any reason, you should throw IOException. In this case, the WizardDescriptor keeps the wizard open and a user has a chance to change panel input. Method instantiate() is invoked again after the user clicks Finish. Reasons for failure typically fall outside normal validation, but include errors creating files or directories during instantiation, for example.
Method initialize() lets you initialize any objects required by the iterator. A typical use here is to store the WizardDescriptor object so the iterator has access to the WizardDescriptor property cache within instantiate().
Method uninitialize() performs uninitialization tasks. This method is invoked when the wizard closes for all closing options (not just FINISH_OPTION).
Table 12.4 lists these additional methods that you override when using WizardDescriptor.InstantiatingIterator.

WizardDescriptor.AsynchronousInstantiatingIterator
The AsynchronousInstantiatingIterator is a subinterface of InstantiatingIterator. It has the same methods except that method instantiate() is invoked outside the Event Dispatch Thread (EDT). The wizard still remains open, however, which means you can handle errors as described above by throwing IOException within instantiate().
Note that the user can’t cancel or close the wizard while instantiate() is running.
WizardDescriptor.ProgressInstantiatingIterator
ProgressInstantiatingIterator is a subinterface of AsynchronousInstantiatingIterator. It defines method instantiate() with a ProgressHandle parameter. To use this iterator, you must add a dependency on the Progress API. The WizardDescriptor instantiates the ProgressHandle object, but method instantiate() must start, update, and finish the progress bar. Like AsynchronousInstantiatingIterator, method instantiate() is invoked outside the EDT thread.
Let’s modify the PizzaWizard to use ProgressInstantiatingIterator. Here are the steps.
1. Add a new dependency on the Progress API in module New Pizza.
2. Make PizzaWizardIterator implement WizardDescriptor.ProgressInstantiatingIterator and have NetBeans generate methods for instantiate(), instantiate(ProgressHandle), initialize(), and uninitialize().
3. Provide implementations for these methods, as shown in Listing 12.31. Note that the PizzaWizardIterator is unchanged except for the new methods.
We initialize private class field wizard in method initialize(). This lets us access the WizardDescriptor’s property cache so we can retrieve the required input provided by the user.
Method instantiate(ProgressHandle) does the work that was previously performed in the Order Pizza actionPerformed() method. We grab the Customer and PizzaOrder objects from the property cache, build the pizza, store Customer in the CustomerStore, and return PizzaOrder in the instantiate() method’s return object.
We simulate a long-running process using Thread.sleep() and periodically update the progress bar with ProgressHandle method progress().
We also throw IOException if “JoeCriminal” is our customer. The WizardDescriptor catches this and returns focus to the wizard so the user can correct any problems. The WizardDescriptor invokes instantiate() again when the user clicks Finish.
Finally, we override instantiate() to guard against WizardDescriptor invoking the no-argument version, which should not be invoked with ProgressInstantiatingIterator.
Listing 12.31 PizzaWizardIterator—Using a Progress Bar
public final class PizzaWizardIterator implements
WizardDescriptor.ProgressInstantiatingIterator<WizardDescriptor>,
PropertyChangeListener {
private int index;
private List<WizardDescriptor.Panel<WizardDescriptor>> panels;
private WizardDescriptor wizard = null;
. . . Unchanged Code Omitted . . .
@Override
public Set<PizzaOrder> instantiate(ProgressHandle ph) throws IOException {
Set<PizzaOrder> pizzaSet = new HashSet<>();
PizzaOrder p = (PizzaOrder) wizard.getProperty(
BuildPizzaController.PROP_PIZZA_ORDER);
pizzaSet.add(p);
Customer customer = (Customer) this.wizard.getProperty(
IdentifyCustomerController.PROP_CUSTOMER);
// Simulate a long-running multi-step task:
ph.start(5);
try {
ph.progress("Storing customer " + customer.getName(), 1);
Thread.sleep(1500);
if (customer.getName().contains("JoeCriminal")) {
throw new IOException(" Cannot sell to JoeCriminal");
}
CustomerStore custStore = Lookup.getDefault().lookup(
CustomerStore.class);
if (custStore != null) {
custStore.storeCustomer(customer);
}
ph.progress("Building " + p.getPizzaSize() + " pizza", 2);
Thread.sleep(2000);
ph.progress("Place toppings " + p.getToppings().toString(), 3);
Thread.sleep(2000);
ph.progress("Cooking pizza", 4);
Thread.sleep(2000);
ph.progress("Ready!", 5);
Thread.sleep(2000);
} catch (InterruptedException e) {
Exceptions.printStackTrace(e);
}
ph.finish();
return pizzaSet;
}
@Override
public Set instantiate() throws IOException {
assert false : "This method cannot be called if the class implements
WizardDescriptor.ProgressInstantiatingWizardIterator.";
return null;
}
@Override
public void initialize(WizardDescriptor wd) {
this.wizard = wd;
}
@Override
public void uninitialize(WizardDescriptor wd) {
this.panels = null;
this.wizard = null;
}
}
4. Make changes to OrderPizzaAction method actionPerformed(), as shown in Listing 12.32. Note that DialogDisplayer method notify() blocks until the user successfully completes and wizard and method instantiate() completes. This lets you access any objects created in method instantiate() with WizardDescriptor method getInstantiatedObjects(), as shown.
Listing 12.32 OrderPizzaAction actionPerformed()—Using a Progress Bar
@Override
public void actionPerformed(ActionEvent e) {
WizardDescriptor wiz = new WizardDescriptor(new PizzaWizardIterator());
wiz.setTitleFormat(new MessageFormat("{0} ({1})"));
wiz.setTitle(Bundle.CTL_OrderPizza());
if (DialogDisplayer.getDefault().notify(wiz) ==
WizardDescriptor.FINISH_OPTION) {
// User clicked Finish and method instantiate() has finished
Set<PizzaOrder> pizzaSet = wiz.getInstantiatedObjects();
if (pizzaSet.iterator().hasNext()) {
PizzaOrder p = pizzaSet.iterator().next();
Customer customer = p.getCustomer();
StringBuilder sb = new StringBuilder();
sb.append("Thank you, ").append(customer.getName()).append(
", for your order!
");
sb.append(p.getPizzaSize());
sb.append(" Pizza
");
if (!p.getToppings().isEmpty()) {
sb.append("With ");
for (String topping : p.getToppings()) {
sb.append(topping).append(", ");
}
sb.append("
");
}
if (p.isPickup()) {
sb.append("For Pickup");
} else {
sb.append("For Delivery");
}
DialogDisplayer.getDefault().notify(
new NotifyDescriptor.Message(sb.toString()));
}
}
}
Figure 12.34 shows the OrderPizza wizard running after the user clicks Finish. Note that the wizard is still running, even though the buttons are all disabled. The progress bar displays the completion percentage as well as the current task label.
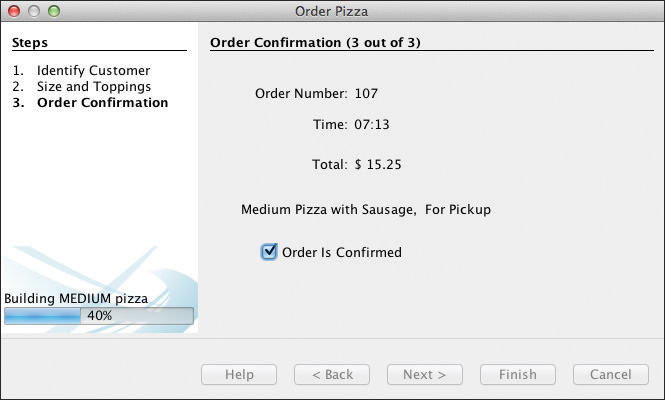
WizardDescriptor.BackgroundInstantiatingIterator
BackgroundInstantiatingIterator is also a subinterface of AsynchronousInstantiatingIterator, and you must override the same methods. For this iterator, the WizardDescriptor closes the wizard (when completed successfully) and then invokes the instantiate() method in a background thread. Because control returns to the invoking method, the instantiated objects are not available when the wizard completes. When using BackgroundInstantiatingIterator, you are responsible for handling GUI feedback and progress for the user as well as catching any exceptions thrown in method instantiate().
BackgroundInstantiatingIterator is appropriate for an instantiation that is long-running or when it is not desirable to have the wizard remain open.
12.10 Key Point Summary
A process that guides users through multiple steps to create one or more artifacts is called a wizard. The NetBeans Platform provides a multi-class framework that lets you construct wizards for your application. The wizard framework has the following features.
• Classes that participate in a wizard include the WizardDescriptor, wizard panel classes (one for each step), visual panel classes, wizard iterators, and a wizard action class.
• Each step in a wizard has a visual component and a controller (a wizard panel). The wizard panel creates its visual panel, obtains user input, and updates panel state.
• A wizard is controlled by a WizardDescriptor. The WizardDescriptor is responsible for stepping through the wizard (using an iterator), maintaining state, and updating the visual component’s buttons (Help, Back, Next, Cancel, and Finish).
• The WizardDescriptor invokes wizard panel method readSettings() at the beginning of each step so the wizard panel can read state from the WizardDescriptor and configure the step’s visual panel.
• The WizardDescriptor invokes wizard panel method storeSettings() at the end of a step so the wizard panel can store state with the WizardDescriptor.
• Use Static step sequencing when the order and number of steps in a wizard is constant. Use Dynamic step sequencing when user input affects the order or number of steps.
• Use the standard DialogDisplayer method notify() to start a wizard. The return value WizardDescriptor.FINISH_OPTION means the wizard completed normally.
• Create public getter methods in the visual panel to obtain user input.
• Use listeners in the visual panel to respond to changes in user input. The wizard panels become property change listeners that respond to changes in user input.
• In general, the wizard panel implements user input validation and notifies the WizardDescriptor of changes in the validity of the current panel.
• Use the WizardDescriptor property cache to store state and coordinate input with other panels.
• The Simple Validation API provides validators suitable for visual panel input. This reduces tedious and redundant validation code in wizard panels.
• If a wizard panel can finish early, implement interface WizardDescriptor.FinishablePanel and override method isFinishPanel(). The wizard panel must fire a state change event to notify the WizardDescriptor when a panel’s finishable state changes.
• To validate user input asynchronously, implement interface WizardDescriptor.AsynchronousValidatingPanel in the wizard panel. Override the prepareValidation() method, which is accessed in the main thread, and the validate() method, which is invoked in a background thread. The WizardDescriptor invokes these methods after a user clicks Next. The Cancel button is active during asynchronous validation.
• Synchronous validation is appropriate when between-panel validation is not long running. Implement interface WizardDescriptor.ValidatingPanel and override method validate().
• Dynamic sequence wizards include a Wizard Iterator class that lets you control a wizard sequence.
• Use property change events to communicate from wizard panels to the Wizard Iterator when user input causes changes to the wizard sequence.
• The Wizard framework includes several instantiating iterators. After a user completes a wizard, the WizardDescriptor invokes method instantiate() which creates one or more artifacts based on obtained input.
• The WizardDescriptor invokes method instantiate() synchronously, asynchronously, asynchronously with a ProgressBar, or as a background task, depending on which instantiating iterator you use.