
2. Background Basics
The Swing graphical user interface, JavaBeans, and JavaBean properties are all central to using the NetBeans Platform. You manipulate Swing components and any business objects that you create with listeners, events, and event handlers. Broadly speaking, these concepts are vital in having objects in an application communicate with each other. This chapter describes techniques for this type of communication, so that when you see them later in a NetBeans Platform application, you’ll understand their purpose and structure.
We begin with JavaBeans, JavaBean properties, and property change events. In building an application, you typically define business objects (or model objects) with JavaBeans and access their data with JavaBean properties. Methods that manipulate business objects make sure these application objects remain consistent with your business logic. We’ll also briefly show you lambda expressions, an important Java 8 language feature that we use in our code examples.
After introducing JavaBeans, properties, and property change handlers, we’ll show examples that give you a broad overview of Swing as a graphical user interface. We’ll explore examples that handle user input events and keep track of changes to model data. This ensures that the view (graphical user interface) and model are always consistent. We’ll also introduce the standard Java Logging facility.
We finish this background chapter by discussing thread safety and threading techniques as they relate to Swing-based applications. Because Swing uses a single-threaded model, dedicated background threads should perform long-running tasks within Swing applications. In this case, thread safety is crucial. We’ll discuss making objects thread safe and how to launch background threads in Swing.
What You Will Learn
• Create JavaBeans and JavaBean properties.
• Use bound properties and property change listeners.
• Replace anonymous inner classes with lambda expressions.
• Understand Swing basics.
• Use common Swing components.
• Create UI forms with the Swing form designer.
• Incorporate Swing component events and listeners into your application.
• Use the Java logging facility.
• Understand concurrency in Swing.
2.1 JavaBeans and Properties
Let’s begin our review of background basics with JavaBeans. A JavaBean is a Java class that encapsulates data as class fields. You access the class data through methods that set values (called setters) and get or read values (called getters). When the methods that access the JavaBean class fields follow well-defined naming conventions we call these fields properties.
We begin with class Person,1 which has fields that hold information for each Person object we create. The naming convention for property names includes an initial lowercase letter, no special symbols, and camel casing for obvious compound words. Listing 2.1 shows class Person with its private fields and constructors. Note that each Person object has an incremented id value.
1. After we fully describe class Person, we’ll show you how to build a Java application with the NetBeans IDE that uses Person.
package com.asgteach.familytree.model;
import java.io.Serializable;
import java.util.Objects;
public final class Person implements Serializable {
private final long id;
private String firstname;
private String middlename;
private String lastname;
private String suffix;
private Person.Gender gender;
private String notes;
private static long count = 0;
public enum Gender {
MALE, FEMALE, UNKNOWN
}
public Person() {
this("", "", Gender.UNKNOWN);
}
public Person(String first, String last, Person.Gender gender) {
this.firstname = first;
this.middlename = "";
this.lastname = last;
this.suffix = "";
this.gender = gender;
this.id = count++;
}
public Person(Person person) {
this.firstname = person.getFirstname();
this.middlename = person.getMiddlename();
this.lastname = person.getLastname();
this.suffix = person.getSuffix();
this.gender = person.getGender();
this.notes = person.getNotes();
this.id = person.getId();
}
}
Class Person has three constructors: a constructor that creates default values for the fields, a constructor for specifying firstname, lastname, and gender, and a copy constructor that creates a new Person object that is a copy of its parameter.
Property fields are private with getters and setters to manipulate them. We’ll create getters and setters for each field, except for the read-only id field, which needs only a getter.
Generating Getters and Setters
Once you define private fields within a class, NetBeans (and other IDEs) can generate setters and/or getters for you, since these methods follow well-known naming conventions.
To be recognized as a property method, each getter method name includes the prefix “get” followed by the property name with an initial capital letter. A getter’s return type is the same as the field’s type. A boolean property typically uses the prefix “is,” although you can optionally use the prefix “get.” For example, here is a getter for boolean property manager.
private boolean manager = true;
. . .
// getter for manager
public boolean isManager() {
return manager;
}
Properties and Getters
Not all getters necessarily correspond to a field with the same name. For example, suppose a Person class has private integer age. We can write a boolean getter called isTeenager() as follows.
private int age;
// getter for age
public int getAge() {
return age;
}
. . .
public boolean isTeenager() {
return (age >= 13 && age <= 19) ? true : false;
}
The class includes boolean (read-only) property teenager , but the class does not have a field called teenager. Instead, the getter returns a boolean computed from the age property.
Setters include the prefix “set,” return void, and include a single parameter whose type matches the property’s type. Listing 2.2 shows the getter and setter methods for class Person.
Listing 2.2 Person Getters and Setters
public String getNotes() {
return notes;
}
public void setNotes(String notes) {
this.notes = notes;
}
public String getFirstname() {
return firstname;
}
public void setFirstname(String firstname) {
this.firstname = firstname;
}
public Person.Gender getGender() {
return gender;
}
public void setGender(Person.Gender gender) {
this.gender = gender;
}
public String getLastname() {
return lastname;
}
public void setLastname(String lastname) {
this.lastname = lastname;
}
public String getMiddlename() {
return middlename;
}
public void setMiddlename(String middlename) {
this.middlename = middlename;
}
public String getSuffix() {
return suffix;
}
public void setSuffix(String suffix) {
this.suffix = suffix;
}
public long getId() {
return id;
}
There are three additional methods you should override for a JavaBean class: toString(), equals(), and hashCode(). These methods all have default implementations provided by Object, so you’ll get the defaults if you don’t provide your own implementations.
Always override toString() to provide a more meaningful value than the default. (The default value is the class name, followed by “@” and the unsigned hexadecimal value of the hash code. For example, without overriding toString(), the Person class toString() method returns
com.asgteach.familytree.model.Person@123
which is not very useful.)
Methods equals() and hashCode() are crucial for correct behavior of your JavaBean in determining equality. You should always override both methods. Method hashCode() is used in Java collection classes that need to compute hash codes. Both hashCode() and equals() should rely on the same fields for their implementations.
NetBeans and other IDEs can also generate implementations for equals() and hashCode(). You specify which field(s) participate in the implementation. For class Person, we use field id. Two Person objects are equal if their id fields are equal; none of the other fields affect equality. This means you can have two Person objects with the same firstname and lastname fields that will be unequal if their ids are not equal. Similarly, two Person objects with equal ids will be equal even if their lastname fields (for example) are not equal.
Correct equals() and hashCode() Generation
If you use an IDE to generate code for these methods, make sure you specify the same fields for equals() code generation as you do for hashCode() code generation.
Listing 2.3 shows methods equals(), hashCode(), and toString() for class Person.
Listing 2.3 Methods equals(), hashCode(), and toString() for Class Person
// Class Person
@Override
public int hashCode() {
int hash = 3;
hash = 97 * hash + Objects.hashCode(this.id);
return hash;
}
@Override
public boolean equals(Object obj) {
if (obj == null) {
return false;
}
if (getClass() != obj.getClass()) {
return false;
}
final Person other = (Person) obj;
return Objects.equals(this.id, other.id);
}
@Override
public String toString() {
StringBuilder sb = new StringBuilder();
if (!firstname.isEmpty()) {
sb.append(firstname);
}
if (!middlename.isEmpty()) {
sb.append(" ").append(middlename);
}
if (!lastname.isEmpty()) {
sb.append(" ").append(lastname);
}
if (!suffix.isEmpty()) {
sb.append(" ").append(suffix);
}
return sb.toString();
}
Creating a Java Application
We now have a simple JavaBean object with properties. Let’s create a Java application that uses class Person. Use the following steps.2
2. In this chapter we’re providing background information. We introduce creating a NetBeans Platform application in Chapter 5.
1. From the NetBeans IDE top-level menu bar, select File | New Project. NetBeans displays the Choose Project dialog. Under Categories select Java and under Projects select Java Application, as shown in Figure 2.1. Click Next.

2. NetBeans displays the Name and Location dialog. For Project Name, specify PersonAppBasic. For Project Location, click Browse and navigate to the desired project location. Accept the defaults on the remaining fields and click Finish, as shown in Figure 2.2.
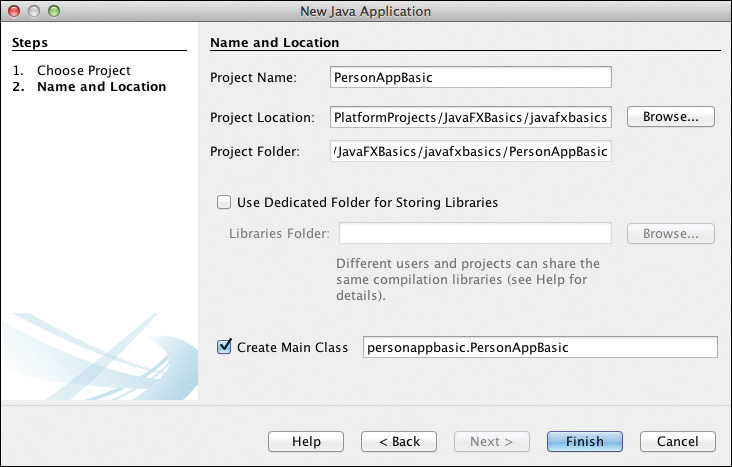
NetBeans builds a Java application project for you and brings up PersonAppBasic.java in the Java editor. Next, we’ll add the Person class to the project and replace the code in the empty main method.
1. Expand project PersonAppBasic, right click on Source Packages, and select New | Java Class... as shown in Figure 2.3.

2. NetBeans displays the Name and Location dialog. For Class Name specify Person and for Package specify com.asgteach.familytree.model, as shown in Figure 2.4. Click Finish.

NetBeans creates class Person.java in package com.asgteach.familytree.model, as shown in the Projects view in Figure 2.5. Insert the Java code for class Person (using copy/paste or edit), as indicated in Listing 2.1 through Listing 2.3.

Program PersonAppBasic
Listing 2.4 shows program PersonAppBasic with two Person objects. After creating the objects homer and marge, we modify their properties (middlename and suffix) using appropriate setters. Because the Person class overrides toString(), we can show useful output with print statements. We can also compare Person objects with equals().
Listing 2.4 Program PersonAppBasic
public class PersonAppBasic {
public static void main(String[] args) {
Person homer = new Person("Homer", "Simpson", Gender.MALE);
Person marge = new Person("Marge", "Simpson", Gender.FEMALE);
homer.setMiddlename("Chester");
marge.setMiddlename("Louise");
homer.setSuffix("Junior");
System.out.println(homer);
System.out.println(marge);
if (homer.equals(marge)) {
System.out.println(homer + " is equal to " + marge);
} else {
System.out.println(homer + " is not equal to " + marge);
}
}
}
Output:
Homer Chester Simpson Junior
Marge Louise Simpson
Homer Chester Simpson Junior is not equal to Marge Louise Simpson
Bound Properties
Bound properties use the well-known Publish-Subscribe pattern to let interested parties know when property values change. This technique is useful for communicating changes among participants in an application.
We will show two approaches for notifying interested parties (listeners) of changes. The first approach is a fine-grained notification. Each setter fires a property change event to its listeners when invoked, since a setter changes its property’s value. The second approach uses a more coarse-grained notification, where interested listeners respond to overall changes to an object, rather than specific property changes. We’ll discuss the second approach in the next section.
Here are the modifications to class Person to create bound properties.
1. Add property change support using convenience class PropertyChangeSupport from package java.beans.
2. Provide methods addPropertyChangeListener() and removePropertyChangeListener() so that interested classes can add and remove themselves as listeners.
3. Provide convenience method getPropertyChangeSupport() to register a Person as the event source for property change events. (Method getPropertyChangeSupport() enables safe registration without an unsafe “leaking this” reference.)
4. Create public static Strings for each bound property so that publishers and subscribers have a consistent way to identify property names.
5. Modify the setters of bound properties to fire a property change event to all registered listeners.
Listing 2.5 shows the modifications (in bold) to class Person to create bound properties for firstname, middlename, lastname, suffix, notes, and gender.
The first step creates a PropertyChangeSupport reference and sets it to null. Next, we create static final Strings for each property name so publishers and subscribers (listeners) can access these Strings instead of the property names directly. (This also lets you use your IDE’s code completion mechanism when accessing the Strings.) Lastly, the getPropertyChangeSupport() method creates a PropertyChangeSupport object the first time it’s invoked. This method is used to add and remove listeners and fire property change events in the setters.
PropertyChangeSupport Thread Safety and Behavior
A PropertyChangeSupport instance is thread safe. (We discuss thread safety and PropertyChangeSupport in more detail. See “Concurrency and Thread Safety” on page 68.) Furthermore, PropertyChangeSupport does not fire a property change event if the property’s old value and new value are the same and non-null.
Listing 2.5 Adding Bound Properties to class Person
package com.asgteach.familytree.model;
import java.beans.PropertyChangeListener;
import java.beans.PropertyChangeSupport;
import java.io.Serializable;
import java.util.Objects;
public final class Person implements Serializable {
private final long id;
private String firstname;
private String middlename;
private String lastname;
private String suffix;
private Person.Gender gender;
private String notes;
private PropertyChangeSupport propChangeSupport = null;
// Property names
public static final String PROP_FIRST = "firstname";
public static final String PROP_MIDDLE = "middlename";
public static final String PROP_LAST = "lastname";
public static final String PROP_SUFFIX = "suffix";
public static final String PROP_GENDER = "gender";
public static final String PROP_NOTES = "notes";
private static long count = 0;
public enum Gender {
MALE, FEMALE, UNKNOWN
}
. . . constructors unchanged . . .
// Convenience method to make sure object is fully constructed
// before passing to PropertyChangeSupport constructor
// (see "Leaking 'this'" on page 32).
private PropertyChangeSupport getPropertyChangeSupport() {
if (this.propChangeSupport == null) {
this.propChangeSupport = new PropertyChangeSupport(this);
}
return this.propChangeSupport;
}
public void addPropertyChangeListener(PropertyChangeListener listener) {
getPropertyChangeSupport().addPropertyChangeListener(listener);
}
public void removePropertyChangeListener(PropertyChangeListener listener) {
getPropertyChangeSupport().removePropertyChangeListener(listener);
}
. . . getters unchanged . . .
public void setNotes(String notes) {
String oldNotes = this.notes;
this.notes = notes;
// oldNotes is oldValue and notes is newValue
getPropertyChangeSupport().firePropertyChange(
PROP_NOTES, oldNotes, notes);
}
public void setFirstname(String firstname) {
String oldFirst = this.firstname;
this.firstname = firstname;
getPropertyChangeSupport().firePropertyChange(
PROP_FIRST, oldFirst, firstname);
}
public void setGender(Person.Gender gender) {
Person.Gender oldGender = this.gender;
this.gender = gender;
getPropertyChangeSupport().firePropertyChange(
PROP_GENDER, oldGender, gender);
}
public void setLastname(String lastname) {
String oldLast = this.lastname;
this.lastname = lastname;
getPropertyChangeSupport().firePropertyChange(
PROP_LAST, oldLast, lastname);
}
public void setMiddlename(String middlename) {
String oldMiddle = this.middlename;
this.middlename = middlename;
getPropertyChangeSupport().firePropertyChange(
PROP_MIDDLE, oldMiddle, middlename);
}
public void setSuffix(String suffix) {
String oldSuffix = this.suffix;
this.suffix = suffix;
getPropertyChangeSupport().firePropertyChange(
PROP_SUFFIX, oldSuffix, suffix);
}
. . . unchanged code omitted . . .
}
Leaking ‘this’
Don’t do this:
private PropertyChangeSupport propChangeSupport =
new PropertyChangeSupport(this);
Such a construct allows the this reference to escape when it is not yet properly constructed, creating an object that isn’t thread safe.
Project PersonAppBound uses property change support, as shown in Listing 2.6. After creating two Person objects, the program supplies a property change listener and event handler. This property change listener accesses the property name and the event source (the object that fired the property change event). You can also access the property change event’s old value with getOldValue() and new value with getNewValue(). (See “Lambda Expressions” on page 38 to see how this listener can be simplified.)
Listing 2.6 Program PersonAppBound
public class PersonAppBound {
public static void main(String[] args) {
Person homer = new Person("Homer", "Simpson", Gender.MALE);
Person marge = new Person("Marge", "Simpson", Gender.FEMALE);
// create a property change listener
final PropertyChangeListener pcl = new PropertyChangeListener() {
@Override
public void propertyChange(PropertyChangeEvent evt) {
System.out.println("Property " + evt.getPropertyName()
+ " changed for " + evt.getSource());
}
};
homer.addPropertyChangeListener(pcl);
marge.addPropertyChangeListener(pcl);
homer.setMiddlename("Chester");
marge.setMiddlename("Louise");
homer.setSuffix("Junior");
homer.setLastname("Jones");
System.out.println(homer);
System.out.println(marge);
// old and new value same, no property change event generated
homer.setMiddlename("Chester");
homer.removePropertyChangeListener(pcl);
marge.removePropertyChangeListener(pcl);
}
}
Output:
Property middlename changed for Homer Chester Simpson
Property middlename changed for Marge Louise Simpson
Property suffix changed for Homer Chester Simpson Junior
Property lastname changed for Homer Chester Jones Junior
Homer Chester Jones Junior
Marge Louise Simpson
Optionally, you can also supply methods to add and remove listeners that are only interested in changes to a specific property, as shown in Listing 2.7. These methods support single-property listeners. When using this add/remove listener pair, listeners will only be notified when the specified property is changed.
Listing 2.7 Single Property Listener Support
public void addPropertyChangeListener(String propertyName,
PropertyChangeListener listener) {
getPropertyChangeSupport().addPropertyChangeListener(
propertyName, listener);
}
public void removePropertyChangeListener(String propertyName,
PropertyChangeListener listener) {
getPropertyChangeSupport().removePropertyChangeListener(
propertyName, listener);
}
Coarse-Grained Notification for JavaBean Objects
CRUD is an acronym for Create, Read, Update, Delete and refers to database-type applications with some sort of persistent store. In a typical CRUD application, you may not care if a particular property has changed. Instead, you may be interested when an object is created, updated, or deleted. In this case, you need some type of manager class that keeps track of your objects. This manager class may simply store objects in memory or it may write objects to a persistent store.
Let’s design a manager class that uses property change support to notify listeners when Person objects are updated, added, or removed. We call this manager class FamilyTreeManager. This is an example of the coarse-grained notification approach we mentioned previously. We’ll retain the code support for a Person’s bound properties. However, changes to a Person’s properties will not generate property change events because we do not register any listeners.
Listing 2.8 shows the FamilyTreeManager class. We could use a database to store Person objects here, but to simplify our example we use a hash map instead.3 The FamilyTreeManager has property change support similar to the property change support you’ve seen in class Person. FamilyTreeManager provides methods for adding, updating, and deleting Person objects. Each of these actions modifies the underlying collection, stores and updates copies of the Person object, and notifies listeners via property change support when changes occur. Note that firePropertyChange() uses null for the old value and Person for the new value as arguments. This makes sure the property change fires, since the old and new values are different. Public static Strings define property names. Both addPerson() and updatePerson() make local copies of the Person argument before modifying the map. A local copy ensures the stored Person object can be modified only through the FamilyTreeManager’s modifier methods.
3. We show a database implementation in Chapter 10 (see “Using CRUD with a Database” on page 501).
FamilyTreeManager provides method getAllPeople() to return a copy of all Person objects stored (as a list), without any kind of sorted ordering.
FamilyTreeManager is a singleton, so users of this class obtain a FamilyTreeManager object through the static factory method getInstance().
Singletons
A singleton class guarantees only one instance of that class object exists. This is typically achieved with a static factory method as shown in Listing 2.8. However, you’ll discover the NetBeans Platform provides a better way to obtain singleton objects (see “Global Lookup” on page 218).
public class FamilyTreeManager {
private final Map<Long, Person> personMap = new HashMap<>();
private PropertyChangeSupport propChangeSupport = null;
// FamilyTreeManager property change names
public static final String PROP_PERSON_DESTROYED = "removePerson";
public static final String PROP_PERSON_ADDED = "addPerson";
public static final String PROP_PERSON_UPDATED = "updatePerson";
private static FamilyTreeManager instance = null;
protected FamilyTreeManager() {
// Exists only to defeat instantiation.
}
public static FamilyTreeManager getInstance() {
if (instance == null) {
instance = new FamilyTreeManager();
instance.propChangeSupport = new PropertyChangeSupport(instance);
}
return instance;
}
public void addPropertyChangeListener(PropertyChangeListener listener) {
this.propChangeSupport.addPropertyChangeListener(listener);
}
public void removePropertyChangeListener(PropertyChangeListener listener) {
this.propChangeSupport.removePropertyChangeListener(listener);
}
public void addPerson(Person p) {
Person person = new Person(p);
personMap.put(person.getId(), person);
this.propChangeSupport.firePropertyChange(
PROP_PERSON_ADDED, null, person);
}
public void updatePerson(Person p) {
Person person = new Person(p);
personMap.put(person.getId(), person);
this.propChangeSupport.firePropertyChange(
PROP_PERSON_UPDATED, null, person);
}
public void deletePerson(Person p) {
Person person = personMap.remove(p.getId());
if (person != null) {
this.propChangeSupport.firePropertyChange(
PROP_PERSON_DESTROYED, null, person);
}
}
public List<Person> getAllPeople() {
List<Person> copyList = new ArrayList<>();
for (Person p : personMap.values()) {
// Make a copy of Person
copyList.add(new Person(p));
}
return copyList;
}
}
Unlike class Person, FamilyTreeManager does not need a private method getPropertyChangeSupport() (see Listing 2.5 on page 30). Instead, FamilyTreeManager uses a static factory method and can therefore supply the fully constructed instance object to the PropertyChangeSupport constructor.
Program PersonAppCoarse uses the FamilyTreeManager, as shown in Listing 2.9. This program defines a property change listener with a propertyChange() event handler. Next, it instantiates a FamilyTreeManager object and adds the previously defined property change listener. The program creates Person objects, adds them to the FamilyTreeManager store, and modifies and updates the Person objects. It then deletes one of the Person objects (marge) and displays the modified collection.
The output shows the results of the propertyChange() event handler calls, as well as the output from the getAllPeople() method.
Listing 2.9 Program PersonAppCoarse
public class PersonAppCoarse {
public static void main(String[] args) {
// Define a property change listener
final PropertyChangeListener pcl = new PropertyChangeListener() {
@Override
public void propertyChange(PropertyChangeEvent evt) {
System.out.println(evt.getPropertyName()
+ " for " + evt.getNewValue());
}
};
FamilyTreeManager ftm = FamilyTreeManager.getInstance();
ftm.addPropertyChangeListener(pcl);
Person homer = new Person("Homer", "Simpson", Person.Gender.MALE);
Person marge = new Person("Marge", "Simpson", Person.Gender.FEMALE);
ftm.addPerson(homer);
ftm.addPerson(marge);
System.out.println(ftm.getAllPeople());
homer.setMiddlename("Chester");
homer.setSuffix("Junior");
ftm.updatePerson(homer);
marge.setMiddlename("Louise");
marge.setLastname("Bouvier-Simpson");
ftm.updatePerson(marge);
System.out.println(ftm.getAllPeople());
ftm.deletePerson(marge);
System.out.println(ftm.getAllPeople());
// delete marge again
ftm.deletePerson(marge);
ftm.removePropertyChangeListener(pcl);
}
}
Output:
addPerson for Homer Simpson
addPerson for Marge Simpson
[Homer Simpson, Marge Simpson]
updatePerson for Homer Chester Simpson Junior
updatePerson for Marge Louise Bouvier-Simpson
[Homer Chester Simpson Junior, Marge Louise Bouvier-Simpson]
removePerson for Marge Louise Bouvier-Simpson
[Homer Chester Simpson Junior]
In summary, this program has the following features:
• The overridden methods toString(), hashCode(), and equals() in class Person let you use Person objects in hash maps and display their data with print statements.
• FamilyTreeManager implements property change support for operations that modify its underlying store.
• FamilyTreeManager is implemented as a singleton.
• FamilyTreeManager makes sure that Person objects stored in its collection are only updated with addPerson(), updatePerson(), and deletePerson(). It also copies the Person collection before returning objects to the caller.
• The application defines a property change listener and propertyChange() event handler and adds this listener to the FamilyTreeManager.
2.2 Lambda Expressions
Java 8 has acquired a major language innovation: lambda expressions. Because lambdas are significant, let’s take a quick detour and show you how lambda expressions help reduce boilerplate code.
What is a lambda? A lambda is an anonymous method. Like a method, it has a parameter list, return type, and function body. However, unlike “regular” methods, the compiler can infer many of these characteristics so you don’t need to completely specify them. You can use lambdas in place of an anonymous inner class when that class has a single abstract method. Interfaces with a single abstract method are called functional interfaces. Let’s look at a few examples.
Lambda Expressions with Functional Interfaces
The program shown in Listing 2.9 on page 36 implements a property change listener as an anonymous inner class. Interface PropertyChangeListener has one abstract method propertyChange() that returns void and has one parameter, PropertyChangeEvent. To override this method with an anonymous inner class, you use
// Define a property change listener
final PropertyChangeListener pcl = new PropertyChangeListener() {
@Override
public void propertyChange(PropertyChangeEvent evt) {
System.out.println(evt.getPropertyName()
+ " for " + evt.getNewValue());
}
};
This anonymous inner class can be converted to a lambda expression as follows.
final PropertyChangeListener pcl = (PropertyChangeEvent evt) -> {
System.out.println(evt.getPropertyName()
+ " for " + evt.getNewValue());
};
Because PropertyChangeListener is a functional interface, the compiler can infer that the lambda expression defines void method propertyChange() with parameter type PropertyChangeEvent. You can further reduce code by omitting the parameter type and, if the method body is a single line of code, the surrounding braces. In fact, you can reduce this code even further when you use the lambda expression with the FamilyTreeManager addPropertyChangeListener() method, as follows.
ftm.addPropertyChangeListener(evt ->
System.out.println(evt.getPropertyName()
+ " for " + evt.getNewValue()));
If you only need to print the PropertyChangeEvent argument (instead of using getPropertyName() and getNewValue()), you can use a method reference. In this case, the compiler supplies the PropertyChangeEvent argument to System.out.println() for you.
// method reference
ftm.addPropertyChangeListener(System.out::println);
Another common functional interface is Runnable. The following pre-Java 8 code instantiates a Swing form (class PersonJFrame), wraps it in a Runnable, and invokes the code on the Swing thread with SwingUtilities.invokeLater(). (We discuss SwingUtilities in more detail in “Swing Basics” on page 40.)
/* Create and display the form */
SwingUtilities.invokeLater(new Runnable() {
public void run() {
PersonJFrame.newInstance().setVisible(true);
}
});
With lambda expressions, this code reduces to the following.
/* Create and display the form */
SwingUtilities.invokeLater(() -> {
PersonJFrame.newInstance().setVisible(true);
});
Since method run() has no parameters, the empty parentheses act as a placeholder. The braces in this example are optional, since the method body is a single statement.
In general, we use lambda expressions in our code examples instead of anonymous inner classes.
Functional Data Structures
Java 8 also has streams or functional data structures. These are data structures with functional interfaces. Let’s develop an example so when you see streams and lambdas in our code examples, you’ll recognize them.
The following example is FamilyTreeManager method getAllPeople() as shown previously in Listing 2.8 on page 35. This method uses a for loop (an external iterator) to copy each element in the map and add it to an array list.
public List<Person> getAllPeople() {
List<Person> copyList = new ArrayList<>();
for (Person p : personMap.values()) {
// Make a copy of Person
copyList.add(new Person(p));
}
return copyList;
}
The Java 8 Stream interface forEach() method provides an internal iterator. The verbose form explicitly instantiates an anonymous inner class with functional interface Consumer, as shown here with the getAllPeople() method.
public List<Person> getAllPeople() {
List<Person> copyList = new ArrayList<>();
personMap.values().forEach(new Consumer<Person>() {
public void accept(Person p) {
copyList.add(new Person(p));
}
});
return copyList;
}
Because Consumer is a functional interface, we can replace the anonymous inner class with a lambda expression, as follows.
public List<Person> getAllPeople() {
List<Person> copyList = new ArrayList<>();
// Use lambda expression
personMap.values().forEach(p -> copyList.add(new Person(p)));
return copyList;
}
Functional data structures (streams) let you use a declarative style of programming. When you want to apply multiple operations on a stream of data, your code becomes more clear. This style also lends itself to easier parallelization.
Our example uses only method forEach() with lambdas, which in itself lets us write more concise code. Other methods (which you can chain together) include filter() (you provide a criterion with a lambda expression), map() (transform an element to a different type), findFirst(), or reduce() (you provide a criterion).
2.3 Swing Basics
Let’s continue our exploration of background basics by examining the Swing graphical user interface (GUI). Swing is part of the Java standard and provides a set of light-weight components based on the JavaBeans model. Knowledge of Swing is important because the NetBeans Platform is based on the Swing GUI. In this section, we’ll introduce these topics.
• Swing threading model
• Java Logging facility
• Swing components and the GUI Form Designer
• Loose-coupling when responding to changes in the model and view
These topics help developers create GUI-based programs that are correct, maintainable, and easily ported to the NetBeans Platform.
We’ll explore each of these concepts with a Swing application called PersonSwingApp. Let’s begin by porting a version of the Person application to Swing; that is, we’ll use the same Person and FamilyTreeManager classes and provide a GUI to display and edit Person objects. We’ll use the NetBeans GUI Builder to compose the look of the application.
Our program will initialize several Person objects and display these in a Swing tree component called JTree. Swing components require a model to hold data that is displayed. Here we’ll use the default model for JTree, called DefaultMutableTreeNode (a JTree model that lets you make modifications to the nodes in the tree).
A JTree provides a selection mechanism, either single selection or multi-selection. We’ll use single selection and display the selected node (Person) in an adjacent panel that lets users edit fields. After editing is complete, the user clicks an Update button to save the changes. (That is, the edited Person object is saved to an in-memory store.)
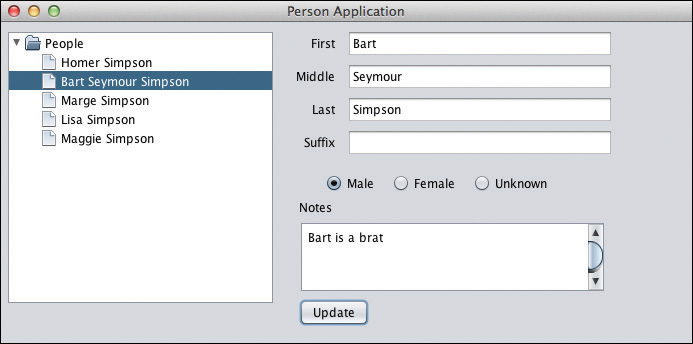
Figure 2.6 shows this application running. On the left you see a JTree component with its top node People and five child nodes. The node for Marge Simpson is selected and Marge Simpson’s properties are displayed in the right-hand panel. This editing panel uses text field components (JTextField) for the firstname, middlename, lastname, and suffix Person properties. A radio button group includes radio buttons (JRadioButton) to select gender. A text area (JTextArea) holds property notes and text labels are displayed with JLabel components.
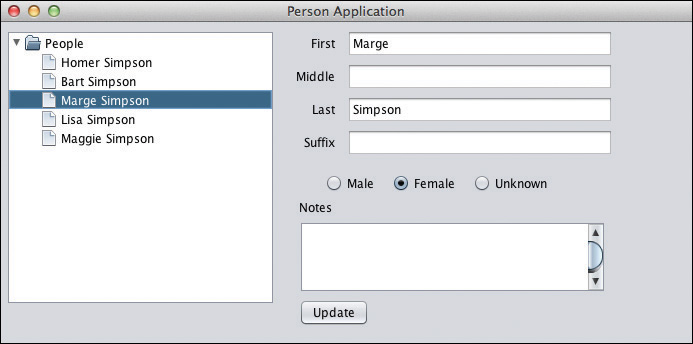
Below this editing area is an Update button (JButton) that the user clicks to update a selected Person object.
Creating a GUI-Form Project
Let’s begin by creating a project with the NetBeans IDE. Follow these steps to create a project and a JFrame (Swing) container.
1. From the NetBeans IDE top-level menu bar, select File | New Project. NetBeans displays the Choose Project dialog. Under Categories select Java and under Projects select Java Application. Click Next.
2. NetBeans displays the Name and Location dialog. For Project Name, specify PersonSwingApp. For Project Location, click Browse and navigate to the desired project location. Uncheck Create Main Class as shown in Figure 2.7 and click Finish.

NetBeans creates an empty Java Application project. You now must add a JFrame container to your project in order to build a Swing-based GUI.
Add a JFrame Container
Follow these steps to add a JFrame container to project PersonSwingApp.
1. From the Projects view window, expand project node PersonSwingApp.
2. Right click on Source Packages and select New | JFrame Form... from the context menu, as shown in Figure 2.8.
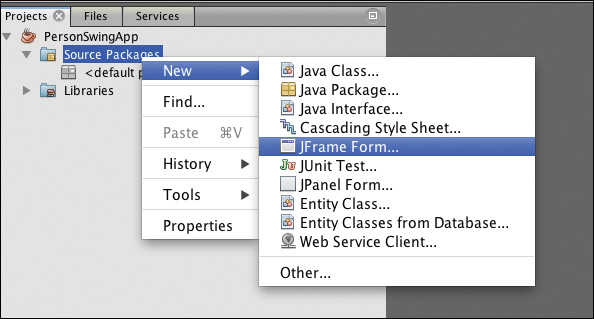
3. NetBeans displays a Name and Location dialog. For Class Name, specify PersonJFrame and for Package, specify personswingapp, as shown in Figure 2.9. Click Finish.

NetBeans creates class PersonJFrame.java and brings up the form in the GUI Builder.
Swing Form Designer
The NetBeans IDE Swing Form Designer is an easy way to design the look of your application. You drag and drop components from the Swing component palette onto the form designer. You can align multiple components using right-justified, center alignment, or left-justified. Alternatively, you can align them using column-wise or row-wise placement.
Figure 2.10 shows the entire form with the components placed. Note that the text field opposite label First is selected (highlighted on the form). This in turn highlights the text field in the Component Navigator window (firstTextField as shown on the left in Figure 2.11) and brings up the component’s Property Editor (as shown on the right in Figure 2.11) .


The Swing Component palette is shown in Figure 2.12.

The form designer generates Java code that instantiates the components and configures their properties. It also generates code to lay out the components according to your placement. You cannot edit the generated code, but you can configure component properties by invoking setters after the component is initialized. You can also provide custom code with the Property Editor.
Listing 2.10 on page 46 shows a portion of the generated code that instantiates and initializes the Swing components for our application.
Listing 2.10 Form Designer Generated Code
// invoked from the constructor
private void initComponents() {
genderButtonGroup = new javax.swing.ButtonGroup();
jScrollPane1 = new javax.swing.JScrollPane();
personTree = new JTree(top);
jPanel1 = new javax.swing.JPanel();
jLabel4 = new javax.swing.JLabel();
jLabel5 = new javax.swing.JLabel();
firstTextField = new javax.swing.JTextField();
middleTextField = new javax.swing.JTextField();
lastTextField = new javax.swing.JTextField();
suffixTextField = new javax.swing.JTextField();
maleButton = new javax.swing.JRadioButton();
femaleButton = new javax.swing.JRadioButton();
unknownButton = new javax.swing.JRadioButton();
jScrollPane2 = new javax.swing.JScrollPane();
notesTextArea = new javax.swing.JTextArea();
updateButton = new javax.swing.JButton();
. . . more code to instantiate components and configure layout . . .
}
Each component placed on the form requires its own variable, as shown in Listing 2.11. The Property Editor lets you specify an alternate name for the variable. Like the code that initializes the components, you cannot edit these component variable declarations directly. Here, we supply meaningful names to all variables that we subsequently access programmatically. We didn’t bother to rename the JLabel components, since they hold text that doesn’t change and we don’t write code to access them.
Listing 2.11 Swing Component Variable Declarations
// Variables declaration - do not modify
private javax.swing.JRadioButton femaleButton;
private javax.swing.JTextField firstTextField;
private javax.swing.ButtonGroup genderButtonGroup;
private javax.swing.JLabel jLabel1;
private javax.swing.JLabel jLabel2;
. . . code omitted . . .
private javax.swing.JTextField suffixTextField;
private javax.swing.JRadioButton unknownButton;
private javax.swing.JButton updateButton;
// End of variables declaration
Working with the NetBeans GUI Form Designer
For more information on working with the NetBeans GUI Form Designer, see this tutorial on the NetBeans IDE web site:
https://netbeans.org/kb/docs/java/quickstart-gui.html
Program Structure
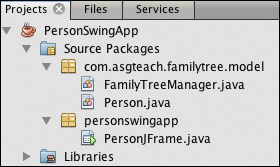
Figure 2.13 shows the project structure in the NetBeans IDE. Classes FamilyTreeManager and Person are located in package com.asgteach.familytree.model and class PersonJFrame (the main application class) is located in package personswingapp.
Before we start throwing methods and variables at you, let’s look at the overall program structure of our main class, PersonJFrame, as shown in Listing 2.12. This class extends JFrame, which is a top-level Swing window.
Next, we define fields or class variables. Variable top is a DefaultMutableTreeNode, which is the root of the JTree model data. Variable ftm is the FamilyTreeManager object (which we initialize with the static factory method getInstance()). Field thePerson contains the currently selected Person. Finally, field logger defines a Logger object (see “Java Logging Facility” on page 51).
The main() method calls factory method newInstance(), which invokes the private constructor. This creates the JFrame window and makes it visible (see “Single-Threaded Model” on page 49 for more on invokeLater()). The Swing Form Designer generates code in initComponents() as well as field declarations for components. This code is not editable in the IDE. Any customized code for the Swing components must follow method initComponents() in the constructor.
We also provide the following three listener classes for program event handling: ActionListener, to respond to Update button clicks, PropertyChangeListener for property change events, and TreeSelectionListener for tree selection changes. We describe these listeners in detail later in this chapter.
Listing 2.12 Overall Program Structure
public class PersonJFrame extends javax.swing.JFrame {
// Class variables
private final DefaultMutableTreeNode top =
new DefaultMutableTreeNode("People");
private final FamilyTreeManager ftm = FamilyTreeManager.getInstance();
private Person thePerson = null;
private static final Logger logger =
Logger.getLogger(PersonJFrame.class.getName());
// private constructor
private PersonJFrame() { . . .}
// factory method
public static PersonJFrame newInstance() { . . . }
// initialize components (generated)
private void initComponents() {
. . .
}
public static void main(String args[]) {
/* Create and display the form */
SwingUtilities.invokeLater(()->
PersonJFrame.newInstance().setVisible(true));
}
// Define listeners
// ActionListener for Update button
private final ActionListener updateListener = (ActionEvent e) -> { . . . };
// PropertyChangeListener for FamilyTreeManager
private final PropertyChangeListener familyTreeListener =
(PropertyChangeEvent evt) -> { . . . };
// TreeSelectionListener for JTree
private final TreeSelectionListener treeSelectionListener =
(TreeSelectionEvent e) -> { . . . };
// Variables declaration - do not modify
// (generated)
private javax.swing.JRadioButton femaleButton;
private javax.swing.JTextField firstTextField;
. . .
}
Let’s now examine the code in main() and explain why we start up our application in a separate thread.
Single-Threaded Model
Swing component objects are not thread safe. Thread safety is achieved by performing all Swing-related operations on a single thread, called the Event Dispatch Thread or EDT. As it turns out, most GUI frameworks are single threaded because it’s difficult to implement components efficiently while accounting for thread safety issues. Therefore, all GUI operations must be performed in the EDT. Normally, this is not an issue; events occur and are handled in the EDT. Components, in turn, are accessed and updated in the EDT. You only have to worry about executing within the EDT if, during execution of a background thread, you need to access the GUI. We’ll cover this scenario later in the chapter.
To help you work with the EDT, Swing has utility method invokeLater(), which guarantees that its run() method executes in the EDT. We use invokeLater() to set up our Swing application from main(), as shown in Listing 2.13. (We can use a lambda expression here since Runnable is a functional interface.)
Listing 2.13 Swing Application main()
public static void main(String args[]) {
/* Create and display the form */
SwingUtilities.invokeLater(()->
PersonJFrame.newInstance().setVisible(true));
}
Note that the initial thread, that is, the thread that creates and begins executing your application, is not the EDT. The above lambda expression instantiates the PersonJFrame object with the static newInstance() method and makes the window frame visible. We use the newInstance() factory method here so that later we can configure listeners in a thread-safe way.
Listing 2.14 shows the code for the constructor and methods configureListeners() and newInstance(). Method configureListeners() is invoked by newInstance() after the constructor returns.
Listing 2.14 Constructing PersonJFrame
private PersonJFrame() { // constructor
// Configure Logger
. . . code omitted . . .
buildData();
initComponents(); // generated by the form builder
personTree.getSelectionModel().setSelectionMode(
TreeSelectionModel.SINGLE_TREE_SELECTION);
createNodes(top);
}
private void configureListeners() {
// Listeners are registered after constructor returns
// for thread safety
ftm.addPropertyChangeListener(familyTreeListener);
personTree.addTreeSelectionListener(treeSelectionListener);
updateButton.addActionListener(updateListener);
}
public static PersonJFrame newInstance() {
PersonJFrame pjf = new PersonJFrame();
pjf.configureListeners();
return pjf;
}
Take another look at the PersonJFrame constructor (Listing 2.14). The constructor invokes method buildData() to initialize our Person objects, and initComponents(), a generated method that initializes the Swing components. After initComponents() completes we configure the Swing component JTree. This provides the tree view in our application and is discussed in more detail later (see “JTree” on page 58).
Listing 2.15 shows the code for buildData(). (We also log the collection returned by FamilyTreeManager’s getAllPeople().)
Listing 2.15 Method buildData()
// Add Person objects to FamilyTreeManager
private void buildData() {
ftm.addPerson(new Person("Homer", "Simpson", Person.Gender.MALE));
ftm.addPerson(new Person("Marge", "Simpson", Person.Gender.FEMALE));
ftm.addPerson(new Person("Bart", "Simpson", Person.Gender.MALE));
ftm.addPerson(new Person("Lisa", "Simpson", Person.Gender.FEMALE));
ftm.addPerson(new Person("Maggie", "Simpson", Person.Gender.FEMALE));
logger.log(Level.FINE, ftm.getAllPeople().toString());
}
Java Logging Facility
Listing 2.12 on page 48 instantiates a Logger object in the PersonJFrame.java class as follows.
private static final Logger logger =
Logger.getLogger(PersonJFrame.class.getName());
A logging facility, especially in large, complex applications, is helpful in generating messages with relevant information during debugging and testing phases. At later stages of program development, you can remove this output since it often clutters the console and is probably not meaningful to the user. By assigning different levels to logging output, you can control which log records appear on the console. Furthermore, you can direct logging to a file, filter records, and format log records.
Table 2.1 shows the logging levels, from highest to lowest. By default the standard logging facility sends all log messages of level INFO and higher to the console. Thus, any debugging-type log messages should be at level CONFIG or lower.

To see log messages at levels lower than the standard threshold of INFO, you need to set both the logging level and the log handler level. You can also add additional handlers. For example, the logging API provides a FileHandler that sends log messages to a file.
Our example application configures two handlers in the constructor, as shown in Listing 2.16. One handler (handler) directs log messages of FINE or higher to the console. A second handler (fileHandler) writes log messages to a default file (javaN.log in the user’s home directory).
Listing 2.16 Java Logging and Handler Configuration
public class PersonJFrame extends javax.swing.JFrame {
. . . other class variables . . .
private PersonJFrame() {
// Configure Logger: set its level to FINE
// (default threshold level is CONFIG)
logger.setLevel(Level.FINE);
// Define a handler to display messages on the console
// Set level to FINE
Handler handler = new ConsoleHandler();
handler.setLevel(Level.FINE);
logger.addHandler(handler);
// Define a second handler to write messages to a file
try {
FileHandler fileHandler = new FileHandler();
// records sent to file javaN.log in user's home directory
fileHandler.setLevel(Level.FINE);
logger.addHandler(fileHandler);
logger.log(Level.FINE, "Created File Handler");
} catch (IOException | SecurityException ex) {
logger.log(Level.SEVERE, "Couldn't create FileHandler", ex);
}
. . . code omitted . . .
}
}
You can also build log messages with parameters. Here {0} is a placeholder for variable node in this log message.
logger.log(Level.FINE, "Node updated: {0}", node);
We have several log statements throughout our program. As Listing 2.16 shows, log messages are also useful in catch handlers. (Catch handler log messages will typically be level SEVERE or WARNING.)
Listing 2.17 shows messages that appear in the File Handler’s log file for our application. All levels here are FINE and the message text is bold for clarity.
Listing 2.17 Log File Output (XML format)
<?xml version="1.0" encoding="UTF-8" standalone="no"?>
<!DOCTYPE log SYSTEM "logger.dtd">
<log>
<record>
<date>2013-05-18T09:29:16</date>
<millis>1368894556261</millis>
<sequence>0</sequence>
<logger>personswingapp.PersonJFrame</logger>
<level>FINE</level>
<class>personswingapp.PersonJFrame</class>
<method><init></method>
<thread>13</thread>
<message>Created File Handler</message>
</record>
<record>
<date>2013-05-18T09:29:16</date>
<millis>1368894556362</millis>
<sequence>1</sequence>
<logger>personswingapp.PersonJFrame</logger>
<level>FINE</level>
<class>personswingapp.PersonJFrame</class>
<method>buildData</method>
<thread>13</thread>
<message>
[Homer Simpson, Bart Simpson, Marge Simpson, Lisa Simpson, Maggie Simpson]
</message>
</record>
<record>
<date>2013-05-18T09:29:26</date>
<millis>1368894566117</millis>
<sequence>2</sequence>
<logger>personswingapp.PersonJFrame</logger>
<level>FINE</level>
<class>personswingapp.PersonJFrame$4</class>
<method>valueChanged</method>
<thread>13</thread>
<message>Bart Simpson selected</message>
</record>
<record>
<date>2013-05-18T09:29:31</date>
<millis>1368894571564</millis>
<sequence>3</sequence>
<logger>personswingapp.PersonJFrame</logger>
<level>FINE</level>
<class>personswingapp.PersonJFrame$3</class>
<method>propertyChange</method>
<thread>13</thread>
<message>Node updated: Bart Seymour Simpson</message>
</record>
</log>
Listing 2.18 shows the same messages as they appear on the console (again, each message text is bold).
Listing 2.18 Logging Messages on the Console
run:
May 18, 2013 9:29:16 AM personswingapp.PersonJFrame <init>
FINE: Created File Handler
May 18, 2013 9:29:16 AM personswingapp.PersonJFrame buildData
FINE: [Homer Simpson, Bart Simpson, Marge Simpson, Lisa Simpson, Maggie Simp-
son]
May 18, 2013 9:29:26 AM personswingapp.PersonJFrame$4 valueChanged
FINE: Bart Simpson selected
May 18, 2013 9:29:31 AM personswingapp.PersonJFrame$3 propertyChange
FINE: Node updated: Bart Seymour Simpson
Using Swing Components
A discussion of the Swing components and all their APIs would fill an entire book. Our goal here is to familiarize you with some frequently used components (specifically, those that appear in our example program). Swing also has layout components that handle the arrangement of components within a window. The advantage of using the Swing Form Designer, however, is that you can use a drag-and-drop editor to arrange your components.
Figure 2.14 shows a partial class hierarchy of Swing components. Note that most components descend from JComponent, which includes many methods that control appearance, such as font, background color, foreground color, border, and opacity.
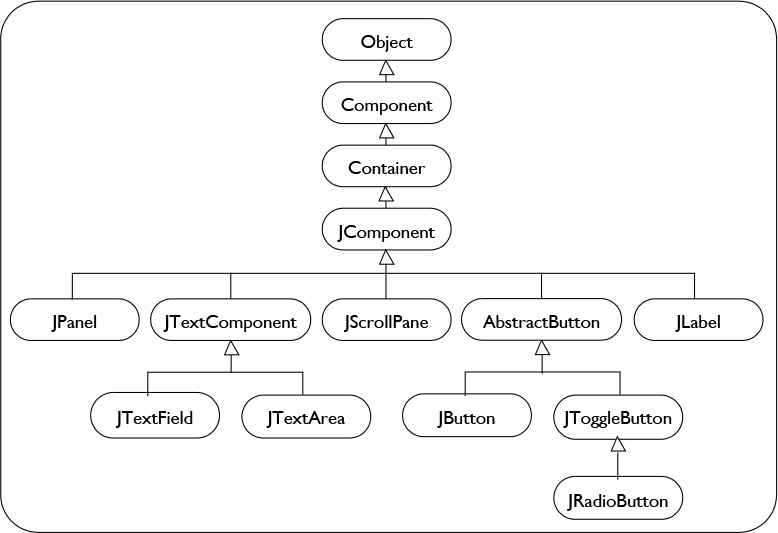
Our program uses JLabel components to hold static text and JTextField components to edit text.
JLabel
JLabel holds text that users don’t edit, although you can change the text programmatically. Here’s the code that defines a JLabel that displays “First.”
javax.swing.JLabel jLabel1 = new javax.swing.JLabel();
jLabel1.setText("First");
JLabel components can be more nuanced than the above code indicates. You can use both images (icons) and text with labels, format label text with HTML, and configure their appearance with JComponent methods setFont(), setForeground(), setBorder(), setOpaque(), and setBackground(). You can also connect a label with another component (such as a JTextField) that lets the associated component affect the label’s appearance. For this purpose, use method setLabelFor() to associate a label with another component.
We use JLabel to display the static text in our Swing application, as shown in Figure 2.6 on page 42.
JTextField
JTextField lets users edit text within a single-line field. Use method setText() to write a text field’s text and getText() to read its contents. If the user hits the Enter or Return key, JTextField generates an Action event. The underlying model for JTextField is Document, which lets you listen for insert, delete, and replace edit operations. For our current example, however, we don’t respond to any events and simply use getText() and setText() to keep our model data synchronized with the text fields.
Here’s the code for the text field that holds the Person property firstname and sets its value from a Person object (thePerson).
JTextField firstTextField = new javax.swing.JTextField();
firstTextField.setText(thePerson.getFirstname());
And here’s the code to update a Person object (thePerson) from the text field.
thePerson.setFirstname(firstTextField.getText());
JTextArea
While JTextField is useful for single-line input, JTextArea lets you provide multi-line input. We use JTextArea to edit the Person notes property and let the user provide multi-line input. Similar to JTextField, use setText() to write the text and getText() to read the text area’s text.
JTextArea notesTextArea = new javax.swing.JTextArea();
// set the text in the text area
notesTextArea.setText(thePerson.getNotes());
// get the text from the text area
thePerson.setNotes(notesTextArea.getText());
JRadioButton
JRadioButtons provide an on/off toggle. Radio buttons placed together in a radio button group provide mutually exclusive behavior. This means only one radio button can be selected at once. When you select a different radio button, the other radio buttons in the same group automatically turn “off.” We use this mutually exclusive behavior to determine a person’s gender. The value can be only one of male, female, or unknown.
Here’s the code that defines the three gender radio buttons, the gender radio button group, and the code that initializes them. The ButtonGroup component provides mutually exclusive behavior for the radio button components.
// Define the ButtonGroup
ButtonGroup genderButtonGroup = new javax.swing.ButtonGroup();
// Define the three JRadioButtons
JRadioButton maleButton = new javax.swing.JRadioButton();
JRadioButton femaleButton = new javax.swing.JRadioButton();
JRadioButton unknownButton = new javax.swing.JRadioButton();
// Add the radiobuttons to the ButtonGroup
genderButtonGroup.add(maleButton);
maleButton.setText("Male");
genderButtonGroup.add(femaleButton);
femaleButton.setText("Female");
genderButtonGroup.add(unknownButton);
unknownButton.setText("Unknown");
The setSelected() and isSelected() methods set and query a JRadioButton. Here, we set the radio buttons from a Person object’s gender property.
if (thePerson.getGender().equals(Gender.MALE)) {
maleButton.setSelected(true);
} else if (thePerson.getGender().equals(Gender.FEMALE)) {
femaleButton.setSelected(true);
} else if (thePerson.getGender().equals(Gender.UNKNOWN)) {
unknownButton.setSelected(true);
}
JButton
JButton components provide a graphic that is “pushed” when the user clicks the button. You create buttons with a text label or an icon label (image) or both. Buttons can be programmatically enabled and disabled, and you typically define an action event handler to process button clicks. Here is how we use the Update button in our example program.
// Create a JButton with text "Update"
JButton updateButton = new javax.swing.JButton("Update");
// we begin with the update button disabled
updateButton.setEnabled(false);
// later we enable the button
updateButton.setEnabled(true);
// define an action event handler that is invoked
// when the button is clicked
updateButton.addActionListener((ActionEvent e) -> {
// do something
});
JTree
The JTree component displays hierarchical information. JTree provides graphical handles that let you expand tree nodes as well as compress them. The tree displays data from a model. We use Swing’s default model in our example program, which consists of a root or top node and children nodes. Children nodes can themselves have child nodes, or they can be “leaf” nodes (no children).
The hierarchy in our example is very simple. The top node is a String (“People”) with five child nodes, which are all leaf nodes. Each child node is a Person object. The JTree uses an object’s toString() method for display. Here’s the code to construct the JTree model and the JTree.
// Define the top node
DefaultMutableTreeNode top =
new DefaultMutableTreeNode("People");
// Create the JTree with node top
JTree personTree = new JTree(top);
// Set the selection model to single (that is, not multi-select)
personTree.getSelectionModel().setSelectionMode(
TreeSelectionModel.SINGLE_TREE_SELECTION);
// Build the JTree model using FamilyTreeManager getAllPeople()
ftm.getAllPeople().forEach(p -> top.add(new DefaultMutableTreeNode(p)));
Here’s how to access the selected node.
// Get the selected node
DefaultMutableTreeNode node = (DefaultMutableTreeNode)
personTree.getLastSelectedPathComponent();
You can access the object in a node with method getUserObject(). Here we check to make sure the selected node is a “leaf” node, since all the Person objects (in our example) are stored in leaf nodes.
if (node == null) {
// no node is selected
} else if (node.isLeaf()) {
// it's a child node, so we know it's a Person object
// get the node's user object
Person person = (Person) node.getUserObject();
// do something with person
} else {
// it's not a leaf node, so it must be the top node
}
Event Handlers and Loose Coupling
Now that we’ve described our model data and view (the Swing components), let’s examine how the program interacts. Based on user interactions, we have three different kinds of events and three event handlers to process these events.
Our program begins with the JTree component collapsed (showing only the top node People) and the Update button disabled. When the user expands the JTree, the rest of the nodes appear showing Person objects for Homer, Marge, Bart, Lisa, and Maggie. The user can now select one of these nodes or even the top node. Figure 2.15 shows the sequence of a collapsed JTree component, an expanded JTree component, and finally the JTree component with node Bart Simpson selected.

When the user selects a Person node, the Update button is enabled and the Person’s data appear in the Edit area. More precisely, when the user selects a node, the TreeSelection event handler is invoked, as shown in Listing 2.19.
In the event handler lambda expression, we get the selected node and if it’s null, disable the Update button and return.
If the node is a leaf node, the user has selected a Person object (such as Bart Simpson in Figure 2.15). We grab the selected Person object and invoke method editPerson(), which in turn calls updateForm().
Method updateForm() copies the Person properties to the appropriate text fields, radio buttons, and text area for editing. The method also enables the Update button. Now the user can edit and update the Person object.
Listing 2.19 Handling JTree Selection Changes
// TreeSelectionListener for JTree
private final TreeSelectionListener treeSelectionListener =
(TreeSelectionEvent e) -> {
DefaultMutableTreeNode node = (DefaultMutableTreeNode)
personTree.getLastSelectedPathComponent();
if (node == null) {
updateButton.setEnabled(false);
return;
}
if (node.isLeaf()) {
Person person = (Person) node.getUserObject();
logger.log(Level.FINE, "{0} selected", person);
editPerson(person);
} else {
updateButton.setEnabled(false);
}
};
private void editPerson(Person person) {
thePerson = person;
updateForm();
}
private void updateForm() {
firstTextField.setText(thePerson.getFirstname());
middleTextField.setText(thePerson.getMiddlename());
lastTextField.setText(thePerson.getLastname());
suffixTextField.setText(thePerson.getSuffix());
if (thePerson.getGender().equals(Gender.MALE)) {
maleButton.setSelected(true);
} else if (thePerson.getGender().equals(Gender.FEMALE)) {
femaleButton.setSelected(true);
} else if (thePerson.getGender().equals(Gender.UNKNOWN)) {
unknownButton.setSelected(true);
}
notesTextArea.setText(thePerson.getNotes());
updateButton.setEnabled(true);
}
Figure 2.16 shows the application as the user edits Bart Simpson fields. Note that the Update button is enabled and several fields have been modified.

When the user clicks the Update button, the button’s action event handler is invoked. Listing 2.20 shows this method. We gather all of the information in the text fields, radio buttons, and notes text area and update our Person object. We then use the FamilyTreeManager to update the Person object in the FamilyTreeManager store.
Listing 2.20 Handle Update Button
// ActionListener for Update button
private final ActionListener updateListener = (ActionEvent e) -> {
updateModel();
ftm.updatePerson(thePerson);
};
// Get all the data from the components
private void updateModel() {
thePerson.setFirstname(firstTextField.getText());
thePerson.setMiddlename(middleTextField.getText());
thePerson.setLastname(lastTextField.getText());
thePerson.setSuffix(suffixTextField.getText());
if (maleButton.isSelected()) {
thePerson.setGender(Gender.MALE);
} else if (femaleButton.isSelected()) {
thePerson.setGender(Gender.FEMALE);
} else if (unknownButton.isSelected()) {
thePerson.setGender(Gender.UNKNOWN);
}
thePerson.setNotes(notesTextArea.getText());
}
After the Update button’s action handler finishes, the edited Person (in this case Bart Simpson) is saved in the FamilyTreeManager store. As a result, the JTree component updates its view and shows the modified Bart Simpson, as shown in Figure 2.17.
How the JTree correctly displays the underlying Person model is perhaps the most important architectural take-away from this chapter. The JTree component updates its model because we’ve defined a property change listener that listens for changes to the FamilyTreeManager. While we could have put the JTree model update code inside the Update button’s event handler (see Listing 2.20), this would be wrong! Why? Because the JTree model should not be coupled with the Update button’s code. The JTree model’s only job is to make itself consistent with the FamilyTreeManager’s Person objects. How the Person objects are modified (via an Update button or from some other as yet undefined action) should not be relevant.
Indeed, as you begin using the NetBeans Platform, you’ll see that it’s possible for one (independently executing) module to modify model data and a separate module to reflect these changes. The editing code is not aware of the display code and vice versa. This makes the modules loosely coupled. Making modifications to the editing code (for example, replacing the Update button with a Save menu item) should not affect the code that displays the data. Thus, property change events are a powerful mechanism for communicating among otherwise non-connected objects.
Here, both the Update button and the JTree model are dependent on the FamilyTreeManager, but neither of these is dependent on each other.
Listing 2.21 shows the FamilyTreeManager property change listener. The method gets the updated Person object from the PropertyChangeEvent and searches the JTree model to find the target node. Method setUserObject() updates the JTree model and method nodeChanged() lets the JTree model know which node has been updated so that the JTree component can refresh itself.
Not only does the Update button event handler have no code to update the JTree model, the property change listener in Listing 2.21 has no code that deals with any of the components (text fields, radio buttons, and text area) that provide the Update button with new property values for Person. As you can see, event handlers help keep your code loosely coupled.
Listing 2.21 PropertyChangeListener for FamilyTreeManager
private final PropertyChangeListener familyTreeListener =
(PropertyChangeEvent evt) -> {
if (evt.getNewValue() != null && evt.getPropertyName().equals(
FamilyTreeManager.PROP_PERSON_UPDATED)) {
Person person = (Person) evt.getNewValue();
DefaultTreeModel model = (DefaultTreeModel) personTree.getModel();
for (int i = 0; i < model.getChildCount(top); i++) {
DefaultMutableTreeNode node = (DefaultMutableTreeNode)
model.getChild(top, i);
if (person.equals(node.getUserObject())) {
node.setUserObject(person);
// Let the model know we made a change
model.nodeChanged(node);
logger.log(Level.FINE, "Node updated: {0}", node);
break;
}
}
}
};
2.4 Improving the User Experience
The application we showed you in the previous section is very basic. When the user selects different Person nodes, the Update button is enabled, even if the user has not actually made edits to the Person. Furthermore, if the user selects the top node (“People”), the previously selected Person still appears in the Editing panel.
In this section, we’ll make improvements to the user interface and in the process discover more useful features of the Swing GUI and its components. We’ll make the following changes to the application.
• Enable the Update button only after the user makes at least one edit to the Person displayed in the Editing panel. (Why update the Person if you haven’t made any edits?)
• After the user clicks the Update button to save changes, disable the Update button (until the user makes further edits).
• If the user selects a different Person in the JTree component, disable the Update button (even if changes have been made to the currently displayed Person).
• If the user selects the top node, clear the Editing form and disable the Update button. This provides the expected feedback to the user.
Figure 2.18 shows the Editing panel when the user first selects a Person from the JTree component (here the user selects Bart Simpson, shown on the left side). The Update button is initially disabled, but after the user makes the first edit, the Update button becomes enabled (as shown on the right side).

These improvements require that we listen for changes in the text fields and the text area as soon as the first keystroke is detected. We don’t care what edits the user makes, only that a change has occurred.
We must also listen for selection changes in the radio buttons and enable the Update button when a change occurs.
To do all this requires additional event handlers for these listeners. We need a method to clear the form, and we must make sure that we don’t start listening for changes before the Editing panel is fully initialized with all of its values.
Let’s begin with a boolean class variable called changeOK to regulate when we listen for changes, as shown in Listing 2.22.
Listing 2.22 New PersonJFrame Class Variables
public class PersonJFrame extends javax.swing.JFrame {
private final DefaultMutableTreeNode top =
new DefaultMutableTreeNode("People");
private final FamilyTreeManager ftm = FamilyTreeManager.getInstance();
Person thePerson = null;
private static final Logger logger =
Logger.getLogger(PersonJFrame.class.getName());
private boolean changeOK = false;
. . . code omitted . . .
Next, we provide code that clears the Editing panel, as shown in Listing 2.23. This code disables the Update button, sets boolean changeOK to false, and sets all the text fields and text area to empty strings. We set the selected property of all the radio buttons to false and call clearSelection() on the radio button group.
Listing 2.23 Method clearForm()
private void clearForm() {
updateButton.setEnabled(false);
changeOK = false;
firstTextField.setText("");
middleTextField.setText("");
lastTextField.setText("");
suffixTextField.setText("");
maleButton.setSelected(false);
femaleButton.setSelected(false);
unknownButton.setSelected(false);
genderButtonGroup.clearSelection();
notesTextArea.setText("");
}
Once the user selects a Person to edit, we initialize the Editing panel using method updateForm(). The changes include code that disables the Update button and toggles the changeOK boolean. Listing 2.24 shows the new updateForm() method with the changes shown in bold.
Listing 2.24 Method updateForm()
private void updateForm() {
changeOK = false;
updateButton.setEnabled(false);
firstTextField.setText(thePerson.getFirstname());
middleTextField.setText(thePerson.getMiddlename());
lastTextField.setText(thePerson.getLastname());
suffixTextField.setText(thePerson.getSuffix());
if (thePerson.getGender().equals(Gender.MALE)) {
maleButton.setSelected(true);
} else if (thePerson.getGender().equals(Gender.FEMALE)) {
femaleButton.setSelected(true);
} else if (thePerson.getGender().equals(Gender.UNKNOWN)) {
unknownButton.setSelected(true);
}
notesTextArea.setText(thePerson.getNotes());
changeOK = true;
}
The Editing panel is now ready to detect changes. When any of the listener event handlers are invoked, these methods make a call to the modify() method, which enables the Update button (see Listing 2.25).
private void modify() {
updateButton.setEnabled(true);
}
We make a similar change to method updateModel(), as shown in Listing 2.26.
Listing 2.26 Method updateModel()
private void updateModel() {
if (!changeOK) {
return;
}
updateButton.setEnabled(false);
thePerson.setFirstname(firstTextField.getText());
. . . code unchanged . . .
}
Now let’s show you the new listeners. First, in order to detect changes to the underlying text in text-based components (such as JTextField and JTextArea), you write DocumentListeners and add these listeners to the underlying Documents of text-based components.
JTextComponent
Note that both JTextField and JTextArea derive from abstract class JTextComponent (see Figure 2.14 on page 55). JTextComponents provide an underlying model called Document to manipulate text. You use DocumentListeners to respond to changes in the Document model.
Listing 2.27 shows the DocumentListener we use to detect changes in the underlying text for the text-based components. DocumentListeners must provide implementations for methods insertUpdate(), removeUpdate(), and changeUpdate() to handle insertions, deletions, and changes to the underlying Document model. In each of these event handlers, we make sure that the Editing panel is ready to listen for changes before we call method modify().
Listing 2.27 DocumentListener for Text Components
// DocumentListener for text fields and text area
private DocumentListener docListener = new DocumentListener() {
@Override
public void insertUpdate(DocumentEvent evt) {
if (changeOK) {
modify();
}
}
@Override
public void removeUpdate(DocumentEvent evt) {
if (changeOK) {
modify();
}
}
@Override
public void changedUpdate(DocumentEvent evt) {
if (changeOK) {
modify();
}
}
};
Changes to the radio button selection status is detected with ActionListeners. Listing 2.28 shows the ActionListener we use for the radio buttons.
Listing 2.28 ActionListener for Radio Buttons
// ActionListener for Radio Buttons
private final ActionListener radioButtonListener = (ActionEvent e) -> {
if (changeOK) {
modify();
}
};
The final change includes adding these new listeners to the respective components. We add listeners to the components in method configureListeners(). Here’s the modified configureListeners() method, as shown in Listing 2.29. The changes are shown in bold. Note that we attach the listener to the text components’ Document model using text component method getDocument().
Listing 2.29 Method configureListeners()
private void configureListeners() {
// Listeners are registered after constructor returns
// for thread safety
ftm.addPropertyChangeListener(familyTreeListener);
personTree.addTreeSelectionListener(treeSelectionListener);
updateButton.addActionListener(updateListener);
// add document listeners to text fields, text area
firstTextField.getDocument().addDocumentListener(this.docListener);
middleTextField.getDocument().addDocumentListener(this.docListener);
lastTextField.getDocument().addDocumentListener(this.docListener);
suffixTextField.getDocument().addDocumentListener(this.docListener);
notesTextArea.getDocument().addDocumentListener(this.docListener);
// add action listeners to radiobuttons
maleButton.addActionListener(this.radioButtonListener);
femaleButton.addActionListener(this.radioButtonListener);
unknownButton.addActionListener(this.radioButtonListener);
}
Our Swing application (called PersonSwingAppEnhancedUI) now has a nicely responsive UI, and the Update button is enabled only when it makes sense to save changes to the underlying model.
2.5 Concurrency and Thread Safety
Before we demonstrate how concurrency works with Swing and make modifications to our Swing application to support execution of background threads, let’s discuss concurrency and thread safety. Some thread safety issues are a result of using Swing (which is not thread safe) in a multi-threaded execution environment, and others are basic concurrency principles that apply even when you’re not using Swing. Let’s discuss these issues now. After we prepare our application to run safely in a multi-threaded environment, we’ll modify the code so that the Update button event handler code runs in a background thread.
Thread-Safe Objects
If your execution environment is multi-threaded, then you need to use objects that are thread safe. An excellent reference on thread safety is Java Concurrency in Practice by Brian Goetz (Addison-Wesley, 2006) as well as Effective Java, Second Edition by Joshua Bloch (Addison-Wesley, 2008).
Thread safety can be achieved several ways. You can work with immutable objects, for instance, or mutable objects that are thread safe. You can also achieve thread safety with objects that are contained within a call stack frame or in a single thread (this is how Swing works).
Both Person and FamilyTreeManager require scrutiny to use them in a multi-threaded environment. Let’s begin with Person, which is a mutable object. To achieve thread safety with Person objects, we’ll use thread containment. That is, we will only invoke setters on a Person object in the EDT. Any Person object used on a background thread will be an exclusive copy. We’ll show you this code when we describe the update action, which will now execute on a background thread.
Let’s discuss the changes required to make the FamilyTreeManager class thread safe.
SwingPropertyChangeSupport
Since we have a multi-threaded Swing application, we want to make sure property change events fire on the EDT (because their event handlers access Swing components). To do this, we’ll replace PropertyChangeSupport with SwingPropertyChangeSupport and call its constructor with true as the second argument. With this modification, SwingPropertyChangeSupport ensures that property change events fire on the EDT. We use SwingPropertyChangeSupport with the FamilyTreeManager class.
ConcurrentHashMap
We use thread-safe ConcurrentHashMap instead of HashMap (HashMap is not thread safe). Next, we use synchronized with static factory method getInstance(). (Since method getInstance() is static, the lock is on the class.) This method needs to be synchronized because of the check and set, which is not atomic.
Synchronized Methods
We provide synchronization for the three FamilyTreeManager modifier methods: addPerson(), updatePerson(), and deletePerson(). The firePropertyChange() method is outside the synchronize block since we’re using SwingPropertyChangeSupport, which fires property change events on the Swing EDT. Method getAllPeople() is also synchronized. It performs a deep copy of the map, creating an ArrayList to return to the caller. Listing 2.30 shows the changes to class FamilyTreeManager in bold.
Listing 2.30 Thread-Safe FamilyTreeManager
public class FamilyTreeManager {
private final ConcurrentMap<Long, Person> personMap =
new ConcurrentHashMap<>();
// PropertyChangeSupport and SwingPropertyChangeSupport are thread safe
private SwingPropertyChangeSupport propChangeSupport = null;
// FamilyTreeManager property change names
public static final String PROP_PERSON_DESTROYED = "removePerson";
public static final String PROP_PERSON_ADDED = "addPerson";
public static final String PROP_PERSON_UPDATED = "updatePerson";
private static FamilyTreeManager instance = null;
protected FamilyTreeManager() {
// Exists only to defeat instantiation.
}
// Thread-safe lazy initialization
public synchronized static FamilyTreeManager getInstance() {
if (instance == null) {
instance = new FamilyTreeManager();
instance.propChangeSupport =
new SwingPropertyChangeSupport(instance, true);
}
return instance;
}
public void addPropertyChangeListener(PropertyChangeListener listener) {
this.propChangeSupport.addPropertyChangeListener(listener);
}
public void removePropertyChangeListener(PropertyChangeListener listener) {
this.propChangeSupport.removePropertyChangeListener(listener);
}
public void addPerson(Person p) {
Person person;
synchronized (this) {
person = new Person(p);
personMap.put(person.getId(), person);
}
this.propChangeSupport.firePropertyChange(
PROP_PERSON_ADDED, null, person);
}
public void updatePerson(Person p) {
Person person;
synchronized (this) {
person = new Person(p);
personMap.put(person.getId(), person);
}
this.propChangeSupport.firePropertyChange(
PROP_PERSON_UPDATED, null, person);
}
public void deletePerson(Person p) {
Person person;
synchronized (this) {
person = personMap.remove(p.getId());
if (person == null) {
return;
}
}
this.propChangeSupport.firePropertyChange(
PROP_PERSON_DESTROYED, null, person);
}
public synchronized List<Person> getAllPeople() {
List<Person> copyList = new ArrayList<>();
personMap.values().forEach(p -> copyList.add(new Person(p)));
return copyList;
}
}
Adding Listeners and Thread Safety
A common mistake with thread safety is to use reference this as an argument to a method inside a constructor. This creates a leaking “this” reference, because the reference is not fully initialized until after the constructor returns. There are various techniques to fix this problem. In the FamilyTreeManager class, for example, the static factory method getInstance() invokes the constructor first. It then provides the returned reference (instance) for the PropertyChangeSupport instantiation as follows.
. . .
// thread safe
instance = new FamilyTreeManager();
instance.propChangeSupport = new PropertyChangeSupport(instance);
. . .
Similarly, in our Swing application, we use a static newInstance() method to call the PersonJFrame constructor and then set the listeners after the constructor is fully initialized. Listing 2.31 shows the code for PersonSwingApp, a Swing program that safely configures listeners.
Listing 2.31 PersonSwingApp class PersonJFrame
public class PersonJFrame extends javax.swing.JFrame {
. . .
private PersonJFrame() { // constructor
// Configure Logger
. . . code omitted . . .
buildData();
initComponents();
personTree.getSelectionModel().setSelectionMode(
TreeSelectionModel.SINGLE_TREE_SELECTION);
createNodes(top);
}
private void configureListeners() {
// Listeners are registered after constructor returns
// for thread safety
ftm.addPropertyChangeListener(familyTreeListener);
personTree.addTreeSelectionListener(treeSelectionListener);
updateButton.addActionListener(updateListener);
}
public static PersonJFrame newInstance() {
PersonJFrame pjf = new PersonJFrame(); // call the constructor
pjf.configureListeners(); // safely configure listeners
return pjf;
}
. . . code omitted . . .
}
Another thread-safe technique to add listeners is callback methods; that is, methods invoked by a caller after the object is constructed. For example, in the NetBeans Platform you typically add listeners in the TopComponent life cycle method componentOpened() and remove listeners in method componentClosed(). (See “Window System Life Cycle Management” on page 369.)
Concurrency in Swing
Because you typically create background tasks in Swing applications to execute long-running tasks, Swing provides several static methods to manage threads, all callable with SwingUtilities.
• invokeLater()
public static void invokeLater(Runnable doRun)
Executes doRun.run() asynchronously on the EDT. This happens after all pending AWT/Swing events have been processed.
public static void invokeAndWait(Runnable doRun)
throws InterruptedException,
InvocationTargetException
Executes doRun.run() synchronously on the EDT. This call blocks until all pending AWT events have been processed and doRun.run() returns. Be very careful using this method, since a block can potentially cause a deadlock.
• isEventDispatchThread()
public static boolean isEventDispatchThread()
Returns true if the current thread is the event dispatching thread. Use this method when you need to execute code on the EDT, but you could be executing in a background thread.
2.6 Swing Background Tasks
Let’s now turn our attention to background threads in Swing applications that execute potentially long-running tasks. Since Swing uses a single-threaded model, it’s important that event handlers execute quickly. While an event handler is executing (always on the EDT), the EDT is not processing subsequent user input. If an event handler results in a long-running task, the UI will temporarily freeze since no processing of user input can occur until the task finishes. Project PersonSwingAppMultiThread takes our example Swing application and executes the Update button in a background thread.
Introducing SwingWorker
Long-running tasks should run in background threads. Swing provides a helper class to launch background threads called SwingWorker. Listing 2.32 shows how to use SwingWorker to save updated Person objects in a background thread.
Testing Background Threads
To simulate a long-running task, we’ll use Thread.sleep() in method doInBackground(). This technique helps test how long-running background threads affect your application.
Listing 2.32 shows the Update button’s modified event handler, which is invoked on the EDT. Before leaving the EDT, you execute any code that updates or accesses GUI components. Here, we invoke updateModel(), which synchronizes the Person (model) object with the Swing component text fields, radio buttons, and text area. We then make a copy of the Person object, field thePerson.
Concurrency Tip
Making a copy of thePerson is crucial for correct behavior. Without a copy in the background thread, the wrong Person object might be saved if the user selects a different Person in the JTree component. In general, don’t access mutable class fields in background threads without first making a copy.
Generic class SwingWorker provides two parameterized types. The first type (Person) is the return type for methods doInBackground() and get(). The object returned by doInBackground() is accessible with get() when the background task completes. The second parameterized type applies to periodically published values. This is useful when long-running tasks publish partial results. Here, we use Void, since we don’t publish partial results. See “Monitoring SwingWorker Status” on page 76 for an example of SwingWorker that publishes periodic results.
Put code inside method doInBackground() that should execute in a background thread. Here we call ftm.updatePerson() to save the modified Person object with the FamilyTreeManager.
Concurrency and Property Change Events
Recall that method updatePerson() fires a property change event to FamilyTreeManager property change listeners. Because we’re invoking updatePerson() in a background thread, we use SwingPropertyChangeSupport to fire the property change event on the EDT (see “SwingPropertyChangeSupport” on page 69).
To start the background thread, invoke the SwingWorker execute() method. This schedules the thread for execution and immediately returns. We’ve also overridden the done() method, which is invoked on the EDT after the background task completes. This method is where you place code to update or refresh the GUI. Method get() blocks until the background task completes. However, if you call get() within method done(), no block occurs since the background task has finished.
Listing 2.32 Program PersonSwingAppMultiThread—Using SwingWorker
// ActionListener for Update button
private final ActionListener updateListener = (ActionEvent e) -> {
// first update the model from the UI
updateModel();
// copy Person for background thread
final Person person = new Person(thePerson);
SwingWorker<Person, Void> worker = new SwingWorker<Person, Void>() {
@Override
public Person doInBackground() {
// Simulate a long running process
try {
Thread.sleep(3000);
} catch (InterruptedException e) {
logger.log(Level.WARNING, null, e);
}
// save in background thread
logger.log(Level.FINE, "calling ftm for person {0}", person);
ftm.updatePerson(person);
// only if interested in accessing person after
// background thread finishes; otherwise, return null
return person;
}
// invoked after background thread finishes
@Override
protected void done() {
try {
if (!isCancelled()) {
logger.log(Level.FINE, "Done! Saving person {0}", get());
}
} catch (InterruptedException | ExecutionException ex) {
Logger.getLogger(PersonJFrame.class.getName())
.log(Level.SEVERE, null, ex);
}
}
};
// invoke background thread
worker.execute();
};
SwingWorker Tip
SwingWorker is designed to be executed only once. Executing a SwingWorker object more than once has no effect; it will not result in invoking the doInBackground() method again.
With Family Tree updates executing in a background thread, our new PersonSwingAppMultiThread application lets you interact with the user interface while updates are running. For example, it’s now possible to select different Person objects in the JTree, edit the Person displayed in the Editing pane, and even update a newly edited Person object. (Method Thread.sleep() helps test these concurrency scenarios.)
Monitoring SwingWorker Status
Class SwingWorker provides several callback methods to monitor background tasks. You can make intermediate results available with publish(), set the progress of a task with setProgress(), and safely update the GUI with process(). This section shows you how to use these methods.
To illustrate, let’s add a Process All button to our application that performs a background task on the FamilyTreeManager collection of Person objects. We’ll show you how to publish partial results and synchronize partial completion with a progress bar.
Application PersonSwingAppSwingWorker includes a Process All button, a progress bar, and a status text area. The processing converts (copies of) each Person’s name to all uppercase. Figure 2.19 shows how the new user interface appears with the Process All button, progress bar, and status text area all below the JTree component.

JProgressBar
We use the Swing Form Designer to place a progress bar on our form. The default constructor sets the minimum to 0 and the maximum to 100, with a horizontal orientation and no progress String displayed indicating percent complete. The setProgress() method updates the progress. You can also use a progress bar to reflect an indeterminate-length task with method setIndeterminate(true).
private javax.swing.JProgressBar progressBar;
progressBar = new javax.swing.JProgressBar();
. . .
// reset progress to 0
progressBar.setProgress(0);
. . .
// currentProgress is current value, maxProgress is finished value
// convert currentProgress to percentage for progressBar range 0 to 100
progressBar.setProgress(100 * currentProgress / maxProgress);
Built-In Progress Indicator
The NetBeans Platform provides an easy-to-use progress indicator for actions that execute in background threads. This means you don’t have to create a progress bar yourself and add it to the Swing form. (See “Progress Indicator” on page 518 for an example.)
Figure 2.20 shows the Process All background task running. Partial results appear in the text area, and the progress bar indicates the task is 60 percent complete. The Process All button is disabled during execution to prevent more than one Process All background task from running at the same time.

Listing 2.33 shows the Process All action listener. As in the previous example, we first configure the GUI on the EDT. Here, we disable the Process All button, configure the progress bar, and get a collection of Person objects from the FamilyTreeManager.
In this example, the first parameterized type for SwingWorker is Collection<Person>. This type specifies the return type for methods doInBackground() and get(). The second parameterized type (Person) specifies the type of partial results published.
Method doInBackground() processes the list one Person at a time and publishes the processed Person object with method publish(). Method publish() makes its argument available to method process(), which is invoked on the EDT. This enables safe updates of the GUI with partial results.
Method doInBackground() invokes setProgress(), which causes a property change event to fire to registered listeners. We define a property change listener; the property change event handler updates the progress bar. (The property change event handler is called on the EDT so you can safely update the GUI.)
Method doInBackground() returns the processed Person list, which becomes available using method get(). As in the previous example, we override method done() to call get(). Recall that done() is invoked on the EDT when the background task completes. Method done() is also a convenient place to reset GUI components. Here, we re-enable the Process All button, reset the status text area, and reset the progress bar.
Because the Process All event handler spawns a background thread, the application’s GUI remains responsive during the thread’s execution.
Listing 2.33 Program PersonSwingAppSwingWorker—Monitoring SwingWorker
// ActionListener for Process All button
private final ActionListener processAllListener = (ActionEvent e) -> {
// get list of people from ftm
final Collection<Person> processList = ftm.getAllPeople();
processAllButton.setEnabled(false);
progressBar.setValue(0);
progressBar.setStringPainted(true);
logger.log(Level.FINE, "Process All requested for {0}", processList);
SwingWorker<Collection<Person>, Person> worker =
new SwingWorker<Collection<Person>, Person>() {
final int count = processList.size();
@Override
public Collection<Person> doInBackground() {
int i = 0;
for (Person person : processList) {
try {
// do something with each person
doProcess(person);
logger.log(Level.FINE, "Processing person {0}", person);
publish(person); // make available to process()
setProgress(100 * (++i) / count);
// simulate a long-running task
Thread.sleep(500);
} catch (InterruptedException e) {
logger.log(Level.WARNING, null, e);
}
}
return processList;
}
private void doProcess(Person p) {
p.setFirstname(p.getFirstname().toUpperCase());
p.setMiddlename(p.getMiddlename().toUpperCase());
p.setLastname(p.getLastname().toUpperCase());
p.setSuffix(p.getSuffix().toUpperCase());
}
@Override
protected void done() {
try {
if (!isCancelled()) {
logger.log(Level.FINE, "Done! processing all {0}",
get());
}
} catch (InterruptedException | ExecutionException ex) {
Logger.getLogger(PersonJFrame.class.getName())
.log(Level.SEVERE, null, ex);
}
// reset any GUI elements
progressBar.setValue(0);
progressBar.setStringPainted(false);
statusTextArea.setText("");
processAllButton.setEnabled(true);
}
@Override
protected void process(List<Person> chunks) {
chunks.stream().forEach((p) -> {
statusTextArea.append(p + "
");
});
}
};
worker.addPropertyChangeListener((PropertyChangeEvent evt) -> {
if ("progress".equals(evt.getPropertyName())) {
progressBar.setValue((Integer) evt.getNewValue());
}
});
worker.execute();
};
2.7 Key Point Summary
This chapter covers basic concepts used repeatedly in both Swing and NetBeans Platform applications. The approach encourages loosely-coupled designs by building model objects with JavaBeans properties and property change support. Here are the key points in this chapter.
• Use JavaBeans and JavaBean properties to store model data.
• Provide getters for readable properties and setters for writable properties.
• Provide property change support for bound properties.
• Provide implementations for toString(), equals(), and hashCode() for model objects.
• Provide a singleton “manager” class for coarse-grained property change support models.
• To reduce boilerplate code, use lambda expressions for functional interfaces, such as event listeners and Runnable.
• Swing is a well-established GUI framework with a single-threaded model. Swing components are not thread safe and must be accessed only on the Event Dispatch Thread (EDT).
• Use SwingUtilities.invokeLater() to execute code on the EDT.
• The NetBeans IDE Form Designer helps you design and configure Swing components with drag and drop on forms.
• Choose Swing components from the Form Designer’s Swing Component Palette.
• Java has a standard logging facility that helps you configure which messages appear on the console. You can also log messages to other destinations, such as files.
• Use JTextField for single-line text editing and JTextArea for multi-line text editing.
• Use JLabel to display text labels, JButton to represent a graphic action, and JRadioButton for mutually exclusive choices.
• The Swing JTree component lets you display hierarchical data and provides a user selection event.
• Swing components generate one or more specific events, which you can listen for and respond to with corresponding event handlers.
• Writing listeners and event handlers for specific events (property change events, tree selection events, action events) helps your application remain loosely coupled.
• Use DocumentListeners to detect editing events for text-based Swing components.
• JRadioButtons generate action events for selection changes.
• Execute potentially long-running tasks in background threads. Use helper class SwingWorker to create the background thread and manage the communication between the background thread and the EDT.
• When building multi-threaded applications, pay attention to mutable objects that can be accessed concurrently and use them in a thread-safe way.
What’s Next?
Perhaps you noticed that we did not implement user actions to add or delete Persons in our Swing example programs. Once you have a Swing desktop application with several actions, you’ll typically want to use a menu bar with menu items. We didn’t add this functionality to these programs (yet) because this is exactly one of the many features the NetBeans Platform provides: a built-in menu bar, toolbar, and action framework.
We’ll be exploring how to do all this and more in upcoming chapters. But first, let’s take a slight detour and examine the new Java GUI: JavaFX.