
With ConstraintLayout, instead of using nested layouts you add a series of constraints to your layout. A constraint is like a rubber band. It pulls two things toward each other. So, for example, you can attach a constraint from the right edge of an ImageView to the right edge of its parent (the ConstraintLayout itself), as shown in Figure 9.3. The constraint will hold the ImageView to the right.

You can create a constraint from all four edges of your ImageView (left, top, right, and bottom). If you have opposing constraints, they will equal out and your ImageView will be right in the center of the two constraints (Figure 9.4).

So that is the big picture: To place views where you want them to go in a ConstraintLayout, you give them constraints instead of dragging them around the screen.
What about sizing widgets?
For that, you have three options: Let the widget decide (your old friend wrap_content), decide for yourself, or let your widget expand to fit your constraints.
With all those tools, you can achieve a great many layouts with a single ConstraintLayout, no nesting required. As you go through this chapter, you will see how to use constraints with list_item_crime.
Now, convert list_item_crime.xml to use a ConstraintLayout. Right-click on your root LinearLayout in the component tree and select Convert LinearLayout to ConstraintLayout (Figure 9.5).

Android Studio will ask you in a pop-up how aggressive you would like this conversion process to be (Figure 9.6). Since list_item_crime is a simple layout file, there is not much that Android Studio can optimize. Leave the default values checked and select OK.

Finally, you will be asked to add the constraint layout dependency to your project (Figure 9.7). ConstraintLayout lives in a library, like RecyclerView. To use the tool, you must add a dependency to your Gradle file. Or, you can select OK on this dialog and Android Studio will do it for you.

If you peep your app/build.gradle file, you will see that the dependency has been added:
Listing 9.1 ConstraintLayout project dependency (app/build.gradle)
dependencies {
    ...
    compile 'com.android.support.constraint:constraint-layout:1.0.0-beta4'
}
Your LinearLayout has now been converted to a ConstraintLayout.
Look to the toolbar near the top of the preview and you will find a few editing controls (Figure 9.8).

|
Show Constraints |
Show Constraints will reveal the constraints that are set up in the preview and blueprint views. You will find this option helpful at times and unhelpful at others. If you have many constraints, this button will trigger an overwhelming amount of information. |
|
Toggle Autoconnect |
When autoconnect is enabled, constraints will be automatically configured as you drag views into the preview. Android Studio will guess the constraints that you want a view to have and make those connections on demand. |
|
Clear All Constraints |
Clear All Constraints will remove all existing constraints in this layout file. You will use this option soon. |
|
Infer Constraints |
This option is similar to autoconnect in that Android Studio will automatically create constraints for you, but it is only triggered when you select this option. Autoconnect is active anytime you add a view to your layout file. |
When you converted list_item_crime to use ConstraintLayout, Android Studio automatically added the constraints it thinks will replicate the behavior of your old layout. However, to learn how constraints work you are going to start from scratch.
Select the ConstraintLayout view in the component tree, then choose the Clear All Constraints option from Figure 9.8. You will immediately see a red warning flag with the number 4 at the top right of the screen. Click on it to see what that is all about (Figure 9.9).

When views do not have enough constraints, ConstraintLayout cannot know exactly where to put them. Your TextViews have no constraints at all, so they each have a warning that says they will not appear in the right place at runtime.
As you go through the chapter, you will add those constraints back to fix those warnings. In your own work, keep an eye on that warning indicator to avoid unexpected behavior at runtime.
You need to make some room. Your two TextViews are taking up the entire area, which will make it hard to wire up anything else. Time to shrink those two widgets.
Select crime_title in the component tree and look at the properties view on the right (Figure 9.10).

The vertical and horizontal sizes of your TextView are governed by the height setting and width setting, respectively.
These can be set to one of three view size settings (Figure 9.11), each of which corresponds to a value for layout_width or layout_height.

Table 9.1 View size setting types
|
Setting type |
Setting value |
Usage |
|---|---|---|
|
fixed |
|
Specifies an explicit size (that will not change) for the view.
The size is specified in |
|
wrap content |
|
Assigns the view its “desired” size. For a TextView, this means that the size will be just big enough to show its contents. |
|
any size |
|
Allows the view to stretch to meet the specified constraints. |
Both crime_title and crime_date are set to a large fixed width, which is why they are taking up the whole screen. Adjust the width and height of both of these widgets. With crime_title still selected in the component tree, click the width setting until it cycles around to the wrap content setting. If necessary, adjust the height setting until the height is also set to wrap content (Figure 9.12).

Repeat the process with the crime_date widget to set its width and height. Now, the two widgets overlap but are much smaller (Figure 9.13).

With your other widgets out of the way, you can add the handcuffs image to your layout. Add an ImageView to your layout file. In the palette, find ImageView (Figure 9.14). Drag it into your component tree as a child of ConstraintLayout, just underneath crime_date.

In the pop-up, choose ic_solved as the resource for the ImageView (Figure 9.15). This image will be used to indicate which crimes have been solved.

The ImageView is now a part of your layout, but it has no constraints. So while the graphical editor gives it a position, that position does not really mean anything.
Time to add some constraints. Click on your ImageView in the preview or in the component tree. You will see dots on each side of the ImageView (Figure 9.16). Each of these dots represents a constraint handle.

You want the ImageView to be anchored in the right side of the view. To accomplish this, you need to create constraints from the top, right, and bottom edges of the ImageView.
First, you are going to set a constraint between the top of the ImageView and the top of the ConstraintLayout. The top of the ConstraintLayout is a little difficult to see, but it is just under the blue CriminalIntent toolbar. In the preview, drag the top constraint handle from the ImageView to the top of the ConstraintLayout – you will need to drag to the right somewhat, because the image is at the top of the constraint layout. Watch for the constraint handle to turn green and a pop-up reading Release to Create Top Constraint to appear (Figure 9.17), and release the mouse.

Be careful to avoid clicking when the mouse cursor is a corner shape – this will resize your ImageView instead. Also, make sure you do not inadvertently attach the constraint to one of your TextViews. If you do, click on the constraint handle to delete the bad constraint, then try again.
When you let go and set the constraint, the view will snap into position to account for the presence of the new constraint. This is how you move views around in a ConstraintLayout – by setting and removing constraints.
Verify that your ImageView has a top constraint connected to the top of the ConstraintLayout by hovering over the ImageView with your mouse. It should look like Figure 9.18.
Do the same for the bottom constraint handle, dragging it from the ImageView to the bottom of the root view, also taking care to avoid attaching to the TextViews. Again, you will need to drag the connection toward the center of the root view and then slightly down, as shown in Figure 9.19.

Finally, drag the right constraint handle from the ImageView to the right side of the root view. That should set all of your constraints. Hovering over the ImageView will show all of them. Your constraints should look like Figure 9.20.

Any edits that you make with the graphical editor are reflected in the XML behind the scenes. You can still edit the raw ConstraintLayout XML, but the graphical editor will often be easier, because ConstraintLayout is much more verbose than other ViewGroups.
Switch to the text view to see what happened to the XML when you created the three constraints on your ImageView.
Listing 9.2 ImageView’s new XML constraints (layout/list_item_crime.xml)
<android.support.constraint.ConstraintLayout
    xmlns:android="http://schemas.android.com/apk/res/android"
    xmlns:app="http://schemas.android.com/apk/res-auto"
    xmlns:tools="http://schemas.android.com/tools"
    android:layout_width="match_parent"
    android:layout_height="wrap_content">
    ...
    <ImageView
        android:id="@+id/imageView"
        android:layout_width="wrap_content"
        android:layout_height="wrap_content"
        app:srcCompat="@drawable/ic_solved"
        android:layout_marginTop="16dp"
        app:layout_constraintTop_toTopOf="parent"
        app:layout_constraintBottom_toBottomOf="parent"
        android:layout_marginBottom="16dp"
        android:layout_marginEnd="16dp"
        app:layout_constraintRight_toRightOf="parent"/>

</android.support.constraint.ConstraintLayout>
Take a closer look at the top constraint:
app:layout_constraintTop_toTopOf="parent"
This attribute begins with layout_.
All attributes that begin with layout_ are known as layout parameters.
Unlike other attributes, layout parameters are directions to that widget’s parent, not the widget itself.
They tell the parent layout how to arrange the child element within itself.
You have seen a few layout parameters so far, like layout_width and layout_height.
The name of the constraint is constraintTop.
This means that this is the top constraint on your ImageView.
Finally, the attribute ends with toTopOf="parent".
This means that this constraint is connected to the top edge of the parent.
The parent here is the ConstraintLayout.
Whew, what a mouthful. Time to leave the raw XML behind and return to the graphical editor.
Your ImageView is now positioned correctly. Next up: Position and size the title TextView.
First, select crime_date in the component tree and drag it out of the way (Figure 9.21). Remember that any changes you make to the position in the preview will not be represented when the app is running. At runtime, only constraints remain.

Now, select crime_title in the component tree. This will also highlight crime_title in the preview.
You want crime_title to be at the top left of your layout, positioned to the left of your new ImageView. That requires three constraints:
-
from the left side of your view to the left side of the parent, with a
16dpmargin -
from the top of your view to the top of the parent, with a
16dpmargin -
from the right of your view to the left side of the new ImageView, with an
8dpmargin
Modify your layout so that all of these constraints are in place. (As of this writing, finding the right place to click can be tricky. Try to click inside of the TextView, and remember that you can always key Command+Z (Ctrl+Z) to undo and try again.)
Verify that your constraints look like Figure 9.22. (The selected widget will show squiggly lines for any of its constraints that are stretching.)

When you click on the TextView, you can see that it has an oval area that the ImageView did not have. TextViews have this additional constraint anchor that can be used to align text. You will not be using it in this chapter, but now you know what it is.
Now that the constraints are set up, you can restore the title TextView to its full glory.
Adjust its horizontal view setting to any size (0dp) to allow the title TextView to fill all of the space available within its constraints.
Adjust the vertical view size to wrap_content, if it is not already, so that the TextView will be just tall enough to show the title of the crime.
Verify that your settings match those shown in Figure 9.23.

Now, add constraints to the date TextView. Select crime_date in the component tree. You are going to add three constraints:
-
from the left side of your view to the left side of the parent, with a
16dpmargin -
from the top of your view to the bottom of the crime title, with an
8dpmargin -
from the right of your view to the left side of the new ImageView, with an
8dpmargin
After adding the constraints, adjust the properties of the TextView. You want the width of your date TextView to be Any Size and the height to be Wrap Content, just like the title TextView. Verify that your settings match those shown in Figure 9.24.

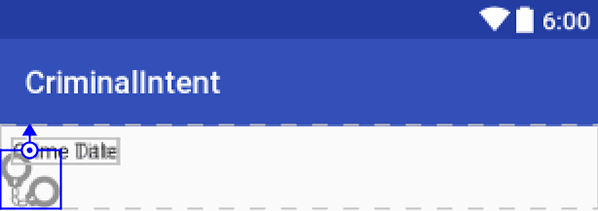
Your layout in the preview should look similar to Figure 9.1, at the beginning of the chapter.
Run CriminalIntent and verify that you see all three components lined up nicely in each row of your RecyclerView (Figure 9.25).

Now that the layout includes the right constraints, update the ImageView so that the handcuffs are only shown on crimes that have been solved.
First, update the ID of your ImageView. When you added the ImageView to your ConstraintLayout, it was given a default name. That name is not too descriptive. Select your ImageView in list_item_crime.xml and, in the properties view, update the ID attribute to crime_solved (Figure 9.26). You will be asked whether Android Studio should update all usages of the ID; select Yes.

With a proper ID in place, now you will update your code. Open CrimeListFragment.java. In CrimeHolder, add an ImageView instance variable and toggle its visibility based on the solved status of your crime.
Listing 9.3 Updating handcuff visibility (CrimeListFragment.java)
private class CrimeHolder extends RecyclerView.ViewHolder
        implements View.OnClickListener {
    ...
    private TextView mDateTextView;
    private ImageView mSolvedImageView;

    public CrimeHolder(LayoutInflater inflater, ViewGroup parent) {
        super(inflater.inflate(R.layout.list_item_crime, parent, false));
        itemView.setOnClickListener(this);

        mTitleTextView = (TextView) itemView.findViewById(R.id.crime_title);
        mDateTextView = (TextView) itemView.findViewById(R.id.crime_date);
        mSolvedImageView = (ImageView) itemView.findViewById(R.id.crime_solved);
    }

    public void bind(Crime crime) {
        mCrime = crime;
        mTitleTextView.setText(mCrime.getTitle());
        mDateTextView.setText(mCrime.getDate().toString());
        mSolvedImageView.setVisibility(crime.isSolved() ? View.VISIBLE : View.GONE);
    }
    ...
}
Run CriminalIntent and verify that the handcuffs now appear on every other row.