

Despite the proliferation of digital imaging systems, learning about and understanding the characteristics of the different formats in film-based systems provides an important starting point in the understanding of photography and can make the process of deciphering the complexities of digital imaging easier. Indeed, it is often the use of film cameras and the joy of watching a print appear under the safelight that initially piques the interest of a would-be photographer, even today. Without first considering film-based systems, there is no benchmark for evaluating the merits of digital camera systems. Additionally, at the time of writing, although smaller formats are now dominated by digital equipment, the limited choice and high cost of digital large format can be prohibitive; therefore a number of professionals still work with film. This chapter begins by introducing camera systems using film, providing a comparison of the main formats used by professionals, before moving on to digital cameras. It attempts to provide an overview, necessary when considering the purchase of camera equipment. It also aims to highlight the way in which camera design influences the method and type of photographic work. Included is a section on specialized accessories. This mainly covers cameras using film, although a number of accessories can be adapted for digital (but some of them, such as Polaroid (Instant-picture) adaptors, are not necessary when working digitally). Following this is a section on avoiding camera failures. The remainder of the chapter covers digital cameras, characteristics, basic features and types of camera systems. It is hoped that the level of detail will highlight the differences between working with film and working digitally. A summary comparison is provided at the end.
Camera design
Fundamentally, all cameras consist of the same basic components: a light-tight box, a method of focusing the image onto the image plane, an image sensor to capture and record the image, and some means of controlling exposure. However, the history of camera design has seen many developments, leading to ever more sophisticated and portable devices, culminating in the twentieth century with the addition of electronic components and of course, the introduction of digital cameras. Today, many manufacturers are winding down their production of film-based cameras in favour of the development of digital systems.
Cameras may be classified according to their design and this is often dependent on the way in which the image is viewed (Figure 2.1). The four main categories of camera design are: direct vision/rangefinders (both compact and advanced models), twin-lens reflexes, single-lens reflexes and view cameras, all of which are described in more detail in Langford’s Basic Photography. When considering purchasing or using a camera for serious photography, however, what is more important is the camera system. The system encompasses not only the design of the camera, but the level of sophistication in design, the degree of control by the user, the way in which it is used and the type of accessories available with it. Traditionally, camera systems using film have been classified by image format; that is the size and dimensions of the captured image.
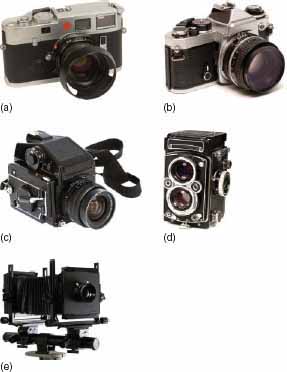
Figure 2.1 The main types of camera design: (a) a compact rangefinder camera; (b) a single-lens reflex camera, 35 mm format camera;(c) a single-lens reflex camera, medium format; (d) a twin-lens reflex, medium format camera; (e) a view camera.
Image format
Many formats have been introduced during the history of photography, but in the professional market, three main camera formats have dominated: 35 mm, medium format and large format (also known as view cameras). Using a particular format has implications in many areas for the photographer: in the quality of the final image, the portability of the equipment, versatility of use, the maximum aperture of the lenses and importantly in the cost of both equipment and film. These factors influence the way in which the photographer works at every level. Ultimately the system and format they select will probably determine – or be determined by – the type of photography in which they specialize.
The size of the image ultimately determines the size of the camera and accessories. Each format has a ‘standard’ lens (see Chapter 3). This lens is the one that gives a field angle of view of somewhere between 45° and 57°. The amount of lens refraction producing this angle, although less than the angle of view of the human eye, produces an image close to that perceived by the human visual system. This means that relative size of and perspective between objects within the images will be least distorted and closest to the way in which the original scene was perceived. The focal length of the standard lens will be determined by this. Fisheye, extra wide angle and wide-angle lenses are then shorter in focal length and telephoto lenses longer than the standard lens.
One of the limiting factors of a lens is its covering power. When light is imaged through a lens there will be an acceptable circle of illumination formed, outside of which there is rapid fall-off illumination and natural vignetting occurs. Within the circle is another circle, called the circle of acceptable definition. This defines the physical extent of an image through the lens that will be sharp and conform to some measure of acceptable objective image quality. The diameter of the circle of acceptable definition must cover the diagonal of the image format (see Figure 2.2). This, together with the required field angle of view defines the focal length of the lens for a particular format. As shown in Figure 2.3, the larger the image format, the longer the focal length of the lens. This has a bearing on a number of characteristics of the overall system. It also has important implications in terms of the focal lengths used in digital systems, discussed later.
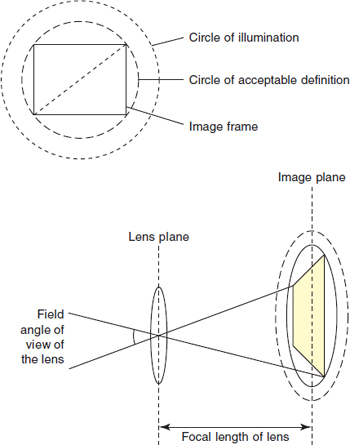
Figure 2.2 Lens covering power – the inner circle of acceptable definition defines the covering power of the lens. Its diameter must be equal to the diagonal of the image format.
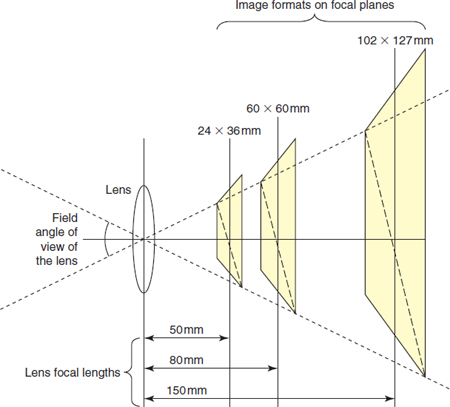
Figure 2.3 Image formats and standard lenses: the smaller the image format, the shorter the focal length of the lens required to give the standard field angle of view.
35 mm format
35 mm format cameras use rollfilm with an image dimension of 24 36 mm, which is the smallest currently used in the professional market. The small format means that the camera body is smaller and less bulky than medium format or view cameras, and so it is the most portable. Using equipment of this size means that you can carry around a comprehensive outfit in a small case. There is an unrivalled range of lenses and accessories available, and the whole system will incorporate the very latest developments in technology.
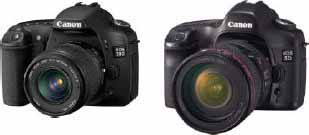
Figure 2.4 35 mm Prosumer SLR cameras often have camera bodies very similar to their professional equivalents.
The 35 mm market includes both professionals and amateurs. The majority of cameras are single lens reflex (SLR) cameras, although the format also encompasses compact cameras and rangefinders. 35 mm cameras probably represent the best value for money because prices are highly competitive. They sell to a huge market of amateurs and the 35 mm format is the one that has moved furthest away from traditional mechanical operation towards more and more electronic control, on-board processing and in some cases complete automation. In more recent years a type of hybrid camera, the ‘Semi-professional’, more recently known as the ‘Prosumer’ (‘Professional Consumer’) camera has appeared. These SLRs tend to have more of the features of the professional ranges, but are cheaper and aimed at the serious amateur (Figure 2.4). Often the lower price results in a compromise in-build quality and lens performance and Prosumer cameras tend to be the ones with the most programmable and automatic features. These models are updated quite rapidly and bristle with every conceivable feature. This ‘bells and whistles’ aspect is sometimes more to upstage rival brands than to improve your photography.
One of the useful features 35 mm cameras tend to include as standard is through-the-lens (TTL) exposure metering. This of course means that the whole imaging process is faster than it would be if separate exposure metering were required. Metering can be performed while looking through the viewfinder and in many cases, the camera controls are designed to be easily altered in this position. Modern SLRs often include a number of TTL metering modes, such as centre-weighting and spot metering, and with knowledge and experience the most difficult subjects can be correctly exposed. This is a factor that really defines how the cameras are used; they are portable, all-in-one units, allowing the user to capture fleeting shots without spending a long time setting things up. Although they may indeed be used in a studio setting, where there is time and space to get everything right, they are also designed for all other types of photography and they far surpass the other formats in their versatility. Many 35 mm ranges also include dedicated flash units and at the more expensive end, these may include TTL flash metering. Indeed, later models of independent flash units may also be adapted to use the TTL metering systems of 35 mm cameras. This is a huge bonus when using on-camera flash and is particularly useful in photojournalism.
Because of the small image format, lenses for 35 mm camera systems are the shortest, with a standard lens of focal length 50 mm, telephoto lenses longer than this, wide-angle lenses beginning at around 24 mm and extra wide-angle lenses at 20 mm and below. Depth of field is affected by a number of factors, such as focusing distance, selected aperture and importantly, lens focal length. Shorter lens focal lengths produce a larger depth of field, especially useful when subjects are close. Another important characteristic of shorter focal length lenses is wider achievable maximum apertures (f/1.0–f/1.4 at the more expensive end of the 35 mm market), therefore the lenses are also faster. The result of this is that they are the most versatile in low light level conditions. The smaller camera size means that they are already the most portable, but with faster lenses, they are also the easiest to hand-hold in existing light, meaning that fewer accessories such as tripods and additional lighting may be necessary. Large apertures also allow the selection of faster shutter speeds to freeze motion, particularly important in areas such as sports photography.
As previously highlighted, modern 35 mm cameras tend to rely heavily on electronics to control everything from exposure metering, film winding, ISO setting, exposure compensation and bracketing to sophisticated program modes. A downside of this is the possibility of camera failure either as a result of failure of the power supply, or because of a fault in on-board circuitry, which can be expensive to repair. Excessive control buttons or, alternatively, total automation can also be counterproductive for serious work. The many mode options and viewfinder signals get in the way, even lead you into errors – perhaps through mis-selection or distraction by data displays at the key moment of some fleeting shot. Any camera for advanced amateur or professional work must also offer complete manual control. You need to have the assurance that you can take over and make use of your personal experience to get exactly the result required, including chosen effects.
A fully automated camera is well worth considering however, for fast, candid photography (including situations where you must shoot over your head in a crowd). Autofocusing can be useful, particularly if panning and focusing on a moving subject but it is important to remember how power-hungry continuous focusing is. There can also be a tendency for the focus to slip between different subjects and it can sometimes be easier to change focus manually. The more sophisticated models have a range of autofocus zones within the frame, which are useful if the subject is off-centre. Some of the highest quality (and of course most expensive) lenses have ultrasonic image stabilizers to combat camera shake which can result in a huge improvement in image quality, but as this is also a form of continuous autofocusing, they will eat up your camera batteries.
It is important to remember that these cameras are only superficially intelligent. For example, they program greatest depth of field in bright light, and they can easily be focusing on, or exposing for, the wrong part of the subject. Worse still, you may start composing your pictures in ways which ensure that the auto mechanisms work perfectly (key element centre frame, for example). So make sure that there are convenient read-then lock facilities for autofocus and for TTL exposure measurement. If the camera autosets film speed by DX cassette code sensing (page 101) it must also have a or exposure compensation control. Thus you can effectively set a different speed to suit up or down rating and changes to processing. Other features you may well rate as essential for any SLR camera include a stop-down button to preview your actual depth of field with all preset aperture lenses.
Because film structure is the same regardless of frame size or format, image quality is another important consideration. Film grain is the result of either specks of silver (black and white) or clouds of dye (colour) being formed in the emulsion layers during processing. When enlarged for printing, beyond a certain level film grain becomes apparent. The random structure of the film grain can be used for creative effect, but it can also degrade the image appearance in terms of sharpness and noise. The size of developed grains is also a limiting factor in the resolution of the film, or its ability to record fine detail. Relative to a 35 mm frame size, film grain will be much larger than it is in the larger formats. 35 mm film therefore has the lowest effective resolution of the three, which means that if enlarged to the same size as a frame of medium- or large-format film, the images will be less sharp, grain will be more evident and generally they appear to be of lower quality. Scratches and blemishes will also be much larger when the film is printed and perhaps more difficult to remove. The lower image quality may be problematic if the images are enlarged much beyond 8 10 in. (203 220 mm), however other factors can compensate for this, such as variations in the processing chemicals, and also in the distance at which the prints are to be viewed.
Medium format
Medium-format cameras tend to dominate in many other areas of professional photography, where image quality is paramount or more important than the speed of capture. They represent a good compromise between the size and quality of the image produced by their large-format counterparts and the versatility of use of 35 mm.
The medium-format market is quite different to that of 35 mm format cameras. They require more skill in use and are not as portable, therefore they do not appeal to any but the most serious amateurs, who are usually prepared to invest more in a camera system. As a result of this, the market is less competitive, with fewer manufacturers making fewer different models. Additionally, the larger format image requires lenses of higher quality, so generally these systems are larger and significantly more expensive. Features tend to be more conservative, and because of the small numbers manufactured you can expect to pay over twice the price of an equivalent 35 mm kit. Where the competition among small-format camera manufacturers has lead to the development of many gimmicks and automatic features, medium-format cameras tend to be simpler in design and rely more on mechanics than electronics. The increase in cost is often in the quality of components and the camera build.
Medium-format cameras are small enough to use hand-held and cope with action subjects. You can use most types at waist or eye level – there are a range of direct viewfinder wide-angle models as well as reflexes (Figure 2.5). At the same time, shift cameras (Figure 2.6) and monorail view cameras are now made for medium formats. Since rollfilm picture size is between three and five times the area of 35 mm, you can crop after shooting if you wish and print (or reproduce) from just part of the image without too much lost quality. An SLR this size also has a screen large enough to usefully attach a drawn overlay for critical jobs where your composition must fit a tightly designed layout.
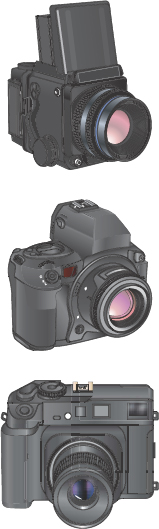
Figure 2.5 There are a range of different camera designs available in medium-format cameras for general work.
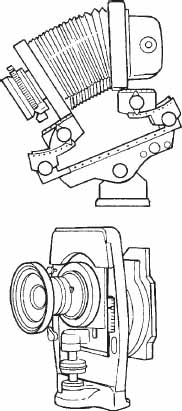
Figure 2.6 Medium-format cameras providing camera movements. Top: scaled-down monorail design accepts rollfilm magazines, instant picture or digital backs. Bottom: bellowless wide-angle shift camera for architectural work offers rising and drop front, accepts rollfilm backs.
There are a range of image formats available incorrect guesswork. Many medium-format for medium-format cameras. The films are mainly 120 mm wide and the most common image formats are 60 × 45 mm, 60 × 60 mm and 60 × 70 mm. They are available as sheet film but are mainly used as rollfilm. Here the camera designs allow more versatility than 35 mm. When using a roll of 35 mm it is usually necessary to shoot the entire roll before the film can be changed. The alternative is to rewind the shot part of the film, change films and then, when ready to use the film again, it is necessary to wind it on to the point at which it had been wound to before. As well as being inconvenient, this is fraught with difficulties, resulting often in gaps of unused film which is wasted, or in double exposure of frames due to incorrect guesswork.Many medium-format cameras solve this problem with detachable, interchangeable film backs, meaning that different types of film can be loaded during a shoot, without any of the hassle of rewinding, so you can be shooting using one film back while an assistant is quickly emptying and reloading another, allowing fast, continuous photography. You can also shoot one scene on several different kinds of film stock by juggling backs. It is a facility which permits you to swap to an instant picture (peel-apart) back at any time during a shoot to visually check on lighting or exposure (see Figure 2.7). Many professional type rollfilm cameras will accept digital backs too (page 37).
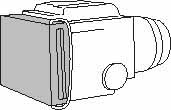
Figure 2.7 An instant-picture back, accepting packs of peel-apart material, attached to a rollfilm SLR camera in place of the film magazine.
The standard lens for medium format is generally an 80 mm focal length. If you are used to working with 35 mm the shallower depth of field given by the longer focal length lenses normal for medium formats can be an unwelcome surprise – especially when shooting close-up. Lenses also have maximum apertures one or two stops smaller than their 35 mm camera equivalents (typically, f/2.8 or f/4 for a standard focal length lens) meaning that although they can be hand-held, they require relatively bright conditions. The longer lens also means more camera shake, so a tripod is usually a necessary accessory. The range of film stocks made in 120 rollfilm is also more limited, with the emphasis on professional rather than amateur emulsions.
The method of exposure determination in these systems is often built-in, but as already mentioned, these cameras tend not to have as many features to aid the photographer as their smaller counterparts. Using them takes you back to the fundamentals of photography, with the majority of exposures made in manual mode, with manual focusing. They require more consideration in their approach. The process of loading or changing film backs, or winding on film, is more technical than the point-and-shoot and wind-on approach that might be used with 35 mm and the skills required to use them properly take time to acquire. However once you are used to this way of working, they can be just as versatile and the increase in quality means that they tend to be preferred for high-quality print output such as that produced for magazines and books.
Large-format view camera systems
In many ways cameras using 4 × 5 in. (102 × 127 mm) image format and upwards are a world apart (Figure 2.8). Photography with this type of equipment is more craft-orientated; it demands more elaborate preparation and encourages a more considered approach to your subject. There are fewer camera designs to choose from, and both cameras and lenses are expensive – especially the 8 × 10 in. (203 × 254 mm) size.
These cameras are closest to very early camera designs, incorporating a bellows extension between moveable lens and film planes. Most commonly, they are attached along an axis, a monorail, allowing the distance between them to be altered; the two planes also have a range of positions and tilts that can be applied in a variety of camera movements, to manipulate the size and shape of the subject, covered imaging area, magnification and depth of field (see Figure 2.9 – more details on camera movements are covered in Langford’s Basic Photography). Making the most of these cameras requires skill, practice and a genuine understanding of the optical principles governing them. Most certainly not for the amateur, the image capture process is involved and time-consuming. The cameras are bulky and cumbersome, requiring a tripod and they often lack electronic aids completely, unless you add costly accessories. Therefore, you must expect to use a separate hand-held exposure meter and calculate the exposure increase needed for bellows extension, etc. which is taken care of in other cameras by TTL light measurement. The image is inverted and viewed directly through a large ground glass screen in the position of the film plane at the back of the camera.

Figure 2.8 Typical 4 5 in. unit constructed monorail camera.
Because these cameras require tripods and time to set up, they tend to be used more for still-life subjects. The camera movements available and large image format allow great representation of detail and fine tuning of image shape; this type of precision work lends itself to high-quality studio still-life photography. The other main application, for the same reasons, is architectural photography, where tilting camera movements may be used to correct converging verticals and translational movements may be used to capture the top or edges of a building that other formats would not cover.
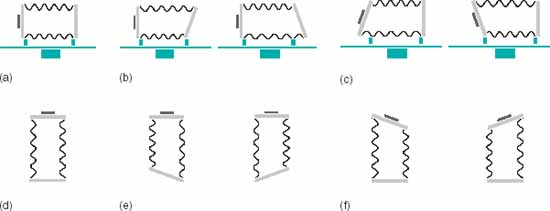
Figure 2.9 Camera movements using a view camera. Both lens plane and film plane have a range of tilt (b, c) and swing (e, f) movements for achieving different manipulations of the image plane.
The standard lens for a 4 × 5 in. large-format camera is most commonly 150 mm, or 180 mm. The long focal length results in shallower depth of field than either 35 mm or medium format, however, if the subject allows it, tilting or swinging either front or back planes may bring required zones of subject into focus, improving effective depth of field. You must expect to stop down more and consequently require more light or longer exposures. Even maximum lens apertures average around f/4.5–f/5.6, some three to four stops slower than most 35 mm format lenses.
On the other hand, you can expect view camera lenses to have a much wider image circle than lenses intended always to be dead-centred on the film. For example, a good normal-angle 180 mm lens designed for 4 5 in. will give a circle of acceptable quality about 300 mm in diameter when focused for infinity and stopped down to f/22. This means that you can shift or pivot the lens until its axis is more than 70 mm off-centre if necessary for rising, cross or swing front effects before you see loss of image quality at any corner. It is a false economy to buy, say, a monorail view camera offering extensive movements and use it with an economy lens barely covering the format.
After setting up a shot, the image is usually captured on individual sheets of film, which are loaded into a sheet film holder and are then processed separately. This means that there is the same versatility as medium format in terms of being able to repeat the same shot on different film stock. Single sheets are more expensive, but the time taken in setting up means that fewer mistakes are made and less film is wasted. The range of film available is much lower than that available for other formats, but the large image size ensures that grain is finest, images are sharpest and the tonal range and level of detail is the greatest possible. Images from 4 5 in. film are 13 times larger than a frame of 35 mm and can easily be enlarged to 10 16 in. and beyond.
To work with the relatively large focusing screen of a view camera is like having upside-down colour television. The equipment brings you much closer to the optical craft aspects of photography than any smaller camera, but you must understand what you are doing. Remember, too, that a 4 5 in. camera with a couple of good lenses can cost you over three times the price of a professional quality 35 mm three lens outfit.
Specialized accessories
You can choose from a very large range of camera accessories. Many are unnecessary and gimmicky, but some of the more specialized add-ons allow you to interface cameras with completely different kinds of technology.
Optical adaptors
Most 35 mm SLR camera systems include different adaptor rings which allow the camera body to fit over the eyepiece end of a microscope, telescope, medical endoscope, etc. Owing to reflex design you can still accurately frame-up, focus and measure exposure whatever optical device is fitted. In fact the camera becomes a film-containing back for the other device.
Camera triggers
You can buy electronic sensor units which trigger your camera in response to light, sound, radio or infrared radiation. Normally, you wire one of these devices to a small- or medium-format camera having electric release sockets plus motor-drive so that any number of pictures can be taken remotely. The camera might be set up in some inaccessible position, such as under a jump on a racecourse, and then fired when you transmit an infrared or radio pulse from the safety of the track-side. For natural history photography you can mount the camera in some hidden location, its shutter triggered automatically when your subject breaks the path of an infrared beam projected out of the trigger box itself (see Figure 2.10). This works equally well day or night.

Figure 2.10 Remote triggers. Left: breaking an invisible infrared beam projected and reflected across the path of some event. Centre: two IR beams angled to correspond to one point in space. Only an object breaking the beams here triggers the camera. Right: ultra-high-speed flash triggered by sound detection.
With high-speed analytical work, a sudden happening – a spark or one object striking another, for instance – can trigger events via a light or sound sensor or by breaking a strategically placed beam. Here you can set up the camera in a darkened studio with the shutter locked open and using the trigger to fire an ultra-short duration flash. Most trigger units allow you to tune their level of sensitivity to suit ambient conditions, sound or light. You can also dial in a chosen delay (milliseconds or microseconds) between sensing and firing to capture the event a little after trigger activation.
Instant-picture (Polaroid) adaptors
Instant-picture adaptors for ‘self-developing’ film are made to fit most professional type small-, medium- and large-format cameras, provided they have detachable backs. Peel-apart instant-picture material (page 102) is necessary, otherwise your result is laterally reversed. Small-and medium-format cameras only use film in pack form – two 35 mm pictures can be exposed side by side on one sheet if the back adaptor incorporates a slide-over device. Large-format cameras can use either packs or individual pull-apart sheets in envelopes which push into a back inserted into the camera like a sheet film holder. Backs for instant-picture sheets also accept some regular sheet films in envelopes. This is useful if you do not want to keep changing from an instant-picture adaptor to film holders. Instant pictures are not only invaluable for previewing results and checking equipment, but your instant colour print will probably be good enough to scan direct into a digital system via a flat-bed scanner (see also Chapter 10).
Programming and data backs
Most advanced 35 mm (and some medium-format) camera systems allow you to replace the regular camera back with a dedicated program or data back. The substitute back is considerably thicker and carries electronic keys and a battery compartment. It extends the camera’s electronic facilities in various ways. For instance, some backs for motor-driven cameras allow you to program autobracketing – a quick series of frames each shot at a different level of exposure such as half, one or two stops’ progression. The same back may also act as an ‘intervalometer’, so that you can trigger pictures at intervals of seconds, minutes or hours, and preset the total number of frames to be shot. Usually the inside face of the back carries a printing panel of low intensity LEDs to expose characters and figures through the base of your film, alongside or just within each frame. (The diode brightens or dims by varying its pulse rate to suit the slow or fast ISO speed set for the film.) This feature allows you to program in date, time, frame number, etc., or the camera can automatically imprint the aperture and shutter settings it made for each picture. A good programming/data back is expensive but invaluable for various kinds of record photography, especially time-lapse and surveillance work. It frees you from tedious logging of notes.
Special view camera backs
One or two specialist back accessories are made for view cameras principally 4 5 inches. They are mostly designed to make the camera quicker and more convenient to use. For example, a sliding back reduces the delay between composing and exposing. Simple rails allow you to rapidly exchange focusing screen for film holder (Figure 2.11) or digital back. Meanwhile, the shutter is closed and set en route by an electrical or mechanical link between the front and back of the camera. Working in reverse, the shutter locks open when you return the focusing screen.
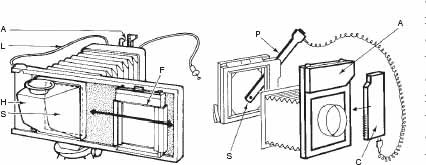
Figure 2.11 Special view camera accessories. Left: time-saving sliding back arrangement. A, aperture-setting indicator. L, link holds bladed shutter open when focusing screen (S) and reflex hood (H) are aligned with lens. F, film holder, with darkslide facing camera already removed (see text). Right: TTL exposure-metering equipment. Probe (P) has a spot-reading tip (S) you can move to measure any chosen area on the lens side of the focusing screen. C, control unit for setting film speed, etc. A, electronic bladed shutter which operates with all lenses.
Other replacement view camera backs accept a spot meter probe. This measures image light reaching the focusing screen from the lens and can program an electronic bladed shutter to give you aperture-priority exposure control. Other forms of exposure program are unsuitable for view camera photography because the subject itself and movements mostly determine what aperture you should set. Elaborate ‘add-on’ items for view cameras are manufactured in quite small numbers, which makes them expensive. Some more than double the cost of an outfit. So although extras make your camera quicker and more convenient to use they may not be justified unless you use large-format equipment most of the time.
Which one is best?
Clearly, no one camera will serve you well for every kind of assignment. Some give you a choice of at least two formats – a 120 rollfilm camera with a 35 mm back, for example; a 4 5 in. plus rollfilm back or an 8 10 in. camera adapted down to 4 5 in. However, the result is often an unsatisfactory compromise, with the lens too long focus and the camera unnecessarily bulky for the smaller format. Most photographers therefore opt for two camera outfits – for example, small and medium format or medium and large. Having two complementary kits means that you can exploit their advantages and minimize their individual shortcomings for the widest range of subjects. When you have made this decision go on to choose whether reflex, direct viewfinder or monorail designs (as available) will suit you best, and pick appropriate lenses.
On price, you will find that within any one category of camera the difference between cheapest and most expensive models can easily be a factor of 2 or 3 (six to eight times with 35 mm gear). Sometimes this extra cost is because the body has features utilizing the latest technology, or it is built with greater precision and finish, using much tougher components. Like hand-built cars, this lasting precision and reliability cannot really be seen unless you open up the inside.
Avoiding camera failures
Even the finest cameras are basically just machines and their users only human, so mistakes do occur from time to time. Every photographer must have occasionally lost pictures at the camera stage. The important thing is to minimize risks by setting up safety routines you follow as second nature, especially checks before and during shooting. It should be impossible for you to completely ruin any assignment through some failure of camera handling. Here are some typical hazards and suggested precautions.
Misuse of unfamiliar equipment: This is most easily done with rental cameras and lenses. Check anything complex and strange by exposing and processing a test film before using it on an important shoot.
The pre-set aperture fails to stop down within the lens of your SLR camera when you take the picture, usually due to sticky blades or a broken spring. The result is various degrees of overexposure (unless you set widest aperture). Do a quick pre-check before loading film. Set a small aperture and slow shutter speed, then notice if the diaphragm stops down by looking through the back of the open camera and pressing the release.
Your shutter fails to open, or close, or fully close. The result is no picture, or fogging and vast overexposure. Often the camera mechanism sounds abnormal, but check by looking through the back of the empty camera or make a trial exposure on instant-picture film.
Using flash, you get no image (perhaps just faint results from existing light) or, with a focal plane shutter camera, your correctly exposed flash picture only extends over about one-half or one-quarter of the frame. These failures are due to mis-synchronization (for example, part frames result from using fast-peaking electronic flash with a focal plane shutter at too short a shutter speed). Be wary of any camera which has an old X/M (or X/FP) switch for change of synchronization. Electronic flash fired on these M or FP flashbulb settings goes off before the shutter opens – no matter what speed is selected or whether it is a lens or focal plane shutter type. This error happens easily on a camera with a hot shoe and a sync selection switch tucked away somewhere else on the body. Pre-check by pointing the flash and empty wide-aperture camera towards a white surface in a dimly lit area. Through the open back of the camera you should briefly see the full picture area as a white shape when the shutter fires.
A run-down battery, making the camera meter erratic or non-active: this may also cause failure of the camera’s electronically timed shutter and other circuitry. Always check with the battery state button when preparing for a session. Carry a spare set of batteries too, and as further back-up include a separate hand-held exposure meter. There are clearly advantages in having a camera body which, in the event of battery failure, still allows you use of at least one (mechanically powered) shutter speed.
Mechanical jam-up of an SLR camera: The whole unit locks solid, often with the mirror up. Some cameras offer you a reset lever or (medium formats) have some accessible screw you can turn with a small screwdriver to release the mechanism. The best precaution is to carry a spare body.
Shooting on already exposed film: This is most likely on 35 mm, 70 mm and sheet film, as regular rollfilm winds up onto a new spool, its backing paper marked ‘exposed’. Adopt a rigorous safety routine. Exposed 35 mm film can always be bent over at the end or rewound completely into its cassette. Each sheet film holder darkslide must be reinserted with the black top facing outwards after exposure. Seal 70 mm cassettes and all cans of bulk film with labelled tape.
35 mm film not properly taken up when loading: Consequently, unknown to you, the film fails to wind on by one frame between exposures. Get into the habit of noticing, after shooting two or three frames, whether some rotation of the camera’s rewind knob (or equivalent tell-tales) proves that film is actually transported inside the camera. Cameras with autoload mechanisms rarely suffer from this problem.
Out of focus due to coming too close with an autofocus camera: practise, and get used to recognizing nearest focusing distance from the way, say, a head reaches a particular size in the viewfinder.
Soft focus, and sometimes upset of the camera’s whole electronic system, due to condensation on the lens and internal mechanism: If this happens on the internal glass surfaces of a direct viewfinder camera lens its effects are hidden until you see the results. Avoid bringing very cold equipment into a warm, moist atmosphere unless it is wrapped up and allowed to reach ambient temperature slowly.
Obstruction of part of the picture: The cause is usually in front of the lens (your finger, strap, lens hood or a filter holder too narrow for the lens’s angle of view, etc.), especially with a direct viewfinder camera. Alternatively, it might be between lens and film (part of a rollfilm sealing tab fallen into the camera, crumpled bellows in a view camera used with shift movements or an SLR with its mirror not fully raised). Always glance into the camera space behind the lens as you are loading film. Fitting a hood of correct diameter will reduce the risk of something getting in front of the lens.
Remember the value of having an instant-picture back, to allow you to confirm visually that lens and body are working correctly – plus checking lighting, exposure and composition – at any time during a shoot. Some professional photographers habitually expose one instant picture at the beginning and another at the end of every assignment, as insurance. It is also a good idea to carry another complete camera (a 35 mm SLR, for example) as emergency back-up.
The digital revolution
The first patents for devices capturing images electronically were filed as far back as 1973. Kodak created a prototype digital camera in 1975 using a charge-coupled device (CCD), recording black and white images on to digital cassette tape; however it was built to test the feasibility of digital capture using solid state sensors, rather than as a camera for manufacture (due to it’s bulky size and a weight of nearly 3.6 kg). It was not until 1981 that Sony developed a camera using a CCD, suitable to be hand-held and available to the consumer. The birth of digital still cameras as we know them today happened in 1988, when Fuji showcased their camera, the DS-1P, at Photokina. Early digital formats could not compete with their film equivalents in terms of cost or quality; digital cameras as a practical option for consumers were not really available until the mid-1990s. Since then the digital market and technologies have grown exponentially.
The move to digital imaging by many photographers has involved a preceding step via ‘hybrid’ imaging – that is, capture on film followed by digitization using a scanner. However, in the last ten years, huge advances in sensor technology, computing capabilities and the widespread adoption of broadband (ADSL) Internet connection by the consumer have meant that digital imaging has finally arrived. For example, most households in Britain now own at least one computer and the majority of new mobile phones have a built-in digital camera. The digital camera market has therefore been advanced by the consumer market and of course the widespread use of imaging on the Internet.
Immediate results and the ability to easily manipulate, store and transmit images have become a priority in many disciplines, with some sacrifice in the quality that we expect in our images. In the professional market there have also been compromises between versatility of systems and image quality, but progress towards the uptake of entirely digital systems has been somewhat slower. In some types of photography image quality is still more important than speedy processing and the lack of equipment available in larger formats has meant that film-based systems are still common. Sports photography and photojournalism, however, have embraced a predominantly digital workflow from capture to output.
The image sensor
Instead of exposing onto silver halide coated film, currently the majority of digital cameras contain one of two types of light sensitive array, either a charge-coupled device, known as a CCD, which is common in earlier digital cameras, or fast overtaking it, the complementary metal-oxide semiconductor or CMOS image sensor. The sensor is in the same position as the film in an analogue camera. Many of the key external features of digital and film cameras are similar, but digital cameras have a whole other layer of complexity in terms of user controls in the camera software.
Both types of digital image sensor are based on the same material, silicon, which when ‘doped’ with small amounts of other elements, can be made sensitive to light. When exposed to light, it produces a small amount of electrical charge proportional to the amount of light falling on it, which is stored, transported off the sensor, converted into a stream of binary digits (1’s or 0’s, hence the name ‘digital imaging’), and written into a digital image file. The process is a complex one, and the structure and operation of the sensor is covered in more detail in Chapter 6. There are many fundamental differences between film-based and digital imaging, not least that where a frame of film both captures and stores the image, and is therefore not reusable, a digital sensor captures the image, but it is then transported away and stored as an image ‘file’ somewhere off the chip. Theoretically, if an image file is not compressed and is continually copied and migrated across different media, it is permanent and can be reproduced as many times as required, without any degradation in quality.
Sampled images

Figure 2.12 Sampling and quantization in a digital image: (a) The image is spatially sampled into a grid of discrete pixels; (b) The continuous colour range from the original scene is quantized into a limited set of discrete levels, based on the bit depth of the image.
Another key difference between digital and analogue imaging is the fact that the digital image is captured across a regular grid of pixels (Picture Elements). Each pixel is an individual image-sensing element, which produces a response based on the average amount of light falling on it. Where film ‘grains’ are distributed randomly through a film emulsion and overlap each other to create the impression of continuous tones, pixels are non-overlapping and if a digital image is magnified, individual pixels will become very evident. Digital images are a discrete representation. This is further accentuated by the fact that pixels are not only discrete units across the spatial dimensions of the image, but that they can only take certain values and are solid blocks of colour. The process of allocating a continuous input range of tone and colour to a discrete output range which changes in steps, is known as quantization (see Figure 2.12). The whole pixel will be the same colour, regardless of the fact that the light falling on it in the original scene may have varied across the pixel area.
A digital image is therefore ‘sampled’ both across its physical dimensions and in terms of its colour values. The stepped changes in colour values and the non-overlapping nature of the pixels are limiting factors in the quality and resolution of a digital image. The spatial sampling rate is determined by the physical dimensions of the sensor. The quantization levels depend upon the sensitivity of the sensor, analogue to digital conversion, image processing in the capture device and ultimately on the output file format.
Resolution in digital imaging
Resolution is the capability of an imaging system to distinguish between two adjacent points in an image and is a measure of the detail-recording ability of a system. It defines how sharp your images will appear and what level of fine detail will be represented. In any imaging system this is affected by every component through which light passes; in a film-based system the lens and the film will be the key factors, but anything placed over the lens or sensor, such as a filter, may also affect it. It is usually the resolution of the image sensor that is the ultimate limiting factor, which is why film grain is important, although a poor quality lens, as any photographer knows, is a primary cause of loss of sharpness. There are a number of measures of resolution, but two commonly used and covered in more detail in the chapters on lenses and film are resolving power and Modulation Transfer Function (MTF).
Where resolution in traditional film-based imaging is well-defined, the different ways in which the term is used and its range of meanings when referring to digital systems can be confusing. It is helpful to understand these differences and to be clear about what resolution means at different stages in the imaging chain. You will see the term explained and used in different contexts throughout this book, but to summarize.
Fundamentally, digital images do not have an absolute resolution, but a number of pixels. The level of detail that is represented will depend upon how this number of pixels are captured or viewed. Therefore, image resolution is often quoted in pixel numbers, calculated by number of rows × number of columns. It may be referred to in terms of megapixels, a megapixel being a million pixels; this is a value often quoted by digital camera manufacturers.
At different stages in the imaging chain, resolution may also be measured as a function of distance. Scanner or monitor resolution, for example, may be quoted in terms of numbers of pixels per inch (ppi) and printers are often specified in terms of dots per inch (dpi). The combinations of these different resolutions in the output image determine the final image quality and also output image size. These relationships are examined in more detail in the chapter on digital imaging systems. When quoted by manufacturers of these devices, they will usually quote the upper limit for that device, although it will be possible to capture and output images at a range of resolutions below this.
A clever trick that manufacturers often use to enhance the apparent characteristics of their devices is to quote interpolated resolution. This applies to cameras and scanners. The actual (or optical) resolution of a device is defined by the number of individual elements and their spacing; however it is possible to rescale an image by interpolating values between the actual values, in effect creating false pixels. The visual effects of this are a slight blurring of the image, because the interpolation process averages adjacent pixels values to create the new pixels.
In cameras too, the effective resolution may be quoted, although manufacturers may not identify it as anything other than resolution. Again, this is a form of interpolated resolution, but refers in this case to the fact that in the majority of cameras, the sensor is filtered, so that each pixel captures only one colour, usually red, green or blue. To obtain the other colour values at each pixel in the captured RGB image, adjacent pixels of each colour are used and the missing values interpolated. As with all interpolation there is an associated blurring and loss of quality. There is an exception, however: in the last few years, a new sensor, the Foveon™ chip, has been developed, which captures colour at different depths in the sensor and therefore captures all three RGB values at every pixel. This sensor, however, is only available in a few cameras currently on the market, so for the majority, effective resolution still applies.
How many pixels?
When buying a digital camera, resolution is a primary consideration, and a key factor in image quality, however the previous discussion indicates the confusion around the subject. The highest number of megapixels does not necessarily represent the highest quality or automatically mean that the largest level of detail will be reproduced. Other factors are involved as well.
The pixel pitch, which is the centre-to-centre distance between pixels and relates to the overall pixel size, is important in determining the maximum level of detail that the system is able to reproduce. Tied up with this however, is the imaging area of each pixel, which in some cameras may be as low as 20%, due to the inclusion of other components and wiring at each pixel and channels in between imaging areas. Also, the pixel shape; whether there are microlenses above each pixel to focus and maximize the light captured; even the interpolation algorithms used in calculating missing colour values, which vary between manufacturers, these will have an effect on final image resolution. These factors combine to influence the shape of the sensor’s MTF and it is this that is a far better indicator of how well a camera will perform. The quality of the lens must additionally be taken into account. Finally, and really important, is the pixel size relative to the overall size of the imaging area on the sensor.
What the above discussion highlights is the complicated nature of resolution as a measure of image quality in digital cameras. Do not make a choice based solely on the number of megapixels. Make informed decisions instead, based on results from technical reviews and from your own observations through testing out different camera models. You need to decide beforehand how you want to use the camera, for what type of subjects, what type of photography and what type of output.
Bearing all this in mind, it is still useful to have an idea of the physical size of output images that different sensor resolutions will produce. Print resolution requirements are much greater than those for screen images. Although it is now widely accepted that images of adequate quality can be printed at 240 dpi, or perhaps even lower, a resolution of 300 dpi is commonly given as required output for high-quality prints. Some picture libraries and agencies may, instead of specifying required image size in terms of output resolution and dimensions, state a required file size instead. It is important to note that this is uncompressed file size. It is also necessary to identify the bit depth being specified as this will have an influence on file size. Figure 2.13 provides some examples for printed output.

Figure 2.13 Sensor resolution, dimensions, file size and printed output.
Features of digital cameras
Digital image capture is a complex process. The signal from the sensor undergoes a number of processes before it is finally written to an image file. The processes are carried out either on the sensor itself, in the camera’s built-in firmware or via camera software, in response to user settings. They are designed to optimize the final image according to the imaging conditions, camera and sensor characteristics and output required by the user. The actual processes and the way they are implemented will vary widely from camera to camera. Some are common to most digital cameras however. They will be covered in more detail in other chapters, but are summarized below. They include:
• Signal amplification: This may be applied to the signal before or after analogue-to-digital conversion; this is a result of auto exposure setting within the camera and ensures that the sensor uses its full dynamic range. In effect the contrast of the sensor is corrected for the particular lighting conditions.
• Analogue-to-digital conversion: The process of sampling and converting analogue voltages into digital values.
• Noise suppression: There are multiple sources of noise in digital cameras. The level of noise depends upon the sensor type and the imaging conditions. Adaptive image processing techniques are used to remove different types of noise. Noise is enhanced if the camera gets hot (the sensor is sometimes cooled to reduce the noise levels), also if long exposures or high ISO settings are used.
• Unsharp mask filtering: Used to sharpen edges and counteract blurring caused by interpolation.
• Colour interpolation (demosaicing): This is the process of calculating missing colour values from adjacent colour-filtered pixels.
These are sensor specific, in-built and not user controlled. Additionally, settings by the user will implement processes controlling:
• White balance: The image colours (the gamut) are shifted to correct for the white of the illuminant and ensure that neutrals remain neutral. White point setting may be via a list of preset colour temperatures, calculated by capturing a frame containing a white object, or measured by the camera from the scene. In film cameras, this requires a combination of selecting film for a particular colour temperature and using colour-balancing or colour-correction filters.
• ISO speed: The sensitivity of the sensor is set by amplifying the signal to produce a required range of output values under particular exposure conditions. Again in film cameras, this would be achieved by changing to a film of a different ISO. ISO settings usually range from 100 up to 800. Some cameras will allow ISO values up to 1600 or even 3200. The native ISO of the sensor however is usually 100–200. Anything above this is a result of amplification. Amplifying the signal also amplifies the noise levels and this may show up as coloured patterns in flat areas within the image.
• Exposure and the image histogram: This is a process of shifting the output values by amplification of the input signal, to ensure that the maximum range of output values is produced, ideally without clipping the values at the top or bottom of the range. The actual exposure measurements are taken through the lens as for a film camera and image processing takes care of the rest. To optimize this process the image histogram is provided in SLRs and larger formats to allow exposure compensation and user adjustment. This is a graphical representation, a bar chart of the distribution of output levels and is an accurate method of ensuring correct exposure and contrast, as viewing the image in the low resolution and poor viewing conditions of the LCD preview window may produce inaccurate results. In particular, it can be difficult to tell in the preview when highlight values are clipped, a situation to be avoided. The histogram will easily alert you to this and allow you to make necessary adjustments for a perfect exposure. For more information on exposure and the histogram, see Chapter 11.
• Image resolution: Many cameras, will allow a number of resolution settings, lower than the native resolution of the camera to save on file size. These lower resolutions will be achieved by down-sampling, either dropping pixel values completely if the image is being downsampled by a factor of 2, or by interpolating values from the existing sensor values.
• Capture into a standard colour space: With the necessary adoption of colour-managed workflow, a number of standard colour spaces have emerged. Capturing into a standard colour space means that the image gamut has the best chance of being reproduced accurately throughout the imaging chain (see Chapter 11 for further details). The two most commonly used standard colour spaces in digital cameras are sRGB and Adobe RGB (1998). sRGB is optimized for images to be viewed on screen. The slightly larger gamut of Adobe RGB encompassed the range of colours reproduced by most printers and is therefore seen as more suitable for images that are to be printed.
• File quality (if image is to be compressed) and file format: Most cameras will offer a range of different output file formats. The most common ones in digital cameras are JPEG, TIFF and RAW formats. The merits of these different formats are discussed in detail in Chapter 11. Of the three, JPEG is the only one that compresses the image, resulting in a loss of information. A quality setting defines the severity of the loss, file size and resulting artifacts. TIFF and RAW are uncompressed and therefore file sizes are significantly larger. TIFF is a standard format that may be used for archiving images without loss. RAW is more than a file format, as it results in almost unprocessed data being taken from the camera. With RAW images, the majority of the image processing detailed above is performed by the user in separate software after the image has been downloaded from the camera.
This short summary highlights some of the differences between using film and working digitally. The immediacy of results from digital cameras is somewhat counterbalanced by the number of settings required by the user before image capture. However it also highlights the high degree of control that you have. Many of the adjustments that would have to be performed optically with a film-based system, or by changing film stock, may be achieved by the flick of a switch or the press of a button.
Digital sensor sizes
One of the initial problems in producing digital cameras with comparable image quality to film was the difficulty and expense in manufacturing CCDs of equivalent areas. Many digital cameras have sensors which are significantly smaller than 35 mm format. The sizes are often expressed as factors, and they are based on the diagonal of a 1 in. optical image projected onto a sensor by a lens, which is close to 16 mm. Examples of the actual dimensions of some image sensors are shown in Figure 2.14, compared to typical film formats.
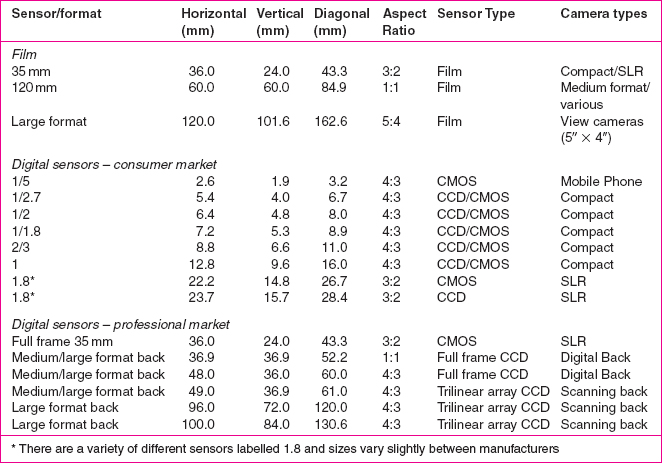
Figure 2.14 Dimensions of typical film formats and digital image sensors.
The small sensor sizes mean that in most digital cameras the focal lengths of lenses are significantly shorter than in film-based systems. This has a number of implications. First of all, it means that in the compact market, it has been possible to make much smaller camera bodies, and this is the reason that miniature cameras have proliferated (it has also made the tiny cameras used in mobile phones a possibility, see below). As for film camera formats, a shorter focal length means greater depth of field. The result of this is that using a shallow depth of field for selective focus on a subject is much more difficult in digital photography, because more often than not everything in frame appears sharp. This is one of the reasons that professionals often prefer a full-frame sensor of the same size as the equivalent film format, because in this case the lens focal lengths and depth of field will be the same as for film.
A further implication of the smaller sensors is that lens of focal lengths designed for film formats will produce a smaller angle of view when placed on a digital camera with a smaller sensor. This means that standard focal length lenses effectively become telephoto lenses (see Figure 2.15). The problem affects small-format SLRs, where lenses from the equivalent film format might be used, and also the larger formats when using digital backs with a smaller imaging area than the associated film back. It can also cause confusion when comparing the zoom lenses of two cameras with different-sized sensors. Effective focal length is sometimes quoted instead. This expresses the focal length as the same as a focal length of a lens on a film camera, usually 35 mm, based on an equivalent angle of view.
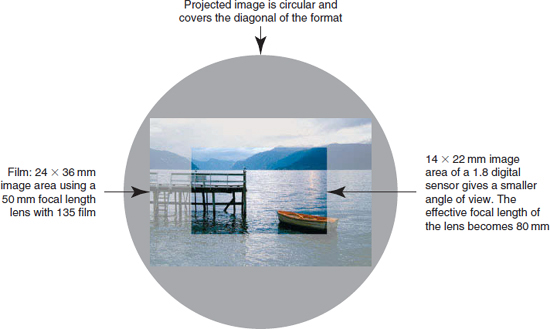
Figure 2.15 Change in angle of view as a result of smaller sensor size and focal length. Manufacturers often quote ‘effective focal length’ for digital lenses, which relates the field of view of the lens to that provided by the focal length of the lens in the related film format.
Digital camera equipment
Digital camera equipment is less easily classified by image format than film simply because of the huge variation in sensor size. Cameras can, however, be put into broad categories based upon the market for which they are aimed and like film cameras, this dictates the level of sophistication and cost of the equipment.
The equipment falls into a number of main types (see Figure 2.16):
1 Specially designed compact type cameras for point-and-shoot snapshots. Mobile phone cameras – with fewer features – can also be included in this category.
2 Hybrid cameras. There are a range of different designs, but they often bridge the gap between compacts and SLRs, containing many of the features of both.
3 Small-format SLR cameras. Up to 35 mm, these fall into two classes: Prosumer (or semi-professional) which are cheaper and aimed at the serious amateur, and professional SLRs based on existing film cameras, retaining their same ‘front-end’ features, but permanently housing a digital sensor in place of film.
4 Medium- and large-format digital backs. These are high resolution, capturing either an entire frame at once or in the larger formats scanning down the frame using a linear sensor. The majority are digital backs, which you simply attach and detach from your present medium- or large-format camera in the same way as a conventional rollfilm magazine or sheet film holder. There are a few available, however, that are built on to camera bodies.

Figure 2.16 Types of digital camera: (a) high-end compact, (b) hybrid and (c) professional SLR.
Point and shoot: Mobile phone cameras and compacts
At the lowest end of the market are mobile phone cameras. Pixel counts of up to 5 megapixels on sensors in mobile phones are now beginning to rival and surpass those in the compact point-and-shoot cameras of a few years ago. CMOS image sensors were first used in mobile phones; at the time the noise levels and low resolution associated with CMOS were unacceptable for other cameras, but the advances in the sensors in terms of both smaller pixel sizes and improved noise suppression have meant that image quality has steadily improved. These improvements have lead to the development of full-frame 35 mm CMOS sensors now used in professional SLRs. The optics on mobile phone cameras tend to be low quality, often plastic, however this is of much less importance bearing in mind the way in which these cameras are used. Interestingly, mobile phone cameras are currently the fastest growing part of the digital camera market. In recent years it has become common to see mobile phone images sent in by the public used in newspapers and television reports, where it would not have been possible to obtain such images unless a journalist had been on the scene.
There are a huge variety of compact cameras available, with many of the features typical on film compact cameras, such as built-in flash, a large variety of exposure and shooting modes, including movie modes and red-eye reduction. There has been a trend towards miniaturization by some manufacturers, aided by the ease of producing small CMOS sensors and the fact that many have scrapped viewfinders in favour of viewing the image on the LCD screen at the back. The other types of compact commonly available look more like an SLR, but tend to have smaller sensors. Nevertheless, recent models have sensors of up to 10 megapixels. Both types tend to be more automated, often without manual options. They may also only have digital zoom rather than optical zoom and output still image file formats may be limited to JPEG only. Prices are widely variable and continually coming down. The shelf-life of a particular camera model continues to decrease; often the next version in a successful range will be out six months after the last.
At the top end of the compact market are a couple of cameras aimed more at the professional (see Figure 2.16(a)) – the point-and-shoot for the professional photographer, if you will. They are significantly more expensive than the majority of compacts, up to three times more than those at the cheaper end but have fewer automated features, some without zoom lenses. They allow manual setting of most features; capture to RAW file format and sensor resolutions rival those of some SLRs. The cost is in the quality of sensor and the optics.
Semi-professional SLRs (Prosumer cameras)
These cameras are hybrids, with many of the automatic features of compact cameras, but with more of the manual controls available with SLRs. Where professional SLRs may be sold as camera body only, these tend to be marketed as all-in packages. Currently they do not include full-size sensors, i.e. of equivalent size to the film format. Actual sensor sizes are variable (see Figure 2.14). The upper limit of effective resolution of the sensors in these cameras is around 10.1 megapixels, which can theoretically produce an output print size of nearly 330 mm × 220 mm and a file size of around 30 MB. They may have a range of interchangeable lenses and a variety of accessories available and are sometimes compatible with the lenses from the equivalent film cameras. However, the smaller sensors mean that there will be a conversion factor between the lenses. The lenses are also of lower quality than the professional ranges. This is not to knock them however; some of the hybrid cameras produced by manufacturers such as Canon and Nikon in recent years contain sensors that surpass the performance of those in professional ranges of a few years ago.
They are aimed at the serious amateur and their price reflects their hybrid status, being significantly more affordable, sometimes half the price (including lenses) of the professional equivalent (body only).
Full-frame SLRs
These cameras are the closest to conventional film formats and are aimed at the professional. The camera bodies are almost identical in design, apart from the image sensor and related optics, processing and the LCD screen on the back. Some manufacturers have even maintained the position of the main controls to make the transition from film to digital even easier. Sensors are full-frame; the same image size as 35 mm format and this means that there is no lens conversion factor required. The variation in price is therefore down to number of pixels and hence resolution, with an upper limit at the time of writing of around 16 megapixels, giving an output file size of nearly 50 Mb. Often sold as a camera body only (although some may come with cheaper lenses), they are designed to replace the film camera body in a professional kit, without requiring additional lenses or accessories. They tend not to have the array of automatic features of their semi-professional counterparts, with fewer modes and more manual control. These cameras have been widely adopted by photojournalists, in particular sports photographers, who often carry laptops as part of their kit and are able to download, crop and adjust their images before sending them wirelessly to their picture editors within a matter of minutes. In these types of photography, speed is of the essence and can mean the difference between your images, or someone else’s, being used and syndicated.
There are also a number of medium-format full-frame digital SLRs available. Significantly more expensive, the sensors are larger than those used in 35 mm, but smaller than the physical dimensions of their film equivalent (36 mm × 48 mm is quite typical). More commonly available are digital backs for this format (see below).
Digital backs
For highest quality digital images intended for big prints, larger file sizes are required. This is made possible by fitting a digital back to a rollfilm SLR or view camera (see Figure 2.17). At this level, CCDs dominate. There are two main types: either frame arrays, which capture the entire frame at once, and are mainly medium format (although some can be attached to large-format camera bodies), or digital scanning backs, which use a trilinear CCD array (three rows of sensors, each capturing red, green or blue), and are designed for both medium and large-format cameras. The single shot arrays are not equivalent in size to their film counterparts, the largest currently available at around 49 × 37 mm, but with pixel counts of up to 7216 × 5412 (39 million), a sensor of this size produces image files of over 100 MB and resolution easily matches that of medium-format film.

Figure 2.17 Digital backs: (a) A digital back for a medium-format camera (image courtesy of Phase One, Inc.), (b) a scanning back containing a trilinear CCD array for a large-format view camera (image courtesy of Better Light, Inc.).
Because digital scanning backs physically track across the camera image plane throughout an exposure, subject matter is limited to still-life as both camera and subject must remain still for a couple of minutes. Therefore they cannot be used with flash, and using tungsten illumination you must avoid any lighting intensity variations (such as minor flickering) because this will show up as a band across the picture. A full colour image of many millions of pixels is built up line by line to give image files at the top end of the scale of over 400 MB.
Clearly, dealing with files of this size is a completely different matter compared to the convenience of using digital SLR. There are huge storage requirements involved and processing must be done predominantly on a peripheral computer, therefore digital large format is much more likely to be used in a studio setting than its analogue counterpart.
Comparing digital and silver halide camera equipment
Advantages of digital:
• You get an immediate visual check on results (for example, displayed on a large studio monitor screen).
• No film or lab costs, or liquid processing in darkrooms.
• Sensitivity can be altered via ISO speed setting to match a range of lighting conditions.
• Exposure can be checked using the histogram to ensure correct scene intensity/contrast and to prevent highlights being ‘blown out’.
• You can erase images, and reuse file storage, on the spot.
• Colour sensitivity is adjustable to suit the colour temperature of your lighting.
• Camera images can be transmitted elsewhere rapidly and wirelessly.
• Digital image files can feed direct into a designer’s layout computer – ideal for high-volume work for catalogues, etc.
• Extensive ability to alter/improve images post-shooting.
• Digital image files are theoretically permanent, if correctly archived.
• Silent operation.
Disadvantages of digital:
• Much higher cost of equipment; this includes powerful computing back-up with extensive file capacity (RAM) necessary for high-resolution work. The technology is continuing to develop, meaning that equipment may require frequent updating, another source of expense.
• There are a huge range of knowledge and skills required to keep up with changes in the imaging systems, to ensure that your methods match standard workflows within the industry and to maximize the potential of the equipment. This needs extra investment from you in terms of both time and money.
• Digital workflow is not simply restricted to capture, but requires an imaging chain consisting of other devices such as a monitor and printer.
• Correct colour reproduction of a digital image from input to output requires the understanding and implementation of colour management which is a complex and still developing process.
• Silver halide film still offers excellent image resolution at low cost – roughly equivalent to 3 billion pixels for every square centimetre of emulsion. Also colour prints, particularly in runs, work out much cheaper by traditional neg/pos chemical methods.
• The limits to final acceptable image size are highly influenced by the number of pixels per inch the camera sensor codes within a file. So when planning a large final print you must start with a camera delivering sufficient pixels.
• High-resolution systems based on scanning are limited to still-life subjects.
• Cameras with digital sensors, like computers, are adversely affected by heat (i.e. from tungsten lamps).
SUMMARY
![]() The 35 mm film format is the smallest used by professionals. These systems are the most portable, versatile and the cheapest, with the largest range of accessories. Using 35 mm camera equipment you gain the benefit of latest technology at competitive prices. However, equipment may be either too automated or offer excessive options which get in the way. Consider manual override to be essential.
The 35 mm film format is the smallest used by professionals. These systems are the most portable, versatile and the cheapest, with the largest range of accessories. Using 35 mm camera equipment you gain the benefit of latest technology at competitive prices. However, equipment may be either too automated or offer excessive options which get in the way. Consider manual override to be essential.
![]() Medium-format cameras offer a sensible compromise between equipment mobility and final image quality. As well as SLR and direct viewfinder types, shift cameras and monorail designs are made for rollfilm format. Often they allow use of interchangeable film magazines, instant picture and digital backs. However, equipment is expensive, and has a smaller range of lenses than 35 mm. Using this format also means less depth of field and narrower choice of film stock.
Medium-format cameras offer a sensible compromise between equipment mobility and final image quality. As well as SLR and direct viewfinder types, shift cameras and monorail designs are made for rollfilm format. Often they allow use of interchangeable film magazines, instant picture and digital backs. However, equipment is expensive, and has a smaller range of lenses than 35 mm. Using this format also means less depth of field and narrower choice of film stock.
![]() Large-format view cameras demand a slower, more craft-knowledgeable approach. They tend to be expensive, yet basic. The range of lenses is limited, with relatively small maximum apertures, but most often give excellent coverage to allow you to utilize comprehensive movements for architectural, still-life and technical subject matter. You can shoot and process pictures individually, and their size means that large prints show unique detail and tonal qualities.
Large-format view cameras demand a slower, more craft-knowledgeable approach. They tend to be expensive, yet basic. The range of lenses is limited, with relatively small maximum apertures, but most often give excellent coverage to allow you to utilize comprehensive movements for architectural, still-life and technical subject matter. You can shoot and process pictures individually, and their size means that large prints show unique detail and tonal qualities.
![]() It is vital to have reliable camera technique – get into the habit of routine precautionary checks before and during shooting. Look through the back of the empty camera to see that the shutter, aperture and flash work and that there are no obstructions. Take an instant-picture shot before and after a session. Carry a spare body or some back-up camera; an exposure meter; spare batteries – plus a screwdriver.
It is vital to have reliable camera technique – get into the habit of routine precautionary checks before and during shooting. Look through the back of the empty camera to see that the shutter, aperture and flash work and that there are no obstructions. Take an instant-picture shot before and after a session. Carry a spare body or some back-up camera; an exposure meter; spare batteries – plus a screwdriver.
![]() Digital imaging is now the dominant means of image production for the consumer photography market, but remains a developing area. The high cost and limitations of larger digital formats mean that certain sectors of the professional photography market still work with film.
Digital imaging is now the dominant means of image production for the consumer photography market, but remains a developing area. The high cost and limitations of larger digital formats mean that certain sectors of the professional photography market still work with film.
![]() Professional digital camera systems aim to match image format and resolution for the three main formats used in film systems.
Professional digital camera systems aim to match image format and resolution for the three main formats used in film systems.
![]() Currently, digital cameras use one of two types of image sensors, the charge-coupled device (CCD) or the complementary metal-oxide semiconductor (CMOS), both of which use a silicon-based ‘array’ of picture sensing elements (pixels) to convert light falling on the sensor into electronic charge.
Currently, digital cameras use one of two types of image sensors, the charge-coupled device (CCD) or the complementary metal-oxide semiconductor (CMOS), both of which use a silicon-based ‘array’ of picture sensing elements (pixels) to convert light falling on the sensor into electronic charge.
![]() Once the image has been recorded on the image sensor, it is processed, transferred off the chip, and stored as an image file, consisting of binary digits (‘Bits’) representing the image data. If archived properly, a digital image file may be stored permanently and reproduced as many times as required without any loss of quality.
Once the image has been recorded on the image sensor, it is processed, transferred off the chip, and stored as an image file, consisting of binary digits (‘Bits’) representing the image data. If archived properly, a digital image file may be stored permanently and reproduced as many times as required without any loss of quality.
![]() Digital images are sampled: spatially, they consist of discrete non-overlapping elements usually arranged in a rectangular grid. They are also sampled in terms of their colour values (quantized), as pixels may only take a fixed range of values, determined by the bit depth of the image file. These two factors determine the image file size, ability to represent fine detail and ultimately the quality of the final image.
Digital images are sampled: spatially, they consist of discrete non-overlapping elements usually arranged in a rectangular grid. They are also sampled in terms of their colour values (quantized), as pixels may only take a fixed range of values, determined by the bit depth of the image file. These two factors determine the image file size, ability to represent fine detail and ultimately the quality of the final image.
![]() Resolution has a number of different meanings in digital imaging and it is useful to understand these different definitions. Fundamentally it describes the detail-recording ability of an imaging system. Resolution of a digital image is normally expressed in terms of number of pixels. Resolution in a digital camera also refers to number of pixels, but may refer to interpolated resolution rather than the real resolution of the chip and can therefore be misleading as a figure of merit. For other devices, resolution is usually quoted in terms of numbers of pixels (or dots) per inch – this defines the level of detail captured at input and the dimensions of the image at output.
Resolution has a number of different meanings in digital imaging and it is useful to understand these different definitions. Fundamentally it describes the detail-recording ability of an imaging system. Resolution of a digital image is normally expressed in terms of number of pixels. Resolution in a digital camera also refers to number of pixels, but may refer to interpolated resolution rather than the real resolution of the chip and can therefore be misleading as a figure of merit. For other devices, resolution is usually quoted in terms of numbers of pixels (or dots) per inch – this defines the level of detail captured at input and the dimensions of the image at output.
![]() Although the front-end design of digital cameras, particularly for professional formats, is the same as that of film cameras, digital cameras have a number of features and settings not required with film. These are changed via a software user interface, either on an LCD screen on the back of the camera or remotely using a peripheral computer. This offers you a huge range of options at your fingertips, but it adds an extra layer of complexity to the capture process, however this is counterbalanced by the ability to view immediate results and adjust as necessary.
Although the front-end design of digital cameras, particularly for professional formats, is the same as that of film cameras, digital cameras have a number of features and settings not required with film. These are changed via a software user interface, either on an LCD screen on the back of the camera or remotely using a peripheral computer. This offers you a huge range of options at your fingertips, but it adds an extra layer of complexity to the capture process, however this is counterbalanced by the ability to view immediate results and adjust as necessary.
![]() Digital camera settings to change the white balance of the sensor and ISO speed rating to match illumination means that a wider range of imaging conditions are catered for by the same sensor. Correct exposure in digital cameras is further aided by the image histogram, allowing fine tuning of brightness and contrast. In film systems sensitivity and colour balance is achieved using different film stocks and filters and is therefore a more complicated and time-consuming process.
Digital camera settings to change the white balance of the sensor and ISO speed rating to match illumination means that a wider range of imaging conditions are catered for by the same sensor. Correct exposure in digital cameras is further aided by the image histogram, allowing fine tuning of brightness and contrast. In film systems sensitivity and colour balance is achieved using different film stocks and filters and is therefore a more complicated and time-consuming process.
![]() The physical dimensions of digital image sensors vary widely and are often smaller than film formats. This has implications for the optics of the cameras, as the smaller format means that shorter focal length lenses will produce the same field of view as those used on film cameras. Shorter lenses mean smaller cameras and larger depth of field. More recently professional cameras containing full-frame sensors that are the same size as their equivalent film format have been developed. For these cameras, there is no change in terms of field of view or depth of field when lenses for equivalent film formats are used with them.
The physical dimensions of digital image sensors vary widely and are often smaller than film formats. This has implications for the optics of the cameras, as the smaller format means that shorter focal length lenses will produce the same field of view as those used on film cameras. Shorter lenses mean smaller cameras and larger depth of field. More recently professional cameras containing full-frame sensors that are the same size as their equivalent film format have been developed. For these cameras, there is no change in terms of field of view or depth of field when lenses for equivalent film formats are used with them.
![]() Digital camera systems may be loosely classified according to the market that they are aimed at. The largest section of the market comprises compact cameras and mobile phone cameras. These vary hugely in design and features. More expensive than these are semi-professional (Prosumer) cameras, which are aimed at the serious amateur, are usually SLR in design and tend to have many of the features of professional 35 mm cameras.
Digital camera systems may be loosely classified according to the market that they are aimed at. The largest section of the market comprises compact cameras and mobile phone cameras. These vary hugely in design and features. More expensive than these are semi-professional (Prosumer) cameras, which are aimed at the serious amateur, are usually SLR in design and tend to have many of the features of professional 35 mm cameras.
![]() For the professional market, a number of manufactures now make 35 mm full-frame SLRs, which are designed to match their film-based equivalents in terms of quality and features. These are currently significantly more expensive than either the film versions or the semi-professional SLRs.
For the professional market, a number of manufactures now make 35 mm full-frame SLRs, which are designed to match their film-based equivalents in terms of quality and features. These are currently significantly more expensive than either the film versions or the semi-professional SLRs.
![]() There are a range of medium-format digital camera systems available. A few manufacturers make SLR cameras, but many professionals opt for digital backs designed to be used with existing equipment. Currently, the sensor dimensions are smaller than the 120 mm film; however image quality is generally regarded as equivalent.
There are a range of medium-format digital camera systems available. A few manufacturers make SLR cameras, but many professionals opt for digital backs designed to be used with existing equipment. Currently, the sensor dimensions are smaller than the 120 mm film; however image quality is generally regarded as equivalent.
![]() Large-format digital systems are usually digital backs containing either an area CCD array of smaller dimensions than large format films, or a tri-linear array of CCD elements scanned across the image. Full-frame sensors are more difficult to successfully manufacture to this size. The scanning backs, which do match the imaging area of the equivalent films, require still-life subjects and non varying light sources to prevent image artefacts such as banding.
Large-format digital systems are usually digital backs containing either an area CCD array of smaller dimensions than large format films, or a tri-linear array of CCD elements scanned across the image. Full-frame sensors are more difficult to successfully manufacture to this size. The scanning backs, which do match the imaging area of the equivalent films, require still-life subjects and non varying light sources to prevent image artefacts such as banding.
![]() The decision to move to a digital workflow requires careful consideration. The technology continues to evolve and equipment will need to be updated on a more regular basis than film-based systems.
The decision to move to a digital workflow requires careful consideration. The technology continues to evolve and equipment will need to be updated on a more regular basis than film-based systems.
![]() Digital camera systems are more expensive and require understanding of a range of different issues on top of those required for film photography. However, the versatility of the systems and the ability to view and alter images immediately post capture offer profound advantages compared to the time required to produce an image using film.
Digital camera systems are more expensive and require understanding of a range of different issues on top of those required for film photography. However, the versatility of the systems and the ability to view and alter images immediately post capture offer profound advantages compared to the time required to produce an image using film.
![]() Top-end digital cameras can deliver results fully the equal of equipment using silver halide materials; capital cost is far higher, although reducing every year.
Top-end digital cameras can deliver results fully the equal of equipment using silver halide materials; capital cost is far higher, although reducing every year.
PROJECTS
1 This project involves the use of the histogram as an exposure tool:
(a) Set up a still-life scene using a variety of objects, including a test chart, if you have one, such as the Macbeth colour checker chart. If not, ensure that there are a range of colours in the scene and that there is one white, one black and one mid-grey object included. Set the lighting so that there is a range of approximately seven stops between shadows and highlights (you can check this by zooming in and taking exposure readings from these areas).
(b) Ensure that a memory card is in the camera, turn the camera on and perform a complete format. Set the speed to 200 ISO. Set the colour space, if possible, to Adobe RGB.
(c) Take 5 bracketed exposures, in increments of 1 stop, from 2 stops below correct exposure to 2 stops above.
(d) Ensure that the histogram is displayed when the images are played back. Examine how the shape of the histogram changes as the exposure changes. Identify the point at which shadows or highlights within the image are clipped – this will show on the histogram as a peak at either side. Your camera LCD screen may also display clipped areas within the image.
2 This project involves investigating the ease of use and results obtained using the different methods of setting white balance in your camera:
(a) Select a number of scenes under different lighting conditions, e.g. daylight, tungsten, and fluorescent. In each, include a white object, such as a sheet of paper, and a mid-grey object, such as a Kodak grey card.
(b) Set the speed to 200 ISO throughout. Find correct exposure, set colour space to Adobe RGB and file format to JPEG (high quality).
(c) Take shots of each scene using the different white balance methods available: (i) Auto-white balance, (ii) Pre-set to the light source or colour temperature and (iii) Using custom white balance (you will need to check the instructions for the camera to do this – it usually requires a reference frame of a white object).
(d) Download the images to your computer and view them side by side on screen in an imaging application such as Adobe Photoshop. Identify the method that works best for each light source.
3 This project involves the capture of a scene using the different ISO speed settings to investigate the effect on image quality and noise levels:
(a) Use the camera on a tripod for one scene in daylight conditions and another scene with low light conditions (not night conditions, but indoor using natural light, for example).
(b) For each scene shoot a range of images using all the possible ISO speed settings on your camera.
(c) Download and examine your images in Photoshop. Zoom into areas of shadow and mid-tone.
(d) Identify at which ISO speed noise begins to be visible and in which areas it is most problematic. You may find you get different results depending on the lighting conditions.
(e) You might want to further extend this project by trying out some noise removal techniques (see the Image Manipulations chapter).