
Appendices
A: Optical calculations
Formulae below relate to lenses, and make use of the following international symbols:
f = focal length
u = distance of object from lens (measured from front nodal point *)
v = distance of image from lens (measured from rear nodal point *)
d = total distance between object and image, ignoring nodal separation
0 = object height
1 = image height m = magnification
(*Warning: these distances are difficult to measure accurately with telephoto and inverted telephoto lenses, because the nodal points may be well in front or behind the centre of the lens. See page 71).
You can calculate focal length, or image and object distances, or magnification, when other measurements are known. The key equation is:
From which are derived:

Bear in mind that when you are using an enlarger or projector the ‘object’ refers to the negative or transparency; the ‘image’ is that projected on the baseboard or screen.
Depth of field
When the object distance is greater relative to focal length, the simplest way to calculate depth of field is to work from hyperfocal distance (see Glossary). This gives sufficient accuracy for most practical purposes.

Exposure increase in close-up work
Owing to the effect of the inverse square law when the lens is located much beyond the focal length from the image plane, exposure time indicated by an external meter should be multiplied by a factor calculated as

Of these the middle formula is the easiest to apply; remember that m is the height of an object divided by its image height on the focusing screen.
Supplementary lenses and focal length
Assuming that the supplementary lens is placed very close to the main lens:
s = focal length of supplementary lens*
When using a converging supplementary:
When using a diverging supplementary:
Cosine law
Illumination across the field of a lens reduces as the fourth power of the cosine of the angle made between the portion of field and the axis. This means that less light is received at the corners of the frame in the camera than at the centre – noticeably so with wide-angle lenses of non-retrofocus construction. With negative/positive photography the effect of the camera lens is often compensated for by the cosine law effect on the enlarger lens. But with positive/positive printing corner darkening is cumulative.

Light filtration for Ilford multigrade IV black and white paper, using a colour head enlarger
| Paper grade effect | Durst (max 170M) head | Durst (max 130M) head | Besseler; Chromega; Vivitar; De Vere | Meopta |
| 00 | 150Y | 120Y | 199Y | 150Y |
| 0 | 90Y | 70Y | 90Y | 90Y |
| 1⁄2 | 70Y | 50Y | 70Y | 70Y |
| 1 | 55Y | 40Y | 50Y | 55Y |
| 11⁄2 | 30Y | 25Y | 30Y | 30Y |
| 2 | 0 | 0 | 0 | 0 |
| 21⁄2 | 20M | 10M | 05M | 20M |
| 3 | 45M | 30M | 25M | 40M |
| 31⁄2 | 65M | 50M | 50M | 65M |
| 4 | 100M | 75M | 80M | 85M |
| 41⁄2 | 140M | 120M | 140M | 200M |
| 5 | 170M | 130M | 199M | – |
B: Gamma and average gradient
The gamma of a film is the slope of the straightline portion of the characteristic curve of the film, as shown in the graph.
The average gradient ![]() is a measure of contrast using the characteristic curve of a film. First you have to find two points on the characteristic curve, as shown in the graph. The first point is at 0.1 above Dmin. The second point is at 1.5 units log relative exposure from the first point. The average gradient is the slope of the line joining the two points.
is a measure of contrast using the characteristic curve of a film. First you have to find two points on the characteristic curve, as shown in the graph. The first point is at 0.1 above Dmin. The second point is at 1.5 units log relative exposure from the first point. The average gradient is the slope of the line joining the two points.

C: Chemical formulae: Health and safety
Chemicals picked out with asterisk (*) need careful handling (see Safety advice page 440).
Monobath
Single-solution combined developer and fixer for black and white films. Gives a set degree of contrast. Works on the basis of active developer components developing fully during long inertia period before fixer begins to affect film. May cause dichroic fog with some film types. Process to completion – about 6 minutes at 20 °C.
| Water (hot) | 750 ml |
| Sodium sulphite (anhydrous) | 60 g |
| Hydroquinone | 30 g |
| Sodium hydroxide* | 25 g |
| Phenidone | 3 g |
| Sodium thiosulphate (crystals) | 150 g |
| Cooled water, to make | 1 l |
| Before use, add 40% formaldehyde* | 10 ml |
Reducers for black and white silver image materials
Reducer R-4a is a subtractive reducer for correcting the effects of overexposure. Maintains image contrast, also removes veil due to fog.
| Stock solution A | |
| Water | 250 ml |
| Potassium ferricyanide | 38 g |
| Water, to make | 500 ml |
| Stock solution B | |
| Water | 1 l |
| Sodium thiosulphate (crystals) | 480 g |
| Water, to make | 2 l |
Mix one part solution A, four parts solution B and 27 parts water just before use. When reduction is sufficient, halt action by transferring film/paper to tray of running water. Finally wash fully and dry.
Reducer R-8 is a proportional reducer. Reduces density and also slightly reduces contrast.
| Water (about 32 °C) | 600 ml |
| Ferric ammonium sulphate | 45 g |
| Potassium citrate | 75 g |
| Sodium sulphite (anhydrous) | 30 g |
| Citric acid | 20 g |
| Sodium thiosulphate (crystals) | 200 g |
| Sodium thiosulphate (crystals) | 480 g |
| Water, to make | 1 l |
Use at full strength. Treat negative for 1–10 min (18–21 °C), then wash fully. For slower action dilute 1 + 1.
Reducer R-15 has a super-proportional effect, reducing mostly high-density areas and therefore lowering contrast.
| Stock solution A | |
| Water | 1 l |
| Potassium persulphate* | 30 g |
| Stock solution B | |
| Water | 250 ml |
| Sulphuric acid (10% sol)* | 15 ml |
| Sodium thiosulphate (crystals) | 480 g |
| Water, to make | 500 ml |
Use two parts A and one part B. Pre-treat negatives in liquid hardener, then wash. Reduce by inspection, then fix and wash fully.
Iodine bleacher
For total erasure of image, to ‘shape-out’ subjects on prints; can also be applied on tip of brush to convert black specks to white (these can then be spotted in normally).
| Warm water | 750 ml |
| Potassium iodide | 16 g |
| Iodine* | 4 g |
| Water, to make | 1 l |
Keeps well. Apply undiluted with brush or cotton wool. To remove the intense brown stain, rinse and treat in a small quantity of print fixing bath (10 min). Discard fixer. Wash fully.
Intensifiers for black and white silver materials
Intensifier IN-4 is a proportional type (chromium intensifier). Strengthens image without much change in contrast.
| Stock solution | |
| Water | 500 ml |
| Potassium dichromate* | 90 g |
| Hydrochloric acid (concentrated)* | 64 ml |
| Water, to make | 1 l |
Use one part stock and ten parts water. Preharden negative. Then bleach the black image in reducer, wash for 5 min and redevelop in regular bromide paper developer. Work in white light (but not direct sunlight). Finally rinse, fix and wash. Can be repeated to increase the effect.
Intensifier IN-6 is a sub-proportional intensifier. Strengthens paler densities more than high-density areas, so it reduces contrast. Works best with fast negative materials.
| Stock solution A | |
| Distilled water (about 21 °C) | 750 ml |
| Sulphuric acid (concentrated)* | 30 ml |
| Potassium dichromate* | 23 g |
| Distilled water, to make | 1 l |
| Stock solution B | |
| Distilled water (about 21 °C) | 750 ml |
| Sodium metabisulphite | 3.8 g |
| Hydroquinone | 15 g |
| Wetting agent (Kodak Photo-Flo) | 3.8 g |
| Water, to make | 1 l |
| Stock solution C | |
| Distilled water (about 21 °C) | 750 ml |
| Sodium thiosulphate (crystals) | 22.5 g |
| Water, to make | 1 l |
For use add two parts B to one part A, stirring continually. (Note: add sulphuric acid to water very slowly, with constant stirring. It is dangerous to add water to sulphuric acid). Then, still stirring, add two parts C and one part A. Wash negative for 5–10 min, treat in hardener for 5 min and then wash again for 5 min before intensifying. Treat negative for up to 10 min (20 °C) with frequent agitation. When using a tray, treat only one piece of film at a time and discard solution afterwards. Finally wash negative for 15 min.
Black and white silver halide emulsion
Chlorobromide enlarging type. Normal contrast, warm black tones.
| Solution A | |
| Water | 750 ml |
| Gelatine | 25 g |
| Potassium bromide | 53 g |
| Sodium chloride | 15 g |
| Cadmium chloride* | 2 g |
| Hydrochloric acid (30% sol)* | 2.5 ml |
| Solution B | |
| Water | 1400 ml |
| Silver nitrate* | 100 g |
| Solution C | |
| Water | 250 ml |
| Gelatine | 150 g |
Bring all the above solutions to 60 °C. Then, under amber safelighting, add solution B to solution A in three separate and equal parts at intervals of 5 min. Some 5 min after the last addition, add solution C.
Ripening. Hold the emulsion at 60 °C for 30–45 min, covered from all light.
Coating additions. Cool the emulsion (but keep it liquid enough to coat paper – about 40 °C). Then make the following additions (quantities here per litre of emulsion).
| Potassium bromide (10% sol) | 2 ml |
| Chrome alum (10% sol) | 15 ml |
| Formalin (40%), 1 part plus 3 parts water* | 40 ml |
| Alcohol (rectifed spirit) | 10 ml |
| Glycerine | 10 ml |
| Sulphuric acid, 1 part in 10 parts water* | 3 ml |
Once prepared, the emulsion can be stored in an opaque container in a refrigerator. For coating follow information as for commercial emulsion.
Handling and using chemicals safely
Most common chemicals used in photography are no more dangerous to handle than chemicals – oven cleaners, insect repellents, adhesives – used as a matter of course around the home. However, several of the more special-purpose photographic solutions such as bleachers, toners and intensifiers do contain acids, irritant or toxic chemicals which must be handled with care. These are picked out with an asterisk (*) in the formulae given here and earlier. Your response to direct contact with chemicals may vary from finger staining to direct irritation such as infammation and itching of hands or eyes, or a skin burning or general allergic reaction which may not appear until several days later. People who suffer from any form of skin disease, or from allergic conditions such as hay fever or asthma, should be particularly careful as their skin tends to be more sensitive.
The following guidelines apply to all photographic chemical processes:
• Avoid direct skin contact with all chemicals, especially liquid concentrates or dry powders. Do this by wearing thin plastic (disposable) gloves, and using print tongs when lifting or manipulating prints during processes in trays.
• Avoid breathing in chemical dust or fumes. When weighing or dissolving dry powders work in a well-ventilated (but not draughty) area. Do not lean over what you are doing, and if possible wear a respiratory mask (the fabric type as used by bikers is inexpensive).
• Be careful about your eyes. When mixing up chemicals wear eyeshields, preferably the kind you can wear over existing spectacles. (Remember not to rub an eye with a chemically contaminated gloved hand during processing.) If you do splash or rub an irritant into your eye rinse it with plenty of warm water immediately. Repeat this at least for 10 min – it is important that the eye surface be washed and not just the eyelids. Install a bottle of eyewash somewhere close to where you are working.
• Keep things clean. Liquid chemical splashes left to dry-out turn to powder which you can breathe in or get on your hands or clothes, as well as damaging films and equipment. Similarly do not leave rejected test prints, saturated in chemical, to dry out in an open waste bin close to where you are working. To prevent chemicals getting on your clothes wear a PVC or disposable polythene-type apron.
• Labels are important. Carefully read warnings and procedures, the chemical manufacturer has printed on the label or packaging, especially if you have not previously used the product. When a product is, or contains, a chemical which may be dangerous the manufacturer must by law publish a warning. The warning notice may incorporate a symbol plus a risk statement and safety statement advising you of any simple first-aid actions to follow if necessary.
• Clearly label the storage containers for chemicals and stock solutions you have made up yourself. Never, ever, leave photographic chemicals in a bottle or container still carrying a food or drink label. Conversely do not put food in empty chemical containers.
• Keep chemicals and food and drink well separated. Even when properly labelled keep all your chemicals well out of reach of children – never store them in or near the larder. Avoid eating in the darkroom, or processing in the kitchen where food is prepared.
• Chemical procedure. Where a formula contains an acid which you must dilute from a concentrated stock solution, always add the acid slowly to the water (adding water to acid may cause splattering). Do not tip one tray of chemical solution into another of a different kind, as when clearing up – cross-reaction can produce toxic fumes.
• In rooms where chemicals are handled and processing machines run every day you may need to install an extra local ventilation system. Make sure this draws fumes away from you, not towards you.
D: Lighting and safety
Mishaps with lighting are a common cause of accidents in photography. Here are some safety guidelines:
1. Lighting heads are potentially most unstable when their floor stands are extended to full height. Make sure the whole unit will not topple over if a cable is tugged - clip the cable to the stand at floor level. Weigh down the base if a sudden gust of air might bowl over a unit (a monobloc head with umbrella or softbox fitted and raised to the top of its stand is especially vulnerable).
2. Try to run cables where they will not be walked over or stood on. Do not overload cable with too many lights through the use of distributor boxes or adaptors. Avoid powering a lighting unit through cable tightly coiled on a drum. Electricity can heat a coiled-up cable until it smoulders.
3. Do not drape materials over incandescent lamp sources to diffuse or filter light. Use the proper fittings which space accessories away from hot surfaces. Fires can also start from litter (for example, background paper) trapped between electrical plugs and sockets.
4. Lights or powerpacks suspended from ceiling track must be fitted with safety chains. Always raise these overhead units after use; similarly lower floor standing units.
5. Electricity and water (including condensation) do not mix. Avoid storing or using lighting where it may come into contact with moisture unless specially protected first.
6. Never open up an electronic flash to attempt to repair it. Units are not intended for user servicing, and even a small flashgun may give you a shock. Do not disconnect, or reconnect, a flash head to a fully charged powerpack because this may cause contacts to ‘arc-over’.
7. Make sure all your lighting equipment is efficiently grounded (‘earthed’).
E: Batteries
Batteries are vital power sources for most kinds of cameras, power-winders, hand flash units and exposure or colour temperature meters. So battery failures mean breakdowns that can ruin a shooting situation, especially when on location, unless you can anticipate problems. Each of the main types of battery has different practical characteristics.
Alkaline: Good staying power, as needed for micromotors and camera circuitry, as well as flash units and meters. Virtually leak-proof. Good shelf life, and still work quite well at low temperatures.
Nickel cadmium (Ni-Cad): These batteries are rechargeable. Batteries and charging gear are expensive, but with two batteries and a charger you should always have firesh battery supplies. However, Ni–Cads need charging more often than you would have to replace alkaline types, so you may be caught out by your batteries ‘dying’ on a shoot. Ni–Cad batteries do not have infnite life, and need recharging more frequently as they age. Since these batteries deliver high amperage they can damage components in some electronic circuits, and so should only be used if specifically recommended by the equipment manufacturer.
Silver oxide: Very suitable for LED displays in camera viewfinders, etc. Gives constant voltage throughout a long life.
Lithium: Covers a number of individual types, all of growing importance. Has a long storage life. However, unless your equipment is specifically designed for lithium batteries, their useful life may be short. They must be effectively leak-proofed – never leave an exhausted lithium battery in any equipment.
Storing batteries
Remember, batteries work by chemical reaction, which is speeded up by high temperature and slowed down in the cold. Warm storage reduces life – the spare batteries in your pocket are probably losing power almost as fast as those in your camera. At low temperatures many batteries become sluggish. Outside on a cold day you may have to raise battery temperature with body heat to gain sufficient power to run your equipment. By the same token batteries sealed into a polythene bag and stored in a refrigerator or freezer have greatly extended shelf life.
Battery care
• Always check the polarity of batteries before fitting. Make sure they face the appropriately marked terminals.
• As far as possible, when you load a battery run a (cleaned) pencil eraser over both contacts. Complete the process by rubbing the contacts on clean paper. This can improve performance by 50%.
• Never attempt to recharge batteries other than Ni–Cad types.
• Do not attempt to open battery cases. Do not throw any battery into the fire. Keep batteries away from young children. ll It is always best to remove batteries before storing equipment for more than a week or so. Avoid leaving any exhausted battery in any equipment, and change your batteries at least once a year.
F: Colour conversion filter chart
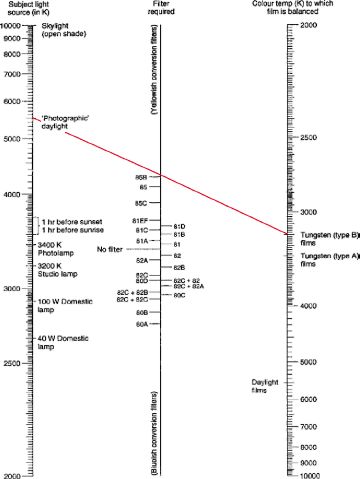
Locate the colour temperature of your subject light source in the left-hand column. In the righthand column find the colour temperature to which your film is balanced. Use a straight edge to connect these two figures (see example) and read off the number of the correction filter you need from the middle column. In the example shown a subject in 5500 K daylight exposed onto type B tungsten film requires use of an 85B filter.
G: Ring around chart
Chart mapping the relationship of filter colour and strength. Strongest filtration is furthest from the centre. Using combinations of filters you can change the colour of light in directions between the main ‘spokes’ – for example, choosing yellowish orange (10R + 20Y) or reddish orange (20R + 10Y). Filter values hold good for CC filters used in shooting or printing; also for the relative strengths of filters in a colour head enlarger. To make up red, green and blue use combinations of yellow, magenta and cyan filters.

* In same units as f. If in dioptres, divide dioptre value by one metre to get s.