
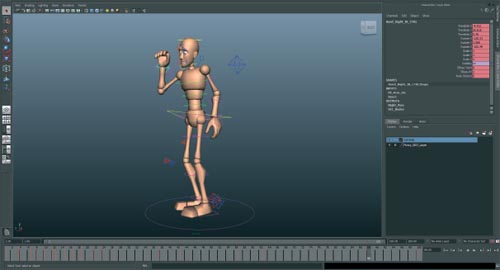
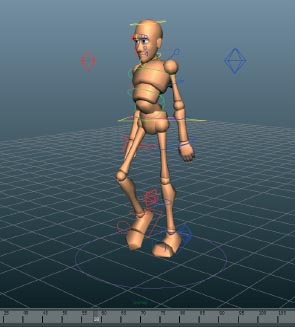
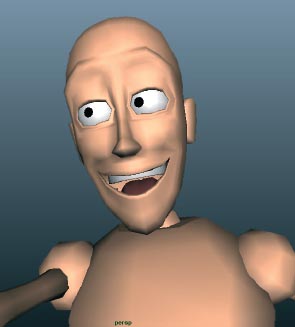
1
Animation Principles
THE PRINCIPLES OF ANIMATION, identified and perfected by the original Disney animators, guide us when we make technique and performance choices in our work. They are not rules, but rather guidelines for creating appealing animation that is engaging and fun to watch.
These seemingly simple concepts combine to inform the most complex animation and performances on screen. Though some translation of these principles must occur for animators to utilize these concepts in Maya, this chapter offers a clear explanation of them and shows you how you can begin applying them in your own work.
Squash and Stretch
LAUDED AS THE MOST IMPORTANT PRINCIPLE, squash and stretch gives characters and objects a sense of flexibility and life. Also, this principle dictates that as characters and objects move and deform, their volume generally stays the same. Some of squash and stretch can be dictated by the object actually smooshing into something, such as a ball bouncing on the ground. With characters, squash and stretch can mean many different things. It can be combined with anticipation to make a character “wind up” for an action in a visually interesting way. One example would be as a character prepares to move, he may squash his spine, making his figure bulge out. Then as he springs into motion, his form elongates and stretches thin to retain the same volume. Whenever possible, use squash and stretch on your characters to give a sense of strain (a character reaching for something high overhead), or to give a sense of fear (a character squashes into a little ball in a corner to avoid being seen by a predator). Start looking for squash and stretch in professional animation and in life, and you'll see quickly how much this simple principle adds to the illusion of life we give objects and characters.

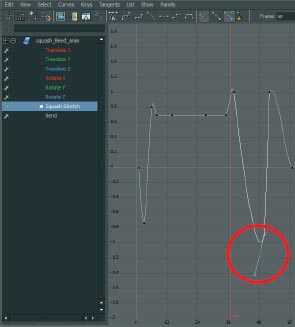
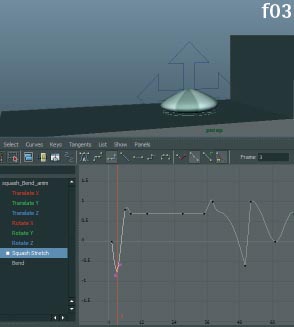
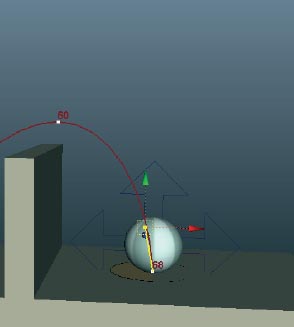
1 Open squash_Stretch_start.ma. We have an animated bouncing ball with the squash control keyed at 0 on f01 and f16. Hit play on the timeline and see how the ball seems neither alive, nor like it's made from rubber. This lifeless plastic ball is in need of some squash and stretch!
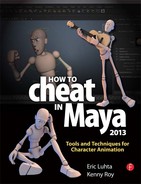
2 Go to f08, and check out this dead ball! When it hits the ground, we expect a ball made from rubber to react! It needs to squash, so select the middle squash_anim control and translate it down in Y to the base. The location of this control determines where the ball squashes from.

3 Adjust the Squash Stretch amount in the channel box and key the entire control. The ball contacts for 2 frames, so this frame will be the start of it squashing, about -0.2 or so. Also notice that as the ball squashes down in Y, it bulges out in X and Z, retaining its volume.
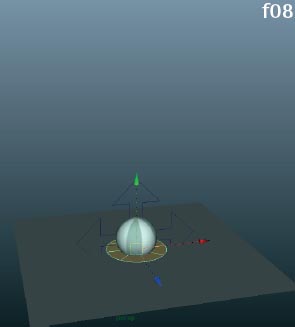
4 At f09, the momentum continues downward through the ball, making it squash even more into the ground. Set the squash to -0.4 and key the control.

5 Go back to f07. As the ball falls, it would stretch out from the air resistance and the anticipation of hitting the ground. Translate the control back to the middle of the ball (Y is 0) so it stretches from its center, adjust the stretch control, and set a key.

6 At f11, center the squash control in Y, stretch the ball slightly and key it. Since the first and last frames are set to 0, the ball returns to its shape at the top of the bounce. Play back the animation with the controls turned off and watch this principle shine.
![]()
squash_Stretch_start.ma
squash_Stretch_finish.ma
Squash and stretch isn't only about physically squashing and stretching in a cartoony manner. Also think about squash and stretch in the broader sense of being the contrast between compressed/contained and outstretched/extended.
Anticipation
ANTICIPATION IS THE PRACTICE of moving a character in a certain way to prepare the character and the audience for the action. Most often, anticipation means moving the character a small amount in the opposite direction of the main action. Since a lot of animation is very physical, many times anticipation is a necessary part of getting the correct physical performance out of the character. For instance, a character jumping must bend his knees first. A pitcher must bring his arm back before he throws the ball. This natural motion that occurs in everyday life is what makes anticipation as an animation principle so effective. We are very accustomed as humans to tracking fast-moving objects by taking a cue from its anticipation, and then looking ahead of the object in the opposite direction. So as animators we must take advantage of this hard-wired trait of humans and use it to our advantage. We can make it so that the audience is always looking at the part of the screen that we want them to, by activating the visual cue of anticipation.
Anticipation also serves a purpose in fine tuning your performance choices. Disney animator and animation legend Eric Goldberg is known for relating anticipation directly with thought itself. This makes perfect sense; if we see a character really “wind up” for an action, it is clear to us that the character has planned the action well in advance, and is thinking about how to move. On the other hand, if a character moves instantaneously and without warning the motion comes across as unplanned. Think of the difference between the apparent thought process of Popeye swinging his arm back to punch an unsuspecting Brutus, and Brutus's head when the fist hits him on the back of the head. Popeye was planning to wallop the big bully, but Brutus was not thinking at all of the fist about to hit him! So as you are working, pay close attention to how much anticipation you are using in your animation. It may just mean the difference between a thinking, planning, and intelligent character, and a character simply reacting to the world around him.
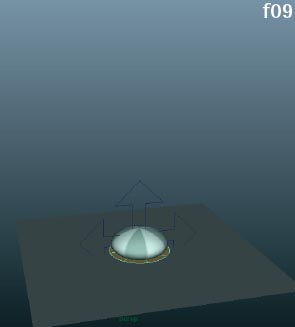
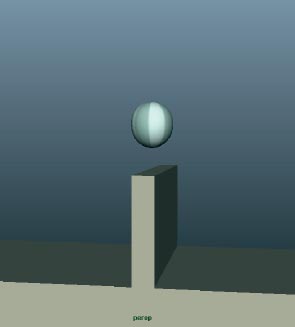
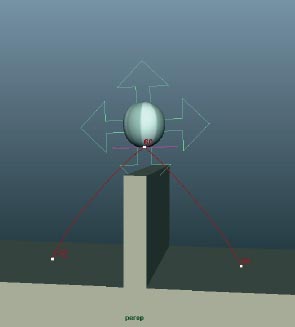
1 Open anticipation.ma. In this scene, a bouncing ball looks at a wall, and then deftly hops over. Play it a few times and see if you can spot the anticipation before the jump.
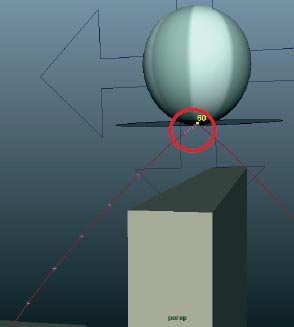
2 If you select the squash_Bend_anim control on the ball, you will see there is a keyframe on the Squash Stretch control at f50 with an unlocked tangent. This is the frame of anticipation. We are going to play with this anticipation and see what looks best.
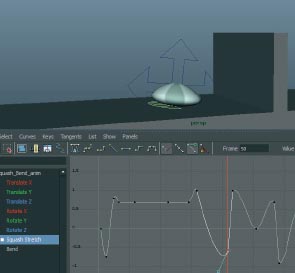
3 Select the squash_Bend_anim control, and open the Graph Editor. See that key frame with the unlocked tangent handles? Try moving that key up and down and finding a good size of squash for this anticipation. Watch the animation over and over again to see what looks best. Remember, it's up to you!
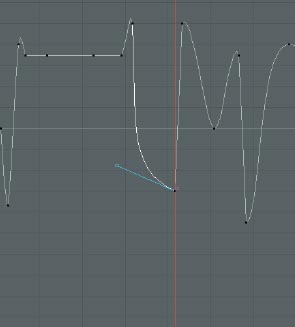
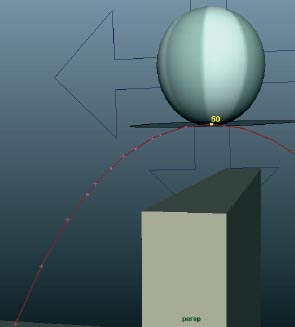
4 Now play with the handle itself! Drag it way out towards the left and play back the animation. See what a different impression you get as to the thought behind the jump? Subtle changes in anticipation can have incredible results.
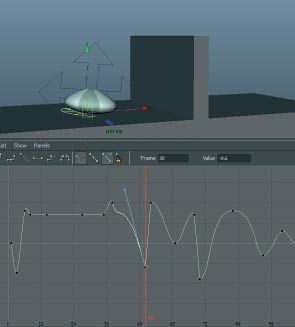
5 Or does this look better? Remember, if you keep the number of keyframes you use to a minimum, you can spend more time making adjustments and less time wrestling with technical trouble. What new impression does this anticipation give you? What is the ball thinking?
6 At f03 is another little anticipation that I sneaked in. Play with the size and timing of this one as well, and start training your eye to hone in on the most powerful and engaging performance.
![]()
anticipation.ma
Play your animation at speed! We know that timing is vitally important in animation. You get so much more information playing your animation at speed than you do if you just scroll through the timeline.
Staging
STAGING IS A FUNDAMENTAL that encompasses a mass of artistic sensibilities. Staging involves framing the camera in a way to best capture the action. It involves making sure your animation has been planned to best communicate the motion, the character arc, the story. Simply put, staging is how you create the scene.
Ideally staging starts with your planning phase. Thumbnailing your poses is the best way to make strong pose choices at the start of a shot. If you are not a strong drawer, then perhaps you rely more on photo or video references to give you cues to begin your work. At this very early phase, staging means you are thinking about how your posing and the layout of the scene are going to clearly show the motion.
As you begin your scene, staging becomes more complex. How are you going to maintain the high level of communication throughout the life of the shot? Will you be able to hit all of the poses that you'd like, or are the poses going to have to be changed to work when the character is in motion? Staging means that you are thinking about the entire action at this point. Adjusting the camera, making tweaks to the layout, and finding just the right balance in the composition all improve your staging of the scene. When you are finished blocking, generally the major staging decisions have been made. This does not mean that staging is over!
As you finish the animation, there are still staging considerations you must be aware of. Where is the audience's eye going to be looking at every moment of the shot? If you've animated the scene correctly, you have a very good idea of what the audience should be paying attention to at every second. As your shot is finished and moves through the rest of the pipeline, other decisions that hone in the audience's focus are going to come into play: lighting, effects, and editing.
As animators, our staging choices have far-reaching impact on the success of a shot in communicating an idea. We'll practice these staging concepts by repositioning a bouncing ball animation, the camera, and some lights to find the greatest impact.

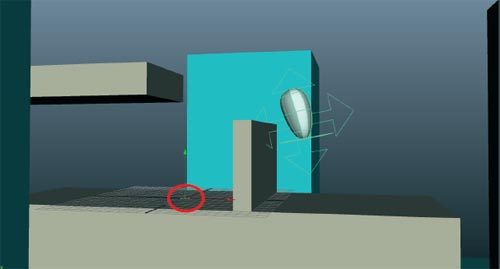
1 Open staging_start.ma, and set one of your panels to look through “renderCam”. Yikes. This scene has a lot of staging problems. The camera is in a position where it cannot see any of the action, the ball has been positioned very oddly, and the light is casting a shadow on the entire main action. Let's make some adjustments.

2 Rotate, pan and zoom the camera around until you've found an angle that shows off the animation nicely when you scrub through the timeline. This is a nice angle for me.

3 Let's adjust the position of the animated ball to make the action read clearer, shall we? Grab the “all” group in the Outliner, and scrub through the animation. See how the ball is pushed far towards the edge of the set, and hits the wall on f65? Let's reposition it to be a little more centered, and to not hit the set on its path.
![]()
staging_start.ma
staging_finish.ma
It's easy to forget that staging is more than just the camera angle. If you're working on a production, you may not have any control over the camera angle chosen for a shot. If this is the case, you must design your staging within the camera you've been given. This might entail “cheating” poses so they look their best in a particular camera.
4 Much better. I moved the group back to the world origin, and the animation is working much better to camera.
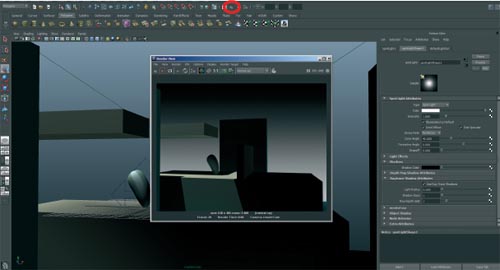
5 Hit the render button to see how the lights are positioned. Uh oh, the main action is happening in deep shadow!
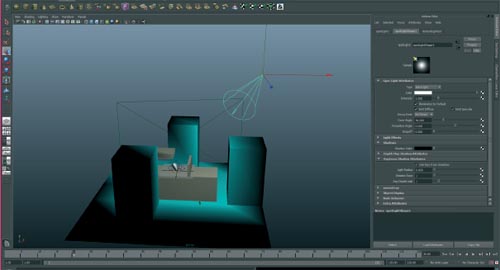
6 In a perspective panel, press the ![]() key to enable the lighting, and make sure Show > Lights is enabled in the viewport menu. Select the light and transform and rotate it until it gives a nice ¾ lighting angle. The action should be lit so that we get a fully lit view of the scene, but also so that the shadows are angled to show the detail and depth of the set.
key to enable the lighting, and make sure Show > Lights is enabled in the viewport menu. Select the light and transform and rotate it until it gives a nice ¾ lighting angle. The action should be lit so that we get a fully lit view of the scene, but also so that the shadows are angled to show the detail and depth of the set.

7 Now click render when you have repositioned your light. Beautiful!
If you select a spotlight, and then go to the Panels menu in any panel and choose Look Through Selected, it will create a temporary camera view that matches the view as seen from that spotlight. Many Maya users find using Maya's in-panel camera moving tools to position lights is a fast and easy way to stage the scene. Maya even gives you an in-panel preview of the light's cone angle!
Straight Ahead/Pose to Pose
THIS FUNDAMENTAL DESCRIBES the two basic approaches to block in a piece of animation. “Straight ahead” means that an animator creates the base animation by posing the animation in a frame, then moving forward one or more frames and posing again. This approach is akin to stop-motion animation, in which you have to pose every one or two frames because the camera needs to capture that frame on film before moving forward. “Pose to pose” means that you create the key poses, and then essentially time the rest of the animation by inserting blank or “hold-poses” in between your key poses. This is akin to a non-linear approach in which you can test different timings of a shot by simply sliding poses around on the time slider. Both approaches have their advantages and disadvantages.
Straight ahead animating should be used when the action is very mechanical or physical. This is because the ability to perceive the motion as you frame through the animation in slow motion is far greater than trying to imagine what pose the highly mechanical or physical movement is going to hit. Let's take an overlapping antenna, for instance. With this kind of highly physical action it would be impossible to imagine where the antenna is going to be without framing through the animation and adjusting the pose as you go. This is what we'll do to practice this concept.
Pose-to-pose animating should be used for creating character performances. Unlike highly physical actions, the key poses a character hits are going to tell the story. So in order to be sure that you arrive at these golden moments, you should pose them out and retime them as necessary to make the motion work. We bias our work in performance animation to feature the pose because, without a strong sense of the character's body language, the emotional story gets lost. We're going to create a pose and retime it using Maya's Dope Sheet.

1 Open straightAhead_start.ma. This bouncing ball looks familiar, but now it has an antenna on top. Let's practice animating straight ahead and make the antenna flop back and forth.

2 On f01, the ball is at the top of its arc, so the antenna will be travelling upwards, trying to catch up. Select all the antenna controls, and key them upwards.
3 Go to f04. The ball has started falling and so the antenna will continue to move upwards as it catches up with where the ball was a few frames earlier. Keep an eye on the squash and stretch for a cue. Key the antenna a bit more up.

4 When the ball hits the ground at f08, the antenna will not react yet because the momentum needs time to travel up through the ball. Key the antenna straight up.
5 Now at f10, the ball is traveling upwards again, but the antenna will still be moving down from the impact of the ball hitting the ground a couple frames earlier. Key the antenna bending downward.
6 Finish the scene by copying f01 to the last frame (f15) as you do with all cycles.
![]()
straightAhead_start.ma
straightAhead_finish.ma
As we demonstrated in this example, straight ahead usually works best when there is a frame of reference to judge the movement by. In this case, we knew what the antenna should do because of where the ball was. Don't confuse animating straight ahead with animating blindly. That rarely turns out well, even for experienced animators. Always have a good plan for what you are going to animate beforehand!
7 Open pose_to_pose_start.ma. This character is waving to someone he thinks he recognizes, but then he realizes he doesn't know them! He retracts into an embarrassed pose, and looks away.
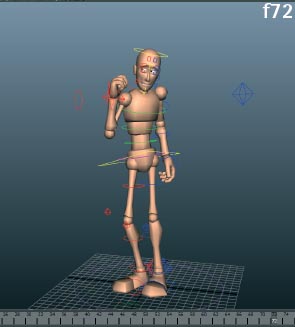
8 Let's create his embarrassed pose on f72 and then adjust the timing using the Dope Sheet. Select all of the controls in the body and hit ![]() on f72. Pose Goon with his face and body exhibiting embarrassment.
on f72. Pose Goon with his face and body exhibiting embarrassment.
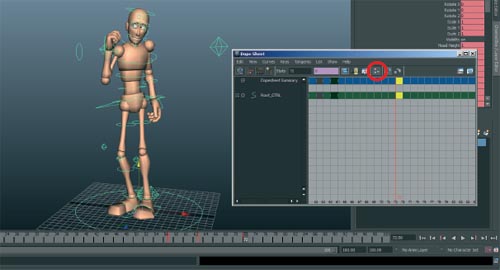
9 Open the Dope Sheet and find the Hierarchy/Below button and click it. Now if you choose Goon's root_CTRL in the panel you will notice all of the key frames load into the Dope Sheet. The Dope Sheet is a good tool for broad retiming of a scene.
10 Frame 72 is too soon for this final pose. Select the block on f72 in the Dope Sheet and middle-mouse drag it to a later frame— whatever looks good to you! I chose 100 and I like how Goon slinks into this embarrassed pose.
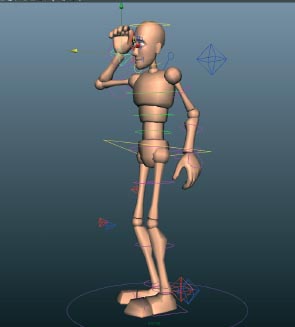
11 Goon now needs a breakdown to define the arc of this movement and make it less linear. Rotate the camera to his profile. See how the arm comes very close to his face? It is common to need to add breakdowns when you retime animation created pose to pose.
12 On f88, grab Goon's Root control and move it forward just a little. Also add a little bit of bend throughout the spine, and lastly move his hand forward so that it takes a nice arced path from the pose above his head to the pose near his face.
![]()
pose_to_pose_start.ma
pose_to_pose_finish.ma
You can get a nice settle in a pose by selecting all of your controls, then middle-mouse dragging and copying a pose from a few frames before your last key pose to a frame 6 to 8 frames later. This method needs adjustment to make it look perfect, but gives you a very quick and easy settle to start working from.
Overlapping Action/Follow-through
OVERLAP AND FOLLOW-THROUGH are the two most intuitive fundamentals in animation. Both basically deal with the principle that it takes energy to move objects and also to slow them down. “Overlap” is what we call it when an object “lags” behind the main action. “Follow-through” is what we call it when an action overshoots or goes past the end pose.
Overlap instills a fluidity in character animation. When added to your character's gestures, overlap makes the animation feel like the character has a natural limber quality. When a character swings his arm, the bending of the wrist has a nice organic quality. Natural rise and fall in the spine in a walk cycle makes it feel calm, while an extreme amount of overlap in the spine in a walk can make the character look depressed and sad. In this way we can see overlap has a very major impact on the performance of a character.
With follow-through, the main thing you can show is a sense of weight with your character. The heavier the weight, the more energy it will take to stop the character. Use follow-through to emphasize this.
We've already had some practice with overlap in the last section, but let's get some more practice with a simple animation of Goon landing from a jump.

1 Open overlap_start.ma. Playing back the animation, you can see Goon is landing on the ground from a jump. See, though, how his spine looks very stiff and unnatural. This scene needs some overlap and follow-through.

2 Select the controls in Goon's spine and set a key on frame 1. Just like the antenna that you animated in the last section, we are going to have his spine “lag behind,” or overlap, as he falls. As Goon falls, set a key on the spine, having him straighten up a bit. I like this pose.
3 When he hits the ground, we need the action to follow through. This means bending Goon back over as he lands. Try a few different choices of pose and a few different timings as well.
4 Don't stand him up too fast. Try a few different timings and sizes of pose at the end here as well. You'll notice that the weight of the character changes drastically with only a few frames of difference!

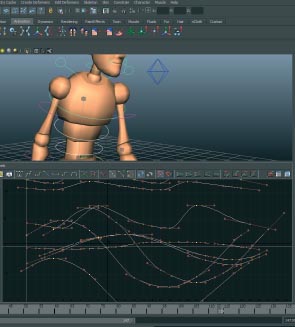
5 Let's also offset the overlap to get an even more natural follow-through in this action. Select the controls of the spine, and open the Graph Editor. Isolate just the Rotate X channels; it should look like this.
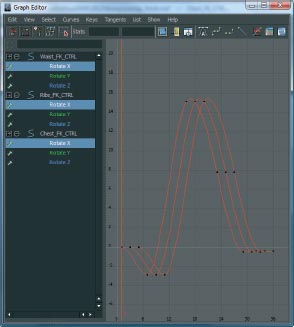
6 Offset the ribs by moving them two frames forward, and offset the chest by moving them four frames forward. Now play the animation back, and you have an even nicer, fluid overlap in the spine!
![]()
overlap_start.ma
overlap_finish.ma
Simply offsetting the curves is a common trick, but it will rarely get you finished overlap and follow-through. You will almost always need to diligently polish the curves to get “final worthy” results!
Slow In/Slow Out
SLOW IN AND SLOW OUT, also called ease in and ease out, refer to the spacing of the keys when an action comes to a stop or changes direction, or a character transitions from pose to pose. This principle means to animators that we typically decelerate objects as they come to a stop rather than have them come to a dead halt instantly (“slowing in” to the pose). It also means we should gradually accelerate objects as they begin to move and not have them instantly be at full speed (“slowing out” of a pose). In the Graph Editor of Maya, this principle is simply illustrated by flat tangents. It is easy to see how an object slows in to a change of direction in the Graph Editor when we look at the curves of a bouncing ball. As the ball arrives at the top of its arc, and also the flat tangent of the Y curve, it decelerates evenly before changing direction and accelerating again.
This is not a blanket rule, however! Not every action should slow in and slow out! In the bouncing ball animation, when the ball hits the ground there will be no slow in or slow out. Instead, we animate those tangents with a very sharp direction change as a result of the ball hitting the solid ground and having to change direction instantly. Consider also an animation of a character running. The feet are going to be really pounding the ground, meaning the legs are still going to be accelerating as the foot hits the ground. “Flatting” all of your tangents in the Graph Editor is a common mistake, as is having flat tangents be your default tangent type. True understanding of slow in and slow out means understanding which situations should have nice eased poses, and which ones should have stark direction changes. We are going to take advantage of Maya 2013's new editable motion trails to practice when to use slow in and slow out. Also check out the Splines (Chapter 2) for more details on slow in and slow out.
1 Open slow_in_start.ma. This bouncing ball animation has a problem. Play the animation back. See how linearly the ball changes direction at the top of the arc? We have a slow in to the pose of the ball at the top, where nothing would make it physically slow down. Let's fix that with the editable motion trails.
2 Select the ball_anim control and create the editable motion trail by clicking Animate > Create Editable Motion Trail. (Motion Trails are discussed in-depth in the Techniques chapter.)
3 Select the f60 keyframe on the motion trail, then right click on the motion trail and select “Timing Beads In.” You can now see the frame bias, or how much Maya will slow in to the keyframe when interpolating the in-betweens. In this instance, the in-beads are squished right near the keyframe, creating way too much slow in!
4 Select the bead furthest from the keyframe and drag it away from the keyframe. The arc smoothes out, and also the interpolation gets far less linear. Frame through the keys and see how the ball travels more distance per key than before. Undo and compare to before if you like.

5 We also want the impact on the ground to be stronger, so let's create a “fast in” (the opposite of a slow in) on the impact. Select the key at f68 on the motion trail that is on the right side of the wall, on the ground. Right click and check “Show In Tangent.”
6 Select the tangent handle that is displayed, and with the move tool ![]() move it to the right in the X axis until it is almost in line with the arc of the motion trail itself. Play the animation back and see the result. With character animation, VERY subtle changes make all the difference!
move it to the right in the X axis until it is almost in line with the arc of the motion trail itself. Play the animation back and see the result. With character animation, VERY subtle changes make all the difference!
![]()
slow_in_start.ma
slow_in_finish.ma
You can view the Tangents, Beads, or the Keyframe itself, one at a time, but never all at once. Maya does this to reduce scene overhead and to keep working with editable motion trails simple and straightforward. If you ever get confused, you can always delete and recreate the editable motion trail from the Outliner – doing so does not delete the animation itself.
Arcs
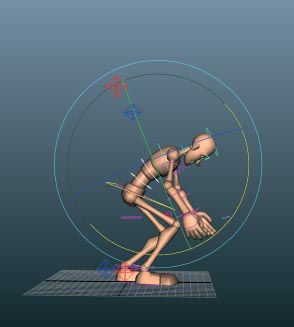
EARLY ANIMATORS OBSERVED the interesting fact that most natural actions follow an arced path. They then practiced applying this trait to their animation to create more appealing movement. This came to be known as the principle of “arcs”. To avoid giving mechanical, robotic performances, check your animation constantly by tracking objects on screen and make sure they do not follow linear paths. Remember to check your arcs from all angles first, but finally and most importantly from your camera view; this is the view the audience will see!
Another very common mistake is to only track arcs on major body controls. As animators, we tend to bias our attention to the controls that give us the gross pose of a character: Root, Hand IK, Foot IK, and Head. All too often, beginning animators will then try to track the arcs of their animation, but because of all the attention and time spent using only four or five main controls, will only look to these areas for smoothing. This can lead to a visual discontinuity within the animation of the body. Instead, you have to look at the entire body, and determine the forces in the body. A fantastic resource for learning how to determine the force in a pose is the book Force: Dynamic Life Drawing for Animators, published by Focal Press. Investigate how the entire pose itself has rapidly changing, dynamic shapes, all of which need to move naturally and on arcs.
For our purposes, we are going to adjust the arcs on a full- body turn animation. Our character is looking towards screen left, when he suddenly turns and looks towards screen right. There is no breakdown key in the middle of the turn, meaning there is only a very drab, linear interpolation happening between the left and right poses. To fix this, we are going to add a breakdown and improve the arcs of the turn.
1 Open arcs_start.ma. Yuck! This body turn is unnatural and mechanical. See how linearly the body and head turns from left to right? We are going to fix this immediately by adding a breakdown in the middle of the turn.
2 Select the locator on the tip of Goon's nose named noseTrack_Loc. Then go to Animate > Create Editable Motion Trail. We will not be editing the motion trail in this scene, just using it for visual feedback. See how straight the head turn is?
3 Let's add the breakdown. Select the Center_Root_FK_CTRL, Waist_FK_CTRL, Ribs_FK_CTRL, Chest_FK_CTRL, Neck_FK_CTRL, and Head_FK_CTRL. On Frame 21, create a pose in which Goon is bending a little bit over, making the motion trail bend into an arc.
4 Don't forget the head usually leads the body in a turn! I like to have the head rotated slightly in the Z axis so that the chin is tilted on the head turn. This gives the head a little bit of natural motion.
5 Now select the Root_CTRL and create another Editable Motion Trail. The body movement needs some arc smoothing as well!

6 On f21 and f28, create some breakdown keys by translating the Root_CTRL downwards and make a nice, arced motion. Motion trails are powerful tools included in Maya 2013, and are directly editable in panel. Track the arcs throughout the rest of the body to get nice smooth motion.
![]()
arcs_start.ma
arcs_finish.ma
If you want to be able to edit the arcs of your arms in panel, try re-animating this shot with IK arms enabled, and by adding an Editable Motion Trail to the controllers after blocking the animation. The visual feedback of motion trails has always been very useful, but now we can use them to actually improve the animation, all in camera!
Secondary Action
THIS PRINCIPLE REALLY GIVES a scene some deep subtext. Secondary action is any action that is not the primary action in a scene. A character sharpening a pencil as he complains to his boss would be secondary action; the primary action has to do with the poses and body language involved in speaking to the boss. A character running his hand through his hair as he turns away from the mirror, giving himself a wink, would be good secondary. The main action in this example is the turn, but the hand through the hair adds a nice level of meaning to the whole scene.
The wonderful thing about secondary action is that there really is no amount that is too much. Especially with humans: we're constantly multitasking, constantly occupying ourselves with more than one thing at a time. The animation can, of course, become too busy. The fact is there is a balance, but for the most part your scenes can always use an extra level of animation and therefore subtext.
The way master animators truly utilize secondary action is by “coloring” the action to suit the subtext of a scene. This means changing the secondary action in pose, timing, spacing, etc. to distinguish it from a normal, “vanilla” performance of the same action. Let's look at an example. Let's imagine a scene where a mother is ironing clothes while looking out a window. Her husband walks into the room and tells her that their son has been killed in war. She is facing away from him, and still continues to iron. But her body language changes. Her hands start shaking. She looks like she's about to faint as her eyes well up with tears. The adjustments to the action of ironing clothes (the secondary action in this scene) is what we call coloring the action. Now imagine the same set up, with the wife looking out the window and the husband entering the room. This time, he enters and simply asks her how her day was, but this time, she found out that morning that she is pregnant. She answers him “Fine,” and smiles. How would you “color” the secondary action in this scene? When she hears the husband enter the room, would she excitedly speed up her action? Maybe she got some baby clothes out of a box and that's why she's ironing. She'd then pause and look at the clothes as she describes her day to her husband. Suddenly, through secondary action, animators have access to an enormous amount of subtlety in a scene. I like to call secondary action the “window to subtext”.
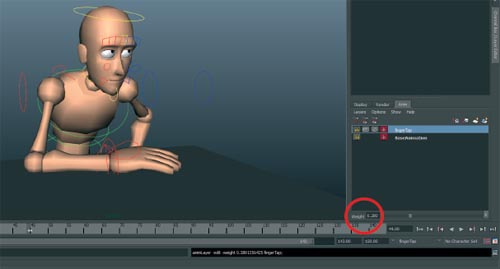
We are going to do a simple trick with Animation Layers to practice using secondary action to show subtlety in a scene. In our scene, Goon is sitting at the library, tapping his finger, very bored. Then someone he really likes walks by, and his eyes follow them. By animating the weight of the animation layer with the finger on it, we are going to “color” that action; basically, he forgets to tap his finger while he is captivated by this person walking by. Secondary action can be so subtle, that sometimes just STOPPING a secondary action is enough to completely color it!
1 Open secondary_start.ma. Play back the animation, and you'll see Goon is completely bored and tapping his finger at the desk. Then a person he likes walks by and he is captivated.
2 In the bottom half of the Channel Box your Layers tabs are all visible. When you select the layer tab labeled “Anim,” you'll see that there is a “BaseAnimation” (with the entire body pose animated inside) and a “fingerTap” layer.
![]()
secondary_start.ma
secondary_finish.ma
Check out Chapter 12 for an in-depth look at Animation Layers and how to use them.
3 Maya 2013 has powerful tools for blending animation together. In fact, you can blend dozens of layers of animation together if you please; the only limit is what you can keep track of. Slide the Weight slider up and down and see how the finger tapping is affected.
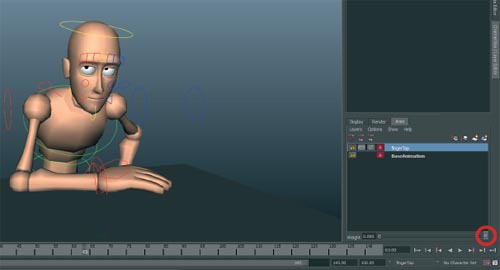
4 Not only can you blend animation, but you can key the weight! Find a good frame when you are sure that Goon has recognized the person walking by. Set a key on the weight of Anim layer “fingerTap” by hitting the ![]() (set key) button next to the weight slider.
(set key) button next to the weight slider.
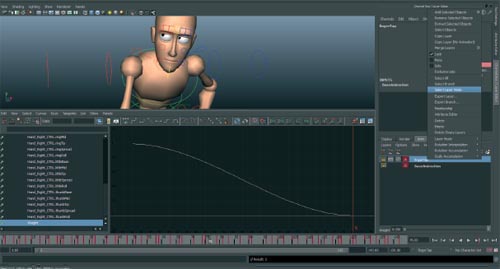
5 Advance 10-20 frames in the animation and slide the weight of the fingerTap Anim layer down to 0. Goon is now so transfixed on this person that he's completely dropped his secondary action, a very powerful way of “coloring” it! To see your weight curve in the Graph Editor, right click on the Anim layer and click on “Select Layer Node.”
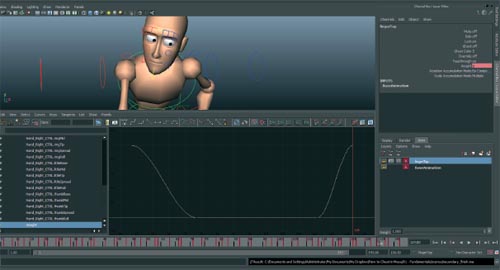
6 Experiment! Play around with the secondary action and see if you can tell different stories by animating the weight of the layer. Maybe bring it back to 1 at the end of the scene and observe the resulting change in the subtext!
If you are unsure about a secondary action, sometimes it can be better to key the main action on the master animation layer, and only when it is looking solid, key the secondary action on a new Anim layer. You can always turn off the layer if the secondary doesn't work out, without fear of destroying your main action.
Timing
TIMING IS LESS A FUNDAMENTAL than it is the very foundation of the art of animation. Animation is, of course, just a series of still images that flash by fast enough to create the illusion of motion. Our task is to use timing not just to accurately portray motion in realistic scenes, but to use timing as a method to convey meaning in a scene.
In character animation the main goal is to get your audience to empathize with a character. As they succeed, the audience celebrates; when they fail, the audience feels their loss. As animators we can get so caught up in the physics and mechanics of the motions that we create that sometimes we forget the timing of a scene can be improved to tell a deeper story. The pauses in between actions can have more powerful messages than the actions themselves.
In the last section, we adjusted the secondary action of the character to show that he is so captivated in that moment that his hand just naturally stops moving. It has a subtle but powerful effect on the performance of the character. Although a full animation curriculum on timing is outside the purview of this book, we can definitely experiment with this scene to give ourselves some insight into the powerful effect subtle timing changes can have on a performance. We'll use the keyframe editing tools in the timeline and Graph Editor to make these adjustments.
1 Open timing_start.ma. The timeline of our secondary action exercise has been extended at the end to allow us to make some adjustments here. Pay particularly close attention to the performance at the end, where Goon looks back toward the desk.

2 Let's extend the time that Goon spends looking toward the desk halfway between his gaze towards screen left and the final pose back towards screen right. Select all of Goon's controls. Don't forget to select Goon's eyeTarget_CTRL too. Position the cursor over f127 on the timeline, then ![]() LMB and drag the cursor all the way past f150.
LMB and drag the cursor all the way past f150.
3 This red box is your selection on the timeline. The left and right arrows scale your keys in either direction. The middle double arrow icon moves the selection through the timeline. Drag each one of the arrows around and get familiar with their use, then Undo so that you are back to the original timing.
4 Use the center double arrow icon to move the selected keys forward 30 or so frames. We aren't going to choose a specific timing, because we want to observe the subtle differences that timing makes. What does this new timing tell you? To me, the longer he pauses in this in-between pose, the more it looks like he's THINKING about what he saw.
5 Let's play with the end too. Experimenting is fun! Select all of Goon's controls again and open the Graph Editor. Select the last two poses by dragging a selection box around all of the keys. Now scale the last two poses' keys by hitting ![]() and then
and then ![]() MMB drag to the right with the cursor placed near frame 150. Release the mouse button when the last key is near frame 180.
MMB drag to the right with the cursor placed near frame 150. Release the mouse button when the last key is near frame 180.

6 Play the animation and it not only looks like he's thinking more, this slower transition to the end pose feels like he's a little melancholy. However, whenever you scale keys in the Graph Editor, your keys usually end up placed in between frames. Select all of the keys in the Graph Editor and click on Edit > Snap. Now the keys are back on integer frames.
![]()
timing_start.ma
timing_finish.ma
Novice animators often struggle with the difference between timing and spacing. While they are connected to each other, they're NOT the same. A movement over 10 frames can look completely different depending on how you change the spacing, even though the actual time in which it moves (10 frames) stays consistent.
Exaggeration
EXAGGERATION IS ONE OF THE SIMPLEST, yet most misunderstood principles of animation. Why? For decades novice animators have tried to blindly exaggerate their animation to try to recreate the amazing cartoony styles of the animators of yore. However, exaggeration doesn't necessarily mean better animation, or even more cartoony. Exaggeration must be used with a keen eye for the effect you are trying to achieve.
Find the core idea in your scene and figure out the best way to exaggerate the message. If you are animating a character getting pricked on the butt with a pin, then you are going to exaggerate the timing and spacing of him shooting into the air. If you are animating a character that gets scared by a spider, you might exaggerate the squash and stretch in his body by having his legs run away from his torso, stretching out his spine! In both of these cases we choose the main idea and exaggerate only where we need to in order to strengthen the message. Both scenes would look way over-complicated if we had exaggerated the posing, timing, spacing, composition, weight, anticipation, etc.
Your animation scenes in Maya should be as lean as possible. To illustrate how easy it can be to exaggerate a fundamental, we're going to take a finished walk cycle and adjust the overlap in the spine using the Graph Editor. Your workflow must create animation that has minimal keys, therefore making it easy to change the animation later on. For our purposes, the overlap in the spine on a walk cycle is a great fundamental to experiment with, because it has such a large impact on the performance.

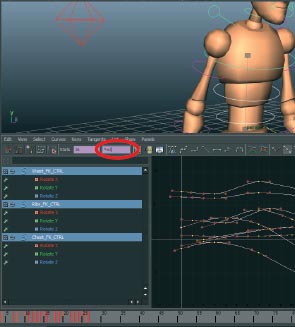
1 Open exaggeration_start.ma. Goon is walking a straight-ahead, “vanilla” walk with little performance to it. Select the controls in the spine and open the Graph Editor.
2 As you can see, as of right now these curves are not exaggerated at all. Hit ![]() to use the Scale Tool in the Graph Editor. Now select the curves in the spine and MMB drag up and down to scale these keys. Notice that the point on the graph where your mouse starts the dragging motion is considered the center of the scale.
to use the Scale Tool in the Graph Editor. Now select the curves in the spine and MMB drag up and down to scale these keys. Notice that the point on the graph where your mouse starts the dragging motion is considered the center of the scale.
3 Scaling keys up and down in the Graph Editor scales their values, whereas scaling left and right scales timing. Without the rest of the body's controls selected, scaling the timing of the spine won't produce good results.
4 You can also perform the scale by using some of the math functionality in Maya. Select the controls in the spine and then in the Graph Editor value box (the right box of the two) type in “*=2”. The ![]() symbol means to multiply the values and the “=2” tells Maya how much to multiply by.
symbol means to multiply the values and the “=2” tells Maya how much to multiply by.
5 Playing back the animation now shows more exaggeration in his spine, but it needs some tweaking. Select just the Rotate X curves in the Graph Editor and then hit ![]() to use the move tool. MM drag them upwards to get the spine to overlap more forward over his center of gravity.
to use the move tool. MM drag them upwards to get the spine to overlap more forward over his center of gravity.

6 Experiment! The best thing you can do to grow your list of cheats is to find some more on your own. Use the Graph Editor to exaggerate other aspects of the walk, like the arms, or the Translate Y in the Center_Root_FK_CTRL to get some more extreme up and down motion as Goon steps.
![]()
exaggeration_start.ma
exaggeration_finish.ma
To make reselecting the same channels easier, select a channel (Rotate X for example) and in the Graph Editor go to the menu and click Show > Show Selected Type(s). You'll see that only the selected channel now shows on the left side of the Graph Editor for all selected objects. This is a good cheat to use when adjusting a single fundamental like we did on the spine. Restore the other channels by clicking Show > Show All. The Graph Editor is covered in depth in Chapter 3.
Solid Drawing
AT FIRST GLANCE, “solid drawing” has little to do with CG animation in Maya. What does drawing have to do with animating on the computer? On the contrary, this is an extremely important fundamental to remember when creating animation on the computer. Why? As CG animators, it is very easy to relax our artistic sensibilities and let Maya do all of the work. However, the moment you forget the art of pose, perspective, form, volume, and force, you will quickly see your animation dissolve into unappealing mush. Solid drawing is a fundamental that persists from the hand-drawn days of cel animation. What it basically imparts is a dedication to the figure-drawing principles that the master animators all adhered to. When you started your drawing, you always had to begin with the same basic construction of the character: simple shapes combined with clean, meaningful lines, taking into consideration the line of action, the force of the pose, and the weight of the character. Perhaps most of all, perspective and a sense of the character's volume had to be extremely consistent. In other words, all 24 drawings per second of animation had to look like the same character.
In CG, we have a lot of help from Maya to achieve solid drawing, but we should pay close attention to make sure we aren't being lazy. Since we are working with 3D models, for the most part Maya takes care of staying “on model.” Even so, you have to be careful not to pose your character in such a way that the body or face is distorted so much that it doesn't look like the same character. Most of the time this happens when an animator hasn't thoroughly tested the rig, and is using controls to create movement that were not intended for that purpose. In CG we can indeed go off-model, and it is your job to avoid this.
We are going to fix a piece of animation that has some very bad counter-animated controls, and is also experiencing some skin-weight issues. Speaking strictly as an animator, you don't have to be as concerned with technical issues, but remember that CG animation is often a team effort, and solid drawing is the result of everyone working together.
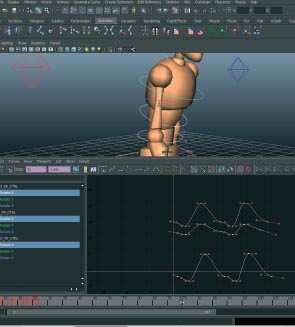
1 Open solid_drawing_start.ma. This walk cycle looks a little off. The spine controls have been animated against each other. As a general guide, body sections that work together should move in harmony with each other. Going against the natural design of how something moves, even if intentional, can create off-model-looking poses.

2 A good way to see your controls is to use the X-Ray rendering in panel, either in the Shading menu or with the X-Ray button. This mode makes all of the geometry semi-transparent so you can see joints, edges, and curves very easily.

3 Select Waist_FK_CTRL and Ribs_FK_CTRL and open up the Graph Editor. As you can see, they have been posed in such a way that they are rotated against each other.
4 Delete the Rotate X curves. Notice that there are still values in Rotate X when you switch to the Channel Box. This is because Maya leaves a channel's value at the current frame whenever you delete ALL animation on a channel. Select the Rotate X channel and type in ![]() and hit
and hit ![]() .
.
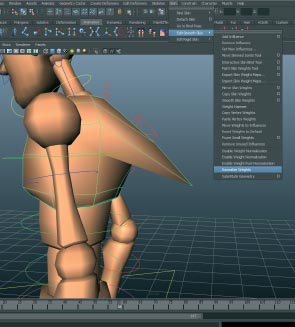
5 Now that the controls have been zeroed and the counter-animation removed, Goon is still leaving some vertices behind as he walks away. Select his chest geometry and switch to the Animation menu set. Click on Skin > Edit Smooth Skin > Normalize Weights.

6 Now the model should be behaving! Don't worry what that did, as it's a rigging issue that most animators won't have to deal with. The point is, with CG animation, artistic choices, like posing, and some technical choices, like skin weights, can have an impact on solid drawing.
![]()
solid_drawing_start.ma
solid_drawing_finish.ma
Instead of deleting the curves themselves in the Graph Editor, we can delete animation from a channel by right clicking on that channel in the Channel Box, and clicking Delete Selected. This will delete the animation on the channel, not the channel or the attribute itself. Remember, the channel's value will remain at the current frame value whenever you delete all animation.
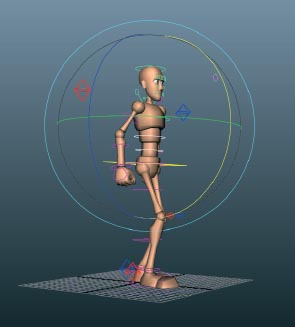
Appeal
IT COULD BE SAID that all of the fundamentals combine to make “appeal.” Beautiful, organic timing is appealing to the eye. Interesting, dynamic posing is also appealing. Character designs, contrasting shapes and rhythm, are all fine tuned, worked, and re-worked to get the most appeal. Does appeal mean “good”? Not at all: the evil villains in our most beloved animations all have appeal. From their striking silhouettes to vibrant colors, even the bad guys must be appealing. Appeal is the pinnacle of our task as animators, it is the goal. Above all else we should strive to always put images in front of our audiences that are worthy of their time.
Let's focus on posing for our discussion of appeal. As animators our work takes place far after the characters have been designed, modeled, textured, and rigged. But even with appealing characters, bad posing can ruin the entire show. For instance, an arm pointed directly at camera loses all of its good posing from foreshortening; the animation must work well with the chosen composition. Take the camera into consideration and be sure that your staging is well thought out. The silhouette of your pose should be strong, without limbs lost within the silhouette of the body. And “maxed-out” or hyperextended arms and legs never look very good.
Twinning is another major issue in posing. In nature, nothing is ever perfectly symmetrical. Without being careful to avoid twinning, it sneaks its way into our animation. It saves time, for instance, to set channels on both sides of a character at the same time. If this is a cheat you use, then you must remember to go back through the scene and un-twin your poses. Arms, legs, hands, even facial poses can fall victim to twinning.
We must be mindful of the appeal of our animation by constantly critiquing our work and showing it to others.
To practice, we are going to take a single pose and make some adjustments to increase the appeal.
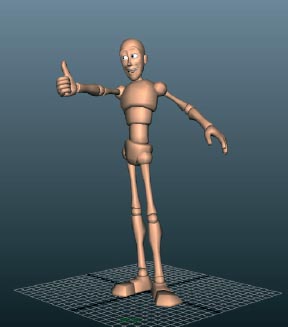
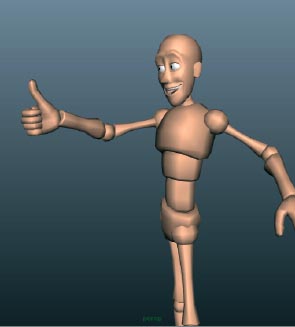
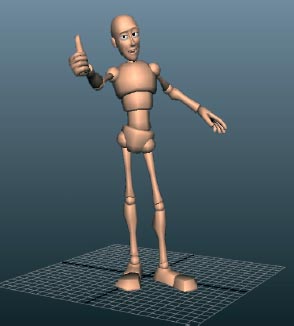
1 Open appeal_start.ma. You'll see Goon has been posed giving “thumbs up” to a character off screen.
2 This face pose could use a lot more appeal. Let's start with the face. It's totally twinned, and the facial controls are all at max. We can make this look better by adding some asymmetry, and dialing back some of the maxed out controls.
3 There we go! I added some asymmetry to the face in the brows, cheeks, and mouth, and Goon is already looking much better. I also made the pupils bigger and have the lids touching them so he looks more friendly and less wired.
4 Let's fix the maxed-out arm as well. Bring a little bit of bend into the elbow and make the wrist look more natural.
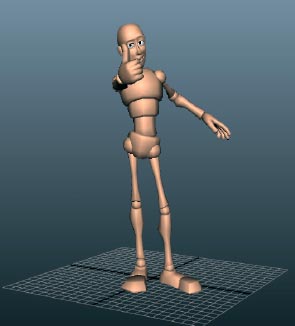
5 Surprise! Change your perspective panel to renderCam and see how we've lost the entire arm pose in foreshortening! This needs to be remedied.
6 Repose the arm to get a nice clean read on the upper arm and forearm, and finally fix the the hand so that the pose feels natural. This pose is much more appealing than what we started with!
![]()
appeal_start.ma
appeal_finish.ma
Always keep an eye on the renderCam. As animators we want our animation to work in 3D as much as possible, but when it comes down to it, the animation needs to look good through the main camera first and foremost. Working with the renderCam open somewhere is good workflow practice.
What Is “Workflow”?
by Kenny Roy
IT WAS YEARS into my teaching career, with hundreds of classes and thousands of hours of animation critiques under my belt, before a student suddenly asked me, “You keep on saying the word ‘workflow’, but what does it mean?” I was stunned, because after all of my harping on the subject, it never occurred to me that the very concept of “workflow” itself might be unclear to beginner animators.
Simply put, a workflow is the step-by-step process you employ to create a shot from start to finish. It adapts to the project, it grows and changes slowly over time, but on a shot-to-shot basis your workflow always stays the same.
This may sound like a no-brainer, but the reality is most new animators pay little to no attention to the actual process as they learn. Instead, they animate ”by the seat of their pants,” and look at the unpredictable results on screen for indications of improvement. Let's take a related example in another area of art to illustrate this point.
Back in school, I had a figure-painting teacher who was very strict. His name was Yu Ji. In his class, students were subjected to a constant barrage of commands regarding how and when to do each step of a painting. First, you wipe the canvas with some highly thinned burnt umber or raw umber paint until the entire canvas is a nice, fleshy brown. Then do a quick sketch in pencil to define the form. Immediately go over that with a thin brush with umber paint, completely filling in all of the shadow areas. THEN, and ONLY THEN, do you start mixing paint to try to match the colors you see. And even when it came to finally painting with color, Yu Ji sounded like a broken record as he walked through the class to correct the color choices of his students. “Is the color warmer or cooler than the color next to it?” “Is it lighter or darker?” “What is the color tendency?” (Within warm colors, was it more red, or yellow, for example.) These same three questions were repeated at least a hundred times over the course of a three-hour class.
It would be years before I realized that what Yu Ji was doing was teaching us good workflow, above all else. Everything we were forced to do helped us avoid the major struggles that befall young painters. Most importantly, these were tried-and-true methods that produced better results. For instance, making the entire canvas brown made it so that we did not mix our colors too light just because they were competing with a blinding white canvas. Filling in shadow areas early on and foregoing minor details made the students focus on the large shapes in the form. Finally, his three questions made it so that we were mixing our colors based on the color relationships that we saw, barring preconceived notions from influencing our color choices. When I think back on it now, I cherish the amazing workflow that Yu Ji gifted his class, and I feel bad for thinking he was so strict!
Back to animation.
In animation, students typically start with a workflow that roughly resembles the order in which they learned the fundamentals. Pose the character with some rough timing and spacing, add some squash and stretch here, some anticipation and follow-through there. This is a messy way to work, and until you learn how to really let the fundamentals work in concert, your animation will lack the fluidity and beauty that the legends are capable of. There are just as many pitfalls awaiting novice animators as figure painters. In Yu Ji's class, we were forced to make our canvas brown so as not to wrongly exaggerate the colors; perhaps the first step in your workflow should be to not thumbnail some REALLY pushed poses and try to hit them with the model. You would be doing this because you know that as you move forward with the shot and get into polish, many of the pose choices will become watered down to accommodate timing, spacing, and compositional constraints. Yu Ji made us fill in all of the shadow areas with brown before adding any details. Sounds a bit like getting body movement looking really good before adding facial animation, doesn't it? And finally, those three questions we asked ourselves reminded us to constantly critique our choices within the painting, and with the live model. Before you move into your polishing phase, it would be a good idea to establish a workflow step in which you look at the animation one more time and ask yourself some questions. “Are my poses as dynamic as I originally planned?” “Is there still contrast in the animation in pose, timing, and composition?” “Does this resemble the reference and observation I've gathered?”
Your questions might be different, but the main point, both in figure painting and animation workflow, is that you do it every time. Instead of leaping at a shot with no plan in mind, just begin at step 1 of your workflow. Stop animating feverishly for huge lengths of time only to step back and realize the shot has not progressed at all.
If at any time in the middle of animating a shot you catch yourself asking the question “OK, now what's my next step?” you know you've crossed into the world of workflow. Welcome! You are on your way to becoming a great animator.