9
High Dynamic Range Images
Photographers once hindered by the inability of film to faithfully capture the wide range from brightness to darkness, i.e., the contrast or the dynamic range found in many scenes, are now hindered by the same limitation of digital sensors. Imagine that the red light of dawn is illuminating the distant mountain peaks, but the foreground remains in shadow. The scene’s contrast is the difference in brightness levels between the darkest portion of the shadowed foreground and the brightest spot on the sunlit mountain. We measure this contrast in stops of light; each stop is a halving or a doubling of the light. If you correctly expose that scene for the brightest mountain peaks, the shadows are underexposed, so you lose detail and may suffer unattractive levels of digital noise. If you properly expose for the darkest shadows in the foreground, you overexpose the mountains so they lack detail. Since the beginning of photography, photographers have had to make choices due to limitations of technology. We have had to accept this limitation even though our eyes can easily see detail in the darkest and lightest portions of most scenes.
The problem of too much contrast has been greatly reduced by a new shooting strategy that produces images designed to be processed by special software. These special images easily render fine detail throughout the entire range of brightness levels found in the scene. It’s a simple process. Shoot a series of images in one- or two-stop exposure increments so that some of the images contain well-exposed highlights, and others contain well-exposed shadows. The HDR software processes all of the images, combining them into a single 32-bit image that features a very wide dynamic range that’s too great to be properly viewed on your computer monitor. This image is then tone-mapped or processed back into a 16- or 8-bit file so we can properly view it with the limitations of our current technology. This final tone-mapped image preserves the color and detail of all parts of the original scene.
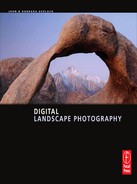
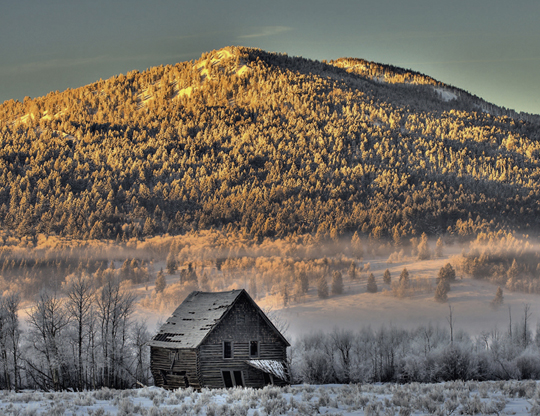
(a) This lonely, decaying cabin, though badly twisted and bent, continues to hold out against Idaho’s brutal mountain winters. The dynamic range between the sunlit snow on the mountain and the shaded wood under the roof is far too wide to be successfully recorded in a single image. Five images were shot to fully capture the dynamic range. These included the standard exposure, +2, +4, –2, and −4 stops of light. These images were merged into one single tone-mapped image using Photomatix Pro. Final image adjustments were done with Photoshop CS3.
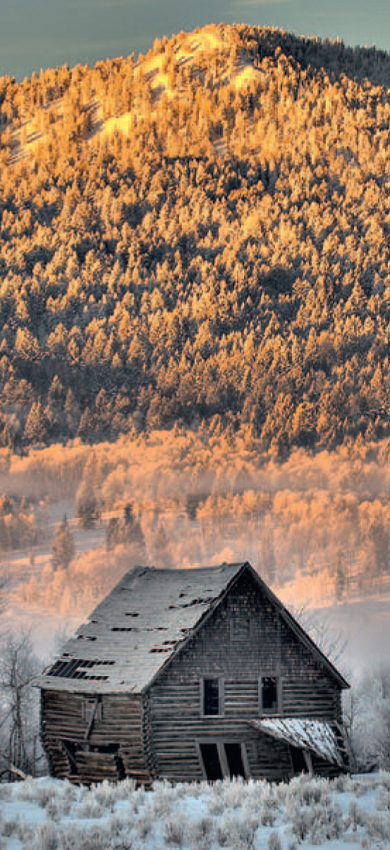
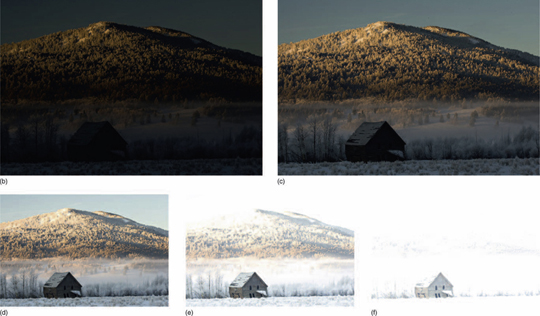
(b) The cabin scene is underexposed by four stops of light from the camera’s suggested exposure. The brightest highlights at the top of the mountain have excellent detail, but everything else is far too dark. (c) This image is two stops darker than the camera’s suggested exposure. The sunlit portions of the scene are looking better, but everything else is too dark. (d) This is the camera’s suggested exposure. The highlights on top of the mountain are significantly overexposed, but the cabin is underexposed. This image clearly shows the camera’s sensor can’t cover the dynamic range of the scene. (e) All sunlit objects and white snow are overexposed, but the dark wood on the cabin is much better. (f) Everything looks overexposed except the cabin’s black windows. As you can see, none of the individual images can adequately record the wide range of brightness levels in this scene. High dynamic range (HDR) software takes the best exposed parts of each image and assembles them into the chapter-opening photograph on page 164.
CONTROLLING HIGH CONTRAST
Before exploring the details of HDR photography, let’s look at how extreme contrast was dealt with prior to the widespread use of today’s HDR techniques. Many of these tactics are still quite useful and therefore well worth learning.
PHOTOGRAPH IN LOW-CONTRAST LIGHT
The best color landscape photographers learned early to photograph in the soft, low-contrast light of a cloudy day. Soft light is superb for photographing waterfalls, autumn color, large patches of wildflowers, patterns in the rock, and many other landscapes where the white sky can be eliminated from the image by careful composition.
The golden light of dawn and dusk is also exceptionally good for many photogenic subjects, and is widely sought by landscape photographers wanting to capture beautiful colors in their images. This light also has lower contrast than the harsh sun of midday. Yes, our digital darkrooms do allow considerable manipulation of colors in digital images, and HDR software techniques do accommodate many high-contrast scenes, but dawn and dusk rightly remain the favorite times for most landscape photographers, not only for the enhanced colors, but also for the narrower dynamic range of light.
Your landscape images are far more likely to be rewarding if you photograph early and late in the day instead of prematurely rushing off to join the breakfast and dinner crowd. Serious photographers know that this beautiful light is transient and woefully short lived, so they shoot now and eat later or before.
COMPOSE TO AVOID EXCESSIVE CONTRAST
A carefully engineered composition can often help avoid too much contrast. One simple example that’s regularly employed by astute shooters is making a photographic silk purse out of the sow’s ear of lousy light by composing a brilliantly colored maple forest so that an ugly white sky is excluded from the frame. However, if excessive contrast arises not from bright overcast, but from the harsh light of midday sun, then composing to reduce contrast can be harder and sometimes impossible.
REDUCE CONTRAST WITH FLASH, REFLECTORS, AND DIFFUSERS
When a scene’s contrast is too high to successfully record, photographers either wait for better light or they apply various techniques to modify the ambient light. Reflectors are used to bounce light into the shadows of a scene, which lowers the contrast. Flash can easily accomplish the same thing. These methods can work well for close-up images, but most landscape scenes are far too large for reflectors or flash to effectively change the lighting ratios. There are exceptions. In the last chapter we discussed how we used electronic flash at Mono Lake to illuminate silhouetted sand tufas in the foreground and how the additional light effectively reduced the contrast between the foreground and the bright red light of the dawn sky.
SPLIT NEUTRAL-DENSITY FILTERS
These filters worked wonders to reduce contrast in many scenes, and are still widely used by many landscape photographers. But split neutral-density (ND) filters are expensive and, more important, they place another layer of glass or plastic in front of the lens, raising the risk of increased flare and loss of sharpness.
Although split ND filters are still used today, the emerging HDR techniques are vastly easier to use and superior in flexibility and quality. Rather than using precious space telling you how to use the split ND filters and how to deal with their numerous problems, we’ll go out on the proverbial limb and predict the future. We predict that split ND filters will rapidly fade from the scene as more photographers discover the gratifying capabilities of HDR techniques. Indeed, we won’t be surprised if future cameras actually process HDR images right in the camera without need for additional processing or software.
HDR PHOTOGRAPHY VS. SPLIT ND FILTERS
The advantages of HDR imagery are huge! HDR photography can capture an extremely wide contrast range. Certain scene configurations necessary to hide the split of an ND filter aren’t needed in HDR shooting and processing. A single high-quality ND filter might cost over $100, which is more than the cost of most HDR software, and it’s relatively easy to shoot the series of exposures required by HDR software. Also, with HDR the extra glass or plastic, which reduces sharpness or might increase flare problems, is removed from the optical path. We struggled with split ND filters for years. Today we value the freedom in expressing our creativity that’s offered by HDR photography, and we know that you will, too. Looking back, the split ND filters did work, sort of, but they seem primitive when compared to HDR techniques. The biggest drawback to HDR is that the scene and camera must be motionless or nearly so. Camera or subject movement, such as clouds scooting across the heavens, or branches swaying in the breeze, can cause ghosting. Try to avoid subjects that are moving a lot, even though at least some ghosting can actually be removed. Photomatix Pro, FDRTools, and Dynamic Photo HDR all permit some ghost removal, so at least moderate subject or camera movement isn’t a hopeless situation.
Calm mornings allow wonderful reflections of the tufa towers at Mono lake to occur as the sun first illuminates the Sierra Nevada Mountains to the west. Five exposures capture this early dawn view quite easily. This is a tough scene for split ND filters because the bright golden light surrounds the shadowed tufa towers in the upper part of the image. It’s difficult to hide where the filter changes from dark, to light, but it’s no problem for HDR!

HDR SOFTWARE CHOICES
Software is certain to evolve quickly as more photographers begin their journey into this wonderful new world of photographic opportunity and use the necessary software. They’ll send feedback to the publishers, which helps improve the product. Some of the leading software packages include Photomatix Pro (www.hdrsoft.com), FDRTools (www.fdrtools.com), Artizen HDR, and Dynamic Photo HDR (http://www.mediachance.com/hdri/index.html). Even Photoshop CS4 has HDR capability, but it’s slightly more limited compared to dedicated programs. As of early 2009, we had been shooting HDR images and using HDR software for only 6 months. Our research of many HDR software reviews showed that Photomatix Pro was particularly well liked, so we used this application for the images you see in this book. However, HDR experts (we’re novices) tell us that each software package has special strengths and all render the same set of images in different ways, so don’t be afraid to experiment with different software.
CAPTURING HDR IMAGES
USE A TRIPOD
It’s best to use the native speed of your digital sensor, normally ISO 100 or ISO 200, to ensure the best quality of digital capture and the lowest noise. Landscape images usually require lots of depth of field, demanding small apertures like f/16 and f/22 and, as a result, your shutter speeds will be correspondingly slow. A solid tripod always helps ensure sharp images, and the elimination of camera motion reduces the chances of HDR ghosting. For best results, make sure the scene aligns perfectly in each image of the HDR series. However, it’s possible to hand-hold a series of images for HDR processing if you brace yourself solidly and shoot the series quickly by using high-speed shooting and autobracketing.
RAW VS. JPEG
We shoot nearly all of our images as RAW files. We convert the images later when we have a need for them. Lately, we have been shooting each image as RAW + JPEG, so we have a choice of either. Most HDR enthusiasts shoot RAW images because of the increased ability to edit and change white balance, sharpness, exposure, color space, and other factors. However, JPEGs work just fine too. It’s true that JPEGs offer less adjustability than RAW images, but HDR comes to the rescue because the presence of the multiple exposures means that all of the brightness levels in the scene are captured perfectly in at least one of the JPEG images when the series is shot properly. Simply bracket each exposure by at least one stop and no more than two. Then it doesn’t matter that you don’t have as much leeway for adjusting JPEG exposure.
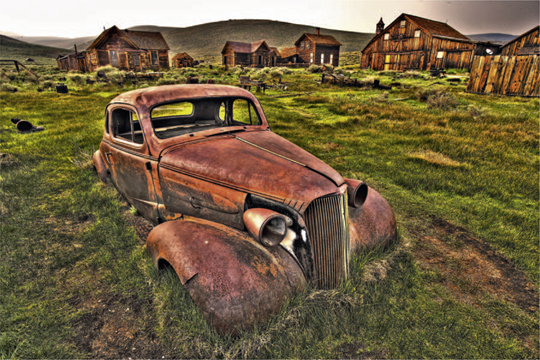
Be creative in your landscape photography. We see nothing wrong with shooting double exposures, mixing natural light with flash, zooming or shaking the camera during the exposure, or using HDR software to make fun, but unnatural looking images. Barbara adjusted her sliders in Photomatix Pro to deliberately create this surreal scene of a car in the fabulous ghost town of Bodie.
VARY THE SHUTTER SPEED ONLY
Allow only the shutter speed to change through a series of exposures destined for a single HDR image. Changes in aperture cause changes in depth of field…changes in ISO cause changes in noise … changes in white balance cause changes in color… and all of these changes are unwanted! Change only shutter speed! Your HDR software will more easily align the multiple images and will thank you!
COVER THE DYNAMIC RANGE COMPLETELY
Consider a landscape. It has a dynamic range that you could measure by spot-metering the brightest and darkest areas of the scene. You can express that dynamic range in stops. For example, suppose at some arbitrary ISO the scene’s highlights were measured as f/4 and 1/1000 second. Also suppose that the darkest shadow was measured as f/4 at 1/15 second. The difference is six stops. No? Count ‘em yourself in the series of 1/2000, 1/1000, 1/500, 1/250, 1/125, 1/60, 1/30, 1/15, 1/8, 1/4, and 1/2 seconds. Well, a scene having a contrast or dynamic range of six stops or fewer fits within the dynamic range of many modern digital cameras, so HDR techniques may be quite unnecessary. What if the highlights were 1/2000 and the shadows measured 1/2 second? Now the scene’s contrast is 10 stops, more than likely well beyond the camera’s dynamic range, so a resulting image would have either overexposed and lack detailed highlights or would have little details and noisy shadows, or even both.
The HDR scheme starts out by making a series of exposures, the brightest one producing a histogram with its right edge at least one stop below the clipping level on the right edge of the graph. The darkest exposure should have its left edge near the middle of the graph to capture detail in the darkest portions of the scene without noise.
Let’s do it step by step for the example above that has a contrast range of 10 stops.
1. We start by using our favorite metering scheme (the spot meter works well) and our histogram to produce the first image, the one where the histogram’s right edge is about one stop below clipping (one stop underexposed). The shadows are badly clipped, but we’ll ignore that. In this image we have guaranteed that no highlight detail is lost because of overexposure. Underexpose by two stops if the scene has a few small very bright spots to prevent overexposing them. Normally, only the bright sun is allowed to be overexposed if it’s in the scene or perhaps specular highlights that have no detail anyway.
2. Then we change the shutter speed (only) to increase the exposure by one stop and make the second image. The right edge of the histogram moves right and is about at the edge. The shadow areas have also moved slightly right but are still badly clipped. It’s still okay!
3. We repeat step 2 and make our third image. Now the right side of the histogram is noticeably clipped and the shadows have moved even more to the right, but are still clipped.
4. We continue making images and increasing the exposure by one stop each time until the left side of the histogram coincides with the middle of the histogram graph. In this image the shadows are definitely not blocked by underexposure, and they contain all available detail and minimal noise.
Aha! We can stop now, because we have a series of images where one image or another portrays every brightness of the scene, from brightest to darkest, in a manner that every brightness of the scene lies well within the dynamic range of the camera.
Two questions arise. First, how many images will be needed? Secondly, is a one-stop exposure increment between images optimum? Well, as the lawyer says, it all depends. The answers are interdependent. Here are the factors:
1. The more contrasty the scene, the more images needed to cover it with a given exposure increment.
2. The greater the exposure increment, the fewer images needed to cover a scene of a given contrast.
3. Larger exposure increments, say, two stops, may be necessary to cover extremely contrasty scenes. Some brightly lit outdoor scenes can have a contrast of 16 stops. That takes 17 images with 1-stop exposure increments, but only 8 images with a 2-stop increment. Fortunately, most scenes have less contrast.
4. One may want to manipulate the number of images and the exposure increment to accommodate the automatic exposure bracketing abilities of her camera.
AUTOBRACKETING
Manually bracketing exposure does work nicely, and all cameras with manual exposure can do it. Most cameras are also capable of autobracketing even when using manual exposure, although many have a limited autobracketing range. If your camera can only shoot a three-frame bracket comprising the nominal exposure and +1 and −1 stop, your 2-stop bracketing range isn’t enough for most scenes. But don’t give up too quickly. Many cameras offer bracketing choices you may be unaware of. For example, the Canon 1D Mark III’s default autobracketing shoots a three-frame exposure bracket. Both the bracketing range (up to +3 and −3 stops) and the exposure increments (1, 1/2, or 1/3 stop) can be selected by the user. Let’s use a bracketing range of +1 and −1 stop. The default autobracketing (AEB) setting only shoots three exposures. The first is the standard exposure, the second is the exposure reduced by −1 stop, and the third is the exposure increased by +1 stop. This doesn’t help you much if you must shoot five exposures to cover the dynamic range of the typical landscape.
Read the Camera Manual
It helps to read the fine print. Many if not most DSLR cameras have custom functions or menu choices that offer additional ways to use autobracketing. Custom function 1 – 6 turns the Canon 1D Mark III into a convenient HDR shooting machine. This custom function lets you choose bracketing of two, three, five, or seven images. Choice #2 in CF 1 – 6 changes the bracketing from three images to a more effective five images. A 5-stop bracket in 1-stop increments covers the range of −2, −1, metered exposure, +1, and +2 stops of light. If you set the bracketing increment for 2 stops of light, as many HDR enthusiasts do, the 5-exposure bracketing sequence covers a range of −4, −2, metered exposure, +2, and +4 stops of light. This bracketing range should cover most natural landscapes with the exception of some scenes with very bright highlights, very deep shadows, and also scenes in harsh light.
We should mention that some cameras have even wider bracketing ranges. For example, our Canons offer brackets of seven images and our Nikons can be set for nine-image brackets. With the bracketing increment set at 2 stops, a series of seven images that are bracketed in 2-stop increments covers the range of −6, −4, −2, metered exposures, +2, +4, and +6 stops of light. This range should adequately cover the vast majority of high-contrast scenes. In this case, leave the camera set on automatic using aperture priority (so the aperture doesn’t vary) and shoot the seven-image series. When you look at the images with editing software, examine the histograms and discard any unneeded images. For example, if you have one image where the brightest highlights are at least one stop underexposed, you probably don’t need an image that has the highlights three stops underexposed. So remove any unnecessary images from the group to be processed by the HDR software, although you may want to just set the removed images aside for later deletion. If your camera is able to do what we just described, then this is the easiest way to successfully shoot a set of images covering the entire dynamic range of the scene.
The harsh sun creates deep and dark shadows in the late afternoon on the Methodist church in Bodie. Normally this contrast is too much for a sensor to successfully handle, but a series of five exposures that vary by one stop each handles the contrast nicely when tone-mapped.

We realize this whole procedure might sound complicated or involved, but we assure you it rapidly becomes quick and easy. We can compose the image, focus, determine the exposure starting point, and shoot the entire five-image series of bracketed exposures in less than 30 seconds. As we have stressed throughout this book, it’s a matter of knowing your equipment and developing an efficient shooting flow.
Autoexposure and Exposure Compensation
It’s quite feasible to shoot a bracketed exposure series that works perfectly for HDR by using autoexposure and exposure compensation. Every camera we have seen offers exposure compensation when using autoexposure. Indeed, many cameras offer exposure compensation for flash, too. The flash compensation exposure control won’t affect your natural light images, so make sure you find and use your camera’s control for natural-light exposure compensation.
As we have said, the controls used for autoexposure bracketing vary from camera to camera, so we can describe their use only in general terms. If your camera can shoot a three-image bracket in one-stop increments, try this procedure. Set the camera to matrix or dynamic metering and set the exposure compensation to +1. Shoot the three-image exposure bracket. Now set the exposure compensation to −1 and shoot another three-image bracket. You now have six images that include −2, −1, 0, 0, +1, and +2 exposure stops. Delete one of the two identical standard (0) exposures. This leaves five exposures that cover a range of −2 to +2 stops in 1-stop increments. This works for many scenes where the dynamic range isn’t too extreme. If your camera offers 2-stop autobracketing increments, set the camera’s exposure compensation control to +2 and shoot three exposures which include 0, +2, and +4. Now set the camera to −2 exposure compensation and shoot three more exposures which are 0, −2, and −4 stops. The six images now cover the range of −4, −2, 0, 0, +2, and +4 stops. Delete the duplicate (0 compensation) exposure and your five images cover the exposure range of −4 stops to +4 stops in 2-stop increments. This should satisfactorily cover the dynamic range of most scenes you’ll photograph. The key here is to find out how your camera autobrackets and also check for any adjustments that can be made through menu or custom function choices.
HDR IMAGE SET GOALS
Here’s the key to creating the perfect series of exposures to make an excellent HDR image. The darkest (most underexposed) image must provide excellent detail and color in the highlights. The lightest image must capture detail without significant noise in the darkest shadows. The exposures of the series should be no more than two stops apart and no less than one stop. Maintain the same ISO, focus, aperture, white balance, and composition throughout the series. You want everything to be identical except the exposure, which is varied by changing the shutter speed.
MARK YOUR HDR IMAGES
A series of images shot in one- or two-stop increments is easy to recognize in your image browser because the compositions are identical and the exposures vary widely from image to image. View the images displayed by the browser to locate the HDR exposure sets. Once a set of images is located, highlight all of the images and label them. For example, we recently made a five-image exposure bracket in 1-stop increments of the amazing tufa formations that emerge from the salty waters of Mono Lake. We labeled the entire set of images as Tufa-HDR-5-SI. We also add the frame number so each image has a unique name. The camera adds an extension to the file. The official name of the first image of this set is Tufa-HDR-5-SI-41880. CR2 + JPEG. The second image differs only in the frame number, which is 41881 and so on. Tufa identifies the subject. HDR means this series is intended for HDR processing. The number 5 tells us five images make up the series. The letters SI stands for the original Source Image. The frame number is 41880. CR2 + JPEG indicates there is a Canon RAW image and a JPEG with the same frame number. By the way, always archive the original source images. HDR software continues to improve and someday, as it breaks new boundaries, you’ll be able to re-process your images for even better results.
HDR techniques work best with subjects that don’t move. Even clouds drifting across the sky or branches blowing in the wind can leave “ghost images.” Most HDR software can reduce or effectively eliminate some ghosting. Photographers new to HDR tend to think of only static landscapes as suitable for this treatment. However, we frequently use HDR to help photograph wildlife that hold still some of the time. We have trouble with dark bison and moose amid white snow, the white heads of mostly dark bald eagles, and these Canada geese. HDR solves these high-contrast subject problems. Using HDR on wildlife is effective and easy to do if you can set your camera to a two-image bracket. Use manual metering and set the exposure using the histogram to guide you so the lightest tones are nearly touching the right edge of the histogram. Set the camera so the second autobracketed image is two stops brighter than the first one. Shoot as many frames per second as possible to reduce the chance of the animal moving during the two exposures. The darkest image captures the detail and color in the brightest highlights. The lightest image captures the shadows and dark portions of the image. Create the final image by tone-mapping the two images.

PROCESSING HDR IMAGES
It doesn’t take long to shoot numerous HDR groups of images. Now the images must be merged together so highlights, mid-tones, and deep shadows all appear in one image with terrific detail and color. HDR software is specially designed to make this feat fairly simple and straightforward. Our goal is to make natural-looking images (some prefer surreal) that have a huge dynamic range. It’s a goal that only recently became achievable, and was naught but a photographer’s dream in the bygone days of film and the early days of digital photography.
Before exploring some basic processing details, let’s discuss natural-looking images. HDR images actually don’t look natural when projected, when viewed on a monitor, or made into prints because we aren’t accustomed to seeing high contrast handled so well by those media. Some argue that HDR images are inherently unnatural because of their extremely wide range of detail. Yet, when viewing the scene with our own eyes, it’s easy to see detail throughout the scene, as our eyes adjust for varying brightness levels. Our own belief is that HDR techniques produce images that indeed do look natural, because they reveal the detail that we see while directly viewing the scene with our eyes. For too many years the limitations of film and sensors have produced images with low dynamic range and we accepted them as natural. Now, though, we think it’s time we all learn and accept a new definition of natural and fully embrace the new-found powers of HDR photography.
LOAD THE HDR SOFTWARE
To be honest, we began our journey into HDR photography fairly recently. We haven’t had time to try every software package or learn the details of everything that can be done. We’ve shot hundreds of sets of images for HDR processing and, working on most of them, we’re rapidly learning new details as we continue to gain experience.
We bought a few books on HDR photography and we read the software reviews carefully. Many writers spoke favorably of Photomatix Pro so we bought the $99 download. In our limited time with it we found the program to be easy to use and we’ve discovered several features that will surely accommodate the needs developed as our experience grows. Besides, it produces terrific results. All of the HDR images in this book were processed with Photomatix Pro.
Go ahead and load Photomatix Pro onto your computer so we can lead you step by step into producing your first natural-looking HDR image.
Caution: We used version 3.1 so the following work flow may be slightly different in later versions.
SELECT THE IMAGES
When the software window opens, click on GENERATE HDR IMAGE. When the next window opens, click on BROWSE and navigate your folders to find the images you want to combine into one HDR image. Select the images and click on OPEN. Make sure you have selected the correct images. (You can also drag and drop the RAW files from the desktop directly onto the Photomatix desktop icon.) Now click on OK to open the Generate HDR-Options window.
REDUCE OR ELIMINATE GHOSTING ARTIFACTS
With the GENERATE HDR-Options window open, make sure the ALIGN SOURCE IMAGES box is checked. Even when shooting on a tripod, it’s possible for the camera to move slightly between images. That step helps to align the images, if necessary. Check either the BY CORRECTING HORIZONTAL AND VERTICAL SHIFTS or The MATCHING FEATURES button. The BY CORRECTING HORIZONTAL AND VERTICAL SHIFTS option is normally best for landscapes.
Sometimes, unavoidable subject movement occurs while shooting an HDR series. Clouds and blowing branches are common culprits. If you know that such movement has indeed happened, check the ATTEMPT TO REDUCE GHOSTING ARTIFACTS box and the BACKGROUND MOVEMENTS (e.g., water or foliage) radio button.
CAVEAT
Unnecessary use of this feature can reduce image quality!
On the other hand, if you have flowing water, you might decide not to check the ATTEMPT TO REDUCE GHOSTING ARTIFACTS box to let the water movement overlap, producing a surreal flowing water appearance.
TONE CURVE, WHITE BALANCE, AND COLOR SPACE CHOICES
There are a few more check boxes, but leave them at their default selections unless you have a reason to change them. We use RAW images, so the NO TONE CURVE APPLIED box is checked because RAW images don’t have a tone curve. We then select the AS SHOT white balance although you do, at this point, have the choice of changing the white balance. Then we select the Adobe RGB color space. You also have the choice of sRGB or ProPhoto RGB color space.
GENERATE THE 32-BIT HDR IMAGE
Now click OK to generate the 32-bit HDR image. It takes a minute or two for the image to appear on the computer screen and your first look will certainly be underwhelming. The image may have blocked-up shadows and burned-out highlights, so it looks slightly worse than horrible. It has such a huge dynamic range that it can’t be properly displayed by the far more limited dynamic range of a computer monitor. The image must undergo further processing called tone-mapping. Since it takes time to generate this 32-bit file, be patient and do save it at this point so you can easily tone-map it again at some later date.
TONE-MAPPING WITH TONE COMPRESSOR
Photomatix Pro offers two mapping methods called Details Enhancer and Tone Compressor. Both methods can produce natural-looking images, but Details Enhancer is the more complicated because it has more choices. It can produce images that look natural or just the opposite. We generally choose Tone Compressor, because its fewer choices make it easier to understand, and because it does make natural-looking images. Furthermore, we find that Tone Compressor is the better of the two at producing the colorful and detailed shadows that we so dearly love.
Our preference for Tone Compressor notwithstanding, we’ve lately been processing every series of HDR images through Details Enhancer and Exposure Blending. Then we pick the look we like the best. It’s amazing how different the images look with the different methods, so experiment.
Click on TONE MAPPING to start this tool for the open HDR image. From the Tone Mapping window, click on TONE COMPRESSOR, which opens up a window with seven sliders on the left side of the screen. The first is the BRIGHTNESS slider. This slider globally changes the tones of all pixels. Move it left to darken the image, or right to lighten it. Make sure you don’t overexpose the highlights by monitoring the histogram for clipping on the right. The slider below the BRIGHTNESS slider is the TONAL RANGE COMPRESSION slider. Moving this to the right compresses the tonal range while moving it to the left expands the tonal range. Adjust it so everything looks good to you. Usually, the TONAL RANGE COMPRESSION slider ends up at a value or two lower than that of the BRIGHTNESS slider. Finally, the CONTRAST ADAPTATION slider changes the contrast in the image. Move it left to increase contrast or right to reduce contrast. Adjust the slider until you find the setting you like the best.
FOUR MORE SLIDERS
The next two adjustment sliders are the WHITE POINT and BLACK POINT controls. Adjust each until you like the look of it. We find 0.25% works well for most of our images, but we still make a few other small adjustments from time to time. Now move the TEMPERATURE slider to the right to add yellow or to the left to add blue. Finally, move the SATURATION slider right to increase color saturation or left to reduce it. Adjust each of these sliders until you’re pleased with the image. Now click on PROCESS.
SAVE THE IMAGE
Save the newly tone-mapped image by going to the (File > Save As…) menu at the top of the window. Save it with the name it already has or rename it. You can save the file as a JPEG, 16-bit TIFF, or 8-bit TIFF. We usually save it as a 16-bit TIFF to retain maximum detail and flexibility.
We enjoy photographing clouds lit by fabulous light. This desert scene is tremendously high in contrast. The rocks in the foreground are dimly lit, while some clouds are lit by bright sun. Not only is there a huge contrast range between the dark brown rocks and the white clouds, but the distribution of light makes it even worse. The foreground is in the shade while some of the clouds are illuminated by sun. No color film or digital sensor that we know of can handle this contrast range in a single image. We shot five images that cover the range of −4, −2, 0, +2, and +4 stops of light. They were combined with software to make a 32-bit image, tone-mapped, and final adjustments were done with Photoshop.

Now you can use regular processing software such as Photoshop or Adobe Lightroom to tweak the image. Perhaps you need to eliminate spots from sensor dirt, adjust a color, or sharpen the image, so proceed with the rest of your workflow. Tone Compressor is quite simple and effective, so don’t be afraid to try it. The results are wonderful!
CONCLUSION
HDR software is quickly evolving and improving. The ability to tone-map images offers incredible freedom to portray scenes far too contrasty to have been successfully captured by traditional photographic and darkroom techniques. This exciting new HDR capability, now available to everyone,radically changes the look of images and will eventually change our perception of what a fine image looks like. Do embrace HDR technology and its power to overcome the limitations of old technology and create a new generation of HDR images.