
7
Composing Pleasing Images

WHAT IS COMPOSITION?
Composition is the thoughtful and meaningful placement of carefully chosen elements of a scene into an image of that scene. Good composition uses the effective selection and arrangement of the elements of a scene to present a visually pleasing image that tells a strong story. Composition combines several important elements: subject selection, object placement, camera viewpoint, perspective, leading lines, pattern, line, form, and image orientation.
Most photographers naturally concentrate on how to include and arrange the key elements of a subject, but the more experienced shooter never forgets that the exclusion of certain elements can be equally important. Beginners tend to include too much in the image, which often produces cluttered and chaotic scenes that aren’t pleasing to view. An effective guideline (but not a rule) is to simplify the scene. When in doubt, try framing the scene tighter.
WHY IS COMPOSITION SO CHALLENGING?
The decades of our long photographic careers have allowed us to develop certain compositional skills, and we’ve been privileged to teach them to more than 4000 field workshop students. From this teaching experience, it’s clear that everyone can learn to compose more effective images, and some of our students are naturally more gifted at it than others. Many of our students make an early error by thinking they have an inherent ability to see wonderful images and that composition is easy. They believe the hard parts of photography are getting excellent exposures and sharp images. Those students are convinced that if they could only learn the mysterious science of photography, the artistic considerations are so simple that they’ll rapidly transform into the complete photographer they long to be.
We wish that learning to make good compositions was easy, but it isn’t. In our case, we long ago mastered exposure, how to shoot sharp images, and how to use the camera effectively to handle any subject. We’ve learned, though, that technical skills are the easy part of nature photography because our abilities to recognize memorable image opportunities and our compositional skills steadily continue to develop and will most likely do so for the rest of our photographic careers.
These sand tufas at Mono Lake grab your attention immediately. Eventually, you look past them to the sagebrush desert and finally travel all the way to the snow-capped Sierra Nevada Mountains in the background. This is a good use of foreground, middle ground, and background to complete the composition.

So, how can we help you develop your eye to see wonderful images in the scene in front of you and for composing them into effective and pleasing photographs? Our first request is that you don’t assume you’re already sufficiently gifted at seeing or composing good landscape images. You probably can still learn a lot and so can we, but we can hopefully help you to easily and swiftly improve your skills and expand them over the years to come.
Composition is challenging because it’s highly subjective and the typical scene is filled with related and unrelated elements. There are so many ways a scene can be composed. Who can really say what makes the best composition? It depends on the photographer and eventually the viewer. There are no compositional rules that work all of the time and no recipes to follow. In our opinion that’s what makes composition more difficult than exposure or sharpness. An image is either well exposed or not. An image is either sharp or not. Sure, you can like a soft image and even shoot some on purpose as we sometimes do, but we all agree they’re not sharp. We almost always agree on those things and there’s little room for personal preferences — either it is or it ain’t.
Not so with composition. Composition offers endless possibilities. A few simple rules of thumb can help here and there, but there are no bright-line rules defining right or wrong. We must individually strive to please ourselves by finding our own way of selecting scenes and composing them out of the seeming chaos of nature.
TIPS FOR MAKING PLEASING COMPOSITIONS
Let’s agree right now that there’s no formula for consistently shooting good compositions. But there are several guidelines that can steer you away from mistakes and help you obtain well-composed images. Please notice that our suggestions are only guidelines and not rules. All composition rules can be broken from time to time with pleasing results.
DECIDE WHAT’S APPEALING ABOUT THE SCENE
As you observe the landscape before you, decide what attracts you to the scene. Is it the reflections of autumn maple trees in a still pond? The repeating curves of sand dunes? The flow of the water as it cascades down a rocky slope? The solitude of a lone person kayaking on a foggy lake in the light of dawn? Or is it, perhaps, the loneliness of a weathered old cabin surrounded by snow-covered mountains?
Your mission is to mercilessly eliminate each and every extraneous object that is unnecessary to the story you want your image to convey. In a word — simplify! Your first task is to decide just what parts of the scene appeal to you. Then compose those parts into your image while ruthlessly rejecting every non-essential or distracting element from the edges of the frame. Seek a slight improvement by pointing your camera a little to the left. Or to the right. Move your tripod a bit sideways, even a little bit. Move it the other way. Raise it. Lower it. Zoom in. Out. Use a larger aperture to defocus those ugly dead leaves on the tree in the background. Hide that obnoxious fence post in the middle of the scene behind a convenient tree. If you don’t gotta have it, get rid of it!
AVOID CLUTTER
Photographers weak at composition tend to shoot cluttered images that include too many non-essential or distracting objects. A careful selection of the shooting angle, zooming more tightly, and moving closer will all help to avoid clutter. As an example, a fine image of a forest might require you to zoom in a bit tighter to eliminate a road or ugly wire fence from the image. Sometimes it’s necessary to eliminate ugly light, too. Photographers know that a viewer’s eye is first attracted to the brightest areas of an image, so we could wisely elect to deliberately exclude a small part of a forest waterfall too brightly lit by an intruding ray of sunlight. It’s not only a compositional concern, but eliminating the bright part of the waterfall may also help ensure that the scene’s contrast doesn’t exceed the dynamic range of the camera.
Some photographers refuse to compose tightly, because they can subsequently crop the image during post-capture editing. This is easy to do, and we often do a small amount where necessary. Cropping can produce a fine image, but it has a potential drawback. If the cropping discards a large quantity of pixels, there may not be enough remaining for a high-quality print. However, for smaller prints, or for Web applications, moderate cropping is generally acceptable. It’s your choice. Our choice? We believe that the best procedure is to compose tightly and carefully in the camera so that little further cropping is needed.
Many fine landscape images are simple in design, but they work beautifully. Barbara and her dog (Yogi Bear) immediately draw you into this sunrise scene.

COMBINE ELEMENTS THAT WORK TOGETHER
This is another guideline that helps you avoid clutter. Concentrate on and compose only those elements of the scene that really go together. Compose a section of an autumn maple forest so that the colorful leaves hanging on their branches are supported by a nice tree trunk. Avoid distractions like sky hotspots peeking through the leaves, roads, trails, fences, and telephone wires. We’re not saying that it isn’t possible to make a nice autumn image that includes a fence; just make sure it’s a truly photogenic fence and one that leads your eye through the scene. One example may be a weathered old split-rail fence that starts in a lower corner of your image and extends diagonally through the image to an important element of the scene in the upper opposite corner.
Otherwise, compose the image so the fence is excluded. However, we realize some distracting elements can’t be removed from the scene because of their location. We have a mountain near our home that we refused to photograph for years, because an air traffic control radar station is perched on the very peak. Today radar stations are easily obliterated (from photographic images!) by the power of the digital darkroom. Jet contrails streaking across the sky are also easily eliminated, so a photographer can take small liberties from time to time, knowing things can later be fixed with editing software. Still, it’s wise (and always our goal) to shoot the finest possible image with the best composition in the camera so little must be done after the fact.
The trunk and branches of this red maple tree support all of the beautiful leaves. To capture this sort of image, you need terrific autumn colors, bright overcast light, and absolutely no wind. We didn’t know it at the time, but we should have shot another image that had two stops of additional exposure. Then we could have run it through HDR to get more color and detail in the nearly black tree trunks.

HOW BIG SHOULD THE MAIN SUBJECT BE?
There’s no rule here, either. It all depends on the subject matter and what story the image should tell. Perhaps you’re photographing the famous old Methodist church in the ghost town of Bodie, which lies north of Mono Lake in eastern California. You could fill the frame with the church to show off the detail in the old wood or you could make the church much smaller in the image to show it in context with the other buildings of Bodie. Either choice can make a fine composition.
Most of us do fill the frame with a waterfall because it’s the dominant feature of the scene. It’s effective to show a close-up of the waterfall so you can easily see how the water so splendidly tumbles over the rocky outcrop. But it’s equally effective to compose a waterfall small in the image. One can use a wide-angle lens to shoot from 10 to 30 yards downstream, letting the river lead the viewer’s eye up to the waterfall in the background.
HORIZONTAL OR VERTICAL ORIENTATION
Decide whether your selected scene will work better as a horizontal or vertical image. It isn’t always an easy decision. Some scenes suggest a horizontal treatment. Reflections along the opposite bank of a lake work well as horizontal images and so does a sweeping expanse of undulating dunes. Most waterfalls and tall buildings suggest vertical compositions.
As a rough guideline, consider main objects that are much taller than wide to suggest vertical images and subjects that are much wider than tall to suggest horizontal images. Beginners (including us in our earlier years) tend to shoot too many horizontal images because they think that it’s easier to work the camera horizontally and forget about vertical possibilities. In fact, cameras are designed to be equally effective horizontally and vertically and should always be oriented to best accommodate the important elements of the scene. Most of us, however, must work hard at breaking that bad horizontal-only habit. The skilled photographer can compose the majority of scenes either horizontally or vertically, and with equal success.
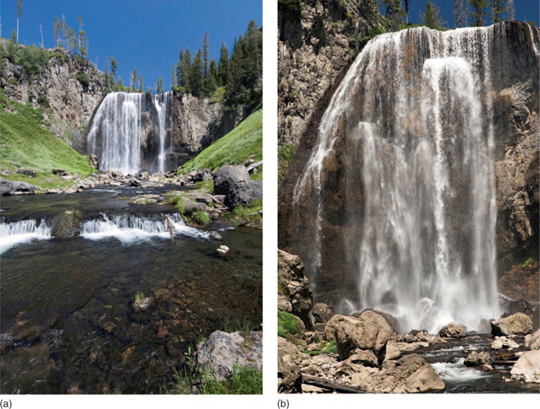
(a) Most subjects like Dunanda Falls can be photographed well from the same spot with different lenses. This wide-angle shot was taken with a Nikon 12 – 24 mm zoom at the 12 mm setting to include plenty of foreground. The crop factor for the Nikon D300 is 1.5×, so it’s equivalent to an 18 mm lens on a camera with a full-frame sensor. (b) Here’s Dunanda Falls shot from the same spot with a Canon 24 – 70 mm lens set at 65 mm and a Canon 1Ds Mark II. This camera has a full-frame sensor. These images show the differences in lens coverage you get between an 18 and a 65 mm focal length.
Let’s consider an autumn reflection scene. The opposite side of a small lake, in dawn’s unruffled waters, showcases the reflections of gorgeous autumn foliage. The more interesting part of the reflections is wider than tall, so a horizontal image is suggested. Maybe, though, you also notice an attractive area of the lake filled with pretty reflections of extra bright leaves or perhaps with the crisp reflection of an outstanding birch tree, either of which can nicely fill a vertical frame. Don’t hesitate to change your camera to a vertical orientation. (And don’t forget to re-polarize.)
Nothing, we repeat, is cast in stone, and many expansive horizontal landscapes can be successfully composed using tight vertical sections. Conversely, oftentimes very tall objects that scream for a vertical composition can work well as a loose horizontal. Explore the opportunities by attempting to find effective compositions both ways.
LEVEL THE HORIZON
Too many landscape images are marred by a tilted horizon. A lake is flat and its surface doesn’t slope down in either direction. Images with tilted water horizons always suggest that the water is about to flow out! With or without water, it’s good practice to pay extra attention to keeping the horizon level. We both use grid screens in the viewfinder (they replace the original screens in our high-end cameras) to assist in keeping horizontal lines horizontal and vertical lines vertical. If you can’t replace your viewing screen with a grid screen, use an inexpensive accessory level that attaches to the flash hot-shoe on the top of your camera. At least one camera, the Nikon D3, has a built-in virtual horizon, a firmware feature to help level the camera. Airplane pilots enjoy it because it looks just like a traditional flight instrument!
(a, b) Always look for a horizontal composition in an obvious vertical and vice versa. Many scenes can be successfully framed both ways! Notice how we use the tree trunks and branches in each image to support the leaves in this foggy autumn maple forest. We like both compositions and our favorite varies from day to day.

If your camera has live view capability, be sure to activate it. Live view lets you see your intended image on the LCD monitor before you shoot. Many cameras let you activate grid lines that overlay the live view image. One can line up a horizontal line of the scene with a camera grid line and be comfortable that everything is level. No matter how careful we are, sometimes horizons are tilted despite our best efforts. Most image-editing programs offer an easy method for post-capture leveling of horizons and alignment of verticals, so the forgetful shooter can relax a bit.
VIEWPOINT
Viewpoint refers to the camera’s location with respect to a scene, so it’s your selection of shooting position that defines the viewpoint. Unfortunately, most of us shoot standing up with the camera at eye level, so the viewpoint tends to be monotonous and, what’s more, may not produce the best images. If shooting from eye level works best, then that’s the viewpoint to use. However, another viewpoint often works better. Many successful photographers like to use wide-angle lenses and get very close to — or even lie on — the ground. These viewpoints can be excellent for subjects where you want to emphasize the foreground. For example,they permit filling the foreground with wildflowers that form leading lines to the mountains in the background. A prominent, near foreground gives a sense of depth to an image.
Viewpoints above the subject can be good, too. Shooting down at a scene from a mountain ridge, a hill, or any other elevated vantage point frequently shows an unusual but pleasing angle to an image. You don’t have to get very high for a good aerial viewpoint. At times, we use only a tall stepladder to achieve our aerial perspective. If you do that, clamp a ball head to the top of the ladder for camera mounting, and be sure to hold still when shooting.
PERSPECTIVE
Perspective is the visual effect of depth caused by the difference in the apparent sizes of foreground objects and background objects. Consider a scene with a flower in the foreground and a tree in the background. The perspective is determined by the ratio of tree size to flower size or, speaking more clearly, how large the flower appears compared to the tree, and it’s determined only by the distance between the subjects and the camera. This effect is absolutely critical to establishing where the emphasis lies in an image. Many photographers wrongly think that viewpoint and perspective are the same. Definitely untrue. Viewpoint can be changed by raising or lowering the camera, or by side-to-side movement. Perspective can be changed only by changing the distance from camera to subject. (Geometricians will please ignore the insignificant perspective change caused by slight side-to-side movement!) Moreover, some photographers believe that perspective is varied by changing lens focal length. Also untrue. Changing focal length will change what is or isn’t included in the image, but the relative apparent sizes of foreground objects and background objects remains the same, so the perspective is unchanged.
Let’s photograph a decaying home from the past century with mountains behind it. To illustrate perspective, we’ll start by photographing the house in the foreground from a long distance and using a long lens. For our second shot, we use a slightly shorter lens and we keep the house the same size by moving closer. The shorter lens makes the distant mountains look a little smaller. We take a third shot with an even shorter lens, maintaining the same house size by moving closer still. Again, the apparent size of the mountains diminishes. We keep shooting, moving closer and closer and using shorter and shorter lenses to hold the house size constant. The old saying says that if you keep doing what you always did, you’ll keep getting what you always got. To the contrary, in our case, we kept going closer, kept using shorter lenses, kept the same house size and, beyond, we kept getting smaller mountains. The changes to the relative size of the foreground house and background mountains are changes in perspective. This example shows that, for a more dominant background, you stay far from the foreground and use a longer lens and, for a more dominant foreground, get closer to the foreground and use a shorter lens.
It’s the perspective of an image that produces the pleasing effect of a large foreground element visually leading the viewer’s eye right to the main subject in the background. Our cliché scene is the beautiful flower prominent in the foreground, with a small but pretty waterfall way in background. Get that image by getting close to the flower with your short lens. It’s likewise the effect of perspective that gives us the ominous image of the helpless little prey animal in the foreground visually overwhelmed by the massive and snarling grizzly looming in the background. Get that one by moving a long way from the scene with your long lens. Come to think of it, maybe you should be even farther from that scene and not worrying about perspective!
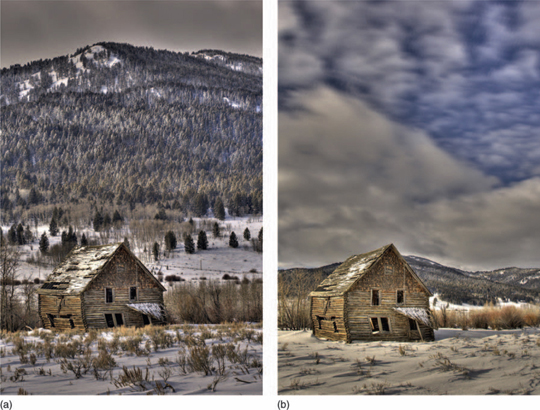
(a, b) This charming old cabin from the late 1800s continues (so far) to defy gravity. We began photographing it from far away with a 118 mm focal length and slowly snowshoed closer until we ended up at 28mm. In each image, we kept the cabin about the same size and in the same position in the composition. Look at the mountains behind the cabin. Did you notice how these mountains change in size relative to the cabin, which doesn’t? What you’re seeing is a change in perspective, an important concept that’s widely misunderstood by many photographers who falsely assume viewpoint and perspective are the same thing. Viewpoint is determined by where you shoot from. You can change your viewpoint without changing the shooting distance by making a parallel movement, for example. Perspective describes the relationship between the size of the foreground to the size of the background. Perspective can only be changed by physically (not zooming a lens) moving much closer or farther away from the subject. If you want the background to dominate the image, such as these mountains, stay far away and use a longer focal-length lens. If you want a dominating foreground, move close to the foreground and use a shorter focal-length lens. Study these images carefully. This is an important concept to understand. Both of these cabin images were made using HDR techniques.
Consider reading this section on perspective again. It’s vitally important to the success of your images and in developing your creative eye that you completely understand perspective. Remember that changing your shooting distance changes the relative sizes of the foreground and background.
FRAMING THE IMAGE
Decide, as you view the scene before you, whether the horizontal or vertical orientation makes more sense. Carefully choose your viewpoint, the spot from which to shoot the image, and then study the edges of the frame for unnecessary or objectionable objects or hotspots of light. Remove unwanted elements by changing viewpoint, angle, focal length, or distance. The viewfinders of many professional DSLRs display 100% of the final image, but the viewfinders of less expensive cameras unfortunately show only 90 to 95% of the final image. With those cameras, the inability to see the edges of the scene may result in unwanted distractions appearing in the image. Solve this by moving your camera around slightly to see if there are distractions near the edges and, if so, compose more tightly to remove them or plan to edit them out later.
YOU NEED A STRONG CENTER OF INTEREST
All fine images have a center of interest, which could be a waterfall, an old barn, a natural rock arch, or perhaps reflections of autumn foliage. It’s easy to think of the center of interest as the one dominant object in the image, but you could also have several dominant objects together, forming a repeating pattern. Shooting a landscape image of overlapping lines on the sand dunes actually fills the entire frame with the center of interest. In practice, most scenes have an obvious center of interest but, as demonstrated, there are exceptions.
CHOOSE THE BACKGROUND
Once you find that gorgeous scene and decide on the center of interest, consider what the background will be. Poor backgrounds ruin many images, so carefully choose how you frame the scene. For example, we enjoy photographing Michigan’s beautiful beech-maple forests during autumn. We prefer overcast days for shooting sections of those very colorful trees so the soft lighting will give a low-contrast scene that doesn’t exceed the dynamic range of the camera. Now, though, we must be concerned with keeping any sign of a bright and featureless white or gray sky completely out of the background. It would appear as an ugly blob with no detail. We’re also careful to not allow any little patches of that bright sky to sneak in between the leaves, since the hotspots quickly kidnap a viewer’s eye and become an unwanted center of interest.
This silhouetted conifer tree is carefully composed to be isolated from other nearby trees. Its shape makes a strong center of interest. The mountain background is chosen so plenty of dawn’s reddest rays light the background. Back-button focus on the tree and expose for the mountain to capture this scene.

RULE OF THIRDS
This rule as been around for centuries and was used before photography by painters and architects.
It was one of the first rules we learned at the beginning of our careers. We think the idea is worthwhile, but let’s call it a guideline rather than a rule. Here’s how it works. Imagine dividing your frame into thirds, both horizontally and vertically, just like a tic-tac-toe grid. The grid has four points of intersection, which some call power points or sweet spots, and this guideline suggests that you locate the center of interest of your image at or near one of the four points.
This rule of thirds helps one avoid always sticking the center of interest of an image smack-dab in the middle of the frame, making the proverbial bull’s-eye shots that so quickly become tiresome. Keep in mind, though, that images following this guideline, or any guideline for that matter, can get boring if the technique is overused. Avoid monotony by occasionally stretching the rule. And don’t mechanically rely on numbers and percentages. Compose the image in any way that looks good to you, and not necessarily to others. If you later decide that the composition isn’t all that good, at least it didn’t cost anything to shoot, and its deletion takes but a second.
PLACING THE HORIZON
Conventional wisdom states that a horizon line should not exactly bisect an image. Like the bull’s-eye composition described above, a horizon line that’s always in the same place quickly gets dull. Here, though, are some guidelines for horizons. If the sky is more interesting than the foreground, place the horizon line so the sky occupies more than half of the image. But if the foreground is more interesting than the sky, place the horizon line so the sky occupies less than half of the image. In both cases, avoid precise bisection. Place the horizon line so that the amount of sky is proportionate to its visual attractiveness. In the case of a particularly dramatic sky, include as much as possible, leaving only a little foreground, perhaps less than one-quarter of the image.
This brown bear fishing for salmon atop Brooks Falls at Katmai National park in Alaska is composed using the “rule of thirds.” We prefer to think of this “rule” as a guideline, although it does work often and well. The bear is placed at the top left power point because this position gives it more room to look into the frame toward the lower right power point. We like how the falls makes a diagonal that flows the opposite way.

Remember, too, that not all images must include a horizon. And when overcast skies prevail, compose the image to completely eliminate that featureless bright blob, because it grabs the viewer’s eye and belittles the intended center of interest. As the great movie producer Sam Goldwyn might have said, exclude it out!
In spite of our previous admonitions, occasionally a mid-image horizon does work nicely. Perfect mirror reflections of landscapes bathed in golden light can be very appealing with the horizon in the center of the image. Panoramas are another case. Here, the horizon is best placed in the middle when shooting multiple images of a scene to make a single panoramic image. By doing this, there’s less chance of inadvertently cutting off important elements, so the stitching process is simplified. One can always crop the top or bottom of the final panorama to deliberately move the horizon to a more photogenic position.
SHOWING DEPTH IN THE IMAGE
The images you view on your LCD screen or your computer monitor or project with a digital projector or showcase as a fine print all have height and width but no depth. The images are two-dimensional representations of a three-dimensional scene. You can’t record the scene in three dimensions without very specialized photography gear, but it’s quite possible to compose images that give a very strong feeling of depth.
USE THE GROUND
An easy technique to suggest depth in an image is to shoot a scene having a strong foreground, an interesting middle ground, and a helpful background. The foreground grabs your attention first and your eye then moves through the middle ground and finally works its way to the background. The different grounds lead your eye through the image suggesting depth. It’s easier than you think to find scenes that meet these criteria, and it gets even easier with practice. Many people photograph mountains or interesting old buildings with nice skies in the background. These images, occasionally eyecatching as described, can often be enhanced by including a nice foreground object, such as a lush patch of wildflowers, a pretty pond with a frog, or perhaps a weathered old split-rail fence. You can move in close to the new foreground, emphasizing elements that draw you into the image and lead your eye to the middle ground, which is the mountain or building. Your eye then naturally moves to the background’s distant sky, the last element contributing to the sense of depth. The image is surely two-dimensional, but its sense of depth is very strong.
USE WIDE-ANGLE LENSES
An effective way to suggest depth is to use a wide-angle lens close to the foreground. This method creates a very prominent foreground that grabs a viewer’s eye and leads it farther into the image. Early in our careers we seldom used wide-angle lenses, much to the detriment of our images. Don’t make the same mistake. Use your wide-angle lenses often. These days we frequently use lenses between 15 and 20mm close to the main subject to capture that wonderful foreground that so insistently invites us farther into the image.
The close-in-and-wide-angle technique for implying depth works particularly well when the elements of the scene are similarly sized. Think of a wide expanse of flowers in a large field, or of a long stretch of white-capped waves crashing onto a beach. The flower image will show apparently large flowers prominently in the foreground and seemingly much smaller flowers way in the background. The wave image likewise has the apparent disparity of sizes.
SHADOWS
The effective use of shadows does wonders for suggesting depth. Light is critical to the use of shadows, as exemplified conversely by the flatness caused by scarcity of shadows under a heavy overcast. If the light comes from directly behind or nearly directly behind the photographer, there will be few and smaller shadows, because the bulk of the shadows will be invisibly behind the objects that cast them. Some subjects, such as sand dunes, snowy landscapes, and foggy scenes enjoy an enhanced sense of depth from the texture and the shadows brought out by side- and back-lighting.
We especially enjoy photographing the patterns of the sand dunes found in Death Valley National Park. The flat light of a cloudy day, though, makes it difficult or impossible to depict the depth and texture of the dunes, so we always plan to shoot the dunes when they’re bathed in the warm sunlight of early or late day.
You feel the great depth right away in this scene, even though the image itself has no depth at all. Place the horizon of Moccasin Lake near the top of the image. Use the prominent stones in the foreground to draw you into the scene on a visual journey that leads to the exquisite colors in the background. This perspective is easily achieved by using a wide-angle lens only a few feet away from the foreground.

CONVERGING LINES
In any scene, approximately parallel lines that originate in the foreground and flow toward the background will converge like the rails of a receding railroad track, thus suggesting depth. Examples include roads, trails, the aforementioned railroad tracks, rivers, and shorelines that lead away from the camera. All of these subjects are opportunities to use converging lines to suggest depth in an image.
LEADING LINES
Some landscapes have a single dominant leading line that begins in the foreground and leads your eye to a center of interest in the background. Look for and use any strong lines that lead the viewer’s eye toward the image’s center of interest whenever you can. Fences and streams are often used as leading lines.
CURVES AND PATTERNS
The famous “S” curve of a meandering creek is frequently used to make pleasing compositions. S curves are a bit of a cliché, but they frequently work well, so don’t hesitate to use them in your landscapes.
Many scenes present the observant photographer with several curves that might be included in an image, rather than the common single S curve. Here we’d suggest that the shooter move in closely or zoom tightly to assess the visual merits of including lots of curves or even all of them. It may be difficult, when shooting a series of curves, to strictly apply our foreground-to-midground-to-background guideline, but filling the image with a series of curves makes a pleasing image and can be thought of as an intimate landscape.
WORK THE SUBJECT
When you’ve found a potentially pleasing subject, be sure to spend plenty of time working all of its possibilities. There may be many. Explore multiple variations of every shooting parameter: different viewpoints, different perspectives, varying apertures to manipulate depth of field and selective focus, faster and slower shutter speeds for depicting movement, changes in polarization of glare and skies, and vertical and horizontal orientations. It goes on and on. Moreover, if you come back tomorrow when the light has changed, there’ll be an equally large and uniquely different collection. Somewhere in that unbounded array of possibilities lies an image to make you proud!
In our opinion, this tip is unarguably the most important that we can offer for making memorable images, so please take your time to absorb what we say here. Let’s use an example to illustrate this crucial point about working the subject. For more than 20 years we have taught nature photography field workshops in our beloved northern Michigan. We take every workshop to Au Train Falls, which means we have guided nearly 3000 people to this underwhelming waterfall. That’s not a typo, and an image of the overall falls is true to the subject — underwhelming — except during spring runoff when the water is high. When we visit the falls with our summer or fall workshop participants, the river is always low, with only a few inches of water in the deeper parts, and the edges are bone dry.
Au Train falls is actually a long series of small cascades. It’s fun to photograph because, when wearing rubber boots, it’s easy and safe to walk on the sandstone river bed searching for attractive compositions. This way you can get in close to the small cascades with a wide-angle lens. Shooting from right in the river makes it easy to capture images of the water flowing directly toward the camera. Several of the small cascades can be shot at close ranges, as close as 2 feet, and from many angles it presents endless compositional choices in an otherwise unexciting waterfall.
We’re going to temporarily abandon any attempt at diplomacy and come right out and tell you that, in our experience, amateur photographers don’t extract anywhere near the actual potential of a subject. They remain rooted in whatever spot they started in and, for whatever reason, just don’t move around. Setting up the tripod in some spot and doing all of your shooting in that one place is a major mistake! It’s a huge mistake! It’s a stupendous mistake! It’s a … well, you get the idea. You have to move frequently to work most subjects well.
We probably won’t be shooting much at Au Train Falls, having been there so many times, but if we were shooting at a less familiar waterfall, we’d be moving around more than a hungry weasel chasing mice in a woodpile. We’d shoot it from the river, from the right side, the left, from the top, the bottom, and maybe even from the back. We’d spend hours, not minutes, photographing it from this angle and that, from this height and that, and we’d make dozens and dozens of compositions. We’d use several different lenses and we’d shoot different shutter speeds in each composition to vary the look of the flowing water. We’d polarize a little and we’d polarize a lot. We’d try vertical and horizontal compositions. Can it be a panorama? We would shoot some HDR sets of images and use fill flash to freeze water drops. We’d leave little untried and most likely walk out in the dark!
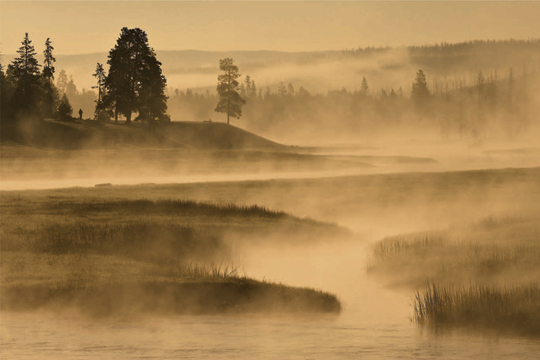
The highlights and overlapping shadows of this foggy marsh imply a strong feeling of depth. The tiny size of the lone person in the top left corner adds a sense of scale to the scene.
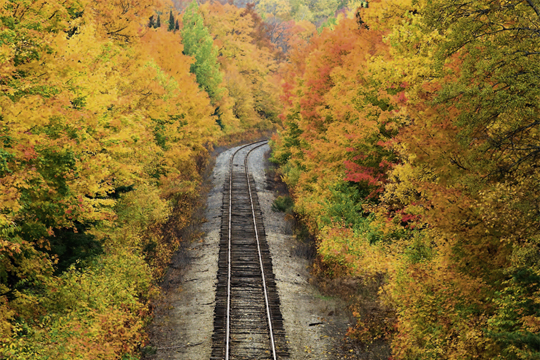
These railroad tracks wander through miles of remote northern Michigan forest. From a highway bridge, we shot down on the tracks for an aerial viewpoint. The converging tracks in the distance impart a strong sense of depth.
These foreground lines at the incredible “wave” nicely lead your eye to the dominant rock in the top left corner. Once again, we used a wide-angle lens to produce this wonderful perspective.

This fine image by Dan Pater, one of our “editing commandos,” was taken during a Michigan autumn color workshop. We’re always inspired by our talented students, and love his exquisite use of a wide-angle lens and careful composition to include a sunstar in the scene. It’s an unexpected image — in a fall color workshop — because there’s no fall color in the scene. Leave it to Dan to find a terrific image at the peak of autumn color that has no color.

We just can’t stress it enough. Far too many potentially good photographers — sometimes technically sharp but artistically still-learning photographers, sometimes photographers anxious to get to the better place just down the road a piece, sometimes photographers anxious to meet their pals at the restaurant — prematurely abandon high-value photographic targets long before they discover the best compositions.
ALWAYS STRIVE TO IMPROVE YOUR COMPOSITION SKILLS
An effective composition is an essential component of every successful image. It doesn’t come easily for most, but everyone can improve their skills if they don’t assume to already know enough and constantly work at it. Developing your eye to recognize good image possibilities is an ongoing process that you can practice year after year. In our case, we don’t get much better at shooting sharp images or exposing the scene, but we continue to improve at seeing and composing images. Even after working a subject as completely as we know how, we still wonder what incredible images were present that we failed to see. Every year we have a few students make a composition that is totally unique at a location previously visited by 3000 students, so we know it can be done. The key is to slow down, take lots of time, and carefully study every scene for its photo opportunities.
Some good image possibilities just can’t be seen. Consider, for example, foam floating down a river or autumn leaves swirling in a small whirlpool on the surface of the stream. We can see that those subjects are moving but, no matter how experienced we are, we can’t see what neatly intricate patterns they might make with a long exposure, say two seconds or more. Why not? Because we can’t see the patterns they make over time, but our cameras can capture the path of this motion with long exposures.