
Chapter 7. Rotoscoping and Paint
It’s a small world, but I wouldn’t want to paint it.
–Steven Wright
Why roto something painstakingly by hand if a matte or motion track lets the computer do it for you? It’s always preferable to use a procedural solution when you can. Inevitably, though, it’s sometimes necessary to animate a mask or paint some frames. Rotoscoping (or roto) is the art (although not everyone would call it that) of drawing on a shot frame by frame, generally using masks. Cloning and filling using paint tools are variations on this task.
“Rotoscoping” was invented by Max Fleischer, the animator responsible for bringing Betty Boop and Popeye to life, and patented in 1917; it involved tracing over live-action movement, a painstaking form of motion capture. The term has come to stand for any tracing of movement frame-by-frame in a moving image.
After Effects is not famed as a rotoscoping tool, and while third-party tools to create and track masks and paint continue to evolve, masks and paint in After Effects CS3 are largely unchanged from the previous version.
If you’ve determined that no procedural method for keying (Chapter 6, “Color Keying”) or tracking (Chapter 8, “Effective Motion Tracking”) a matte will help your shot, here are some guidelines for roto and paint:
• Keep it simple. Use as few points as possible per mask, or as few paint strokes as you can. Put these in motion with as few keyframes as possible (the next section has specifics).
• Paint is a last resort; it’s virtually always slower and more painstaking than animating masks, when that’s an alternative, although a quick clone or well-placed paint stroke in a matte gap can save you time.
• Review constantly at full speed. The next section offers some new tips to help you do just that.
• Combine strategies. Effective rotoscoping may mix keying (whether color keying or a hi-con matte, Chapter 6), tracking, animated masks, and paint. Break the shot down, starting with the strategy that gains the most ground quickest.
“Keyframing” began at Disney, in the 1930s, where top animators would create the key frames—the top of the leap, the moment of impact—and lower-level artists would add the in-between frames thereafter. With a computer, you are the one creating the keyframes, leaving the computer itself to create the in-betweens as much as possible.
It can be satisfying to knock out seamless roto, especially if you can avoid fighting the tools.
Articulated Mattes
Keep it simple, keep it quick; the simpler and quicker your masking process, the better (and more satisfying) the result.
The previous edition advocated rotoscoping in the Layer viewer, but thanks in part to e-mail correspondence with a reader (check the acknowledgments for details) I have rethought that stance when articulating mask shapes. The paint tools, however, operate only in Layer view (more on that later).
To roto effectively, you can play a game called “preserve the RAM cache.” To win, you need to prevent the sequence that is being rotoscoped from constantly re-rendering, which is exactly what happens each time you draw a mask shape directly on a frame.
Instead, try the following steps, beginning with a plate shot that needs roto:
1. Create a comp containing only the plate (you can drag the source to the new Composition icon in the Project panel).
2. Add a solid layer above the plate; you can make it white and name it Mask although neither is essential.
3. Turn off the solid layer so only the plate layer is displayed.
4. Lock the plate layer (this is important).
5. Create a RAM Preview of the entire comp or a section to roto (by specifying a shorter work area).
6. Select the solid (still hidden) and your masking tool of choice (Pen or a shape); draw a selection on the first frame.
7. Press M to reveal Mask Path and create a keyframe.
8. Proceed to another point in time and edit the shape to update the selection.
9. Note that the green bar in the Timeline is still displayed—the RAM cache remains because the layer is locked. Press the Spacebar (not RAM Preview) to see the mask interpolate over the footage at full speed.
With this setup, you can make further adjustments and add more masks without disturbing the RAM buffer, so that as you use the Page Up and Page Down keys to quickly check adjacent frames, update is instantaneous. When it comes time to apply the masks, you can either apply the solid as a track matte or copy the masks and keyframes to the plate layer itself.
There are a few things to watch out for:
• This method works best with layers that have not been transformed; you can precomp to get back to the source footage if necessary. You can fine-tune masks in the context of the comp, if necessary.
• When working with a large scene, turn off layers you don’t need and limit the work area or Region of Interest.
• You may need to select and lock all layers other than the one where you’re drawing the masks.
Having laid down the basic groundwork for how to quickly preview masks over footage, we now turn our attention to making best use of the tools themselves.
Rotobeziers
Rotobezier shapes are designed to animate a mask over time; they’re like Bézier shapes (discussed in Chapter 3, “Selections: The Key to Compositing”) without the handles, which means less adjustment and less chance of pinching or loopholes when points get close together (Figure 7.1).
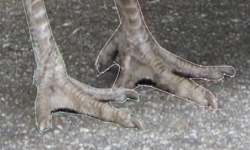
Figure 7.1. Bézier handles are a bad mix with animation; for each point, three points must be managed for each vertex, and crimping inevitably results when handles cross.
You can freely toggle a shape from Bézier to Rotobezier mode and back, should you prefer to draw with one and animate with the other (Figure 7.2).

Figure 7.2. In the Mask context menu, not only can you convert a Bézier shape to Rotobezier, you can lock and hide masks, close a shape, and set the first vertex for use with such features as Smart Mask Interpolation and the Reshape tool, discussed later.
Rotobeziers aren’t universally beloved, partly because it’s difficult to draw them accurately in one pass. Activate the Pen tool (G key) and check the Rotobezier box in the Tools menu, then click the layer to start drawing points; beginning with the third point, the segments are by default curved at each vertex (Figure 7.3).
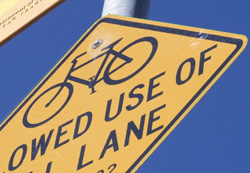
Figure 7.3. Your first pass with Rotobeziers can just hit the key transitions quickly. Place a point at the apex of each curve, as well as at each corner.
The literal key to success with Rotobeziers is the Alt/Option key. At any point as you draw the mask, or once you’ve completed and closed it by clicking on the first point, hold Alt/Option. A double-ended arrow icon appears, the Adjust Tension pointer. Dragging it to the left increases tension, making a vertex a sharp corner (Figure 7.4a and b), like collapsed Bézier handles. Drag in the opposite direction, and the curve rounds out. You can freely add or subtract points as needed by toggling the Pen tool (G key; look for the cursor to change, adding a plus or minus sign beside it).
Figures 7.4a and b. Alt/Option-drag a point anywhere between full tension (a) and no tension (b).
If the Selection tool (V) is active, Ctrl+Alt (Cmd+Option) activates the Adjust Tension pointer.
A summary of mask shortcuts:
• To replace a Mask shape, in Layer view select the shape from the Target menu and start drawing a new one; whatever you draw replaces the previous shape. Beware: The first vertex point of the two shapes may not match, creating strange in-between frames. To set the first vertex point, context-click on any mask vertex.
The hardest thing to accept about Rotobeziers is that the first pass at the shape is usually wrong, and each point you add changes the shape around adjacent points. You can instead draw regular Béziers, get the still shape right, then context-click the mask and toggle Mask and Shape Path > Rotobezier. This lets you leverage the real strength of Rotobeziers, using them for animation.
Strategies for Complex Shapes
Specific strategies make effective roto of complex organic shapes possible, regardless of tools:
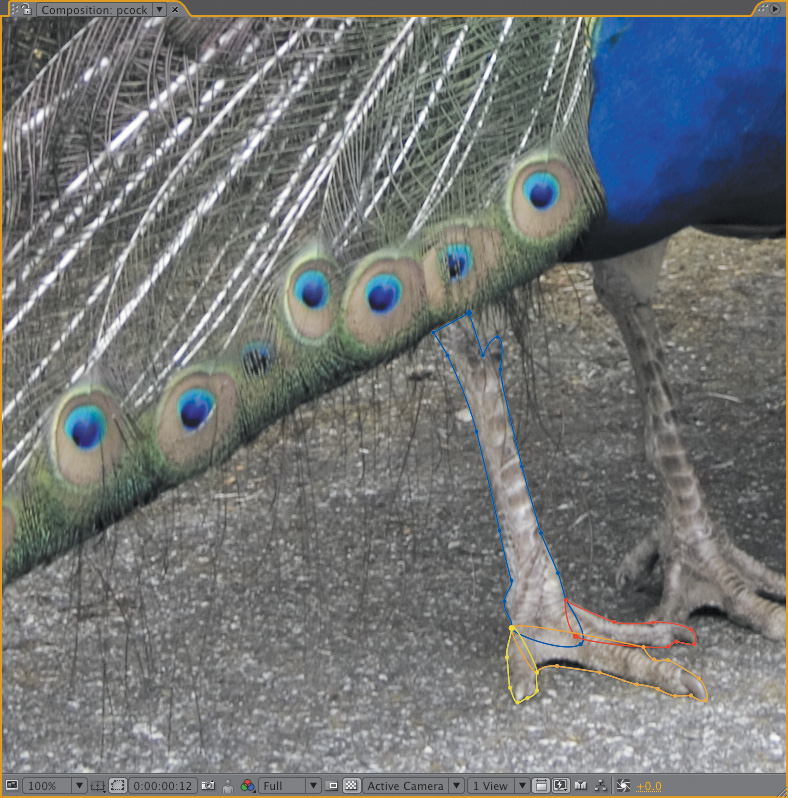
• Use multiple overlapping masks instead of a single mask on a complex, moving shape (Figure 7.5).
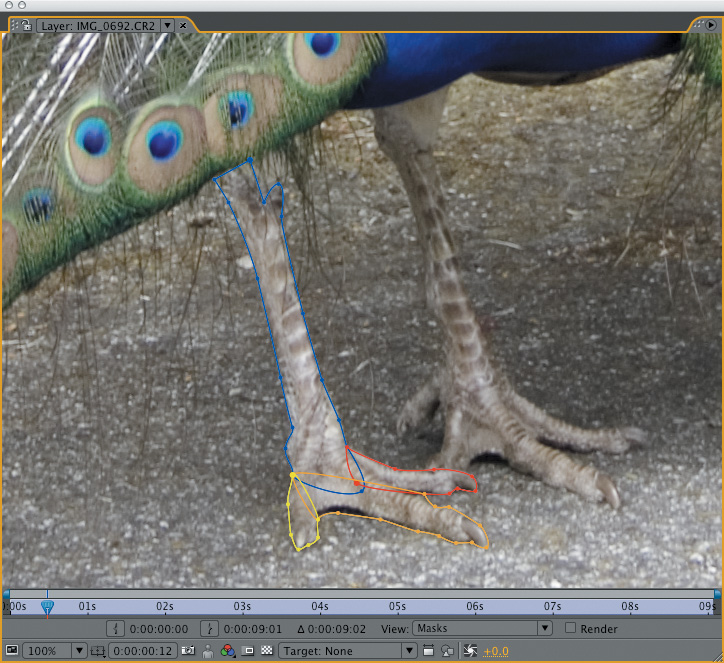
Figure 7.5. Rotoscoping a complex shape that needs articulation over time? Divide it into individual shapes, each with a dozen or less vertices, so as to avoid headaches.
One key to working quickly is to intentionally create overlapping, separate mask shapes for different parts of your masked area that you know will move independently, or be revealed and concealed (in this case, because of a simple perspective shift). A shape with 20 or more points will be difficult to manage over time.
• Define a shape beginning on a frame where it can be drawn with the fewest possible points, adding more points as needed as you go. As a rule of thumb, no articulated mask should contain more than a dozen or so points.
• Go through the clip and look for the natural keyframe points, where a change of direction, speed, or shape begins or ends, and block in keyframes before you animate them.
Enable Cycle Mask Colors in Preferences > User Interface Colors to generate a unique mask color with each new mask. You can customize the color if necessary to make it visible by clicking its swatch in the Timeline.
Block in and refine the first shape, then refine as necessary. Check the result at full speed against a contrasting background, just as you do with color keys. Then move on to the next shape. Following are more strategies to help you work with masks in After Effects.
Overcome Mask Limitations
As mentioned earlier, masks in After Effects haven’t evolved as a feature in quite some time. Here are some common limitations, followed by tips to work around them.
• There is no direct way to apply a tracker directly to an After Effects mask, let alone track individual mask points (although you are welcome to try a script called RotAE at aenhancers.com which attempts this; just search on the keyword RotAE).
• You can’t translate multiple mask keyframes at once; even if you select multiple keyframes, the move is applied only at the current frame.
• After Effects lacks the ability to specify whether a feather is applied to the inside or outside of a mask, nor can you vary feather settings on a per-vertex basis (Figure 7.6).

Figure 7.6. This mask has no threshold to match the motion blur of the shot. After Effects lacks per-vertex mask feather, but animate the mask and enable motion blur, and you create the feathering effect automatically (Figure 7.13). For per-vertex feather or filtering, check out PV Feather from RE:Vision Effects (www.revisionfx.com).
• Adding points to an animated mask has no adverse effect on adjacent mask keyframes. Delete a point, however, and it is removed from all keyframes, usually deforming them (hence the tip above to start with the simplest shape).
Preferences > General includes a preference, on by default, to preserve a constant vertex count when editing masks. Practically the only reason to disable this is if you’re creating keyframes on every frame, with no in-betweens.
• There is no dedicated morphing tool in After Effects. The tools to do a morph, however, do exist, along with solid deformation tools generally.
The following sections elaborate upon the above points in depth.
New in After Effects CS3, you can link mask shapes together directly with expressions. Alt/Option-click the Mask Path stopwatch, then use the pickwhip to drag to the target Mask Path. Only a direct link is possible, no mathematical or logical operations, so all linked masks behave like instances of the first.
Tracking and Translating
One workaround for the lack of a mask tracker is described in the next chapter: if the movement comes from camera motion, you can essentially stabilize the layer, animate the mask in place, and then reapply motion to both.
You can also apply a motion track to a separate layer containing the mask and apply the layer as a track matte (Figure 7.7). Or, if you’re merely trying to translate a mask with many keyframes, since you can’t multiselect and nudge multiple mask keyframes, you can instead move an entire track matte layer containing them.

Figure 7.7. The green holdout area is a corner-pinned mask to which a track can be applied (and a corner-pin track can even track the deformation as it moves across a frame). The same idea works in any case where a simple mask shape can be tracked without need to deform drastically over the course of the shot.
Mask Motion Blur
To mask motion blur would seem to be something of a nightmare, as its edges defy careful observation. It’s not easy by any means, but masks respect the motion blur settings of the composition; a masked element in motion can be set with motion blurred edges that obey the same composition settings as any other animated element.
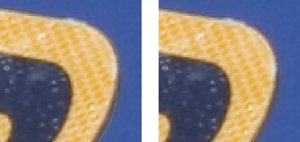
That means you have a chance of matching the motion blur using a mask whose contours would fit the shape of the object in its stationary state (Figure 7.8). To make the mask work with the moving element is a matter of getting the composition’s Shutter Angle and Shutter Phase settings to match. (For details, see Chapter 2, “The Timeline.”)

Figure 7.8. Putting a rotoscope mask in motion via keyframes allows motion blur to come along for the ride, simplifying the problem posed in Figure 7.6.
This may leave you with edge problems to cleverly conceal, whether by choking, further blurring the edges, forcing them to the background color, and so on.
Morph
Let’s talk about morphing—that’s right, that craze of the early ’90s, the breakout success by PDI, the Bay Area company that would go on to do Shrek, on Michael Jackson’s Black or White video.
Thing is, morphing can come in handy, without being so blatant and obvious, if you consider it a concealing tool. It’s useful when you don’t want anyone to notice a transition between two objects or even a transition between one object and itself at a different point in time. Or heck, go crazy morphing together members of your extended family to see if you look anything like the result.
What exactly is a morph? It is, quite simply, a combination of two warps and a dissolve. Given two images, each with a corresponding shape (say, the features of the face), you warp the source image’s face shape to the face shape of the target, warp the target from something that matches the source to its face shape, fading the target in over the source.
After Effects has no tool called “Morph,” and for a long time, the program offered no good way to pull off this effect. However Reshape is a warping tool that lays the groundwork for simple morphs. You can build these up into more complex morphs, with separate individual transitions occurring to create an overall transition.
Reshape
Unfortunately, creating a morph with Reshape is nowhere near a one-button process. This book generally steers away from step-by-step recipes in favor of helping you solve larger problems creatively, but in this case, it’s easy to get confused. So here is a step-by-step, using a demonstration of my own resemblance transitioning to that of my evil twin (Figure 7.9):
1. Start with two elements that have some basic similarities in their relative position of features. The subtler the distortion required, the more you can get away with.
2. Isolate the two elements you will be morphing from their backgrounds to prevent contamination. If you’re working with elements shot against a blue screen, key them out first. Otherwise, mask them. In my example, I created masks for each layer.
3. Ascertain that the two layers are the same size in the X and Y dimensions and as closely aligned as possible. If they are not, precompose one layer to match the other. This step is important because it will make matching the source and target masks much, much simpler. Name the two layers Source and Target (as they are in the example) if it helps you follow along.

Figure 7.9. Me and my evil twin, and that awkward adolescent phase in between.
4. Choose matching sections from your two clips for the duration of your transition (say, 24 frames). If you have still elements, no worries. The closer your moving elements are to still, the more likely you’ll get a clean result.
5. Draw a mask around the boundary that is going to morph in both layers. Be as precise as possible, erring to the inside if at all (Figure 7.10). This could be the masks created in step 2, if you created masks there. It need not be active; if you don’t need it to mask out the background, set it to None. Rename each mask something descriptive like outer (the name used in my example).
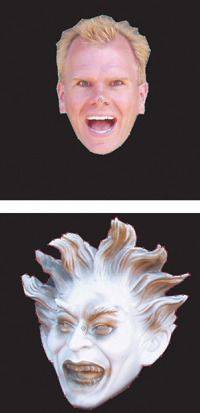
Figure 7.10. The outline of each head is carefully masked. These two masks need not correspond to one another; they are defining the boundary for the Reshape effect and can have differing numbers and orders of points. This mask prevents Reshape from pulling bits of background into the morph region.
6. Create a mask around the area of the Source layer that is the focus of the morph. In my example, the focus is facial features: the eyes, nose, and mouth (Figure 7.11). Make this mask as simple as you can; use Rotobeziers and as few points as will work to outline the features in question.

Figure 7.11. The full setup along with the top layer enabled at 100% and color corrected. It begins the final animation at 0% Opacity, reaching 100% at the end of the transition.
7. Set the mask mode to None; this mask is your first shape, you don’t need it to influence the layer at all; you will use it for the Reshape effect only. Give it a name (mine is called me).
8. Copy this mask shape and paste it in the Target layer. If the two layers are the same dimensions, it should be an identical size and position as it was in the Source layer.
9. Duplicate the mask. Give it a different color and rename it. In my case, I called the mask it.
10. First scale and rotate, then if necessary move individual points (as little as possible!) so that the it mask surrounds the equivalent area of the Target layer that me does of the source: in my example, the eyes, nose, and mouth.
11. Copy the resulting it mask shape, and paste it to the Source layer to create a new, third mask.
As of version 7.0, mask names are copied along with masks; the copied mask in step 8 remains named me in the new layer.
12. You now have three masks for each of the Source and Target layers. Now apply the Reshape effect to each layer.
13. Starting with the Source layer, set the Source Mask (me), the Destination Mask (it), and the Boundary Mask (outer). Set Elasticity to Liquid (you can experiment with other settings later if need be). Set Interpolation to Smooth.
14. At the first frame of the morph transition, still in Source, set a keyframe for Percent (at the default, 0.0%, meaning no reshaping is occurring). At the last frame, set Percent to, you guessed it, 100.0%. Now sit back and wait for the gruesome transformation. Don’t worry about how it looks yet.
The Correspondence Points in Reshape can be raised from the default of 1 to make the distortion more precise (and in some cases, less twisted). The downside is that this slow effect thus becomes even slower. Better to simplify what you’re attempting to do with your masks and fix things there; raise this value only as a last resort.
15. Repeat steps 12 and 13 for the Target layer, with the following changes: Set Source Mask to it and Destination Mask to me. The Percent keyframes should be set to 0.0 at the last frame of the transition (where it is keyframed to 100.0 on the Source layer) and, you guessed it, 100.0 at the first frame.
16. You’ve created the warps, now you just need the cross dissolve. Set an Opacity keyframe for Target at the last frame of the transition (leaving it at the default 100.0%), and then add a 0.0% Opacity keyframe at the first frame.
If at any point during setup it becomes difficult to interact with the UI because After Effects is taking so long updating a frame, enable Caps Lock on your keyboard to prevent any further frame rendering until you’re done.
You should now be ready to preview. The preview may take a long time to build the first frame; subsequent frames render much more quickly, so be patient. The main question to resolve is whether the features line up properly; if not, you must adjust the source and destination mask shapes accordingly, watching the median frame to see whether the changes are improving matters.
At this point my example may be looking good in terms of the face transition, but, of course, I’ve made life hard on myself by transitioning from a head of one size to a larger one, and the edges just kind of fade in. Therefore—and this is where it can get really complicated—I add a second morph, using the same steps as before, but all new masks.
Because I know this is complicated, I’ve included the source project and the final result as projects on the book’s DVD-ROM. Please do not use the result as the centerpiece of your horror feature.
Why complicated? Why new masks? These two questions are interrelated. If you set a second Reshape effect, the key is to avoid influencing the result of the first Reshape effect at all. Therefore, on the second instance the Boundary mask should be the boundary of the object minus the area occupied by the original source and destination masks. My second set of shapes covers the ears and top of the head, but avoids the area of the previous masks completely (Figure 7.12).
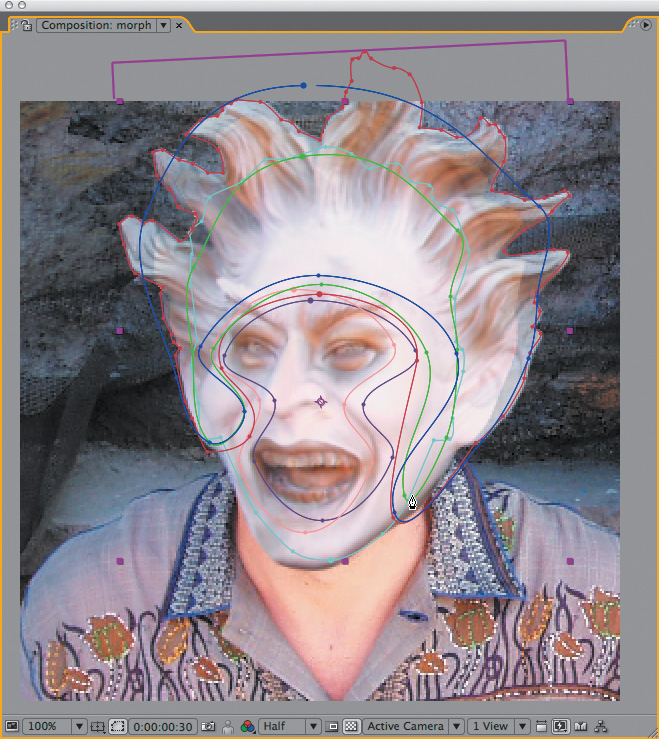
Figure 7.12. The full setup to do more than one morph on a single image quickly becomes pretty gnarly. Here are two non-overlapping holdout areas containing two sets of transition curves. This setup also takes exponentially longer to render.
Now, a quick look at a detail I left out (by having you duplicate the Source and Destination masks in step 9, for example, rather than draw them from scratch).
First Vertex and Target Mask
The Reshape tool heavily relies on the First Vertex to determine which point on the source mask corresponds to which on the destination mask. In this morph example, it is easiest to duplicate the source mask to create the destination mask to automatically satisfy the two criteria most essential for a smooth Reshape effect:
• Placement of the First Vertex corresponds on both masks
• Each mask has the same number of points
If either is not fulfilled, Reshape will execute some not-so-nice compensatory measures, probably deforming the in-between frames in undesirable ways. The easiest solution is usually to duplicate the source mask and edit it, keeping the same number of points. The next easiest method would be to draw a new mask with the same number of points, in the same direction (clockwise or counterclockwise), and to set the First Vertex where you need it (by context-clicking on the mask and choosing Select First Vertex from the menu).
To draw a new mask, go to the Layer viewer and choose Masks from the View pulldown (Figure 7.13). If the layer has a mask, a Target pulldown appears along the bottom of the viewer. Choose the mask you want to replace from this menu and draw or paste a new one (Figure 7.14). If the Mask Path has keyframes, it will deform from the previous mask shape to the new one, and if the First Vertex and vertex direction match, the transition will be clean.

Figure 7.13. The View menu specifies what is active in the Layer panel; the Render checkbox determines whether that particular step is displayed, or the source.

Figure 7.14. Choose a mask from the Target menu and draw a new mask (or paste in a mask shape). The target mask shape will be replaced; this is predominantly useful with a keyframed Mask Shape.
Puppet
Reshape is old-school compared with the Puppet tools, in many ways the most interesting addition to After Effects CS3. To get started with Puppet, select a layer (preferably a foreground element with a shape defined by transparency, such as an alpha channel or mask), add the Puppet Pin tool (Ctrl+P/Cmd+P) by clicking points on areas you want to animate. Click two points, drag the third, and behold: The layer is now pliable in a very organic, intuitive way.
Just because I could, I created a pretzel (Figures 7.15a and b). Puppet can be used for much subtler stuff, but this example clearly demonstrates something previously impossible in After Effects.

Figures 7.15a and 7.15b. Just to show I could, I made myself an ultra-long pretzel in Photoshop and then deformed it into the familiar shape (without worrying about realistic nuances such as light direction). Puppet can really deform stuff.
Here are the basic steps to create a deformation animation:
1. Use the Puppet Pin tool to add three pins to a foreground layer. Experimentation will tell you a lot about where to place these, but they’re very similar to the places on a marionette where the wires connect: the center, joints, and ends.
2. Move one of them, and observe what happens to the overall image.
3. Add points as needed to further articulate the deformation.
4. To animate by positioning and timing keyframes: Expose the numbered Puppet Pin properties in the Timeline (UU); these have X and Y Position values matching many other properties in After Effects.
5. To animate in real time: Hold Ctrl/Cmd as you move your cursor over a pin, and a stopwatch icon appears; click and drag that pin and a real-time animation of your cursor movement records from the current time until you release the mouse. You can specify an alternate speed for playback by clicking Record Options in the toolbar.
To animate an image from its initial position once you’ve already deformed it, create keyframes for the pins that have moved, go to the frame that should have the initial position, and click Reset for those pin properties. Only keyframes at the current time are reset.
Try these steps with virtually any matted image and see what happens; you’ll quickly get the feel for how Puppet is used. To refine the result, you have some options.
In the toolbar is a toggle to show the mesh. The mesh not only gives you an idea how Puppet actually works, it can be essential to allow you to properly adjust the result. I like to leave it on.
Expansion and Triangles use defaults that are often just fine for a given shape. Raising Expansion can help clean up edge pixels left behind in the source. Raising Triangles makes the deformation more accurate, albeit also slower. The default number of triangles varies according to the size and complexity of the source.
Pins disappeared? To display them, three conditions must be satisfied: the layer is selected, the Puppet effect is active and the Puppet Pin tool is currently selected.
More Tools
The Puppet Pin tool does the heavy lifting, but Ctrl/Cmd+P cycles through two other Puppet tools that help in special cases.
The pretzel example requires specific control over which parts of the deformation overlap as two regions cross; this is handled by the Puppet Overlap tool. The mesh must be displayed to use Puppet Overlap, and you apply the Overlap point on the original, undeformed mesh shape, not the deformation (Figure 7.16).
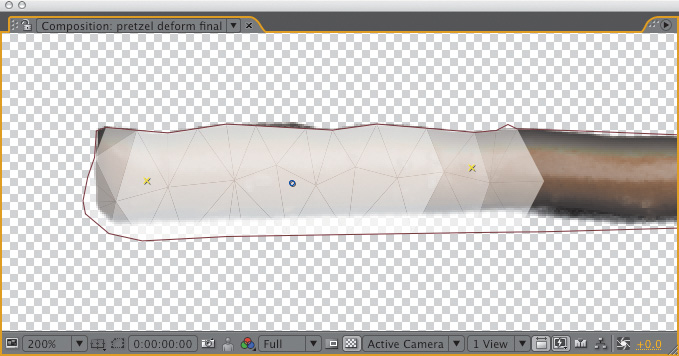
Figure 7.16. The Puppet Overlap tool lets you specify an area of the mesh that you wish to specify be in front or behind other parts of the mesh; a pretzel shape has just this type of need for over/under relationships.
Overlap is not a tool you animate (except perhaps its numerical settings, which are found in the Timeline). Instead, you place it at the center of the area that should overlap others and then adjust the settings as to how much “In Front” it’s meant to be and its Extent (how far from the pin this overlap area reaches). You can leave the In Front setting at the default until you start mixing more than one overlap; the higher the value, the closer to the viewer (and negative values will be further away than those with no setting, which default to 0).
The Starch tool prevents an area from deforming. It’s not meant to anchor a region of the image but instead to sit between animated pins, preventing the highlighted area (expanded or contracted with the tool’s Extent setting) from being squished or stretched (Figure 7.17).

Figure 7.17. You would expect such a grotesque extension of the fingers to distort the fingernails and back of the hand, the darker areas show where Starch pins are preventing areas of the mesh from deformation..
Paint and Cloning
Paint is generally a last resort when roto is impractical, and for a simple reason: Paint work is typically painstaking, and more likely to show flaws than approaches involving masks. Of course, there are exceptions. The ability to track clone brushes offers a huge advantage over masks, which are not so easy to track, and painting in the alpha channel is akin to masking with paint.
For effects work, paint controls in After Effects have at least a couple of predominant uses:
• Clean up an alpha channel mask by painting directly to it in black and white
• Clone Stamp to overwrite part of the frame with alternate source
Once you fully understand the strengths and limitations of paint, you can come up with your own uses.
Paint Fundamentals
Two panels, Paint and Brush Tips, are essential to the three brush-based tools in the Tools palette—Brush, Clone Stamp, or Eraser. These can be revealed by choosing the Paint Workspace (Figures 7.18a, b, and c).
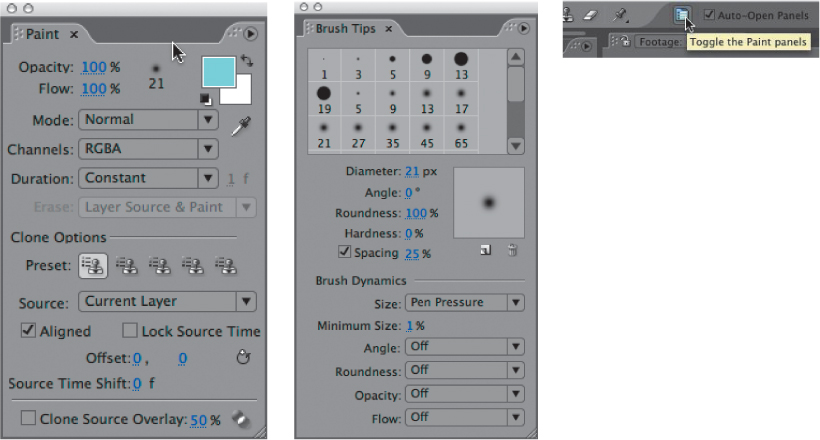
Figures 7.18a, b, and c. Use the keyboard shortcut Ctrl+B (Cmd+B) to cycle through the three basic brush tools (a, above); to their right is a toggle that reveals (or hides) the Paint and Brush Tips panels (b and c, left and right).
The After Effects paint functionality is patterned after Photoshop, but with a couple of fundamental differences. After Effects offers fewer customizable options for its brushes (you can’t, for example, design your own brush tips). More significantly, Photoshop’s brushes are raster based, while After Effects brushes are vector based, allowing them to be edited and animated at any stage.
Suppose that you have an alpha channel in need of a touch-up; for example, the matte shown in Figure 7.19 is a difficult key without matte cleanup, due to tracking markers and shadows. With the Brush tool active, go to the Paint palette and set Channels to Alpha (this palette remembers the last mode you used); the foreground and background color swatches in the palette become grayscale, and you can make them black and white by clicking the tiny black-over-white squares just below the swatches. To see what you are painting, switch the view to the Alpha Channel (Alt+4/Option+4); switch back to RGB to check the final result.
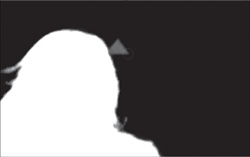
Figure 7.19. Touch up an alpha channel matte (for example, remove a tracking marker): In the Paint palette, select Alpha in the Channels menu, then display the alpha channel (Alt/Option+4).
• Brush-based tools operate only in the Layer panel
• Brushes include a Mode setting (analogous to Transfer Modes)
• With a tablet, you can use the Brush Dynamics settings, at the bottom of the Brush Tips palette, to set how the pressure, angle, and stylus wheel of your pen affect strokes
• The Duration setting and the frame where you begin painting are crucial
• Preset brushes and numerical settings for properties such as diameter and hardness (a.k.a. feather) live in the Brush Tips panel.
The older Vector Paint effect (Pro only) remains useful for painting in the context of a comp viewer, but it won’t clone, and it’s not intuitive; I prefer to open two viewers (Comp and Layer).
Much more fun and interactive than the Brush Tips panel are the following shortcuts. With the brush tool active in the Layer viewer:
• Hold Ctrl/Cmd and drag to scale the brush
• Add the Shift key to adjust in larger increments, and Alt/Option for fine adjustments
• With the mouse button still held, release Ctrl/Cmd to scale hardness (an inner circle appears representing the inside of the threshold, Figure 7.20)
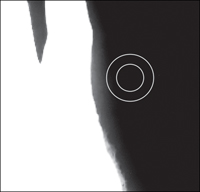
Figure 7.20. Modifier keys (Ctrl/Cmd to scale, Alt/Opt to feather, all with mouse button held) let you define a brush on the fly. The inner circle shows the solid core; the area between it and the outer circle is the threshold (for feathering).
• Alt/Option-click to use the eyedropper (with brushes) or clone source (with the clone brush)
There is a major gotcha with Constant (the default mode): Paint a stroke at any frame other than the first frame of the layer, and it does not appear until that frame during playback. It’s apparently not a bug, but it is certainly an annoyance.
By default, the Duration setting in the Paint menu is set to Constant, which means that any paint stroke you create on this frame continues to the end of the layer. For cleaning up an alpha channel, this is typically not a desirable setting because you’re presumably painting stray holes in your matte here and there, on single (or just a few) frames. The Single Frame setting confines your stroke to just the current frame on which you’re painting, and the Custom setting allows you to enter the number of frames that the stroke will persist.
The other option, Write On, records your stroke in real time, re-creating the motion (including timing) when you replay the layer; this stylized option can be useful for such motion graphics tricks as handwritten script.
The Brush Tips panel menu includes various display options and customizable features: You can add, rename, or delete brushes, as well. You can also name a brush by double-clicking it. Brush names do not appear in the default thumbnail view except via tooltips when you move your cursor above each brush.
As in Photoshop, the X key swaps the foreground and background swatches with the Brush tool active.
For an alpha channel, you will typically work in Single Frame mode (under Duration in the Paint panel), looking only at the alpha channel (Alt+4/Option+4) and progressing frame by frame through the shot (pressing Page Down).
After working for a little while, your Timeline may contain dozens of strokes, each with numerous properties of its own. New strokes are added to the top of the stack and given numerically ordered names; to select one to edit or delete, you may more easily find it using the Selection tool (V) to directly select it in a viewer panel.
Cloning Fundamentals
When you clone moving footage, the result retains grain and other natural features that still images lack. Not only can you clone pixels from a different region of the same frame, you can clone from a different frame of a different clip at a different point in time (Figures 7.21a, b, and c), as follows:
• Clone from the same frame: This works just as in Photoshop. Choose a brush, Alt/Option-click on the area of the frame to sample, and begin painting. Remember that by default, Duration is set to Constant, so any stroke created begins at the current frame and extends through the rest of the composition.
The Aligned toggle in the Paint panel (on by default) preserves 1:1 pixel positions even though paint tools are vector-based. Nonaligned clone operations tend to appear blurry.
• Clone from the same clip, at a different time: Look at Clone Options for the offset value in frames. Note that there is also an option to set spatial offset. To clone from the exact same position at a different point in time, set the Offset to 0, 0 and change the Source Time.
• Clone from a separate clip: The source from which you’re cloning must be present in the current composition (although it need not be visible and can even be a guide layer). Simply open the layer to be used as source, and go to the current time where you want to begin; Source and Source Time Shift are listed in the Paint panel and can also be edited there.
• Mix multiple clone sources without having to reselect each one: There are five Preset icons in the Paint panel; these allow you to switch sources on the fly and then switch back to a previous source. Just click on a Preset icon before selecting your clone source and that source remains associated with that preset (including Aligned and Lock Source Time settings).
To clone from a single frame only to multiple frames, toggle on Lock Source Time in the Paint panel.
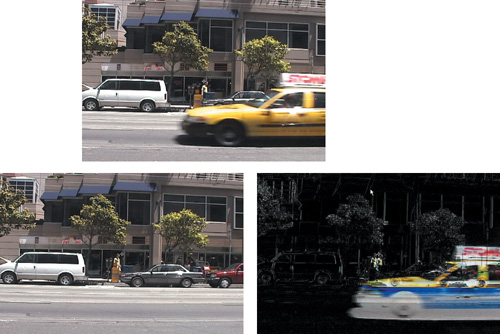
Figures 7.21a, b, and c. Clone source overlay is checked (a) with difference mode active, an “onion skin” that makes it possible to line up precisely two matching shots (b and c). Difference mode is on, causing all identical areas of the frame to turn black when the two layers are perfectly aligned.
That all seems straightforward enough; there are just a few things to watch out for, as follows.
Tricks and Gotchas
Suppose the clone source time is offset, or comes from a different layer, and the last frame of the layer has been reached—what happens? After Effects helpfully loops back to the first frame of the clip and keeps going. This is dangerous only if you’re not aware of it.
Clone is different from many other tools in After Effects in that Source Time Shift uses frames, not seconds to evaluate the temporal shift. Beware if you mix clips with different frame rates, although on the whole this is a beneficial feature.
Edit the source to take control of this process. Time remapping is one potential way to solve these problems; you can time stretch a source clip or loop it intentionally.
You may need to scale the source to match the target. Although temporal edits, including time remapping, render before they are passed through, other types of edits—even simple translations or effects—do not. As always, the solution is to precompose; any scaling, rotation, motion tracking, or effects to be cloned belong in the subcomposition.
Finally, Paint is an effect. Apply your first stroke and you’ll see an effect called Paint with a single checkbox, Paint on Transparent, which effectively solos the paint strokes. You can change the render order of paint strokes relative to other effects. For example, you can touch up a green-screen plate, apply a keyer, and then touch up the resulting alpha channel, all on one layer (Figure 7.22).
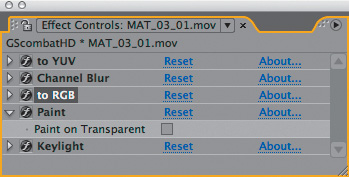
Figure 7.22. Paint strokes and effects are interleaved; touch-up of the plate occurs after compression artifacts related to 4:2:2 sampling are removed (see previous chapter) but before Keylight is applied.
The View pull-down menu in the Layer panel (Figure 7.23) lists, in order, the paint and effects edits you’ve added to the layer. To see only the layer with no edits applied, toggle Render off; to see a particular stage of the edit—after the first paint strokes, but before the effects, say—select it in the View menu, effectively disabling the steps below it. These settings are for previewing only; they will not enable or disable the rendering of these items.

Figure 7.23. The Layer panel’s View pull-down menu is a useful method for soloing paint strokes in the overall effects pipeline.
You can motion track a paint stroke. To do so requires the tracker, covered in the next chapter, and a basic expression; this topic is fully covered in Chapter 10, “Expressions.”
Wire Removal
Wire removal and rig removal are two common visual effects needs. Generally speaking, wire removal is cloning over a wire (typically used to suspend an actor or prop in mid-air). Rig removal, meanwhile, is typically just an animated garbage mask over any equipment that appeared in shot.
Some rotoscoping applications have dedicated wire-removal tools, but in After Effects, you’re on your own. However, wire removal need not be a painstaking process in After Effects simply because there’s no dedicated tool for it. There are several creative approaches that can work; if the ends of the wire are trackable, you can track position and rotation and apply these to a null, which would be the parent of a masked element to replace the wire. This specific instance, with an example, is demonstrated in the following chapter.
Rig removal is often aided by tracking motion, because rigs themselves don’t move, the camera does. The key is to make a shape that mattes out the rig, then apply that as a track matte to the foreground footage and track the whole matte (see Chapter 8).
Dust Bust
This is as nitty-gritty as rotoscoping gets. For various reasons, even on the highest budget visual effects film, the shooting and transfer process introduces flaws visible on a frame-by-frame basis: Dust and scratches make their way onto the pristine master. Most of these flaws can be corrected only via frame-by-frame cloning, sometimes known as dust busting. If you’ve carefully read this section, you already know what you need to know to do this work successfully, so get to it.
Photoshop CS3 offers an intriguing Adobe alternative to the After Effects vector paint tools; for the first time ever, it’s possible to work with moving footage in Photoshop. The After Effects paint tools are heavily based on those in Photoshop, but with one key difference: Photoshop strokes are bitmaps (actual pixels), those from After Effects are vectors. This makes it possible to use custom brushes, as are common in Photoshop (and which are themselves bitmaps). There’s not as much you can do overall with the stroke once you’ve painted it as in After Effects, but if you like working in Photoshop, it’s certainly an option. After Effects can open Photoshop files containing video.
Conclusion
And so, like rain, into every effects artist’s life a little rotoscoping must fall. The tools outlined here are mostly sufficient for the type of rotoscoping work that compositors will have to do. Dedicated rotoscope artists would likely choose software other than After Effects to ply their trade, or perhaps employ Silhouette as an After Effects plug-in. As long as rotoscoping isn’t your stock in trade, however, the After Effects tools will usually allow you to finish the shot without having to look for other software.
The next chapter completes the picture by adding motion tracking to your areas of expertise. As mentioned, motion tracking plus rotoscoping can equal a shortcut around tedious tasks.