
Chapter 16. Perspectives, Views, and Editors
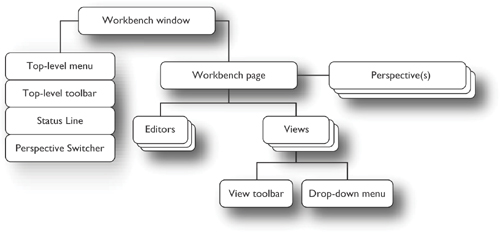
The Hyperbola UI described in Part II is purposely simple, but it still touches on most of the central features of the Workbench’s UI paradigm, in particular, perspectives, views, and editors. If you take a careful look at the Eclipse IDE’s UI, you can see that much more can be done with these building blocks than what we’ve used so far in Hyperbola. For example, as shown in Figure 16-1, the Workbench allows multiple windows to be opened and each window to have multiple perspectives. You can also define perspectives that are fully customizable by the user—views can be moved, minimized, closed, or arranged as fast views. RCP applications can use this power to provide a rich user experience and many layers of functionality without overwhelming the user.
Figure 16-1 Runtime composition of perspectives, views, and editors
In this chapter we extend Hyperbola to have multiple perspectives and multiple windows, and to use advanced view manipulation techniques. Specifically, we show you how to
• Add perspectives
• Use the programmatic perspective and view APIs
• Use multiple instances of a view and sticky views
• Open and track multiple Workbench windows
• Connect parts together
• Add drag-and-drop support to the editor area
16.1 Perspectives
Perspectives group together and organize UI elements that relate to a specific task or workflow. For example, in the Eclipse IDE, the Java perspective contains views for editing Java source files, while the Debug perspective contains views for debugging Java programs. You can have multiple perspectives in the same window, allowing you to switch tasks without having to change windows.
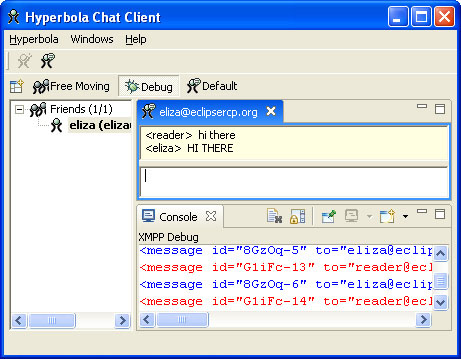
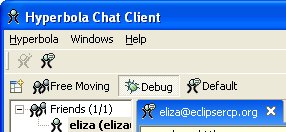
To show how perspectives can be used in RCP applications, let’s walk through the steps required to add two new perspectives, “Free Moving” and “Debug,” to Hyperbola. The Free Moving perspective allows the user to move around the Contacts view. The Debug perspective, as shown in Figure 16-2, shows a console with the XMPP output of all incoming and outgoing messages.
Figure 16-2 The Debug perspective in Hyperbola
16.1.1 Adding Perspectives
The first step is to define the new perspective extensions and perspective factory classes. Open Hyperbola’s plug-in editor and add two new perspective extensions to the existing org.eclipse.ui.perspectives extension point, as shown in Figure 16-3. The steps are the same as in Chapters 4, “The Hyperbola Application,” and 5, “Starting the Hyperbola Prototype.”
Figure 16-3 Two new perspectives added to Hyperbola
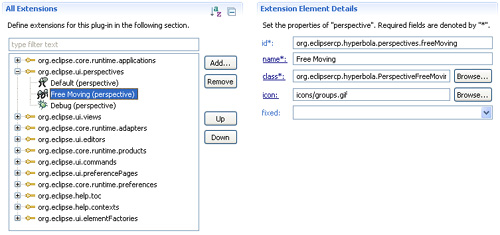
Notice that the original Hyperbola perspective does not have an icon. An icon was not needed because the perspective concept was never exposed—users just saw the Hyperbola window. In this new Hyperbola perspectives are exposed; therefore, you need icons. For each of the new perspectives and for the default perspective, supply a meaningful name and icon.
The class attribute defines an IPerspectiveFactory that generates the initial page layout and visible action sets for a page. You can use the usual trick of clicking on the class attribute to launch the New Class wizard. Name the perspective classes PerspectiveFreeMoving and PerspectiveDebug.
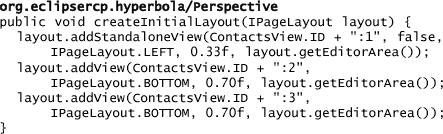
The Free Moving perspective is the same as the original Hyperbola perspective except that the Contacts view has a title bar and is movable. So, instead of calling IPageLayout.addStandaloneView(), call IPageLayout.addView() as shown here:

By default, Eclipse views are closable. To override this behavior, the Free Moving perspective retrieves the IViewLayout and calls setCloseable(false). The decision to allow views to be closed depends on how your UI is structured. Preventing views from being closed keeps things simple for the user. If you decide to allow views to be closed, ensure that users know how to get them back again. See Section 16.2.1 for examples of actions that open views.
Notice that the createInitialLayout() method is passed an IPageLayout. The perspective uses the layout object to control how the page looks and where views go.
Note
Editors are not directly added to a perspective layout; instead, you position the views around the area in which the editors are opened. It’s also possible to hide the editor area. It can be made visible later via the IWorkbenchPage.setEditorAreaVisible(boolean) method or by using the org.eclipse.ui.workbench.ActionFactory.SHOW_EDITOR action.
16.1.2 Adding the Debug Perspective and Console View
The Eclipse Platform includes a very useful Console plug-in that can be used to add a console to your RCP application. Here we use the Console view contributed by this plug-in in the Debug perspective. The console supports advanced features such as line coloring and hyperlinks. To add the console to Hyperbola, follow the instructions in Chapter 13, “Adding Help,” for adding plug-ins to your target, but instead of adding the Help plug-ins, add the following:
• org.eclipse.text
• org.eclipse.jface.text
• org.eclipse.ui.console
• org.eclipse.ui.workbench.texteditor
Then, to implement a console that displays all outgoing and incoming XMPP message in raw XML, create the DebugConsole class as follows:
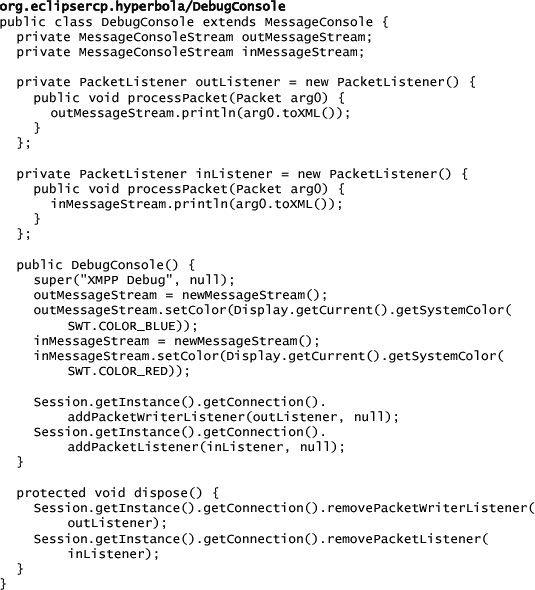
Add the new DebugConsole to the console manager in the ApplicationWorkbenchAdvisor’s initialize(IWorkbenchConfigurer) method as follows:

Alternatively, you can use the org.eclipse.ui.console.consoleFactories extension point to register the Debug console with the Console view. This approach is good if you expect to ship Hyperbola without a console and have it added by another plug-in. In this case, decoupling the advisor from the console is a good idea.
The Debug perspective is very similar to the original Hyperbola perspective, but it adds a Console view below the chat editor area:
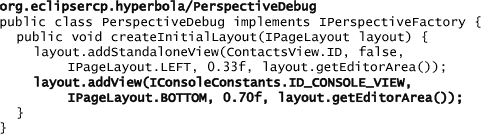
The IPageLayout.BOTTOM flag is used to place the Console view below the editor area. The Console view’s ID is defined by the Console plug-in and is available from IConsoleConstants.
16.1.3 IPageLayout Reference
Our use of IPageLayout has been straightforward, but in fact there are many additional useful methods. These methods can be grouped into two categories:
View placement—Methods meant for placing views in the perspective, for example, methods that stack views together or add placeholders for views to be opened after the perspective is shown. See Table 16-1 for a complete list.
Table 16-1 IPageLayout Placement Methods

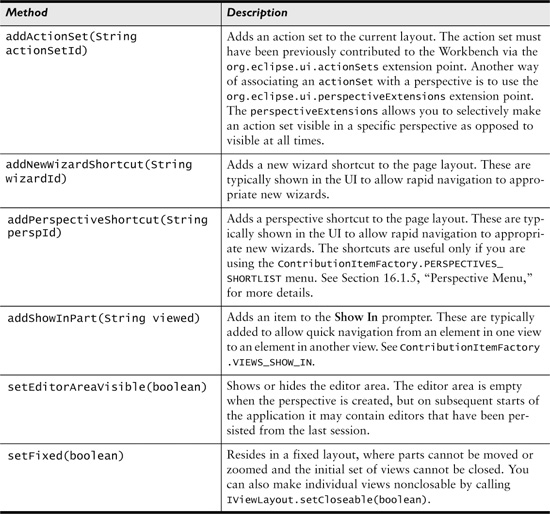
Perspective configuration—Methods to configure other elements associated with a perspective, for example, which wizards or action sets are shown when the perspective is activated. Refer to Chapter 17, “Actions,” for how to define and use action sets and new wizards. See Table 16-2 for a complete listing of perspective configuration methods.
Table 16-2 IPageLayout Configuration Methods
Note
The user can manually detach movable views from a Workbench window by dragging them, but there is no programmatic or declarative support for creating a detached view using IPageLayout.
Note
Many of these methods take view identifiers, for example, as the base for relative positioning. IPageLayout includes constants for view identifiers. They are listed mostly for convenience and backward compatibility. We recommend that you define your layout relative to the editor area and use your own view IDs instead of these. It’s entirely possible that these predefined view IDs are contributed plug-ins (e.g., IDE plug-ins) that are not included in your application.
If you have more complex layout requirements or want to allow users to drag and stack views together, refer to the APIs available on IPageLayout, IViewLayout, and IFolderLayout.
16.1.4 Perspective Bar
Hyperbola’s two new perspectives are defined, but they are not available to the user yet—users have no way of opening them. For most applications, providing a way to switch between perspectives is sufficient. The Workbench provides a perspective switching bar that is hidden by default in RCP applications. It has to be enabled from the WorkbenchWindowAdvisor to appear, as shown in Figure 16-4.
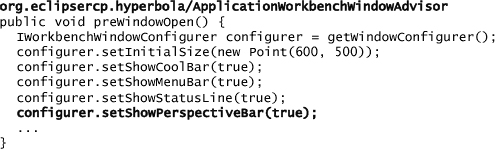
The perspective bar allows switching between open perspectives and includes the ability to open new perspectives. Its context menu contains several useful options for manipulating perspectives and the perspective bar itself. You can show or hide perspective text, close individual or all perspectives, as well as customize, reset, and change the location of the bar. The perspective bar’s default location is just below the toolbar, but it can be placed in the top right or on the left using the IWorkbenchPreferenceConstants.DOCK_PERSPECTIVE_BAR preference. You can set this in the Hyperbola preferences.ini file as follows:
org.eclipsercp.hyperbola/preferences.ini
org.eclipse.ui/DOCK_PERSPECTIVE_BAR=TOP_RIGHT
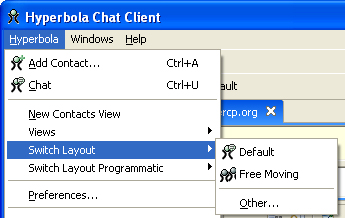
16.1.5 Perspective Menu
Instead of, or in addition to, the perspective switching bar, you can use the Perspective menu. The Perspective menu displays a list of perspective shortcuts that have been configured for the active perspective and an Other... item, as shown in Figure 16-5. The Other... item shows a dialog allowing the user to open any other perspective. If you do not like the wording or the prompting dialog, you can always write a custom menu and dialog using the perspective APIs discussed in Section 16.1.6, “Programmatic Perspective Control.” But if you want to use it as is, simply add the contribution item to an existing menu in the ActionBarAdvisor.
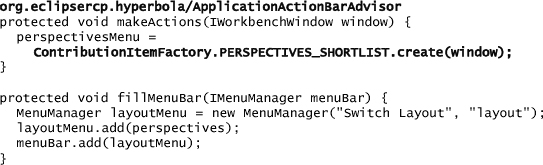
Figure 16-5 Using the Perspective menu
The menu shows the list of perspective shortcuts that have been added to the perspective layout via the IPageLayout method addPerspectiveShortcut(String). To keep menus and toolbars scalable as your application grows, it’s important to allow the perspective to control the available set of actions, perspectives, and view shortcuts. In the case of Hyperbola, each perspective should add a shortcut for each of the other perspectives, as shown here, so users can get to any perspective from any other perspective:
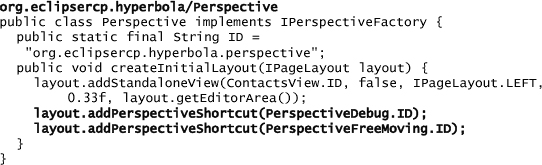
In large applications, shortcuts are added for the most frequently used transitions, and the Other... category is used to navigate to the others. A common performance blooper is to reference perspectives from other plug-ins in the perspective factory. This causes the other plug-ins to be loaded at startup.
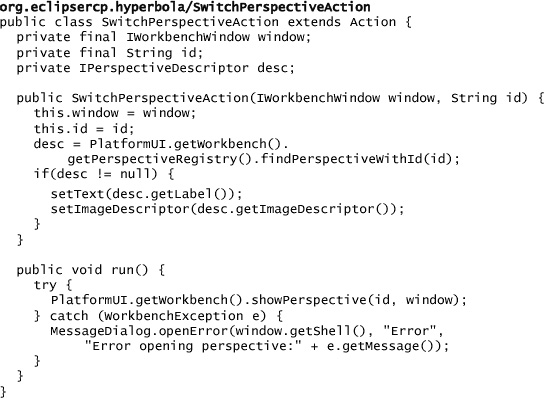
16.1.6 Programmatic Perspective Control
If the perspective bar and menu give users too much control over your application, you can hide the bar and add your own actions to switch between perspectives. You may not even want to expose the term perspective. One common pattern is to add an action that shows a particular set of views that matches a workflow the user understands to the top-level menu or toolbar. To the user, it is a set of arranged views; to the application, it is a perspective.
The snippet below shows a sample action that shows a given perspective in a given window. This might surface in Hyperbola, for example, as a simple “Debug” menu entry. The action uses the perspective’s ID to find the perspective descriptor from the registry. The descriptor contains the label and icon that were defined in the perspective extension. If you prefer to have perspectives open in a separate window, you can set the IWorkbenchPreferenceConstants.OPEN_PERSPECTIVE_WINDOW preference to true, and then IWorkbench.showPerspective() opens all new perspectives in their own windows.
All defined perspectives are stored by the Workbench perspective registry and are accessed by a unique ID. Given an ID, the following classes offer APIs for manipulating, querying, and observing perspectives within the Workbench:
IWorkbenchPage—The Workbench page has methods for opening, closing, and reverting perspectives.
IPerspectiveRegistry—The registry provides access to the perspectives known to the Workbench. A perspective descriptor has the information described in the extension point such as ID, name, and icon.
IPerspectiveListeners—You can register to receive perspective notifications using the IWorkbenchWindow.addPerspectiveListener() method. Three separate listener interfaces are available: IPerspectiveListener, IPerspectiveListener2, and IPerspectiveListener3. A common use of perspective listeners is to update the title of the application window when a perspective is changed. See org.eclipse.ui.workbench.PerspectiveAdapter.
Tip
You may notice when debugging perspectives that you modify the perspective, but the changes do not appear when you relaunch. We saw this in Chapter 5. It is because the Workbench saves perspective layouts between launches. If you modify a perspective in code, you may have to reset the perspective to see your changes. You can reset a perspective using the context menu on the perspective bar or by calling IPerspectiveRegistry.revertPerspective(IPerspectiveDescriptor) in your code.
16.2 Views and Editors
While developing Hyperbola in Part II, you learned the basics of using views and editors and the differences between the two. Typically, an editor shows the main content of your application, whereas views support this with additional navigation or context-sensitive information related to the task being done with the editor.
If you are familiar with the Eclipse IDE, you already know that in Hyperbola we have hidden a couple of the standard IDE mechanisms for managing views and editors. For example, the idea of a user opening an arbitrary view is not exposed, whereas in the Eclipse IDE there’s a Window > Show View menu entry that allows the user to open any view.
As with many things related to perspectives, views, and editors, it’s up to the individual RCP application to decide how to expose these to the end users. The goal of this section is to review some of the advanced RCP-related view and editor features.
16.2.1 Multiple Instances of the Same View
As we have seen in Hyperbola, it’s possible to open multiple instances of an editor each with its unique editor input. It’s also possible to open multiple instances of a view. Imagine a more advanced Hyperbola that allows you to connect to multiple servers at once. Users can then manage different contacts lists or different logins within the same application. To present this, however, Hyperbola would need a Contacts view for each connection.
There are two techniques for opening multiple instances of the same view in the same perspective. Regardless of the technique used, the first step is to edit Hyperbola’s plug-in definition and change the enableMultiple property of the Contacts view extension point to true.
Once that is done, multiple views can be opened directly in the perspective factory, as shown below. The view ID argument of the addView() method can take a qualified view format as primary-id:secondary-id. The secondary ID must be unique within the perspective.
The second technique is to open the secondary views via an action. The following OpenViewAction is generically defined to open a new instance of a given view ID, and the action is added to Hyperbola as Hyperbola > New Contacts View:
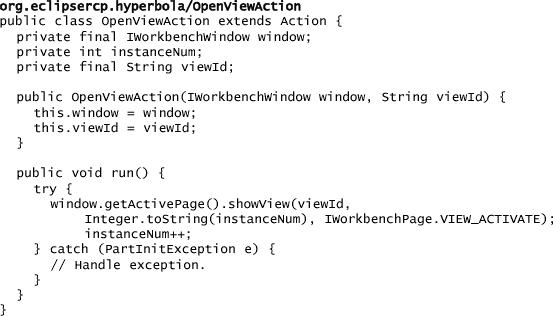
Notice that the view is created with both a view ID and a secondary unique instance ID. The secondary ID must be remembered if you need to refer to individual views. In this Hyperbola example the secondary ID does not need to be remembered.
If you run Hyperbola and trigger the New Contacts View action, a new Contacts view opens at a default location, at the bottom right of the editor area in the perspective. This can be improved. Just as you can define a perspective that contains multiple instances of the same view, so you can define placeholders for these views in the layout. When the views are opened, they are placed in the predefined placeholder locations. The following snippet shows how the Free Moving perspective is set up to ensure that all Contacts views are opened together in the same stack:
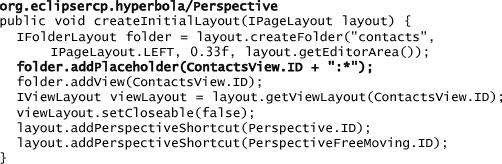
Notice that the Contacts view placeholder uses a multi-instance view format of primaryId:secondaryId and a * wildcard for the secondary ID. This indicates that any Contacts view with a secondary ID should be placed in the folder. Wildcards are also supported for the primary ID.
16.2.2 Sticky Views
A sticky view is a view that stays open across perspective switches. Once open in one perspective, the sticky view remains open in all perspectives hosted in that Workbench window. This is true even for perspectives that do not define that view as part of their layout. Sticky views were added to support instructional aids that can span perspectives such as Help, Intro, and Cheat Sheets.
Sticky views are defined using the stickyView tag in an org.eclipse.ui.views extension, as shown in this snippet:
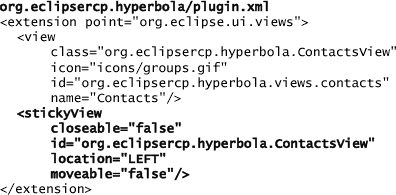
The sticky view extension adds a placeholder for the view in the Workbench page but does not show the view. The given ID must be that of an existing view. When the existing view is opened, it becomes sticky. Think of this extension as adding the sticky attribute to an already defined view.
16.2.3 Showing Contributed Views
It’s quite easy to open specific views if the application knows in advance about all the possible view IDs. In applications that allow views to be contributed by other plug-ins, you may want to allow users to open views manually.
The Workbench exposes a view shortlist mechanism that you can use to show users a list of available views. This is similar to the Window > Show View menu entry found in the Eclipse IDE. Set this up by creating a contribution item in the ActionBarAdvisor and adding it to any menu. In the following example, the item is added to the Hyperbola main menu:
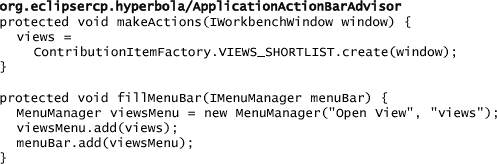
The initial list of views shown in the menu consists of the view shortcuts defined by the active perspective. This list is configured by a perspective using IPageLayout.addShowViewShortcut(String).
16.2.4 View Registry
Of course, if you don’t like the predefined view menus or features, you can consult the view registry and customize how views are managed in your application. The view registry is accessed using the IWorkbench method getViewRegistry() and has several useful methods for querying registered views. Each view is described using an IViewDescriptor that includes the view’s name, icon, ID, and other properties defined in the view’s extension point.
16.2.5 Connecting Parts Together
There’s a good chance that your UI parts—the views and editors—will need to communicate. For example, the Hyperbola Contacts view could show a contact in bold when a chat editor for that contact is active.
In the Workbench there are three techniques for communicating between parts. First let’s review the techniques, then we’ll look at how to use one of these techniques to implement contact entry bolding.
Using the selection—The ISelectionService allows views and editors to register their selection with the Workbench, thus allowing other parts to listen to selection changes and respond appropriately. To publish selections, use the IWorkbenchSite method setSelectionProvider(ISelectionProvider), and to subscribe to selections, use the ISelectionService method addSelectionListener(ISelectionListener). This is a good technique because it allows parts to be decoupled. We’ve already used this technique to connect the Hyperbola actions to the Contacts view and ensure that when the selection changes, the actions are enabled correctly.
Part listeners—You can also connect parts together by listening to the events that are fired when a part is closed, opened, and hidden. Use IPartService to register for part events. Again, this is a good technique because it keeps the parts decoupled. This is the technique that is used below to implement the Hyperbola bolding of the contact example.
Direct communication—Whereas the selection and part service allows any part to listen and react to changes, you can also use a direct connection by having specific views call back to or open other views or editors (e.g., using the methods on IWorkbenchPage to open or close parts). For example, the Hyperbola bolding feature can be implemented by allowing the ChatEditor to notify the ContactsView when it opens. This technique is not ideal because it places a tight coupling between the parts.
To implement bolding of contacts when a chat is in progress, the Contacts view has to know when a chat editor is opened and closed and bold the appropriate contact accordingly. The best technique is for the Contacts view to register a part listener using the IPartService and remember which chat editors are open. The label provider is refreshed when a part is opened or closed, and the active chat list is consulted to decide whether or not a contact should be bold.
The code changes are simple and are described here:
• Add a part listener to the Contacts view to track which chat editors are opened and closed.
• Register and unregister the part listener.
• Change the label decorator to set the font of an item, and use the list of active chat editors to determine the font for a contact.
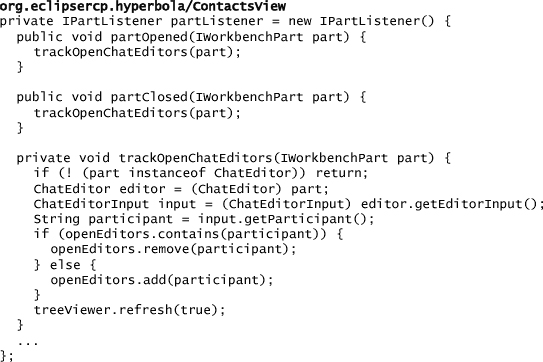
The part listener is added as a field of ContactsView. It remembers the set of open chats in openEditors and refreshes the labels when a chat editor is opened or closed.
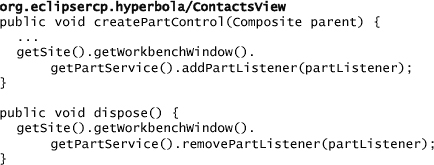
The part listener is registered with the Workbench when the Contacts view is created and unregistered when it’s closed.
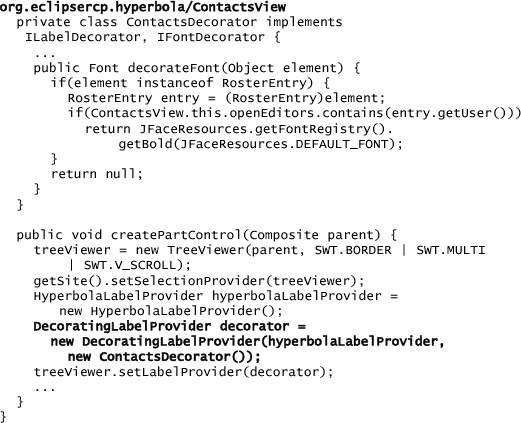
The existing label provider is augmented with a special decorating label provider that allows other label decorators to participate in label decorations. The new ContactsDecorator consults the list of opened chat editors and makes the contacts that have open editors show as bold. It also implements an IFontProvider as an indication that it can change the font in addition to providing text and images. The original HyperbolaLabelProvider is still used, but it is wrapped in the DecoratingLabelProvider instance.
The result of these changes is shown in Figure 16-6.
Figure 16-6 Contacts view with bold contacts
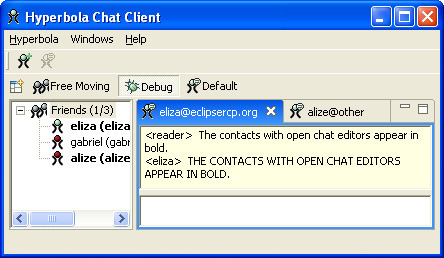
Approaches such as this are very powerful. One of the key points here is that the chat editor did not require modification. You can imagine adding other plug-ins to Hyperbola that also connect to existing parts without needing to modify those parts; that is, plug-ins have opportunities to integrate with your application without you needing to know about them.
16.3 Multiple Workbench Windows
The Workbench supports opening multiple top-level windows. These windows are managed by the Workbench, and the WorkbenchWindowAdvisor participates in each window’s lifecycle. There are two techniques for opening a new Workbench window from an RCP application:
• Use the ActionFactory.OPEN_WINDOW or the OpenInNewWindow action. These actions open a new window using the perspective currently showing in the window in which the action is run.
• Call the IWorkbench method openWorkbenchWindow(String, IAdaptable). This method opens a new window and shows the identified perspective.
16.3.1 Window Navigation Menu
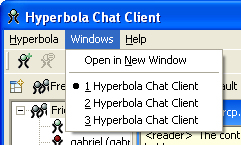
When an application allows multiple windows to be created, it should provide an easy way of navigating between the windows. The Workbench provides a reusable menu that displays a list of open windows. Selecting a window causes it to get focus. To add the windows list menu to your application, add the ContributionItemFactory.OPEN_WINDOWS item to a menu, as shown in the following snippet and in Figure 16-7:
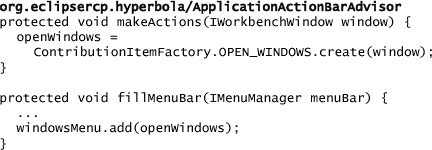
Figure 16-7 Window list menu in action
16.4 Drag and Drop with Editors
Each Workbench window has an editor area that is optionally visible. When the editor area is visible, it can be used as a target for drag-and-drop operations. For example, this is used by the IDE to open an editor on a file dropped on the editor area. This is possible even if the editor area is blank. Drag and drop on the editor area is set up using the IWorkbenchWindowConfigurer for a particular window.
To show how this works, let’s enhance Hyperbola to allow dragging contacts from the Contacts view into the editor area to initiate a chat. There are four main parts involved in making this happen:
• Decide which transfer types are to be supported by the editor area and implement them. In Hyperbola the transfer type is an IEditorInput that describes the editor to be opened when the drop completes. Since drag and drop can occur between applications, a transfer type is used to serialize the required information. Even if the drag and drop occurs within the same application, a transfer type is needed.
• Because editor inputs are serialized when they are transferred in a drag-and-drop event, the ChatEditorInput must be modified to implement IPersistableElement.
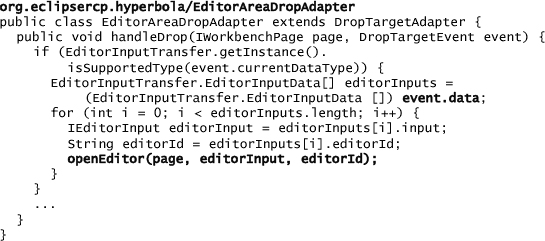
• Add a drop adapter that knows the actions to take when an IEditorInput transfer type is dropped onto the editor area. Drop adapters are simple—they perform actions based on the transfer type dropped. In the Hyperbola case, the drop adapter opens an editor.
• Enable the Contacts view to initiate a drag operation. The Contacts view also has to create the editor inputs that are dropped in the editor area.
The next sections step through the code needed for each of these four parts. The transfer type for dragging editor inputs from one part to another is already defined in the Workbench and is called EditorInputTransfer. This is the class that serializes the editor inputs into a byte array that is then added to the drag-and-drop events. The transfer is added to the Workbench window by calling the IWorkbenchWindowConfigurer method addEditorAreaTransfer(Transfer) from the WorkbenchAdvisor, as shown here:

Notice that this also configures a DropTargetListener to listen for drops in the editor area. The drop adapter registered is Hyperbola’s EditorAreaDropAdapter, shown below. It processes the drop event and opens an editor if the transfer type is an editor input. The adapter can open multiple editors if the transfer contains an array of editor inputs. You can extend its behavior to accept application-specific objects as well. The editor area for each window can be individually configured and reconfigured with additional editor area transfers and drop listeners at any time.
Once the editor area is configured to accept drop requests, the next step is to enable dragging from the Contacts view. Add the following method to the ContactsView and call it from createPartControl():

The method adds drag-and-drop support to the ContactsView’s TreeViewer. When a drag is started, the listener initializes the event by creating an editor input for each of the contacts selected in the viewer. The selection is obtained using getNames(). If the event does not support EditorInputTransfers, the drag is canceled by setting event.doit to false.
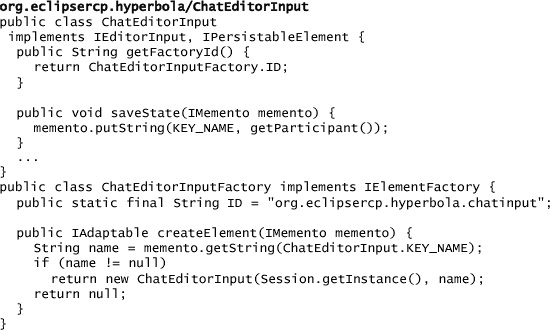
The last step is to modify ChatEditorInput to implement IPersistableElement. The IPersistableElement allows the input to be serialized during a drag and drop. Drag-and-drop transfers are always serialized, even when the drop occurs inside the application.
This requires two changes; the first is to implement saveState(IMemento) and getFactoryId(). The next is to implement a factory that can deserialize the chat editor inputs. Since the chat editor input is simple, all it takes to serialize the input is to remember the user name. The factory can create a new input using the name.
With these changes Hyperbola is drag-and-drop-enabled. We set up only the Contacts view to initiate drags, but it’s easy to see how other views could be similarly set up. If you want to learn more about drag and drop, read the articles listed in Section 16.6, “Pointers.”
16.5 Summary
The one thing to remember when designing your RCP application is that the Workbench provides a default implementation for many useful features that are designed to scale. Perspectives, views, and editors provide a rich UI model that you do not have to reinvent. In places where the standard features do not apply to your application, the Workbench tries to allow you to write your own custom solution using the provided APIs.
16.6 Pointers
• Arthorne, John (IBM). “Drag and Drop in the Eclipse UI,” August 25, 2003 (http://eclipse.org/articles/Article-Workbench-DND/drag_drop.html).
• Irvine, Veronica (IBM). “Drag and Drop—Adding Drag and Drop to an SWT Application,” August 25, 2003 (http://eclipse.org/articles/Article-SWT-DND/DND-in-SWT.html).