
XML databases have become more popular for storing small amounts of data, hierarchically formatted data, or larger amounts of simple data. The data appear in your application as a series of hierarchical objects, objects within objects, that end with an XMLDocument object holding everything together. Of course, storing a host of objects on your hard drive isn't going to work. You need some way to place those documents on the hard drive so that they conform to standard storage methods and some way to retrieve them so that you can rebuild the object structure as needed. The storage process is serialization, while loading the document from disk relies on deserialization. The resulting disk on file is in XML format.
Fortunately, Visual Studio has a considerable number of storage technologies built into it. Often you can read and write XML data without worrying too much about the underlying structure because the XML file is truly data. However, you may want to store the data as structured settings or configuration information. Perhaps you want to provide custom handling of the data so that the application can interact with this data in a specific way. When you want to interact with XML in these specialized ways, you must create a customized class to perform the task. The class tells how to serialize and deserialize the data so your application can interact with them properly.
This chapter helps you understand the specialized techniques you can use to create applications that interact with XML in certain ways. Using XML files has significant advantages over other techniques you might have tried in the past. For example, when your application relies on XML files instead of using the registry, you can move the application to a different machine with significant ease. In addition, XML files are easier to fix than the registry. Because XML files don't use a customized storage technique, you can also view them from other applications, making data reuse extremely easy as well.
Many developers are viewing XML storage technology as a fix for many of the ills that accompany other techniques. Certainly, XML data storage is more straightforward than using the binary storage techniques employed by earlier computer applications. However, XML files aren't perfect — they come with problems of their own. One of the bigger issues is that XML files are huge compared to their binary counterparts. Everything appears in human-readable form, making the file two or three times as big in most cases. Of course, storage is cheap today, so the file size issue may not be much of a concern for your organization. A second concern is that the human-readable format of the data files also creates a security problem, since anyone can read the data — you don't even need a special application to do it. Solving this issue is considerably harder and you'll likely have to provide a creative application-specific solution.
The code listings in this chapter don't provide a full description of the sample application. To obtain a complete code listing for this sample, download the sample code from the publisher's Web site at
http://www.wrox.com/WileyCDA/WroxTitle/C-Design-and-Development-Expert-One-on-One.productCd-0470415967.html.
You have many options for storing data on your system. In fact, one of the benefits of using computers is that they offer so many different ways to accomplish the same task. Only the human component of the computer places any limitations on what computers can do. Storage methods in the past have included binary files, standardized storage such as the registry, databases, plaintext files, and many other storage forms. XML is a relative newcomer to computer data storage, but it has many benefits that you should consider as part of your application design and development process:
Structured storage akin to databases
Plaintext format so you can view the file using just about any utility
Easy to fix with a plaintext editor
Extremely flexible — you define the storage structure
Hierarchical structure so the records need not follow the relational model
The following sections view XML as a storage methodology. You'll see how XML can benefit you as a developer, your application, the administrator, and the end user.
As described in the "Using the XCopy Deployment" section of Chapter 16, an XCopy deployment is one in which the entire application appears within a single folder. The folder may have subfolders (hence the need for XCopy to copy or move the application from one location to another), but the application is essentially self-contained. Being self-contained means that the application settings also appear in the application folder — moving the application also moves the settings. However, the XCopy application has only the application settings in the folder, not the user settings.
When creating an XCopy application, you may actually create several XML serialization classes to handle data at specific levels. Only the application settings appear in the folder; the other files can appear in other locations on the system. The reason that these files appear in other places is that you must keep these settings separate from each other. User-specific settings that affect one user shouldn't affect every other user on the machine. Consequently, you often have to design the application such that it considers these levels of settings:
Organizational (optional): Includes anything that affects the organization as a whole, such as the implementation of policies or the location of networked drives.
Machine (optional): Affects machine-level configuration, such as the use of special drivers or the location of machine-level resources. These settings could also include Windows-specific features for a particular machine, such as networked drives. Machine-level settings affect the local machine and are tied to a specific machine. These settings move with the machine, not with the application.
Application (often included): Modifies application-level behavior, such as the use of local application settings or data. Application settings affect everyone who uses the application, rather than just one user. If settings affect every application on the system, rather than the local application, you may consider implementing them as organizational-level settings to make changes easier (you have to look in only one place); however, using the application level for these settings also works.
Administrative (rare): Defines administrator-level settings for the local machine. These settings differ from user-level settings in that the user only relies on them while acting as an administrator. In addition, every administrator uses the same settings. As with machine settings, administrator settings normally affect a single machine and move with that machine, rather than with the application.
User (normally included): Configures the user's choices for the application. For example, if the user wants to use a particular color scheme, that choice would appear in this file. Each user has different settings to reflect that user's needs or wants. User-level settings move with the user, not with the application.
Each of these levels represents a change in scope. Every entry on this list provides a different way of viewing the data and the data are used in different ways. A user's data have no place in the application folder. Not only don't you want to move that data with the application but leaving the user's settings in plain view may also represent a security breach or privacy concern. The "Choosing a Data Location" section of the chapter describes how these files affect storage location as well.
At this point, you may be yelling, "Foul! It's obvious from the previous paragraph that the application isn't self-contained after all." A common point of confusion for developers is that when you create an XCopy application, the application is self-contained, but not necessarily all the application settings. In this case, the application and the application-level settings appear in a single folder. However, the user settings appear with the other user data, the machine settings appear with the other machine settings, and so on. The issue is one of organization. Many current application issues stem from a lack of organization — moving the application, the user, or the machine to a different location is too hard because the data used to configure the entities appear in a central location such as the registry and are too difficult to extract from the storage container. Using XML serialization helps free you from this concern and makes it considerably easier to move different application elements as needed without affecting any other application element.
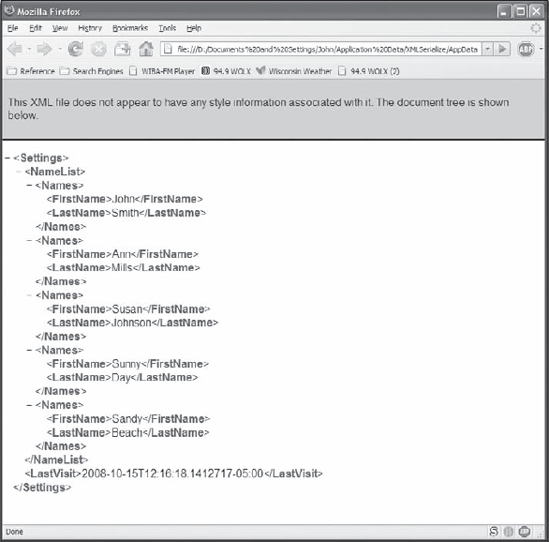
Some developers probably avoid using XML serialization because the very name of the technology sounds complex. However, the data need not be complex to let you perform a lot of work. In fact, as shown in Figure 22-1, the data are often quite simple. In this case, the sample application (described as the chapter progresses) stores both data and settings for individual users in the user's folder. A data folder for any other level of storage can follow a similar pattern — keep the data simple to make any needed repairs equally simple. Of course, you'll want to document the file as part of the design process so that everyone knows what it contains.
It's helpful to use different applications for viewing and repairing XML data. You can view XML data using any browser, which means that if you simply want to see what the user is storing, you can do so without installing anything special. A browser provides a safe viewing environment. However, you should probably use a special product such as Microsoft's free XML Notepad 2007 (
http://www.microsoft.com/downloads/details.aspx?familyid=72d6aa49-787d-4118-ba5f-4f30fe913628)or Altova's XML Spy (http://www.altova.com/) to edit the data. The Altova product isn't free, but you can download a free trial copy to determine whether you like it. (See the "Editing XML Files Using XML Notepad 2007" section of Chapter 29 for a description of XML Notepad 2007.) Although you can edit any XML file using Notepad in an emergency, relying on a professional XML editor can help reduce the potential for edit-induced errors, such as a misplaced angle bracket. To reduce the potential for errors further, you should create an XML Schema Definition (XSD) file for the file and use it as you edit to prevent mistakes. You can learn more about using XSD athttp://www.w3schools.com/Schema/default.asp.
In this case, the XML file contains two pieces of data. The first, <NameList>, is an example of data entries. This list appears in the Name List field of the sample application as shown in Figure 22-2. The <NameList> element contains <Names> child elements — each of which describes one name entry. The <Names> elements, in turn, contain <FirstName> and <LastName> child elements that describe each <Names> entry. The <LastVisit> element shows an example of a property setting for the application. It simply tells the application the last time that the user started the application and used it. This information appears in the Last Visit Date field of the sample application. Of course, you can make properties mean anything, and a file can have as many properties as you need to make the application functional.

Figure 22.2. The sample application uses XML serialization to store both application data and settings.
The reason the sample application stores the data at the user level, rather than the application level, is that each user will have a different last visit date and a different set of names to store. In some cases, you might store data at the application or organizational levels, depending on how the application uses the data and whether others in the organization need to access that data. From a user perspective, storing the data this way means that it's relatively easy to move the data from one location to another — everything appears in one location. In fact, you could easily add an application feature to move data to another location for the user.
The moment you create an XML file containing data, you have a potential data source for reports based on that data. In fact, it often helps to put the storage class you create (see the "Creating the XML Storage Class" section of this chapter for details) into a library so that you can use it with multiple projects. The storage class is your key to easy data manipulation, and the data file presents the information you want to see in the report. Using the XML serialization approach means that you spend considerably less time developing report applications because you already have the means to extract the necessary data — all you really have to do is display them in some way (whether on paper or on screen is up to you).
An important consideration when working with XML data in reports is that you often need to create a specific visualization for the user. For example, if your data record all the orders made by a particular customer, it may not include a totals field for each order because most theories of data storage say not to store calculated data. Not storing calculated data when using the XML serialization technique is even more important because the XML files tend to become large. Consequently, when working with reports, you may need to trade application speed for storage size and efficiency.
The XML storage class is the centerpiece of XML serialization. If you don't get this part of the application right, working with the XML data is going to be difficult. The storage class provides an interface between your application and the data on disk. In some respects, the storage class is a kind of a data provider. However, this data provider is smart in that it usually knows where to find the data you need, so all you really need to consider are the data themselves — what you plan to do with them, how you plan to present them.
The XML storage class can appear complicated at first, but if you break it down into pieces, creating one becomes considerably easier. The following sections describe the design elements of an XML storage class. You can use this pattern to create just about any XML storage class you'll ever need.
An XML storage class provides the code needed to manipulate the XML data file. The class requires three elements:
Properties to describe the data elements
A method to load the data
A method to save the data
Listing 22-1 shows a skeleton of the code used to create the XML storage class for the sample application. Don't worry about the details for right now, the listing shows basic design concepts that you need to implement this technology.
Example 22.1. A class structure for storing data in XML format
public class Settings
{
   // A list of names stored by the program.
   public Names[] NameList{get;set;}

   // The last date the user used the program.
   public DateTime LastVisit{get;set;}

   public static Settings LoadSettings()
   {
      ... Code Used to Load Settings ...
   }

   public static void SaveSettings(Settings Current)
   {
      ... Code Used to Save Settings ...
   }
}
Every entry in the XML file shown in Figure 22-1 appears as part of this class. The <NameList> element in Figure 22-1 is the NameList property in this listing. Likewise, the <LastVisit> element is the LastVisit property. The names you choose for your properties affect the application output, so you need to choose property names carefully. Use property names that work in both the data file and within the application.
Notice that NameList uses a custom data type, Names[]. The XML file reflects this requirement using the <Names> child elements. The "Creating the Customized Data Description" section of the chapter provides details on this custom type. The use of an array means that the XML file can have multiple copies of <Names>. Meanwhile, LastVisit relies on the DateTime data type, so you don't have to do anything special to store it. However, some developers miss one potential gotcha of working with data types that appear in the .NET Framework or as part of a third-party library. When you view the documentation for the DateTime data type (see http://msdn.microsoft.com/en-us/library/system.datetime.aspx), it shows this data type has the Serializable attribute. If you don't see the Serializable attribute, you can't use the data type for XML serialization — at least not without help.
The LoadSettings() and SaveSettings() methods aren't all that special. The LoadSettings() method loads the data and passes them to the caller as a Settings object. Notice that the data type matches the class name for your XML storage class. Likewise, the SaveSettings() method stores the data. The caller must provide the data as a Settings object — again, the name matches the XML storage class name. The "Obtaining the XML Data from Disk" section of the chapter describes the LoadSettings() method in detail, while the "Implementing a Save Routine" section of the chapter describes the SaveSettings() method in detail.
When you create custom data types for the XML storage class, you need to add one important piece of code — the Serializable attribute shown in Listing 22-2. If you leave out this attribute, the compiler will still compile the application for you. However, when you attempt to use the class to manipulate data for XML serialization, you'll see an error. You can discover more about this requirement at http://msdn.microsoft.com/en-us/library/system.serializableattribute.aspx.
Example 22.2. Defining the data elements
[Serializable()]
public class Names
{
   public String FirstName{get;set;}
   public String LastName{get;set;}

   // The default constructor.
   public Names()
   {
   }

   // A constructor that accepts inputs.
   public Names (String NewFirstName, String NewLastName)
   {
      FirstName = NewFirstName;
      LastName = NewLastName;
   }
}
The Names class appears as the <Names> element in the XML file shown in Figure 22-1. This class contains two properties, FirstName and LastName, which receive entries in the XML file (the <FirstName> and <LastName> elements).
The code shown in Listing 22-2 is simple. All it contains are properties for each of the data values. In both cases, the properties use the String data type. If the application required another custom data type, you would define another class to describe it. This class would appear in the XML file with the appropriate child elements, just as the <Names> element appeared with the <FirstName> and <LastName> child elements. Using classes in this way, you can create any number of levels of data desired.
A final consideration is the kind of constructors that you need. In most cases, you need to define two constructors. The first constructor provides the default implementation and doesn't accept any arguments. You can assign default values to each of the properties; however, in many cases it isn't necessary to do so. The second constructor accepts values for each of the properties the class supports. Depending on how your class works, you probably won't want to create constructors that accept values for only some of the properties, because it leaves the data type in an uncertain state. It's better to force the developer to provide specific values for each of the parameters, even if the value is null.
The sample application uses extremely simple property definitions for clarity. In a real-world application, you need to assume that some can (and probably will) provide inaccurate or non-useful data at every level of the XML file input. Consequently, you need to provide properties that check every datum that the XML file accepts. In most cases, you want to check for the following data properties in every property:
Data type
Data length
Data content (relying on a RegEx expression whenever possible)
Allowable entries (for data that provide specific values)
Theoretically, making these checks will prevent someone from using the property incorrectly. When a data input error does occur, make sure you don't change the data value — the default response should make no change at all, rather than use a default value. If you make a change, the change could be precisely what the caller wants in order to cause the application to behave in an unanticipated manner.
In addition, you'll probably throw more exceptions back to the caller. Attempting to handle all the exceptions locally is a wonderful idea from a reliability perspective, but it prevents the caller from knowing that something has gone wrong. This is one situation where an exception actually provides a level of communication with the person using your XML storage class. Failure to communicate will cause confusion on the part of the developer. Of course, this person won't be quite as thrilled about using your XML storage class the next time.
Exceptions describe special conditions, something not expected. Chapter 14 describes some ways of handling the errors described by exceptions. You can always handle an error locally, and then throw a custom exception that helps the caller understand the problem with his or her call. Whether you use a custom exception depends on the complexity of the error and whether any of the standard exceptions will fulfill the requirement. You can also choose to log errors as needed to understand the issues that developers using the XML storage class encounter. These log entries can help you create better classes in the future and could also make it possible for your class to handle a few additional errors locally.
After you finish creating the XML storage class, you'll want to test it out, which means creating code to save the file to disk. The following sections describe issues you should consider before you build the save method and then show how to build such a routine for the sample application. Of course, the principles also work fine for your application.
One of the most important concerns for the save routine is thinking about where you want to save the data. Choosing the wrong location can cause significant problems later. Here are some suggestions for various data storage techniques you may require (these settings rely on the data storage scenarios described in the "Implementing an XCopy Application" section of this chapter):
Organization: Stores organizational settings on a network drive because they affect the organization as a whole. In addition, only a network administrator has permission to write to these files — a user can only read the settings as part of loading the application.
Machine: Normally placed in the
WindowsSystem32folder where they can affect the machine as a whole. The local administrator can change these settings, but not every user who works with the machine.Application: Always appears within the application folder so that you can implement XCopy application solutions.
Administrative: Normally appears in the local Administrator's folder or on a network folder depending on how the settings affect the application. Place administrator-specific application settings that affect the local system in the Administrator's folder on the local machine.
User: Typically appears in the user's personal folder (but not necessarily in My Documents). Use the My Documents folder when you want the user to interact with the settings in some way (such as double-clicking them to start the application). Otherwise, hide the settings from view in the user's Application Data folder within a custom subfolder (see Listing 22-3 for details).
The save routine performs a number of important tasks. As a minimum, your save routine should perform the following steps:
Locate the data path used to store the data.
Determine whether the data directory already exists — if not, create it.
Create the XML serializer used to serialize the data. You must tell the XML serializer what kind of data to write.
Create a
StreamWriterobject to perform the actual task of writing the data. This object contains the path to the data file and the data filename.Serialize the data using the
XmlSerializerobject with theStreamWriterobject.Flush the data to disk from the Windows cache and then close the file.
Listing 22-3 shows the SaveSettings() method. This method accepts a Settings object, which contains the data to save, as input.
Example 22.3. Saving the settings to disk
public static void SaveSettings(Settings Current)
{
   // Create a user-specific settings string.
   String UserPath =
      Environment.GetFolderPath(
         Environment.SpecialFolder.ApplicationData) +
      @"XMLSerialize";

   // Determine whether the directory exists.
   if (!Directory.Exists(UserPath))
      Directory.CreateDirectory(UserPath);

   // Define an XML serializer.
   XmlSerializer DataWrite =
      new XmlSerializer(typeof(Settings));

   // Create a stream writer to output the data.
   StreamWriter Output =
      new StreamWriter(UserPath + @"AppData.CONFIG");
// Save the settings. DataWrite.Serialize(Output, Current); // Flush and close the output file. Output.Flush(); Output.Close(); }
As you can see, the example code implements all the requirements for saving the data. In this case, the method saves the data to the user's Application Data folder as defined by the Environment.SpecialFolder.ApplicationData enumeration in the XMLSerialize folder (a custom folder for this application). The Environment.GetFolderPath() method is the best way to obtain the location of a special Windows folder on any machine. You can see a complete list of the folders you can access using the Environment.SpecialFolder.ApplicationData enumeration at http://msdn.microsoft.com/en-us/library/system.environment.specialfolder.aspx.
It's important to both flush and close the data file when you exit the routine. Otherwise, you can experience odd exceptions, none of which tells you about the actual problems. For example, if you forget to flush the file (empty the Windows cache) using the Flush() method, you can see the exception shown in Figure 22-3. If you forget to use the Close() method, you'll almost certainly see the exception. The exception seems to indicate that another application has the file open. However, the actual problem is that your application didn't close the file after you wrote to it the last time, so your application has the file open. The odd thing is that CLR will eventually close the file for you as part of disposing of the StreamWriter object — so you won't see the error consistently.
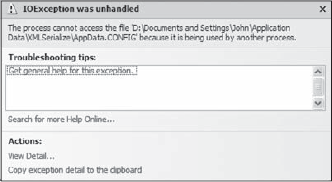
Figure 22.3. Examine errors carefully because tehy don't always point to the real cause of a problem
You'll use the SaveSettings() method to save changes to the data whenever necessary. In most cases, it's a good idea to save the data whenever you make a change to ensure that the application doesn't lose anything. As a minimum, you'll add the SaveSettings() method to the FormClosing event handler as shown in the following code:
private void frmMain_FormClosing(object sender, FormClosingEventArgs e)
{
   // Save the date of the last visit.
   CurrentSettings.LastVisit = DateTime.Now;
   Settings.SaveSettings(CurrentSettings);
}
The frmMain_FormClosing() method begins by saving the current date and time to the CurrentSettings.LastVisit property. The CurrentSettings object is a global variable that methods use whenever they need to access the application data or settings. The "Obtaining the XML Data from Disk" section of the chapter describes how the application creates this object. After the method updates the date, it calls Settings.SaveSettings(), which is a static method (so you don't need an object to access it), to save the data.
Saving the data for your application is the first part of a two-part task. The next time you start the application, you need to load the XML data from disk. In addition, the code must interpret these data and put them into a form the application can understand. Deserializing the data isn't any more complex that serializing it. Both processes begin with a good XML storage class definition. The following sections describe the deserialization process in detail.
At some point, you'll have an XML data source on disk. In order to use this XML data source in your application, you must load the file. Visual Studio provides a number of methods for loading XML data. For example, you can simply use the XMLDocument.Load() method to perform the task. However, when you use these techniques, you must work with the XML data as you would any other XML document. Because you serialized the data and have an XML storage class to use, you have a better option as shown in Listing 22-4.
Example 22.4. Loading the settings from disk
public static Settings LoadSettings()
{
   // Create a user-specific settings string.
   String UserPath =
      Environment.GetFolderPath(
         Environment.SpecialFolder.ApplicationData) +
      @"XMLSerialize";

   // Determine whether the application settings exist.
   if (!File.Exists(UserPath + @"AppData.CONFIG"))
      return null;

   // Define an XML serializer.
   XmlSerializer DataRead =
      new XmlSerializer(typeof(Settings));

   // Create a stream writer to read the data.
   StreamReader Input =
      new StreamReader(UserPath + @"AppData.CONFIG");

   // Load the settings.
   Settings Current;
Current = (Settings)DataRead.Deserialize(Input); Input.Close(); // Return the current settings. return Current; }
In this case, the code begins by creating a user path. This part of the code is very much the same as the SaveSettings() method shown in Listing 22-3, so you could possibly place this code in another function to make updates easier.
Before it can do anything else, the code must determine whether the data file exists. When the file doesn't exist, the method returns a null value. The null return value is a signal to the caller that the data don't exist yet and that the caller will need to create them.
When the file does exist, the code creates an XmlSerializer to read the data. Notice that you must tell the XmlSerializer how to read the data by providing the data type using typeof(Settings). The code creates a StreamReader next. The StreamReader provides the connection between the disk and the application. At this point, the code can read the data.
Notice that you must perform type conversion on the output of the DataRead.Deserialize() method because the method returns an object. Of course, you must provide Input as the data source on disk. When the data read is finished, the code calls Input.Close() to close the data source. You don't need to flush the data cache in this case because you haven't written any data to disk.
Normally, you'll read application configuration data during the application initialization. Listing 22-5 shows a typical scenario. Notice that you must call InitializeComponent() before you read the data to ensure that any required controls are ready for use.
Example 22.5. Loading and interpreting the data file
// Holds the current settings.
Settings CurrentSettings;

public frmMain()
{
   InitializeComponent();

   // Load the settings when available.
   CurrentSettings = Settings.LoadSettings();

   // Initialize CurrentSettings when the settings
   // aren't available on disk.
   if (CurrentSettings == null)
      CurrentSettings = new Settings();
   else
   {
      // Retrieve the stored values.
foreach (Names ThisName in CurrentSettings.NameList)
lstNameList.Items.Add(
ThisName.FirstName + " " + ThisName.LastName);
// Show the date of the last visit.
lblLastVisit.Text = CurrentSettings.LastVisit.ToLongDateString();
}
}The code begins by creating a global variable, CurrentSettings, to hold the XML data stored on disk. Next, the code calls Settings.LoadSettings(), a static method call, to load the data from disk. If the return value is null, meaning the application hasn't stored any data on disk yet, the code creates a new instance of Settings. Otherwise, the code acts on the data in CurrentSettings to fill lstNameList and set the last visit date in lblLastVisit.
It's important to realize that application settings can cover a lot of ground. The example described in this chapter loads some user data and settings from the user's folder on the hard drive. However, you have many more options than data and settings. Many applications require a special environment to run. For example, the application may require the addition of path information to locate data on disk or set a particular environment variable. You can perform many of these kinds of environmental changes using the System.Environment class (see http://msdn.microsoft.com/en-us/library/system.environment_members.aspx for details).
In many cases, the .NET Framework doesn't provide direct access to the Windows environment, so you must rely on P/Invoke to perform the task (see Chapter 27 for details on using P/Invoke). The SystemParametersInfo() function is one of the key calls to use for needs of this sort. You can learn more about this extremely useful function at http://msdn.microsoft.com/en-us/library/ms724947.aspx. You can use this function to modify the following types of environmental options:
Accessibility
Desktop
Icon
Input
Menu
Power
Screen saver
UI effect
Window
As you can see, you can interact with many Windows features using this single call. In order to use this function, you must add the following line of code to the beginning of your code:
using System.Runtime.InteropServices;
The SystemParametersInfo() function may look intimidating at first, but it really isn't. Here's how the method definition looks:
[DllImport("User32.DLL", SetLastError=true)]
public static Boolean SystemParametersInfo(
   UInt32 uiAction,
   UInt32 uiParam,
   StringBuilder pvParam,
   UInt32 fWinIni);
When using this method, uiAction contains a constant value that defines the action to perform. The uiParam contains the size of the buffer used to hold data for the call. You use uiParam with pvParam, which contains the actual data you want to pass, such as the name of a file. The fWinIni argument contains the flags for performing the task, such as flags used to change wallpaper information. Finally, the return value is a Boolean indicating success or failure.
All the uiAction values come from a single header file, WinUser.H, which you can view at places such as http://www.woodmann.com/fravia/sources/WINUSER.H. Of course, if you have installed the C++ files on your system, you can simply load the file into Visual Studio and use it as you create your application. Here are some examples of uiAction values defined as constants:
// Defines actions for getting or setting the wallpaper.
const UInt32 SPI_SETDESKWALLPAPER = 0x14;
const UInt32 SPI_GETDESKWALLPAPER = 0x73;

// Update the user's information.
const UInt32 SPIF_UPDATEINIFILE = 0x1;

// Tell other applications about the change in status.
const UInt32 SPIF_SENDWININICHANGE = 0x2;
Notice that all the values appear as UInt32 and you define them all as hexadecimal values, since that's what WinUser.H uses. Using hexadecimal values also makes it easier to perform certain tasks, such as creating flags because you see the data as the call will see them. Flags rely on bit positions, and decimal values make it difficult to work with bits.
You have some XML data you want to work with, a method for saving that data to disk, and a method for loading the data into the application each time it starts. At this point, you're ready to manipulate the data, which is the point of the sections that follow. In this case, the application modifies the user data in some way and presents those changes on screen.
Before you can have a usable database, you need data to fill it. The data can come from any source. For example, you can choose to store environmental information or something as simple as the date. More than a few scientific applications retrieve data directly from sensors, and security systems use information from cameras or other sources. Applications often use Web services as a data source or even manipulate information already found in organizational data sources. Much of the data will come directly from the user, as is the case for the example application. Listing 22-6 shows the code used to add new data to the database for the sample application.
Example 22.6. Creating a new data entry
private void btnAdd_Click(object sender, EventArgs e)
{
   // Add the first and last names to the list box.
   lstNameList.Items.Add(txtFirstName.Text + " " + txtLastName.Text);

   // Add the name to the settings.
   if (CurrentSettings.NameList == null)
   {
      // Create a new Names array.
      Names[] NewList = new Names[1];

      // Initialize the values.
      NewList[0] = new Names(txtFirstName.Text, txtLastName.Text);

      // Add the results to the current settings.
      CurrentSettings.NameList = NewList;
   }
   else
   {
      // Create a new list to hold the name.
      List<Names> NewList = CurrentSettings.NameList.ToList<Names>();

      // Add the new entry.
      NewList.Add(new Names(txtFirstName.Text, txtLastName.Text));

      // Add the results to the current settings.
      CurrentSettings.NameList = NewList.ToArray<Names>();
   }
// Save the settings to disk. Settings.SaveSettings(CurrentSettings); // Remove the information from the text boxes. txtFirstName.Text = ""; txtLastName.Text = ""; }
As shown in the code, you must consider two cases when adding data to the XML data file. Either the data file already has entries, in which case you add a new entry to the list, or the data file is new, which means there aren't any existing entries.
The sample application uses a list box to display the list of names. The first task the code performs is to add the names using the same format as all the other names in the list. This is a friendly view for the data where the first name and last name appear separated by a space. Any applications you create will also need to provide a friendly view.
The next step is to determine how the application will add the data to CurrentSettings. If the user hasn't added any data in the past, the CurrentSettings.NameList property is null. In this case, the code creates a new Names[] array. Remember that Names is a custom data type created for this application. The example relies on the Names constructor that allows the first name and last name as input. It then adds the resulting array to the CurrentSettings.NameList property.
If the second case occurs, where the CurrentSettings.NameList property already has input, the code transforms the CurrentSettings.NameList property into a list using CurrentSettings.NameList.ToList<Names>(). It then simplifies the task of adding a name to the list using the NewList.Add() method. The code ends by converting the list to an array using NewList.ToArray<Names>() and adding the results to the CurrentSettings.NameList property.
No matter how the code adds data to the CurrentSettings.NameList property, it needs to save the data to disk using the Settings.SaveSettings() method. Any application you create should follow the same process — saving the data whenever there is a change. If your application experiences a catastrophic failure, the saving process will preserve most of the information intact.
Consider placing the save routine on a separate thread to improve performance for network drive saves. You may find that your application runs slowly if you have to save large data files over a network connection. Using a threaded application will make the apparent speed of the application greater. However, you're exchanging speed for reliability in this case. If the application fails before it completes the save, you could end up with a damaged data file. Consequently, you must weigh the risk against the need to provide acceptable speed.
In most cases, the second thing that happens to data the user adds to the XML data file is that it requires change. Perhaps the user made a mistake in data entry or the data have simply changed. Editing tasks become common as an application becomes older. Consequently, the second feature you normally add to your application is the ability to modify data as needed. Listing 22-7 shows the code used to perform this task in the example.
Example 22.7. Changing a data entry
private void btnEdit_Click(object sender, EventArgs e)
{
   // Obtain the individual name values.
   String WholeName =
      (String)lstNameList.Items[lstNameList.SelectedIndex];
   String[] Values = WholeName.Split(' '),

   // Create the form and place the values in it.
   frmEdit ThisEdit = new frmEdit();
   ThisEdit.txtFirstName.Text = Values[0];
   ThisEdit.txtLastName.Text = Values[1];

   // Display the form.
   if (ThisEdit.ShowDialog() == DialogResult.OK)
   {

      // Update the data in the list box.
      lstNameList.Items[lstNameList.SelectedIndex] =
         ThisEdit.txtFirstName.Text + " " +
         ThisEdit.txtLastName.Text;

      // Modify the current settings.
      for (int i = 0; i < CurrentSettings.NameList.Length; i++)
         if ((CurrentSettings.NameList[i].FirstName == Values[0]) &&
             (CurrentSettings.NameList[i].LastName == Values[1]))
         {
            CurrentSettings.NameList[i].FirstName =
               ThisEdit.txtFirstName.Text;
            CurrentSettings.NameList[i].LastName =
               ThisEdit.txtLastName.Text;
         }

      // Save the settings.
      Settings.SaveSettings(CurrentSettings);
   }
}
The code begins by obtaining the data currently shown in the list box and modifying it for use by the application. The friendly view is nice for users, but not very useful for the application. In this case, the application uses the simple WholeName.Split() method to perform the task. How you manipulate the data for your application depends on how you change it to make it user friendly. In some cases, you must create a balance of sorts between the needs of the user and the need for the application to ensure you can keep the user interface and the data source in sync.
At this point, the application creates a new form called frmEdit. Figure 22-4 shows how this form appears to the user. When the application displays the form, it contains the first and last name of the user entry that the user selected for change. This form has all the usual features and one special change to make it friendlier to the application. The default TextBox Modifiers property setting is Private. The example sets this property to Public so that the data contained within the controls is easier to access. If you want to make the application more secure, you could also expose the data values through a property. Of course, using this approach would also means more setup before you could create the form for display.

Now, the application must wait for the user to do something. When the user finally clicks either Change or Cancel, the form closes and returns a DialogResult value to the caller. When the value is DialogResult.OK, the code performs additional processing. In order for this technique to work, you must set the DialogResult property for each of the Button controls. Otherwise, the caller has no way of knowing which button the user clicked.
The first task the code performs is to update the information in lstNameList. Because this is an editing function, the code relies on the lstNameList.SelectedIndex value to locate the proper entry to change. The code then adds the user-friendly view of the data as normal.
The second task is to locate the entry to modify in the data. The example uses a simple for loop to perform the task. When both the CurrentSettings.NameList[i].FirstName and CurrentSettings.NameList[i].LastName properties match the selected value, then the code can make the required changes. In this case, all the code needs to do is replace the existing values. The code then saves the resulting changes using the Settings.SaveSettings() method. As always, saving the data after each change provides a certain level of reliability.
Adding data entries means that you'll eventually want to delete them as well. Deleting data is always dangerous because you never know when the user will delete something accidentally and want it back. Implementing an undo feature is outside the scope of this book, but you could consider adding undo if you feel that users are likely to make a lot of deletion mistakes and the data are hard to recreate. Listing 22-8 shows the simple deletion technique used for the example in this chapter.
Example 22.8. Removing old data entries
private void btnDelete_Click(object sender, EventArgs e)
{
   // Obtain the selected value.
   String WholeName =
      (String)lstNameList.Items[lstNameList.SelectedIndex];
   String[] Values = WholeName.Split(' '),

   // Locate the right element.
   for (int i = 0; i < CurrentSettings.NameList.Length; i++)
      if ((CurrentSettings.NameList[i].FirstName == Values[0]) &&
          (CurrentSettings.NameList[i].LastName == Values[1]))
      {

         // Create a new list from which to remove the name.
         List<Names> NewList = CurrentSettings.NameList.ToList<Names>();

         // Remove the selected entry.
         NewList.RemoveAt(i);

         // Add the results to the current settings.
         CurrentSettings.NameList = NewList.ToArray<Names>();
      }

   // Save the settings.
   Settings.SaveSettings(CurrentSettings);

   // Delete the selected value from the list box.
   lstNameList.Items.RemoveAt(lstNameList.SelectedIndex);
}
The code begins by obtaining the selected entry in the list and modifying it so the application can use it. This technique is the same one used for editing entries as described in the "Editing Existing Entries" section of the chapter.
After the code determines what to search for, it uses a for loop to locate the information. In order to remove the entry using the simplest possible approach, the code transforms the NameList[] array into a List using a call to CurrentSettings.NameList.ToList<Names>(). Notice that you must provide the type of the data to the ToList() method or the call won't work. Now that the code has a List to work with, it can use the RemoveAt() method to remove the required entry. Finally, the code simply converts the List back into an array using the NewList.ToArray<Names>() method and stores the new array in CurrentSettings.NameList.
The code ends by saving the new CurrentSettings to disk. It then removes the entry from lstNameList. As with editing, deleting entries from a long list can take time. Theoretically, you can perform this task in a thread to make the application more responsive to user needs. However, there is always the risk of data corruption when you trade speed for reliability.
Most users don't work well with random data — that is, data that appear in any random order. Users like to see data ordered in some way. Consequently, you need to sort the data entries at some time. You have the following options for sorting the data entries:
Sort the data before the user sees it on screen.
Maintain a sorted data list in the data file.
The first option, sorting the data before the user sees them on screen, is actually the faster approach and requires significantly less work on your part. It's the approach used by the application because there isn't a good reason to expend time and energy on sorting the data entries on disk. To implement this approach, you can choose a control that provides sorting, such as the ListBox. All you have to do to see the list in sorted order is to set the Sorted property to True. The code within the ListBox control takes care of all the details for you, so you don't really have to worry about sorting at all.
The second option, sorting the data in the data file involves some additional work on your part because now you have to create a method for sorting the data. The advantage to sorting the data file is that sorting the data can speed other tasks such as editing and deleting entries. Sorting isn't a quick solution that will fix every potential speed problem, but it can help significantly in some situations.
At one time, the code for performing this task (sorting the data entries) could become quite complex and many developers were less than enthusiastic about creating it. However, with the addition of LINQ to Visual Studio, sorting your data has become a lot easier. Look again at the SaveSettings() method shown in Listing 22-3. If you add the following code to the beginning of this method, the entries appear on disk in sorted order.
// Sort the Current data so it appears sorted on disk.
IEnumerable<Names> Sorted =
   Current.NameList.OrderBy(
      Names => Names.FirstName + Names.LastName);
Current.NameList = Sorted.ToArray<Names>();
You'll have to read Chapter 23 to get a full appreciation for the beauty of this technique. However, this LINQ technique begins by creating an IEnumerable<Names> object named Sorted. The addition of the source type, Names, is essential to make this technique work. The Current.NameList.OrderBy() method relies on a special expression, a lambda expression, to order the information in Sorted. In this case, the lambda expression is performing a comparison. It tells the method to compare each element in Names and sort them by using a combination of Names.FirstName + Names.LastName. As you'll discover later, LINQ focuses mainly on what you want the code to do, rather than how to do it. That's the case here — you tell the code how you want the data sorted and then the code determines how best to achieve the task. The result is a completely optimized sort routine that doesn't require much work on your part at all.
After the code sorts the data, it must place it back into Current.NameList for saving. Remember that Sorted is an IEnumerable<Names> type, so you can make a direct assignment. The way to perform this task is to call on the Sorted.ToArray<Names>() method. Notice again that you must provide a source type for the code to work. Otherwise, Visual Studio will claim that it doesn't know how to perform the task (and it doesn't, because you haven't told it everything you want it to do). After the SaveSettings() method ends, you can verify that the data on disk really are sorted (many developers find it amazing that such simple code actually does something). Figure 22-5 shows a typical example of the sorted data entries.

This kind of coding is where the techniques in Chapter 19 come into play. You can use the various profiling techniques to determine whether sorting the entries on screen or sorting the data file on disk works best for your needs. The mistake that many developers make here is that they get false results because they don't fully end one method before they begin another. For example, if a developer is in a hurry when performing the profiling task, it would be quite easy to forget to set the ListBox Sorted property to False. If you make this mistake, your sorting data on-disk profile results will reflect the on-screen sorting as well.
Likewise, you can impair the quality of the profiling for the on-screen sorting by using a sorted data file. The user certainly won't enter the data in sorted order, so using a sorted file will give you false results by making the on-screen sorting appear faster. As you can see, you must exercise care when testing for this scenario.
In general, you'll find that on-screen sorting is faster when you perform simple loading and saving of the data file and the user adds data to a relatively short list most of the time. When the user begins working with a long list and performs mostly deletes and edits, using on-disk sorting will likely prove faster. Of course, the complexity of your application also affects the performance of these two techniques — on-screen sorting works better with less complex applications.
A final consideration for using the serialized XML data technique is that the user will still want to see data in a usable format on screen. Of course, you already know about the need to create calculated fields as required from the "Using XML Data in Reports" section of this chapter and the requirement to sort data from the "Sorting the Data Entries" section of the chapter. However, the user usually expects more than a few calculated fields and sorted data.
In most cases, you must fine-tune the presentation to reflect real-world requirements that the user has, and some users will have different needs than others do. The best way to achieve this goal is to add settings information to the user's data file that provides specific information on how the user wants to see the data displayed. You can categorize these settings as follows:
Aesthetic (the appearance of the display)
Data centric (the presentation of the data)
User interface (such as the use of speed keys)
Layout (the order of controls on the display)
Filtering (the amount and type of data displayed)
The only way to fine-tune the data presentation is to perform extensive user testing. The user testing should include every group that will interact with the application. In addition, you should include someone from every skill level in each group as part of the testing team when possible. However, you need to balance the testing results with the requirements of the XML data file. Remember, you don't want to create an immense file that slows the application to a crawl. Consequently, you must consider the trade-offs of the design decisions you make. If the requirements for a particular data storage and presentation task become too intense, you may want to consider a robust storage technology such as a full database implementation. As mentioned earlier in the chapter, XML serialization is only one tool in what should be a full toolbox.
This chapter has described an important technique you can add to your toolbox, serializing XML. Using serialized XML in place of other strategies, such as the registry, can significantly decrease support costs for your organization. In addition, the technique preserves data format, while making it easier to interact with the data in new ways. Of course, as with any tool, using serialized XML in the wrong place can also cost you in ways that older binary formats don't. The biggest issue for most organizations today is that XML is difficult to secure, making it a less useful candidate for sensitive information. The larger file size can also prove to be a problem on devices that have limited memory, making serialized XML a less helpful technique for mobile devices.
If you've used the registry, plaintext files, or databases to store configuration in the past, now is the time to give serialized XML a try. Even though you may initially think that using serialized XML is more difficult or time consuming than other techniques, you'll appreciate the way it helps you create flexible applications that have fewer problems locating and using needed data. Make sure you take the same time to define the schema of the data you must store as you would with a database storage technique, because the resulting XML file is a kind of database. Try various approaches to interacting with the data. You may find that this new technique offers flexibility in storing settings that makes it easier for you to slim down your code and make it faster.
Chapter 23 discusses another fascinating technology, Language INtegrated Query (LINQ). The most interesting part of LINQ is that you use the same query technique for nearly any data source, including a few sources that you normally can't query easily within C#. Of course, you can use LINQ to query your XML files. For example, by using LINQ, you can perform a query across the network that locates all the users who have a particular option selected. You can't perform the same kind of query using the registry or plaintext files (the plaintext files are theoretically doable, but creating the required code would be incredibly hard). Consequently, Chapter 23 builds on what you've discovered in this chapter and demonstrates a new way to query all structured data on your system.