
Chapter 18: Integrating the Office 2010 Clients with SharePoint 2010
What’s In This Chapter?
- Common SharePoint integration points that exist in all of the Office suite products
- Integration of each Office 2010 application with SharePoint
- Setting up Office 2010 integration from within Central Administration and Group Policy settings
Microsoft Office 2010 is now more tightly integrated with SharePoint than any previous version. Collaboration has become an intuitive part of the user experience, and it is a familiar ingredient of all the Office 2010 applications. With SharePoint 2010 and Office 2010 together, teams will be able to communicate effectively, stay in touch, share questions or concerns, and, of course, work on shared content.
Believe it or not, many workers still send e-mail attachments back and forth as their only form of collaboration. There are several reasons why this is not the most efficient way to accomplish the task at hand. There can be confusion about which version of the document is the most recent, who is working on it, and who made which changes to the file. In addition, each time a document arrives in a mailbox, it takes up more space on the Exchange server. Consider the cumulative effect of a single file being sent back and forth between a handful of people four or five times — and this happening many times a day between hundreds or thousands of users. This can significantly affect server storage, especially when you compare it to saving each file in a single place in SharePoint and using version control. This simple example alone makes a great case for utilizing SharePoint integration to its fullest.
In this chapter, you will learn about the SharePoint 2010 integration features that are part of several different Office 2010 applications.
Office 2010 Application Commonalities
All of the Microsoft Office applications have a common look and feel. The menus are similar, and so is the contextual Office Fluent UI or Ribbon that is part of the user interface, first introduced in Office 2007. Once users are familiar with one Office application, it becomes easy to switch between different applications and quickly find those common commands and buttons. With this in mind, it is logical that many SharePoint collaboration and integration features are also the same across the Office applications. There are also a multitude of points where Office and SharePoint talk to each other. If a user would like to take an action such as upload a document to SharePoint, for example, or even edit or tag an existing document, those tasks can be done from either within SharePoint or from the client application.
This section describes the many convenient ways to make the most of Office 2010 collaboration and integration. This integration is covered from two points of view. The first perspective is from working within the Office applications; the second perspective looks at Office integration options from within SharePoint in the browser.
Connecting to SharePoint from within Microsoft Office 2010 Applications
People work in Office applications all day long, so saving files to SharePoint should be a convenient process. In the name of efficiency, files can be accessed, worked on, and saved without ever having to open SharePoint in the browser. This section covers the concepts of live co-authoring, the Backstage view, and the Document Information Panel in Office.
Live Co-authoring
Gone are the days where you have to wait until another user checks a document library file back in before you can make your own changes! Now, with Office 2010, multiple users can work on the same file at the same time, and communicate with each other during the process. Whether using OneNote, Word, PowerPoint, or the Excel Web Application, the new live co-authoring feature promises to bring a higher level of efficiency to your daily work and collaboration.
What does the live co-authoring experience look like? The following example demonstrates Word 2010 co-authoring. As shown in Figure 18-1, when a document is being edited from a document library in SharePoint, the familiar Save button at the top-left corner of the application looks a little different. It also has a small “refresh” symbol as an overlay. This means that if the document is being co-authored, when you click the Save button it will be saved and also refreshed at the same time, to show any changes that other users have made to the document concurrently.
While working in the document, an icon at the bottom left indicates the number of users simultaneously editing the document, as shown in Figure 18-2. Two people are working on the example document.
Clicking on the people icon with the number 2 on it will display a list of the users’ names. Each name is clickable, and can be expanded to display more information about the person, with various ways to contact them. The paragraphs that other users are working on are locked for editing, as shown in Figure 18-3.

A vertical line appears down the left side of the locked paragraph, with the user’s name and contact information next to it. When you click the Save button, if another user concurrently edited the document a notification pops up, letting you know that Word has refreshed your document with changes made by other authors.
Backstage View
Microsoft Office 2010 applications all have what’s called the Backstage view. Think of this view as an amplified replacement for the old File menu at the top-left corner of previous versions of the applications. As shown in Figure 18-4, click the File tab to bring up the Backstage view.
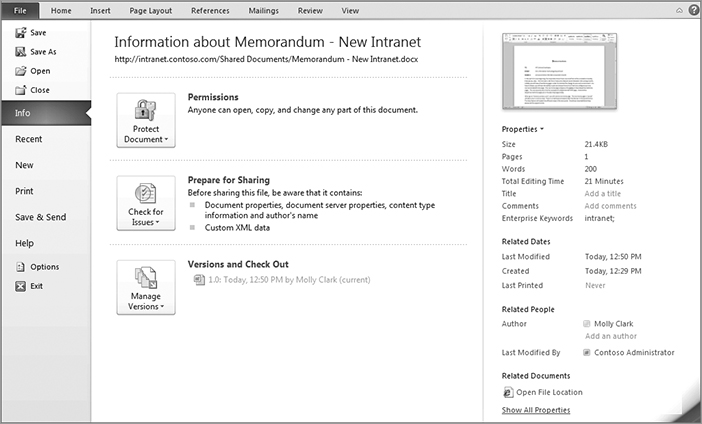
Notice that there are several tabs down the left side of the Backstage view. The Info tab contains vital information about the file, along with some buttons for interactivity with SharePoint.
- Permissions — Click the Protect Document button to carry out any of the following actions:
- Mark the document as Final — A document is marked as final indicates that editing is complete.
- Encrypt with Password — Require that a password is used in order to open this document. When collaborating on documents in SharePoint, this archaic option is a bit redundant, because SharePoint permissions can be used on documents instead.
- Restrict Editing — This option enables users to segregate parts of a file and define which users can edit each different part.
- Restrict Permission by People — This option makes use of Microsoft’s Information Rights Management Service, which is a separate product that can be purchased.
- Add a Digital Signature — Insert a digital signature box into the document or spreadsheet when an official signature of approval needs to be obtained. This digital signature option is also available on the Insert tab, and it can be used in conjunction with the out-of-box workflow called “Collect Signatures - SharePoint 2010”.
- Prepare for Sharing — Click the Check for Issues button to carry out any of the following actions:
- Inspect Document — Check the document for items such as comments, personal information, or hidden text.
- Check Accessibility — Inspect the document for any content that people with disabilities may find difficult to read.
- Check Compatibility — This checker looks for issues in the file that may exist due to compatibility with earlier versions of Office. Display either Office 97–2003 or Office 2007 issues, or both.
- Versions and Check Out — Click the Manage Versions button to check the file in or out, compare major versions, recover draft versions, or delete all draft versions. The list of previous versions is displayed in this section for easy reference. Note that document library versioning should be turned on in order to look at previous versions of the document.
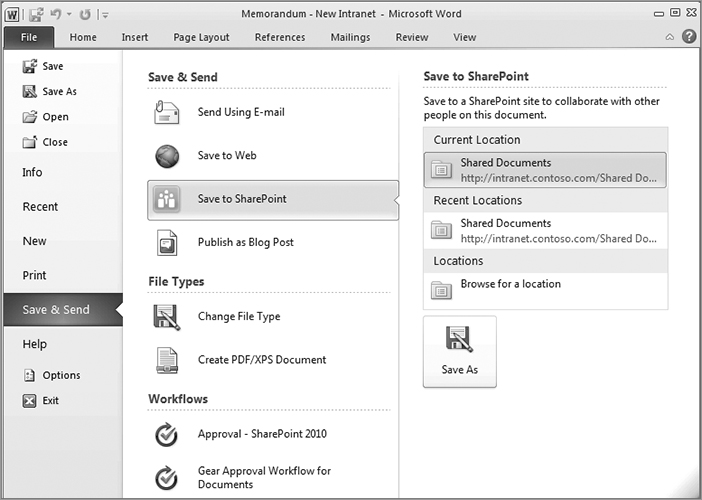
The Backstage view’s Save & Send tab, shown in Figure 18-5, contains several options related to document collaboration and integration with SharePoint.
- Send Using E-mail — When this option is selected, some useful dialog boxes explain to users the difference between sending the file as an attachment in e-mail versus sending a link to the SharePoint document. As stated at the beginning of the chapter, when users understand the benefits of keeping the files within SharePoint, collaboration becomes much more efficient.
- Save to Web — Use your Windows Live login account to save a file to your own personal or public folders on the Internet.
- Save to SharePoint — This option shows the current location, recent locations, and My SharePoint locations. In order to save to SharePoint, the current logged-in user must have at least Contribute permissions on the target library.
- Publish as Blog Post — This option enables the capability to publish to a SharePoint blog. It is covered in more detail later in this chapter.
- Workflows — This section shows SharePoint workflows that can be run on the current file.
The Document Information Panel
In Microsoft Word, Excel, and PowerPoint, the document information panel is where you can view the metadata associated with a file, from within the application. Metadata refers to the properties associated with each file in a library. Columns in libraries are considered metadata, and contain information about each file, such as the create date and creator. You can add custom metadata to libraries simply by creating new columns. (See Chapter 16 for more about metadata.) Figure 18-6 shows an example of a default Document Information Panel.

By default, the document information panel is not displayed when documents are opened, but this can be remedied with a quick setting change in the document library:
1. In the document library’s Library tab, click Library Settings.
2. In the General Settings section, click Advanced Settings.
3. In the Content Types section, the Allow management of content types option should be changed to Yes. Click OK.
4. Back on the Document Library Settings page, there will now be a section called Content Types. It may be necessary to scroll down the page a little bit to get to this section.
5. All of the content types for the library are listed here. By default, the only content type is called Document. Click the name of the Document content type.
6. In the Settings section for this content type, click Document Information Panel settings. This screen is shown in Figure 18-7.

7. The Show Always section enables you to force the document information panel to be displayed each time files of this content type are opened.
8. The Document Information Panel Template section enables customization of the panel itself, which is covered in the section “Integrating SharePoint 2010 with InfoPath.”
You can configure a document information panel globally so that all documents of a certain content type in the site collection are affected. To do so, click Site Settings at the site collection level. In the Galleries section, click Site Content Types. Start at step 6 in the preceding set of instructions.
For information on how to further customize the appearance of the document information panel, skip ahead to “Integrating SharePoint 2010 with InfoPath.”
Connecting to Office 2010 from SharePoint 2010
Each library and list in SharePoint 2010 can be connected to the logged-in user’s Office client software. From a library, there will be a Library Tools section of the contextual Ribbon, as shown in Figure 18-8.

Click the Library tab inside the Library Tools section. This displays the Ribbon containing all of the options available at the library level. Figure 18-9 shows a document library, with the Library tab displayed.
In the Ribbon, the section labeled Connect & Export contains buttons related to Office integration. Depending on the current type of list or library, different options will appear in this area. Many of these concepts are expounded upon later in this chapter:
- Sync to SharePoint Workspace — Create a synchronized copy of the current library on your local computer using SharePoint Workspace 2010. SharePoint Workspace is an Office application that enables entire SharePoint sites or site lists and libraries to be synchronized to an offline copy.
- Connect to Office — Users can save their personal favorite SharePoint links to their own list. This list within SharePoint is similar to saving items as Favorites in the browser but even better. When items are saved in this list, these bookmarks are available no matter which computer a user logs into. These locations are also available on the Save & Send tab in the Backstage view.
- Connect to Outlook — In SharePoint, certain types of lists and libraries can be connected to Outlook. This means that the list itself is added as a type of folder in the Outlook client, and the list items are accessible and editable from within Outlook. Document libraries can be connected to Outlook, and the types of lists that can be connected are Contacts, Calendars, Tasks, and Discussion Boards. External content types can even be connected to Outlook! Learn more about external content types in Chapter 16. Once a list or library has been connected, it will be displayed at the bottom of Outlook’s folder view, under SharePoint Lists.
Right-click on any SharePoint list from Outlook and click Open in Web Browser to get back to the associated SharePoint site.
- Export to Excel — Take a look at the columns and data in the current view of the list. This option enables you to export the data to an Excel spreadsheet. The column order and filtering of the current view are carried over in Excel. This is a useful feature when you want to further analyze data, or when the need arises to send static list information to an individual outside of the organization.
- Create Visio Diagram — This option is available in a task list, and creates several visual representations of the task list in a new Visio diagram. Note the tabs across the bottom of Figure 18-10. Each tab displays a different visual representation of the list, such as Task Status, Workload Distribution, and Incomplete Tasks by Assigned To.

- Open With Access — This handy integration functionality enables you to connect a SharePoint list to Microsoft Access. When this is done, the live SharePoint list data is available as a table in an Access database.
- Open Schedule — From a SharePoint task list, click Open Schedule to export tasks in the current list to Microsoft Project.
Now that some of the more common integration features have been covered, the rest of this chapter details each of the Microsoft Office 2010 applications as they relate to SharePoint.
Integrating SharePoint 2010 with Word 2010
Microsoft Word 2010 is used for document creation and editing, and has its own set of unique integration points with SharePoint. This section covers the following Word capabilities:
- Comparing document versions
- Document barcodes
- Quick Parts
- Blogging
Comparing Document Versions
From the Review tab in Word, you can compare various document versions to each other. Of course, multiple versions of a document will not be saved unless versioning is enabled in the library’s settings. By default, versioning is not enabled. Follow these steps to enable versioning:
1. Click to select the target document library.
2. In the contextual Ribbon at the top of the screen, under the Library Tools tab, click the Library tab.
3. Click the Library Settings button.
4. In the General Settings section, click Versioning Settings.
5. Choose Create major versions so that each time the file is saved, it becomes a new version number. You can create major and minor (draft) versions if it is necessary to work on drafts and publish each file when it is ready for public consumption (major versions).
6. To access the file’s versions from SharePoint, click the drop-down box on the file name and select Version History (see Figure 18-11).

The version history shows file version numbers, along with the dates and names of the users who modified them. These file versions can be opened, but sometimes it’s hard to tell exactly what was changed in the document, especially if it’s a large document or only very minor changes were made. In situations like this, Word can be used for more than just listing the versions. Documents can be visually compared side by side.
In Word, open a document from a SharePoint document library. On the Review tab in the Ribbon, click the Compare button. Figure 18-12 shows the options to compare specific versions to each other, or even to combine versions.

When versions are compared side by side, the differences are indicated in red, making it readily apparent exactly who made which changes during the collaboration process.
Document Barcodes
The Information Management Policy settings in SharePoint have several capabilities, but the main one related to Office integration is the capability to insert barcodes into documents when your document management solution requires that unique barcodes be associated with, and inserted into, each document. Barcodes policies can be set up at the site-collection level, or on an individual document library. Follow these steps to turn on the barcode functionality for a library:
1. In the document library’s Library tab, click Library Settings.
2. In the General Settings section, click Advanced Settings.
3. In the Content Types section, Allow management of content types should be changed to Yes. Click OK.
4. Back on the Document Library Settings page, there will now be a section called Content Types. You may have to scroll down the page a little bit to get to this section.
5. Click Information Management Policy Settings.
6. On the Edit Policy screen, check the box next to Enable Barcodes, and optionally select to prompt users to insert a barcode before saving or printing.
Quick Parts
Quick Parts in Word are yet another point of integration with SharePoint 2010. Quick Parts are fields that you can insert into a Word document. Metadata (columns) from the document library can be inserted into the associated document. Insert a Quick Part into a document as follows:
1. Open a Word document from a SharePoint library, and ensure that it is in Edit mode.
2. Click on the Insert tab in the Ribbon at the top of the page.
3. In the Text section, click Quick Parts.
4. Choose Document Property and then, in the fly-out, choose the name of the field to insert.
Notice that the document library’s column data for that document is displayed in a Content Control box in the document. When the metadata in the library is changed, the Word document will display the updated information the next time it is opened.
Blogging in Microsoft Word
Microsoft Word can be used to quickly create and post blog entries to SharePoint and other types of blog sites. This section covers the Word 2010 blog integration with SharePoint 2010. Here is a list of some blog terminology to be aware of:
- Blog posts — These can be thought of as journal entries that chronicle information on a general topic. Some blog posts are of a personal nature, and some are more educational or technical.
- Blog site — This is the web location where blog posts are posted. SharePoint provides a Blog template that enables you to easily and quickly get your own blog up and running.
- Blog account — The account is simply the URL and login information associated with the blog site.
Read more about blogging and social media in Chapter 17.
To quickly create a new blog site in SharePoint, click Site Actions New Site. Click the Blog template, specify a Title and URL for the new blog, and click the Create button. There’s your new blog site! All that is needed now is the site’s URL from the Address bar in the browser, to be used later in this section.
The New tab in Word’s Backstage view has an option to create a new blog post, as shown in Figure 18-13.

The first time a blog post is created in Word, the user is prompted to Register a blog account, with options to register now or later. Click Register Now, and follow these steps to set up Word for blogging:
1. On the New Blog Account screen, choose SharePoint Blog from the list of providers, and click Next.
2. On the New SharePoint Blog Account page, enter the URL of the blog site in SharePoint. An example is shown in Figure 18-14. Note that the “default.aspx” part has been left out. Click OK. The Picture Options button enables users to select where pictures in blog posts are stored. By default, they are uploaded to a picture library called Photos on the blog site.

3. An Account registration successful dialog will pop up. Click OK.
4. Once this new blog post has been written, simply click the Publish button in the Ribbon.
There is yet another way to create a new SharePoint blog post in Word. On the blog site in SharePoint, there is a set of links called Blog Tools on the right side of the page, which is only visible to content owners and editors. Click Launch Blog Program to Post, which will launch Microsoft Word, and the new blog post creation (blank) page.
If you have a regular Word document that wasn’t originally created as a blog post, you can post it to a blog site. On the Save & Send tab of the Backstage view in Word, click Publish as Blog Post. Then, inside the newly formatted Word document, click the Publish button.
Integrating SharePoint 2010 with Excel
This section describes the ways in which Excel 2010 is tightly integrated with SharePoint 2010. We cover importing from and exporting to SharePoint 2010, along with Web Parts that display charts, and a little bit about Excel Services.
Importing Spreadsheets into SharePoint
The capability to import spreadsheet data into SharePoint is very powerful, and enables workers to become more efficient in their daily tasks. Any properly formatted Excel spreadsheet can be imported into SharePoint as a new, custom list.
If you can simply upload a spreadsheet into a document library and take turns with other users checking out and working on it, why would you want to import the spreadsheet? What is the difference?
The difference is quite significant. Think about a scenario in which managers are tasked with entering their daily sales figures in a spreadsheet every day. If that spreadsheet is in a document library, those managers can collaborate on it by taking turns checking it out, adding their sales numbers, and remembering to check it back in. When the spreadsheet is a custom list in SharePoint instead, users are simply creating new items in the same list. Besides the obvious efficiency increase, a benefit of working in a SharePoint list is the capability to use SharePoint alerts. Once the data has been collected, it can still be exported back out to spreadsheet format if needed.
A spreadsheet must be properly formatted in order for it to be imported. Each column heading becomes a new column in the SharePoint list, so make sure that row 1 (and only row 1) contains the column headings. The list data must begin at row 2, and there should be no blank rows among the data portion of the spreadsheet.
A common reason for import failure is your IE settings. It most cases, the site you are trying to import needs to be in the Local intranet or Trusted sites zone.
The following steps can be taken to import a spreadsheet into SharePoint:
1. In SharePoint, click Site Actions, and choose More Options… .
2. Select Import Spreadsheet in the list of templates in the middle of the screen. Click the Create button on the right.
3. In the Name box, type a name for the new list, and in the Import from Spreadsheet section, click the Browse button.
4. Navigate to the current location of the spreadsheet, click to select the spreadsheet name, and click Open.
5. Back on the New screen in SharePoint, click the Import button. The spreadsheet will be automatically opened in Excel, with a dialog box called Import to Windows SharePoint Services list. If there are no named ranges used in the spreadsheet, choose Range of Cells in the Range Type box.
6. The Select Range box allows for selection of the cells that need to be imported as a list in SharePoint. After a range has been selected, click the Import button.
7. The new SharePoint list is automatically created, and you will be taken to the default view of this list.
Another way to move data from Excel to SharePoint is from within Excel. Select the spreadsheet’s data region, click the Format as Table button, and pick a style. From this new table, click the Design tab in the Ribbon. The Export button will provide the option to Export Table to SharePoint List.
Exporting to Excel
As mentioned earlier in the section “Connecting to Office 2010 From SharePoint 2010,” there is an Export to Excel button in lists and libraries that you can use to export the current view to Excel. Another way to export the data to Excel is a hidden task pane that exists in the list’s Datasheet view.
1. Click the Datasheet View button in the List tab of a SharePoint list (or the Library tab in a library). This view is displayed in Figure 18-15.

2. Click the task pane. This is a little hard to find at first. It is a long, vertical bar that goes down the right side of the datasheet view (highlighted in Figure 18-15). The contents of this task pane are displayed in Figure 18-16.

3. You can choose from several Excel options, including Query list with Excel, Print with Excel, Chart with Excel, or even Create Excel PivotTable Report. The Access options are discussed later in this chapter.
When you are in the Datasheet view and the Datasheet View button is grayed out, it is most likely because this capability has been disabled on the list. In the list settings, an administrator can go to Advanced Settings and change Allow items in this list to be edited using the datasheet? to Yes.
Chart Web Part
The new Chart Web Part is a fantastic addition to the already long list of SharePoint’s out-of-the-box Web Parts. Many SharePoint projects require a graphical display of data as a Web Part on a page. Figure 18-17 shows an example of the Chart Web Part.

The data in this Web Part can come from a SharePoint list, an external content type (previously known as the BDC), Excel Services, or even another Web Part on the same page. The Data & Appearance button directs you to a screen with wizards to Customize Your Chart or Connect Chart to Data. The interface and configuration screens are very intuitive, and the chart itself is highly customizable, which makes this Web Part perfect for business users, thereby making the job of the SharePoint administrator and developer easier!
Publishing to Excel Services
The Save & Send tab in Excel’s Backstage view has an option to Publish to Excel Services. Excel Services is a SharePoint technology that is used in facilitate sharing, securing, and ease of use when it comes to Excel spreadsheets as interactive entities in the enterprise. If a spreadsheet will be used in Excel Services, publishing the file to a library is the preferred method over simply saving the file. Click the Excel Services Options button in order to specify spreadsheet components to be published, such as individual sheets and charts. Excel Services are covered in more detail in Chapter 20.
Excel Web Access Web Part
The Excel Web Access Web Part can be used to display data from within a spreadsheet that has been published to Excel Services. You can display the entire spreadsheet or just specific portions of it such as ranges and charts. When typing interactivity is enabled in the Web Part properties and Office web applications are installed on the server, the spreadsheet is editable right in the Web Part. Charts in this Web Part are different from the Chart Web Part described earlier because the chart’s configuration is done within Excel. The Chart Web Part is set up within the Web Part settings. For more information on the fun you can have with Excel Web Access check out Chapter 20.
Integrating SharePoint 2010 with PowerPoint
PowerPoint is an application that is used to create powerful and portable presentations, and PowerPoint 2010 has more multimedia capabilities than ever. This section covers the ways in which SharePoint and PowerPoint are integrated. Live co-authoring, covered earlier in the chapter, is also available in PowerPoint presentations. This allows multiple users to work on the same file, and each user’s currently edited slide is locked from editing by the other collaborators. Because PowerPoint presentations consist of slides, our first stop is a look at slide libraries.
Slide Libraries
First introduced in SharePoint 2007, slide libraries are used to provide a list of individual slides for collaboration purposes. Slide libraries not only enable you to view an inventory of slides, you can piece these slides together to create new presentations. In a slide library, each slide has a checkbox next to it. To create a new presentation based on slides in the library, simply check the boxes next to the slides needed, and click the Copy Slide to Presentation button.
Broadcasting Slide Shows
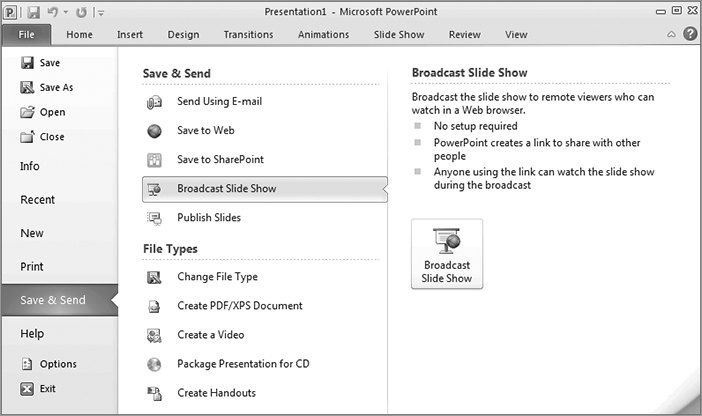
PowerPoint 2010 offers the capability to broadcast a PowerPoint presentation straight to the Web browser, which can be offered publicly on the Internet or locally on the intranet, via SharePoint Server. To broadcast a presentation means to make a live view available in a web browser. Individuals who are viewing the web page will see the slides as they are being clicked through. In other words, the presenter’s current slide is displayed as they are discussing it. Here are the steps involved in broadcasting a PowerPoint 2010 presentation:
1. In PowerPoint, go to the Backstage view by clicking the File menu at the top left.
2. Click the Save & Send tab on the left side.
3. In the Save & Send section, click the Broadcast Slide Show button, as shown in Figure 18-18.
4. On the right, click the larger Broadcast Slide Show button.
5. By default, there is a public service called the PowerPoint Broadcast Service that only requires a Windows Live ID. Click Start Broadcast to use this service, or click Change Broadcast Service to use a custom one, such as a SharePoint site. The creation of a PowerPoint broadcast site in SharePoint is covered in the next section, “PowerPoint Service Application.”
6. A URL link will automatically be generated and displayed on the screen. Hand this out to anyone who will need to view this live presentation, i.e., the intended audience.
7. Click the Start Slide Show button to begin the presentation, which entails a live view of the current slide.
Note that no audio is associated with this live broadcast. The intent is that a company conference line or direct phone call can be used, in order for the audience to hear the presenter’s voice. When the presentation is over, click to end the broadcast.
PowerPoint Service Application
When Office 2010 Web Applications have been installed and deployed from Central Administration in SharePoint as covered in Chapter 19, listed among the service applications is the PowerPoint Service Application. This service enables you to set up your own internal PowerPoint broadcast URL. Follow these steps to create a SharePoint broadcast site:
1. In Central Administration, click Create Site Collections in the Application Management section.
2. Create a new top-level site collection, in the web application of your choosing. A good name and URL for this site would be “Broadcast.”
3. In the Template Selection section, click the Enterprise tab and choose PowerPoint Broadcast Site.
4. Pick a site administrator and click OK.
5. On the Top-Level Site Successfully Created screen, click the link to the new site collection.
6. Click People and Groups on the left.
7. Configure the permissions on the site. Users who will be broadcasting slides are Broadcast Presenters, users who will view the slides are Broadcast Attendees, and obviously administrators of the permissions on this broadcast site are the Broadcast Administrators.
From this point on, when users are broadcasting PowerPoint presentations and are prompted to pick a broadcast service, they will use the URL of this new Broadcast site. The “Managing Office 2010 and SharePoint through Group Policy” section in this chapter shows how Group Policy can be used to block the default PowerPoint Broadcast Service. Your own custom internal broadcast URLs can be set in Group Policy also.
Integrating SharePoint 2010 with Outlook
Outlook is Microsoft’s e-mail management program, integrating e-mail with personal lists such as contacts, calendars, and tasks. With Outlook 2010, you can find and view information, customize your user interface, and connect to SharePoint and other social media networks. This section focuses specifically on the ways in which Outlook 2010 is used with SharePoint 2010.
In particular, you will learn how to manage SharePoint alerts from Outlook, the types of SharePoint lists and libraries that can be connected to Outlook, and how you can integrate Exchange calendars with SharePoint calendars in the browser.
Managing SharePoint Alerts
In SharePoint, alerts are e-mail notifications that are set up by end users, per document library and list. When alerts are set up, automatic e-mails arrive when items in a list are added or changed, and at the frequency that the user specifies. Users can manage all of their own alerts on various SharePoint sites from a single location in Microsoft Outlook.
In Outlook, on the Home tab of the Ribbon, click the Rules button in the Move section. Click Manage Rules & Alerts, and then choose the Manage Alerts tab. This screen displays a list of all your existing alerts, which can each be viewed and modified. To create a new alert, click the New Alert button.
SharePoint Lists and Libraries
Many types of SharePoint lists and libraries can be connected to Outlook for interactivity from within the Outlook client software. Using Outlook for e-mail is a standard part of life for many people, so the convenient accessibility of SharePoint data in Outlook is yet another way that Office and SharePoint integration drives efficiency. The following types of lists and libraries can be connected to Outlook:
- Calendars
- Tasks
- Project tasks
- Contacts
- Discussion boards
- Document libraries
- Individual document sets
- Picture libraries
In the Library or List tab in the Ribbon (depending on whether it’s a library or a list), each of these types of lists has a Connect to Outlook button. Users can click this button to link their own Outlook client to SharePoint. When this is done, a new PST file is automatically created on the client hard drive, called SharePoint Lists.pst. Take a look at Outlook’s Folder view, which usually has this file as the last PST at the bottom. Items in these SharePoint lists are synchronized, and editable from either SharePoint or Outlook 2010.
All lists and libraries that are connected to Outlook are actually full, offline copies of the libraries in their entirety. From a client support perspective, this could be a nightmare. Imagine end users flippantly clicking the Connect to Outlook button for document libraries with hundreds of files in them. Those hundreds of files are then copied to the PST on that client hard drive. A new setting in SharePoint 2010 enables site administrators to avoid this scenario: Offline Client Availability. Follow these steps to disable the offline availability of a library:
1. In the Library tab in the library’s Ribbon, click the Library Settings button.
2. In the General Settings section, click Advanced Settings.
3. Scroll down to the section called Offline Client Availability. The default setting for the question Allow items from this document library to be downloaded to offline clients? is Yes. Change it to No and click OK.
When offline availability is turned off, the Connect to Outlook button in the library is grayed out and disabled. If clients have already created offline copies of the library, they will still exist as disconnected, and will not receive any further updates from the library.
There are a couple of options other than completely blocking users from downloading offline copies of the libraries to Outlook, but these options entail giving a bit of guidance to library owners and contributors:
- Teach users the practice of setting up multiple document libraries on each site, as opposed to one large one — A good way to carry this out would be when the site is provisioned. Create new sites with no default document libraries, and instruct the new site owner to create new, separate libraries for different topics.
- Use document sets — New to SharePoint 2010, document sets enable you to group similar documents together. Multiple document sets can be created in each document library. One of the great things about document sets is that the set itself can be connected to Outlook.
- Sync to a SharePoint Workspace instead — There is an option to download only headers, which would take up less space than the full files. SharePoint Workspaces are discussed later in this chapter.
Calendars and Meetings
As discussed previously in this chapter, SharePoint calendars can be connected to Outlook clients — but the integration doesn’t stop there! Now, when SharePoint 2010 and Outlook 2010 are used in conjunction for meeting planning, the experience is quite seamless.
Using an overlay view, you can now add Outlook calendars to SharePoint calendars in the browser, enabling a quick visual comparison of the team’s personal calendar with the appointments in a SharePoint calendar. On the left side of a SharePoint calendar in the browser, click Calendars in View. This allows for up to 10 additional calendars to be displayed in the view, which includes not only SharePoint calendars from multiple sites, but Exchange calendars also!
Outlook 2010 also has a new feature called the Outlook Social Connector. This is covered in detail in Chapter 17.
Integrating SharePoint 2010 with InfoPath
Since its inception in Microsoft Office 2003, InfoPath has been highly integrated with SharePoint. SharePoint 2010 offers a plethora of new integration points with InfoPath 2010.
A part of the Microsoft Office suite of applications, InfoPath is used for the creation and filling out of forms. This powerful program enables business users to easily create and customize their own forms. A lot of time and money can be saved by using InfoPath forms, as no programming knowledge is required, and the interface and form publishing process are simple and familiar.
InfoPath Forms Services was first introduced in Microsoft Office SharePoint Server 2007. It is a SharePoint technology that allows for centralized administration of forms in an organization, and also provides the ability for forms to be filled in using the browser instead of relying on client software.
If you have used InfoPath, then you know that in the past it was a single application in Office. In Office 2010, the product has been divided into Microsoft InfoPath Designer 2010 and Microsoft InfoPath Filler 2010. Because designing a form and filling out a form are two distinct tasks, typically performed by different types of users, it is logical to provide two different entry points to the program.
When forms are created, one of the first choices to make is whether the form will be browser-based, that is, it can be opened and filled out in the browser. If a form has not been set up as browser-based, it must rely on client software. The latter option requires that all client computers have InfoPath software installed as part of the Microsoft Office suite. Different types of controls and capabilities within InfoPath forms are compatible with different versions of the InfoPath client, so compatibility with clients is a consideration that is best tackled at the beginning of the form creation process.
When a new form is created for use in a SharePoint form library, you have three different options for publishing the form to SharePoint:
- Form Library — This method entails publishing the form to a single library on a SharePoint site. When you know that the form will not be needed in other sites or libraries, use this option. Browser-based forms are optional here. Note that at the SharePoint library level, there is a setting that the administrator can use to force the way the client machine opens forms.
- Site Content Type — The form is published to a SharePoint site as a content type. This type of form can then be used in multiple libraries and subsites, and the content type is managed from one location.
- Administrator-approved form template — These types of forms are to be uploaded to InfoPath Forms Services in Central Administration, and can be globally available in the organization. This option requires that the browser-based option is selected. This does not mean that the form can be only browser-based, but that it at least must be available in that format. The next section describes how to manage these administrator-approved forms.
To open documents in the browser, in the Form Library settings, click Advanced Settings. Figure 18-19 shows the options for Opening Documents in the Browser.

In the case of form libraries, InfoPath is the applicable client application.
The following sections describe the administrator-approved templates in relation to InfoPath Forms Services, which entails some Central Administration settings, and step-by-step instructions on how the form deployment process is carried out. A few other concepts covered are the new InfoPath Form Web Part, customizing the document information panel using InfoPath, and customizing SharePoint list forms.
InfoPath Forms Services in Central Administration
In Central Administration, click General Application Settings on the left side of the screen. Figure 18-20 shows the InfoPath Forms Services section.

The following list describes the options available for managing InfoPath Forms Services:
- Manage form templates — This is the master list of all templates that exist in InfoPath Forms Services. By default, there are already several in the list, which are associated with some out-of-the-box workflows in SharePoint 2010.
- Configure InfoPath Forms Services — This page contains general settings such as timeouts, authentication, and postback thresholds.
- Upload form template — Once an administrator-approved template has been created as described in the previous section, it can be uploaded to InfoPath Forms Services on this screen.
- Manage data connection files — Upload existing data connection files here so that they can be globally accessed from multiple InfoPath forms.
- Configure InfoPath Forms Services Web Service Proxy — Use this page to enable the web service proxy for forms.
Deploying Forms in InfoPath Forms Services
Deploying a form template to InfoPath Forms Services is typically done by a SharePoint administrator. This section covers the steps required to take a form from inception to “going live” on a SharePoint site.
What you will need:
- The template file — The person who has created the InfoPath form will send the form template to the administrator as an XSN file.
- Site Collection URL — To which site collection(s) will this form need to be deployed? The form creator should also supply this information.
Once the form template and site collection URL have been obtained, take the following steps:
1. On the General Application Settings page in Central Administration, click Upload Form Template.
2. Browse to the form template, which is the XSN file that the form creator supplied.
3. Optionally, click the Verify button, to verify that the form does not contain any errors.
4. Click the Upload button; and after the process has completed, a Form Template Status screen will indicate success.
5. On the Manage Form Templates screen, hover over the name of the template that was just uploaded. Click Activate to a Site Collection.
6. Pick a site collection from the drop-down box and click OK.
After the template has been deployed to the site collection, it is available as a content type that can be added to libraries in the site collection.
InfoPath Form Web Part
One of the new SharePoint 2010 out-of-the-box Web Parts is called the InfoPath Form Web Part. This Web Part allows for the insertion of any browser-based InfoPath form right onto a Web Part page. The following steps are taken as a form is inserted on the home page of a company’s departmental site. The availability of the Web Part makes it a few clicks easier for the site visitors, as filling out this form is the most commonly performed task done on the site in this example:
1. At the top left, click Site Actions and choose Edit Page.
2. On the Ribbon at the top, click the Insert tab, and then click Web Part.
3. In the Forms category, select InfoPath Form Web Part, and click Add.
4. Click the link that says “Click here to open the tool pane,” and the Web Part tool pane will appear on the right side of the screen. Figure 18-21 shows some tool pane settings.

5. The first drop-down box, called List or Library, contains multiple options, depending on how many forms have been published to the current site. The names of these forms are listed, along with names of lists on the site that have custom InfoPath forms (customizing SharePoint list forms is covered later in this chapter). There is also an extra option called Deployed Forms. Pick the desired form name; or if the form was deployed via InfoPath Forms Services, pick Deployed Forms.
6. The rest of the Web Part options are pertinent to the way the form will be displayed, and the behavior when the Submit button is clicked.
7. Click OK at the bottom of the Web Part tool pane to save the changes.
The InfoPath form will be displayed directly on the SharePoint page, which can now be easily and quickly filled out by site users.
Customizing the Document Information Panel
An earlier section of this chapter, “Connecting to SharePoint from within Microsoft Office 2010 Applications,” introduced the document information panel. To change the appearance of the document information panel, such as displaying it in a color other than the default blue, or inserting a company logo or other graphics, you can use InfoPath to perform this type of customization.
Inherently, a Document Information Panel is going to be associated with a content type in SharePoint. When a custom document information panel is created, the process involves InfoPath communicating with a specific document library in order to obtain information about the content types and metadata (columns) associated with the library. Therefore, before the form is created, obtain the URL of the target document library. Once you have the URL, use the following steps to customize the look and feel of the document information panel using InfoPath 2010:
1. On the Backstage view in InfoPath Designer 2010, click the New tab on the left. Figure 18-22 shows some of the Available Form Template options when creating new forms.

2. In the Advanced Form Templates section, choose Document Information Panel, and click Design This Form on the right.
3. On the first screen in the Data Source Wizard, enter the URL to the target document library, and click Next.
4. Choose the content type that the custom document information panel will be associated with and click Next.
5. Click Finish. At this point, a new form will be displayed in Design view in InfoPath, with all of the library fields already inserted. Customize this form by changing the background color, adding a company logo, or rearranging the form fields.
6. It is recommended that you save your own local copy of the form template as a backup, so click the Save button at the top of the screen.
7. Click the Quick Publish button, located in the Quick Access Toolbar at the top left of InfoPath, above the File menu. (Alternately, click the File menu, and on the Info tab, click the Quick Publish button). This publishes the custom document information panel back to the document library specified in step 3.
From this point on, files in that document library will display the new custom Document Information Panel instead of the default blue one.
Customizing SharePoint List Forms
By default, lists in SharePoint have a standard look and feel. In previous versions of SharePoint, form customization was not an easy or intuitive endeavor. With SharePoint 2010, you can use InfoPath to do advanced customizations of regular list forms.
Typical SharePoint lists have three associated forms:
- NewForm.aspx — This is used when a new item is created in a list.
- DispForm.aspx — After a list item has been created and it is opened to view, this form is used.
- EditForm.aspx — When the Edit Item button is used on a list item, this is the form that is filled out.
The form customization process starts with first navigating to the desired list. On the List tab in the Ribbon, look in the Customize List section for the button called Customize Form.
If the icon does not exist, then the current list type is not compatible with InfoPath form customization. To verify this, go to the list settings screen and click Form Settings. A message will indicate non-compatibility.
Follow these steps to customize a SharePoint list form:
1. Open the target SharePoint list.
2. Click the Customize Form button in the List tab in the Ribbon.
3. The Microsoft InfoPath Designer 2010 application will start running.
4. A very basic version of the current list form will be displayed in InfoPath Designer, with a Fields pane displayed on the right side of the screen.
5. Customize the form by changing the background color, adding a form title, or rearranging the form fields. See Figure 18-23 for the Design view of this Sales Report form.

6. Once the form customizations are complete, click the Quick Publish button, located in the Quick Access Toolbar at the top left.
7. A notification will pop up, saying that the form was published successfully. Click OK and close InfoPath Designer.
Figure 18-24 shows the list form after it has been customized.

All three of the list default forms are automatically changed to be displayed with the new colors and title. This example shows an EditForm.aspx file of an existing list item. Think of the possibilities! No client software is required to work in SharePoint lists that have been customized in this manner, as the forms are browser-based by default.
Integrating SharePoint 2010 with Microsoft Visio
The Microsoft Visio application enables the creation of advanced visuals such as charts, diagrams, flowcharts, and even floor plans and network diagrams. This section covers several ways that you can use Visio and SharePoint in conjunction. Chapter 25 explains how SharePoint workflows integrate with Visio Services.
The Visio Graphics Service is a service application in Central Administration. SharePoint users can create Visio diagrams on their client machines and publish them to the server, after which point the client software is no longer needed. After the diagram has been published to the Visio Graphics Service, the server can take care of refreshing that diagram and maintaining the data connections inside of it.
Visio Graphics Service Configuration
In Central Administration, click Manage Service Application, and see that the Visio Graphics Service is listed. Click the Visio Graphics Service link to get to the Visio Graphics Services Management page. There are two different pages here, where service customization options are located:
- Global Settings — This page contains settings such as the maximum diagram size, maximum and minimum cache sizes, and the maximum data refresh duration. Also, if external data connections are to be used in Visio graphics, there is a section here for an unattended service account’s Application ID.
- Trusted Data Providers — This page contains a list of default data providers, with databases such as SQL and Oracle. You can add new, custom trusted data providers here.
You can save Visio files as web drawings. You can view these files in the browser. They have a file extension of .vdw.
Visio Web Access Web Part
When added to a page in SharePoint, the Visio Web Access Web Part is used to display Visio files that have been saved to SharePoint as a Web Drawing (VDW) file. Follow these steps to insert a Visio Web Access Web Part on a page and configure it:
1. At the top left, click Site Actions and choose Edit Page.
2. On the Ribbon at the top, click Insert Web Part.
3. In the Business Data category, select Visio Web Access, and click the Add button.
4. Click the link that says Click here to open the tool pane, and the Web Part tool pane will appear on the right side of the screen. Figure 18-25 shows some tool pane settings.
5. Click the ellipses button next to the Diagram URL box, navigate to the document library in which the VDW file exists, select the target file, and click OK.
6. Click OK at the bottom of the Web Part tool pane.
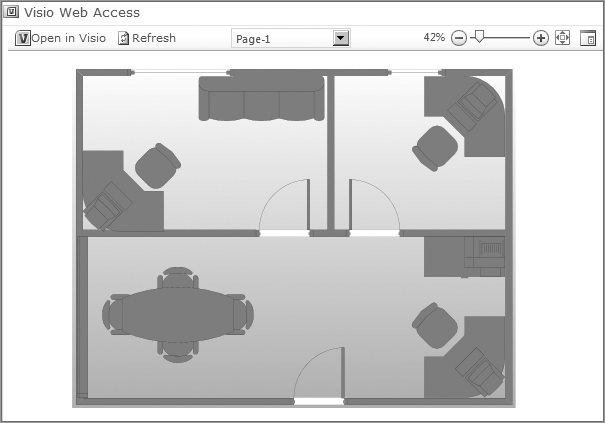
Figure 18-25 shows an example of a Visio diagram being displayed in a Visio Web Access Web Part. You can make further customizations in the Web Part tool pane. In addition to the settings displayed in Figure 18-26, there are sections to configure the Toolbar and User Interface, and the Diagram Interactivity.

Integrating SharePoint 2010 with OneNote
OneNote is an Office application that is used to quickly take notes and organize them. Not only are there note typing and writing capabilities, you can insert many different types of objects into OneNote files, such as images, links, and even video or voice clips. Putting notes in OneNote gives you a visually clear and easily searchable solution.
The capability for OneNote to be shared and integrated with SharePoint and the other Office applications makes it a very useful and easily accessible tool. The live co-authoring feature discussed at the beginning of this chapter also applies to Office OneNote.
To create a new shared notebook for collaboration from a document library in SharePoint, follow these steps:
1. Click the File tab to open the Backstage view.
2. Click the New tab on the left side of the screen.
3. Choose Network, type a name for the new file, and choose the URL of the target document library.
4. Click the Create Notebook button.
5. Once the new file is created, OneNote offers you the option to send the link in an e-mail to someone.
From this point on, users who have at least Contribute permissions on that document library will be able to open the file and make their notes. The left side of the screen contains a vertical button with the name of the current file. Right-click on this button to view several options, such as the capability to Sync this notebook now.
Integration with Access 2010 and Access Services
Microsoft Access is a small-scale relational database management system. It has historically been used to create relatively simple solutions; and in most cases, database creators need not have any programming knowledge. Access provides the ability to connect to any external data sources, such as SQL or other databases. Before delving into how this application relates to SharePoint, you should know about some basic Access objects:
- Tables — Tables are the location where the data itself is stored. Everything that you do in Access is going to be based upon the information in your tables.
- Queries — Queries provide a way to look at the data in one or more tables. For example, using a query you can filter and refine information, reference information from various tables, and define the way that common fields relate to each other.
- Forms — Forms are the means by which end users interact with data in the tables. These generally consist of text boxes, drop-down menus, and other types of controls, such as buttons. Forms are the user interface when adding or modifying table data.
- Reports — Reports are used to display or print the Access data. Business users generally view reports in order to quickly assess numbers, using tables or graphs.
In scenarios where multiple users are attempting to access and modify the data within Access database tables, which can be difficult to accomplish, SharePoint integration provides a solution. If you think of lists and libraries in SharePoint as tables in a database, it is easy to understand the natural integration with Microsoft Access.
This section describes how to use SharePoint lists as tables in Access databases and the new concept of Access Services in SharePoint 2010.
SharePoint Data As a Table
The data in SharePoint can easily be connected to serve as live table data in an Access database, which can be queried and reported on. There are a couple of ways to accomplish this. In this section, you’ll learn the methods that you can use to establish communications between SharePoint and Access.
Connecting to Access from SharePoint
From a SharePoint 2010 list, on the List tab in the Ribbon, click the Open with Access button in the Connect & Export section. Figure 18-27 shows the screen that appears.

If the desired database already exists, navigate to it or otherwise customize the name of the new database to be created. The option to link to the dynamic data is the default, but the data can optionally be exported from SharePoint as static.
SharePoint libraries do not have the Open with Access button that exists in lists, but they can be connected to Access. Refer to the “Exporting to Excel” section and Figure 18-16 earlier in this chapter, which demonstrates how to access the hidden task pane.
Connecting to SharePoint from Access 2010
When armed with the URL of the target SharePoint site, you can create a dynamic connection to SharePoint from within the Access 2010 software. This section describes the various ways to go about this.
Figure 18-28 displays the External Data tab in Access 2010. Both the Import & Link section and the Export section contain drop-down boxes called More, each of which contains an option for SharePoint List.

Data can be imported from SharePoint into Access, and it can even be exported from Access, to become a table in SharePoint.
Using the Create tab in Access 2010, you can also create several different types of SharePoint lists right from Access! The Database Tools tab contains a button called SharePoint, which you can use to move the tables to a SharePoint list and create linked tables in the database. In previous versions of Access, this was a manual operation, per table. The last step, which is new in Office 2010, is to upload the database file to a SharePoint document library, where it can be opened and interacted with.
A Real-World Example
A project management department at a small company has an Access database on a file share, which they have always used to enter new projects. Some fairly complex Access reports are run on the project data. These reports are based on multiple tables and queries, are full of advanced calculations, and need to be shown to the company president every month.
The problem with this archaic solution is that it is not easy for multiple people to enter data at the same time. This is a good scenario in which the tables can be added to SharePoint as lists, and connected to Access. The Access database itself can then be uploaded to a document library, and the original copy on the file share can be deleted. Multiple users can access the Project Management SharePoint site and enter and edit project data, and those monthly reports can still be run from within the Access database in the document library.
Note that changes to the database design itself (not the data) will require that the database file be downloaded, changed, and then uploaded to the document library again. When multiple users change the database design simultaneously, one user’s version of the file can be overwritten.
Access Services
There seems to be something missing when it comes to the way Access and SharePoint work together. How can legacy Access databases be fully translated into purely SharePoint applications? It shouldn’t be necessary to have to keep queries and reports in Access, and only tables in SharePoint. SharePoint 2010’s answer to this need is called Access Services.
Table 18-1 shows the additional functionality that Access Services brings to SharePoint.
Table 18-1 Additional Functionality with Access Services
| Functionality | Just SharePoint | SharePoint and Access Services |
| Data in SharePoint lists | ✔ | ✔ |
| Centrally deployed interface | ✔ | ✔ |
| Collaborative design | ✔ | |
| Web forms in the browser | ✔ | |
| Web reports in the browser | ✔ | |
| Server-side macros | ✔ |
Existing Access databases can be published to Access Services, which will convert them to SharePoint web objects. The SharePoint user and permissions model is leveraged, and the databases then become more collaborative. For design and structure changes, the database is only locked per object, as opposed to per the whole database. One user can redesign a report while another user modifies a form or creates a new one. Once a database has been published in Access Services, the database objects are all run completely within the web browser, and no client software is needed, except for those users who will be redesigning the database.
Access Services Web Service Application
In Central Administration, Access Services is listed as one of the Service Applications by default, and is considered a middle-tier service that handles the query processor and the data access layer. Access Services also manages communication between the Access application and the SharePoint content database, which enables the use of large lists. In addition, SharePoint 2010 adds some advanced database concepts to SharePoint lists, which were fairly basic in the past. These new capabilities are relationships between lists, unique column constraints, and data-level validation.
Access Services are configured like other service applications, which are discussed in Chapter 7.
You can configure numerous settings to optimize the performance of Access Services as an application. For example, there are several query settings, such as maximum columns per query, maximum sources (lists) per query, and maximum calculated columns per query. The setting called Maximum rows per query enables you to control how many rows can be viewed at once. For instance, if there are 2 million rows, a default of 50,000 rows per query is a good setting. Another setting called Maximum records per table enables you to set a limit on the table’s size. For example, the IT department may want to reassess the use of a database when it reaches a certain size. At that point, it can be further determined whether the data may be better suited to a different type of database, such as SQL. There are several settings related to the maximum number of sessions, and even a maximum size for the log file. To access the settings described, go to Central Administration and click Access Services.
To get started publishing an existing Access 2010 database to Access Services, follow these steps:
1. In the database, click the File menu. The Backstage view will be displayed.
2. On the Save & Publish tab, click Publish to Access Services.
3. Click to Run the Compatibility checker. Some items may be flagged as incompatible with the web, such as certain types of characters in field names. When there are incompatibility issues, a new table called Web Compatibility Issues is automatically created. You will need to resolve any issues before the database can be published to the web.
4. The database will be published as a subsite, so fill in the URL of the top-level SharePoint site. As shown in Figure 18-29, enter a site name, and then click the Publish to Access Services button.
5. Once the Access database ACCDB file has been published to Access Services, it is not needed anymore and can be deleted or archived.

Note that during the web compatibility troubleshooting process, you can right-click on any object in Access, such as a table, and run the compatibility checker on just that object. This enables you to gradually work through the issues, especially when there is a long list of them.
One of the first things that is apparent on the New tab of the Backstage view in Access 2010 is an option to create a new “Blank Web Database.” Once SharePoint 2010 with Access Services has been deployed in the organization, users can be trained to get in the habit of always choosing Blank Web Database when creating new databases. When creating these databases, the design interface is trimmed down to only allow for functionalities that are web friendly. This will ensure SharePoint compatibility going forward, with no web compatibility issues to work through when it’s time to go live with the database.
After databases have been published to Access Services, they can be saved as templates to be used later, which is a similar concept to saving a SharePoint site as a template. Follow these steps to save the template and deploy it:
1. On the Settings page of the published database in SharePoint, click the Options drop-down and choose Open in Access.
2. Click the File menu, and on the Save & Publish tab on the left, click Save Database As.
3. For the format, choose Template (ACCDT).
4. The Create New Template from This Database screen will display (see Figure 18-30). Type a name for the template, and at the bottom optionally choose to include the data in the template.

5. The template file can then be uploaded to the Solution gallery on a SharePoint site, and activated.
6. From that point on, when users click to create a new subsite, there will be a new option with the same name as the template that was created. The nice thing about this method is that the person creating the new site based off the Access template need not have Microsoft Access installed on his or her client machine.
Previously known as Microsoft Office Groove 2007, SharePoint Workspace is an application that enables you to take a SharePoint site’s data offline. With this tool, SharePoint sites, along with all of their content, become convenient and portable. SharePoint content can be set up for automatic synchronization that is able to be customized at a granular level. Although some list types are not compatible with offline synchronization, for the most part this is a wonderful tool for those of us who are frequently on-the-go.
Earlier in this chapter, it was mentioned that some list types and document libraries can be connected to Microsoft Outlook for use from within the Outlook client and offline. Compared to the offline capabilities of Outlook, SharePoint 2010 Workspace provides a much more granular synchronization interface, and the capability to select an entire SharePoint site for offline accessibility.
The Site Actions menu on a SharePoint 2010 site contains an option called Sync to SharePoint Workspace. Also, from within each document library in the browser, the Library tab in the Ribbon contains a link to Sync to SharePoint Workspace. The same goes for lists, and the button is on the List tab in the Ribbon.
The first time the SharePoint Workspace software is elicited, the user is prompted to create a new account or restore an existing account. This “account” will contain the user’s connection settings for the different SharePoint sites to which they need to have offline access, and which libraries and lists are set up to synchronize to this offline copy. The user’s e-mail account is used to initially configure the account, or an Account Configuration Code can be used in conjunction with an Account Configuration Server.
Groove Server 2010 is a different product that can be used to manage SharePoint Workspace accounts. SharePoint Workspace account management is beneficial because it expedites the setup of new accounts and facilitates the restoration of backed-up accounts. Detailed information about Groove Server 2010 is beyond the scope of this chapter, but you can find more information on Microsoft’s TechNet site: http://technet.microsoft.com.
In this SharePoint Workspace example, an account will be created simply using the logged in user’s domain e-mail account. Once an account is created, the user is first asked whether all of the site’s content should be synchronized to their Workspace. At this point, it is a good idea to click the Configure button instead of the Yes button. The configuration screen enables users to select specific lists and libraries for offline synchronization. For each list or library that is clicked, a drop-down box enables selection of all content, headers only, or no content.
Follow these steps to connect SharePoint Workspace to a SharePoint site:
1. At the top left of the site, click Site Actions, and choose Sync to SharePoint Workspace for the first time.
2. On the Account Configuration Wizard’s Welcome to SharePoint Workspace screen, choose Create a new account, and click Next.
3. The current logged in user’s name and email address will automatically be filled in. Click Finish to accept these default settings.
4. At the security prompt called Sync to SharePoint Workspace, click OK.
If the site has a large amount of content, click the Configure button instead, in order to selectively choose lists and libraries to be synchronized offline.
A dialog box will be displayed, showing the progress of the synchronization. When complete, the status of each list and library will be displayed as in Figure 18-31. Notice that the types of objects that are not supported are indicated in this list, such as calendars and data connection libraries.

5. Click Open Workspace to open this SharePoint site in SharePoint Workspace.
Each SharePoint site that is synchronized is shown as a different Workspace in a window on the screen called Launchbar. From this Launchbar, click to open any SharePoint Workspace. Notice that navigating through the site’s document libraries and folders is a faster experience than waiting for web pages to load in the browser. Many document library and list functionalities exist in this application, such as document upload, file check in or out, version history, and even filling out of forms.
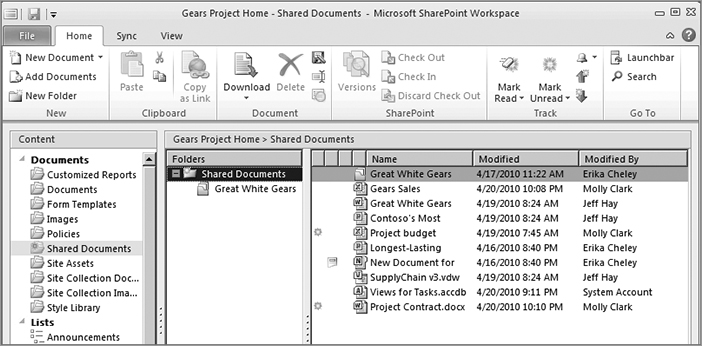
SharePoint Workspace also contains a unique functionality that enables users to mark items as read or unread. When SharePoint Workspace is running in the toolbar of the client computer, a small notification message pops up to indicate that an item in a certain location is unread. Within a library in the Workspace, a special green, ring-shaped icon is displayed next to items that are unread. Figure 18-32 shows a document library called Shared Documents that exists in a site called Gears Project Home. This library has two unread items, as indicated by the ring-shaped icons.
You can also configure many options within the SharePoint Workspace client via the Backstage view by clicking the File menu. In addition, from this screen you can set up desktop alerts and change account and connection settings.
Publishing Links to Office Client Applications
In SharePoint, Personalization Site Links are special links that can be set up and pushed to client Office applications, such as links to commonly used document libraries or sites. The end user can view these links on the left side of the Save As and the Open dialog boxes in each Office Application. This allows the user quick access to commonly used SharePoint locations. Using Audiences, you can set up these links to be available to users in specific groups or specializations. For example, a Team Site for users who work in the company’s Human Resources department could be created as a Personalization Site Link, targeted only to members of the Active Directory group called Human Resources. The following steps demonstrate how to create a Personalization Site Link.
1. In Central Administration, in the Application Management section, click Manage Service Applications.
2. Scroll down and click User Profile Service Application.
3. In the My Site Settings section, click Publish Links to Office Client Applications.
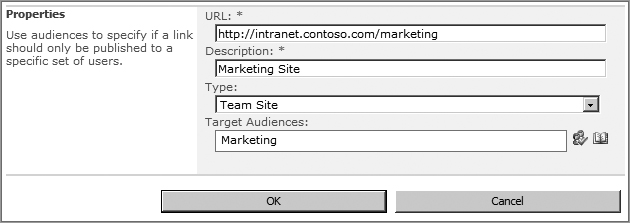
4. Click the New Link button. Figure 18-33 shows the Properties page for the new link, which will become available to all clients in their Office applications.
Managing Office 2010 and SharePoint through Group Policy
Active Directory and Group Policy administrators will be excited to know that they can now standardize a plethora of SharePoint and Office 2010 settings across a large organization. Basically, ADMX files are administrative templates that are used in Group Policy management. These files allow for client registry settings to be configured in a central location and deployed in Active Directory containers. To learn more about managing Group Policy, step by step, refer to http://go.microsoft.com/fwlink/?LinkId=75124.
Figure 18-34 shows the Group Policy Management Editor on a domain controller.

For the Office suite, more than three thousand settings can be modified via Group Policy. This section highlights some of the more useful user configuration settings that are pertinent to Office integration and SharePoint. Table 18-2 applies to the entire suite of applications; Table 18-3, Table 18-4, and Table 18-5 are each pertinent to a specific Office application. The Policy column contains the name of the Group Policy Object, the GPO Path column shows the path to navigate to that setting, and the last column describes the purpose of the setting.
Table 18-2 Microsoft Office 2010 System
| Policy | GPO Path | Description |
| Places Bar Locations | File Open/Save Dialog Box | Configure the list of items displayed in the Places Bar of the Common File dialog boxes. |
| User templates path | Shared Paths | Specify the location of user templates. |
| Disable Document Information Panel | Document Information Panel | Control whether users can view document information in the document information panel. |
| Maximum number of items to scan from today to determine the user’s colleagues for recommendation | Server Settings SharePoint Server | Max number of items to scan in the Outlook mailbox to determine the user’s colleagues. Larger = more accurate; Smaller = faster. |
| Control Blogging | Miscellaneous | Enable only SharePoint blogging, or disable blogging altogether. |
| Home Workflow Library | Miscellaneous | Allow administrators to make workflows from a specified list or library available within the workflow-enabled Office applications. |
Table 18-3 Microsoft Outlook 2010
| Policy | GPO Path | Description |
| Default SharePoint lists | Account Settings SharePoint Lists | Deploy SharePoint lists to Outlook by providing a list of SharePoint list URLs. |
| SharePoint folder sync interval | Account Settings SharePoint Lists | Define the interval in which Outlook automatically updates SharePoint folders. The default is 20 minutes. |
| Default servers and data for meeting workspaces | Meeting Workspace | Define up to five servers to be listed when meeting workspaces are created. |
Table 18-4 Microsoft InfoPath 2010
| Policy | GPO Path | Description |
| Control behavior for Microsoft SharePoint Foundation gradual upgrade | Security | Control whether forms and form templates follow URL redirections provided by Microsoft SharePoint Foundation during a gradual upgrade. |
| Turn off InfoPath Designer mode | Miscellaneous | Control whether InfoPath users can design new or existing form templates. |
Table 18-5 Microsoft PowerPoint 2010
| Policy | GPO Path | Description |
| Disable default service | Broadcast | Remove the default broadcast service from the Broadcast Slide Show dialog box. |
| Default file location | PowerPoint options Save | Specify the default location for presentation files. |
Although these are only a few of the thousands of settings you can deploy globally, they can be pretty powerful. Consider using some of these settings to encourage users to save Office documents to SharePoint, or to automatically see a shared list of the company’s vendors in their Outlook application. You don’t want users to have to “go find” SharePoint when it is time to upload a document for collaboration, or search for a company policy.
Microsoft Office 2010 and its corresponding web companions, the Office Web Applications, are very tightly integrated with the SharePoint server functionality. SharePoint 2010 and the Office 2010 desktop applications all include the distinctive Ribbon interface. This provides a common user experience across the platform, which also helps to facilitate adoption. Each desktop application has a new set of key features that improve the user experience and provide integration between documents.