
Chapter 14. Scala Tools, Libraries, and IDE Support
In the previous chapter, Chapter 13, we looked at how to design scalable applications in Scala. In this chapter, we discuss tools and libraries that are essential for Scala application developers.
We briefly introduced you to the Scala command-line tools in Chapter 1. Now we explore these tools in greater detail and learn about other tools that are essential for the Scala developer. We’ll discuss language-aware plugins for editors and IDEs, testing tools, and various libraries and frameworks. We won’t cover these topics in exhaustive detail, but we will tell you where to look for more information.
Command-Line Tools
Even if you do most of your
work with IDEs, understanding how the command-line tools work gives you
additional flexibility, as well as a fallback should the graphical tools
fail you. In this chapter, we’ll give you some practical advice for
interacting with these tools. However, we won’t describe each and every
command-line option. For those gory details, we recommend downloading and
consulting the tool documentation package
scala-devel-docs, as described in For More Information and also in The sbaz Command-Line Tool.
All the command-line tools
are installed in the
scala-home/bin directory
(see Installing Scala).
scalac Command-Line Tool
The
scalac command compiles Scala source files,
generating JVM class files. In contrast with Java requirements, the
source file name doesn’t have to match the public class name in the
file. In fact, you can define as many public classes in the file as you
want. You can also use arbitrary package declarations without putting
the files in corresponding directories.
However, in order to
conform to JVM requirements, a separate class file will be generated for each type with a name that
corresponds to the type’s name (sometimes encoded, e.g., for nested type
definitions). Also, the class files will be written to directories
corresponding to the package declarations. We’ll see an example of the
types of class files generated in the next section, when we discuss the
scala command.
The
scalac command is just a shell-script wrapper around
the java command, passing it the name of the Scala
compiler’s Main object. It adds Scala JAR files to
the CLASSPATH and it defines
several Scala-related system properties. You invoke the command as
follows:
scalac[options ...] [source-files]
For example, we used the following
scalac invocation command in A Taste of Scala, where we created a simple command-line tool
to convert input strings to uppercase:
scalac upper3.scala
Table 14-1 shows the list of the
scalac options, as
reported by scalac -help.
| Option | Description |
| Print a synopsis of advanced options. |
| Override location of bootstrap class files. |
| Specify where to find user class files. |
| Specify where to place generated class files. |
| Specify the file in which dependencies are tracked. (version 2.8) |
| Output source locations where deprecated APIs are used. |
| Specify character encoding used by source files. |
| Explain type errors in more detail. |
| Override location of installed compiler extensions. |
| Specify |
| Print a synopsis of standard options. |
| Specify recompilation detection strategy:
|
| Generate no warnings. |
| Generate faster byte code by applying optimizations to the program. |
| Print program with all Scala-specific features removed. |
| Specify where to find input source files. |
| Specify for which target JVM object files should be
built: |
| Enable detailed unchecked warnings. |
| Print identifiers with unique names for debugging. |
| Output messages about what the compiler is doing. |
| Print product version and exit. |
| A text file containing compiler arguments (options and source files). |
Tip
We recommend routine use of the -deprecation
and -unchecked options. They help prevent some bugs
and encourage you to eliminate use of obsolete libraries.
The advanced
-X options control verbose output, fine-tune the
compiler behavior, including use of experimental extensions and plugins,
etc. We’ll discuss the -Xscript option when we
discuss the scala command in the next
section.
A few other advanced options,
-Xfuture and -Xcheckinit, are
useful for the val override issue described in Overriding Abstract and Concrete Fields in Traits that affects Scala version 2.7.X.
Similarly, the -Xexperimental option enables
experimental changes and issues warnings for potentially risky behavior
changes. See Overriding Abstract and Concrete Fields in Traits for
details.
An important feature of
scalac is its plugin architecture, which has been
significantly enhanced in version 2.8. Compiler plugins can be inserted
in all phases of the compilation, enabling code transformations,
analysis, etc. For example, version 2.8 will include a continuations
plugin that developers can use to generate byte code that uses a
continuation-passing style (CPS), rather than a stack-based style. Other
plugins that are under development include an “effects” analyzer, useful
for determining whether functions are truly side-effect-free, whether or
not variables are modified, etc. Finally, the preliminary
sxr documentation tool (see [SXR]) uses a compiler plugin to
generate hyperlinked documentation
of Scala code.
You can read more information about
scalac in the developer tools documentation that you
can install with the sbaz command, discussed later in
The sbaz Command-Line Tool. In particular, Table 14-4 shows an example sbaz
command that installs the scala-devel-docs
documentation.
The scala Command-Line Tool
The
scala command is also a shell-script wrapper around
the java command. It adds Scala JAR files to the
CLASSPATH, and it defines several Scala-related
system properties. You invoke the command as follows:
scala [options ...] [script-or-object] [arguments]For example, after compiling our
upper3.scala file in A Taste of Scala, which we revisited in the previous
discussion of scalac, we can execute the
“application” as follows:
scala -cp . Upper Hello World!
The -cp . option
adds the current working directory to the class path.
Upper is the class name with a
main method to run. Hello World
are arguments passed to Upper. This command produces
the following output:
HELLO WORLD!
The command decides what
to do based on the script-or-object
specified. If you don’t specify a script or object,
scala runs as an interactive interpreter. You type in
code that is evaluated on the fly, a setup sometimes referred to as a
REPL (Read, Evaluate, Print, Loop). There are a few special commands
available in the interactive mode. Type :help to see
a list of them.
Our
Upper example demonstrates the case where you specify
a fully qualified object name (or Java
class name). In this case, scala
behaves just like the java command; it searches the
CLASSPATH for the corresponding code. It will expect
to find a main method in the type. Recall that for
Scala types, you have to define main methods in
objects. Any arguments are
passed as arguments to the main method.
If you specify a Scala
source file for script-or-object,
scala interprets the file as a script (i.e., compiles
and runs it). Many of the examples in the book are invoked this way. Any
arguments are made available to the script in
the args array. Here is an example script that
implements the same “upper” feature:
// code-examples/ToolsLibs/upper-script.scalaargs.map(_.toUpperCase()).foreach(printf("%s ",_)) println("")
If we run this script with the
following command, scala upper.scala Hello World, we
get the same output we got before, HELLO
WORLD.
Finally, if you invoke
scala without a script file or object name argument,
scala runs in interpreted mode. Here is an example
interactive session:
$ scala
Welcome to Scala version 2.8.0.final (Java ...).
Type in expressions to have them evaluated.
Type :help for more information.

scala> "Programming Scala" foreach { c => println(c) }
P
r
o
g
...
The
scala command accepts all the options that
scalac accepts (see Table 14-1), plus the options listed in Table 14-2.
| Option | Description |
| Explicitly interpret
|
| Explicitly interpret
|
| Guess what
|
| Preload |
| Parse |
| Save the compiled script for future use. |
| Don’t use |
| Set a Java system
|
Use the -i
file option in the interactive mode when you
want to preload a file before typing commands. Once in the shell, you
can also load a file using the command :load
filename. Table 14-3 lists the special
:X commands available within the interactive
mode.
| Option | Description |
| Prints a help message about these commands. |
| Followed by a file name, loads a Scala file. |
| Resets execution and replays all previous commands. |
| Exits the interpreter. |
| Enables power user mode. (version 2.8) |
The new “power user mode” adds additional commands for viewing in-memory data, such as the abstract syntax tree and interpreter properties, and for doing other operations.
For
batch-mode invocation, use the
-e argument option to
specify Scala code to interpret. If you are using command shells that
support I/O redirection (e.g., the Bourne shell, the C shell, or their
descendants) and you need to build up lines of code dynamically, you can
also pipe the code into scala, as shown in the
following somewhat contrived bash script
example:
#!/usr/bin/env bash# code-examples/ToolsLibs/pipe-example.shh=Hellow=Worldfunctioncommands{cat<<-EOFprintln("$h")println("$w")EOF}commands|scala
Invoking scripts with
scala is tedious when you use these scripts
frequently. On Windows and Unix-like systems, you can create standalone
Scala scripts that don’t require you to use the scala
script-file-name invocation.
For Unix-like systems, the
following example demonstrates how to make an executable script.
Remember that you have to make the permissions executable, e.g.,
chmod +x secho:
#!/bin/shexecscala"$0""$@"!#("You entered:")argv.toList foreach{s=>format("%s", s)}println
$ secho Hello World
You entered: Hello World
Similarly, here is an
example Windows .bat command:
::#!@echooff call scala %0%* goto :eof::!#("You entered:")argv.toList foreach{s=>format("%s", s)}println
See the
scala man page in the developer documentation package
scala-devel-docs to find out more about all the
command-line options for scala,
Limitations of scala versus scalac
There are some
limitations when running a source file with scala
versus compiling it with scalac.
Any scripts executed
with scala are wrapped in an anonymous
object that looks more or less like the following
example:
// code-examples/ToolsLibs/script-wrapper.scalaobjectScript{defmain(args:Array[String]):Unit= {newAnyRef{// Your script code is inserted here.} } }
As of this writing, Scala
objects cannot embed package declarations, and as
such you can’t declare packages in scripts. This is why the examples
in this book that declare packages must be compiled and executed
separately, such as this example from Chapter 2:
// code-examples/TypeLessDoMore/package-example1.scalapackagecom.example.mypkgclassMyClass{// ...}
Conversely, there are
valid scripts that can’t be compiled with scalac,
unless a special -X option is
used. For example, function definitions and function invocations
outside of types are not allowed. The following example runs fine with
scala:
// code-examples/ToolsLibs/example-script.scalacaseclassMessage(name:String)defprintMessage(msg:Message) = { println(msg) } printMessage(newMessage("Must compile this script with scalac -Xscript <name>!"))
Running this script with
scala produces the following expected
output:
Message(Must compile this script with scalac -Xscript <name>!)
However, if you try to
compile the script with scalac (without the
-Xscript option), you get the following
errors:
example-script.scala:3: error: expected class or object definition
def printMessage(msg: Message) = {
^
example-script.scala:7: error: expected class or object definition
printMessage(new Message("Must compile this script with scalac -Xscript <name>!"))
^
two errors found
The script itself
describes the solution; to compile this script with
scalac you must add the option
-Xscript name, where
name is the name you want to give the
compiled class file. For example, using
MessagePrinter for name
will result in the creation of several class files with the name
prefix MessagePrinter:
scalac -Xscript MessagePrinter example-script.scala
You can now run the compiled code with the command:
scala -classpath . MessagePrinter
The current directory will contain the following class files:
MessagePrinter$$anon$1$Message$.class
MessagePrinter$$anon$1$Message.class
MessagePrinter$$anon$1.class
MessagePrinter$.class
MessagePrinter.class
What are all those files?
MessagePrinter and
MessagePrinter$ are wrappers generated by
scalac to provide the entry point for the script as
an “application.” Recall that we specified
MessagePrinter as the
name argument for
-Xscript. MessagePrinter has the
static main method we need.
MessagePrinter$$anon$1
is a generated class that wraps the whole script. The
printMessage method in the script is a method in
this class. MessagePrinter$$anon$1$Message and
MessagePrinter$$anon$1$Message$ are the
Message class and companion object, respectively,
that are declared in the script. They are nested inside the generated
class MessagePrinter$$anon$1 for the whole script.
If you want to see what’s inside these class files, use one of the
decompilers, which we describe next.
The scalap, javap, and jad Command-Line Tools
When you are learning Scala and you want to understand how Scala constructs are mapped to the runtime, there are several decompilers that are very useful. They are especially useful when you need to invoke Scala code from Java and you want to know how Scala names are mangled into JVM-compatible names, or you want to understand how the scala compiler translates Scala features into valid byte code.
Let’s discuss three
decompilers and the benefits they offer. Since the class files generated
by scalac contain valid JVM byte codes, you can use
Java decompilers tools:
scalapis included with the Scala distribution. It outputs declarations as they would appear in Scala source code.javapis included with the JDK. It outputs declarations as they would appear in Java source code. Therefore, runningjavapon Scala-generated class files is a good way to see how Scala definitions are mapped to valid byte code.jadis an open source command-line tool (see [JAD]). It attempts to reconstruct an entire Java source file from the class file, including method definitions, as well as the declarations.
MessagePrinter.class
is one of the class files generated from the example script in the
previous section. Let’s run scalap -classpath .
MessagePrinter. We get the following output:
package MessagePrinter;
final class MessagePrinter extends scala.AnyRef {
}
object MessagePrinter {
  def main(scala.Array[java.lang.String]): scala.Unit;
  def $tag(): scala.Int;
    throws java.rmi.RemoteException
}
Note that the first method
inside object MessagePrinter is the
main method. The $tag method is
part of Scala’s internal implementation. It is an abstract method
defined by ScalaObject. The compiler automatically
generates implementations for concrete types. The
$tag method was originally introduced to optimize
pattern matching, but it is now deprecated and it may be removed in a
forthcoming release of Scala.
Let’s compare the scalap
output to what we get when we run javap -classpath .
MessagePrinter:
Compiled from "(virtual file)"
public final class MessagePrinter extends java.lang.Object{
  public static final void main(java.lang.String[]);
  public static final int $tag()       throws java.rmi.RemoteException;
}
Now we see the declaration of
main as we would typically see it in a Java source
file.
Finally, to use jad, you
simply give it the file name of the class file. It generates a
corresponding output file with the .jad extension.
If you run jad MessagePrinter.class, you get a long
file named MessagePrinter.jad. You will also get
several warnings that jad could not fully decompile
some methods. We won’t reproduce the output here, but the
.jad file will print normal Java statements
interspersed with several sections of JVM byte code instructions, where
it could not decompile the byte code.
All these tools have command-line help:
scalap -helpjavap -helpjad --help
The Scala developer documentation
contains documentation for scalap. Similar
documentation comes with the JDK for javap. The
jad distribution includes a
README file with documentation. The Mac and Linux
distributions also include a man page.
Finally, as an exercise,
compile the following very simple Complex class,
representing complex numbers. Then run scalap,
javap, and jad on the resulting
class files:
// code-examples/ToolsLibs/complex.scalacaseclassComplex(real:Double, imaginary:Double) {def+(that:Complex) =newComplex(real + that.real, imaginary + that.imaginary)def-(that:Complex) =newComplex(real - that.real, imaginary - that.imaginary) }
How are the +
and - methods encoded? What are the names of the
reader methods for the real and
imaginary fields? What Java types are used for the
fields?
The scaladoc Command-Line Tool
The
scaladoc command is analogous to
javadoc. It is used to generate documentation from
Scala source files, called Scaladocs. The scaladoc
parser supports the same @ annotations that
javadoc supports, such as @author,
@param, etc.
If you use
scaladoc for your documentation, you might want to
investigate vscaladoc, an improved
scaladoc tool that is available at http://code.google.com/p/vscaladoc/. You can also find
documentation on vscaladoc at [ScalaTools].
The sbaz Command-Line Tool
The Scala Bazaar System
(sbaz) is a packaging system that helps automate
maintenance of a Scala installation. It is analogous to the
gem packaging system for Ruby,
CPAN for Perl, etc.
There is a nice summary
of how to use sbaz on the scala-lang.org website.
All command-line options are described in the developer documentation.
Table 14-4 summarizes the most useful
options.
| Command | Description |
| Show the current “universe” (remote repository). Defaults to http://scala-webapps.epfl.ch/sbaz/scala-dev. |
| Points to a new “universe”
|
| What’s already installed locally? |
| What goodness awaits on the Interwebs? |
| Install the invaluable
|
| Upgrade all installed packages to the latest and greatest. |
Note that a remote
repository used by sbaz is called a
“universe.”
The fsc Command-Line Tool
The fast
(offline) scala compiler runs as a daemon process to enable
faster invocations of the compiler, mostly by eliminating the startup
overhead. It is particularly useful when running scripts repeatedly (for
example, when re-running a test suite until a bug can be reproduced). In
fact, fsc is invoked automatically by the
scala command. You can also invoke it
directly.
Build Tools
Scala plugins have been implemented for several, commonly used build tools, including Ant, Maven, and Buildr. There are also several build tools written in Scala and aimed specifically at Scala development. Perhaps the best known example of these tools is SBT (simple build tool—see [SBT]).
These plugins and tools are documented very well on their respective websites, so we refer you to those sites for details.
The Scala distribution includes Ant tasks for
scalac, fsc, and
scaladoc. They are used very much like the
corresponding Java Ant tasks. They are described at http://scala-lang.org/node/98.
A Scala Maven plugin is available at http://scala-tools.org/mvnsites/maven-scala-plugin/. It does not require Scala to be installed, as it will download Scala for you. Several third-party Scala projects, such as Lift (see Lift), use Maven.
Buildr is an Apache project available at http://buildr.apache.org/. It is aimed at JVM applications written in any language, with built-in support for Scala and Groovy as well as Java. It is compatible with Maven repositories and project layouts. Since build scripts are written in Ruby, they tend to be much more succinct than corresponding Maven files. Buildr is also useful for testing JVM applications with Ruby testing tools, like RSpec and Cucumber, if you use JRuby to run your builds.
The Scala-oriented SBT, available at http://code.google.com/p/simple-build-tool/, has some similarities to Buildr. It is also compatible with Maven, but it uses Scala as the language for writing build scripts. It also has built-in support for generating Scaladocs and for testing with ScalaTest, Specs, and ScalaCheck.
Integration with IDEs
If you come from a Java background, you are probably a little bit spoiled by the rich features of today’s Java IDEs. Scala IDE support is not yet as good, but it is evolving rapidly in Eclipse, IntelliJ IDEA, and NetBeans. At the time of this writing, all the Scala plugins for these IDEs support syntax highlighting, project management, limited support for automated refactorings, etc. While each of the plugins has particular advantages over the others, they are all close enough in functionality that you will probably find it acceptable to adopt the plugin for the IDE that you already prefer.
This section describes how to use the Scala support available in Eclipse, IntelliJ IDEA, and NetBeans. We assume you already know how to use each IDE for development in other languages, like Java.
Eclipse
For details on the Eclipse Scala plugin, start at this web page, http://www.scala-lang.org/node/94. If you are interested in contributing to the development of the plugin, see this web page, http://lampsvn.epfl.ch/trac/scala/wiki/EclipsePlugin.
Installing the Scala plugin
The plugin requires JDK 5 or higher (JDK 6 is recommended) and Eclipse 3.3 or higher (Eclipse 3.4 is recommended). The plugin installs the Scala SDK itself. To install the plugin, invoke the “Software Updates” command in the Help menu.
Click the Available Software tab and click the “Add Site…” button on the righthand side. You will see the dialog shown in Figure 14-1.

Enter the URL that is shown in the figure, http://www.scala-lang.org/scala-eclipse-plugin. Some people prefer to work with the nightly releases, http://www.scala-lang.org/scala-eclipse-plugin-nightly, but you should be aware that there is no guarantee they will work!
Select the checkbox next to the newly added update site and click the Install button, as indicated in Figure 14-2. Don’t click the “default” Close button!
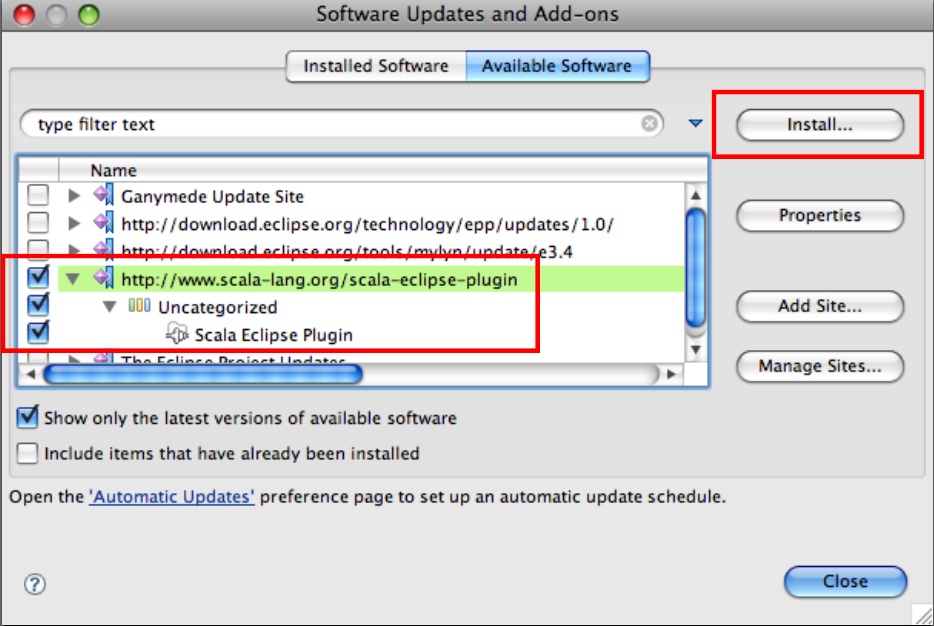
After finding the plugin on the update site, an Install dialog is presented. Click through the sequence of screens to complete the installation. You will be asked to restart Eclipse when the installation completes.
Developing Scala applications
Once the plugin is installed, you can create Scala projects using the File → New → Other… menu item. You will find a Scala Wizards folder that contains a wizard called Scala Project. This wizard works just like the familiar Java Project Wizard.
You can work with your
Scala project using most of the same commands you would use with a
typical Java project. For example, you can create a new Scala
trait, class, or
object using the context menu.
The Eclipse Scala plugin still has some rough edges, but Scala developers using Eclipse should find it acceptable for their daily needs.
IntelliJ
The IntelliJ IDEA team provides a beta-quality Scala plugin. Start here for details: http://www.jetbrains.net/confluence/display/SCA/Scala+Plugin+for+IntelliJ+IDEA.
Installing the Scala plugins
To use the plugin, you must use IntelliJ 8.0.X or later. Consider using the most recent “EAP” build for the latest feature updates.
To install the Scala plugin, start IDEA. Open the Settings panel, e.g., using the File → Settings menu item. On the lefthand side, scroll down to and click the Plugins item, as shown in Figure 14-3.

Select the Available tab on the righthand side. Scroll down to the Scala plugin, as shown in Figure 14-4.
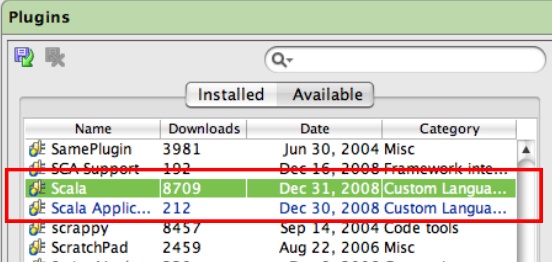
Right-click the Scala plugin name and select “Download and Install” from the menu. Repeat for the Scala Application plugin. You will have to restart IDEA for the plugins to be enabled.
After IDEA restarts, confirm that the two plugins were installed correctly by reopening the Plugin Manager. Click the Installed tab and scroll down to find the two Scala plugins. They should be listed with a black font, and the checkboxes next to them should be checked, as seen in Figure 14-5.

If the font is red or the checkboxes are not checked, refer to the Scala plugin web page above for debugging help.
Developing Scala applications
To create an IDEA Scala project, start by selecting the File → New Project menu item. In the dialog, select the appropriate radio button for your situation, e.g., “Create New Project from Scratch.”
On the next screen, select “Java Module” and fill in the usual project information. An example is shown in Figure 14-6.

Click through to the screen titled “Please Select Desired Technology.” Check the “Scala” checkbox, and check the “New Scala SDK” checkbox. Click the button labeled “…” to navigate to the location of your Scala SDK installation, as shown in Figure 14-7. You will only need to specify the SDK the first time you create a project or when you install a new SDK in a different location.

Click Finish. You will be prompted to create either a project or an application. Select “Application” if you want to share this project with other Scala projects on the same machine.
Now you can work with
your Scala project using most of the same commands you would use with
a typical Java project. For example, you can create a new Scala
trait, object, or
class using the context menu, as for Java
projects.
The IntelliJ IDEA Scala plugin is still beta-quality, but Scala developers using IDEA should find it acceptable for their daily needs.
NetBeans
NetBeans has beta-quality Scala plugins. Start at this web page for details, http://wiki.netbeans.org/Scala. NetBeans 6.5 or a more recent nightly build is required. The Scala plugin contains a version of the Scala SDK. The wiki page provides instructions for using a different SDK, when desired.
Installing the Scala plugins
To install the plugin, download the plugins ZIP file from http://sourceforge.net/project/showfiles.php?group_id=192439&package_id=256544. Unzip the file in a convenient directory.
Start NetBeans and invoke the Tools → Plugins menu item. Select the Downloaded tab and click the “Add Plugins…” button. Choose the directory where the Scala plugins are unzipped, and select all the listed *.nbm files, as shown in Figure 14-8. Click Open.

Back in the Plugins dialog, make sure the checkboxes for all the new plugins are checked. Click Install.
Click through the installation dialog and restart NetBeans when finished.
Developing Scala applications
To create a NetBeans Scala Project, start by selecting the File → New Project menu item or clicking the New Project button. In the pop-up dialog, select “Scala” under Categories and “Scala Application” under Projects, as shown in Figure 14-9. Click Next.

Fill in the project name, location, etc., and click Finish.
Once the project is created, you can work with it using most of the same commands you would use with a typical Java project. There are some differences. For example, when you invoke the New item in the context menu, the submenu does not show items for creating new Scala types. Instead, you have invoke the Other… menu item and work through a dialog. This will be changed in a future release.
Despite some minor issues like this, the NetBeans Scala plugin is mature enough for regular use.
Text Editors
The sbaz
tool manages the scala-tool-support package that
includes Scala plugins for several editors, including Emacs, Vim,
TextMate and others. Like sbaz, the
scala-tool-support package is also included with the
language installation. See the directories in
scala-home/misc/scala-tool-support
for the supported editors. Most of the editor-specific directories contain instructions
for installing the plugin. In other cases, consult your editor’s
instructions for installing third-party plugins.
Some of the packages are fairly immature. If you want to contribute to the Scala community, please consider improving the quality of the existing plugins or contributing new plugins.
Note
At the time of this writing, there are several variations of a
Scala “bundle” for the TextMate editor, which is a popular text editor
for Mac OS X. These bundles are currently being managed by Paul
Phillips on the GitHub
website. Hopefully, the best features of each bundle will be
unified into an “authoritative” bundle and integrated back into the
scala-tool-support package.
Test-Driven Development in Scala
One of the most important developer practices introduced in the last decade is Test-Driven Development (TDD). The Scala community has created several tools to support TDD.
If you work in a “pure” Java shop, consider introducing one or more of these Scala testing tools to test-drive your Java code. This approach is a low-risk way to introduce Scala to your environment, so you can gain experience with it before making the commitment to Scala as your production code language. In particular, you might experiment with ScalaTest (see next), which can be used with JUnit ([JUnit]) and TestNG ([TestNG]). You might also consider ScalaCheck or Reductio (see ScalaCheck), which offer innovations that may not be available in Java testing frameworks. All of the tools we describe here integrate with Java testing and build tools, like JUnit, TestNG, various mocking libraries, Ant ([Ant]), and Maven ([Maven]). All of them also offer convenient Scala DSLs for testing.
ScalaTest
Scala’s version of the venerable XUnit tool is ScalaTest, available at http://www.artima.com/scalatest/.
You can drive your tests
using the built-in Runner or use the provided
integration with JUnit or TestNG. ScalaTest also comes with an Ant task
and it works with the ScalaCheck testing tool (described later).
Besides supporting the traditional XUnit-style syntax with test methods and assertions, ScalaTest provides a Behavior-Driven Development ([BDD]) syntax that is becoming increasingly popular. The ScalaTest website provides examples for these and other options.
Here is an example
ScalaTest test for the simple Complex class we used
in The scalap, javap, and jad Command-Line Tools:
// code-examples/ToolsLibs/complex-test.scalaimportorg.scalatest.FunSuiteclassComplexSuiteextendsFunSuite{valc1 =Complex(1.2,3.4)valc2 =Complex(5.6,7.8) test("addition with (0, 0)") { assert(c1 +Complex(0.0,0.0) === c1) } test("subtraction with (0, 0)") { assert(c1 -Complex(0.0,0.0) === c1) } test("addition") { assert((c1 + c2).real === (c1.real + c2.real)) assert((c1 + c2).imaginary === (c1.imaginary + c2.imaginary)) } test("subtraction") { assert((c1 - c2).real === (c1.real - c2.real)) assert((c1 - c2).imaginary === (c1.imaginary - c2.imaginary)) } }
This particular example
uses the “function value” syntax for each test that is provided by the
FunSuite parent trait. Each call to
test receives as arguments a descriptive string and a
function literal with the actual test code.
The following commands compile complex.scala and complex-test.scala, putting the class files in a build directory, and then run the tests. Note that we assume that scalatest-0.9.5.jar (the latest release at the time of this writing) is in the ../lib directory. The downloadable distribution of the code examples is organized this way:
scalac -classpath ../lib/scalatest-0.9.5.jar -d build complex.scala complex-test.scala
scala -classpath build:../lib/scalatest-0.9.5.jar org.scalatest.tools.Runner
  -p build -o -s ComplexSuite
(We used a to continue the long command on a
second line.) The output is the following:
Run starting. Expected test count is: 4
Suite Starting - ComplexSuite: The execute method of a nested suite is
   about to be invoked.
Test Starting - ComplexSuite: addition with (0, 0)
Test Succeeded - ComplexSuite: addition with (0, 0)
Test Starting - ComplexSuite: subtraction with (0, 0)
Test Succeeded - ComplexSuite: subtraction with (0, 0)
Test Starting - ComplexSuite: addition
Test Succeeded - ComplexSuite: addition
Test Starting - ComplexSuite: subtraction
Test Succeeded - ComplexSuite: subtraction
Suite Completed - ComplexSuite: The execute method of a nested suite
  returned normally.
Run completed. Total number of tests run was: 4
All tests passed.
Specs
The Specs library ([ScalaSpecsTool]) is a Behavior-Driven Development ([BDD]) testing tool for Scala. It is inspired by Ruby’s RSpec ([RSpec]). In a nutshell, the goal of BDD is to recast traditional test syntax into a form that better emphasizes the role of TDD as a process that drives design, which in turn should implement the requirements “specification.” The syntax of traditional TDD tools, like the XUnit frameworks, tend to emphasize the testing role of TDD. With the syntax realigned, it is believed that the developer will be more likely to stay focused on the primary role of TDD: driving application design.
You can also find documentation on Specs at [ScalaTools].
We have already used
Specs in several examples in the book, e.g.,
ButtonObserverSpec in Traits As Mixins. Here is another example for the simple
Complex class we showed
previously:
// code-examples/ToolsLibs/complex-spec.scalaimportorg.specs._objectComplexSpecextendsSpecification{"Complex addition with (0.0, 0.0)"should {"return a number N' that is identical to original number N"in {valc1 =Complex(1.2,3.4) (c1 +Complex(0.0,0.0)) mustEqual c1 } }"Complex subtraction with (0.0, 0.0)"should {"return a number N' that is identical to original number N"in {valc1 =Complex(1.2,3.4) (c1 -Complex(0.0,0.0)) mustEqual c1 } }"Complex addition"should {"""return a new number wherethe real and imaginary parts are the sums of theinput values' real and imaginary parts, respectively."""in {valc1 =Complex(1.2,3.4)valc2 =Complex(5.6,7.8) (c1 + c2).real mustEqual (c1.real + c2.real) (c1 + c2).imaginary mustEqual (c1.imaginary + c2.imaginary) } }"Complex subtraction"should {"""return a new number wherethe real and imaginary parts are the differences of theinput values' real and imaginary parts, respectively."""in {valc1 =Complex(1.2,3.4)valc2 =Complex(5.6,7.8) (c1 - c2).real mustEqual (c1.real - c2.real) (c1 - c2).imaginary mustEqual (c1.imaginary - c2.imaginary) } } }
An object
that extends Specification is the analog of a test
suite. The next level of grouping, e.g., the clause "Complex
addition with (0.0, 0.0)" should {...}, encapsulates the
information at the level of the type being tested, or perhaps a
“cluster” of behaviors that go together for the type.
The next level clause,
e.g., the clause "return a number N' that is identical to
original number N" in {...}, is called an “example” in BDD
terminology. It is analogous to a single test. Like typical XUnit
frameworks, the testing is done using “representative examples,” rather
than by doing an exhaustive exploration of the entire “space” of
possible states. Hence, the term “example.” (However, see the discussion
of ScalaCheck next.)
Statements like (c1
+ Complex(0.0, 0.0)) mustEqual c1 are called “expectations.”
They do the actual verifications that conditions are satisfied. Hence,
expectations are analogous to assertions in XUnit tools.
There are several ways to run your specs. After compiling complex-spec.scala earlier, we can run the specs as follows:
scala -classpath ../lib/specs-1.4.3.jar:build ComplexSpec
Here, as before, we assume the Specs JAR is in the ../lib directory and we assume the compiled class files are in the build directory. We get the following output:
Specification "ComplexSpec"
  Complex addition with (0.0, 0.0) should
  + return a number N' that is identical to original number N

  Total for SUT "Complex addition with (0.0, 0.0)":
  Finished in 0 second, 0 ms
  1 example, 1 expectation, 0 failure, 0 error

  Complex subtraction with (0.0, 0.0) should
  + return a number N' that is identical to original number N

  Total for SUT "Complex subtraction with (0.0, 0.0)":
  Finished in 0 second, 0 ms
  1 example, 1 expectation, 0 failure, 0 error

  Complex addition should
  + return a new number where
        the real and imaginary parts are the sums of the
        input values real and imaginary parts, respectively.

  Total for SUT "Complex addition":
  Finished in 0 second, 0 ms
  1 example, 2 expectations, 0 failure, 0 error

  Complex subtraction should
  + return a new number where
        the real and imaginary parts are the differences of the
        input values real and imaginary parts, respectively.

  Total for SUT "Complex subtraction":
  Finished in 0 second, 0 ms
  1 example, 2 expectations, 0 failure, 0 error

Total for specification "ComplexSpec":
Finished in 0 second, 37 ms
4 examples, 6 expectations, 0 failure, 0 error
Note that the strings in the specification are written in a form that reads somewhat like a requirements specification:
...
Complex addition with (0.0, 0.0) should
+ return a number N' that is identical to original number N
...
There are many ways to run specifications, including using an Ant task or using the built-in integration with ScalaTest or JUnit. JUnit is the best approach for running specifications in some IDEs. These and other options are described in the User’s Guide at http://code.google.com/p/specs/wiki/RunningSpecs.
ScalaCheck
ScalaCheck ([ScalaCheckTool] is a Scala port of the innovative Haskell QuickCheck ([QuickCheck]) tool that supports Automated Specification-Based Testing, sometimes called type-based “property” testing in the Haskell literature (e.g., [O’Sullivan2009]).
ScalaCheck can be
installed using sbaz, i.e., sbaz install
scalacheck.
Using ScalaCheck (or QuickCheck for Haskell), conditions for a type are specified that should be true for any instances of the type. The tool tries the conditions using automatically generated instances of the type and verifies that the conditions are satisfied.
Here is a ScalaCheck test
for Complex:
// code-examples/ToolsLibs/complex-check-script.scalaimportorg.scalacheck._importorg.scalacheck.Prop._deftoD(i:Int) = i *.1implicitdefarbitraryComplex:Arbitrary[Complex]=Arbitrary{ Gen.sized {s=>for{ r<-Gen.choose(-toD(s), toD(s)) i<-Gen.choose(-toD(s), toD(s)) }yieldComplex(r, i) } }objectComplexSpecificationextendsProperties("Complex") {defadditionTest(a:Complex, b:Complex) = (a + b).real.equals(a.real + b.real) && (a + b).imaginary.equals(a.imaginary + b.imaginary)defsubtractionTest(a:Complex, b:Complex) = (a - b).real.equals(a.real - b.real) && (a - b).imaginary.equals(a.imaginary - b.imaginary)valzero =Complex(0.0,0.0) specify("addition with (0,0)", (a:Complex)=>additionTest(a, zero)) specify("subtraction with (0,0)", (a:Complex)=>subtractionTest(a, zero)) specify("addition", (a:Complex, b:Complex)=>additionTest(a,b)) specify("subtraction", (a:Complex, b:Complex)=>subtractionTest(a,b)) } ComplexSpecification.check
The toD
function just converts an Int to a
Double by dividing by 0.1. It’s
useful to convert an Int index provided by ScalaCheck
into Double values that we will use to construct
Complex instances.
We also need an implicit
conversion visible in the scope of the test that generates new Complex values. The
arbitraryComplex function
provides this generator. An Arbitrary[Complex] object (part of the
ScalaCheck API) is returned by this method. ScalaCheck invokes another API method,
Gen[Complex].sized. We provide a function
literal that assigns a passed-in Int value
to a variable s. We then use a for
comprehension to return Complex numbers with real and
imaginary parts that range from -toD(s) to
toD(s) (i.e., -(s * .1) to
(s * .1)). Fortunately, you don’t have to define
implicit conversions or generators for most of the commonly used Scala
and Java types.
The most interesting part
is the definition and use of ComplexSpecification.
This object defines a few helper methods,
additionTest and subtractionTest,
that each return true if the conditions they define
are true. For additionTest, if a new
Complex number is the sum of two other
Complex numbers, then its real
part must equal the sum of the real parts of the two
original numbers. Likewise, a similar condition must hold for the
imaginary part of the numbers. For
subtractionTest, the same conditions must hold with
subtraction substituted for addition.
Next, two
specify clauses assert that the addition and
subtraction conditions should hold for any Complex
number when Complex(0.0, 0.0) is added to it or
subtracted from it, respectively. Two more specify
classes assert that the conditions should also hold for any pair of
Complex numbers.
Finally, when
ComplexSpecification.check is called, test runs are
made with different values of Complex numbers,
verifying that the properties specified are valid for each combination
of numbers passed to the helper methods.
We can run the check
using the following command (once again assuming that Complex is already compiled into the
build directory):
scala -classpath ../lib/scalacheck.jar:build complex-check-script.scala
It produces the following output:
+ Complex.addition with (0,0): OK, passed 100 tests.
+ Complex.addition: OK, passed 100 tests.
+ Complex.subtraction with (0,0): OK, passed 100 tests.
+ Complex.subtraction: OK, passed 100 tests.
Note that ScalaCheck tried
each specify case with 100 different inputs.
It’s important to
understand the value that ScalaCheck delivers. Rather than going through
the process of writing enough “example” test cases with representative
data, which is tedious and error-prone, we define reusable “generators,”
like the arbitraryComplex function, to produce an
appropriate range of instances of the type under test. Then we write
property specifications that should hold for any instances. ScalaCheck
does the work of testing the properties against a random sample of the
instances produced by the generators.
You can find more examples of ScalaCheck usage in the online code examples. Some of the types used in the payroll example in Internal DSLs were tested with ScalaCheck. These tests were not shown in Internal DSLs.
Finally, note that there is another port of QuickCheck called Reductio. It is part of the Functional Java project ([FunctionalJava]). Reductio is less widely used than ScalaCheck, but it offers a “native” Java API as well as a Scala API, so it would be more convenient for “pure” Java teams.
Other Notable Scala Libraries and Tools
While Scala benefits from the rich legacy of Java and .NET libraries, there is a growing collection of libraries written specifically for Scala. Here we discuss some of the more notable ones.
Lift
Lift is the leading web application framework written in Scala. It recently reached “1.0” status. Lift has been used for a number of commercial websites. You can also find documentation on the Lift website.
Scalaz
Scalaz is a
library that fills in gaps in the standard library. Among its features
are enhancements to several core Scala types, such as Boolean, Unit,
String, and Option, plus support
for functional control abstractions, such as
FoldLeft, FoldRight, and
Monad, that expand upon what is available in the
standard library.
Scalax
Scalax is another third-party library effort to supplement the Scala core library.
MetaScala
MetaScala is an experimental metaprogramming library for Scala. Metaprogramming features tend to be weaker in statically typed languages than in dynamically typed languages. Also, the JVM and .NET CLR impose their own constraints on metaprogramming.
Many of the features of Scala obviate the need for metaprogramming, compared to languages like Ruby, but sometimes metaprogramming is still useful. MetaScala attempts to address those needs more fully than Scala’s built-in reflection support.
JavaRebel
JavaRebel is a commercial tool that permits dynamic reloading of classes in a running JVM (written in any language), beyond the limited support provided natively by the “HotSwap” feature of the JVM. JavaRebel is designed to offer the developer faster turnaround for changes, providing an experience more like the rapid turnaround that users of dynamic languages enjoy. JavaRebel can be used with Scala code as well.
Miscellaneous Smaller Libraries
Finally, Table 14-5 is a list of several Scala-specific libraries you might find useful for your applications.
| Name | Description and URL |
Kestrel | A tiny, very fast queue system (http://github.com/robey/kestrel/tree/master). |
ScalaModules | Scala DSL to ease OSGi development (http://code.google.com/p/scalamodules/). |
Configgy | Managing configuration files and logging for “daemons” written in Scala (http://www.lag.net/configgy/). |
scouchdb | Scala interface to CouchDB (http://code.google.com/p/scouchdb/). |
Akka | A project to implement a platform for building fault-tolerant, distributed applications based on REST, Actors, etc. (http://akkasource.org/). |
scala-query | A type-safe database query API for Scala (http://github.com/szeiger/scala-query/tree/master). |
We’ll discuss using Scala with several well-known Java libraries after we discuss Java interoperability, next.
Java Interoperability
Of all the alternative JVM languages, Scala’s interoperability with Java source code is among the most seamless. This section begins with a discussion of interoperability with code written in Java. Once you understand the details, they can be generalized to address interoperability with other JVM languages, such as JRuby or Groovy. For example, if you already know how to use JRuby and Java together, and you know how to use Java and Scala together, then you can generalize to using JRuby and Scala together.
Because Scala syntax is primarily a superset of Java syntax, invoking Java code from Scala is usually straightforward. Going the other direction requires that you understand how some Scala features are encoded in ways that satisfy the JVM specification. We discuss several of the interoperability issues here. [Spiewak2009a] and [Odersky2008] provide additional information.
Java and Scala Generics
We have seen many
examples of Scala code that uses Java types, such as
java.lang.String and various java collection classes.
Instantiating Java generic types is straightforward in Scala (since
Scala version 2.7.0). Consider the following very simple Java generic
class, JStack:
// code-examples/ToolsLibs/JStack.javaimportjava.util.*;publicclassJStack<T> {privateList<T> stack =newArrayList<T>();publicvoidpush(T t) { stack.add(t); }publicT pop() {returnstack.remove(stack.size() -1); } }
We can instantiate it from Scala, specifying the type parameter, as shown in Example 14-1.
// code-examples/ToolsLibs/JStack-spec.scalaimportorg.specs._objectJStackSpecextendsSpecification{"Calling a Java generic type from Scala"should {"Support parameterization"in {valjs =newJStack[String]js must notBe(null)// Dummy check...}"Support invoking the the type's methods"in {valjs =newJStack[String]js.push("one") js.push("two") js.pop() mustEqual"two"js.pop() mustEqual"one"} } }
Since Scala version 2.7.2, you can also use Scala generics from Java. Consider the following JUnit 4 test, which shows some of the idiosyncrasies you might encounter:
// code-examples/ToolsLibs/SMapTest.javaimportorg.junit.*;import staticorg.junit.Assert.*;importscala.*;importscala.collection.mutable.LinkedHashMap;publicclassSMapTest {staticclassName {publicString firstName;publicString lastName;publicName(String firstName, String lastName) {this.firstName = firstName;this.lastName = lastName; } } LinkedHashMap<Integer, Name> map;@Beforepublicvoidsetup() { map =newLinkedHashMap<Integer, Name>(); map.update(1,newName("Dean","Wampler")); map.update(2,newName("Alex","Payne")); }@TestpublicvoidusingMapGetWithWarnings() { assertEquals(2, map.size()); Option<Name> n1 = map.get(1);// warningOption<Name> n2 = map.get(2);// warningassertTrue(n1.isDefined()); assertTrue(n2.isDefined()); assertEquals("Dean", n1.get().firstName); assertEquals("Alex", n2.get().firstName); }@TestpublicvoidusingMapGetWithoutWarnings() { assertEquals(2, map.size()); Option<?> n1 = map.get(1); Option<?> n2 = map.get(2); assertTrue(n1.isDefined()); assertTrue(n2.isDefined()); assertEquals("Dean", ((Name) n1.get()).firstName); assertEquals("Alex", ((Name) n2.get()).firstName); } }
On Unix-like systems, it is compiled with the following command line:
javac -Xlint:unchecked
  -cp $SCALA_HOME/lib/scala-library.jar:$JUNIT_HOME/junit-4.4.jar SMapTest.java
(Again, we wrapped the long line with .)
SCALA_HOME and JUNIT_HOME are
the installation directories of Scala and JUnit, respectively.
The
SMapTest class defines a nested
Name class that is used as the “value” type in a
scala.collection.mutable.LinkedHashMap. For
simplicity, Name has public
firstName and lastName fields and
a constructor.
The
setup method creates a new
LinkedHashMap<Integer,Name> and inserts two
key-value pairs. The two tests,
usingMapGetWithWarnings and
usingMapGetWithoutWarnings, exercise the Java-Scala
interoperability the same way. However, the first test has two
compile-time warnings, indicated by the // warning
comments, while the second test compiles without warnings:
SMapTest.java:29: warning: [unchecked] unchecked conversion
found   : scala.Option
required: scala.Option<SMapTest.Name>
    Option<Name> n1 = map.get(1);  // warning
                             ^
SMapTest.java:30: warning: [unchecked] unchecked conversion
found   : scala.Option
required: scala.Option<SMapTest.Name>
    Option<Name> n2 = map.get(2);  // warning
                             ^
2 warnings
The warnings occur
because of type erasure. In the compiled Scala library, the return type
of Map.get is Option with no type
parameter, or effectively Option<Object>. So we
get warnings for the conversion to
Option<Name>.
The second test,
usingMapGetWithoutWarnings, has no warnings, because
we assign the values returned by Map.get to
Option<?> and then do an explicit cast to
Name when we call Option.get in
the final two assertions.
Using Scala Functions in Java
Continuing with our
previous SMapTest example, we can explore invoking
Scala code from Java where Scala functions are required:
// code-examples/ToolsLibs/SMapTestWithFunctions.javaimportorg.junit.*;import staticorg.junit.Assert.*;importscala.*;importscala.collection.mutable.LinkedHashMap;import staticscala.collection.Map.Projection;publicclassSMapTestWithFunctions {staticclassName {publicString firstName;publicString lastName;publicName(String firstName, String lastName) {this.firstName = firstName;this.lastName = lastName; }publicstaticName emptyName =newName("","");publicstaticFunction0<Name> empty =newFunction0<Name>() {publicName apply() {returnemptyName; }publicint$tag() {return0; } }; } LinkedHashMap<Integer, Name> map;@Beforepublicvoidsetup() { map =newLinkedHashMap<Integer, Name>(); map.update(1,newName("Dean","Wampler")); map.update(2,newName("Alex","Payne")); }@TestpublicvoidusingMapGetOrElse() { assertEquals(2, map.size()); assertEquals("Dean", ((Name) map.getOrElse(1, Name.empty)).firstName); assertEquals("Alex", ((Name) map.getOrElse(2, Name.empty)).firstName); } Function1<Integer, Boolean> filter =newFunction1<Integer, Boolean>() {publicBoolean apply(Integer i) {returni.intValue() <=1; }public<A> Function1<A,Boolean> compose(Function1<A,Integer> g) {returnFunction1$class.compose(this, g); }public<A> Function1<Integer,A> andThen(Function1<Boolean,A> g) {returnFunction1$class.andThen(this, g); }publicint$tag() {return0; } };@TestpublicvoidusingFilterKeys() { assertEquals(2, map.size()); Projection<Integer, Name> filteredMap = (Projection<Integer, Name>) map.filterKeys(filter); assertEquals(1, filteredMap.size()); assertEquals("Dean", filteredMap.getOrElse(1, Name.empty).firstName); assertEquals("", filteredMap.getOrElse(2, Name.empty).firstName); } }
The
SMapTestWithFunctions class has its own
Name class that adds a static
emptyName object and a static
scala.Function0 object empty,
which defines apply to return emptyName. Note that it is also necessary
to define the $tag method that was discussed
previously in The scalap, javap, and jad Command-Line Tools.
The
empty function object is needed when we use
Map.getOrElse in the test method,
usingMapGetOrElse. The signature of
getOrElse is the following:
defgetOrElse[B2 >: B](key :A, default :=> B2) :B2
Where A
is the key type parameter, B is the value type
parameter, and B2 is a supertype of
B or the same as B. The second
default argument is a by-name
parameter, which we discussed in Chapter 8. Note that by-name parameters are
implemented as scala.Function0 objects. So, we can’t
simply pass in the static object emptyName.
The second test,
usingFilterKeys, requires a
Function1 object, which has an
apply method that takes one argument. We use this
Function1 object as a filter passed to
Map.filterKeys.
We define the
filter before the test. The Java code here is
considerably more involved than the equivalent Scala code would be! Not
only do we have to define the apply and
$tag methods, we must also define methods used for
function composition, compose and
andThen. Fortunately, we can delegate to objects that
are already in the Scala library, as shown. Note that other
FunctionN types, for N equals 2 to
22, have other methods that would have to be implemented using similar
“boilerplate.” For example, these types each have a
curry method.
Finally, recall that in
Companion Objects and Java Static Methods, we discussed
that methods defined in companion objects are not visible as
static methods to Java code. For example,
main methods defined in companion objects can’t be
used to run the application. Instead, you should define such methods in
singleton objects.
So, using Scala function
objects from Java can be challenging. If you find it necessary to use
them frequently, you could define Java utility classes that handle the
boilerplate for all the methods except apply.
JavaBean Properties
We saw in Chapter 5 that Scala does not follow the JavaBeans ([JavaBeansSpec]) conventions for field reader and writer methods, for reasons described in When Accessor Methods and Fields Are Indistinguishable: The Uniform Access Principle. However, there are times when you need JavaBeans accessor methods. For example, you need them when you want your Scala instances to be configurable by a dependency injection mechanism, like the one provided by the Spring Framework ([SpringFramework]). You may also need JavaBeans accessor methods for some IDEs that do bean “introspection.”
Scala solves this problem
with an annotation that you can apply to a field,
@scala.reflect.BeanProperty, which tells the compiler
to generate JavaBeans-style getter
and setter methods. We introduced this annotation in Annotations.
Recall the
Complex class we saw previously. Now we add the
annotation to each constructor argument, which is a field in the
case class:
// code-examples/ToolsLibs/complex-javabean.scalacaseclassComplexBean( @scala.reflect.BeanPropertyreal:Double, @scala.reflect.BeanPropertyimaginary:Double) {def+(that:ComplexBean) =newComplexBean(real + that.real, imaginary + that.imaginary)def-(that:ComplexBean) =newComplexBean(real - that.real, imaginary - that.imaginary) }
If you compile this class,
then decompile it with javap -classpath ...
ComplexBean, you get the following output:
publicclassComplexBeanextendsjava.lang.Objectimplementsscala.ScalaObject,scala.Product,java.io.Serializable{publicComplexBean(double,double);publicjava.lang.Object productElement(int);publicintproductArity();publicjava.lang.String productPrefix();publicbooleanequals(java.lang.Object);publicjava.lang.String toString();publicinthashCode();publicint$tag();publicComplexBean $minus(ComplexBean);publicComplexBean $plus(ComplexBean);publicdoubleimaginary();publicdoublereal();publicdoublegetImaginary();publicdoublegetReal(); }
Now compare this output with the result of decompiling the original Complex.class file:
publicclassComplexextendsjava.lang.Objectimplementsscala.ScalaObject,scala.Product,java.io.Serializable{publicComplex(double,double);publicjava.lang.Object productElement(int);publicintproductArity();publicjava.lang.String productPrefix();publicbooleanequals(java.lang.Object);publicjava.lang.String toString();publicinthashCode();publicint$tag();publicComplex $minus(Complex);publicComplex $plus(Complex);publicdoubleimaginary();publicdoublereal(); }
The order of the methods
shown may be different when you run javap on these
files. We reordered them so the two listings would match as closely as
possible. Note that the only differences are the names of the classes
and the presence of getImaginary and
getReal methods in the ComplexBean
case. We would also have corresponding setter methods if the
real and imaginary fields were
declared as vars instead of
vals.
AnyVal Types and Java Primitives
Notice also in the
previous Complex example that the
Doubles were converted to Java primitive
doubles. All the AnyVal types are
converted to their corresponding Java primitives. We showed the mapping
in Table 7-3. In particular, note that
Unit is mapped to void.
Scala Names in Java Code
As we discussed in Chapter 3, Scala allows more flexible
identifiers, e.g., operator characters like
*, <, etc. These characters are
encoded (or “mangled,” if you prefer) to satisfy the tighter constraints
of the JVM specification. They are translated as shown in Table 14-6 (adapted from [Spiewak2009a]).
| Operator | Encoding |
|
|
|
|
|
|
|
|
|
|
|
|
|
|
| |
|
|
|
|
|
|
|
|
|
|
|
|
|
|
|
|
|
|
|
|
You can see this at work
in the following contrived trait, where each character is used to
declare an abstract method that takes no arguments and returns
Unit:
// code-examples/ToolsLibs/all-op-chars.scalatrait AllOpChars { def == : Unit// $eq$eqdef > : Unit// $greaterdef < : Unit// $lessdef + : Unit// $plusdef - : Unit// $minusdef * : Unit// $timesdef / : Unit// $divdef: Unit// $bslashdef | : Unit// $bardef ! : Unit// $bangdef ? : Unit// $qmarkdef:: : Unit// $colon$colondef % : Unit// $percentdef ^ : Unit// $updef & : Unit// $ampdef@@: Unit// $at$atdef##: Unit// $hash$hashdef ~ : Unit// $tilde}
Note that we doubled up
some of the characters to get them to compile as method names, where
using single characters would have been ambiguous. Compiling this file
and decompiling the resulting class file with javap
AllOpChars yields the following Java interface. (We have
rearranged the output order of the methods to match the order in the
original Scala file.)
Compiledfrom"all-op-chars.scala"public interfaceAllOpChars{ publicabstractvoid $eq$eq(); publicabstractvoid $greater(); publicabstractvoid $less(); publicabstractvoid $plus(); publicabstractvoid $minus(); publicabstractvoid $times(); publicabstractvoid $div(); publicabstractvoid $bslash(); publicabstractvoid $bar(); publicabstractvoid $bang(); publicabstractvoid $qmark(); publicabstractvoid $colon$colon(); publicabstractvoid $percent(); publicabstractvoid $up(); publicabstractvoid $amp(); publicabstractvoid $at$at(); publicabstractvoid $hash$hash(); publicabstractvoid $tilde(); }
To conclude,
interoperability between Java and Scala works very well, but there are a
few things you must remember when invoking Scala code from Java. If
you’re uncertain about how a Scala identifier is encoded or a Scala
method is translated to valid byte code, use javap to
find out.
Java Library Interoperability
This section specifically considers interoperability with several important Java frameworks: AspectJ, the Spring Framework, Terracotta, and Hadoop. Because they are widely used in “enterprise” and Internet Java applications, successful interoperability with Scala is important.
AspectJ
AspectJ ([AspectJ]) is an extension of Java that supports aspect-oriented programming (AOP), also known as aspect-oriented software development ([AOSD]). The goal of AOP is to enable systemic changes of the same kind across many modules, while avoiding copying and pasting the same code over and over into each location. Avoiding this duplication not only improves productivity, it greatly reduces bugs.
For example, if you want all field changes to all “domain model” objects to be persisted automatically after the changes occur, you can write an aspect that observes those changes and triggers a persistence write after each change.
AspectJ supports AOP by providing a pointcut language for specifying in a declarative way all the “execution points” in a program for which a particular behavior modification (called advice) is required. In AspectJ parlance, each execution point is called a join point, and a particular query over join points is a pointcut. Hence the pointcut language is a query language, of sorts. For a given pointcut, AspectJ incorporates the desired behavior modifications into each join point. Manual insertion of these changes is not required. An aspect encapsulates pointcuts and advices, much the way a class encapsulates member fields and methods.
For a detailed introduction to AspectJ with many practical examples, refer to [Laddad2009].
There are two issues that must be considered when using AspectJ with Scala. The first issue is how to reference Scala execution points using AspectJ’s pointcut language, e.g., Scala types and methods. The second issue is how to invoke Scala code as advice.
Let’s look at an aspect
that logs method calls to the Complex class we used
previously in this chapter. We’ll add a package declaration this time to
provide some scope:
// code-examples/ToolsLibs/aspectj/complex.scalapackageexample.aspectjcaseclassComplex(real:Double, imaginary:Double) {def+(that:Complex) =newComplex(real + that.real, imaginary + that.imaginary)def-(that:Complex) =newComplex(real - that.real, imaginary - that.imaginary) }
Here is an
object that uses Complex:
// code-examples/ToolsLibs/aspectj/complex-main.scalapackageexample.aspectjobjectComplexMain{defmain(args:Array[String]) {valc1 =Complex(1.0,2.0)valc2 =Complex(3.0,4.0)valc12 = c1 + c2 println(c12) } }
Next, here is an AspectJ
aspect that defines one pointcut for the creation
of Complex instances and another pointcut for
invocations of the + method:
// code-examples/ToolsLibs/aspectj/LogComplex.ajpackageexample.aspectj; public aspectLogComplex{ public pointcut newInstances(double real, double imag): execution(Complex.new(..)) && args(real, imag); public pointcut plusInvocations(Complexself,Complexother): execution(ComplexComplex.$plus(Complex)) &&this(self) && args(other); before(double real, double imag):newInstances(real, imag) { System.out.println("new Complex("+ real +","+ imag +") called."); } before(Complexself,Complexother):plusInvocations(self, other) { System.out.println("Calling "+ self +".+("+ other +")"); } after(Complexself,Complexother) returning(Complexc): plusInvocations(self, other) { System.out.println("Complex.+ returned "+ c); } }
We won’t explain all the details of AspectJ syntax here. See the AspectJ document at [AspectJ] and [Laddad2009] for those details. We’ll limit ourselves to a “conceptual” overview of this aspect.
The first
pointcut, newInstances, matches on
executions of the constructor calls, using the syntax
Complex.new to refer to the constructor. We expect
double arguments to the constructor call. As we saw
previously, scala.Double occurrences are converted to
Java primitive doubles when generating byte code. The
args clause “binds” the values of the arguments
passed in, so we can refer to them in
advice.
The second
pointcut, plusInvocations, matches
on “executions” of the + method, which is actually
$plus in the byte code. The self
and other parameters are bound to the object on which
the + method is invoked (using the
this clause) and the argument to it (using the
args clause), respectively.
The first
before advice is executed for the
newInstances pointcut, that is, before we actually
enter the constructor. We “log” the call, displaying the actual real and
imaginary values passed in.
The next
before advice is executed for the
plusInvocations pointcut, that is, before the
+ method is executed. We log the value of
self (i.e., this instance) and the
other number.
Finally, an after
returning advice is also executed for the
plusInvocations pointcut, that is, after the
+ method returns. We capture the return value in the
variable c and we log it.
If you have AspectJ
installed in an aspectj-home directory, you
can compile this file as follows:
ajc -classpath .:aspectj-home/lib/aspectjrt.jar:../lib/scala-library.jar
  aspectj/LogComplex.aj
This is one line; we used
the to indicate a line wrap. To run this code with
the LogComplex aspect, we use load-time
weaving. We’ll invoke Java with an
agent that “weaves” the advice from
LogComplex into Complex. To use
load-time weaving, we also need the following configuration file,
META-INF/aop.xml:
<!-- code-examples/ToolsLibs/META-INF/aop.xml --><aspectj><aspects><aspectname="example.aspectj.LogComplex"/><includewithin="example.aspectj.*"/></aspects><weaveroptions="-verbose"><dumpwithin="example.aspectj.*"beforeandafter="true"><includewithin="example.aspectj.*"/></dump></weaver></aspectj>
(The META-INF directory should be on the
class path; we’ll assume it’s in the current working directory.) This
file tells the weaver which aspects to use (the
aspect tag) and which classes to target for weaving
(the include tag), and it also enables verbose
output, which is useful for debugging purposes. Finally, we can run the
application with the following command:
java -classpath .:aspectj-home/lib/aspectjrt.jar:../lib/scala-library.jar
  -javaagent:aspectj-home/lib/aspectjweaver.jar example.aspectj.ComplexMain
You get several lines of messages logging the weaving process. The output ends with these lines:
new Complex(1.0,2.0) called.
new Complex(3.0,4.0) called.
Calling Complex(1.0,2.0).+(Complex(3.0,4.0))
new Complex(4.0,6.0) called.
Complex.+ returned Complex(4.0,6.0)
Complex(4.0,6.0)
All but the last line
were output by LogComplex. We added this additional
behavior without manually inserting these statements in
Complex itself!
Recall we said that the
second issue you might encounter when using AspectJ is how to invoke
Scala code from advice. In our
LogComplex aspect, the statements inside our
different before and after advices
are really just Java code. Therefore, we can just as easily invoke Scala
code, applying the same lessons we have already learned for invoking
Scala from Java.
Scala traits almost replace aspects. We saw in Chapters 4 and 13 how you can construct traits that modify the behavior of other traits, then mix the behaviors together when you create new classes or instances. This powerful technique lets you implement a form of aspect advice. However, Scala doesn’t have a pointcut language, like AspectJ. When you need to affect a set of join points that don’t share a common supertype, you’ll need the capabilities of AspectJ. However, if you find yourself in that situation, you should consider if you can refactor your code to extract a common trait that provides the “hooks” you need for advice implemented using traits.
The Spring Framework
The Spring Framework (see [SpringFramework]) is an open source, modular Java enterprise framework that provides a “pure” Java AOP API, integrated support for AspectJ, a dependency injection (DI) container, uniform and well-designed APIs for invoking a variety of other Java third-party APIs, and additional components for security, web development, etc.
Here we focus on dependency injection, as interoperability issues with the other parts of the Spring Framework boil down to either Java or AspectJ issues, which we covered earlier.
We discussed the concept of DI in Dependency Injection in Scala: The Cake Pattern, where we showed elegant patterns for injecting dependencies using Scala itself. However, if you are in a mixed Java/Scala environment, it might be necessary to use a DI framework like the one provided by Spring to manage dependencies.
In Spring DI, dependencies
are specified using a combination of XML configuration files and
source-code annotations. The Spring API resolves these dependencies as
classes are instantiated. Spring expects these classes to follow
JavaBean conventions (see [JavaBeansSpec]). Well-designed classes
will only depend on abstractions, i.e., Java interfaces or Scala traits,
and the concrete instances satisfying those dependencies will be given
to the bean through constructor arguments or through JavaBean setter
methods. Hence, if you use Spring DI with Scala classes, you will need
to use the @scala.reflect.BeanProperty annotation
when you use setter injection. The annotation is not needed when you use
constructor injection.
Tip
Prefer constructor injection, when possible. Not only does this
choice eliminate the need to use the @BeanProperty
annotation, it leaves each instances in a known good state when the
construction process is finished.
However, if you inject
dependencies into Scala objects, you must use setter
injection, as you have no way to define constructor parameters and you
have no control over the construction process.
One other point; remember
that Spring will expect Java-compatible names, so you must use
encoded names for methods and
objects, as needed.
Here is an example that illustrates “wiring together” objects with Spring:
// code-examples/ToolsLibs/spring/object-bean.scalapackageexample.springcaseclassNamedObject(name:String)traitFactory{ @scala.reflect.BeanPropertyvarnameOfFactory ="unknown"defmake(name:String):AnyRef}objectNamedObjectFactoryextendsFactory{defmake(name:String) =NamedObject(name) }caseclassFactoryUsingBean(factory:Factory)
The case class
FactoryUsingBean is a simple type with a dependency
on a Factory abstraction that we want to inject using
constructor injection.
The trait
Factory defines the factory abstraction. It has a
make method to create instances of some kind. To
demonstrate setter injection on objects, we also give
it a nameOfFactory field. This will demonstrate
object dependency injection because the concrete
subtype we will actually use, NamedObjectFactory, is
an object.
Scala requires us to
initialize nameOfFactory with a value, but we will
use Spring to set the real value. We have to use the
@BeanProperty annotation to generate the
setNameOfFactory method Spring will expect to
find.
The concrete
make method in NamedObjectFactory
creates a new NamedObject. It is a simple case class
with a name field.
Note that none of these types depend on the Spring API. You can compile this file without any Spring JAR files.
Next, we define the dependency “wiring” using a standard Spring XML configuration file:
<!-- code-examples/ToolsLibs/spring/scala-spring.xml --><beansxmlns=""xmlns:xsi=""xsi:schemaLocation=""><beanid="factory"class="example.spring.NamedObjectFactory$"><propertyname="nameOfFactory"value="Factory for Named Objects"/></bean><beanid="factoryUsingBean"class="example.spring.FactoryUsingBean"><constructor-argref="factory"/></bean></beans>
We define two
beans. Our factory is given the ID
factory. The “class” is actually the
object NamedObjectFactory. Note
that we have to append a $ to the end of the name,
the actual name of the object in the byte
code.
The
property tag sets the value of
nameOfFactory. We can’t control instantiation of
objects, so we have to inject the correct dependency
after construction completes.
The second bean is our
simple FactoryUsingBean. Since this is a
class, we can use constructor injection. The
constructor tag specifies that the
factory bean is used to satisfy the dependency at
construction time.
Finally, here is a script that uses these types to demonstrate Spring DI with Scala:
// code-examples/ToolsLibs/spring/object-bean-script.scalaimportexample.spring._importorg.springframework.context.support._valcontext =newClassPathXmlApplicationContext("spring/scala-spring.xml");valbean = context.getBean("factoryUsingBean").asInstanceOf[FactoryUsingBean] println("Factory Name: "+ bean.factory.nameOfFactory)valobj = bean.factory.make("Dean Wampler") println("Object: "+ obj)
We create an instance of
ClassPathXmlApplicationContext, specifying our XML
file. This context object is our gateway to the DI container. We ask it
for our factoryUsingBean. We have to cast the
returned AnyRef (i.e., Java
Object) to the correct type. We print out the
factory’s name, to see if it is correct.
Next, we ask the bean’s
factory to make “something” with the string "Dean
Wampler". When we print the returned object, it should be a
NamedObject.
If you have Spring
installed in a spring-home directory, you can
run this script with the following command:
scala -cp
  spring-home/dist/spring.jar:spring-home/.../commons-logging.jar:.
  spring/object-bean-script.scala
(The current working directory “.” is needed in the classpath to find the XML file.) There are many lines of logging output. The last two lines are what we care about:
...
Factory Name: Factory for Named Objects
Object: NamedObject(Dean Wampler)
This example required a number of files and configuration details to get working. For a moderately large Java application, the effort is justified. However, Scala gives you new and simpler ways to implement dependency injection in Scala code without configuration files and a DI container.
Terracotta
Terracotta (see [Terracotta]) is an open source clustering product that distributes an application over several servers by clustering JVMs upon which the application executes. For efficiency, not all of the application’s heap objects are distributed. Instead, the programmer specifies which data structures to distribute through configuration files. A benefit of Terracotta is that the application does not require code changes to support this clustering (at least in principle; some limited customization can be useful for performance reasons). Instead, the byte code is instrumented to provide the clustering. Terracotta is an alternative to distributed caches that require code changes.
[Bonér2008a] provides a detailed
write-up of how to use Terracotta with Scala Actors. A Scala-specific
Terracotta Integration Module (TIM) must be installed. When configuring
which objects to distribute, you have to use the encoded names for
companion objects, method names, etc., as they exist at the byte code
level. We discussed these encodings in Scala Names in Java Code. Finally, you have to add some more
parameters to the java invocation command inside the
scala script. Otherwise, clustering Scala
applications with Terracotta works just like it does for Java applications.
Hadoop
MapReduce is a divide-and-conquer programming model for processing large data sets in parallel. In the “map” phase, a data set is divided into N subsets of approximately equal size, where N is chosen to optimize the amount of work that can be done in parallel. For example, N might be close to the total number of processor cores available. (A few cores might be left idle as “backups” or for doing other processing.) The desired computation is performed on each subset. The “reduce” phase combines the results of the subset calculations into a final result.
Note that mapping and reducing are essentially functional operations. Therefore, a functional language like Scala is ideally suited for writing MapReduce applications.
MapReduce frameworks provide tools for mapping and reducing data sets, managing all phases of the computation, including the processing nodes, restarting operations that fail for some reason, etc. The user of a MapReduce framework only has to write the algorithms for mapping (subdividing) the input data, the computations with the data subsets, and reducing the results. See [MapReduceTutorial] for a succinct overview and [MapReduce] for a description of Google’s MapReduce framework. The name of the Google framework has become a de facto standard for these frameworks.
Hadoop (see [Hadoop]) is an open
source MapReduce framework created and maintained by Yahoo!. There are
two Scala wrappers around the Hadoop API: SHadoop
(see [SHadoop])
and SMR (see [SMRa] and ([SMRb]). Both examples demonstrate the
great reduction in code size when using Scala. [SMRa] attributes this code reduction
to Scala’s support for higher-order and anonymous functions, its
sophisticated type system and type inference, and the ability of
for comprehensions to generate maps in an elegant and
succinct way.
Recap and What’s Next
This chapter filled in the details of the Scala command-line tools that you will use every day. We also surveyed the available support for Scala in various text editors and IDEs. We discussed a number of important libraries, such as testing APIs. Finally, we discussed interoperability between Scala and other JVM languages and libraries.
This completes our survey of the world of Scala programming. The next chapter is a list of references for further exploration, followed by a glossary of terms that we have used throughout the book.