
Chapter 2. ECM Stack: Content In
Now that we have established the key components to ECM, we can talk about the individual aspects of contributing content properly to SharePoint.
In this chapter, we will discuss many details about features and settings in SharePoint. In most cases, we will focus on settings and features specific to SharePoint 2013, with site templates of type “Document Center” and content based on the type Document.
Building a solid foundation
As we stated in the Introduction, everything that happens after the Capture stage has a downstream impact. Creating, storing, and sharing content is easy. However, organizing, managing, and processing content in a manner that is repeatable, findable, and structured takes planning and strategy. Occasionally, we refer to a proper ECM strategy as being like a marriage; it takes work. The rewards for this work are many, but like a marriage, it is a long-term commitment that will only be as successful as what you put into it. If you put little effort into the content that is captured and ultimately stored into your SharePoint ECM solution, you will get little out of it when you start searching for content. This is especially true as the volume of content grows.
The single biggest mistake that you can make when deploying SharePoint as an ECM solution is to underestimate the time required for planning. Every organization and project is unique, so we can’t give you an exact formula for determining timeline, resources, and budget. What we can do is give you some guidance for collecting the information you need for developing a plan. After you have a plan based on your organization’s needs, you can accurately determine the total budget and resources needed. Following is a list of primary activities that we recommend you complete to get prepared for planning how content will be captured into SharePoint:
Remember that we are only collecting information at this point. The information will be used to begin formulating your Information Architecture. It’s important to be realistic about how people use files and systems and why it can be difficult to get control and maintain structure. After all, people like the freedom to name, save, copy, and distribute files in a manner that makes logical sense to them. In an ECM solution, we must tame this natural human instinct by providing methods that support our Information Architecture without becoming cumbersome for the users. This can be accomplished and is generally not a technology problem. It tends to be more of a behavior problem based on bad habits.
In this chapter, we will outline the best practices and methods you can use to get value out of the content that is created, stored, and processed in SharePoint. We can’t guarantee that someone won’t try to circumvent your perfectly structured ECM stack, but we will outline very compelling examples that you can share with the user community to encourage them to comply with best practices for naming files and uploading documents and related content to SharePoint.
Capture
As we stated in Chapter 1, capture is the process of getting content into SharePoint content databases with the proper security location and structure, from an existing format such as image or electronic file, or from the minds of its creators, in the form of native SharePoint documents. It is equally important that content is named and tagged in a consistent manner.
File upload
Users can contribute documents to SharePoint by individually selecting them from a file system and storing them into a library. This is referred to as file upload and occurs when a person initiates the transfer of content from the local client machine or shared network drive to the SharePoint server(s). To do this, the user must first have read/write access to the library they want to contribute to.
As we outlined earlier, you need to do some planning and also education of people before content capture is initiated. This will ensure that you build a solid foundation prior to files being uploaded randomly by SharePoint users. We recommend that prior to upload you specify for your organization what constitutes a proper file. You should intentionally define a file in the following order:
Content
Version
File naming convention
Often, file naming conventions are more about what to exclude than include. For example, you should never put the initials of individuals, dates, times, or version numbers in a file name. This will seem counterintuitive to you and most people that are using only email and local and network file shares to store and share files. This is because a directory structure does not provide the same metadata and search functions that SharePoint provides. This is what makes Information Architecture so powerful. In general, the file name should pertain only to the topic matter, and perhaps include a business function that the content pertains to. It should not include metadata that is better suited for content types.
Note
Defining content type allows for predefined metadata attributes to be applied to a file. Defining and using content types is an essential component of Information Architecture.
When the user knows that a file is appropriate to add to SharePoint, they will browse to the library and use one of the following methods of upload:
Individual document
Multiple documents
From Explorer View
Dragging from source to destination
When uploading an individual document into SharePoint, a user will specify relevant metadata to be added by using an upload dialog, as shown in Figure 2-1. To upload the document, click the Add Document button at the bottom of a library in SharePoint 2010, or click the New Document button in the top-left section of a library in SharePoint 2013.

Browse the local file system, identify the file to be uploaded, and double-click the file. The next step is for the user to apply appropriate metadata. Fields marked with a red asterisk indicate mandatory fields. These fields will be defined as part of the Information Architecture. By default, the metadata fields for the Document content type are Name, Title, Created Date, Last Modified Date, Created By, and Last Modified By. Remember that Name and Title are the only user editable metadata fields. As we will discuss in Information Architecture, in many cases you will want to add more fields.
Note
Depending on the site template you use, the user might experience a different result. For example, using the site template “Team Site” in SharePoint 2013 will result in the ad hoc document upload with the default content type Document not prompting the user for any metadata. The examples in this section are based on the document template “Document Center.”
Both SharePoint 2010 and SharePoint 2013 support the ability to upload multiple files at once. This feature allows users to contribute batches of documents in SharePoint. The feature can be beneficial when users are guided to upload content that is already strictly organized. But often this feature is used as a quick way to bypass proper addition of content to SharePoint. In 2010 and 2013, this feature can be disabled with some deep modifications to the SharePoint ribbon or via CSS.
Similarly to multiple file uploads, you can upload files from the File Explorer view. The benefits of this are added user adoption and the comfort with file movement that users are accustomed to. The downside is that it also allows the bypassing of metadata and records. For newer deployments of SharePoint, we recommend that you tightly control the use of this method by training users to use only the SharePoint user interface.
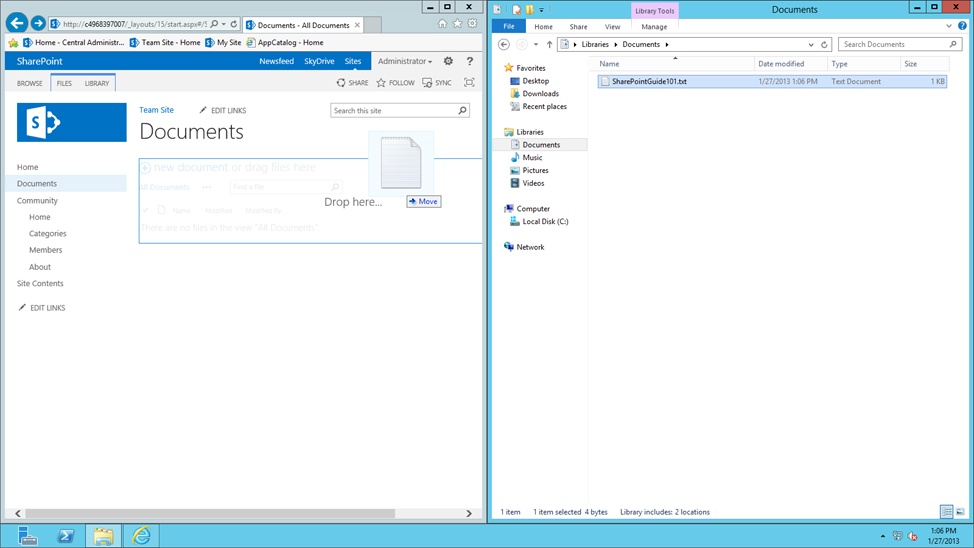
In SharePoint 2013, there is the added ability to drag documents into SharePoint from the desktop to the browser. As shown in Figure 2-2, a user can select a file by right-clicking, holding the button, dragging the selected file over the document library in the SharePoint browser interface, and releasing the button. This requires that the user workstation have Microsoft Office installed and a supported browser. For users without these minimum requirements, the drag method for content capture will not function.
The benefit of this feature is greater convenience for the user. The downside is that the user is not given an opportunity to provide the proper metadata, which typically results in no metadata. If features like drag and drop are being used, you will want to adopt policies that promote the proper use of the feature and train the user community to follow the correct steps for uploading content and providing metadata.
Microsoft Office
When organizations can standardize on the Microsoft stack, they get the added benefit of tight integration with SharePoint. Tight integration not only means greater convenience for your users, but it also means great support when there are questions about functionality and configuration options.
For this reason, we strongly recommend that the organization standardize on using Microsoft Office as one of the primary capture sources. You have the option of allowing users to upload existing Office documents to SharePoint. In addition, they can also save them directly from Office into a SharePoint list or library.
Starting in Office 2007 and subsequent versions, the integration with SharePoint is strong. In Office 2010 with SharePoint 2010, the integration is more than a “Save” location. You also have the ability to modify certain metadata fields, see previous versions, and you have check-in | check-out document management functionality.
When SharePoint is configured to support single sign-on, the integration is seamless. If your organization does not use a single sign-on method or if users are remote, they might be asked during document opening and saving to enter their SharePoint credentials.
The process for creating a new document by using Microsoft Office in SharePoint can be initiated in SharePoint or Office. We recommend that you have users initiate creation in SharePoint. This method is seamless, offers the fewest steps, and avoids confusion about how to save documents. To create an Office document in SharePoint, follow these steps:
Navigate to the destination library.
Select the Files tab.
Select the New Document drop-down.
Select New Document. The user will be prompted to accept launching the client application. If no client application is found on the machine, the document will open in-browser.
Create and save the document in the designated Microsoft Office Client Application.
Note
By default, libraries created in the Document Center template will have Microsoft Office Word as the new document content type. Your configuration can include any content types you choose.
However, if the user elects to initiate the creation in Office, the user will create the standard blank document. To save the document, the user will click the Browse button and enter the site they want to save to. When they press Enter, they will be able to browse that site and its libraries directly in Office. They can select the destination library, name the file, and click Save.
In both scenarios, after a document is saved the user will have additional properties available in the Info portion of the document, as shown in Figure 2-3. After a user has saved to a library once, it can be conveniently accessed as a Recent Location for storing documents to SharePoint in the future.

It is also possible to save links to documents. A link to a document is a pointer to an alternate save location, normally locally on the user’s machine. We strongly recommend that you do not use this feature. It results in confusion about where documents are actually saved. It leads quickly to frustration from the users, missed versions, and duplicate files.
Native SharePoint documents
In the last 10 years, there has been a major shift from legacy ECM implemented via client/server applications to ECM implemented via a browser/server infrastructure. In both scenarios, the storage and management of the content was managed by a heavy server-side application, but the interface for the users went from an accompanied thick client that tied users to a specific device to device independence wherever you have a browser. The shift away from legacy ECM applications that require program files loaded on the client workstation is still not complete. The initial feature set transitioned from thick client programs was focused on features like administration, search, and processing of content after being saved to SharePoint. What remained was content authoring that was still tied to thick client programs, like Microsoft Office, installed on individual devices. We are of the opinion that over the next several years, desktop client authoring tools will primarily be used for production level authoring and web interfaces will be used by the vast majority of users who create basic documents. The other consideration is the rise of mobile authoring and content contribution using tablets and smart phones.
Starting in SharePoint 2010, it is now possible to create documents in the browser. For the average user, all required functionality is present in the browser, with the ability to use the new Ribbon toolbar to perform word processing, spreadsheet, and presentation creation. In SharePoint 2010, the ability to do so still relied on the client machine having an install of Microsoft office.
Now, in SharePoint 2013, the reliance on the device having a client Office application is no longer the case, allowing for fully independent creation of content via the web browser. This is a game changer that helps define SharePoint 2013 as a fully cloud-enabled ECM solution.
In either SharePoint 2010 or SharePoint 2013, this requires an additional product called Microsoft Office Web Apps. In SharePoint 2010, this is an add-in to the existing farm, and in SharePoint 2013, this is a separate Microsoft Office Web Apps server, also referred to as Web Applications Companion (WAC). This gives you the ability to interact with a spreadsheet exactly as you would in the thick client Microsoft Excel program, as shown in Figure 2-4.

When this functionality is deployed, it is nearly unnoticeable that the user is not working within a thick client application. In addition, access to this functionality is supported across many mobile devices, including laptops, tablets, and handheld smartphones.
The latest support of Office Web Apps allows for users to simultaneously edit documents. This functionality is useful in a team site scenario when multiple people are contributing to the early drafting of content, where the direction of the content isn’t fully outlined. Having multiple contributors, regardless of location, be able to share ideas in real time is extremely powerful.
Note
We advise that simultaneous editing be used during the early stages of the content life cycle, such as in initial drafts and brainstorming sessions. As the content becomes more defined, you should begin using the document versioning features of SharePoint.
If at all possible, organizations should take the extra step into native SharePoint document creation. If it is possible for your organization to take this path, we recommend an all-or-nothing approach. That is, if you can deploy Web Apps for your SharePoint 2010 farm or install the Office Web Apps Server 2013 and connect it to your SharePoint 2013 farm, you should also remove the thick client-side applications from your user desktops.
In some scenarios, you might want to give certain power users access to the full Office suite. You need to understand that the combination of the two will make supporting users complex due to the interface similarities of both products. Because there are huge technical differences between thick client programs and browser-based usage, it can make it more difficult for the IT support or help desk staff to triage the issue and troubleshoot.
Electronic forms
As we mentioned in Chapter 1, the use of electronic forms is a great way to capture structured information from submitters. It’s important to understand that electronic forms capture is used only for the purpose of capturing data, whereas the capture process using Microsoft Office also facilitates document editing and modification.
Electronic form capture is typically used to receive responses to a specific set of questions submitted by an audience of users. In SharePoint, each submission results in a document saved in a special format located in a library accessible by the publishers of the form and usually not the submitters or respondents of the published form.
In SharePoint, this is most often accomplished by using InfoPath. We will not cover InfoPath in detail in this book and recommend, if you are using electronic forms to capture information, that you get specific training on InfoPath.
Document scanning
The last form of capture we will discuss is image capture. This is the process of taking physical documents, converting them from paper to digital, and storing them in SharePoint.
Document imaging in SharePoint is not a native function or feature of the product. The most common deployment of document imaging for SharePoint is front-loaded using third-party software applications. The two ways to perform document imaging in SharePoint are as follows:
Use external capture applications that release to SharePoint.
Use ad hoc capture applications built into SharePoint.
External capture applications allow you to capture and convert documents and then automatically or manually upload them to a SharePoint document library. The primary benefit of these applications is that they can scale to support the capture of large volumes of paper documents. Ideally, an organization should seek such applications that support the conversion of images from image-only files to richer document files such as Word or PDF. This is done by using Optical Character Recognition (OCR), which we will detail below. Your organization should also seek applications that allow the population of metadata to document libraries as content is uploaded to SharePoint. Simply scanning paper and dumping to SharePoint with simple file names is not a best practice and will leave you unable to find, manage, or process the content effectively, if at all.
Note
If the software used for document imaging capture does not support the population of metadata values, you should consider replacing it or reverting to a manual upload of the content instead.
There are also a handful of ad hoc capture applications that run natively in SharePoint. These applications allow a user to initiate a scan and store a paper file directly from a document library, just as if the user was creating an Office document from scratch. The same metadata considerations apply for this type of solution. You want to find a solution that offers conversion from image-only file types (TIFF, JPG, BMP) into other more-useful formats, combined with metadata.
In either type of solution, the considerations of image capture are the same. You must first isolate which of the following type(s) of capture meets your organization’s needs:
Distributed capture
Production capture
Distributed scanning
Distributed document scanning is close to the user. The scanning is performed by the same user who stores the document into SharePoint libraries. Sometimes document scanners are at individual workstations or shared among users in a departmental fashion. Distributed capture is good for ongoing document imaging at low volume but not particularly good if your organization has large amounts of files.
If you have a large volume of files to be scanned on an ongoing basis, we recommend that you consider planning and implementing a production scanning process.
Production scanning
Production scanning is high-volume capture of paper documents to a repository. This is not common in most organizations and might be an infrequent need. However, some organizations in their quest for ECM technology implement production scanning to convert old paper documents to new digital documents. We recommend before considering such a process with SharePoint that you investigate scanning services to help you offload the technology and process considerations that come with production scanning.
Whether your organizations chooses to use external capture applications or native SharePoint applications, or whether they choose to perform distributed capture, production capture, or both, the considerations on how to capture images into SharePoint are the same.
The most important consideration is image quality. The quality of the scanned image directly impacts a user’s ability to view the document and its ability to be converted using OCR technology. First you must decide whether you need color images or black and white images. The benefit of colored images is that they will have better quality when printed or externally shared. The downside is a more than five-time increase in the storage requirements.
Note
We recommend using color scanning only when you know that these documents will be later printed or that the color is relevant to the meaning of the document. In some cases, you might need to accurately reflect a watermark or other important attribute of the document that comes across only in color.
Most organizations can scan in black and white images, which provide optimum storage size and the ability to be converted using OCR. OCR engines benefit from color scans only when it comes to identifying graphics in a document. If you are attempting to convert many documents that include a combination of graphics in line with text, you can choose color scanning prior to OCR and black and white post OCR.
Another factor that impacts image quality is the resolution or dots-per-inch (dpi) scan setting. Resolution determines the number of pixels used to represent objects in a document. We recommend that you scan all documents at a resolution of 300 dpi. Lower than 300 dpi gives faster scanning speed but dramatically reduces the ability of the document to be converted via OCR. Even if you are not using OCR technology today, the document might be OCR’ed in the future, so it should be a consideration. Any higher than 300 dpi provides no substantial benefit in OCR accuracy, and there are rare occasions when this is needed.
The next important factor is the file format you choose. Be aware that file format at scanning time does not have to be the same file format that is saved to SharePoint. In fact, in most scenarios, it should not be. The format best suited for document conversion using OCR is not the same desired format for general retrieval viewing and storage into SharePoint. We recommend scanning your images as TIFF Group 4, because this will be the ideal format for OCR engines, but having the output conversion results saved in PDF or Word. You will choose between PDF and Word documents when you determine whether these documents will ever be edited.
Sometimes document scanning is done because the digital/editable version of the physical document no longer exists. In that case, you need to scan the document and get all the text you can to rapidly create an editable version of the document to continue its digital life. In such a scenario, you should scan to Word formats.
However, for the vast majority of document imaging scenarios, the documents are not needed for editing but primarily for the purpose of viewing. In such a case, PDF is the ideal format. OCR text is never 100 percent accurate, and the image of the document will always be the most accurate representation of the original document for users. The OCR results are used to make the text available for copying and indexing into SharePoint to facilitate search.
To accomplish this, PDF supports a format of PDF with text under image. When you view the document, you see the original scanned image, but you can copy the text from the document and the SharePoint index crawler can see the text for indexing.
Note
We assume that the PDF iFilter has been installed and configured on your farm. iFilters expose text from documents to SharePoint crawlers. By default, the PDF iFilter is not installed in SharePoint Farms. This is a critical component to any SharePoint ECM solution.
To recap, the recommended best scanning settings should be the following:
Scan image as: TIFF Group 4
Scan resolution: 300 dpi
Convert using OCR to PDF with Text Under Image
Generally, scanned documents are always larger than a born-digital equivalent. Therefore, scanning to SharePoint will create additional storage requirements and configurations on your farm.
Store
The store portion of ECM includes both the logical and physical storage of files and their metadata. While the logical and physical storage of documents are quite separate technically, they are tightly woven together.
Poor planning for physical storage could result in farms not scaling to the needs of an organization and could kill an ECM solution and force a reconfiguration. The logical storage helps plan out this extensibility, but it also is the starting point for users interacting with the system. It’s one of several key determining factors of a successful SharePoint ECM solution.
The physical storage of documents happens within SQL databases where objects are stored by default. The logical storage of documents happens with many features in SharePoint and should be collectively referred to as your Information Architecture.
Physical storage
In SharePoint, the physical storage of documents happens in MS SQL. The documents and their associated metadata are stored into content databases. To ensure scalability and performance of the farm, it’s recommended to keep content database sizes below 150 GB. To do this, you need to know more about the information you are storing there. In most organizations, the best gauge for how large an ECM platform will grow is to first establish a starting point.
Roughly 40 percent or less of the total size of shared network drives and storage will end up in ECM. After proper evaluation of shared drives, you will find that much of the content is not proper ECM content, contains duplicate files, or has met its retention date. For this reason, it is very important to perform a records inventory of your shared drive content so that you can eliminate redundant and outdated information.
So to begin, take 40 percent of your total shared drive space utilized. This will give you a total estimate. If your organization is lucky enough to have this already at less than 150 GB, you are in good shape, but if it’s larger, you need to dig deeper and start calculating that same size, but in sub-units such as departments and/or functional operations within departments.
The results of a records inventory, data cleanup, and segmentation of this information into logical factors will give you a general idea of how many content databases you will need for initial deployment. The tricky part is determining what will be needed as the organization and the information it creates grows. We have a fundamental understanding that there is rapid information growth taking place today. This is supported by the fact that most of the world’s information was created in the last five years. If you weren’t experiencing the demands this amount of information is putting on your organization, you probably wouldn’t be reading this book.
However, for your organization, content can be created only as fast as and with as many knowledge workers that are employed there. Therefore, growth of content should be relatively steady and predictable. There are various means to get to your annual growth, but the easiest way is to take a subset of your shared drive and calculate the total size of it.
Note
The “gotchas” in file storage size are media files. Information Architecture has a methodical way of dealing with this, but be aware of where these files might live in your organization.
If your organization is large and you are fearful of SharePoint’s limits on content databases, you need to consider implementing Remote Blob Storage (RBS).
SharePoint supports configuration of Remote BLOB (Binary Large Objects) Storage (RBS) as an option for storing content objects directly in the database. This is actually a function of SQL Server and provides the ability to offload storage from the content database to external non–SQL-based hierarchical storage platforms. It is recommended for content databases 4 GB and larger.
RBS can facilitate a measure of scalability for specific use cases that involve large individual file sizes and/or high volumes of objects. The configuration of RBS can be targeted to specific SharePoint web applications, site collections, or individual sites. An example of this would be large engineering vector files and high-volume document imaging solutions. In most use cases, this is not necessary, and storing the objects in the database has the advantage of providing one source from a backup and disaster recovery perspective.
There are third-party solutions built to take advantage of RBS to reduce the impact of database BLOB I/O performance issues. This can also reduce the overall footprint of the database architecture needed to support SharePoint and enable the use of lower-cost storage devices. Your most accessed and current content can reside as BLOBs in the content database and be migrated to external RBS storage locations based on metadata values, content types, or other configurable parameters. As a side note, External BLOB Storage (EBS) was a hotfix provided for MOSS 2007 that provided entire farm-level externalization of content objects.
Where content databases meet web applications and site collections is where the logical storage of content begins.
Logical storage/Information Architecture
Information Architecture (IA) at first seems to be one of those vague things that people talk about to sound smart. This section will define it in more tangible terms. IA is where your organization will spend most of its time and planning for a SharePoint ECM Solution. If you don’t understand, formulate, and execute a sound IA, you are almost certainly destined for failure, or at the very least, you will only duplicate what exists on your shared drive infrastructure.
Like its parent ECM, IA is not a technology or feature. It’s a collection of features that, when put together properly, make up the organization of content. IA breaks into the following categories:
Repositories are the bridge from the physical storage to the logical storage. Many users don’t realize that the folder location of the file has little to do with where it’s physically stored. This is an example of how what we see on the screen translates to something very different in the IA.
The metadata model is how the content is tied to its associated metadata. Think of the metadata model as a cell in a spreadsheet, and the metadata is the value placed in the cell; there is an inseparable bond between the two, yet they are distinct in their purpose and their properties. The model also details what metadata a document should have or require during capture and how it should be visible to the user.
The presentation layer is where users can interact with the IA. This layer provides a way to slice and dice content, given good metadata, to better find and interact with it.
Metadata is a separate condition from taxonomy and folksonomy, and they take separate consideration. Together, these are tools that can be used to define ways of organizing content in lieu of folders. Ideally, good-enough taxonomies are created to support any number of combinations to find content. Taxonomy and folksonomy serve the same purpose and are implemented in the same way. However, folksonomy is less strict and more prone to a user’s nomenclature, while taxonomy is a strict listing of terms that is very rarely modified.
During the discussion of managed metadata, we will go deeper into how to build these. Table 2-1 shows the various categories and components that need to be considered as part of a complete IA.
Even though we have identified the individual components, that alone will not solve the IA challenge. When you bring them all together, they will strongly impact how users will interact with a system, the quality of capture, and the results they find when performing a search. Now let’s discuss the goals of IA and then how to approach each individual component.
Ideally, an organization will spend sufficient time planning out the IA for SharePoint; the actual deployment of the farm is just an execution on this plan. Although the IA aligns to SharePoint features, most of the planning work is done outside of SharePoint instead of inside a configuration interface.
The first thing you must consider is what will be the determining factor for creating new repositories in SharePoint. It could be related to the type of content, to the size of content, or by organizational structure.
The type of content might determine that it has a special type of security that no other content in the organization uses. Because of this, it might need a more high-level type of organization so that the proper security can be applied. For example, many organizations have “management” portals. While each manager in the portal heads a department with its own separate SharePoint site, all managers have access to information that users in those departments should not have access to. Therefore, managers have access to the portal as well as access to their individual departments, whereas users can have access only to the department to which they belong.
The size of the content might determine some IA because, as we stated earlier, content goes in content databases. The first two portions of SharePoint IA are web applications and site collections, which also determine the number of content databases. For example, a small organization might get away with one web application and a site for each department, whereas an organization with a higher volume of content will need a web application per department. Even assuming security access for both organizations are the same, the size constraints could be the deciding factor.
And finally, what do you organize by? When you consider only purely logical storage of information without any size or security constraints, you are deciding how users access information. We recommend choosing organization in the following two ways:
By department
By function
Only in unique verticals and cases will this not work for an organization. In many organizations, they are the same. However, some organizations don’t have departments that align directly with function. Generally, if departments are more tied to management than to function, you will want to organize by function, because users are joined by function. However, most organizations get away with departmental organization. You might be asking, “What if users cross departments?”
They could! And there are several ways to approach this. In organizations where security is a larger concern, you will grant access to those knowledge workers who bridge departments on an individual basis. The other option is to create team sites for cross-functional teams while not altering the security at a departmental or functional level. Finally, there is the recommended approach for the vast majority of organizations, which is tying security not to a department level but to a role. For example, all knowledge workers should have knowledge worker access to all department sites no matter which they belong to. The only real downside of this approach is that users might waste time on content that does not pertain to their function.
Note
Security can happen at the item level, but should it? Breaking inheritance on a site collection will increase the cost of managing a SharePoint deployment and is highly discouraged. If you find yourself doing this a lot, there is an issue with the original IA. Keep in mind that this is ultimately a management issue and not a SharePoint ECM Solution issue.
Web applications and site collections
The first thing to consider is the web application, which is where the hand-off from physical to logical storage occurs. Because it’s rare to have a web application without a root site collection, we will also consider site collections at this point.
The web application is the first envelope where the user gets involved. It is also the demarcation of new content databases. While web applications can have multiple content databases, they usually have only one. As illustrated in Figure 2-5, the name of the web application and root site should be simple; that is, legal should be “Legal” and human resources should be “Human Resources.”

If your organization is small and you have a single web application, these will be the names of your sites, and your web application could be a personification of the web application or just your organization name. For example, some companies used \ECM or \DocumentCafe. There are some cases where you will have special web application names, such as in the case of content type publishing, which we will discuss later.
Web applications and root site collections go hand and hand. It’s rare to have a web application without a site collection. The root site in a site collection is the landing location of the web application URL.
Note
When doing anything in SharePoint, you should always have a development, testing, and staging environment separate from your production farm. The development and testing is where the work will happen, and staging is where you test against real use, but with no production implementation. Large projects will have even more testing farms. Never test features or new deployments on a production farm. It seems convenient to do all testing in a separate web application. For simple deployments, this is possible but not advised.
Within each root site collection are sites. Sites, like web applications and site collections, are dependent on how large your SharePoint deployment will be. If you have a single web application for the organization, you will most likely have a site per department and function with the addition of restricted legal and management sites as needed. If you have a web application per department or function, you might not need any subsites, but for very large organizations with nested departments, it might be required.
The rule we would like you to follow in your ECM implementation is to never use sites two layers deep. The most successful user adoption of IA in SharePoint is to be as flat as possible. We find that when you have layers of navigation and repository drilldowns, it’s troublesome for users trying to find the content they need and for administrators working to support enterprise governance.
Sites are where you can also differentiate the types of templates you use. A template contains settings and branding for new sites to be built on. In this book, we use almost exclusively the document center site template. However, customized templates can be used in SharePoint to more rapidly deploy a solution. For example, you can build just the ideal ECM site template for a department just once and then easily use that template to create all other departments in much less time. This takes discipline, because it requires that your full deployment happens up front, prior to any content being uploaded.
Libraries
After web applications and root sites are established and all subsites are created, document libraries and lists must be created as well. Unstructured content lives in libraries, and structured content lives in lists. Because most of what ECM addresses is unstructured content, we will focus on document libraries for your ECM solution.
The first mistake organizations make with libraries is allowing them to be created by individual users. Generally, this results in tree navigations that go on forever and library names that are confusing. The benefit of standardizing libraries across ECM sites is that no matter where a user is in the organization’s farm, they will understand what goes where.
Note
We strongly recommend against allowing users to create libraries themselves. The downside to allowing users to create libraries is that eventually the proficient library-creating user will create libraries like folders. This defeats best ECM practices and only duplicates the problems you have today with a shared drive.
Many organizations will use libraries as the topic matter. Where sites stop at functions, libraries start with topic. However, in the ideal ECM environment, where we are keeping the IA flat, libraries are associated with types of content. The ideal ECM environment will have three libraries per site: Documents, Rich Media, and Email.
While this three-library concept, shown in Figure 2-6, seems radical, it allows for the most flexibility and the least amount of clicks to any document. The concept is that libraries are the types of content—that is, unstructured documents in the “Documents” library; for email-enabled farms, email in the “Email” library; and media files in the “Rich Media” library.
Many organizations already have special considerations for email and rich media, so these might be exceptions. For example, it’s not uncommon to have a separate web application for the entire organization’s rich media files. It is not common to store email in SharePoint, and that takes some serious consideration. Therefore, many organizations might find that the number of libraries they have using the outlined principles in this book are small.
The primary reason that you might choose to expand the listing of libraries would be having too many individual items to contain in a single library. It’s recommended not to exceed 5,000 items per library. Often, we find if you are wanting to store this many items in a library in the first place, you did not heed the initial recommendation of not using SharePoint as a shared drive.
A secondary reason is large amounts of specific document types such as invoices or contracts. Although we can address this easily in the library with the metadata model, it might be enough to consider having separate libraries. How you would decide to handle this is based on the processes that surround those documents and the ease of access at the time of retrieval.
Metadata
Now our discussion will move from repositories, the local filing location, to metadata. At the library level, content starts to be populated, and as that happens, you need to have metadata properties defined and populated as well. The big difference between the two in the case of SharePoint is that repositories are the paths to content and do not exist as pieces of metadata that belong to a document, whereas the metadata model is associated with the documents themselves.
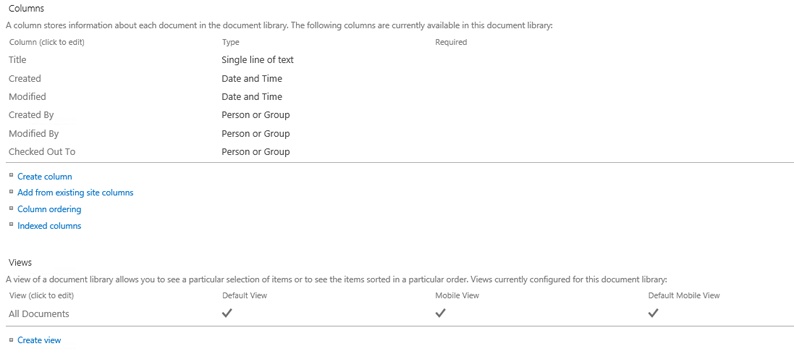
In this section, we will consider the metadata model as all inclusive. Metadata is data about data. As shown in Figure 2-7, metadata comprises the values that appear in SharePoint columns that allow you to organize, view, and find content without opening files individually.
There are two types of metadata, structured and unstructured, just like types of content. Structured metadata are things like “Last Modified Date” and “Author.” These values are usually automatically entered by the system. Unstructured metadata values are created to specifically support the content that will be stored in a particular document library and can be entered at the time of capture during a workflow process or by some other automated means.
Unstructured metadata includes comments, keywords, tags, and so on. The mechanism for entering metadata is via a content type. Content types are the containers of metadata columns. The default content type for a document contains the metadata fields Name and Title, with the additional fields Modified and Modified By added by the farm. While it is possible to create new columns on a library level, we recommend that you do not. At minimum, we recommend that you create and modify content types from the root site. Ideally, you will want to use the content type publishing feature in SharePoint.
Content type publishing allows you to create content types in a single location and then publish them across the farm. This means that all modifications to the content type will be syndicated. This requires you to set up a Content Type hub with all desired content types, as shown in Figure 2-8, in advance of using them in any site. The benefit of the hub is that you know that all content types and metadata fields will be consistent throughout the farm, which also means that if content moves from one library to another, the experience will be consistent.

Organizations should use the Document base content type as the starting point for any new content types. New content types will be created based on a heavily used type of document that is specific to a transaction or operation in the organization. This can follow the same examples we used in the discussion of higher volume and repetitive content items such as invoices and contracts.
Content types should not be confused with a method of organization but rather should be seen as the container of the organization criteria. This distinction is a subtle one. For example, an organization might feel that it can create content types for every type of document and use that as a method of organization. The problem is that content types themselves are not metadata, just containers for it. Therefore, the value of that content type goes only as far as the library where it’s set up. For organizational purposes, you should create new columns, and those columns will have the metadata you desire.
Before creating a new column, decide on its purpose. During the planning phases of your ECM solution, you might tend to put everything you can possibly think of in a content type for fear of missing something. However, this usually results in too much information that is never used. So before you ever add a new column, decide how the column will be used. You should be able to write out use-case examples of how each new column will be consumed and the purpose for having it.
Document ID
To complete our IA, we have two remaining components that are a part of the metadata model. They are rather unique, and it’s important to understand the nuances of each. They are document IDs and taxonomy and folksonomy.
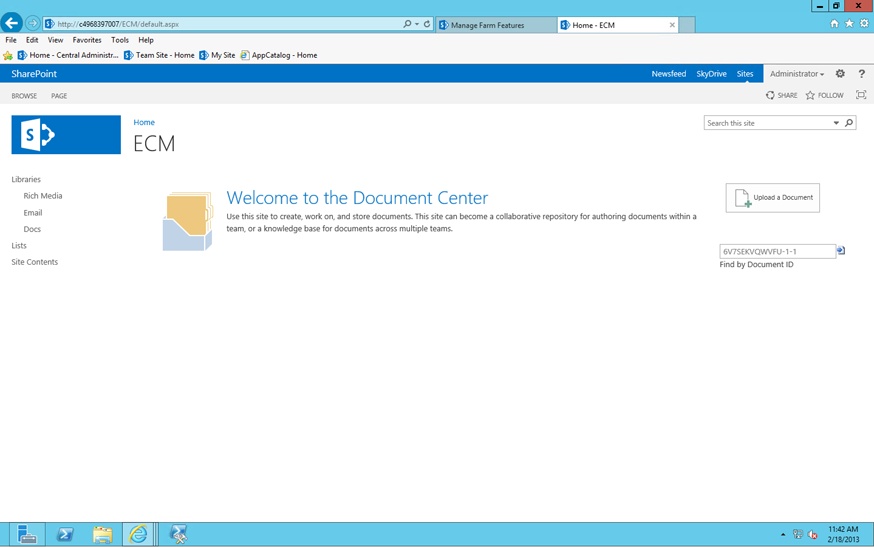
The document ID is a relatively simple feature with a very high impact. The document ID service will allow you to implement persistence for documents across the farm, especially in the scenario where your organization has broadened the IA to include a web application per department, knowing that documents have singularity and that the ability to identify a document wherever it’s located in SharePoint is critical.
The document ID will automatically generate a unique ID per document uploaded to the farm. The document ID is stored as a searchable piece of metadata associated with the content. The document ID (DocID) is persistent for the life of the content object. Therefore, regardless of where that document is sent, the ID will remain the same. If this weren’t the case, Records Management (RecMan) would not work and the chain of custody would be broken. We will cover the importance of legal authenticity and chain of custody in more detail in Chapter 8.
Note
In SharePoint 2010, you had the ability to automatically place the document ID and an optional bar code on Office Documents at print time. This is no longer supported in SharePoint 2013.
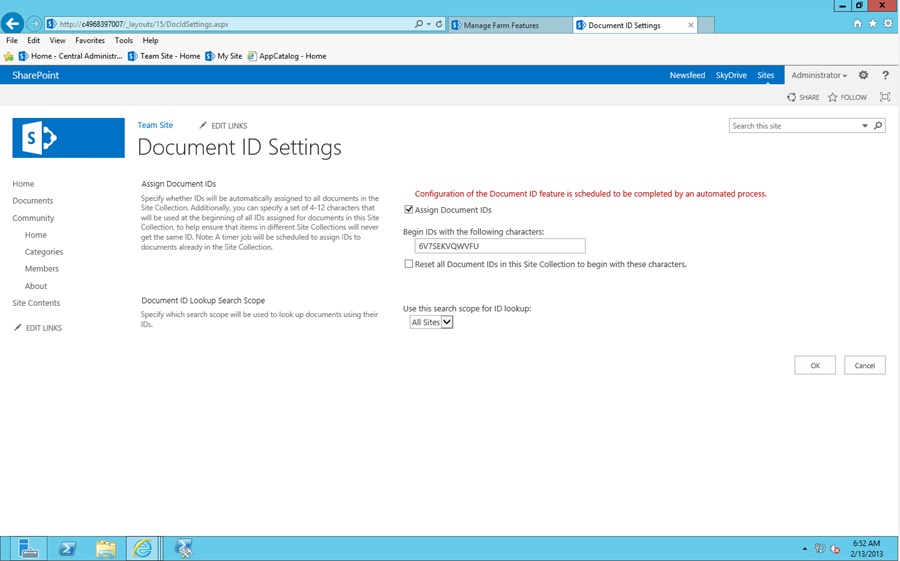
We recommend that you enable the document ID feature on all your ECM site collections. While you might not always show the ID to the user, the feature supports a best practice for your overall content governance strategy. To enable document IDs, you will turn on the document ID site collection feature for all site collections in the farm that you’re planning to use for your ECM solution. When the feature is enabled, a new setting option will appear on the site collection level called “Document ID Settings.” As shown in Figure 2-9, you can specify the prefix for the document ideas to be created. Using custom code, you can also customize these IDs even further to support your enterprise governance requirements.
Taxonomy and folksonomy
When we talk about the terms taxonomy and folksonomy, we’re usually greeted with some blank stares and quizzical expressions. They are uncommon pieces of the natural English language but are used very commonly in the discipline of Records Management and content organization. To make it more familiar, think of a folder structure that you might see when you use File Explorer to navigate and find documents in your local My Documents folder. This is likely the closest thing to a taxonomy structure that anyone should be able to relate to. The file system that the folders and the documents are stored in is just a piece of metadata, and nested folders are a hierarchical organizational structure.
Taxonomy implies a collection of terms and their hierarchy. This creates a relationship that allows you to save content and find it later in a repeatable and logical manner. Taxonomies also branch into areas of synonyms (ontologies) and relationship of terms. But the general purpose of taxonomy is to organize your content based on specific department or operational terminology.
Folksonomy is implemented as a taxonomy that gives departments or operational units more flexibility. Folksonomies tend to be more personal, while taxonomy is stricter and applied to an entire organization. In SharePoint, both are implemented as managed metadata columns as shown in Figure 2-10. When you have mastered how to create and manage your taxonomy, the process is simple. The hard part is the concepts behind these tools.

As we stated already, taxonomy is stricter and folksonomy is more flexible. The biggest mistake organizations make is to build a taxonomy for the entire organization. Not only is this extremely time-consuming, it is very difficult to get consensus between departments, whether or not they are cross-functionally dependent. In your taxonomy, we strongly urge you to abide by the following guidelines:
No “Other,” “Miscellaneous,” or any generalized terms
No terms from parent to child deeper than four levels
No transient terms or terms that could change over time
There are essentially three types of taxonomies. These are functional, regional, and time based. A functional taxonomy for the organization is possible only when it’s simply a listing of the organization’s structure. Each organization is unique, and yours might not fit exactly into a taxonomy as we describe it, but we have found that for the vast majority of organizations, taxonomy per department is required.
Many organizations choose to employ types of taxonomy. A document will be assigned to only one term per taxonomy. For example, if I upload an employment agreement to the HR department’s ECM site and I’m located in the New York office, I would apply “New York” from the regional taxonomy, “HR” from the organization-level taxonomy, and “Legal >> Agreements >> Signed Contract” from the HR-level functional taxonomy.
Taxonomies are stricter. Because of this, you will want to create them up front, and for the most part, they will remain unmodified. Instead of introducing new terms to the taxonomy, you will add synonyms to existing terms to help user adoption.
We have worked with many companies that struggle with the strict nature of taxonomies, and you might find that your organization encounters a similar experience as you start to define them. Therefore, you might elect to incorporate a strict taxonomy with a more flexible folksonomy, or skip taxonomy altogether.
Folksonomy is implemented via managed metadata just like its stricter cousin, taxonomy. The big difference is that the terms are usually user contributed and not assigned up front but as the users interact with the content stored in the ECM solution. The benefit is that the terms more closely align with the terms and idioms that the users commonly call content. You could even think of it as corporate slang or operational lingo. It’s important not to get too carried away with folksonomy because you could end up with term sprawl as terms are rapidly adopted and applied to content to support every spelling variation of every term possible.
The ease of administration of taxonomies and folksonomies in SharePoint doesn’t do justice to how powerful and dangerous they can be. Simply creating a set of terms and publishing to your users without validating language and use can be extremely problematic and difficult to unravel. Your organization needs to spend considerable time planning the use of taxonomies and folksonomies.
The metadata elements “Like” and “Rating” fall roughly into the category of folksonomy, which is the lose tagging of content by users. They also show up as metadata but have their own functions inside of SharePoint.
Would you ever “Rate” your boss’s document with 1-star? Rating documents is the ability for users in a library to note how useful a particular document is with a granular 1–5 rating.
Note
We have found that the “Rating” feature is useful only for organizations with hundreds of users. The obvious reason is the feature is powerful only when many people are rating documents. Otherwise, it does not surface as a meaningful way to get at content. The funny thing, you will find, is that people think it’s a cool feature during demos but the practical use of it will be dependent on a high degree of user interaction.
Similar to rating content is the ability to like content, which is a binary way of flagging content. The biggest difference is that “Like” creates a collection of favorite documents for individual users that are presented in their profile pages as a part of MySites. For this particular feature to be useful, the organization has to plan to use and be effective with MySites.
In this book, we are not going deeply into MySites. However, we do want to assert a position on them so that you can properly prepare if you do decide to implement them. MySites should be carefully planned out, and the benefits and drawbacks should be weighed prior to turning on the Profile Services and MySite features. We have defined the IA that should be followed for an ECM solution. MySites should also be defined and planned in a similar fashion, and it should be considered a project in and of itself.
As you can see, IA, although usually the most ignored element in ECM planning, is an absolutely critical component that will largely define the successful user adoption, content findability, and governance objectives in ECM. Later, we will see examples of SharePoint deployments where the full deployment is executed using the best practices and principles we have covered in this section.
Process
Processing content requires an understanding of what we call the as-is state. Before we can begin to build technical and functional requirements for automating a business process, or the to-be state in SharePoint, we need to complete some discovery with the people who are currently performing the job functions and tasks associated with the process. This also gives us an early opportunity to start building a relationship with the users who will ultimately be the judge of the ECM solutions that we roll out in SharePoint.
We recommend as a best practice to complete the following three steps:
Interview and observation
Process white-boarding
Documentation and review
It’s important to select the right people from your ECM team to perform these steps. Depending on the scope of the process that is being automated, it could require multiple people and skill sets to complete the discovery effectively.
In general, the person performing process discovery should either already have or be capable of creating rapport with the users. In some cases, we have found that using an outside resource that has experience in process design and business consulting can be very beneficial. They often take a fresh look and don’t carry any internal or historical organizational baggage with them. If they are good at building rapport, as we stated earlier, the users might share things with them that they wouldn’t otherwise be comfortable telling someone from IT. The person(s) assigned to perform the process discovery needs to be proficient with the following activities, techniques, and tools:
Business Process Modeling and Notation (BPMN)
Using Visio for process flow-charting
Leading group discussions in white-boarding sessions
Creating written documentation that is easily understood by various stakeholders
Note
The team of people selected to lead your SharePoint ECM solution project are critical to its success. In subsequent chapters of this book, we will discuss how to build out your ECM team and give you some examples of how to generate successful user involvement in process design.
When mapping processes to SharePoint, the most important thing to remember is to take advantage of the fact that old processes can be revisited and improved on. Creating a modern version of a bad process further propagates and delays the evolution of the organization. This is often referred to as “paving the cow path.” That is, always look for opportunities to improve the process before you implement a bad as-is state in SharePoint.
We expect that when you are at the point of choosing how to implement your processes that you have already decided that the process meets the requirements of the organization, is as optimal as possible, and the process is relevant to day-to-day operation. It might seem obvious that a process needs to be relevant, but you might be surprised at the number of processes that exist that add no value whatsoever. This is often referred to as the seven worst words in business, or “We have always done it this way.”
Now you can start thinking about how that process will map to SharePoint features. To help you prepare, we have outlined the most common out-of-the-box (OOTB) types of processes that are available for you to implement in SharePoint.
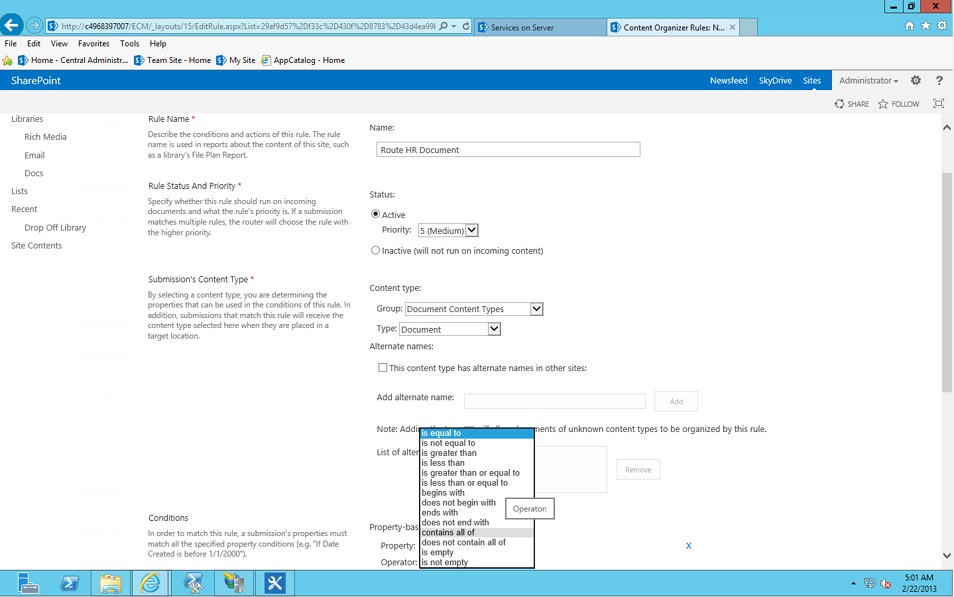
Content routing
When new documents are uploaded to SharePoint, they can be automatically routed, automatically initiate a workflow, or be modified based on specific criteria. This is a basic way to enrich content and reduce burden on users at time of document upload. In SharePoint, this is achieved with a feature called the content organizer. There are many use cases for this feature, and we recommend this as a good place to start automating notifications for users that new documents have been uploaded. In Figure 2-11, we show a simple configuration that will notify Chris that a new document has been added to the Press Release document library and needs his review.
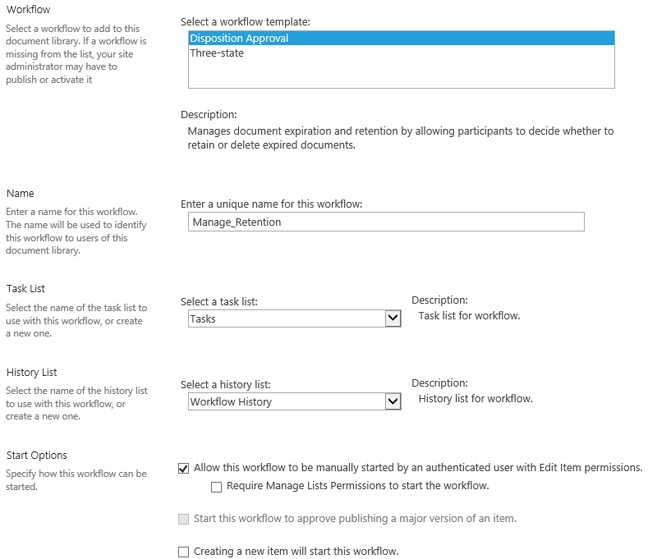
Disposition workflow
This type of workflow manages document expiration and retention by allowing participants to decide what action to take on expired content. The expiration is determined by information management policies that trigger an event. This usually results in a task created for someone, and a workflow process is initiated to track the completion of the assigned task.
As shown in Figure 2-12, when a document has expired (in this case, a Press Release [PR]), a task is assigned to Chris to review the PR document and approve its expiration. This will remove it from the extranet website that it is published to.
Three-state workflow
This workflow is typical of a waterfall workflow, but with limited states. (The term waterfall infers that you can move forward in actions, with limited ability to send documents backward.) The individual states are the steps the document will take based on human decisions or systematic actions. The uses for this workflow are primarily document approval. In the following example, shown in Figure 2-13, a document needs to be approved by three individuals prior to being published to an extranet site.

Conditional formatting
Conditional formatting is used highlight specific content, based on rules and triggers applied to metadata. Many users are already used to conditional formatting, because it is commonly used in Microsoft Excel, and can be similarly used in SharePoint in libraries and lists. It’s most common in lists of data but also very useful in a library of documents to “flag” or highlight content.
Note
Conditional formatting from SharePoint 2010 to SharePoint 2013 changed dramatically with revisions to SharePoint Designer. In SharePoint 2010, conditional formatting was a feature available in SharePoint Designer as a part of “Design View.” In SharePoint 2013 SharePoint Designer, “Design View” was removed. Because of this, the only method for conditional formatting in SharePoint 2013 is to modify XSLT templates or to implement third-party solutions.
Workflow
This more general form of workflow is a very powerful tool to create many types of more advanced workflows. This type of workflow is created outside of SharePoint, using SharePoint Designer and Visio for flowcharting to create a visual representation of the process. After design, they are published to a SharePoint site for use on content. The more advanced workflow allows the use of variables, multiple column data, parallel actions, Boolean logic, and basic conditions. After the workflow has been published, it’s available to be scheduled or used on content in an ad hoc manner. A good illustration of creating a workflow in SharePoint Designer is shown in Figure 2-14.

Content routing, disposition workflow, and three-state workflow can all be achieved in the browser with any authorized user. Conditional formatting and general workflow are created by using SharePoint Designer. It’s an external client application that connects to the sites on the farm for more advanced modification. This tool is not for typical users and can be used to modify many more complex features of SharePoint besides core ECM functionality.
We recommend limiting the use of workflows in ECM to the features and example given, if at all possible. You should also try limiting the number of features and third-party tools to as few as possible. We have found that the key to successful process implementation is simplicity. The general workflow is based on the Windows Workflow Foundation. The administrator will most likely create this workflow in SharePoint Designer with the addition of a Visio flowchart if needed. Obviously, this can be taken further with code, but we caution you to keep it as simple and straightforward as possible. Otherwise, you will follow in a long line of projects that never seem to end.
Note
We recommend that you use the 80/20 rule. Most processes and transactions go smoothly and follow a defined path to completion. If you can solve and automate 80 percent of your non-exception-based workflow processing needs in a simple manner, you will be successful. If you spend all your time focusing on the 20 percent of transactions that are exception based, you will create an overcomplicated and difficult-to-maintain workflow process.
Organizations can conceivably build any workflow scenario they can dream up by using the methods and features we have covered. Use caution when designing and implementing your workflow, and remember that you will have to provide maintenance in the form of updates and modifications. Some best practices to follow when designing workflow include the following:
Document and make available a listing of all public workflows, their purpose, use-case examples, assumptions of using it, and any special considerations. This can often be made available as a SharePoint list.
Determine a simple naming convention for workflows that allows for non-creators to understand what a workflow does.
Never label steps by using individual’s real names. When they leave, you will likely have to update the process.
Do not overcomplicate workflows; keep them as simple as you can. For example, do not automatically jump to SharePoint designer when OOTB 3-state workflow will do fine. Do not automatically jump to Visio when SharePoint Designer will do fine.
Unless mandated for security reasons, always make workflows reusable.
Avoid using custom actions. Not only do you need to support the workflow, you will need to actually document how custom actions work. There’s also a high risk that custom actions have not been fully tested and could result in failure during workflow processing. For this reason, we recommend avoiding them in ECM.
It’s not uncommon for individuals who create a workflow and have intimate knowledge of how it works to leave an organization, leaving the company stuck with one option, which is to discontinue the use of a workflow. This could be very disruptive to the usage of the ECM platform. It’s uncommon in ECM to need advanced workflows beyond approval workflows based on states. Such custom workflows are best suited for custom line-of-business applications built on SharePoint. We therefore recommend that if the workflow cannot be easily created using OOTB methods or SharePoint Designer, the organization should consider a third-party tool for managing and building the workflows.
The subtle difference between Business Process Management (BPM) and workflow is the maintenance of workflows. The “Management” part of BPM separates it from standard workflow creation. In a standard workflow creation, a workflow is published without regard to previous workflow versions, without regard for who created it, and without regard for when it needs to be updated, and so on.
Note
If your organization has many workflows, it’s best to consider a solution that allows the WYSIWYG administration of all workflows. In addition, BPM tools offer versioning of workflows and many more state options that integrate with variables even outside of SharePoint. Unless you are going to be building a completely custom business application or if you have many workflows, we recommend seeking a third-party BPM solution.
We further extend process into the area of Business Intelligence (BI). Although it’s not terribly common on documents, BI in SharePoint is very powerful. Like conditional formatting, BI is a way to visualize content to surface key data and performance metrics that can be used to improve business decisions and outcomes. BI is most common on list data and not content, but some organizations find ways to leverage BI also on documents. More specifically, we are referring to the visualization form of BI, not self-service BI or data mining.
The differences between BI in SharePoint 2010 and SharePoint 2013 are fairly substantial. The subset of features to accomplish this is called PerformancePoint. Typically, an organization will have a separate site collection for data reporting. To be successful with PerformancePoint features and documents, the metadata has to be a top consideration. To achieve relevant and meaningful visualization of the business data, you must have a well-structured, consistent, and accurate metadata model for document content types.
Next steps
We have moved content into SharePoint, stored it, organized it, and set it into motion. Now it’s time to start managing the activity around content and how users interact with content. It’s also time to start making sure that users can efficiently and effectively access content for editing and consumption. In the next chapter, we will cover the Manage portion of the content life cycle.