
Chapter 4. Cases in Point
We have covered the fundamental stages that all content in SharePoint should pass through to leverage a fully functioning ECM solution with a solid and well-planned Information Architecture (IA). You should now understand the methodologies and approaches to getting content into SharePoint, storing it in a meaningful way, and managing and tracking the content to its final preservation stage. Now it’s time to put everything you have learned together by outlining some example deployments that can be used in real-world scenarios.
To do this, we will consider three broad categories of deployments: small scale, large scale, and line-of-business (LOB) applications. The key difference between a small-scale and large-scale deployment is in the capacity of the farm to support a given volume of content. While it is not always the case, the type of deployment a company chooses is roughly determined by its size—more specifically, the amount of content it plans on storing in SharePoint.
Deployment assumptions
A content database should not exceed 150 GB of content. Previously, we outlined a method to estimate the size of your farm. If you know that you will easily exceed 150 GB of content, you should consider a large-scale deployment and leave plenty of space for growth. Remember that the amount of effort to set up and maintain a large-scale deployment will require significantly more time and resources, so carefully validate that it’s the right thing for your organization. We also want to make sure that your SharePoint ECM solution will meet the current and future needs of active content.
How small scale and large scale differ technically is that a small-scale deployment will contain all physical and logical storage in a single web application and site collection, whereas large scale, at minimum, will have a web application or site collection per function or department and perhaps even require additional granularity, depending on content volume.
There are many methods for expanding the storage capabilities within a single site collection as well, but the assumption here is that we are not using third-party tools. We are relying on no-code, only out-of-the box configuration possibilities, and designing with the concept of keeping it simple, thinking about migration and upgrade paths for our SharePoint ECM solution later on.
The other assumption that extends into the LOB applications is that we are working with an on-premise SharePoint 2013 Enterprise Edition small farm configuration. The small farm should have two web front ends and an application server. When the configurations get to the logical storage level only, the server-level configurations will be left to the IT team for general support and maintenance.
The LOB deployments are considered separate of ECM because they address not general content management but business processes that are content driven. They solve specific problems, such as human resources recruiting, contract management, or accounts payable.
All these deployments will be created for a hypothetical company called “Coho Winery.” The company is a conglomerate and owns multiple wineries throughout the United States. Sales are generated in both the B2B and B2C marketplace. They produce their own brands and produce private label wine for some of the largest big box outlets. Their corporate offices have the following standard organizational and functional departments:
Legal
IT
Executive Management
HR
Accounting
Sales & Marketing
Operations
Important
Your organization’s environment and requirements might differ from the one presented in the book. As you follow along in the chapter, be sure to note those differences and then adjust your project planning documents and ECM solution design accordingly.
In the small-scale example, the size of the organization in terms of content is roughly 30 GB, with 150 employees. In the large-scale deployment, it’s roughly 3 TB and 1,000 employees. The company is setting up a brand new SharePoint deployment and, after it’s been configured, moving content from shared drives to the new SharePoint ECM solution. They have never had SharePoint before, and the vast majority of the knowledge workers, those who have access to the ECM solution, are located in the corporate offices, while most regional store employees do not need access.
Besides the LOB applications, the portion of the farm being addressed is purely ECM. You can assume that there are custom applications living elsewhere in the organization.
We will now step through the initial web apps setup process. Both deployments start the same, with the creation of the Port 80 web application called “ECM Café.” The Café is the landing page for the entire ECM system. As illustrated in Figure 4-1, we start in Central Administration and click Manage Web Applications under the heading Application Management.

We then create a new web application, as shown in Figure 4-2, by clicking the New button in the upper-left corner of the Web Applications tab.

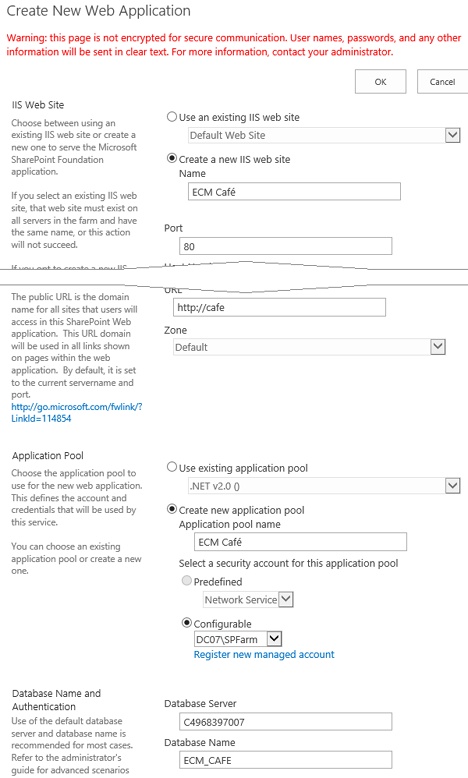
You will be given a dialog box, as shown in Figure 4-3, with all settings to create the new web application. Many of these settings will be determined by your IT department, and such recommendations should override anything stated here. However, the naming of the web applications should be in full control of the ECM team because this is a component of IA.
The settings we are going to change for our deployment are as follows: Name: “ECM Café,” Port: 80, Public URL: http://cafe, Application Pool Name: “ECM café,” Database Name: “ECM_CAFE.” Your organization might have already established a database naming convention. If not, this is a red flag. The convention we are using here for all ECM web applications is “ECM” underscore “_” web application “café.” This should match the name of the web application outlined in your IA. After you have set all these parameters, you can click OK, and the web application is built.
There are two other web applications we will use that are the same for either large scale or small scale and for the LOB applications. These web applications are http://ECMHub and http://Projects, respectively. Again, the naming will fall in line with the naming you have established as a part of your IA, as shown in Figure 4-4. The ECM hub will be accessible to only the ECM team responsible for setting up and maintaining the ECM portion of SharePoint. This is where some testing and the content type syndication will come from. The project’s web application is the location of all the self-service team sites. These are considered cross-functional activities, where the results will be put in ECM but the project itself is a living document within this web application.

As we will see soon, the ECM Café for the small-scale deployments will be the location of the entire ECM system, with the exception of team sites. And in the large-scale deployments, it will simply be a navigational web application that will be a landing page for the entire ECM system.
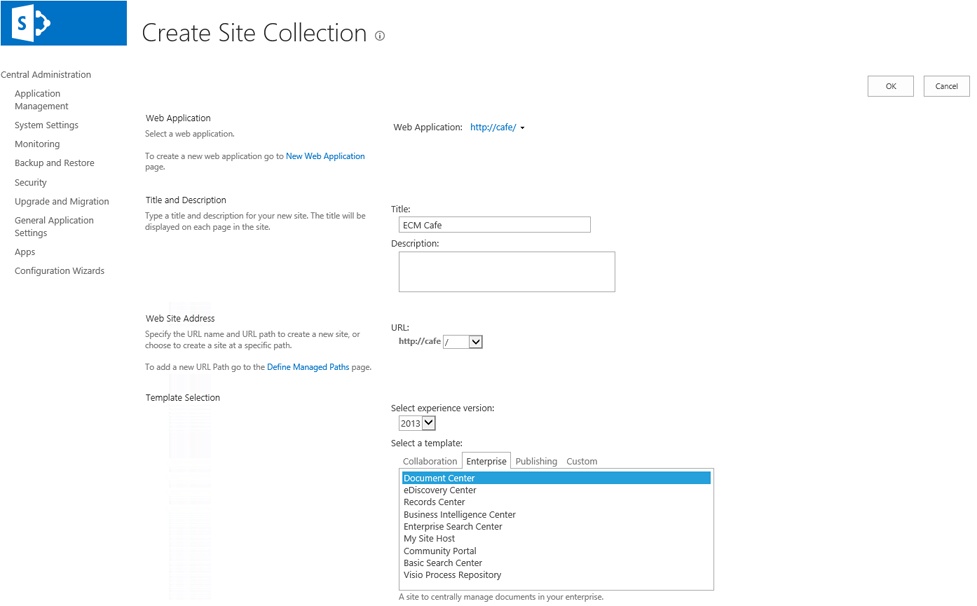
After we have created the three base web applications, we need to add a root site collection for each. To do this, you will need to navigate back to the Central Administration dashboard. Under the Site Collections heading, click Create Site Collections. At this point, as shown in Figure 4-5, you will need to select the web application that you are creating a site collection for, provide a title, and for these first three site collections, they will all be in the root of the web application. With the exception of the Projects web application, the template we will select for the root sites is Document Center, on the Enterprise tab. For Projects, we will use the Team Site template.
All other new web applications and site collections will be created in the same fashion as above, with the exception of the application name, site collection name, and content database name.
Note
You will need to refer back to this section when we create additional web applications for the large-scale and LOB deployments.
Now we can start establishing the first part of IA, components that are shared between both types of configuration, taxonomies with the managed metadata service, and content types used by all site collections in the SharePoint ECM solution.
The order of operation in the early stages of deploying your SharePoint ECM Solution is critical. If you get configurations out of order, you will find a lot of rework to be done. For example, if you configure your content types before you configure your managed metadata term sets for columns that the content type will use, you might cause problems with content type syndication. We recommend that you use the following steps to complete a proper baseline configuration:
Create web applications.
Create root site collections.
Create content type hub creation.
Manage metadata term store creation.
Create content types with retention periods and columns.
Enable syndication.
Create IA with sites and enable consumption of content types.
Create libraries.
Add content types to document libraries.
Managed metadata—taxonomy
Organizations typically have only three types of taxonomies: functional, regional, and period based. Functional is the most common and often the only one used. It refers to the departments or workgroups an organization has and the types of documents each of those departments consumes. Regional taxonomies are very common in organizations that are regionally diverse, such as retail companies or companies with field, branch, or remote offices.
Period-of-time–based taxonomies are the least common and should be used sparingly. They are used for seasonal business or components of a business where documents with set time periods are established—for example, meeting minutes for the Q4 2012 board meeting. Here the time period is relevant to the meaning of the document, not when it was created. The meeting minutes for the Q4 2012 board meeting will always be about the board meeting that took place Q4 2012 and no other time period. The risk of period-based taxonomies is that time periods often change. If this is the case, a time-based taxonomy should not be used. Coho Winery is going to leverage all of these taxonomies in the example deployment so that we can cover each.
Important
Your organization’s taxonomy might differ from the one presented in the book. As you follow along in the chapter, take note of the things that are optional and then adjust your configuration plans accordingly.
The process of building these taxonomies can be painful. This is especially true for functional taxonomies. To facilitate design, we will use the prescribed .csv (comma separated values) format that will allow for import into the managed metadata service. There will be a separate .csv file per taxonomy. While there are third-party tools and Windows PowerShell scripts for importing and exporting taxonomies to and from SharePoint, the only out-of-the-box feature is importing. For this reason, we will want to design all our taxonomies first in CSV and use this as a master record of the taxonomies and leave them unchanged. You can use an Excel spreadsheet to create your taxonomies structure and keep each type on separate tabs to keep them organized in one file. Then save the file as a .csv when you’re ready to import them to the managed metadata service.
Important
After we import this taxonomy, it’s set in stone. This concept of unchanged taxonomies might be uncomfortable for some. If it is for you, we would suggest that maybe taxonomy is not the right thing for your organization, because the purpose of taxonomies is a strict dialect. But also realize that flexibility is built into taxonomies, using synonyms on terms, which can be updated, and 90 percent of the time this is enough.
The real power of taxonomies comes from its rigid dialect. When you click on the term contracts, you want to be able to trust the system to produce all contracts. There are legal and adoption implications to this that we will discuss in later chapters. For this reason, terms must remain static. To support flexibility, we can introduce additional terms as synonyms. If taxonomy changes over time, it loses its accuracy and familiarity with users. If your organization does not want or need this level of precision, consider user-generated folksonomies.
Folksonomies and taxonomies look, feel, and are implemented the same way. The key difference is that folksonomies are user generated, so they are more flexible, where taxonomies are static values that we configure up front to force certain standard descriptions and language. Our recommendation is to stick with taxonomies, but folksonomies can be useful to smaller teams working on short-term projects or organization of personal content not related to a large or historical audience. The biggest risk of folksonomies is getting sprawling term sets where you have every variation and misspelling of every possible term. This ultimately makes the tool useless. Thus, a strict process of adding terms or maintaining them is required. We have outlined the CSV format in Table 4-1, along with the descriptions of each for your review.
Term Set Name This is where we will give the broad name or type of the taxonomy we are working on—that is, functional, regional, or period.
Term Set Description This is a note to all administrators about what is contained in this set and how it’s used.
LCID This is the language code and is used only in SharePoint farms leveraging multilingual user interface (MUI). We will ignore this field for this application and use the code for English, which is 1033, but the column must be present for proper import.
Available for Tagging This allows the term to be used in places where tagging is enabled. Because we want only to encourage adoption of the taxonomy and we want to be sure content is tagged, we will leave this as “TRUE” for all terms. If your organization leverages a folksonomy as well, you might want to set this to “FALSE” for all tags.
Level 1-3 Term These are the actual terms we have decided to use for Coho Winery.
It’s very important that if a term has a child term that the parent field not be left blank. This is one of the most common issues when importing .csv files. For example, if I have level 1 term of Contract and two level 2 terms for Contract (Signed and Not-Signed), I will have to list Contract twice. See Table 4-2 for the correct format. In this case, you can see that Contract is listed three times.
Term Set Name | Term Set Description | LCID | Available for Tagging | Term Description | Level 1 Term | Level 2 Term |
Legal Terms | Term set for all legal terminology to be applied to all legal documents | 1033 | TRUE | Contracts signed or draft format | Contract | |
1033 | TRUE | Signed Contracts | Contract | Signed | ||
1033 | TRUE | Contracts in Draft | Contract | Not-Signed |
Note
A very common and time-consuming mistake is having rogue term fields in the CSV. If SharePoint discovers one row with incomplete data, the import will fail. Make sure to test your imports regularly on a test MMS term set.
Starting with the simpler region taxonomy in Table 4-3 and the period taxonomy in Table 4-4, we outline the first 10 rows of each.
Term Set Description | LCID | Available for Tagging | Term Description | Level 1 Term | Level 2 Term | |
Region | Region | 1033 | TRUE | Tasting Room | ||
1033 | TRUE | Tasting Room | Livermore | |||
1033 | TRUE | Tasting Room | Livermore | Downtown | ||
1033 | TRUE | Tasting Room | Livermore | Mines R. | ||
1033 | TRUE | Tasting Room | ||||
1033 | TRUE | Tasting Room | Napa | |||
1033 | TRUE | Tasting Room | Napa | City Center | ||
1033 | TRUE | Tasting Room | Napa | Wine Trail | ||
1033 | TRUE | Tasting Room | Napa | Sonoma Hills | ||
1033 | TRUE | Production | ||||
1033 | TRUE | Production | Napa | |||
1033 | TRUE | Production | Napa | Wine Trail |
Term Set Description | LCID | Available for Tagging | Term Description | Level 1 Term | Level 2 Term | |
Period | Period | 1033 | TRUE | Financial Quarter | Quarter | |
1033 | TRUE | Financial Quarter | Quarter | Q1 | ||
1033 | TRUE | Financial Quarter | Quarter | Q2 | ||
1033 | TRUE | Financial Quarter | Quarter | Q3 | ||
1033 | TRUE | Financial Quarter | Quarter | Q4 | ||
1033 | TRUE | Crush season | Crush | |||
1033 | TRUE | Crush season | Crush | 2012 | ||
1033 | TRUE | Crush season | Crush | 2013 | ||
1033 | TRUE | Crush season | Crush | 2014 | ||
1033 | TRUE | Crush season | Crush | 2015 | ||
1033 | TRUE | Bottle vintage | Vintage | |||
1033 | TRUE | Bottle vintage | Vintage | 2005 | ||
1033 | TRUE | Bottle vintage | Vintage | 2006 | ||
1033 | TRUE | Financial Quarter | Quarter | Q2 |
We started with these two taxonomies, because their terms are straightforward. However, the functional taxonomy takes substantially more effort.
The functional taxonomy will represent the documents organization-wide, but the taxonomies are defined on the department level. There are several ways to approach building your functional taxonomy. The approach we will use is to design taxonomies for each individual department and then reconcile them all at the end. We have outlined the following key principles to keep in mind when building your taxonomy:
Do not user “Other” or miscellaneous terms. These terms are a catchall that will be used more often than you will like. People see “Other” and they quickly store an item without looking for the appropriate name.
Do not use any transient terms. Terms like dates that will soon be invalid might be applied to a document and then never updated, so they become inaccurate. Dates and versions are the most commonly misused transient terms.
Do not use plural forms of terms.
Repetition is fine. Repetition in child terms will happen; this is common and expected. It’s the entire path of a term that matters.
Focus your terms on root concepts, and avoid being overly detailed. You can use synonyms for more detail.
Do not create term depth further than 4 terms. Users will tend to stop applying terms at the third level.
Do not use terms that are abbreviations, but use abbreviations in extended form for terms and synonyms.
The final taxonomy should be between 150–1,000 terms. We are outlining the beginnings of a taxonomy structure but by no means are these to be considered complete. Your organization is unique, and you will have to structure a taxonomy outline that meets your specific use case and requirements.
Term Set Description | LCID | Available for Tagging | Term Description | Level 1 Term | Level 2 Term | Level 3 Term | |
Functional Taxonomy | Functional Taxonomy | 1033 | TRUE | Accounting and Finance | Accounting | ||
- | 1033 | TRUE | Accounting and Finance | Accounting | Policies | ||
1033 | TRUE | Human Resources and Staff Development | Human Resources | ||||
Functional Taxonomy | Functional Taxonomy | 1033 | TRUE | Accounting and Finance | Accounting | ||
1033 | TRUE | Accounting and Finance | Accounting | Policies | |||
1033 | TRUE | Human Resources and Staff Development | Human Resources | ||||
1033 | TRUE | Human Resources and Staff Development | Human Resources | Annual Employee Reviews | |||
1033 | TRUE | Human Resources and Staff Development | Human Resources | Time Sheets | 1033 | ||
1033 | TRUE | Facility and IT Operations | Operations | 1033 | |||
1033 | TRUE | Facility and IT Operations | Operations | Communications | 1033 | ||
1033 | TRUE | Facility and IT Operations | Operations | Communications | Telephone | ||
1033 | TRUE | Legal and Risk | Legal | ||||
1033 | TRUE | Legal and Risk | Legal | Contracts | |||
1033 | TRUE | Legal and Risk | Legal | Contracts | Employment Agreements | ||
1033 | TRUE | Sales, Marketing, Promotional | Sales & Marketing | ||||
1033 | TRUE | Sales, Marketing, Promotional | Sales & Marketing | Advertising | |||
1033 | TRUE | Sales, Marketing, Promotional | Sales & Marketing | Advertising |
When building functional taxonomies, it’s important to realize that if the users do not relate or are not comfortable with the terms, the taxonomy will not be used. For this reason, it’s very important to incorporate the different functional units in the development building process. We have outlined some guidelines that are commonly used when constructing a functional taxonomy.
Creating a taxonomy
Creating a taxonomy
Creating a taxonomy
Take a screen capture of the shared folder structure for each function. The folder structure will be the starting point, not the result.
Create a list of representatives from each department or function that include project stakeholders or subject matter experts, and interview them by asking the following questions:
What types of documents do you work with on a daily basis?
How do you organize your documents?
Do individuals organize by personal preference at a certain level?
Merge the terms from the folder structure with the comments made during your interviews.
After you have completed the taxonomy outline, review the functions taxonomy and terms with the project stakeholders in each department.
At this point, you need to ask yourself the following questions:
Does this structure make sense?
Do the terms make sense?
Is anything missing?
Is there anything that can be omitted?
Would you use this taxonomy on your documents?
Reconcile all functions into a single spreadsheet.
Compare all terms to the retention schedule. All retention schedule documents should be represented at some level.
Normalize overlap between departments. In some organizations, this means isolating common terms into one portion of the taxonomy for all to use.
Test the final taxonomy, within a staging environment with the easy and difficult departments’ representatives.
As you are defining your taxonomy, it’s important to remember to balance the details about the rules of a standard process instead of the exceptions. You will want to build your taxonomies around standard language and operational use cases and be careful not to overanalyze your taxonomies. You will need to fine-tune them as you conduct reviews with stakeholders, so leave some room for modifications in the process of constructing your taxonomies. Eventually, you will need to complete this effort and publish your terms.
Note
Because of the way that SharePoint uses the managed metadata service and content types, publishing term sets for each department or function can become a burden from a configuration and maintenance standpoint. While it would be a best practice to separate taxonomies per function, it makes it very difficult to consume terms from one department in another. It also makes it difficult to reconcile with retention schedules. For this reason, and for SharePoint ECM only, we would recommend putting all functional taxonomy terms for all departments into the same term set. The benefit is easier maintenance. The downside is more terms shown to users than needed.
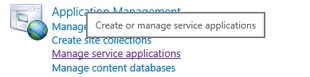
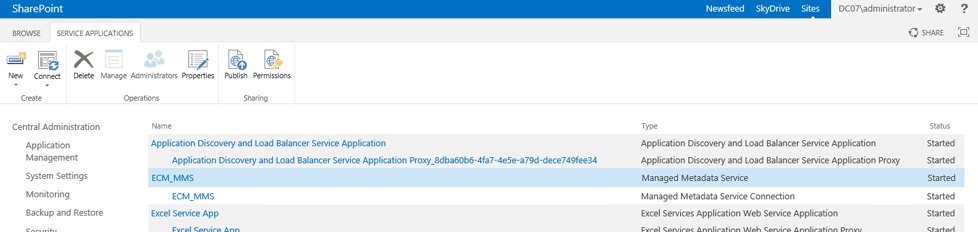
After we design our taxonomies, we must create these terms stores so that they are available to content types. We won’t add the terms yet; we’ll just create the store. Most organizations will be starting with a farm that already has a managed metadata service running, but we will create a new one called ECM_MMS. From your browser, navigate to the SharePoint Central Administration dashboard illustrated in Figure 4-6, and then click Manage Service Applications.
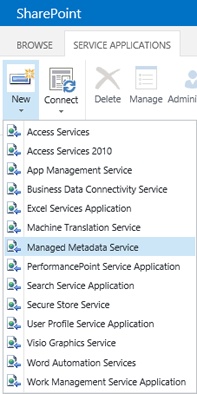
Then click the New drop-down button and select Managed Metadata Service as illustrated in Figure 4-7.
A new dialog will appear, where you will give the new MMS Service a name. We will use ECM_MMS, to separate this managed metadata service from others used in the farm. We will use that name for the database name and application pool shown in Figure 4-8. For the last and very important setting, give the URL of the site collection used for the content type hub—either http://ECMHub or its internal name.

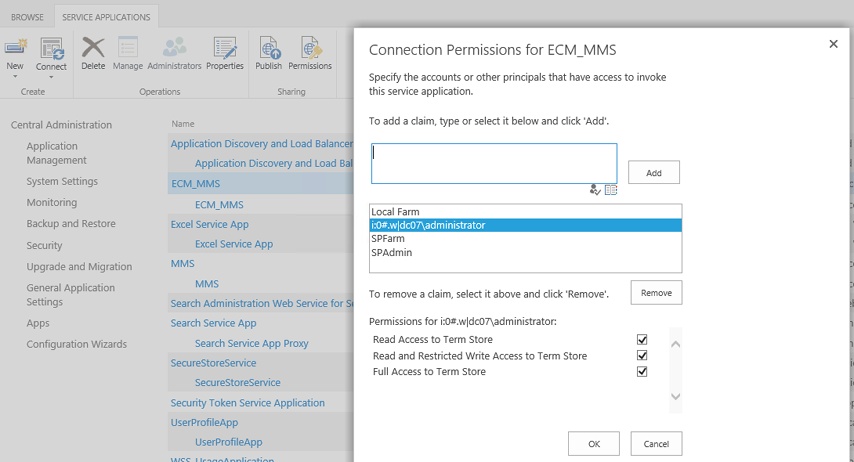
When you click OK, the service application will be created and started. Before we can use it, we need to grant ourselves access. This is done in two places. First, as shown in Figure 4-9, click to the right of your new MMS service application so that the row is highlighted.
Note
Clicking the service application name will cause it to open the MMS management page. This is not what you want at this point.
Next, click the Permissions button on the ribbon. A new dialog will open, as shown in Figure 4-10. Add your user account, and because we want to create and edit taxonomies, give your user full control.
We will need to do this in one other location, as shown in Figure 4-11. Click OK, and then click the Administrators button on the ribbon. This will open a new dialog box where you will also add your user and grant full control.

Below each service application is at least one service connection. We need to make sure that this connection is linked to the content type hub, as shown in Figure 4-12. To accomplish this, use a right-click and select to the right of the service connection name. In this case, it’s MMS, listed just below ECM_MMS, and then click Properties.

By default, the option Consumes Content Types From The Content Type Gallery at http://ECMHub/ will be unchecked. Make sure that this option is checked. Also, because on this farm we are doing only ECM and only leveraging MMS in the ECM site collections, we will make this the default service application.
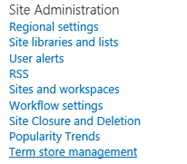
Now that we have created, started, and granted access to the managed metadata service application, we can access it in our //ECMHub site. As shown in Figure 4-13, you need to navigate to your ECMHub and browse to Site Settings, and under Site Administration, you can then select Term Store Management.
For now, we are going to create the base group and the three term sets we will use for Coho Winery. When you get into the Term Store Management Tool, you will see an existing group called “system.” This is the group that will be used for SharePoint for managing hashtags and keywords for sites and MySites. We will not do anything with this group. Instead, as shown in Figure 4-14, click the drop-down arrow to the right of the term store name.
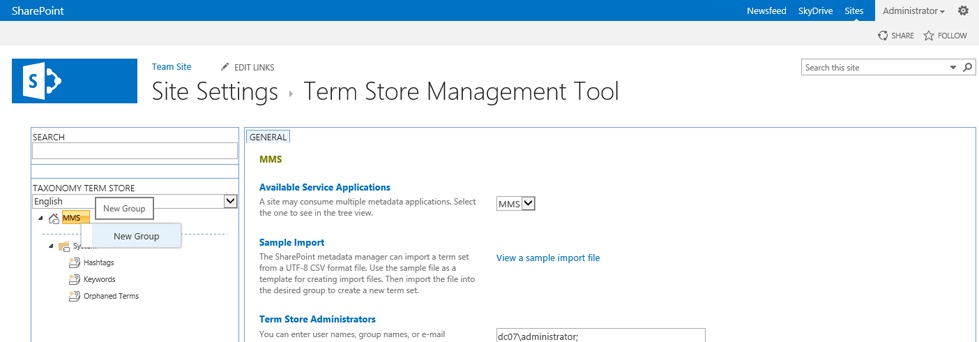
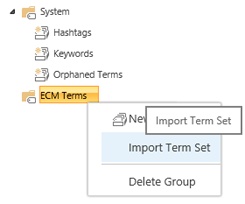
Select the New Group option, and type the name of the group. In this case, we will use ECM Terms. Groups are a logical way to break up term sets and are usually tied to the use cases for which they are used, so name them accordingly. In this case, it’s ECM. Rarely will you need to create new groups because of the size of term sets. Also, we consider keeping term sets to 800 or less to be a best practice for your SharePoint ECM solution. The primary purpose of the group is just having an easy way to organize MMS term sets when used for several use cases. We will call our Group ECM Terms. Now click the drop-down arrow to the right of ECM Terms, and you will be given options to create a term set.
On the new group, there will be a drop-down called Import Terms, as shown in Figure 4-15. Select your CSV file and select OK. Repeat this for the three different taxonomies we outlined earlier in the chapter—region, period, and functional, respectively.
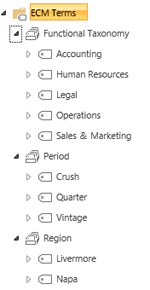
The result, based on the preceding samples, should resemble the terms outlined in Figure 4-16 and show all three term sets.
You have now successfully created and imported your taxonomies. These will be used in the columns for your content types. These steps we have outlined for creating taxonomies are applicable to the most commonly accepted procedures and best practices for building a SharePoint ECM solution. You should be able to apply these to your specific organization and use case.
Content types
Because both the large-scale and small-scale implementations will share the same content types and because the methods for managing content types use content type publishing and the content type hub we named http://ECMHub, we will not spend time setting up the content types and hub for both.
If you remember from the IA sections in Chapter 2, your content types are a single but important component of IA. Many organizations will tend to create content types for every document type imaginable, and they will use content types in lieu of other IA tools, namely taxonomies. We want you to remember that there is a balance. Our approach with Coho Winery is to use a predefined retention schedule that has been approved by the Legal department. This will be the foundation of our content type hub.
Regulated and large companies all have retention schedules, but as we said previously, an organization of any size should create a retention schedule as a key tool in planning out an ECM system. It lists the types of documents the organization uses and how long a document should be kept. If you do not have a retention schedule, we have outlined the process of creating one for you to follow. It will be an interview process of each department and function to determine what types of documents the organization has and what impact they have on the business. It sounds simple, but it tends to be a time-consuming effort that requires subject matter experts in each department to perform a records inventory.
Documents that do not participate in specific LOB activities, or documents that are not risky from a compliance and legal perspective can be omitted from the file type listing. The benefit of this is greater ease of management, but the downside could be that those documents are either not used in ECM or used in a very general way, which could encourage free-form content storage and ultimately lead to bad adoption of the SharePoint ECM solution. If possible, we recommended taking the approach that if a particular type of document is neither relevant to a specific LOB system nor to ECM, it should be removed from any system and users asked to keep it in personal storage.
Next we need to determine the likelihood that these documents will be stored in the SharePoint ECM solution. In general, your goal should be to get all business-related content stored in ECM. In terms of eDiscovery and procedures such as legal holds for email and related content, it’s not what you get correctly identified and stored and managed in ECM that hurts you; it’s more likely the content that you don’t control, file, or properly identify.
When this is done for each department and operational function, the types can be reconciled for the entire organization. We will want to eliminate redundant document types and terms and merge them to create a final list for the content types to be produced. This will be your content type list. For purposes of this implementation, we will use a subset of a retention schedule of only 10 document types that are typical for any organization. It is recommended that your organization try its best to consolidate document types by retention periods.
Note
We will also build all content types based on the base Document content type, unless you have rich media such as audio and video, and then special document types are needed.
We have outlined our initial document type sets in Table 4-6. You will notice, just as with our taxonomy .csv files, that we plan everything in table form, including the columns we want to have prior to doing any setup in SharePoint. Remember that SharePoint is a tool to implement methodologies, not the other way around. Content types are a component of the IA methodology we have discussed; these are for organization of content. Do not expect SharePoint to give you the answer on how to organize or classify your content; it will do exactly what you tell it to do, so be diligent about your planning and documentation.
Document Type | Description | Retention Period |
Agreements | Includes leases, equipment, services, or supplies | AT + 2 years |
Bids and proposals | Project bid submissions, including RFP, quotes, and so forth for projects from vendors | CYE + 2 years |
Correspondence files | Various categories per department and/or type (that is, upper lateral letters) | CYE + 2 years |
Minutes | Board and other meeting minutes | Permanent |
Photographs | Historic, aerial, and other | US + 2 |
Deposits, cash receipts, worksheets | Checks, coins, currency, and credit card transactions | CYE + 10 years |
Salary records | Deduction authorization, beneficiary designation, unemployment claims, garnishments | AT + 2 years |
Employee time sheets | Signed by employee for audit and FEMA reports | CYE + 10 years |
Purchase orders | Submitted purchase orders | 2 years |
Note
Content type publishing is a powerful yet sensitive tool. It is imperative that the content type hub and publishing be enabled before any other site collections or sites can be created. If organizations mistakenly do this out of order, the connection between the hub and the consuming site will be broken. Correcting such an issue is non-trivial.
We need to cover the terminology that is used in retention schedules. In the retention period column, there is usually an abbreviation plus a time period. With the exception of permanent, which are records that should never be deleted (these should be rare), everything has a period after which it should be disposed of or archived. In Figure 4-17, we illustrate the relationship between content types, retention schedule, and document types.
AT stands for after termination date. Agreements will be deleted five years after termination.
CYE stands for current year end. On close of business of the current year, purge these records plus a certain amount of previous years.
US stands for until superseded. These documents are replaced when or some period after there is a newer version of the document that is more current.
CL stands for close or completion. These records are deleted when the project or activity has completed, plus some time.

Note
Some organizations might have some modifications to these abbreviation meanings, while other organizations do not use abbreviations but full text to describe retention.
The Document and Image content types already exist as a part of the base content types, so you do not need to create these. All of the boxes in the bottom row represent new content types that need to be created; we have outlined nine in total. We could create a content type just for retention periods; however, this would not provide friendly names for your users. Instead, we go ahead and create a content type for each known document type mentioned in the retention schedule.
Now that we know what the content types we need to create are, we need to know what sorts of metadata we need for each type.
Metadata is key for a lot of aspects of deploying a good SharePoint ECM solution. The results of applying an effective metadata structure are better findability, compliance, browsing, and consumption of content. However, too much metadata can be overwhelming. When deciding what types of metadata columns to add to each content type, you need to find balance. The proper balance allows you to use the most common search terms; don’t be too narrow or overly broad in an attempt to cover every possible variable or exception. The following questions should be evaluated to provide general document search and satisfy records management functions:
What metadata would be nice to have as search refiners when you search for documents?
What metadata is needed for sorting document libraries?
What metadata is needed to enable retention?
Important
Metadata is subjective to your specific needs. We caution you not to overproduce columns to satisfy every possible variable. It’s a common mistake to create too many metadata columns.
Remember the content type’s primary purpose is to be a container for metadata and enable retention schedules. We will also be using managed metadata, discussed in the next section, to make our content more powerful. We should allow MMS to take on the bulk of organization and IA. The number of columns you have in a content type should be the standard built-in types: name, title, modified by, and modified date. In addition to these, we suggest no more than four additional columns that you know will be used regularly. We modified Table 4-7 to outline the list of content types to include those columns we thought we would need for Coho Winery.
Document Type | Retention Period | Additional Columns |
Agreements | AT + 2 years | Parties, Termination Data |
Bids and proposals | CYE + 2 years | Vendor, Project |
Correspondence files | CYE + 2 years | |
Minutes | Permanent | Meeting Date |
Photographs | US + 2 | Superseded Date |
Deposits, cash receipts, worksheets | CYE + 10 years | Transaction Date |
Salary records | AT + 2 years | Pay Period |
Employee time sheets | CYE + 10 years | Pay Period |
Purchase orders | 2 years | Issued Date, Amount, Status |
For organizations with more content types, you might find that some types can be reconciled to be the same based on additional columns and retention. However, this should be considered as counterintuitive to a general user’s ability to understand the name of content types.
In addition to the unique columns for individual new content types, all content types will have the following three new columns of type MMS that we defined in the taxonomy section previously:
Function
Region
Period
We will require that the functional taxonomy be required and used on all content and that the regional and period be optional. The name of these taxonomies will be unique per organization but still the three most common types of taxonomies used for Coho Winery’s SharePoint ECM solution.
We will begin by adding these three columns to the base Document and Image content types. We start here because all other content types will use these additional columns. We recommend that you think ahead about the type of your column; this could have significant impact on how it’s used in workflow and information management policies. For example, we have a new column, Termination Date, which should be a date type instead of plain text. Here we will also want to group all new columns for easier management of them.
Creating each content type
Creating each content type
Creating each content type
Browse to site settings by selecting the gear graphic in the upper right and clicking Site Settings.
Select Site Content Types, the location of which will depend on your version of SharePoint 2010 or SharePoint 2013 and enabled features.
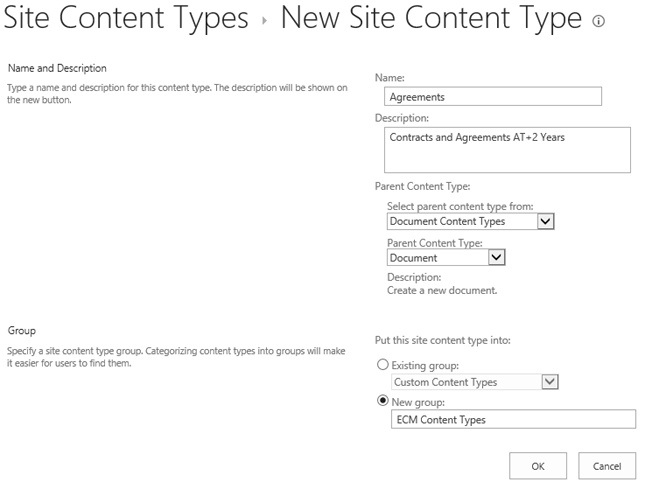
Click the Create button on the top left. The New Site Content Type dialog box appears, as shown in Figure 4-18.
Give the content type a name and description. Select whether it’s based on Document Content Types, Document, or Document Content Types, Picture. It is a good idea to put new content types in a new group to avoid confusion. The first content type you create you will need to give the group a name, but for all others, you can browse to your group via the Existing Group drop-down. In this case, we will create a new group called ECM Content Types.
Click OK.
You are now taken to the Content Type Settings page shown in Figure 4-19. Here we will modify some settings and add columns.
Add all applicable columns. This content type has the unique columns Parties and Termination Date. Click Add From New Site Column.
Give your column a name, type, group, and make sure that the option Update All Content Types Inheriting From This Type? is set to Yes.
For columns Functional Terms, Period, Region, we will set these columns to type Managed Metadata and point them to the appropriate taxonomy. We will also select the Display Value option Display The Entire Path To The Term In The Field. The reason for this is that taxonomy terms are not only about their individual term; their relationship to parent terms is also important. Terms in taxonomy also repeat, but frequently with different parent terms. If you see only the selected term in a view, these two elements can cause problems in sorting and filtering. To make sure that there is no question, we show the entire path. Showing the entire path might be less aesthetic in views. The method for avoiding this is to hide this column unless it is absolutely required in the view. For taxonomies that are flat, where no term has a child term, you can leave this to the default. See the configuration options shown in Figure 4-20 for the Functional Terms column in the new Agreements content type.
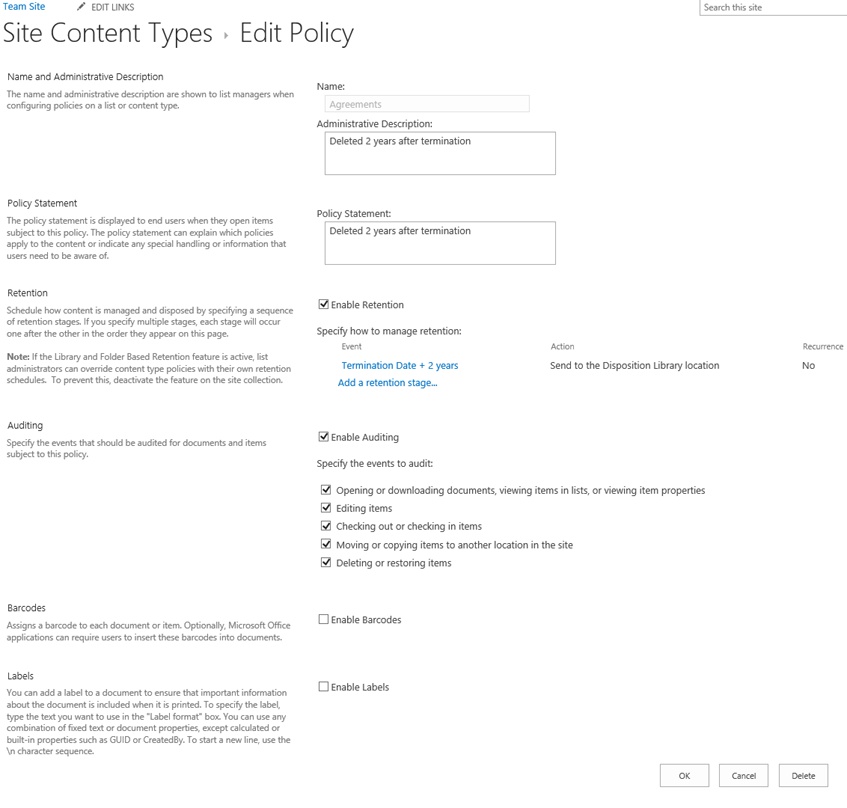
Now that we have created the columns, we can apply the information management policies. On the Content Type Settings page, click Information Management Policy Settings. For the Agreement content type, disposition happens two years after the termination date of the contract. We will use the new Termination Date column to determine this.
Provide a policy statement and administrative description that are equal to the retention period. Click Enable Retention, and then click Add A Retention Stage. Here you will specify the stage based on a supported column and the action taken. For reasons we will explain in the records management and eDiscovery sections, we are choosing to move disposed documents to a new location. We will also enable auditing on all our new content types at this stage, on all particular events.
Our final step in creating the new content type is to enable content type publishing for it. Click Manage Publishing For This Content Type, select Publish, and click OK. Anytime you make changes to content types, it is good practice to publish or republish the changes. This should be very infrequent.

After you have built out all your content types, you are ready to build the IA for either the small-scale or the large-scale implementations.
The primary differences between the small-scale and large-scale deployments is the level at which the IA presents itself. Large-scale deployments are built for larger amounts of content; we plan for and configure them so that they are ready to grow. A small-scale deployment is built for ease of use and administration but not to support large growth or high volumes of content.
Shared Information Architecture
Let’s first create the isolated site collections that have unique permissions and that will be used in both large-scale and small-scale deployments. These are Management, Legal, and Projects, respectively.
The Legal and Management sites have very strict security access and should not even be a part of the default navigation of any site. The Projects site should be accessible easily by anyone.
To create them, navigate to the Central Administration dashboard. Click Application Management, and then select Create Site Collections. Here you will give the site a Title and Type as shown in Figure 4-21. For Projects, we will select Team Site, and for Legal and Management, we will select Document Center.
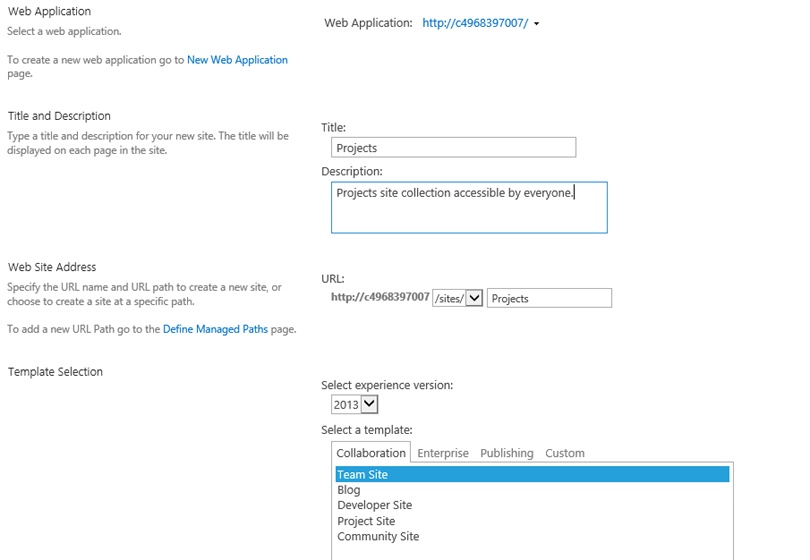
For Administrators, we will select a super user, an IT user, and a records manager. You will recall that previously we recommended choosing three to five administrators who are trained and have good competency with SharePoint.
Repeat the steps for creating site collections for Legal and Management. When all three of the separate site collections have been created, we will assign special security to Legal and Management. For Projects, everyone in the organization will have access because projects serve as the location where all users from any function can work together. For Legal, we will make the entire site collection visible only to users in the Legal group. For Management, we will make the site collection accessible only to users in the Management security group. For the Legal and Management site collections, we can elect to not have any users from IT with access.
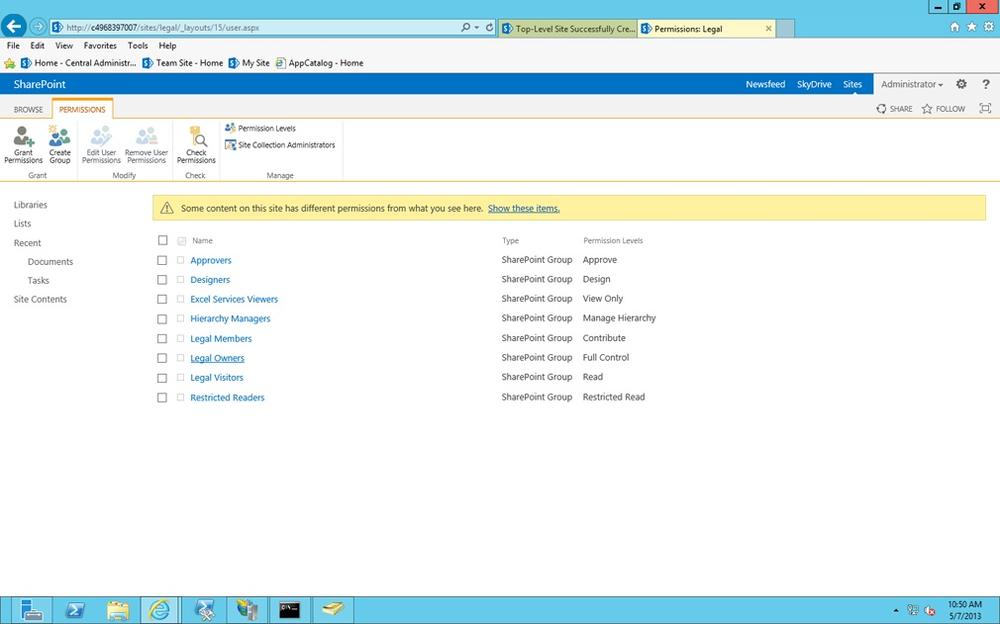
Browse to your new site collection—for example, //Café/sites/legal. Navigate to Site Settings, and select Site Permissions as shown in Figure 4-22. Here we will place the appropriate user groups in the right security level. For example, in Legal we will add the Legal user group to the Legal Owners group. You can do this by clicking Legal Owners.
Now click New on the top left, and select Add People To The Group, as shown in Figure 4-23. Type the name of the active directory security group Legal, and click Share.

For Management and Legal, we will create the standard set of document libraries and rich media. Navigate to the root of one of these site collections—for example, //Café/sites/Legal. Select the Site Settings configuration menu item.
Select Document Library. We will create both a document library called Documents and a picture library called Rich Media. In most site templates, Documents is a default library that already exists. If it does, it does not need to be re-created.
For both of these libraries, we will want to use Advanced options and select to enable versions. The result should look like Figure 4-25.
Note
The differences between the SharePoint 2010 and SharePoint 2013 user interfaces start to become obvious in the settings pages. In SharePoint 2013, new libraries and sites are types of apps, whereas in SharePoint 2010, creation of these can be performed from the Site Actions menu.

Note
In SharePoint 2013, libraries do not automatically appear under the heading Libraries. New libraries appear under the Recent heading. You might have to navigate to Site Settings and modify Quick Launch navigation to get these libraries as static elements under the Libraries heading.
Before we are done, there are a few settings we will enable for all sites and libraries that we create from now on. This includes the sites and libraries created in the following sections:
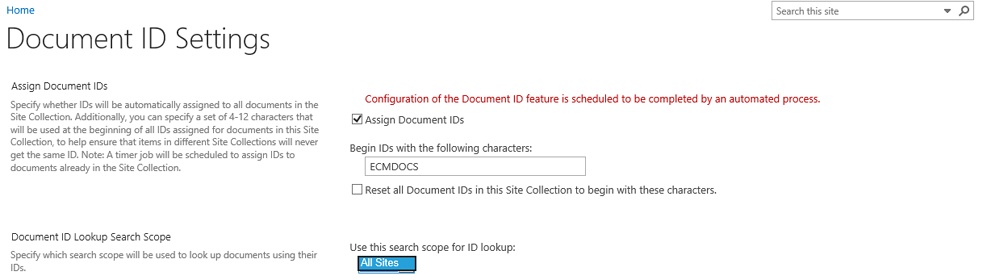
Because we want to make sure that we are tracking all documents as single immutable records, we want to enable the document ID service discussed before that will enable us to do this. To do so, navigate to your new site’s site settings page and click Site Collection Features. Document IDs are a feature of the root site collection. As we see in Figure 4-26, we want to make sure that Document ID Service is selected.
Navigate back to Site Settings, and select Document ID Settings. You should see the screen shown in Figure 4-27. Now you can assign a prefix used when IDs are applied.
Now we need to add the custom content types we created in our content type publishing hub //ECMHub. Navigate to each library, such as Documents, and add the appropriate content type for that site and library. For example, for the Legal site collection and the Documents library, we are going to add the Agreements content type. On the Library ribbon shown in Figure 4-28, click Library Settings.

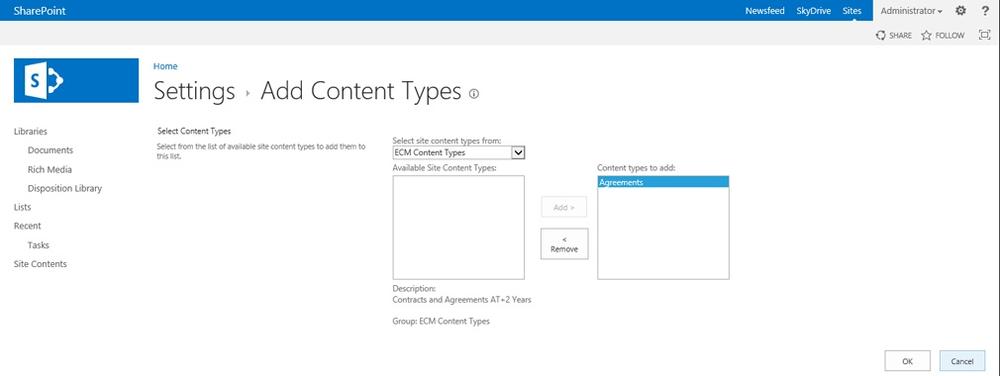
The Settings screen for adding content types will be displayed, as shown in Figure 4-29. Click Add From Existing Site Content Types. Select the ECM Content Types group and Agreements. Click OK.
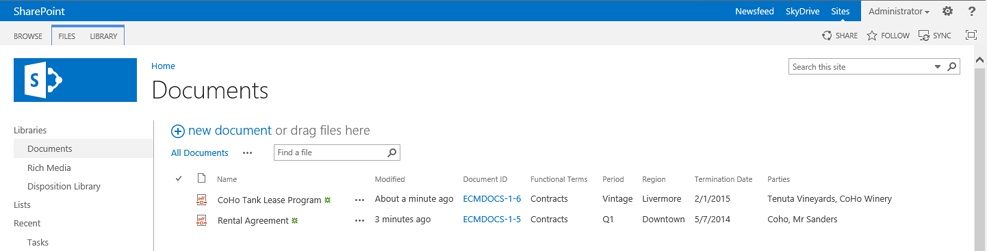
Repeat this for all content types that are appropriate for that library. The content type will now appear as a type of document that can be uploaded and created in this library. It is now also a good time to modify the view of the library to show the columns that are relevant. At minimum, this should include the columns for functional, period, and region taxonomies as well as document ID. We see in Figure 4-30 that the Documents library in the Legal site has a sample agreement document uploaded and assigned to the Agreement syndicated content type.
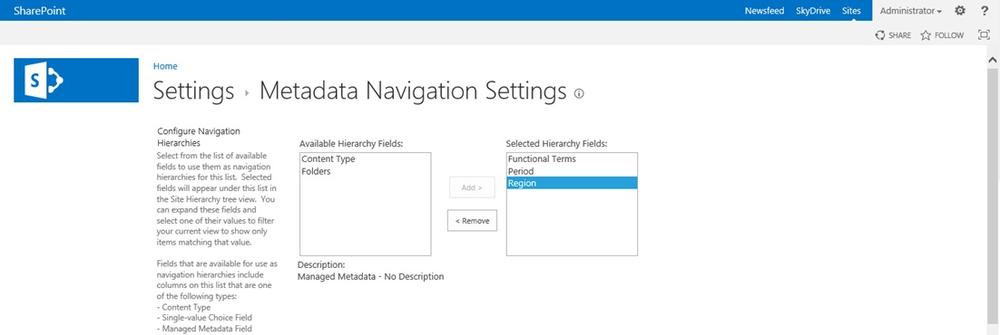
Now that we have all the proper content types, columns, and features, we will enable metadata navigation with the taxonomies we have created so that we can improve browsing and filtering of documents, facilitating the flat IA. To do this, you can go back into library settings and select Metadata Navigation Settings. In this settings dialog, as shown in Figure 4-31, you will be able to pick folders, content types, and all available taxonomies. We do not recommend using folders. Instead, add the three default taxonomies we added previously for Functional Terms, Period, Region, and content types.
After you have done this, users will be able to navigate and filter libraries based any combination of types of documents and terms from the three taxonomies. This is a full representation of the power of a flat, well-defined IA, as shown in Figure 4-32. If you follow this structure, you will have an extremely easy to manage site collection and provide the superior search results that your users want and deserve.

You can now complete this process for all the libraries we have outlined. We encourage you to apply these best practices to the site collections that you create for your organization’s SharePoint ECM solution.
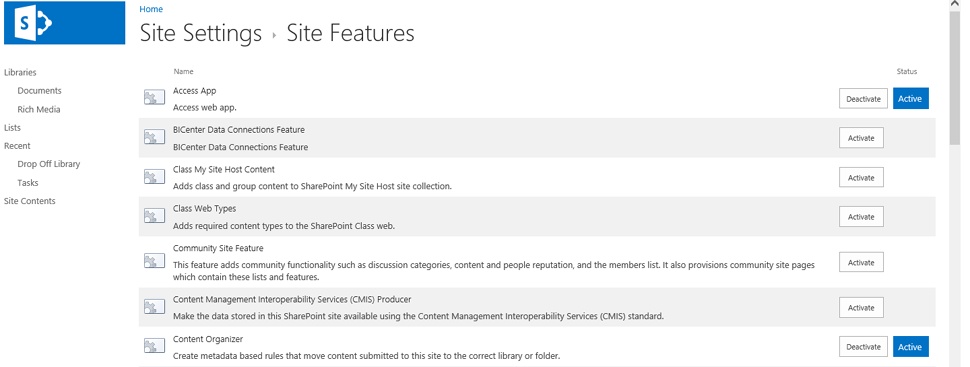
In the Legal site collection, we will take one additional step and create a disposition library. This is the location where all information management policies will send content to have a final review by the Legal department before their manual and final deletion. This is not just any library. It is a special type of library called a Drop Off library. To create it, we first need to enable the Drop Off library feature, as shown in Figure 4-34. Go to the Settings menu, and select Site Settings. Then, under Site Actions, select Manage Site Features. Here you will see the Content Organizer feature; click Activate on this feature.
Note
Content organizer, document center, auditing, and so on are all features of the Enterprise Edition SKU of SharePoint. If you do not see these features, you might be logged in with a CAL without access to Enterprise features or have a non-Enterprise-enabled farm. For purposes of ECM Enterprise Edition, licensing of SharePoint is required.
This is automatically going to create a library called Drop Off Library. In SharePoint 2010, you will see this library under the Libraries heading; in SharePoint 2013, it is found under the Recent heading. Move the library so that it appears under the Libraries heading, and rename the library in Library Settings, as shown in Figure 4-34. We recommend that you provide a more recognizable name, such as Disposition Library; it’s just more user friendly.

Although we have created the Disposition Library, we will need to create a connection to it so that it can be used by the information management policies. The first step is to note the location of the Drop Off library. Go to Site Settings, and select Content Organizer Settings. At the bottom of this settings page, you will see a URL. Save this URL for reference later. It will look something like http://c4968397007/sites/legal/_vti_bin/OfficialFile.asmx.
Now browse to Central Administration. Under the General Application Settings, click Configure Sent To Connections. Here you will create a new connection, as shown in Figure 4-35. Give it a name, and pass in that URL that you noted before.
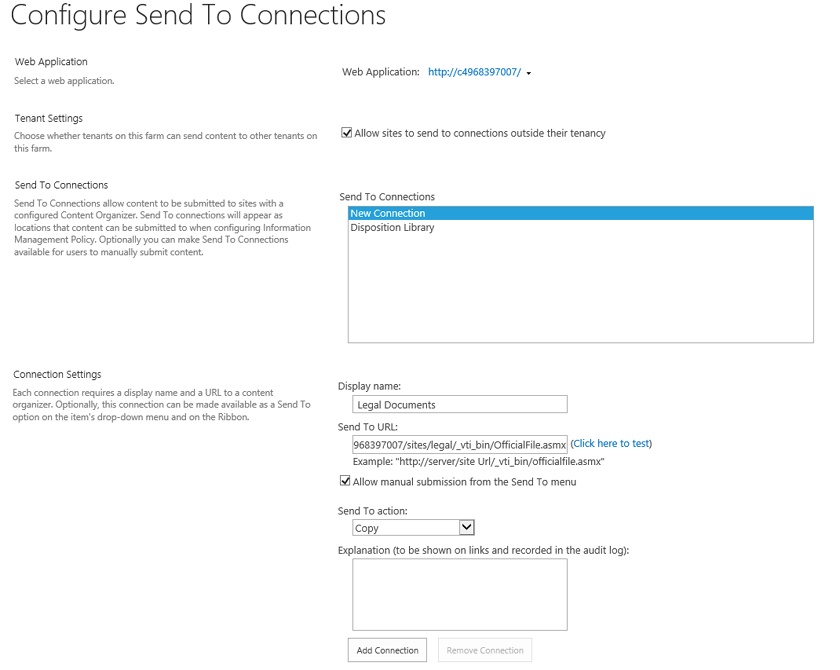
This new connection will create a send-to location that can now be used by all content types as a location for disposition.
We have dealt with the exception site collection where greater or unique security is required. We can now create the IA for the remaining functions. For Sales & Marketing, Human Resources, Operations, Accounting, and IT/Operations, we will create subsites under the root site collection //Café. Navigate to the Settings menu, and select Add An App.
Small scale
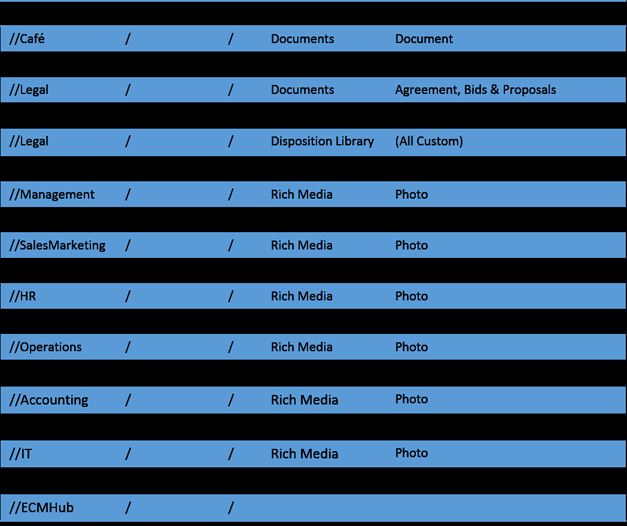
In the small-scale deployment, we will use the web application //Café as the root site collection and container for all subsites. We will create a site for each primary function in the organization: Sales & Marketing, Human Resources, Operations, Accounting, IT—with a separate site collection for Legal, Projects, and Management. The structure of the small-scale deployment, as shown in Figure 4-36, is based on the content types we created previously.
As we build out the sites for the small deployment, we will allow them to be added to the top navigation. To create the subsites, as shown in Figure 4-37, navigate to the Settings menu and select Site Contents.
At the bottom of the page, click the New Subsite option. Give the site a friendly title, a URL name that should have no spaces. For all the subsites, we will use the Document Center template, as shown in Figure 4-38.

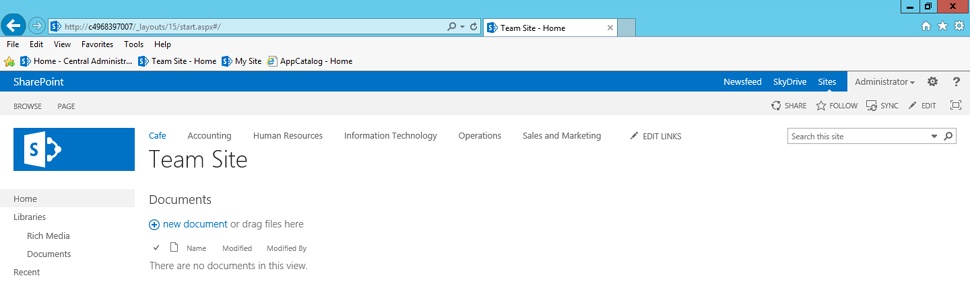
The resulting site contents structure and top navigation will appear as shown in Figure 4-39, showing Accounting, Human Resources, Information Technology, and so on.

After the sites are created, follow the procedures outlined at the beginning of this chapter for managed metadata, taxonomies, content type, and shared IA, as needed for each site collection:
Apply security groups.
Create the libraries.
Assign content types.
Modify views.
Enable metadata navigation.
When done, you will have the foundation for a small-scale farm with powerful SharePoint ECM solution functionality.
Large scale
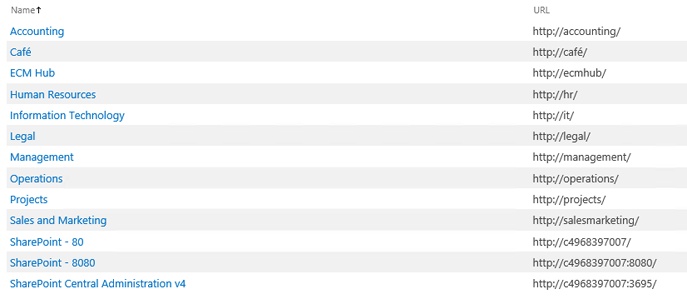
Similar to small scale, with large scale we will start with the special site collections projects: Legal and Management. In this case, we will also create a web application for each function for ease of browsing. Therefore, instead of //Café/sites/legal, we will have //Legal. Additionally, Café will be used as a hub for all the other sites but not contain them. Figure 4-40 shows the structure of the IA for our large-scale deployment use case.

To create the web applications, we will follow the instructions we outlined at the beginning of the chapter when we created //Café, //Projects, and //ECMHub. Figure 4-41 shows the resulting Central Administration Manage Web Applications page.
In the large scale, we don’t have the luxury of having the web applications and root sites appear in the top navigation automatically for café. We will want to add them manually by browsing to //Café and clicking the Edit Links button on the top navigation bar and clicking the + Link button to reconstruct the navigation shown in Figure 4-42.
Next steps
You have now successfully built out the base IA and features for an easy-to-use SharePoint ECM solution. If you have used SharePoint before, you can see the difference in the approach we are taking by using a flat structure. If you are new to SharePoint, you will have a great experience by following the best practices of IA outlined in this chapter. Now it’s time to consider aspects of how to manage these deployments, build a team, and look at special functionality such as records management and eDiscovery.