


Security
In this chapter, we describe how to control access to the records that are stored and managed in an IBM Enterprise Records repository. Security is a key component of a comprehensive records management solution, because it provides access control to the records in the system and ensures that records are destroyed only through a defensible process.
This chapter covers the following topics:
4.1 Security model overview
One of the key features of a records management system is the protection of the records that are being managed. When content is declared as a record, it is no longer under the control of the author or originator. After declaration, it is under the control of the records management system, based on a combination of security settings and how you choose to configure access based on the requirements of your records management solution.
By adjusting security settings and configuration, the Records Manager or Records Administrator decides who can access the content or the metadata associated with the content. Field masking can be configured to limit users to modifying only specific properties while disabling updates of other properties.
After content is declared as a record, Enterprise Records assures that it cannot be deleted unless it is being destroyed as part of an established disposition process. Access controls are configured to prevent users from deleting either the record or content until dictated by retention policy, following the general best practice that records are only destroyed as part of a well-defined, defensible disposition process. Under certain circumstances, authorized users, such as Records Administrators or Records Managers, can delete or undeclare records to correct mistakes or errors in the declaration process. However, the deletion of all records is fully auditable.
Enterprise Records relies on the powerful capabilities of the IBM Content Platform Engine security model. Implementing a robust security schema involves understanding the various options available, such as how the file plan tree can provide a primary structure for imposing inherited security on the records that are declared in the file plan. It is also important to understand the additional features and capabilities of the IBM Content Platform Engine security model that can be applied to records, such as security proxies, inherited security, and marking sets. Implementing a successful records security schema requires the following knowledge and actions:
•Understanding the best practices for access to business records
•Understanding the predefined Enterprise Records security roles and how you can use them
•Identifying typical access rights and how those might apply to departmental users (for example, the difference between a view-only role, an author role, and a coordinator role)
|
Note: Defining the appropriate security schema is a key aspect of designing a comprehensive records management solution.
|
A security schema might include these choices:
•Adding simple departmental or business unit separation to the file plan
•Using the partial security proxy type to allow previously configured access settings to be retained while extending access for purposes of managing and disposing of records
•Using marking sets to impose additional access restrictions on individual records
•Using direct security or custom proxy objects to apply varied access control to individual records
As you learn about the security features that we describe in the remainder of this chapter, remember that the Content Platform Engine offers more options and capabilities for modeling and controlling security than those covered in this book. For more detailed information about the various aspects of the Content Platform Engine security model, such as how inherited security works, how to add and configure marking sets, and how to use field masking to control access for specific properties, see FileNet P8 security documentation in IBM Knowledge Center:
4.2 Records management roles and security
When designing a records management system, whether it is manual or electronic, there are a variety of roles that are played by members of the organization. These roles and the actions performed by each role are typically defined by the processes and procedures of the records management system. These roles define both the actions that a user is permitted to do and restricted from performing.
Enterprise Records has a set of predefined security roles that provide a framework and starting point for defining your records management security. Each of these roles has been assigned specific access levels to the various functions and features available in the system. The first step in creating a security model is to understand the access levels that are defined for each of the predefined roles. This helps you determine the ways in which you might want to further refine the security schema to meet your business requirements.
4.2.1 Four standard roles
Four standard roles are defined by the Base data model of Enterprise Records:
•Records Administrator
•Records Manager
•Records Privileged User
•Records User
These roles are typically mapped to groups in the directory service.
|
Preferable practice: Avoid mapping individual users to Enterprise Records security roles. Instead, set up and use security groups from the directory service. You can then add and remove users from these groups as needed without affecting the configuration in Enterprise Records.
|
There is variation on the predefined roles with the other data models. For example, the DoD Classified data model implements an additional role called the Classification Guide Administrator.
It is a common practice to further differentiate the standard security roles by adding specific security groups to the file plan, based on business requirements. For example, you might want users from a single department to have access only to the records that belong to that department. We describe this topic in more detail later in this chapter.
Now, we focus on the four standard roles that are already defined in the software and how they are implemented. We identify several of the typical responsibilities associated with the standard roles. The specific security permissions for each of these roles is configurable, and in particular, the specific variations between Records Privileged User and Records User must be determined by the needs of the business requirements that you are implementing.
Records Administrator
The Records Administrator is responsible for the setup and configuration of the records management system. This user is often a member of the IT department rather than the business unit or records management team. This user helps to manage the system, including finding and resolving issues often in conjunction with or at the request of the Records Manager. A Records Administrator works with the Records Manager to properly configure file plan components based on the business requirements. In terms of access control, a Records Administrator typically has full control of all entities defined in the file plan and in the file plan object store (FPOS).
These tasks are commonly associated with the Records Administrator role:
•Perform initial system and component configuration
•Manage and configure security
•Configure required object classes and property templates
•Work with the Records Manager to configure the primary file plan category structure, disposition schedules, triggers, and actions
•Import and export records or configuration settings
•Delete entities under special circumstances
•Configure auditing and manage audit log
•Perform backup and restore of file plan and records
•Run or schedule disposition or hold sweeps
•Perform or coordinate required database-level tasks
Many of the tasks the Records Administrator must perform are done through administrative and configuration tools outside of the Enterprise Records desktop interface.
Records Manager
A Records Manager is typically a records management professional who makes decisions about the design of the file plan and the nature of the retention schedules to be implemented. The Records Manager works with the Records Administrator to build and maintain the file plan and all its related elements. After the system has been configured, the Records Manager is primarily responsible for monitoring the records in the system, placing records on hold, initiating disposition, and making any adjustments to the file plan and disposition schedules as business or regulatory requirements change. In terms of access control, the Records Manager typically has full control over most entities defined in the file plan, including the ability to delete records that are not on hold.
Common tasks associated with the Records Manager role are:
•Define the structure of the file plan by determining the appropriate record categories that will establish the classification scheme for records.
•Define and update disposition schedules.
•Allocate disposition schedules to record categories or record types.
•Establish holds and determine the conditions for holds based on requests from authorized business users, such as the legal team.
•Place records on hold.
•Initiate and approve disposition of records.
The Records Manager relies on the Records Administrator to configure the more technical elements of the system.
Records Privileged User
A Records Privileged User is a day-to-day user who typically has permissions to declare records and help manage the records in a file plan. Such a user might be a departmental records coordinator or a records office clerk. The Privileged User operates within the file plan configuration that has been implemented by the Records Manager.
Common tasks associated with the Privileged User role are:
•Create and manage record folders within a given category, if folders are being used.
•Declare records or organize records for automated declaration.
•Update record properties or move records if needed.
•Review records for disposition.
Records User
A Records User is any day-to-day user who needs access to the records in the file plan but does not require the additional permissions of a Privileged User. For example, you might not allow a Records User to declare new records, but you typically allow a Records User to search for and view records.
The Records User role is the most restricted of the four standard roles. Common tasks associated with this role are:
•Search for and view electronic records.
•Create new records by adding content to the repository with the appropriate metadata that will determine where and how the record will be declared.
•Identify electronic documents for declaration and participate in declaring records through a well-defined business process.
•Store and retrieve physical records.
In many cases, the Records User might not require access to the Enterprise Records desktop interface at all, but will instead rely on search and browse capabilities provided by their standard IBM Content Navigator desktop or some other application interface.
4.2.2 Roles and access levels
As you can see from these brief descriptions for each of the four standard roles, the one important difference among these roles is the level of access control. The Records Administrator requires the most access (is the least restricted in terms of access to records and what functions can be performed on records and other entities in the file plan) while the Records User role has the most restrictions. These four standard roles represent the most common, broad access levels required by most organizations. These access levels can be adjusted to suit specific business requirements as needed.
4.2.3 Mapping roles to security groups
It is best to establish the security groups that you want to map to the access roles before building your file plan. Security groups are mapped to access roles when setting up a new FPOS object store, which typically happens for the first time during initial software installation. The security groups are established on the FPOS object store during object store creation and mapped to the security roles as part of the initial object store configuration process.
Knowing which security groups to map to each of the Enterprise Records security roles is important. The most flexible approach is to create one master security group for each of the Enterprise Records security roles. You can then later use the directory service to assign specific groups and users to the master security groups without having to change the security role mappings in Enterprise Records.
Establishing master security groups
In Table 4-1 on page 100, we illustrate four security groups where we use a naming convention that associates the groups with Enterprise Records and identifies the role to which each group applies. These groups need to be established in the directory service with the intention that they will contain other groups as members. Therefore, we refer to these groups as master security groups. Although you can add individual users directly to these groups, you will probably add other groups that have individual users as members. The naming convention that we chose here is merely an example. Most organizations establish their own standards and policies for naming security groups.
Table 4-1 Mapping security roles to master security groups
|
Security roles
|
Example master security groups
|
|
Records Administrator
|
IER_RecordsAdminG
|
|
Records Manager
|
IER_RecordsManagerG
|
|
Records Privileged User
|
IER_PrivilegedUserG
|
|
Records User
|
IER_RecordsUserG
|
|
Preferable practice: Work with your security administrator to establish an appropriate naming convention for your security groups before implementing your Enterprise Records solution.
|
Figure 4-1 shows an example security mapping between roles and master groups for an example FPOS object store. This information can be accessed through the Enterprise Records desktop Administration view by selecting the FPOS repository and viewing the Security Script tab. This mapping is established during the initial configuration of the FPOS object store. Although the mapping can be changed by adjusting which groups are used for each role, the change in mapping does not apply to objects already created. So, it is best to establish this mapping before building out the file plan configuration.
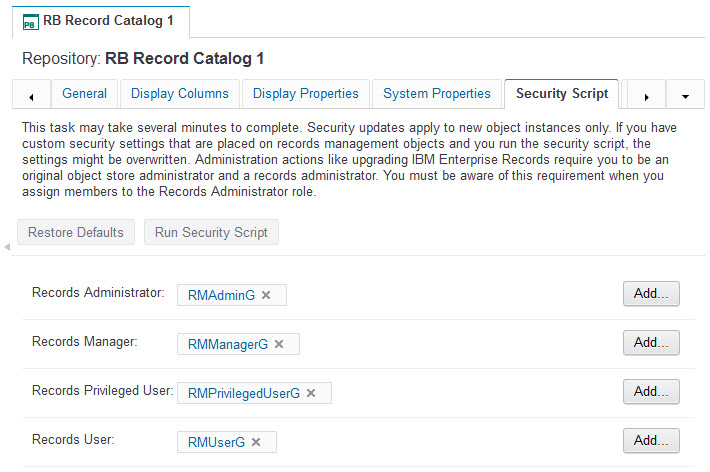
Figure 4-1 Example security mapping between security roles and LDAP groups
Using the predefined security configuration
When setting up the initial security configuration as just described with one master security group for each of the record management roles, it is possible to use the system without further differentiating groups of users. You can assign users directly to these master groups. However, most organizations have existing policies in place where directory services group memberships have already been established according to the employee’s role in the organization. In the long run, it is easier to maintain the mapping of employees into the various security roles by assigning existing organizational groups to the master Enterprise Records security groups.
Assigning existing groups to the master security groups
After you have established the master security groups, you can assign any other security groups to these master groups to give those groups access to Enterprise Records. For example, you might already have a group called Example_RecordsCenterStaff. This group can be added as a member of IER_RecordsManagerG to give all the users who are members of the Records Center full Records Manager access.
The advantage of this approach is that it enables you to adjust security on an ongoing basis without having to remap groups to roles directly in Enterprise Records. You simply adjust security by manipulating group memberships within the directory service.
In Table 4-2 on page 102, we provide an example that shows how you can manage existing security groups in your organization by establishing group membership rather than changing the direct mapping of security roles to the master security groups. In this particular example, we assume that all members of the Example_IT_P8Admins group will be involved as Records Administrators. We can easily establish a specific IT departmental group just for Records Administrators as well. Similarly, in this example, we assume that all of the members of Example_RecordsCenterStaff will be acting in the capacity of Records Managers. We can easily establish specific groups to break down the records center staff into subgroups, part of which serve as Records Managers and others who might more appropriately be privileged users.
Table 4-2 Assigning organizational groups to the master IBM Enterprise Records security groups
|
Master Records Manager security groups
|
Existing directory services groups
|
|
IER_RecordsAdminG
|
Example_IT_P8Admins
|
|
IER_RecordsManagerG
|
Example_RecordsCenterStaff
|
|
IER_PrivilegedUserG
|
Example_Dept_1_Coordinators
Example_Dept_2_Coordinators
Example_Dept_3_Coordinators
|
|
IER_RecordsUserG
|
Example_Dept_1_Users
Example_Dept_2_Users
Example_Dept_3_Users
|
|
Preferable practice: Rather than assigning individual users to the master security groups, use your organization’s existing directory services groups or develop an organizational group hierarchy that reflects your unique organizational structure. These organizational groups must be independent from the Enterprise Records roles and can be assigned to the master Enterprise Records security groups as needed.
|
When you nest security groups, there are obviously many ways to go about arranging your organizational groups. Groups are often organized based on the functional roles of individuals within the organization. A single user can be a member of more than one organizational group, because that person might have multiple roles in the organization. The IBM Content Platform Engine security model will grant the highest level of access to a user who might be in multiple groups where those groups are used to control access to the same object. When using nested groups, always consider the performance impact that might arise if there are a large number of nested groups.
4.3 Determining the security model
Enterprise Records offers a variety of options for configuring the security schema that will determine how access is controlled. The options available will depend on which security proxy type is selected.
4.3.1 Security proxy types
Each ROS can be configured to use only one of three different security proxy types that will determine how access control is applied to each document that is declared a record. This setting applies to the entire ROS object store and, therefore, applies to all documents in a given object store that are declared as records. By default, each ROS is initially configured for full proxy, so this setting must be changed by the Records Administrator if one of the other proxy types are required.
The following security proxy types are available:
•Full proxy: the file plan security configuration overrides the original security settings applied to the document by its home objects store (ROS). The access control is determined by the security configuration established by the file plan and the records configuration in Enterprise Records.
•Partial (Inherited) proxy: the file plan security is inherited and added to the access control defined for each document in its home object store, thereby allowing the existing document security model to remain in place while enabling additional records management access controls to be applied
•No proxy: the record declaration process does not affect the access control of any documents that are declared records, thereby allowing the existing security model to remain unchanged after a record is declared, except for preventing deletion. Just as with the other proxy types, each record will be locked down so it cannot be deleted directly by users, even if those users have delete permission on the original document.
For detailed information about how to configure the ROS object store security proxy type, see the IBM Technote:
Each option has its tradeoffs. The following considerations can be used as guidelines to help determine the best option for a given solution. In general, the partial proxy type provides the most flexibility and aligns with many common use cases.
•Full proxy is useful when:
– There is no existing security model for a new implementation and all documents will be declared as records.
– You want the security to change when a record is declared and you want that access to be determined by the file plan.
– Your file plan structure provides separate containers (categories or folders) to designate who can access records.
– After a record is declared, any further adjustments to security would be controlled by the records management staff.
•Partial (Inherited) proxy is useful when:
– There is an existing security model already in place with the access control that you want, so you only need to enable records management access after declaration and documents are locked down to prevent delete.
– The file plan structure does not align with how you want to assign permissions to records.
– You require security settings to vary on individual records where you can control this on the original documents (such as applying markings or using custom security proxy objects).
– You have the need to adjust access on individual records independently of records management processes after a record is declared.
•No proxy is useful when:
– You do not want to change your existing security model and you can easily add the appropriate access for records management functions to the ROS object store.
– You have complex access control requirements that are best modeled directly on the home object store (ROS).
By using either the full or partial security proxy options, the file plan not only provides a structure for assigning disposition schedules, the file plan can also provide a structure for assigning access to the records in the file plan, which in turn controls access to the associated electronic content. The file plan uses the IBM Content Platform Engine inherited security mechanism to allow Records Managers to establish access control at higher levels in the file plan, which in turn propagates to the subcategories, folders, and records at the lower levels of the file plan. In addition, more specific access controls can be applied at lower levels to allow or restrict specific individuals or groups to certain areas in the file plan.
4.3.2 Containers as security parents
Enterprise Records establishes record containers (the categories and folders into which records are filed) as the security parents for the records that are contained. Therefore, whenever a record is filed into a specific record folder or category in the file plan, the record will inherit the access controls specified on that container. These access controls might be applied directly to individual containers, or they might be access controls inherited from higher levels in the tree structure of the file plan.
By default, there is no access control applied directly to individual records. Although it is possible to assign access controls to individual records, Enterprise Records was designed to use the security parent mechanism and inherited security to allow records management policies to dictate the access to records in the file plan. Whether security is inherited or applied directly, it is ultimately the security on each record that determines access. For more information about security parents and inherited security, see the IBM Content Platform Engine documentation in IBM Knowledge Center:
4.3.3 Controlling security by full proxy
When an electronic record is declared (which means it now belongs to a file plan), the security as defined by that file plan takes over. Often when an electronic document is first created or ingested into the repository (before it is declared as a record), the permissions for that document are controlled by local, departmental, or individual policies. At the time that a document is declared, the security that is determined by the file plan takes effect and completely replaces any security settings that might have been applied to the original electronic document. This file plan security is accomplished through a security proxy mechanism whereby the record object in the file plan serves as the full security proxy for the electronic document that it controls in the repository.
The inheritance that is described in the following sections will work with either the full proxy or the partial proxy security types to control access.
4.3.4 Relating file plan structure to access control
One of the easiest ways to provide simple access separation to records is to construct the Enterprise Records file plan to have separate containers for the records belonging to different parts of the organization, if such separation is needed. For a given record series, you can create separate categories for each department or business unit that uses that record series. This approach not only makes it easy to apply the appropriate access to the records, but it also helps to organize the records for review and disposition based on ownership or responsibility. However, the primary file plan structure will still be determined by how records are organized for retention.
The primary file plan structure rarely matches the way that you need to separate records for ownership and access control. Typically, an organization can have hundreds of departments or units, each of which might use any area of the primary file plan, depending on what types of records they need to store and manage.
Although a file plan structure might look like an organization chart, especially at level 1, the lower levels in the file plan often represent record series or record types that are used by a wide spectrum of the organization. Therefore, these lower-level primary categories cannot be mapped to specific individual departments without further breakdown. For example, it might be the case that Contracts are primarily controlled by a specific department within the Finance area, but in reality, contracts are used and stored by many different departments in the organization. Furthermore, a specific contract might be associated with a specific department even though all contracts are maintained in the file plan under Finance. In many of these cases, the primary file plan structure will not provide a good mechanism for allowing independent, more granular access, such as the access that is required for individual departments.
Figure 4-2 on page 107 illustrates several important concepts for setting up access control with the file plan structure.
First, for records management and administration, you can set the access at higher levels in the file plan so that it is inherited to all levels under them. This allows service accounts and records management users with global access requirements to view and process any record in the system.
Second, you can assign access to specific departmental groups at lower levels of the file plan that will limit their access to only the records contained under that branch of the file plan structure. As the example shows, the category for Employee Identity records (record series EMP110) could contain all records from all departments in the organization, but the only users who should be able to view this data are the HR Department Users. However, you might not want all Human Resource (HR) Department Users to view all Compensation records (record series EMP100). So, by adding the HR Department Users group to the appropriate categories, we can prevent those users from accessing Compensation records, while allowing them to access all Employee Identity records. This simple example of separation of access happens to align with the primary file plan structure.

Figure 4-2 Assigning department-level security to categories in the file plan
As a different example, take Project Management records (record series ADM120). Any department that manages projects will need to keep track of their own project management records and they do not want people in other departments to be able to view their records. So the example in Figure 4-2 shows how we can create a separate category for each organization unit that needs to store Project Management records and assign the appropriate departmental groups as needed to limit access.
|
Preferable practice: Design your file plan primarily based on your retention rules and requirements and then fit your security needs into the file plan design. Use the techniques described here to implement a robust security schema to meet your business requirements.
|
4.3.5 Access control that differs from the file plan structure
The examples described in 4.3.4, “Relating file plan structure to access control” on page 105 might not provide the granularity required for certain use cases. There are a variety of techniques and approaches that can be used within the IBM Content Platform Engine security model to provide the access control that might be required.
In the next section, we describe two basic techniques for applying access control independently of the file plan structure:
•Marking sets
•Direct security
In addition to these two basic techniques, there are also more advanced techniques, such as applying custom security proxy objects to individual records. In these cases, using the partial security proxy type for the Enterprise Records security configuration will typically offer the most flexibility to support the combination of individual record access and records management level global access.
4.4 Individual record security
It is often the case that records are grouped into containers in the file plan not according to their access but according to their retention requirements. In these cases, the inherited security model that the file plan provides might not adequately address the need to control access to individual records depending upon which parts of the organization require access to these records.
In this section, we describe two ways to control access to individual records, independently of the file plan structure:
•Using marking sets to apply a marking value to individual records
•Applying direct security permissions on individual records
Each approach has advantages and disadvantages; however, each approach provides a way to satisfy requirements that call for managing the access to individual records in the file plan independently of the file plan structure.
4.4.1 Marking sets
Marking sets are defined as either hierarchical or list (non-hierarchical). For a hierarchical marking set, the markings are ordered from the lowest marking to the highest marking. When a user is assigned access to a marking, they also attain access to all markings lower in the hierarchy than the one to which they are assigned. The classic example of a hierarchical marking set is security classifications. In the security classification models, there is a set of markings such as Unclassified, Confidential, Secret, and Top Secret. In this model, if a user is assigned access to a Secret marking, that user has access to records that are assigned Secret, Confidential, and Unclassified. They do not have access to Top Secret records.
List (non-hierarchical) markings are not ordered; instead, each marking is independent. In this case, the user must be included in the permissions for the specific marking assigned to a record to access that record. List markings can be used to limit access to individual records based on organizational groupings that are not represented by the file plan hierarchy, such as various departments, projects, or regions. For example, a list marking set can be used to associate a record with a specific department. The marking set consists of the list of all the various departments that can be assigned to a record. Users are associated with a marking by assigning a departmental group to the security permissions for the marking. After the appropriate marking value for a department is assigned to a record, the marking filters access to that record, preventing any users who did not have the permissions for that department from accessing that record. A user only has access to the record if allowed by the security permissions on the marking.
Table 4-3 illustrates this example with three departments. Each department is identified by a marking value in the marking set. For each marking value, the appropriate security groups are assigned with the required access level for each group. Here, we indicate that for each department, regular users will have view only access while department coordinators will have both view and update permissions. This example illustrates that even within a single department, you can easily implement multiple access levels if the security schema that you design supports this approach.
Table 4-3 List marking set that defines access for individual departments
|
Marking value
|
Associated security group
|
Access level
|
|
Dept 1
|
Dept_1_Users
Dept_1_Coordinators
IER_RecordsManagerG
IER_RecordsAdminG
|
View only
View and update
Full control
Full control
|
|
Dept 2
|
Dept_2_Users
Dept_2_Coordinators
IER_RecordsManagerG
IER_RecordsAdminG
|
View only
View and update
Full control
Full control
|
|
Dept 3
|
Dept_3_Users
Dept_3_Coordinators
IER_RecordsManagerG
IER_RecordsAdminG
|
View only
View and update
Full control
Full control
|
Another aspect of the example that we provide here shows that both IER_RecordsManagerG and IER_RecordsAdminG must be included in each of the markings if you want these roles to have access to the records. Remember that marking sets only serve as filters to further restrict access to records. If we did not include these groups in the marking set configuration, users in these roles do not have access to the marked objects.
|
Note: When referring to update permissions on records, this term means the ability to modify metadata only. After an electronic document is declared as a record, no user is allowed to modify the content associated with that record, no matter what level of access that user might have. However, it is a common business requirement that certain properties (metadata) of records are updated during the lifecycle of a record, even after it is declared. Typically, the permission to modify properties (update) is only given to a select group of users. Therefore, in the example that we provide here, only department coordinators (privileged users) are allowed to update.
|
After the marking set has been defined as shown in Table 4-3 on page 109, you can then apply marking values to individual records in the file plan, to the original documents in the content repository, or to both depending on which security proxy type you are using and how the users are planning to access the records.
Figure 4-3 on page 111 illustrates three individual records contained in the Compensation category, each of which is assigned a marking value (either Dept 1, Dept 2, or Dept 3) indicating the department to which it belongs. In this example, two of the records are assigned the Dept 1 marking and one is assigned Dept 2. Note that by using markings, we can mix the records for various departments in a single category in the file plan, yet we still provide department-level access control. In addition, inherited security still gives us the ability to restrict the HR Department Users to from accessing any Compensation records by implicitly excluding that group.

Figure 4-3 Assigning markings to individual records to control access
Marking sets are associated with the string properties of a record. By selecting a value for the marking on an individual record, marking permissions are implicitly applied to that record, which means that markings can be applied automatically when using entry templates or an automated process to declare records.
When the system tries to determine whether a user can access a record, it first looks at the security permissions on the record. If the user has access based on the record’s security (whether it is inherited security based on the file plan or direct security applied to each record), the system then applies any markings. The system allows access only if the user is included in the access defined by the markings. In other words, a marking filters out any users who do not have access as defined by the marking.
When using marking sets, it is important to understand that a user needs access to the marked object if you want the marking set to act as a filter. In other words, a marking set will not grant access to a record to which the user does not otherwise have access. It simply acts as a filtering mechanism for objects that a user is allowed to see using the regular security permissions, which is why we include the master Enterprise Records security groups at level 1 in the file plan so that these permissions are inherited by the records that those users need to access.
4.4.2 Direct security
Another approach to controlling access to individual records is to use direct security on each record. This approach can achieve the same results as the use of marking sets illustrated in the previous section, but this approach requires setting security permissions directly on each record rather than simply marking each record with a marking value.
Figure 4-4 shows our example file plan with direct security applied to individual records. Compare this figure with the one in the previous section. With this approach, we must apply security groups directly to individual records to allow those groups access to the records rather than simply applying a marking value to each record. Notice that the records will still inherit security from the file plan. This allows both Records Managers and Records Administrators full control and full access to all parts of the file plan. In addition, HR department users will be restricted from Compensation records because they are not explicitly assigned to that branch of the tree. However, users in any of the other departmental groups will have access to only the individual records where those permissions apply.
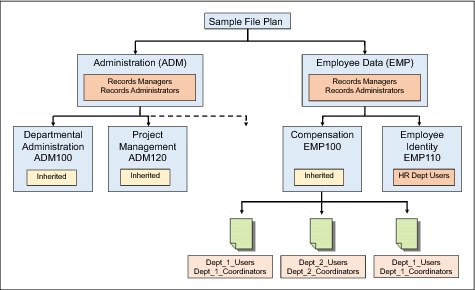
Figure 4-4 Assigning direct security permissions to individual records
4.4.3 Comparing approaches
Both marking sets and direct security allow for a flexible security schema, which enables you to control access to individual records without relying on the structure of the file plan. There are advantages and disadvantages to each of these approaches. In both cases, there is the administrative overhead of assigning a property or properties to each record.
Marking sets
The major advantage to using marking sets is being able to abstract a set of permissions into a list of marking values and to easily apply those permissions by simply setting a single marking value. The marking value can come from metadata associated with the record, such as the name of a department, that can easily be provided by a user who declares the record without that user having to understand the complexities of the underlying security schema and without having to know the exact security group names that need to be applied. The assignment of marking values can even be automated when using either entry templates or workflow for record declaration. Another advantage to marking sets is the ability to modify the permissions in one place.
With direct security, if you need to modify the security permissions related to the group abstraction that you are using, you will probably have to modify the permissions on each record. For example, imagine that you want the Dept_1_Users to now have update permissions in addition to viewing content. With marking sets, you make that adjustment in one place on the marking set. With direct security, you must make an adjustment to possibly hundreds or thousands of records.
Although marking sets provide this powerful abstraction, there is additional effort required in configuring and maintaining the marking sets themselves. In addition, after you incorporate the marking set approach, you must provide a marking value for each and every record to provide adequate access control. If this approach matches your business requirements, it can be the most effective way to achieve the security configuration that you want.
Direct security
The advantage of using direct security is that you can avoid the additional effort of maintaining marking sets. However, direct security is more appropriate when it can be managed and applied programmatically by a custom application that is based on business logic that is built into the application. Direct security can be cumbersome for users to apply and configure. Typically, it should be avoided unless it is managed by a custom application.
4.5 Security and record holds
No matter what access level you have, when a record is on hold, the Enterprise Records system prevents any user from deleting or destroying that record. Even if you are a system administrator with full access control, the Enterprise Records system is designed to prevent deletion of any record that is on hold. A record must be free of all holds before it can be deleted. Holds can be applied on individual records or on record containers (categories, folders, or volumes). Any hold that is applied to the parent container will apply to all entities (records or other containers) within that container.
For more information about record holds, see Chapter 8, “Holds and preservation” on page 213.
4.6 Limiting functional access
The previous sections of this chapter focused on how to control access to the records in the repository by applying permissions in various ways. With Enterprise Records, we can also control access to various functions in the user interface by configuring one or more Enterprise Records desktops to limit user access to the desktop and to limit what features and functions appear in a given desktop. Editing the desktop features and layout is an administrative task that requires the IBM Content Navigator administration desktop.
4.6.1 Limiting access to a desktop
When first setting up an Enterprise Records environment, we typically start with one general Enterprise Records desktop that exposes all features and functions to any user who can authenticate to the specified file plan object store (FPOS). However, in a fully configured solution, we will probably want to limit which users and groups have access to such a desktop.
In Figure 4-5 on page 115, we show an example where we have chosen to limit access to the particular desktop to only Records Administrators and Records Managers. We want to do this because we plan to set up separate desktops for other users, where we will limit which functions and menus items appear, but we want Records Administrators and Records Managers to have full access to all functions and features.

Figure 4-5 Limiting desktop access to specific users and groups
When any user attempts to connect to the desktop, the desktop will authenticate access for that user based on the repository indicated and, if configured (enabled), will limit access to the users and groups listed. In this example, if we attempted to connect to this desktop as any user other than a Records Administrator or Records Manager, we see the message in Figure 4-6 on page 116.
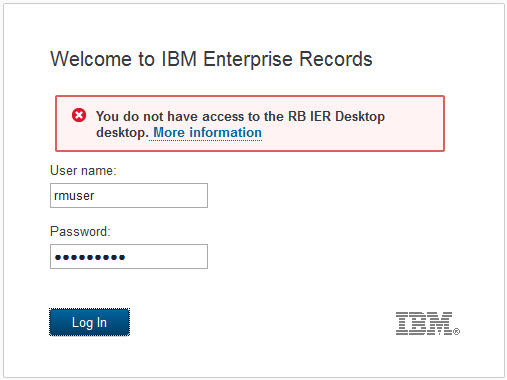
Figure 4-6 User does not have access to the restricted desktop
4.6.2 Limiting access to features
Many Enterprise Records configurations use a limited set of the software’s features. In such cases, it might be desirable to define a separate desktop to expose only the features that particular group of users might need and remove other features from the interface. For example, in our sample use case for a financial institution where we are managing only electronic records and using only basic schedules as record containers in the file plan, we could configure a separate desktop for Records Managers that would expose only the main features needed.
As shown in Figure 4-7 on page 117, for this use case, we configure a separate Enterprise Records desktop for Records Managers where we remove the Physical Items view and add the Work view.
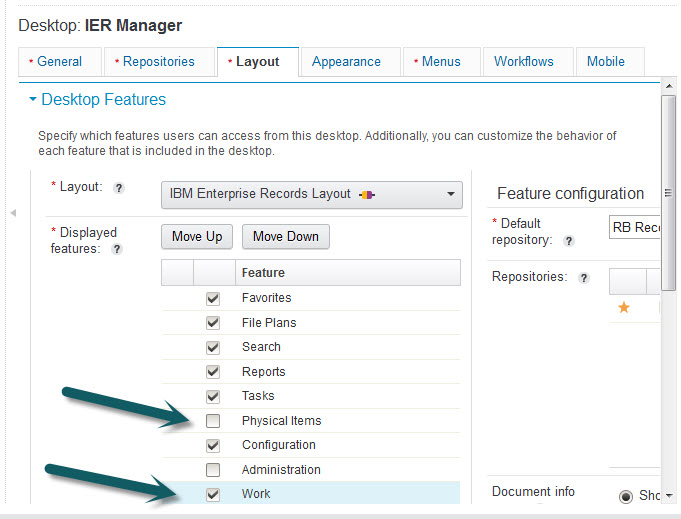
Figure 4-7 Configuring the desktop features to display
When setting up a new desktop, the Work view is not selected by default, so it must be selected to enable access to the workflow features.
|
Note: The Administration view will be displayed only for users who have administrative permissions on the FPOS object store that is selected for desktop authentication. Among all of the Enterprise Records master groups, only the Records Administrators are typically object store administrators. So even if you enabled this feature for a Records Manager desktop, the Records Manager users would not see the view.
|
The ability to configure which features are displayed for a desktop implicitly allows access to be limited to certain functions by limiting which users can access a specified desktop.
4.6.3 Limiting access to specific functions within a view
IBM Content Navigator enables menus to be configured to limit which functions are available. You can configure and assign alternate menus for a specific desktop to control which functions appear in specific menus.
4.7 Separating records into multiple repositories
For an enterprise-wide, global deployment, it might be desirable to separate records based on jurisdiction. Even though this can be accomplished when storing all records in the same object store, it is a typical practice to manage separate content, and the corresponding record information, by jurisdiction. How that separation is managed is dictated by the requirements of the solution. Records could be separated by country, by region, or by any other logical jurisdictional distinction, such as separation by primary line of business. This sort of separation is primarily guided by the strict access and storage policies imposed by certain countries, along with the variation in retention policy details that exist between countries. Because all of the record information for a specified repository is kept in a single database, the best way to ensure that the information is stored and protected accordingly by a local jurisdiction is to separate that information by object store.
IBM Enterprise Records and the IBM Content Platform Engine support the scalability that is afforded by using multiple object stores to manage records across the enterprise. The combination of using a robust security schema with support for access to multiple object stores from the Enterprise Records desktop and the ability to configure separate Enterprise Records desktops means that you can configure a solution for the most demanding access control requirements.
..................Content has been hidden....................
You can't read the all page of ebook, please click here login for view all page.