


Advanced disposition case study
This case study describes using advanced disposition schedules and running the advanced disposition sweep.
This chapter explains how to do the following tasks:
16.1 Configure advanced disposition for approval before destruction
In this section, we demonstrate how to add an advanced disposition schedule to the repository and assign it to the appropriate record category. We configure the advanced disposition schedule to use the Destroy workflow that includes an approval step before destruction.
Advanced disposition schedules are constructed by referencing independent, reusable elements, such as actions and triggers, and then specifying the appropriate retention parameters for each phase.
In this scenario, we construct a disposition schedule for the 0500-030 Agreements record series in the sample government file plan. This series contains record folders that must be destroyed seven years from when the agreement expired. There is one record folder for each agreement where records related to a specific agreement are declared to the correct agreement folder. We set up the disposition schedule to use folder aggregation so that all of the records in the same record folder will be disposed of together.
16.1.1 Add a Destroy action
To add the Destroy action, follow these steps:
1. Log in to the IBM Enterprise Records desktop as a Records Administrator or Records Manager.
3. Click Add Action.
4. Enter the appropriate name and description.
5. Select Destroy for the Action Type.
6. Click Select to choose the Associated Workflow.
7. Select the version of the Destroy Workflow that you want to use. (Unless you have modified the Destroy Workflow, there will only be one version from which to choose).

Figure 16-1 Use the configuration view to add and manage actions
The Configuration View is used to configure various elements, such as Actions, Event Trigger, and Holds. In this case, we use the Configuration View to add a new Action.
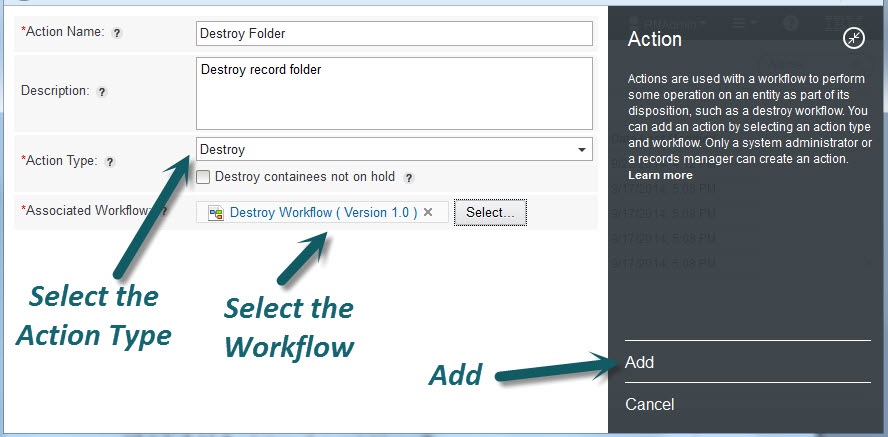
Figure 16-2 The Destroy action type is associated with the Destroy workflow
The Destroy Workflow includes an approval step that must be completed before any records are destroyed.
16.1.2 Add an internal event trigger
To add the internal event trigger, follow these steps:
1. Log in to the Enterprise Records desktop as a Records Administrator or Records Manager.

Figure 16-3 Use the configuration view to add and manage vent triggers
3. Click Add Event Trigger.
Configure the properties and conditions for the event trigger as shown in Figure 16-4 on page 331.

Figure 16-4 Internal event trigger specifies the aggregation and the trigger conditions
4. Select Internal Event Trigger as the event trigger type.
5. Enter an appropriate name and description for the trigger.
6. Select Record Folder for the aggregation.
7. Configure the Conditions by selecting the RetentionTriggerDate property and the Is Not Empty operator.
8. Click Add to save the new internal event trigger.
With this configuration, the event trigger applies to record folders with the RetentionTriggerDate property.
|
Note: The RetentionTriggerDate property is a custom date property that was added to the default data model as part of the case study object store configuration. This property was added to a valid Record Folder class definition, making it available for use with Enterprise Records.
|
16.1.3 Add an advanced disposition schedule
After adding the appropriate action and trigger, we now add the disposition schedule that we want to use for the 0500-030 record series in the case study sample file plan for government.
To add a new disposition schedule, follow these steps:
1. Log in to the Enterprise Records desktop as a Records Administrator or Records Manager.
2. Open Configuration View and select Advanced Disposition Schedules.
3. Click Add Disposition Schedule.
4. Enter the name and description for the schedule as shown in Figure 16-5. For this example, we use 0500-030 - Expiration + 7Y for the name.
In this case, we use a naming convention that refers to the record series to which this schedule will be applied. The name also includes information about the trigger and retention period.

Figure 16-5 Advanced disposition schedule specifies the trigger, the cutoff, and the phases
5. Enter information about the disposition authority, if appropriate. In this case, we reference an Australian government regulation as an example.
6. Choose Internal Event Trigger and select Expired (Folder) for the trigger value. (This is the trigger that we previously configured).
7. Choose RetentionTriggerDate for the cutoff base.
8. Provide a name for the phase (in this case, we use Destroy) and select Destroy Folder for the action. (This is the action we previously configured.)
9. Enter 7 for the retention period years.
10. Click Add to save the advanced disposition schedule.
Figure 16-6 shows the list of advanced disposition schedules for this case study example with the advanced disposition schedule that we just added for record series 0500-030.
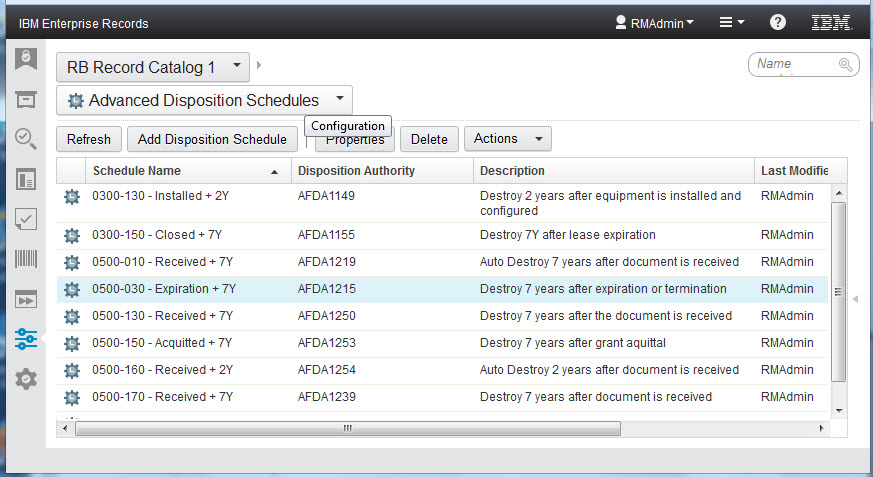
Figure 16-6 List of advanced disposition schedules
After the advanced disposition schedules are added to the configuration, they can be assigned to the appropriate record categories in the file plan.
16.1.4 Assign a disposition schedule to a record category
To assign an advanced disposition schedule to a record category, follow these steps:
1. Log in to the Enterprise Records desktop as a Records Administrator or Records Manager.
2. Browse the file plan to locate the record category to which you want to assign the advanced disposition schedule. In this case, we want to find the 0500-030 record category so we can assign the corresponding disposition schedule for that record series.
In Figure 16-7, the record category 0500-030 Agreements, to which we want to assign the disposition schedule, is highlighted.

Figure 16-7 Browse to the record category to assign the disposition schedule
3. Click Properties to modify the selected record category.

Figure 16-8 Disposition schedule is assigned to the corresponding record category
5. Select Advanced disposition schedule.
6. Click Browse Schedules to select the correct disposition schedule for this record category. The advanced disposition schedule is displayed in the Disposition Instructions property. Notice that the Disposition Authority, if it has a value, is automatically copied from the advanced disposition schedule to the record category when the schedule is selected.
7. Click Save to complete the assignment of the disposition schedule to the record category.
Figure 16-9 shows the advanced disposition schedules assigned to each of the record categories. By running a search for record categories, we can see which schedules are assigned. Using consistent naming conventions for both the record categories in the file plan and the advanced disposition schedules helps in managing the assignment of disposition schedules to record categories.

Figure 16-9 Record categories with advanced disposition schedules assigned
16.2 Schedule and complete advanced disposition
In this section, we show how to schedule the advanced disposition sweep to run, how to initiate disposition, and how to complete the advanced disposition process for destruction using our case study example from the government file plan.
16.2.1 Schedule the advanced disposition sweep
In our case study, we assume that some record folders in the 0500-030 Agreements record category will have a trigger date value that will make these folders ready for disposition.
To schedule and run the advanced disposition sweep, follow these steps:
1. Open Tasks View from the Enterprise Records desktop.

Figure 16-10 Choose to schedule the advanced disposition sweep
3. Select the File plan repository, the Containers for sweep, and the Logs output directory as shown in Figure 16-11.

Figure 16-11 Set the parameters for advanced disposition sweep
In this case, we select the 0500-030 Agreements records category for containers for sweep to limit the scope of the sweep run.
4. Click Next to set the schedule.
5. Enter a name and a description for the sweep. The name is required so that you can identify the sweep after it has completed.
6. Select Run once and Start immediately as run options, and enter an appropriate user name and password, as shown in Figure 16-12.

Figure 16-12 Set the disposition sweep schedule and login information
7. Click Schedule Sweep to schedule the sweep. It will start immediately.
16.2.2 Monitor and verify the sweep results
To verify the results of the advanced disposition sweep, follow these steps:
1. Refresh the tasks lists to verify that the sweep has completed.
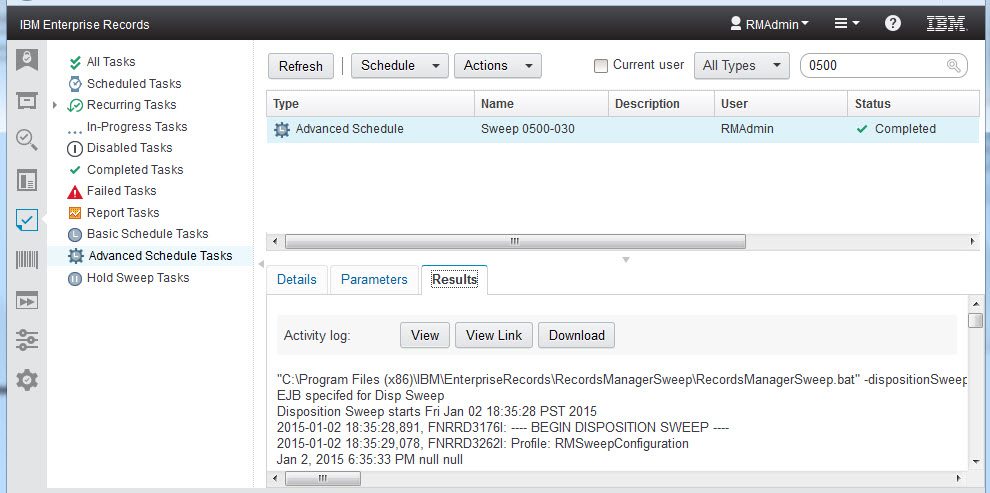
Figure 16-13 Advanced disposition sweep results
The Results tab for the sweep task displays the activity log from the sweep process. You can also verify the sweep results by browsing or searching to see the Ready for Disposition icon next to those items that are ready for processing as shown in Figure 16-14.
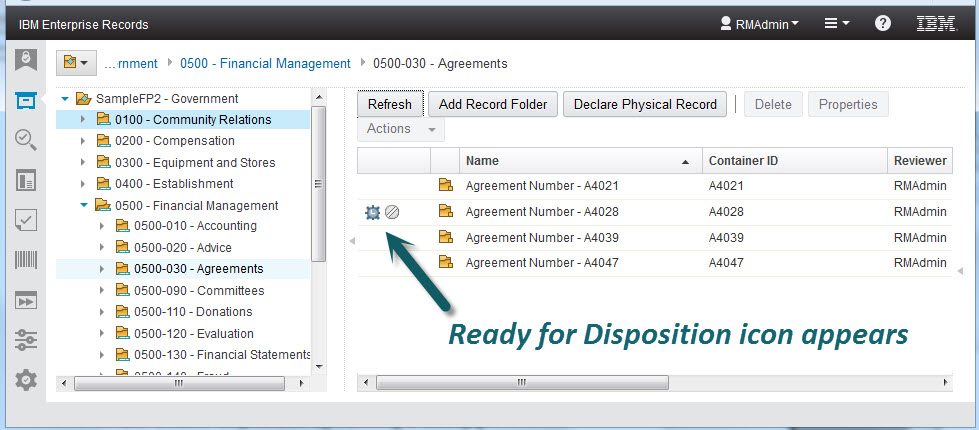
Figure 16-14 Ready for disposition icon appears next to items after running sweep
16.2.3 Initiate disposition by running a sweep
In this section, we show how to initiate disposition by running an advanced disposition sweep where the type of sweep is set for Initiate Disposition.
To initiate disposition by running a sweep, follow these steps:
1. Open Tasks View from the Enterprise Records desktop.
2. From the Schedule menu, select Schedule Advanced Disposition Sweep.
3. Select the File plan repository, the Containers for sweep, and the Logs output directory, as appropriate.

Figure 16-15 Select initiate disposition for the type of sweep
5. Click Next to set the schedule.
6. Enter a name and a description for the sweep. The name is required so that you can identify the sweep after it has completed.
7. Select Run once and Start immediately as run options, and enter an appropriate user name and Ppassword.
8. Click Schedule Sweep to schedule the sweep. It will start immediately.
Monitor or verify sweep results (optional)
You can also monitor and verify the sweep results by using the following steps:
1. Refresh the tasks lists to verify that the sweep has completed.

Figure 16-16 Initiate disposition sweep has completed
3. Browse the file plan to see that disposition is in progress for the appropriate containers, as shown in Figure 16-17.

Figure 16-17 After initiating disposition, the icon changes to show that disposition is in progress
16.2.4 Complete the Destroy workflow process
In this section, we show how to complete the disposition process that was initiated in the previous section. In this case study, we have configured the disposition schedule to use the Destroy workflow.
To approve the records for destruction, follow these steps:
1. Log in to the Enterprise Records desktop with a user account that has permissions to view and process work.
2. Open Work View from the Enterprise Records desktop.
3. Expand the process application space for Records Management.
4. Expand Public Inboxes.
5. Select the Records Manager Approval queue to see the work items available for review, as shown in Figure 16-18.
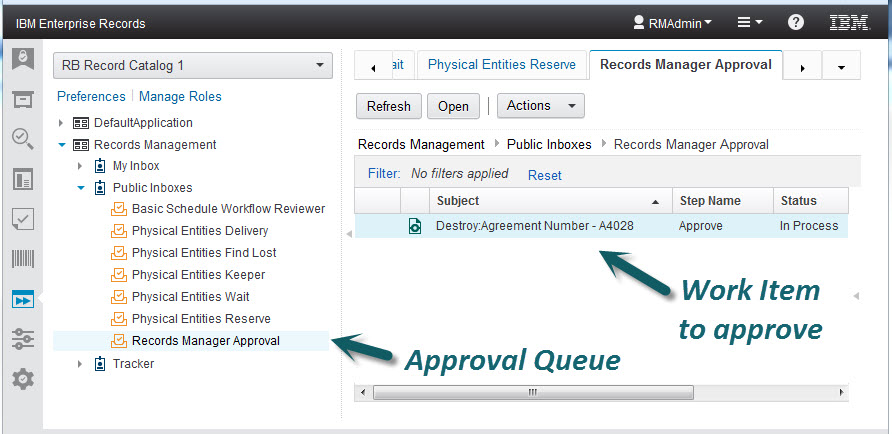
Figure 16-18 Records Manager Approval queue shows work items available to process
In this example, there is one work item to approve for destruction. The subject of the work item indicates Destroy along with the name of item to be destroyed, and the step name indicates Approve as the action to be completed. In this case, we approve destruction of the record folder that contains all records for Agreement Number - A4028.
6. Open the selected work item to view the Approval step. The list of record folders to approve for destruction is shown in Figure 16-19. In this case, we see only one record folder in the list, the folder for Agreement Number - A4028.

Figure 16-19 The Approval step lists items to be approved for destruction
7. By default, Approve is selected for the approval decision, as shown in Figure 16-19. You can either Approve or Reject each item listed. In this case, we approve the destruction of the record folder listed. You can enter comments to explain the decision (optional).
8. Click Complete to dispatch the work item and continue the Destroy process.
9. Refresh the Records Manager Approval queue to review the results of the destruction. After completing the approval step with the decision to approve destruction, all electronic records in the listed record folders that are not on hold will be destroyed.
In this case study, the record folders being destroyed for this record series contain only electronic records, so any additional processing required for physical records will be skipped. A destruction transcript is generated and available for review. Figure 16-20 shows the Transcript step, which is the final step in the Destroy workflow allowing a user to review the destruction transcript.
Figure 16-20 The Transcript step allows a user to review the destruction transcript
10. Open the work item to view the Transcript step. You can download and view the destruction transcript (optional). The transcript is an .xml file that is not intended for routine user review.
11. Click Complete to dispatch the work item and complete the final step in the Destroy workflow, as shown in Figure 16-21 on page 347.
Figure 16-21 Complete the transcript step as the final step in the Destroy workflow
16.3 Configure advanced disposition for automatic destruction
Next, we demonstrate how to add an advanced disposition schedule to the repository and assign it to the appropriate record category for automated destruction by using the Auto Destroy feature.
In this scenario, we configure a disposition schedule for the 0500-130 Financial Statements record series in the sample government file plan. This record series is set up for record-level aggregation where records are filed directly in the record series and disposition is handled individually when their retention is time expires.
16.3.1 Add the Auto Destroy action
If an Auto Destroy action has already been added, you can skip these steps. However, if you have a new system, you might need to add the appropriate Auto Destroy action.
To add the Auto Destroy action, follow these steps:
1. Log in to the Enterprise Records desktop as a Records Administrator or Records Manager.
3. Click Add Action.
4. Enter the appropriate name and description.

Figure 16-22 Configure an action for Auto Destroy
6. Enable the option to destroy containees not on hold as shown in Figure 16-22.
7. Click Add to save the new action.
16.3.2 Add the internal event trigger
To add the internal event trigger, follow these steps:
1. Log in to the Enterprise Records desktop as a Records Administrator or Records Manager.
2. Open Configuration View and select Event Triggers.
3. Click Add Event Trigger.
Configure the properties and conditions for the event trigger as shown in Figure 16-23.

Figure 16-23 Internal event trigger configured for record aggregation
4. Select Internal Event Trigger as the event trigger type.
5. Enter an appropriate name and description for the trigger.
6. Select Record for the aggregation.
7. Configure the Conditions by selecting the DocumentDate property and the Is Not Empty operator.
8. Click Add to save the new internal event trigger.
With this configuration, the event trigger applies to records with the DocumentDate property.
|
Note: The DocumentDate property is a custom date property that was added to the default data model as part of the case study object store configuration. This property was added to a valid record class definition, making it available for use with Enterprise Records.
|
16.3.3 Assign the disposition schedule to the record category
After adding the appropriate action and trigger, we now add the disposition schedule that we want to use for the 0500-030 record series in the case study sample file plan for government.
To add a new disposition schedule, follow these steps:
1. Log in to the Enterprise Records desktop as a Records Administrator or Records Manager.
2. Open Configuration View and select Advanced Disposition Schedules.
3. Click Add Disposition Schedule.
4. Enter the name and description for the schedule as shown in Figure 16-24 on page 351. For this example, we use 0500-130 - Received + 7Y for the name.
In this case, we use a naming convention that refers to the record series to which this schedule will be applied. The name also includes information about the trigger and retention period.
5. Enter information about the disposition authority if appropriate. In this case, we reference an Australian government regulation as an example.
6. Choose Internal Event Trigger and select Received (Record) for the trigger value. (This is the trigger that we previously configured.)
7. Choose DocumentDate for the cutoff base.
8. Provide a name for the phase (in this case we use Auto Destroy) and select Auto Destroy for the action. (This is the action we previously configured.)
9. Enter 7 for the retention period years.
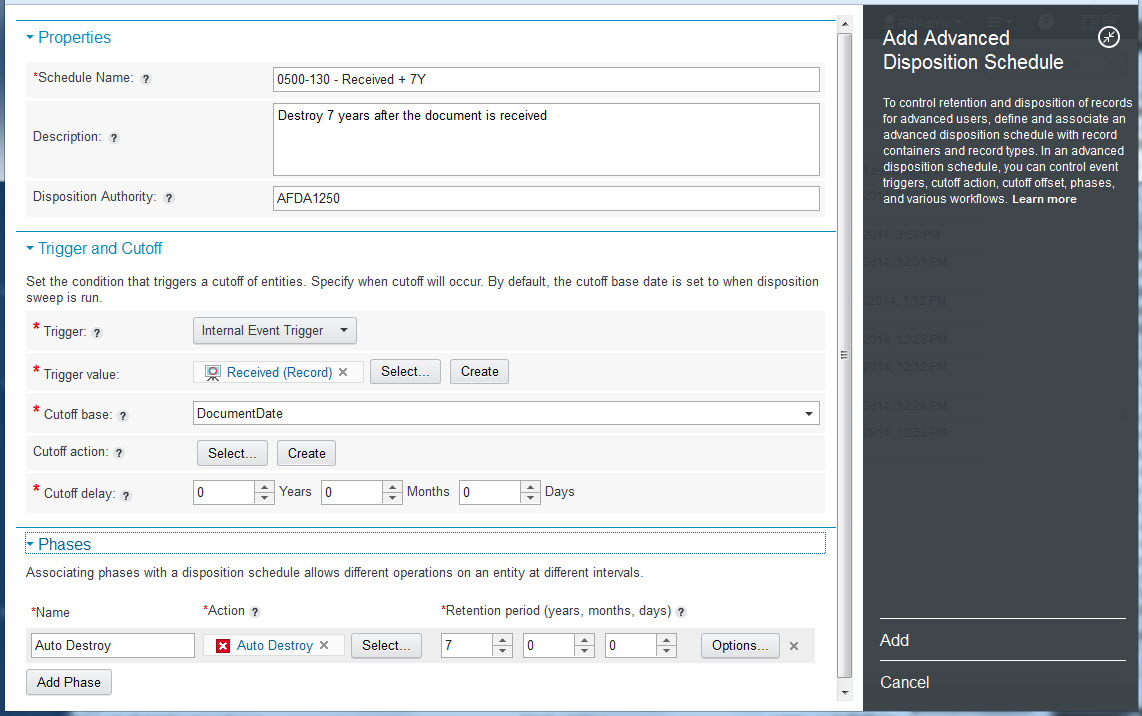
Figure 16-24 Advanced disposition schedule with an Auto Destroy phase
10. Click Add to save the advanced disposition schedule.
16.3.4 Assign the schedule to the correct record category
To assign the advanced disposition schedule to a record category, follow these steps:
1. Log in to the Enterprise Records desktop as a Records Administrator or Records Manager.
2. Browse the file plan to locate the record category to which you want to assign the advanced disposition schedule. In this case, we want to find the 0500-130 record category so we can assign the corresponding disposition schedule for that record series.
3. Click Properties to modify the selected record category.
4. Click the Disposition tab.
5. Select Advanced disposition schedule.
6. Click Browse Schedules to select the correct disposition schedule for this record category. The advanced disposition schedule is displayed in the Disposition Instructions property as shown in Figure 16-25.

Figure 16-25 Disposition schedule is assigned to the corresponding record category
7. Click Save to complete the assignment of the disposition schedule to the record category.
16.4 Schedule and complete advanced disposition for Auto Destroy
In this section, we process the 0500-130 Financial Statements record category for disposition to illustrate advanced disposition using Auto Destroy with record level aggregation.
16.4.1 Schedule the advanced disposition sweep
To schedule the advanced disposition sweep, follow the same steps listed in 16.2.1, “Schedule the advanced disposition sweep” on page 336, but ensure that the appropriate record category (in this example, 0500-130 Financial Statements) is selected for the containers to sweep, as shown in Figure 16-26 on page 353.

Figure 16-26 Schedule the advanced disposition sweep for the appropriate containers to sweep
After the sweep completes, individual records in the 0500-130 record category are ready for disposition, as shown in Figure 16-27.

Figure 16-27 An icon indicates records ready for disposition after running sweep
16.4.2 Schedule Auto Destroy
Auto Destroy should only be scheduled to run after the advanced disposition sweep has successfully completed.
To schedule Auto Destroy, follow these steps:
1. Open Tasks View from the Enterprise Records desktop.
2. From the Schedule menu, select Schedule Advanced Disposition Sweep.
3. Select the File plan repository, the Containers for sweep, and the Logs output directory as appropriate.

Figure 16-28 Schedule the sweep to run Auto Destroy
5. Click Next to set the schedule.
6. Enter a name and a description for the sweep. The name is required so that you can identify the sweep after it has completed.
7. Select Run once and Start immediately as run options, and enter an appropriate user name and password.
8. Click Schedule Sweep to schedule the sweep. It will start immediately.
Monitor and verify the sweep results (optional)
You can monitor and verify the sweep results by using the following steps:
1. Refresh the tasks lists to verify that the sweep has completed.

Figure 16-29 Results after Auto Destroy has completed
You can choose to view or download either the activity log or the Auto Destroy transcript report.
After Auto Destroy has successfully completed, the records have been destroyed without any approval or review.
Figure 16-30 shows the 0500-130 Financial Statements record category after Auto Destroy has completed. The records that were previously ready for disposition are now gone.
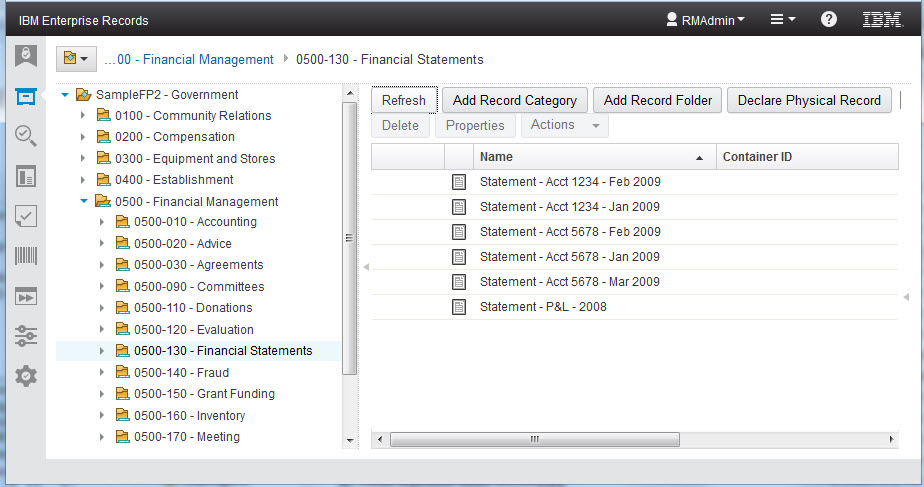
Figure 16-30 After auto destroy completes, records destroyed no longer appear in the record category
16.5 Convert a record category to a basic schedule
In this section, we demonstrate how to convert a record category that has an advanced schedule to use a basic disposition schedule.
16.5.1 Identify an eligible record category
In our case study, the 0500-130 Financial Statements record category is currently configured for advanced disposition. We now convert this record category to have a basic disposition schedule.
Figure 16-31 shows the current configuration for 0500-130 Financial Services. The disposition instructions column shows the advance disposition schedule associated with this record category.

Figure 16-31 Record category with an advanced disposition schedule can be converted
16.5.2 Schedule the container conversion
To schedule the record category for conversion, follow these steps:
1. Open Tasks View from the Enterprise Records desktop.
2. From the Schedule menu, select Schedule Container Conversion, as shown in Figure 16-32 on page 358.
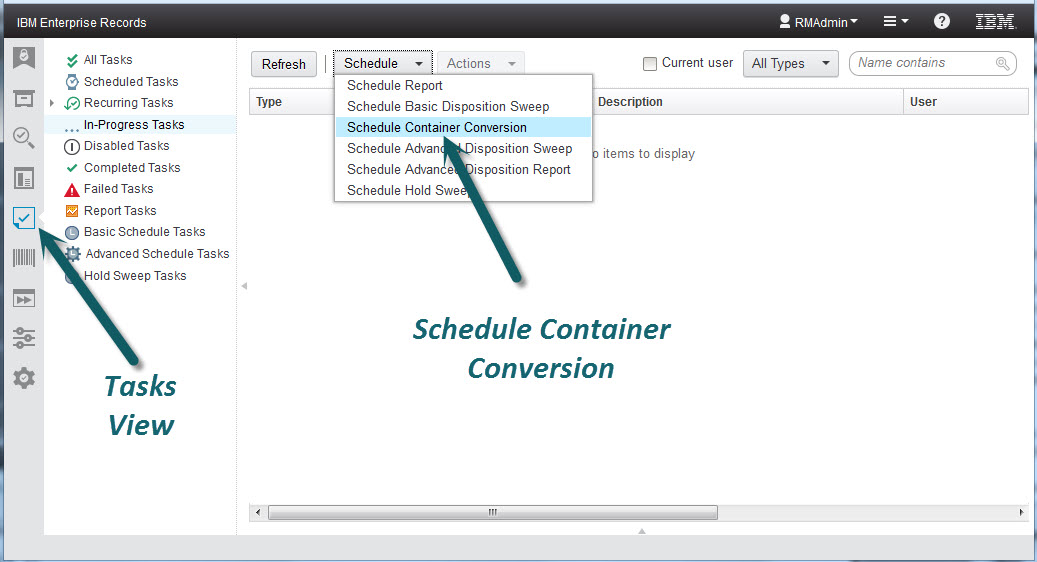
Figure 16-32 Schedule container conversion from the Tasks view
3. Select the record category to convert, as shown in figure Figure 16-33. For this case study, we select 0500-130 Financial Services.

Figure 16-33 Select a record category for conversion
4. Select the correct Retention trigger property, in this case DocumentDate.
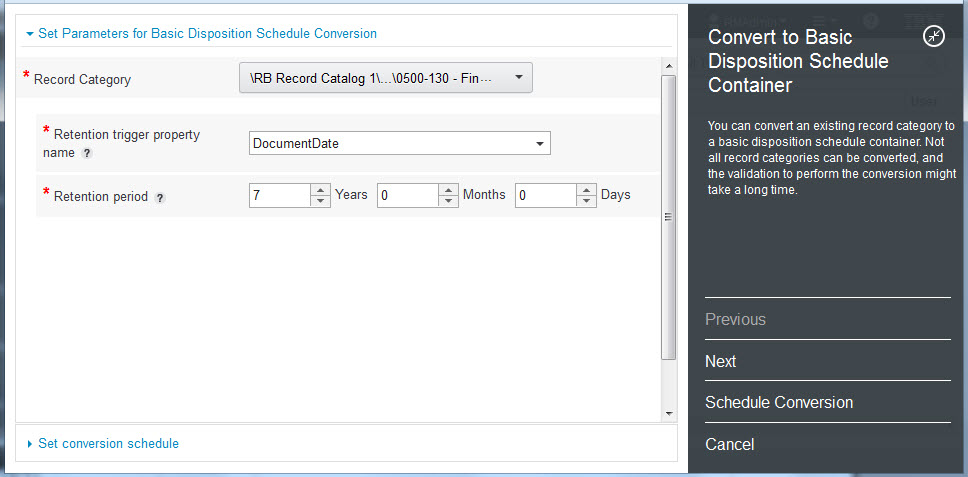
Figure 16-34 Set the retention parameters

Figure 16-35 Set the conversion schedule information
7. Click Schedule Conversion to start the task.
8. Click Refresh to monitor the task for completion.
Figure 16-36 shows the completed conversion task.

Figure 16-36 Container conversion has completed
(Optional) You can Browse to see the updated basic schedule configuration, as shown in Figure 16-37. The disposition instructions for the 0500-130 Financial Services record category display the basic disposition schedule configuration. This record category can no longer use advanced disposition.

Figure 16-37 Disposition instructions column shows the basic schedule configuration
..................Content has been hidden....................
You can't read the all page of ebook, please click here login for view all page.