Part 7. Printing, Faxing, and Scanning
Mac OS X makes it easier than ever to use your printer, fax modem, and scanner. All three functions are built in to the system, so you don’t need to worry about buggy, incompatible software that slows you down when you’re trying to get things done. You have lots of options for printing, faxing, and scanning that enable you to get the most from your devices, but if you’re in a hurry each function can be accomplished with just a few clicks.
Before printing a document, you can preview to make sure it looks the way you want it to, and preview documents can be saved as PDFs that you can exchange with others who don’t have the software you used to create the document; so they can see the document exactly the way you designed it, and print it on their own printers.
Faxing happens the same way and in the same place as printing—the Print dialog box—so if you have a modem, you can fax any document you can print. And a small, simple, but powerful program called Image Capture is responsible for scanning duties.

Using Printers, Fax Modems, Scanners, and Fonts
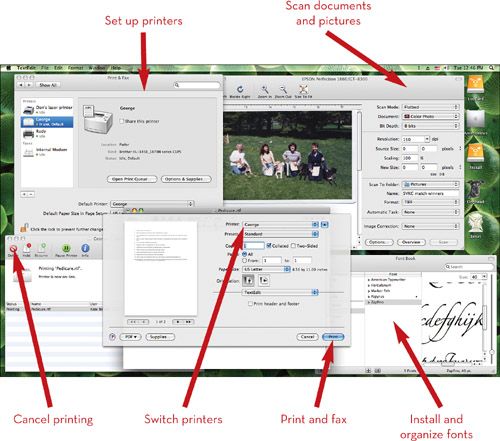
Setting Up a Printer
First, you need to know at least one thing about your printer: how it’s connected. It might be a USB printer plugged in to the Mac itself, or it could be a network printer. When you get that figured out, the Mac’s Printer Setup Utility can go out and find the printer for itself.
![]()
Tip: Two for One
If your printer doesn’t have its model name and number on the front, check the manual that came with it. Sometimes multiple similar models share a driver, and in that case all the similar models should be listed in the manual.
![]()
![]()
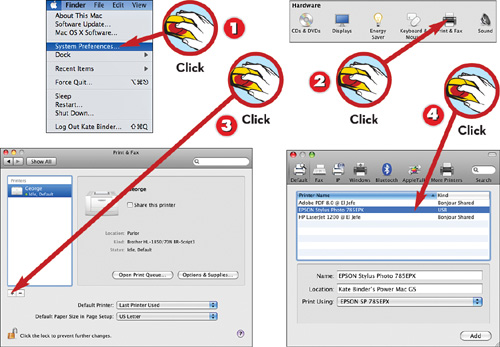
![]() Choose Apple menu, System Preferences.
Choose Apple menu, System Preferences.
![]() Click the Print & Fax button to see your choices.
Click the Print & Fax button to see your choices.
![]() Click the Add button below the Printers list.
Click the Add button below the Printers list.
![]() Select a printer from the pick list.
Select a printer from the pick list.
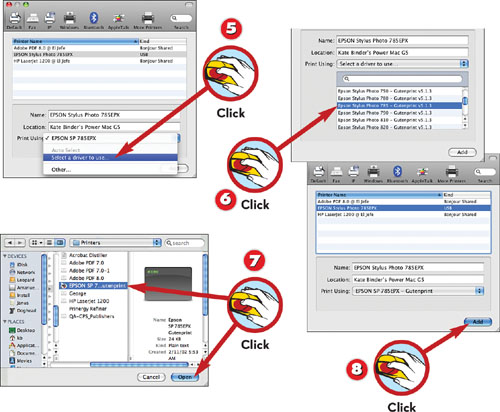
![]() If the system isn’t able to figure out which model your printer is, choose Select a driver to use from the Print Using pop-up menu.
If the system isn’t able to figure out which model your printer is, choose Select a driver to use from the Print Using pop-up menu.
![]() Click your printer model in the pick list.
Click your printer model in the pick list.
![]() If you don’t see your printer model in the list, choose Other from the Print Using pop-up menu; then navigate to the printer driver that came with your printer and click Open.
If you don’t see your printer model in the list, choose Other from the Print Using pop-up menu; then navigate to the printer driver that came with your printer and click Open.
![]() Click Add. If you see a dialog box asking about your printer’s options, choose the appropriate equipment or settings and click Continue.
Click Add. If you see a dialog box asking about your printer’s options, choose the appropriate equipment or settings and click Continue.

Note: Close Enough
If you don’t have the correct printer driver for your printer, you can usually get away with using one that’s similar. Just choose the closest model available.
![]()
Tip: Missing Pieces
To work with your printer, the Mac has to have access to the printer drivers (the software) that came with the printer. If you don’t have these, or if they’re out of date, visit the printer manufacturer’s website to download the latest drivers.
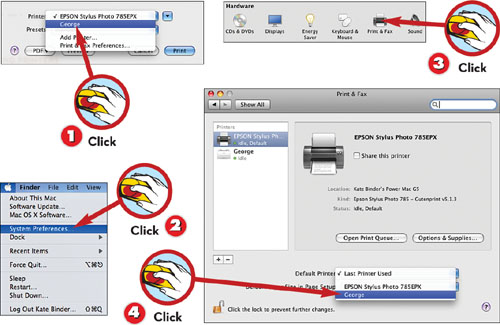
Switching Printers
If you have more than one printer, you should make sure you send each document to the right printer. You can choose a printer each time you print, or you can change the default printer to ensure that the next time you click Print the desired printer will be chosen. Start by choosing File, Print in any program and then follow these steps.
![]()
![]()
![]() To change printers on-the-fly as you prepare to print, choose a different printer from the Printer pop-up menu at the top of the Print dialog box.
To change printers on-the-fly as you prepare to print, choose a different printer from the Printer pop-up menu at the top of the Print dialog box.
![]() To change default printers ahead of time, choose Apple menu, System Preferences.
To change default printers ahead of time, choose Apple menu, System Preferences.
![]() Click the Print & Fax button to see your choices.
Click the Print & Fax button to see your choices.
![]() Choose a printer from the Default Printer pop-up menu.
Choose a printer from the Default Printer pop-up menu.
![]()
Tip: Who’s Who?
If you’re not a fan of printer names like “SuperPrint PhotoJet XL67825 Pro v8.5.1c,” click your printer in the Print and Fax preferences, then click Options & Supplies to change its name to whatever you like.
![]()
Tip: Printing Success
If a friend or family member will be using your computer and you’re not confident of that person’s ability to select the right printer on-the-fly, set the default printer ahead of time so the right printer is preselected in the Print dialog.
Previewing a Document Before Printing
Mac OS X’s printing system lets you easily see what a document will look like when it’s printed before you commit it to paper. Using this system feature, you can preview any document you can print, right from the Print dialog box.
![]()
![]()
![]() With the document open, choose File, Print (or press
With the document open, choose File, Print (or press
![]() -P) to display the Print dialog box.
-P) to display the Print dialog box.
![]() Click the Preview button; the system creates a PDF of the document and opens the PDF in the Preview program.
Click the Preview button; the system creates a PDF of the document and opens the PDF in the Preview program.
![]() Scroll through the document in Preview by clicking the Previous and Next buttons on the toolbar.
Scroll through the document in Preview by clicking the Previous and Next buttons on the toolbar.
![]() Click the Cancel button to return to the original application, or click Print to print the document.
Click the Cancel button to return to the original application, or click Print to print the document.
Note: Spreading the Wealth
When you click Preview, Mac OS X creates a new document from your original and opens it in Preview. You can save the preview document in PDF format, which also opens in Adobe Reader, to share with others who don’t have the program you used to create it.
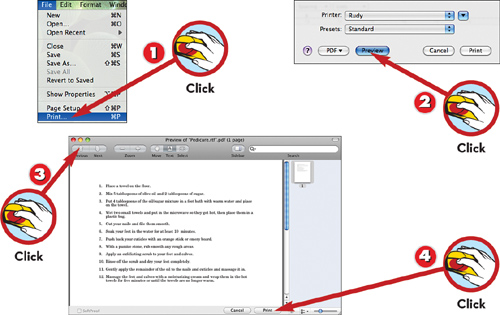
Printing a Document
For all practical purposes, the actual process of sending a document to the printer works the same in Mac OS X as it has in previous generations of the Mac OS. You can exert greater control if you want by inspecting each pane of the Print dialog box and adjusting the settings you find there, or you can just click Print and go.
![]()

![]()
![]() Choose File, Print (or press
Choose File, Print (or press
![]() -P) to display the Print dialog box.
-P) to display the Print dialog box.
![]() Choose a printer from the Printer pop-up menu, then click the arrow button to reveal more settings menus.
Choose a printer from the Printer pop-up menu, then click the arrow button to reveal more settings menus.
![]() Check the settings in each pane of the Print dialog box using the pop-up menu and make changes as needed.
Check the settings in each pane of the Print dialog box using the pop-up menu and make changes as needed.
![]() Click Print.
Click Print.
![]()
Tip: The Print Dialog Box
The Print dialog box’s panes vary according to the printer, but they always include Layout (how many pages to print on each sheet of paper), Paper Handling (which paper tray the printer should use), and one for program-specific features.
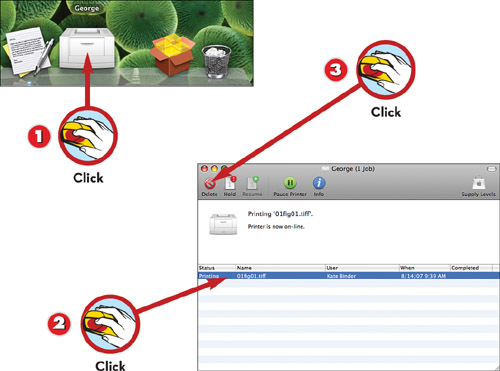
Canceling a Print Job
It happens to the best of us: You send a received fax or a rough draft of your term paper to the printer, only to realize that you’re printing the document on $1/page glossy photo paper. Cancel that print job—now! Here’s how.
![]()
![]()
![]() View the printer’s print queue by clicking the printer icon in the Dock.
View the printer’s print queue by clicking the printer icon in the Dock.
![]() Click the job you want to cancel.
Click the job you want to cancel.
![]() Click the Delete button in the toolbar.
Click the Delete button in the toolbar.
![]()
Tip: Not Now, But Later
If you want to stop a job from printing now but you plan on allowing it to print later, don’t delete it from the queue. Instead, click the Hold button in the print queue’s toolbar to put all the documents that are currently printing on hold. When you’re ready to restart printing, click Resume.
Sending a Fax
If you have a fax modem, you’ve probably spent some time wrestling with third-party fax software, which never seems to work right with either the system software or all the programs from which you want to fax. Those days are over; fax sending capability is built in to Mac OS X, and it’s as close as the Print command.
![]()
Tip: Choosing Fax Recipients
To select fax recipients from your Address Book, click the Address Book button to the right of the To field. The Address pane appears—here, you can click to select a single person or
![]() -click to select multiple people.
-click to select multiple people.
![]()
![]()
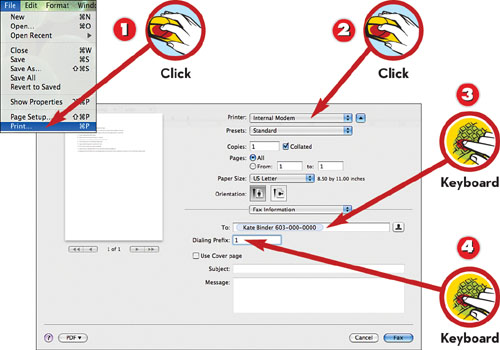
![]() Open the document and choose File, Print.
Open the document and choose File, Print.
![]() Choose your fax modem from the Printer pop-up menu.
Choose your fax modem from the Printer pop-up menu.
![]() Type the name and fax number of the person you want to fax. If the fax recipient’s name is in the Address Book, the fax number is filled in automatically.
Type the name and fax number of the person you want to fax. If the fax recipient’s name is in the Address Book, the fax number is filled in automatically.
![]() Type a dialing prefix (such as 1 for long distance or a long distance access code).
Type a dialing prefix (such as 1 for long distance or a long distance access code).
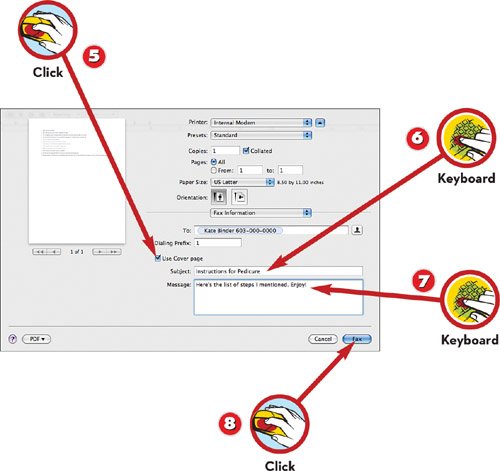
![]() Enter a subject for the fax’s cover page.
Enter a subject for the fax’s cover page.
![]() Enter any message you want to add to the fax’s cover page.
Enter any message you want to add to the fax’s cover page.
![]() Click Fax.
Click Fax.
![]()
Tip: What Goes Out Can Come In, Too
To receive faxes on your Mac, choose Apple menu, System Preferences; then click Print & Fax. Choose your fax modem from the pick list and click Receive Options. Click the check box labeled Receive faxes on this computer. Then set options for what your Mac is to do when a fax is received.
Using a Scanner
Your scanner is the way to get pictures inside your Mac, whether you need to copy a document, email a photo, or produce a web-ready image of a flat item you’re selling at auction online. First, install the scanner and its software according to the instructions that came with it. Then you’re ready to get scanning.
Note: Sticking to the Safe Side
You should be conservative in selecting the scan area. If you scan a larger area than you need, you can trim it when you edit the image in Adobe Photoshop or another program. If you don’t scan enough, you’ll have to rescan the image.
![]()
![]()
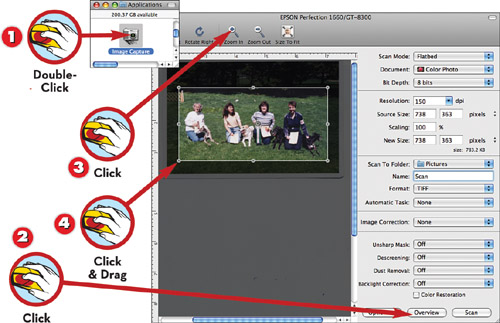
![]() Double-click Image Capture in the Applications folder.
Double-click Image Capture in the Applications folder.
![]() Click Overview to see a quick scan of the entire scanner bed.
Click Overview to see a quick scan of the entire scanner bed.
![]() Click the Zoom In and Zoom Out buttons if you need to get a clearer view of the area you want to scan.
Click the Zoom In and Zoom Out buttons if you need to get a clearer view of the area you want to scan.
![]() Click and drag in the window to select the portion of the image you want to scan.
Click and drag in the window to select the portion of the image you want to scan.
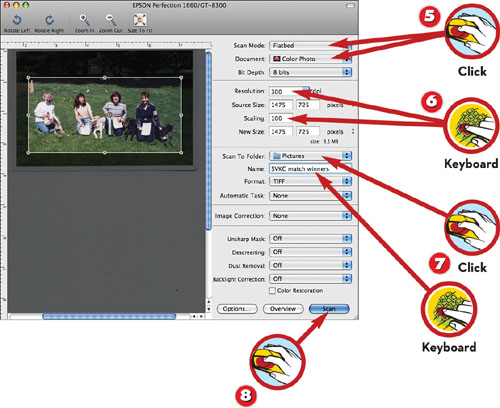
![]() Choose a source type from the Scan Mode pop-up menu, and select a document type from the Document pop-up menu.
Choose a source type from the Scan Mode pop-up menu, and select a document type from the Document pop-up menu.
![]() Set the Resolution and the Scaling percentage.
Set the Resolution and the Scaling percentage.
![]() Choose a location for the image file and give it a name.
Choose a location for the image file and give it a name.
![]() Click Scan. The image is saved in the selected folder.
Click Scan. The image is saved in the selected folder.
![]()
Tip: Making It Better
If you don’t plan to edit your scanned image in an image editor such as Photoshop, you can adjust it using the controls located at the bottom of the dialog box, directly over the Scan button.
Note: More Scanner Options
Click Options to change some of the scanner’s global settings, such as the resolution at which it makes overview scans and which programs start up when you press the buttons on the front of the scanner.
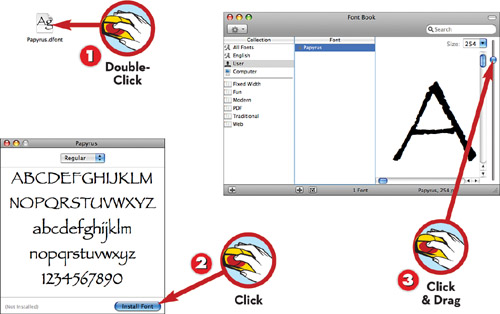
Adding Fonts
There’s no such thing as a font collection that’s too big. Don’t take that the wrong way—using all the fonts you have in one document is usually a very bad move, design-wise. But having a lot of fonts to choose from when you’re creating graphics or printed documents is a luxury that’s available to anyone with a Mac.
![]()
![]()
![]() Double-click the font’s icon. Font Book starts up and displays the font.
Double-click the font’s icon. Font Book starts up and displays the font.
![]() Click Install Font. The font is installed in your home folder’s Library folder.
Click Install Font. The font is installed in your home folder’s Library folder.
![]() Drag the Size slider to preview the font at different sizes.
Drag the Size slider to preview the font at different sizes.
![]()
Tip: Shopping Time
Where do fonts come from? One place to start is Apple’s Macintosh Products Guide (www.guide.apple.com). Click Productivity & Utilities in the left navigation bar on the web page and click the Fonts radio button; then click Find Products in the subsequent page.
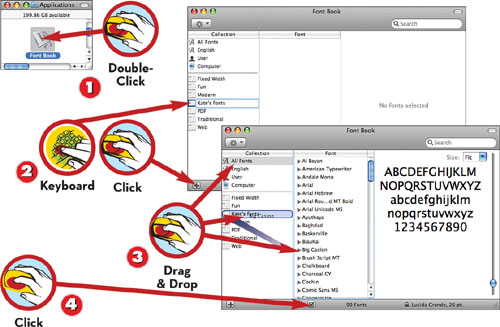
Organizing Fonts
If your font collection has been growing, you’ll love the ability to group the installed fonts into collections. Collections keep your fonts organized so you can quickly apply the fonts you’re using for a given project. Mac OS X comes with a few predefined collections, but feel free to create as many collections as you want.
![]()
![]()
![]() Double-click Font Book in the Applications folder.
Double-click Font Book in the Applications folder.
![]() Click the + button below the Collection column to create a new collection; then type in a name.
Click the + button below the Collection column to create a new collection; then type in a name.
![]() Click All Fonts in the Collection column and drag a font from the Font column into the new collection.
Click All Fonts in the Collection column and drag a font from the Font column into the new collection.
![]() Click a collection name or a font name and click Disable to remove that font from the Font panel. If you see a confirmation dialog box, click Disable again.
Click a collection name or a font name and click Disable to remove that font from the Font panel. If you see a confirmation dialog box, click Disable again.
![]()
Tip: Putting Fonts Back on the Menu
Disabling a font doesn’t delete it—you can always return to Font Book, select the font from the All Fonts collection, and click the same button to make the font available again.