
Part 12. Creating a Home Network
A network, whether it’s composed of physical cables or wireless, connects your computer with other computers so you can share files, play network games, and all use the same printers and Internet connection. The Internet, in fact, is simply a huge network comprising many smaller networks. With Mac OS X, setting up your own network in your home or office is easy.
Creating a network has two basic components. First, you need to make the connection by either hooking up your Macs (and Windows PCs, if you like) with Ethernet cables or installing AirPort cards and an AirPort base station so they can talk to each other wirelessly. Then, you need to tell your Mac how your network is set up so the system knows which connector and language to use to communicate with the other computers it’s connected to.
In this Part, you’ll learn how to set up your network and turn on file sharing so both Windows users and other Mac users on your network can exchange files with you. You’ll also learn how to share printers connected to your Mac with other users on your network. And you’ll find out how to share a single Internet connection among all the computers on a network, as well as how to connect to an AirPort network and get online via a wireless AirPort connection.

Setting Up and Using a Network
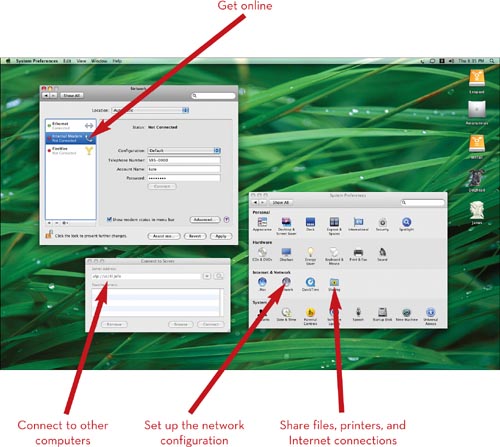
Getting on the Network
The first step to setting up a wired home network is this: Connect your computers with Ethernet cables (a regular one for newer Macs and a crossover cable for older Macs). If you have more than two computers, buy a hub and connect each computer to the hub; otherwise, connect your two Macs directly to each other.
![]()
Tip: An Even Easier Way
If network settings completely befuddle you, try using the Network Setup Assistant to get connected. Start up System Preferences and click Network; then click Assist Me and follow the instructions.
![]()
Tip: Looking It Up
Start up System Preferences and click Network; then choose Network Status from the Show pop-up menu. Click the Built-in Ethernet or AirPort entries in the list to see your IP address.
![]()
![]()
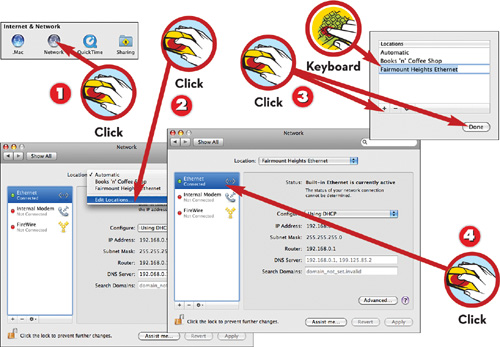
![]() Open System Preferences and click the Network button.
Open System Preferences and click the Network button.
![]() Choose Edit Locations from the Location pop-up menu.
Choose Edit Locations from the Location pop-up menu.
![]() Click the + button, then enter a name for the network configuration you’re about to create and click Done.
Click the + button, then enter a name for the network configuration you’re about to create and click Done.
![]() Click the network port you want to use (usually either Built-in Ethernet or AirPort).
Click the network port you want to use (usually either Built-in Ethernet or AirPort).
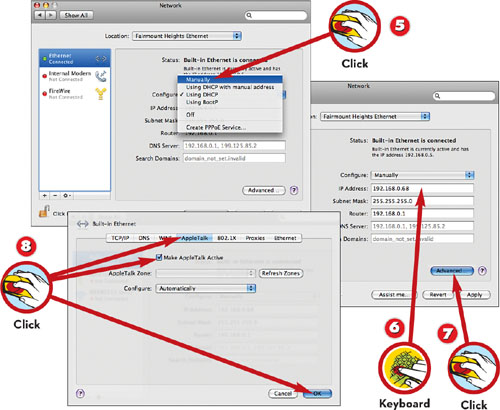
![]() Set the Configure pop-up menu to either Using DHCP or Manually (check with your network admin).
Set the Configure pop-up menu to either Using DHCP or Manually (check with your network admin).
![]() If you choose Manually in step 5, enter settings for the IP Address, Subnet Mask, Router, and DNS Server.
If you choose Manually in step 5, enter settings for the IP Address, Subnet Mask, Router, and DNS Server.
![]() To share files with older Macs that can’t do TCP networking, click Advanced to locate the AppleTalk settings.
To share files with older Macs that can’t do TCP networking, click Advanced to locate the AppleTalk settings.
![]() Click the AppleTalk tab and check Make AppleTalk Active, then click OK.
Click the AppleTalk tab and check Make AppleTalk Active, then click OK.

Note: Going Both Ways
If other users want to connect to your Mac via AppleTalk, both your Mac and their Macs must have AppleTalk turned on as directed in step 8.
Note: By the Manual
When you choose Manually in the Configure IPv4 pop-up menu, you must enter your Mac’s IP address, your router’s IP address, and the subnet mask. If all this is gibberish to you, go to Threemacs.com (www.threemacs.com) to learn about creating networks.
Connecting to Networked Computers
Networking has always been easy with Macs, but now the system’s networking features are easier to use and more powerful than ever. You can connect to any Mac or Windows computer on your network using either AppleTalk or TCP networking, but all you need to know is the computer’s name or IP address.
![]()
![]()
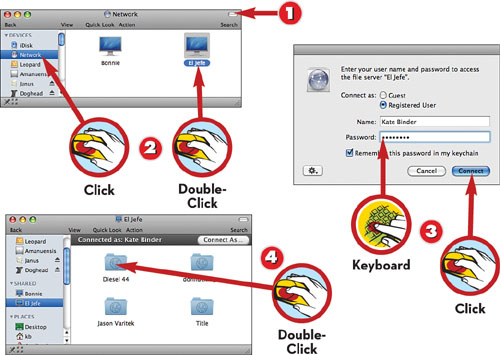
![]() In the Finder, click the transparent button to display the Places sidebar if it’s not already visible.
In the Finder, click the transparent button to display the Places sidebar if it’s not already visible.
![]() Click Network and double-click the computer to which you want to connect.
Click Network and double-click the computer to which you want to connect.
![]() Enter your username and password and click Connect.
Enter your username and password and click Connect.
![]() Double-click a drive or folder to connect to.
Double-click a drive or folder to connect to.
![]()
Tip: Invisible Friends
If the computer to which you want to connect isn’t visible, you need to find out its network address (available in the Sharing section of System Preferences). Then choose Go, Connect to Server in the Finder and enter the address.
![]()
Tip: Connecting with the Other Side
To connect to a Windows computer, assign it an IP address (refer to Windows documentation). Then enter its address in the Connect to Server dialog box in this form: smb://192.168.0.102.
Sharing Files on a Network
When computers aren’t networked, sharing files requires the use of sneakernet: physically walking a removable disk to another machine. Fortunately, creating a network is easy enough (see “Getting on the Network,” earlier in this part) that Mac users rarely have to resort to sneakernet. Here’s how to share your files on a real network.
![]()
![]()
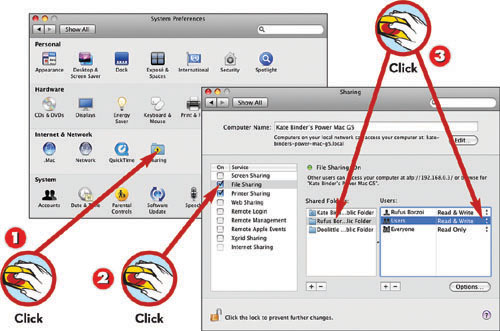
![]() Open System Preferences and click Sharing.
Open System Preferences and click Sharing.
![]() Check the box labeled File Sharing.
Check the box labeled File Sharing.
![]() To change access privileges for specific users, click a user or group’s name and change the privileges status in the column on the right.
To change access privileges for specific users, click a user or group’s name and change the privileges status in the column on the right.
![]()
Tip: When You Get There
To connect to another Mac on your network, see the preceding task, “Connecting to Networked Computers.” When you connect to another Mac, you’ll see the home folders of that Mac’s users. If you log in as a registered user of that Mac, you’ll be able to access the same folders as if you were sitting in front of the Mac. Otherwise, you must connect as a Guest; in this case, you’ll be able to see only the contents of the user’s Public folder (see “Sharing Files with Other Users,” in Part 11, “Sharing Your Mac with Multiple Users").
Controlling Another Mac
If you’ve ever wanted to reach right through the phone and grab someone else’s, screen sharing is for you. With Leopard, for the first time, this feature is built right into Mac OS X. It enables you to control the screen of any Mac on your local network, any Mac you can reach through iChat, and any Mac that’s logged in to .Mac using your username.
![]()
Tip: Mother, May I?
If you don’t see a screen sharing button in iChat or in the Finder, open System Preferences and click Sharing, then click the box labeled Screen Sharing. The Mac to which you want to connect must also turn on Screen Sharing.
![]()
Tip: Find It in the Finder
If you want to share the screen of a Mac on your local network, you don’t need to use iChat. In the Shared section of a Finder window’s sidebar, click the computer to which you want to connect, then click Connect As.
![]()
![]()
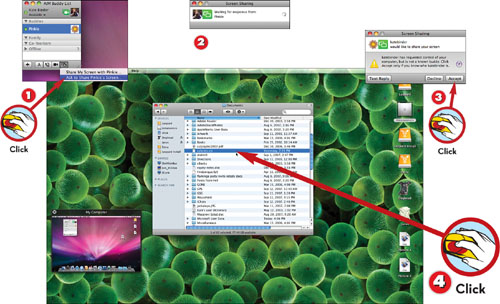
![]() Click the Screen Sharing button at the bottom of the iChat window and choose Ask to Share [User]’s Screen.
Click the Screen Sharing button at the bottom of the iChat window and choose Ask to Share [User]’s Screen.
![]() A dialog box tells you that your Mac is waiting for a response from the other user.
A dialog box tells you that your Mac is waiting for a response from the other user.
![]() The other user must click Accept to begin screen sharing.
The other user must click Accept to begin screen sharing.
![]() The other Mac’s screen replaces your desktop; you can open folders, files, and programs as if you were sitting in front of the shared Mac.
The other Mac’s screen replaces your desktop; you can open folders, files, and programs as if you were sitting in front of the shared Mac.
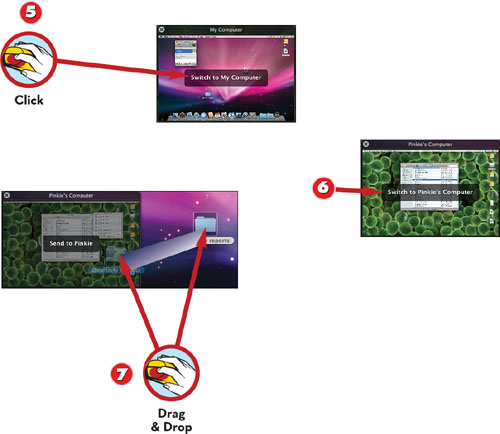
![]() Click the thumbnail of your own Mac’s desktop to return to your Mac.
Click the thumbnail of your own Mac’s desktop to return to your Mac.
![]() Click the thumbnail of the shared Mac’s desktop to return to using the shared Mac.
Click the thumbnail of the shared Mac’s desktop to return to using the shared Mac.
![]() Drag and drop files or folders onto either thumbnail to copy them to the other Mac.
Drag and drop files or folders onto either thumbnail to copy them to the other Mac.
Note: Let’s Share!
You’ve probably noticed that iChat’s Screen Sharing button also gives you the option of sharing your own screen with another user. The process works exactly the same way, except that the other user ends up controlling your Mac.
Note
If you need access to another of your own Macs, you can use .Mac to share screens no matter where your two computers are located. Turn to “Accessing Your Mac Remotely,” in Part 9, to learn more.
Searching Multiple Macs
Searching with Spotlight brings the entire contents of your Mac right to your fingertips—and in Leopard, it does the same with the contents of other Macs on your local network. That’s right; Spotlight can search, almost instantaneously, not only your hard drive but any drive you’re connected to on a LAN.
![]()
![]()
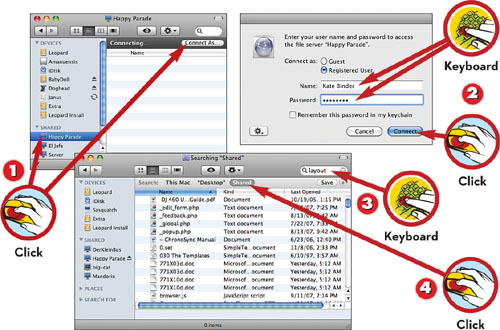
![]() In the Shared section of the sidebar, click the computer to which you want to connect, then click Connect As.
In the Shared section of the sidebar, click the computer to which you want to connect, then click Connect As.
![]() Enter your username and password and click Connect.
Enter your username and password and click Connect.
![]() Type the terms for your search in the Spotlight field.
Type the terms for your search in the Spotlight field.
![]() Click Shared to see the search results from network drives.
Click Shared to see the search results from network drives.
Note: Another Way
You’ll also see the Shared button at the top of a window showing results from a search done using the Spotlight menu. You can use either method to search—there’s no difference in the results.
Note: The Mac Connection
To learn more about connect to other computers on your network, turn to “Connecting to Networked Computers,” earlier in this part.
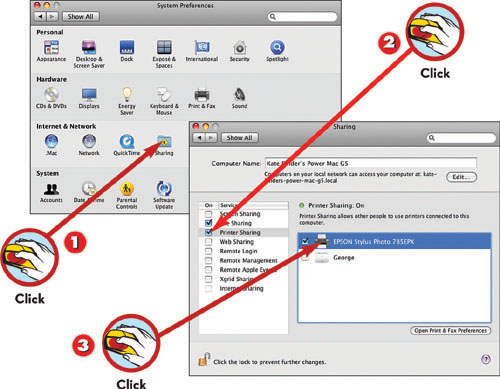
Sharing a Printer on a Network
You can share printers connected to your computer with other computer users on your network. Starting up printer sharing is simple; you can choose to restrict it to Mac users or enable Windows users to use your printers as well. Network users can add shared printers to their Print dialog boxes just like network printers.
![]()
![]()
![]() Open System Preferences and click Sharing.
Open System Preferences and click Sharing.
![]() Check the box labeled Printer Sharing.
Check the box labeled Printer Sharing.
![]() Check the boxes next to the printers you want to share.
Check the boxes next to the printers you want to share.
![]()
Tip: Where in the Office...?
To let other people know where shared printers are physically located, start Printer Setup Utility (in the Utilities folder in Applications). Select the printer and click Show Info; then add a description in the Location field.
Note: What It’s For
Printers on your network are already shared, even if the printers are located in your office. Printer sharing gives network capabilities to devices such as USB inkjets, which don’t usually have network connectors.
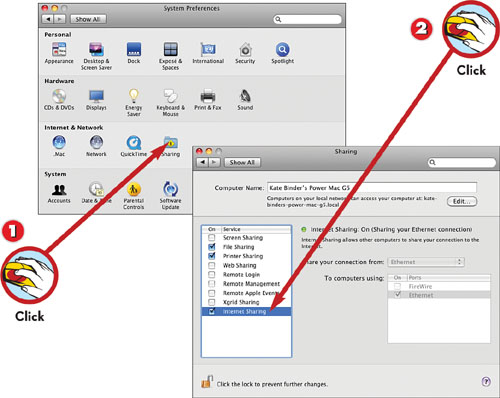
Sharing an Internet Connection
If you’ve ever suffered through life with two Internet-capable computers and only one network connection, you’ll appreciate the ability to share an online connection with all the computers in your house or office. And life gets even better when your connection is broadband, such as a cable modem or a DSL line.
![]()
![]()
![]() Open System Preferences and click Sharing.
Open System Preferences and click Sharing.
![]() Check the box labeled Internet Sharing.
Check the box labeled Internet Sharing.
Note: When Not to Share
If you connect to the Internet and your network via the same port, sharing your Internet connection can tell other computers to access the Internet through it when they shouldn’t (such as when you take your laptop to the office).
Note: Another Way to Share
If you’re sharing an Internet connection through another Mac, you’ll be able to get online only when that Mac is up and connected. If that doesn’t work for you, consider buying a hardware router that can keep you online all the time.
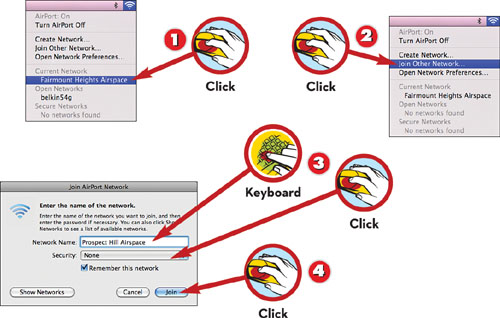
Joining a WiFi Network
With an AirPort card, you can get rid of those annoying network cables and connect to your network from wherever your computer happens to be, as long as you’re close to an WiFi connection point (either an Airport base station, or another brand). AirPort is great for laptops—and it comes built into all Apple’s current laptops—but you can use it for desktop Macs, too.
![]()
![]()
![]() Choose a network name from the Airport menu in the menu bar.
Choose a network name from the Airport menu in the menu bar.
![]() To join a network that isn’t shown, choose Join Other Network.
To join a network that isn’t shown, choose Join Other Network.
![]() Enter the network’s name and security method in the login dialog box.
Enter the network’s name and security method in the login dialog box.
![]() Click Join.
Click Join.
Note: AirPort in Your Menu Bar
The AirPort menu also enables you to switch networks, turn AirPort on or off, or connect to AirPort-equipped Macs.
![]()
Tip: Close to Home Base
If AirPort is turned on but you can’t get in touch with the network you’re looking for, you might be out of range. AirPort base stations have varying ranges; you must be close enough to connect to the base station.