
Part 5. Customizing Your Mac
It’s your Mac—why not have some fun with it? There are myriad ways to make your Mac your own, from changing its desktop picture, its icons, and even your own login icon to changing the way the Finder works and responds to you. You can even change the Finder’s language to any of a couple dozen alternatives, including Asian languages, or you can set up your Mac to talk to you—and listen for your responses.
Your custom settings are associated with your login name, so they’re automatically put into action each time you log in. When other users log in, their own settings are activated. That means a single Mac can offer each user a custom experience. Your custom settings can include useful preferences such as network locations and more fun preferences such as your desktop wallpaper.
In this part you’ll learn how to customize the Finder, the Dock, the desktop, your screen saver, and your security preferences. You’ll also learn how to make your own Dashboard widgets—tiny custom programs that you can build from pieces of your favorite websites. If you move your computer around or switch networks a lot, you’ll benefit from the “Creating Custom Network Locations” task, which shows how to create custom location settings that change all your network preferences with a single click.
Taking Advantage of Custom Settings

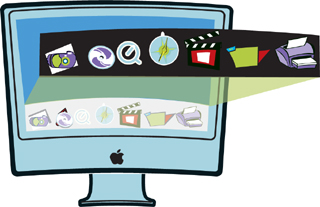
Moving the Dock Around
Although the Dock normally lives at the bottom of your screen, it doesn’t have to stay there. If you prefer, you can put it on the left or right side of the screen instead. No matter which edge of the screen it’s on, the Dock works the same way and you can set its preferences to suit your tastes.
![]()
![]()
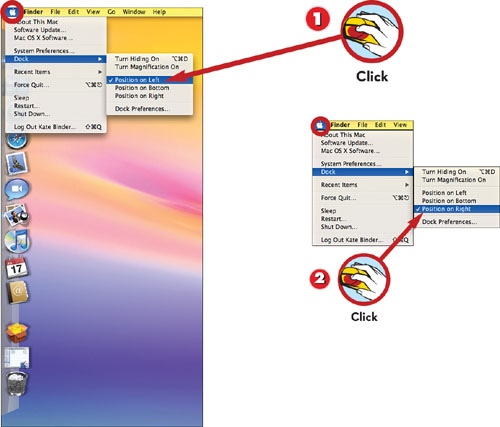
![]() Choose Apple menu, Dock, Position on Left to move the Dock to the left edge of the screen.
Choose Apple menu, Dock, Position on Left to move the Dock to the left edge of the screen.
![]() Choose Apple menu, Dock, Position on Right to move the Dock to the right edge of the screen.
Choose Apple menu, Dock, Position on Right to move the Dock to the right edge of the screen.
![]()
Tip: Hide and Go Dock
To hide the Dock, choose the Apple menu, Dock, Turn Hiding On; the Dock sinks off the edge of the screen whenever you’re not using it. Move your mouse back to that edge, and the Dock pops back up.

Note: Dock Substitutes
The Dock can get crowded if you store everything there. Some users use the Dock as an application switcher, with inactive programs and documents stored in a third-party Dock substitute such as DragThing (www.dragthing.com).
Changing the Dock’s Size
The more stuff you stash in the Dock, the more room it takes up on your screen. If it gets too full, you can shrink it to give you more room onscreen—or, if you prefer, you can make it larger so it’s easier to see what it contains.
![]()
![]()
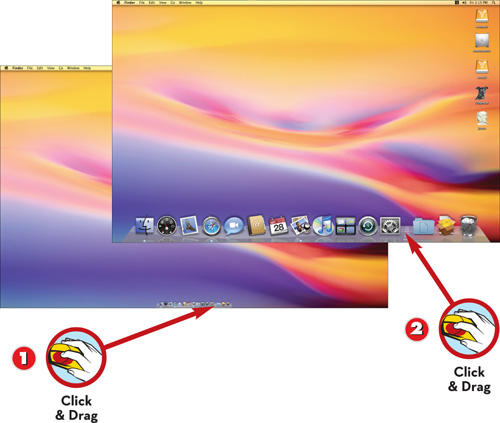
![]() Click the line between the two halves of the Dock and drag upward to enlarge the Dock.
Click the line between the two halves of the Dock and drag upward to enlarge the Dock.
![]() Drag downward to reduce the Dock’s size.
Drag downward to reduce the Dock’s size.
![]()
Tip: There’s Always Another Way
You can also use the Dock Size slider in the Dock preferences (choose the Apple menu, Dock, Dock Preferences) if you happen to be going there to change other preferences as well.
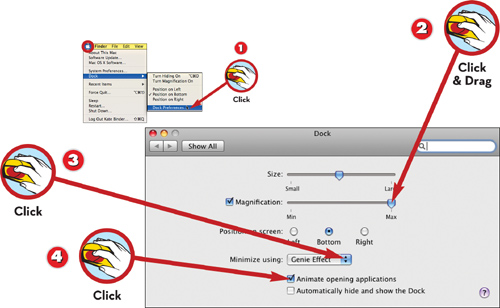
Customizing the Dock’s Behavior
As if moving the Dock around and changing its size weren’t enough, there’s yet more you can do to make the Dock work just the way you want it to. The Dock preferences enable you to control the way the Dock moves—or, more precisely, the way its icons move and change size and the way windows enter the Dock.
![]()
![]()
![]() Choose Apple menu, Dock, Dock Preferences.
Choose Apple menu, Dock, Dock Preferences.
![]() Click and drag the Magnification slider toward Max if you want Dock icons to be enlarged as you pass the mouse cursor over them.
Click and drag the Magnification slider toward Max if you want Dock icons to be enlarged as you pass the mouse cursor over them.
![]() Choose an option from the Minimize using pop-up menu.
Choose an option from the Minimize using pop-up menu.
![]() Click the Animate opening applications check box to make Dock icons bounce as their programs start up.
Click the Animate opening applications check box to make Dock icons bounce as their programs start up.
![]()
Tip: Dock Behavior in Another Context
You can control Dock Preferences by Ctrl-clicking the dividing line between the halves of the Dock. The contextual menu has controls for magnification, hiding, position, and the minimization effect, as well as a Dock Preferences command.
Changing the Way the Finder Works
The Finder—the program that generates the desktop and enables you to explore your hard drive and network drives visually via windows—is where you’ll spend a lot of time while using your Mac. You have several choices about the way it operates; here’s how to set up the Finder to suit your tastes.
![]()

![]()
![]() In the Finder, choose Finder, Preferences.
In the Finder, choose Finder, Preferences.
![]() Click the General button to see basic Finder preferences, and then click check boxes to set the kinds of disks to appear on the desktop.
Click the General button to see basic Finder preferences, and then click check boxes to set the kinds of disks to appear on the desktop.
![]() Choose an option from the New Finder windows open pop-up menu to determine which folder or disk location appears in new Finder windows.
Choose an option from the New Finder windows open pop-up menu to determine which folder or disk location appears in new Finder windows.
![]() Click the check boxes to set whether each folder generates a new window and whether new windows start out in Column view.
Click the check boxes to set whether each folder generates a new window and whether new windows start out in Column view.
![]()
Tip: Finding Files with the Finder
The Finder got its name for its capability to find files. To find files in the Finder, choose File, Find or press F9 and type in the information for which you want to search.

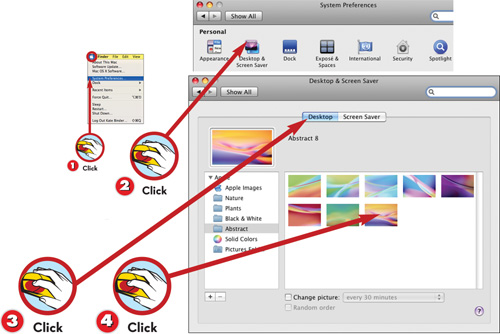
Changing Your Desktop Picture
Every time you sit down in front of your Mac, you’re looking at your desktop—or, more specifically, at the picture displayed on it. Why not have some fun with it? You can change the desktop picture any time you like, using any photo, cartoon, or other graphic that catches your fancy.
![]()
![]()
![]() Choose Apple menu, System Preferences.
Choose Apple menu, System Preferences.
![]() Click the Desktop & Screen Saver icon to see your choices.
Click the Desktop & Screen Saver icon to see your choices.
![]() Click the Desktop button.
Click the Desktop button.
![]() Click a folder and an image from within the folder to apply that image to the desktop.
Click a folder and an image from within the folder to apply that image to the desktop.
![]()
Tip: Surprise Me
If you want your desktop picture to change automatically, click Choose Folder in the Desktop tab and pick a folder full of your favorite images. Then check Change picture at the bottom of the Desktop tab and choose a time interval.
Note: The Mother Lode
Looking for more desktop pictures to relieve your boredom? You can download hundreds of high-quality desktop images at MacDesktops (www.macdesktops.com).
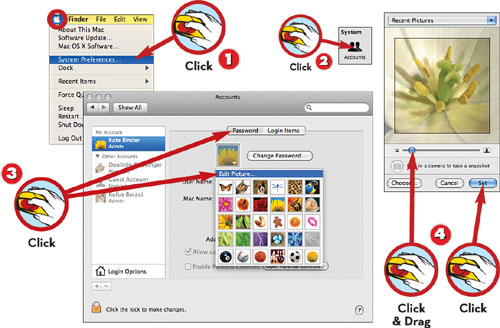
Changing Your Login Icon
Your login icon represents your face within the world of your Mac. It’s used as your buddy icon for online messaging in iChat, it appears next to your personal information in the Address Book, and you see it every time you log in. You can use one of the built-in pictures, or you can add any picture you like—your photo or anything else.
![]()
![]()
![]() Choose Apple menu, System Preferences.
Choose Apple menu, System Preferences.
![]() Click the Accounts icon to see your choices.
Click the Accounts icon to see your choices.
![]() Click the Password button; then click your picture and choose Edit Picture in the pop-up menu.
Click the Password button; then click your picture and choose Edit Picture in the pop-up menu.
![]() Drag or paste an image file into the Images window, drag the image and the scaling slider until the square shows the area you want for the icon, and then click Set to make it your login picture.
Drag or paste an image file into the Images window, drag the image and the scaling slider until the square shows the area you want for the icon, and then click Set to make it your login picture.

Caution: Using Your Own Picture
If you’re concerned about privacy, it might not be wise to use your own photo as a login icon. If people you don’t know will see the photo—as an iChat icon, for instance—you might want to substitute a personal logo of some type.
![]()
Tip: I’m Ready for My Close-Up, Mr. Jobs
If you have an iSight camera, either standalone or built into your Mac, you can use it to take a picture right from the Images window and turn that photo into an icon on the spot.
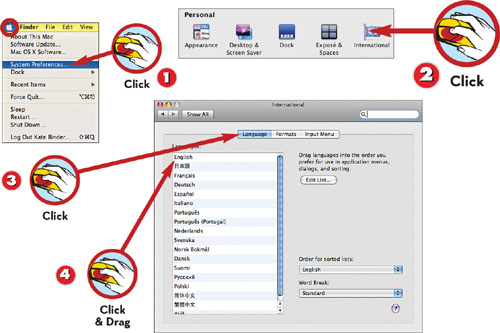
Changing Your Mac’s Language
You might have thought that you would need to buy a special version of Mac OS X if you want your Mac’s interface to use a language other than English. Actually, Mac OS X ships with the capability to display menus, dialog boxes, and other interface elements in a couple dozen languages, including those with special alphabets.
![]()
![]()
![]() Choose Apple menu, System Preferences.
Choose Apple menu, System Preferences.
![]() Click the International icon to see your choices.
Click the International icon to see your choices.
![]() Click the Language button.
Click the Language button.
![]() Click and drag your preferred language to the top of the pick list.
Click and drag your preferred language to the top of the pick list.
![]()
Tip: Making a Menu
When you switch languages, you should also switch keyboard layouts to activate each language’s special characters. In the International preferences’ Input Menu tab, you can create a menu of the languages you use, then click the Show input menu in menu bar box so you can switch keyboard layouts quickly.
Changing Your Screen Saver
Originally invented to stop the kind of screen burn-in that you see on automatic teller machines, screen savers are actually little more than a pretty entertainment these days. But that shouldn’t prevent you from using them; screen savers provide some privacy, shielding your screen from casual observers, as well as being fun to look at.
![]()
![]()
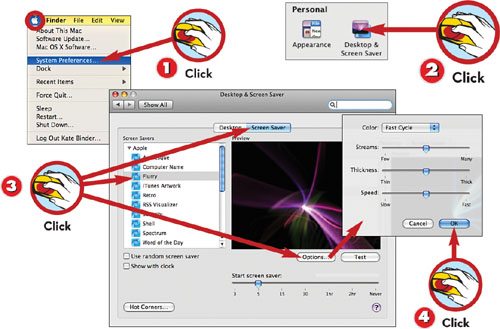
![]() Choose Apple menu, System Preferences.
Choose Apple menu, System Preferences.
![]() Click the Desktop & Screen Saver icon to see your choices.
Click the Desktop & Screen Saver icon to see your choices.
![]() Click the Screen Saver button, and then click a screen saver in the list to select it. Click the Options button.
Click the Screen Saver button, and then click a screen saver in the list to select it. Click the Options button.
![]() Use the settings in this dialog box to change settings specific to each screen saver. Click OK when finished.
Use the settings in this dialog box to change settings specific to each screen saver. Click OK when finished.
![]()
Tip: Got Savers?
If you’re not satisfied with the built-in selection of screen savers—or if you’ve run through them all and are desperately in need of new ones—check out www.macscreensavers.com.
![]()
Tip: A Screen Saver All Your Own
For a custom screen saver, put your favorite photos in a folder and click Choose Folder in the Screen Saver pane’s pick list. Locate the folder you want to use and your Mac uses the “Ken Burns” effect to animate your photos.
Changing File Icons
Mac OS X has wonderful graphics; it’s a lovely looking operating system, and that’s due in large part to its detailed, scalable icons. One of the easiest—and coolest—customizations you can perform on your Mac is to apply the system’s dexterity with icons to your own homemade icons. You can turn any picture you like into an icon.
Note: More Fun with Icons
You can copy and paste existing icons, too. For a great collection of free Mac icons you can download and apply to your files and folders, check out the Iconfactory (www.iconfactory.com).

![]()
![]()
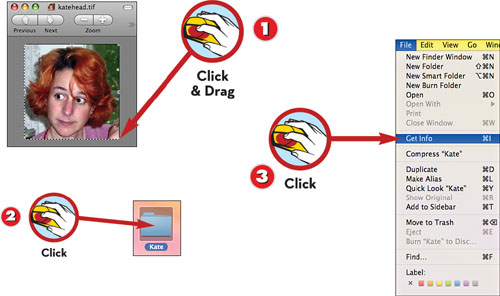
![]() In Preview or another graphics program, select part or all of an image to be the new icon. Press
In Preview or another graphics program, select part or all of an image to be the new icon. Press
![]() -C to copy the selection.
-C to copy the selection.
![]() In the Finder, click to select the file whose icon you want to change.
In the Finder, click to select the file whose icon you want to change.
![]() Choose File, Get Info to see the file’s Info window.
Choose File, Get Info to see the file’s Info window.
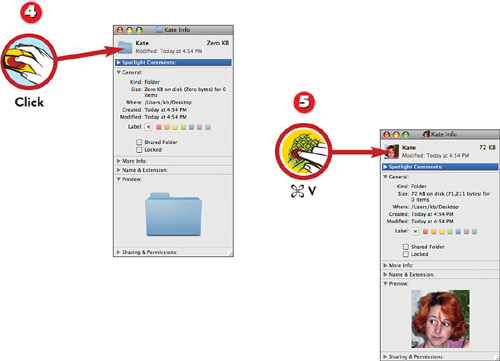
![]() Click the icon shown in the Info window.
Click the icon shown in the Info window.
![]() Press
Press
![]() -V and the new image is pasted into the icon area.
-V and the new image is pasted into the icon area.
![]()
Tip: For Best Results
The bigger the picture you use to create an icon, the more detailed the icon will be when it’s scaled to its largest size. With that in mind, however, remember that at small sizes, simple, clear, less-detailed images are the easiest to identify.
Increasing Your Mac’s Security
Whether these settings are important to you depends on how vulnerable your Mac is to snoopy intruders. If your computer is in a dorm room or an open office, or if it’s a PowerBook, you’ll probably want to put at least some of these measures in place to ensure that unauthorized people can’t use it.
![]()
![]()
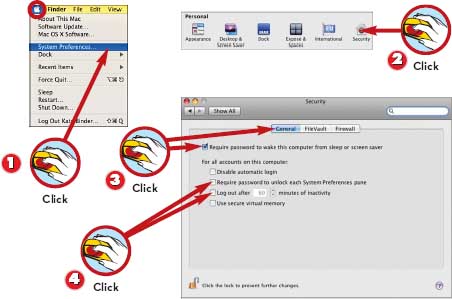
![]() Choose Apple menu, System Preferences.
Choose Apple menu, System Preferences.
![]() Click the Security icon to see your choices.
Click the Security icon to see your choices.
![]() Click the General button, and then click the Require password check box to make sure that only you can wake the computer up when it’s sleeping.
Click the General button, and then click the Require password check box to make sure that only you can wake the computer up when it’s sleeping.
![]() Click the check boxes next to the other options to turn them on or off.
Click the check boxes next to the other options to turn them on or off.
Note: Learning to Live Together
To learn about ways to get along when you share your Mac with other users, turn to Part 11, “Sharing Your Mac with Multiple Users."
Using the Dashboard
Naturally, the Dashboard is where you keep indicators, gauges, and other useful things. This handy feature enables you to quickly access helpful desk accessories and just as quickly sweep them out of the way when you’re done using them.
![]()
![]()
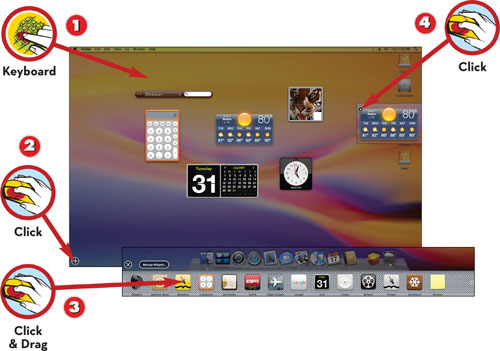
![]() Press F12 to view or hide the Dashboard.
Press F12 to view or hide the Dashboard.
![]() Click the + button to see the Dashboard shelf.
Click the + button to see the Dashboard shelf.
![]() Drag a widget out of the shelf to place it on the Dashboard.
Drag a widget out of the shelf to place it on the Dashboard.
![]() Click the Close button in the upper-left corner of a widget to put it back on the shelf.
Click the Close button in the upper-left corner of a widget to put it back on the shelf.
![]()
Tip: Double Vision
Some widgets can be in two places at once—you can drag more than one sticky or calendar out of the Favorites bar. Watch out, though; if you double-click a widget, you might unintentionally end up with two copies of it when you only wanted one.
Making Your Own Widgets
If you frequently visit particular web pages, you’ll be thrilled to hear that Leopard enables you to stick them right in your Dashboard so you can take a quick glance at them any time. It’s very simple to turn your favorite web pages into Dashboard widgets, and you do it right from Safari.
![]()

![]()
![]() In Safari, type the URL of the web page you want to turn into a widget.
In Safari, type the URL of the web page you want to turn into a widget.
![]() Click the Web Clip button.
Click the Web Clip button.
![]() Select the area on the web page that you want to include in your widget.
Select the area on the web page that you want to include in your widget.
![]() Click Add; the new widget opens in Dashboard.
Click Add; the new widget opens in Dashboard.
![]()
Tip: Make It Your Very Own
To customize the appearance of your widget, click the i button in its lower righthand corner. The widget flips neatly over and presents you with a choice of visual themes. Click the one you want to use.
![]()
Tip: The Widget Underground
Want to be just a little bit subversive? Use Web Clip to avoid ads on web pages by turning them into widgets—and carefully cropping out all the area occupied by ads.
Automatically Updating Your Widgets
If you use more than one computer, .Mac now gives you a convenient way to make sure your favorite widgets are installed on all your Macs. If you’re a .Mac member, you need never again experience the frustration of not having just the widget you need.
![]()
![]()
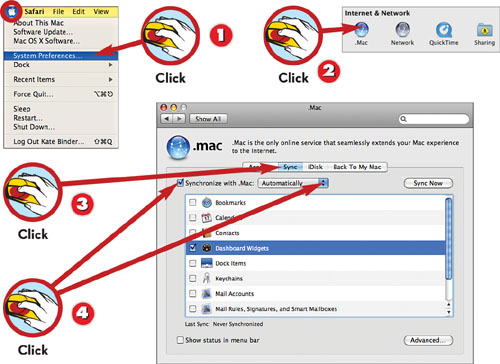
![]() Choose Apple menu, System Preferences.
Choose Apple menu, System Preferences.
![]() Click the .Mac button in the System Preferences window to display the .Mac preferences.
Click the .Mac button in the System Preferences window to display the .Mac preferences.
![]() Click the Sync button.
Click the Sync button.
![]() Click the check box labeled Synchronize with .Mac, then choose Automatically from the pop-up menu.
Click the check box labeled Synchronize with .Mac, then choose Automatically from the pop-up menu.
Note: Dotting Your Mac
Apple’s own online service, .Mac, has lots of other benefits—your own website, synchronization of iCal, Address Book, and Safari’s bookmarks, Internet backup for your important files, and much more. To learn how to set up a .Mac account, turn to Part 9, “Living Online."
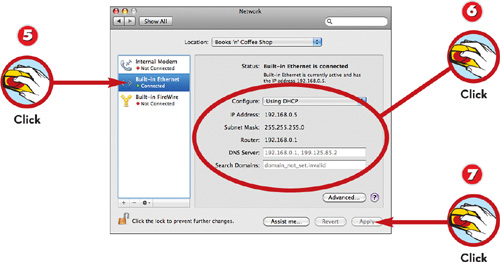
Creating Custom Network Locations
Network locations are groups of network settings, each saved with a descriptive name so you can switch all your settings with a single click and get online or on the local network instantly no matter where you happen to be. After you’ve created a location, to use it all you have to do is choose it from a pop-up menu.
![]()
Tip: A Time and a Place
You can use locations to save settings for different situations as well as different places. For example, if you have both a cable modem and a dial-up account, create a location for each so you can easily switch to dial-up if the cable connection goes down.
![]()
![]()
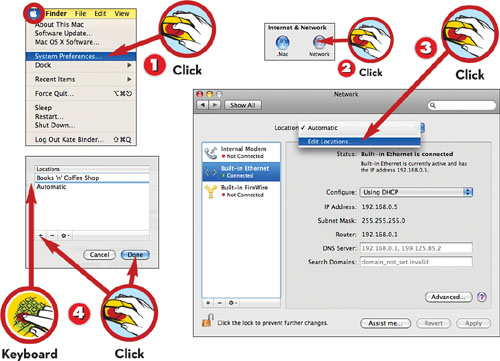
![]() Choose Apple menu, System Preferences.
Choose Apple menu, System Preferences.
![]() Click the Network icon to see your choices.
Click the Network icon to see your choices.
![]() Choose Edit Locations from the Location pop-up menu.
Choose Edit Locations from the Location pop-up menu.
![]() Click the Add Location button, give the location a descriptive name, and click Done.
Click the Add Location button, give the location a descriptive name, and click Done.
![]() Choose the network interface you want to set up from the list at the left.
Choose the network interface you want to set up from the list at the left.
![]() Make the appropriate settings for that network interface.
Make the appropriate settings for that network interface.
![]() Click Apply to switch to the new location.
Click Apply to switch to the new location.
Note: Naming Names
Just to be sure we’re all on the same page here, a descriptive name (see step 4) is something like “Joe’s office Ethernet,” rather than “New Location 4.” It tells you where and under what circumstances the location setting is applicable.
![]()
Tip: What’s in a Name?
To change the names of your locations, choose Edit Locations from the pop-up menu again.