One of the factors that elevates WordPress from being a mere blogging tool into a butt-kicking CMS ready for world domination is its custom post types capability. Custom post types let you go beyond the concept of a blog post or page, and move into just about any type of content you like. Imagine creating a recipe or tutorial site, a staff directory, or a portfolio of work.
In this chapter, we’ll learn about why we might want to create our own post types, how to put them together, and how to create templates for them.
While many of us get along fine with the built-in content types provided in WordPress, sometimes you just have to stretch the system a little—you want to be able to make up your own content types, with customized fields, categories, and more.
Before WordPress 2.9, if you wanted to create a custom content type, you’d have to try to combine pages or posts with categories, tags, custom fields, and some judicious use of theming. While it achieved the task at hand, it was hardly an ideal solution; a blog post is still a blog post, no matter how well your theme could dress it up to look like a product page. More adventurous souls would build plugins and strange hacks that created custom database tables and did other mysterious tricks behind the scenes, but it was an approach fraught with trouble.
Custom post types, by comparison, give us a straightforward way to extend WordPress’s native content types beyond the default types. Setting them up is stupendously easy: just a few lines of configuration and some effort with our templates is all it takes to have intuitive and functional content types.
Note: What’s in a name?
When we’re talking about post types, what we really mean is content types. The fact that it’s called a post type in WordPress might make it seem like it’s still intended for blogging, but don’t be dissuaded—there’s so much more that can be done with these.
Let’s imagine that we’ve found ourselves in charge of creating a website for a small web conference. Any good conference website needs to have at least two important pieces of information: who is speaking, and what they are talking about.
This sounds like a great opportunity to explore post types. We can use these to help us describe each of the speakers and the sessions. We’ll also have information pages and a conference blog, though we’ll use standard pages and blog entries for these. We’ll start by planning out the types of information we’d like to express:
- Speakers pages
-
These will be simple enough. They should describe a little bit about each person, including an image, their business, short and long versions of their bio, and a link to a website. We’ll list all the speakers on a listing page.
- Sessions pages
-
These will be more complex. They should describe the name of the talk, its location, its date and time, a description, and a way to upload a slide deck of the talk. They should also have their own tags, so that a user can check out all the sessions that may be of interest to them. We’ll be listing sessions on a page, too.
Let’s begin with the speakers. Create a new plugin folder
called sitepoint in
wp-content/plugins, and place a new plugin file inside
it with the filename sitepoint-custom-types.php.
You’ll need to give your plugin a header, which WordPress will use when initializing
your plugin for use:
<?php
/*
Plugin Name: SitePoint Custom Conference Types
Plugin URI: http://sitepoint.com
Description: This is a plugin that provides the Custom Post Types
  chapter of the WordPress Anthology.
Author: Your Name Here
Version: 0.1
Author URI: http://sitepoint.com/
*/
?>
You can define your custom post types in a plugin folder, or
in a theme folder’s functions.php file. So which should
you choose?
If your custom content is for wide use, it might be best to
present it as a plugin. If you’re working on a client’s project where
you’re fairly sure they’ll stick to using the theme you provided—
whether that’s Twenty Eleven or your own creative choice—perhaps you’ll be
safe keeping it within the functions.php file in that
particular theme’s folder (which can be found in
wp-content/themes). The litmus test for where your
code belongs is really whether that functionality can be best described as
site functionality or display logic—but for a deeper discussion of this,
have a look at the section called “Does My Functionality Belong in a Plugin or Theme?” in Chapter 6. When in doubt,
it’s usually best to add your functionality in a plugin. If you are
concerned that your client may accidentally turn the plugin off, consider
simply making the plugin a must-use plugin (you can learn more about
must-use plugins in Chapter 5).
In this chapter, we’ll work on a plugin—not least because it makes it really easy for you to drop our example files into your own install. If it sounds like we’re jumping ahead a little, we are. In fact, plugin development is covered in detail in Chapter 5, specifically in the section called “The Anatomy of a Plugin” in Chapter 5. We’ll only be touching on the most basic parts of plugin setup here, and if you’ve been reading cover to cover and are yet to read Chapter 5, these instructions should still make sense. Of course, if you’re just dying to find out now, feel free to flip ahead—we’ll still be here when you return.
Head into the WordPress admin area, go to the submenu, and click on . There’s our plugin, listed alongside any others in the wp-content/plugins folder, with all the information from our header attached to it. Cool, huh? Again, for now, avoid fretting too much about the details behind this—it’s all going to be fully fleshed out in Chapter 5.
Our plugin, as yet, does absolutely nothing, so you’ll need to activate it in order to see your code take shape. Go ahead and click . Make sure you keep your Admin panel open in a separate tab in your browser, too, as we’re going to be coming back to it a lot.
Important: Must-use Plugins Are Active
If you’ve set up your plugin as a must-use plugin, it’s unnecessary to manually activate the plugin. Must-use plugins are automatically active whenever they are present in the wp-content/mu-plugins directory. For more information on this, flip forward to the section called “Must-use Plugins ” in Chapter 5.
The register_post_type() function takes care
of telling WordPress about how we define each new piece of content. Like
most things WordPress, it’s described in great detail over at the Codex,
along with its dizzying array of configuration arguments (See what we
did there—array? Okay, tough crowd …). In this
chapter, we’ll just refer to the ones we need.
We’ll wrap all these up in our own function,
conference_post_types_register(), and call on that
function whenever the
init action occurs:
function conference_post_types_register() {
    register_post_type( 'conference_speaker',
        array(
            'labels' => array((1)
                'name' => __( 'Speakers' ),
                'singular_name' => __( 'Speaker' ),
                'add_new' => __( 'Add New Speaker' ),
                'add_new_item' => __( 'Add New Speaker' ),
                'edit' => __( 'Edit' ),
                'edit_item' => __( 'Edit Speaker' ),
                'new_item' => __( 'New Speaker' ),
                'view' => __( 'View Speaker' ),
                'view_item' => __( 'View Speaker' ),
                'search_items' => __( 'Search Speakers' ),
                'not_found' => __( 'No speakers' ),
                'not_found_in_trash' => __( 'No speakers in the Trash' ),
            ),
            'hierarchical' => false,(2)
            'public' => true,(3)
            'menu_position' => 25,(4)
            'menu_icon' => plugins_url( 'icons/user_comment.png' , __FILE__ ),(5)
            'has_archive' => 'speakers',(6)
            'rewrite' => array('slug' => 'speaker'),(7)
            'supports' => array( 'title', 'excerpt', 'editor', 'thumbnail'),(8)
            'description' => "A conference speaker page is a page of↵
               information about a person who'll appear at this event."

        )
    );
}

add_action( 'init', 'conference_post_types_register' );
|
The
| |
|
| |
|
| |
|
| |
|
| |
|
| |
|
| |
|
We chose just four of the default
|
Tip: Action? What’s that?
Hooks and actions are incredibly important concepts in WordPress hackery. Once more, these are covered in detail in Chapter 5, so head there for a fuller explanation of what these are and how they work. For now, just be pleased they’re making your page work beautifully!
Tip: And More!
There are even more arguments you can pass with
register_post_type(). Explore them all at the
Codex.
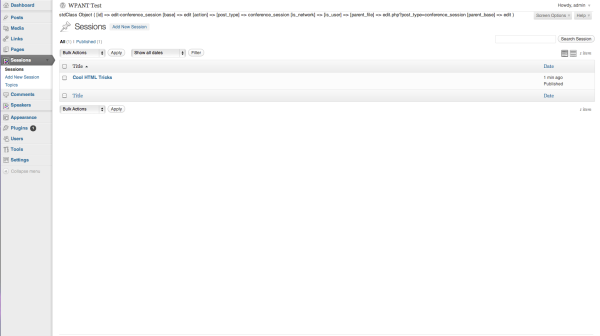
That’s a lot of arguments, but can you believe that this is all you need to create a basic new post type? It’s true! Save your work and have a look at your WordPress admin screen. You should find that your menu now contains a new item for Speakers, as seen in Figure 4.1.

Neat, hey? But we still need to add some new fields; that’s what will come next.
Our conference speakers’ pages need to include a note about who they work for (even if it’s themselves), and their website’s URL and title. Now, you could include these in the text of each page, if you wanted, but that’s hardly the same as properly structured data.
This problem’s been solved for a long time in the world of WordPress, of course; its custom fields feature allows you to create metadata about a post. Used properly, custom fields are a deadly weapon in the hands of an expert WordPress ninja—unfortunately, it also means that our users need to remember which field goes with what type of data. For example, you might want certain blog posts that represent quotations to have a source name and URL, so you’d have to remember to pick the right label, put the source in, and hope there’s nothing you’ve forgotten. And if you use custom fields for several types of posts, they’re all shown right there in the pull-down, which just seems superfluous.
For improved usability, wouldn’t it be better just to fill in a clearly labeled set of fields? Sure it would—that’s why we’ve hidden that interface element from our posting screen. We’ll write our own Edit Screen, with our own form fields.
Let’s create a function that reads the values of a number of custom fields, and prints form fields for each. Here’s a fairly simplistic bit of PHP form creation:
function conference_speaker_fields (){
    global $post;
    $custom = get_post_custom($post->ID);
    $conference_speaker_business = $custom["conference_speaker_business"][0];
    $conference_speaker_website_name = $custom↵
      ["conference_speaker_website_name"][0];
    $conference_speaker_website_url = $custom["conference_speaker_website_url"]↵
      [0];
    $conference_speaker_location = $custom["conference_speaker_location"][0];
    ?>

    <p>
    <label>Employer/Business Name:</label><br />
    <input size="45" name="conference_speaker_business"
       value="<?php echo $conference_speaker_business; ?>" />
    </p>
    <p>
    <label>Website Name:</label><br />
    <input size="45" name="conference_speaker_website_name"
       value="<?php echo $conference_speaker_website_name; ?>" />
    </p>
    <p>
    <label>Website URL:</label><br />
    <input size="45" name="conference_speaker_website_url"
       value="<?php echo $conference_speaker_website_url; ?>" />
    </p>
    <p>
    <label>Location:</label><br />
    <input size="45" name="conference_speaker_location"
       value="<?php echo $conference_speaker_location; ?>" /></p>

    <?php
}
Notice that we’ve prefixed every post meta field with
conference_speaker_? You never know when you might
install a plugin that has fields that clash with your existing ones.
Using a prefix like this makes it less likely to occur.
How do we place them on the edit screen?
add_meta_box() is the function that
will help us, and it accepts seven arguments. The four mandatory
arguments are:
Optional arguments are:
-
context: being the part of the edit screen we want to put it in; acceptable options arenormal,advanced, orside(side placement is great for small fields) -
priority: determines the position (importance) of where the boxes should show; the available options arehigh,core,default, orlow -
callback_args: any further arguments to pass on to our callback function
Let’s take all that HTML we made before in
conference_speaker_fields(), and put it in a new meta
box called conference_speaker_info, with a title of
Speaker Details. Naturally, we only want this to
appear in the conference_speaker content type. Here’s
a function to create it:
 function add_conference_speaker_box(){
    add_meta_box(
        "conference_speaker_info",
        "Speaker Details",
        "conference_speaker_fields",
        "conference_speaker"
        );
}
Here, we’ve only used the four mandatory arguments.
Tip: Why meta?
Hey, have you noticed how functions about custom fields
always seem to refer to meta this and
meta that? It’s because in the past they were
called post meta fields. We now call them
custom fields because this makes more sense, but the functions’ names
remain the same.
We’ll also need a function to save them.
update_post_meta() is the WordPress
function that inserts values as custom fields. We’ll take the value of
each field from the POST variable, and save them in
an appropriately named custom field for the current post:
function save_conference_speaker_attributes(){
    global $post;
    update_post_meta($post->ID, "conference_speaker_business",↵
      $_POST["conference_speaker_business"]);
    update_post_meta($post->ID, "conference_speaker_website_url",↵
      $_POST["conference_speaker_website_url"]);
    update_post_meta($post->ID, "conference_speaker_website_name",↵
      $_POST["conference_speaker_website_name"]);
    update_post_meta($post->ID, "conference_speaker_location",↵
      $_POST["conference_speaker_location"]);
}
The
admin_init action is triggered whenever
an admin page is loaded; accordingly, it’s the right place to call on
our function that adds the conference speaker box:
add_action( 'admin_init', 'add_conference_speaker_box' );
We also want to jump aboard when the
save and
publish actions happen, so that we can
save what’s in our customized fields:
Let’s expand on our plugin a little further, and create our
conference sessions post type, with a
submenu in the menu. We have already learned
how to set up one of these, so the following
register_post_type() should be
reasonably familiar to you:
register_post_type( 'conference_session',
    array(
        'labels' => array(
            'name' => __( 'Sessions' ),
            'singular_name' => __( 'Session' ),
            'add_new' => __( 'Add New Session' ),
            'add_new_item' => __( 'Add New Session' ),
            'edit' => __( 'Edit' ),
            'edit_item' => __( 'Edit Session' ),
            'new_item' => __( 'New Session' ),
            'view' => __( 'View Session' ),
            'view_item' => __( 'View Session' ),
            'search_items' => __( 'Search Session' ),
            'not_found' => __( 'No sessions' ),
            'not_found_in_trash' => __( 'No sessions in the Trash' ),
        ),
        'public' => true,
        'hierarchical' => false,
        'exclude_from_search' => false,
        'menu_position' => 20,
        'menu_icon' => plugins_url( 'icons/calendar_view_day.png' ,↵
           __FILE__ ),
        'query_var' => true,
        'can_export' => true,
        'has_archive' => 'sessions',
        'description' => "A conference session is an event: a↵
           workshop, talk, panel, or get-together.",
        'rewrite' => array('slug' => 'sessions'),
        'supports' => array( 'title', 'excerpt', 'editor', 'thumbnail' )
    )
);
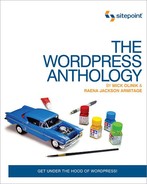
Again, although it’s relatively long, it’s also fairly straightforward. Each piece of session content represents an event in our conference, but in many other respects it resembles a regular sort of post: it’ll have an excerpt, a post body, and a title. We’ll also need some details about where and when the session will be held, so we’ll add another meta box, like so:
function conference_session_admin(){
    add_meta_box("conference_session_meta", "Session Details",↵
                  "conference_session_meta", "conference_session",↵
                  "normal", "core");
}

function conference_session_meta (){
    global $post;
    $custom = get_post_custom($post->ID);
    $conference_session_room = $custom["conference_session_room"][0];
    $conference_session_date = $custom["conference_session_date"][0];
    ?>

    <p>
    <label>Room</label><br />
    <select name="conference_session_room">
      <option value="Grand Ballroom">Grand Ballroom</option>
      <option value="Plenary A">Plenary A</option>
      <option value="Plenary B">Plenary B</option>
      <option value="Theatre">Theatre</option>
    </select>
    </p>

    <p><label>Session date and time</label><br />
    <input size="45" id="conference_session_date"
       name="conference_session_date"
       value="<?php echo $conference_session_date; ?>" />
    </p>

    <?php
}
In this example, we’ve chosen to use a pull-down for each of the conference session venues, since they won’t change. The date and time information is open—that makes it easy to insert flexible statements like “From 8 till late” or “6:30pm for a 7pm start.” So far, so good, and still familiar territory.
Where our sessions will differ significantly from our earlier efforts will be in how we treat the topic of, well, topics.
If you’ve attended a conference lately, you’ll know how tricky it is to decide which sessions to attend—and if it was a really good conference, you would have found yourself spoiled for choice! It’s helpful to be able to plan your timetable by gaining a sense of which sessions will best suit your interests and skills. How can we make this easy for our site’s visitors? One way is by creating a custom taxonomy for our conference sessions. In the general sense, a taxonomy is a scheme of classification. In the WordPress sense, taxonomies are what we call sets of categories and tags. A vanilla install of WordPress already comes with three: post tags, categories, and link categories. Custom taxonomies work like these familiar tags and categories to add more meaning to custom post types.
Tip: Don’t Tax Your Brain Just Yet
Custom taxonomies are discussed in great detail in Chapter 7. Once again, you should look at that chapter for more information about how it all works. In this section, we’ll just touch on the basics.
In our conference scenario, we’ll be expecting our speakers to
hold forth on a number of web-type topics—such as JavaScript, usability,
or WordPress—so it makes sense for our conference session post types to
allow for this. You can create a new taxonomy using the
register_taxonomy()
function, which accepts three parameters: the name of the
taxonomy, the type of content it’s to be used with, and an array of
additional arguments. In the below example, we’ll set up a new taxonomy
for session topics:
-
The first variable will be the name of our taxonomy:
conference_topics. -
The second argument defines which post types it should apply to;
conference_session, in our case. -
Our third argument is an array of more arguments:
-
hierarchicallets us choose if the taxonomy should allow for a hierarchy, like categories, or no hierarchy, like tags. In our case, we’ll use a tag-like construction. -
labelsdefine the names of the taxonomy as seen in the admin area, much like the labels for new post types we learned about earlier. -
query_vardetermines whether the post type is able to be queried—that is, if you can form a loop with it. -
People are likely to enter their tags with a comma between each one;
update_count_callback()calls on a function that ensures that WordPress treats these correctly. -
The
rewritevalue determines what will be shown in the URL for a post of this type.
-
We’ll wrap it all up in a function,
create_conference_taxonomy(), like so:
function create_conference_taxonomy() {

    $topiclabels = array(
      'name' => 'Topic',
      'singular_name' => 'topic',
      'search_items' =>  'Search topics',
      'popular_items' => 'Popular topics',
      'all_items' => 'All topics',
      'parent_item' => null,
      'parent_item_colon' => null,
      'edit_item' => 'Edit topic',
      'update_item' => 'Update topic',
      'add_new_item' => 'Add new topic',
      'new_item_name' => 'New topic name',
      'separate_items_with_commas' => 'Separate topics with commas',
      'add_or_remove_items' => 'Add or remove topics',
      'choose_from_most_used' => 'Choose from common topics',
      'menu_name' => 'Conference topics',
    );
    register_taxonomy( 'conference_topics', 'conference_session',
        array(
       'hierarchical' => false,
             'labels' => $topiclabels,
             'query_var' => true,
             'update_count_callback' => '_update_post_term_count',
             'rewrite' => array('slug' => 'topics' )
        )
    );
}
Tip: Avoid These Terms in Your Taxonomy Name
Some special terms are reserved for WordPress’s use, and if you use them to name your taxonomy, it will result in a cheeky error. Uppercase letters are also a no-no. If you’re being a polite developer, you probably have little need to worry; after all, you’re already prefixing your custom taxonomies uniquely, like we talked about earlier, right? Even so, keep an eye out for the reserved names, which are listed on the Codex.
Finally, you’ll need to initialize this function—associate it with
the init action as follows:
add_action('init', 'create_conference_taxonomy', 0);
Once you’ve put all this together, your new taxonomy will be in your administration area, and should look like Figure 4.2. Since topics are associated with questions, you’ll find them in the menu.
Remember the first time you jumped into WordPress? If you’re anything like us, you would have found yourself lost among all those different screens in the WordPress administrative interface.
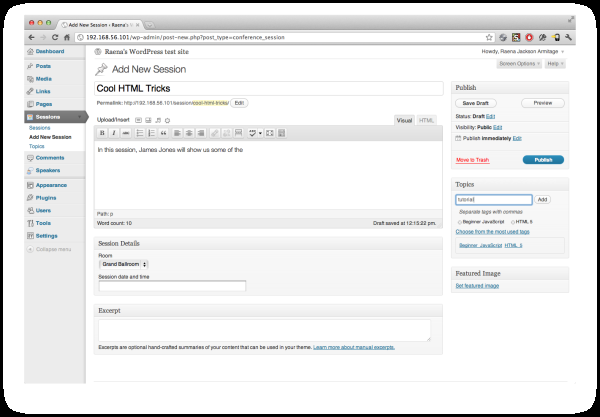
The good news is that on almost every WordPress admin screen, a friendly link is there to guide the way. Clicking it reveals a panel, which can be seen in Figure 4.3. The link often provides relevant links to the Codex or descriptions of each object. The even better news is that, as a WordPress developer, it’s easy for you to add that same level of help to your own work. It’s also a great opportunity to encourage users to visit any help pages you might have set up, or let them know how they can seek support.
The
add_contextual_help hook provides a
simple, nonintrusive way to add or modify help panels, just like the ones
that come with WordPress. It accepts two arguments: the name of the admin
screen that you want to add help to, and some text to add.
Straightforward, right? But hey, wait a minute—how do you know the name of each of the different WordPress admin screens? The Codex provides a handy way to find out. Where do you place this nifty little piece of code? Navigate to the theme folder that you’re currently using. Right now, we’re using Twenty Eleven, so our filepath will be wp-content/themes/twentyeleven. In here you’ll find a functions.php file; this is where you’ll input the following code:
function check_current_screen() {
if(!is_admin()) return;
global $current_screen;
print_r($current_screen);
}
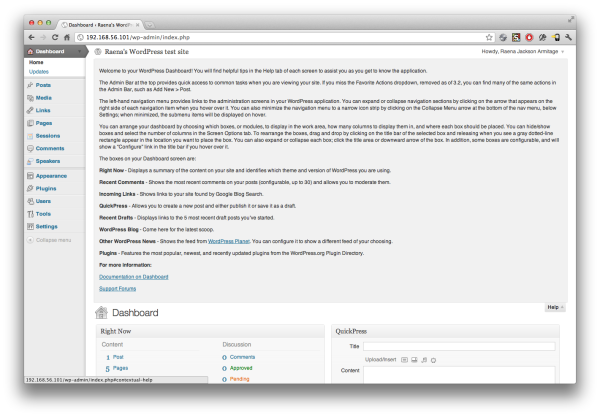
add_action('admin_notices', 'check_current_screen'),This
function reveals a few bits of information about the screens you can call
up in the admin area. Go and click on Sessions, and
you will see that our print_r() function has output
some useful information in the browser. The only piece of data we’re
interested in here is the [id], which
will be the name of the admin screen we’re on. Placing this value in the
admin_notices hook means that it’ll be
nice and obvious at the top of each page, just underneath the
menu. It turns out that the page for editing
conference sessions is called edit-conference_session,
revealed in Figure 4.4, which is hardly
surprising.
Once you have a page’s name, you can hook into its contextual
help menu. We’ll bundle up our add_contextual_help()
actions into a function we can call
conference_contextual_help(), and then bring them all
in using the
admin_init hook. In this example, we’ve
truncated the text in our help menus—normally, you’d want to be more
explanatory—but you should have no trouble coming up with your own
appropriately helpful content. Again, put this code into your
functions.php file:
function conference_contextual_help() {

    $editspeaker = "From this screen, you can view and update all↵
                    your conference's speakers...";
    $addspeaker = "Enter the details of a new speaker...";

    $editsession = "View and edit your conference's sessions...";
    $addsession = "Add a new session ...";

    $editsessiontopics = "Add and edit topics...";

    add_contextual_help('edit-conference_speaker', $editspeaker);
    add_contextual_help('conference_speaker', $addspeaker);

    add_contextual_help('edit-conference_sessions', $editsession);
    add_contextual_help('conference_sessions', $addsession);

    add_contextual_help('edit-conference_topics', $editsessiontopics);

}

add_action('admin_init', 'conference_contextual_help'),
Tip: Okay, Enough Help!
It can be very tempting, when writing contextual help, to try to pack in a full and frank explanation of everything that needs to happen. After all, that’s what help menus are for, right?
Well, sometimes you can lose the reader’s concentration with too much text—it becomes a bit overwhelming. If you look around in WordPress land, you’ll see that it’s all kept simple. Check out the help in WordPress’s default screens, like Media or Settings, where you’ll find a brief overview of the screen’s functionality, and links to the WordPress Codex for anyone who wants to know more.
Remember, WordPress is about being easy and fun, not overwhelming and wordy. Try to take a similar approach to your inline documentation, too.
While you’re poking around in functions.php,
remember to remove—or at least disable—your add_action(
'admin_notices', 'check_current_screen' ); function that we
used earlier. It’s handy for us to know, but your users can do without the
unsightly mess on screen. Once you’ve done this, you should see that your
help text appears in the right places whenever you press
in any given submenu. Neat!
You’ve put together your custom post types, added a custom taxonomy to one of them, and even given the gift of help. All that’s left now is to think about how your new post types will be displayed. And if you’ve already jumped ahead a bit and read Chapter 6, you already know just about everything you need in order to display your nifty new custom post types. It’s true! If you love theming, this will be the easiest part of the chapter.
WordPress has a structured system to look for template information—it’s called the Template Hierarchy. To display a single item, WordPress will look in a particular theme folder for a template called single-{post_type}—like single-conference_session or single-conference_speaker. If a file of that name is not part of our theme, it will look next to single.php, and then to index.php. Similarly, if we’re showing our custom taxonomy, WordPress has a hierarchy for that, too. It looks for:
The simplest path to cool custom post styles, then, is to create a template that falls into the template hierarchy of each of our customized features. In our theme folder, we’ll need two PHP files for our post types: single-conference_speaker.php, and single-conference_session.php. For our purposes, it’s unnecessary to worry about a separate template for each taxonomy term, so we’ll just go with a template for all terms: taxonomy-conference_topics.php.
In this example, we’ll use a child theme for the the Twenty Eleven template. Let’s save ourselves some extra work, and make a copy of Twenty Eleven’s single.php template; then we’ll rename it according to the rules of the Template Hierarchy—let’s call it single-conference_speaker.php.
Looking inside the template, we’ll see that there’s a
<nav> element containing forward
and back links (remember
previous_post_link() and
next_post_link()?), a reference to a
template part, and a reference to the comments template. These are all
surplus to our requirements, so be merciless with the delete key! Get
rid of this superfluous markup, and you should be left with an empty
shell of a template containing an empty loop:
get_header(); ?>

        <div id="primary">
            <div id="content" role="main">

                <?php while ( have_posts() ) : the_post(); ?>


                <?php endwhile; // end of the loop. ?>

            </div><!-- #content -->
        </div><!-- #primary -->

<?php get_footer(); ?>
That certainly is a big, empty hole in the middle of that template. Let’s fill it with template tags!
For our speakers, we’ll list the speaker’s name (the item’s title), plus the company, website, and location (all post meta fields). After that, we’ll show the entry’s content. Here’s some markup and template tags that will help us achieve that effect:
<?php while ( have_posts() ) : the_post(); ?>

    <article id="post-<?php the_ID(); ?>" <?php post_class(); ?>>
        <header class="entry-header">
            <h1 class="entry-title">
                Speaker Profile: <span><?php the_title(); ?></span>
            </h1>
            <p class="speaker-meta">
            Works at: <?php echo get_post_meta($post->ID,↵
                       'conference_speaker_business', true); ?>
            | Visit <a href="<?php echo get_post_meta($post->ID,↵
                       'conference_speaker_website_url', true); ?>">
                <?php echo get_post_meta($post->ID,↵
                   'conference_speaker_website_name', true); ?>
            </a>
          | Comes from: <?php echo get_post_meta($post->ID,↵
                         'conference_speaker_location', true); ?>
            </p>
        </header>

        <div class="entry-content">
            <?php the_content(); ?>
        </div><!-- .entry-content -->

    </article>


<?php endwhile; ?>
As you can see, it’s just like theming a single post or
page—but this time, we’re making use of those custom meta fields. It
will be similar for our sessions, but we’ll also throw in an
if statement that checks to see if the taxonomy
exists. If it does, we’ll use
get_the_term_list() to build up a set
of links:
<?php while ( have_posts() ) : the_post(); ?>

    <article id="post-<?php the_ID(); ?>" <?php post_class(); ?>>
        <header class="entry-header">
            <h1 class="entry-title"><?php the_title(); ?></h1>
            <div class="session-meta">
            <dl>
            <dt>Where</dt>
            <dd><?php echo get_post_meta($post->ID, 'conference_session_room',↵
              true); ?></dd>
            <dt>When</dt>
            <dd><?php echo get_post_meta($post->ID, 'conference_session_date',↵
              true); ?></dd>
            <?php
            if(taxonomy_exists('conference_topics')) {
                echo get_the_term_list( $post->ID, 'conference_topics',↵
                  '<dt>Topics</dt><dd>', ', ', '</dd>' );
                 } ?>
            </dl>
            </div>
        </header>

        <div class="entry-content">
            <?php the_content(); ?>
        </div><!-- .entry-content -->

    </article>
<?php endwhile; ?>
There are very few differences between regular, built-in WordPress content types and your own custom ones. If you’re a skilled themer, you’ll have no problem showing off your custom types!
Earlier in this chapter, we talked about how we could specify an archive page for each of our custom types—the pages that represent each archive will be found at Speakers and Sessions. Now that we’re digging around in our theme, it’s time to put these archives together. Looking back at our Template Hierarchy structure, we can see that WordPress will check for a file called archive-{posttype}.php, so we’ll need two files, archive-conference_session.php and archive-conference_speaker.php.
Once again, we’ll create an archive template by copying the one
that comes with Twenty Eleven, stripping out the unnecessary parts, and
enhancing the rest. We can also manipulate The Loop using our old friend
query_posts(). In this example, we’re collecting
our conference_session items at 30 items per page,
ordered by title:
$args = array(
        'posts_per_page' => 30,
        'order' => 'ASC',
        'orderby' => 'title',
        'post_type' => 'conference_session'
    );
  query_posts($args);
And if we have posts, we’ll display our list. If we happen
to have more than 30 events, we’ll paginate.
twentyeleven_content_nav() is a
function defined by our parent theme that does the job here:
if ( have_posts() ) : ?>

<header class="archive-header">
    <h1>
        Sessions
    </h1>
</header>
<p>You'll love our packed timetable! ...</p>

<?php twentyeleven_content_nav( 'nav-above' ); ?>

<?php /* Start the Loop */ ?>
<?php while ( have_posts() ) : the_post(); ?>

    <article class="session">
        <h2><a href="<?php the_permalink() ?>"><?php the_title();
            ?></a></h2>
        <div class="session-meta">
        <dl>
        <dt>Where</dt>
        <dd><?php echo get_post_meta($post->ID,↵
             'conference_session_room', true); ?></dd>
        <dt>When</dt>
        <dd><?php echo get_post_meta($post->ID,↵
             'conference_session_date', true); ?></dd>
        <?php if(taxonomy_exists('conference_topics')) {
            echo get_the_term_list( $post->ID, 'conference_topics',↵
           '<dt>Topics</dt><dd>', ', ', '</dd>' );
             } ?>
        </dl>
        </div>
        <?php the_excerpt(); ?>

    </article>

<?php endwhile; ?>

<?php twentyeleven_content_nav( 'nav-below' ); ?>
If there’s nothing to display, it’s probably because we’re yet to post any sessions, so we’ll show a message to that effect:
<?php else : ?>

    <article id="post-0" class="post no-results not-found">
        <header class="entry-header">
            <h1 class="entry-title">Watch this space!</h1>
        </header><!-- .entry-header -->

        <div class="entry-content">
            <p>We've yet to post any sessions, but if you
               subscribe to our newsletter you'll be the first
               to find out!</p>
            <?php get_search_form(); ?>
        </div><!-- .entry-content -->
    </article><!-- #post-0 -->

<?php endif; ?>
Once you have your templates sorted, your custom post modifications are complete!
As WordPress evolved, and as its popularity grew, users found themselves dealing with so much more than a mere blogging tool. Before we had this kind of support for custom content types, entire cottage industries grew up around hacking and bending WordPress to a webmaster’s will. Nowadays, powerful CMS features are well within our reach, and in this chapter we’ve shown you just how easy it is to start creating your own powerful CMS features.
A huge slice of the world’s most popular websites is WordPress-powered, and a large reason for that success is down to the fact that developers have let their imaginations grow beyond simple posts and pages. It’s time for you to do the same!