
So far within this book, we’ve touched upon the primary components that comprise the main content and operational functions of WordPress: the core WordPress installation; The Loop that handles WordPress’s main content display logic; post types, which provide for extended flexibility in displaying different types of content; plugins, which add entirely new functionality at the drop of a hat; and themes, which determine how the site will look. While each of these elements are essential in creating the ability to add, manipulate, and display information differently, it is the ability to organize our content into intuitive, searchable groupings that ultimately makes WordPress a useful tool. To this end, WordPress employs taxonomies, which are defined as methods of grouping similar individual instances of content together in meaningful ways.
Before we dig deep into taxonomies as they are applied in WordPress, let’s have a look at an example of how taxonomies are used in the real world. When you walk into any library, you know that there are thousands of publications to choose from. Most of those publications are books, but some are magazines, periodicals, compact discs, DVDs, or—if the library is really old-school—microfiche. While we know that these forms of media are usually kept in different places, imagine how confusing it would be if that was the only form of organization our library gave us! After all, could you imagine throwing an outdoor party and being forced to rifle through thousands of books trying to find the right one on barbecuing sausages? Instead, we have whole sections devoted to specific topics, including one on cooking, and then within it a subsection on barbecuing, and within that a subsection on barbecuing sausages. All the organization and suborganization that you find in any library is an excellent example of taxonomy at work in the real, physical world … and with the help of a real-life librarian or the Dewey Decimal System (google it, kids) you even have a built-in search function.
Now that we’ve covered a good example of what a taxonomy might look like in real life, let’s dig into taxonomies as they are applied in WordPress.
In WordPress, taxonomies are used to add a relational dimension to how you group elements together. Categories and tags are both used to group posts together, and indeed define the taxonomy for any given post once assigned. Core WordPress includes three taxonomies by default: categories, tags, and link categories. Each time you create a new category, tag, or link category, you are creating a term of that taxonomy. For instance, a category called Neighborhoods would be a term of the category taxonomy, while a tag named Fiji would be a term of the tag taxonomy.
While we’ve already talked about categories and tags at length in Chapter 2, what’s important to recognize is that categories are hierarchical in nature. Individual categories can have subcategories, and then those subcategories can have their own subcategories, and so forth. Tags, on the other hand, are not hierarchical but merely labels that you apply to any given post, regardless of which category the post is nested in. In this way, you can think of categories as buckets that are used to group posts together, whereas tags provide a much looser relationship between posts.
Note: Link Categories
Link categories—the third taxonomy type that WordPress includes—are not necessarily a deprecated topic in WordPress, but are not particularly relevant for our discussion on taxonomies. What’s more important is to recognize that they are officially a separate taxonomy type that happen to be included with core which you might see referenced in documentation from time to time. For more information on link categories, have a look in the Codex.
Understanding the relationship between categories and tags in the context of taxonomy is central to developing a solid information structure for your website’s content. The more thoroughly you plan how your WordPress site should function from the standpoint of content and information structure, the more successful your site will ultimately be.
One of the most common mistakes made by both beginners and seasoned web developers alike when building a new website, WordPress or otherwise, is the lack of foresight to plan out the site’s information structure and hierarchy. Especially when you are starting out, there’s the romantic notion of sitting on a barstool somewhere, having a bright idea for a site, and then sketching ideas on a napkin for the next million-dollar online business model. Undoubtedly, this happens from time to time, but it’s the exception to the rule. Ultimately, many of us become far too caught up in the graphic design of a site, and then wonder why we end up with a watered-down product that fails to work as we intended.
Most effective websites are planned from an information hierarchy perspective, rather than from a design perspective. For our purposes, we’ll define information hierarchy (or information structure) as the overall planned organization of the content on a given website. An effective information hierarchy takes various factors into account and puts them together to form a cohesive structure. These factors include the actual site content topics and how content should be presented. Will you be using pages and subpages for some types of content, or will it be posts added to categories and subcategories? What types of content should be searchable? Should some content be searchable on its own, without search entries from posts or pages elsewhere on the website? All these variables combine to create the information hierarchy of a given website.
When you begin putting together a site (or working with a client to put together their site), it’s perfectly fine to ask questions about what the site should look like. However, it’s far more important to ask what the site should do. What information is going to be on the site? How should users be able to interact with that information? Should the information be clustered together in one area of the site, or do we need more structure? Understand that there are no right or wrong answers to these questions, but it’s important you ask them and seek genuine responses.
What you should attempt to end up with is a content wireframe for your website. Unlike layout wireframes, which show the overall design layout of a web page’s basic components prior to it being fleshed out by a graphic designer, a content wireframe offers a comprehensive plan for your site’s information hierarchy. We’ll show you some examples of developed content wireframes in just a bit, but for now consider your responses to these basic considerations carefully. Take your time and be specific with your responses, and remember that regardless of how awesome WordPress or any other web development tool you happen to be using is, it’s ultimately up to you to build your website intelligently.
Part of your plan for the information hierarchy for your website is sorting out which content will be filtered into categories and posts, and which will be set up as pages. Organizationally, you’ll also seek to figure out what you can label and cross-reference as tags. In truth, you can do a lot with WordPress pages, posts, categories, and custom post types, but using custom taxonomies is a fairly easy technique that provides more flexibility in how you organize your content. Using custom taxonomies is also more professional, as it provides the type of polish that clients tend to recognize and respect.
Throughout this chapter, we’ll use a common example to highlight how to use custom taxonomies, and why they might be useful. We’ll put together a WordPress site for a real estate company named Rutherford Real Estate, which wants to display properties organized by neighborhoods in several regions. Furthermore, Rutherford Real Estate has many sales agents working for it, all of whom represent multiple properties in any given region or neighborhood. If Rutherford Real Estate sells property in three regions—each of which have several neighborhoods—and agents can sell properties in any region or neighborhood they choose, let’s have a look at what a visual representation of the business might look like, in Figure 7.1.
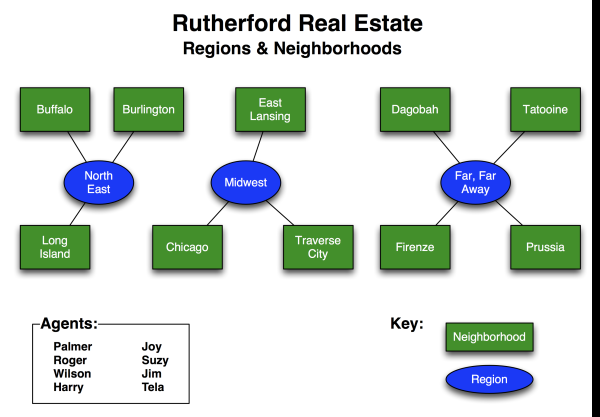
It’s plain to see we’re dealing with two types of information: hierarchical and nonhierarchical, with neighborhoods being hierarchical subsets of regions, and sales agents acting as free radicals that can attach to whatever they please. In WordPress terms, this means that we should be able to safely use categories for regions and neighborhoods, and tags for the agents. Now let’s reframe our chart into a content wireframe that explains the information hierarchy for this business model in our website, in Figure 7.2.
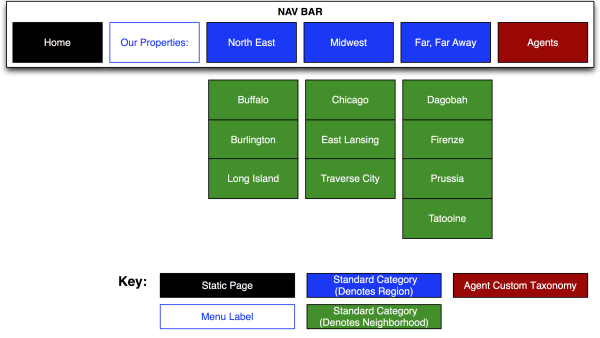
That’s more like it. Our taxonomy is starting to take shape. We’ve established that our three regions will be set up as categories, each having several related subcategories to handle the respective neighborhoods. Subsequently, individual posts will be used to handle individual properties, giving us a nice way to categorize our property listings for Rutherford Real Estate. We’ve also established that we’ll be using tags to handle sales agents, as individual agents can sell properties in different regions, and there may be instances when several agents team up to represent one property in particular. Functionally, this should work well, and many developers will choose to simply stop here and proceed with development. However, with a bit of further planning, you’ll be able to further customize WordPress functionality for Rutherford Real Estate. In the absence of this, a common default permalinking taxonomy that may be configured for Rutherford Real Estate might look like this:
/%category%/%postname%/
If we configured the site as described previously, this might render a permalink for a property titled “Farmhouse” in Traverse City to look like this:
http://www.esquandoloas.com/category/midwest/traverse-city/farmhouse
That’s not bad. It certainly includes the category and post slugs that describe what the content is all about (a farmhouse in Traverse City that’s located in the Midwest), but we could do even better from an SEO perspective. Custom taxonomies allow us to create a separate hierarchical structure with a more descriptive permalink that increases the relevance for search engines like Google, producing higher rankings. Consider a situation where we set up a custom taxonomy for our properties that could create a permalink that looked like this:
http://www.esquandoloas.com/properties-for-sale/midwest/traverse-city/farmhouse
This is semantically a much better permalink, as it instantly establishes to both search engines and real users that the content on this link is a property that’s for sale, located in the Midwest (Traverse City, to be exact), and a farmhouse. Furthermore, if we set this up as a custom taxonomy, we create a whole new taxonomy to work with, leaving our original category taxonomy untouched and intact, which can be used for other purposes on the website—say blogging about news and events that support Rutherford Real Estate’s sales efforts. By adding a custom taxonomy to handle properties, the new content wireframe might look like Figure 7.3.

Now we’re cooking with gas. We have our custom taxonomy set up to work in a hierarchical manner, and we’ve also created a place to use our normal categories and tags for marketing purposes. In addition, we fully expect to set up our permalink taxonomies to reflect two different structures.
For our properties, we’ll have permalinks that look like: http://www.esquandoloas.com/properties-for-sale/midwest/traverse-city/farmhouse, while for our news and events, we’ll have taxonomies that look like: http://www.esquandoloas.com/category/events/marcos-crazy-estate-blowout-sale. Aren’t we fancy?
There are two other really cool aspects of custom taxonomies: extensible functionality requirements and custom searching. Custom searching is fairly straightforward. Using custom taxonomies allows us to delineate content so we can create custom searching restrictions. Therefore, if we want to search the website and only return properties, we can restrict the parameters of the search to only pull from that taxonomy type (more on that in a bit). And when we consider custom taxonomies as a tool we can plug in at any time, we realize that we can extend WordPress in almost any direction we want, even if the site we’re looking to extend is already in place and filled to the brim with existing content. We need do nothing more than establish the new type of content that we want to log within the site, create our taxonomies, and begin to use them.
Now that we’ve discussed what custom taxonomies are and why we’d want to use them, let’s go to the real heart of the matter: creating them and using them to our advantage.
Creating new taxonomies in WordPress is a relatively simple
process, and WordPress provides us with a function that accomplishes the
job:
register_taxonomy(). You should
always use the init action hook when calling
register_taxonomy(), or else you will incur fatal
errors, and nobody likes anything that includes the word “fatal”, do
they?
register_taxonomy() takes one required
parameter and two optional but extremely useful parameters:
register_taxonomy( $taxonomy, $object_type, $args );
The $taxonomy parameter is
required; it is simply the name of the taxonomy being used, and must
exclude capital letters and spaces. It’s extremely important to ensure
that the name of the taxonomy is unique so that it avoids conflicts with
plugins. Drawing from our Rutherford Real Estate example, when naming
the taxonomy for sales agents, we’d be better served using
“Rutherford-sales-agents” instead of “agents.”
The $object_type parameter must be
defined as either a predefined object that is built into core WordPress,
or the slug name of a given custom post type that has already been
created in the installation. The parameter is technically optional, but
leaving it out (or explicitly setting it to null)
will register the taxonomy without associating it with any objects.
Therefore, the taxonomy will be unavailable for administration within
the WordPress back end, and you’ll have to manually register it using
the taxonomy parameter (passed through
$args) when registering a custom post type with
register_post_type() or
register_taxonomy_for_object_type().
WordPress built-in post types that can be passed in as a valid
value for the $object_type parameter are as follows:
-
post -
page -
mediapage -
attachment -
revision -
nav_menu_item
The most commonly used of these built-in post types
with custom taxonomies are post or
page.
The $args parameter is an
associative array of arguments that define and describe the taxonomy.
While it is technically an optional parameter, the functions and
switches that are managed within this array are essential for shaping
taxonomies and making them do what you want. In fact, it’s such an
important aspect of understanding and managing taxonomies that we should
delve deeper into this array.
The $args array (or arguments array, as
we’ll refer to it here) takes up to 12 different arguments, one of which
is not recommended for use by core developers (the
_builtin argument—see the
Codex, which states it’s just for documentation purposes). Each
argument is optional, and individually handles important functionality
switches for taxonomy registration, which can be useful for a variety of
reasons. Let’s look at them in detail.
-
label -
This is a plural descriptive name for the taxonomy marked for translation that is overridden by
$labels->nameby default. -
labels -
This is an associative nested array of labels that define the text used within the taxonomy in and of itself. This nested array is important so we’ll refer to it as the nested labels array argument, and cover this in more detail in the section of the same name.
-
public -
This is a Boolean that describes whether or not the taxonomy should be exposed within the WordPress administrative back end; set to true by default.
-
show_in_nav_menus -
This is a Boolean that describes whether or not the taxonomy should be made available for selection in the navigation menus in the WordPress administrative back end. It defaults to the value set in the
publicargument. -
show_ui -
This is a Boolean that describes whether or not to display a user interface to manage different aspects of the taxonomy in the WordPress administrative back end. It defaults to the value set in the
publicargument. -
show_tagcloud -
This is a Boolean that describes whether or not to allow the Tag Cloud Widget (which ships with core WordPress) to use information set within the taxonomy. It defaults to the value set in the
show_uiargument. -
hierarchical -
This is a Boolean that describes whether or not the taxonomy will be hierarchical, and defaults to false. It’s a principal argument, as it is the master switch that defines whether a custom taxonomy should work like a category or like a tag.
-
update_count_callback -
This is a function name that’s used to update the count of the associated
$object_typewhen it is updated. -
query_var -
This defaults to the
$taxonomyparameter value, and can be used to take either a string (as per the$taxonomyvalue) or a Boolean, which will often befalseto prevent any queries. It’s referenced in the next argument,rewrite. -
rewrite -
Relatively advanced, this parameter can be passed either a Boolean or an array. It defaults to
true, but you can pass afalsevalue to prevent rewriting per the mod_rewrite module in Apache. If you pass the argument an array, these values can be passed: -
capabilities -
This array allows for user-group control by providing the ability to describe the exact capabilities that have access to use functions of the taxonomy. It is useful in determining who can use the taxonomy in the WordPress administrative back end. By default, users of roles with the
manage_categoriescapability can manage, edit, and delete terms in a taxonomy; users with roles with theedit_postscapability can assign terms of a taxonomy to a post.
This sums up the arguments array, but as we noted earlier, we need
to discuss the labels argument further.
The array used for the labels argument is
important for providing the text used throughout the WordPress
administrative back end for all your taxonomy terms.
These labels can and should be set up to be localized for
eventual translation (see Chapter 11 for an
explanation of localization). Let’s have a look at what’s available to
be configured:
-
name -
The general name for the post type, which is typically plural and overridden by
post_type_object->label. When internationalizing this string in preparation for localization, it’s best to use thegettextcontext matching your post type. For more information on context translation withgettext, go to the Codex. -
singular_name -
The name of one object of the post type, which defaults to the value of
name. Using thegettextcontext translation type is useful here as well, and is described in the Codex. -
add_new -
The text used for adding a new term, and the default value is Add New for both hierarchical and nonhierarchical content types. This is another instance where it’s worth using the
gettextcontext translation type (and yes, you can refer to the Codex). -
all_items -
The all items text used in the menu, which defaults to the
namelabel. -
add_new_item -
The text used when adding a new item to the taxonomy, which defaults to Add New Post or Add New Page.
-
edit_item -
The edit item text whose default is Edit Post or Edit Page.
-
new_item -
The new item text whose default is New Post or New Page.
-
view_item -
The view item text whose default is View Post or View Page.
-
search_item -
The search item text whose default is Search Posts or Search Pages.
-
not_found -
The not found text whose default is No Posts Found or No Pages Found.
-
not_found_in_trash -
The not found in trash text whose default is No Posts Found in Trash or No Pages Found in Trash.
-
parent_item_colon -
The parent text, which is only used on hierarchical content types. This defaults to Parent Page or Parent Post.
-
menu_name -
The menu name text, which defaults to the value of
name.
That’s all there is to
register_taxonomy(), which frankly is an awful lot.
Yet register_taxonomy() is really just a function
that defines a lot about how we want our taxonomy to work. This is best
understood by looking at a real-life example, so let’s revisit
Rutherford Real Estate.
We’ve already set up the content wireframes for Rutherford Real Estate that define their information hierarchies. As you may recall, we want to create a new taxonomy to handle locations (regions and neighborhoods), as well as a separate taxonomy to handle sales agents who represent the properties in different regions. The locations taxonomy needs to be hierarchical, as specific neighborhoods (Chicago, East Lansing, and Traverse City) are subsets of the regions they are situated in (Midwest). Conversely, a sales agent named Palmer may represent a property in several neighborhoods, and in more than one region, so there is no hierarchical relationship with sales agents. The taxonomy that handles sales agents should therefore be loose in structure and act similarly to tags. Let’s see what our code should look like to register our new taxonomies:
<?php
//hook into the init action and call create_property_taxonomies
add_action( 'init', 'create_property_taxonomies', 0 );

//create two taxonomies, locations and sales agents
function create_property_taxonomies()
{
  // Add new taxonomy locations, make it hierarchical (like categories)
  $labels = array(
    'name' => _x( 'Locations', 'taxonomy general name' ),
    'singular_name' => _x( 'Location', 'taxonomy singular name' ),
    'search_items' =>  __( 'Search Locations' ),
    'all_items' => __( 'All Locations' ),
    'parent_item' => __( 'Parent Location' ),
    'parent_item_colon' => __( 'Parent Location:' ),
    'edit_item' => __( 'Edit Location' ),
    'update_item' => __( 'Update Location' ),
    'add_new_item' => __( 'Add New Location' ),
    'new_item_name' => __( 'New Location Name' ),
    'menu_name' => __( 'Locations' ),
  );

  register_taxonomy('location', post, array(
    'hierarchical' => true,
    'labels' => $labels,
    'show_ui' => true,
    'query_var' => true,
    'rewrite' => array( 'slug' => 'location' ),
  ));

  // Add new taxonomy for sales agents, NOT hierarchical (like tags)
  $labels = array(
    'name' => _x( 'Sales Agents', 'taxonomy general name' ),
    'singular_name' => _x( 'Sales Agent', 'taxonomy singular name' ),
    'search_items' =>  __( 'Search Sales Agents' ),
    'popular_items' => __( 'Prolific Agents' ),
    'all_items' => __( 'All Sales Agents' ),
    'parent_item' => null,
    'parent_item_colon' => null,
    'edit_item' => __( 'Edit Sales Agent' ),
    'update_item' => __( 'Update Sales Agent' ),
    'add_new_item' => __( 'Add New Sales Agent' ),
    'new_item_name' => __( 'New Sales Agent' ),
    'separate_items_with_commas' => __( 'Separate agents with commas' ),
    'add_or_remove_items' => __( 'Add or remove agents' ),
    'choose_from_most_used' => __( 'Choose from the most prolific sales agents' ),
    'menu_name' => __( 'Sales Agents' ),
  );

  register_taxonomy('agent','post',array(
    'hierarchical' => false,
    'labels' => $labels,
    'show_ui' => true,
    'update_count_callback' => '_update_post_term_count',
    'query_var' => true,
    'rewrite' => array( 'slug' => 'agent' ),
  ));
}
?>
This pulls together all that we’ve just covered on the
register_taxonomy() function quite nicely—so let’s
pick it apart. First of all, we’re creating a function called
create_property_taxonomies(), which we’re adding
with the init action hook. Our new function
begins by defining a $labels variable that consists
of the nested labels array we discussed, and establishes all the text
for the location taxonomy we’ll define in our first
register_taxonomy() function call. Notice that in
keeping with standard coding practices throughout this book, we have set
up the values in our labels array to be localized if required.
Additionally, in the register_taxonomy() function
we’ve defined the hierarchical parameter to be true, ensuring that
locations will work similarly to categories.
Immediately after our first
register_taxonomy() function call, we have reset
the information in the $labels variable by adding a
new array similar to the first, this time inserting the
internationalized text variables that focus on the sales agents. We use
the previous technique in pulling this array into the
register_taxonomy() function that defines sales
agents; however, notice that this time our hierarchical parameter is set
to false, allowing the agents to operate as tags. We’ve also added the
option update_count_callback with a string value
of _update_post_term_count to our
register_taxonomy() function. This ensures that the
taxonomy behaves like a tag, and in instances where you add multiple
items to the taxonomy separated by commas, the items are saved as
separated values as intended, rather than one long, single item that
makes no sense.
Note: Where Do I Register?
You can register new
taxonomies anywhere you like, so long as you call it
with the init action hook, but it’s probably
mainly called from a theme’s functions.php
file. While this technically works, seriously consider whether this
makes the most sense for your users. If you tie your custom taxonomy
directly to the functions.php file in your
theme, you essentially tie your clients’ hands if they lack the
technical awareness or available expertise to port the taxonomy
registration into the subsequent functions.php
file of the new theme. While every website has its own unique
situations and circumstances, custom taxonomies should be viewed as
a feature of the website’s permalinking structure, not a feature of
the current theme that is active on the site. Therefore, taxonomy
registrations should be housed in a must-use plugin, ensuring that
they stay with the website itself, regardless of whether or not the
theme is swapped out at a later date.
Notice that in the screenshots and the previous code example, we’re associating our new taxonomies with generic posts. In many instances (especially a real estate property), you may be looking to associate the taxonomy with a custom post type instead of a generic content type. In this case, you’d actually want to call the name of the custom post type or an array of instances of that post type in a hierarchical situation, as seen in this code chunk:
<?php

// Associating the $object_type with an array of instances of custom post type
  register_taxonomy('location',array('property'), array(
    'hierarchical' => true,
    'labels' => $labels,
    'show_ui' => true,
    'query_var' => true,
    'rewrite' => array( 'slug' => 'location' ),
  ));

// Associating the $object_type with a single instance of a custom post type
  register_taxonomy('agent','property',array(
    'hierarchical' => false,
    'labels' => $labels,
    'show_ui' => true,
    'update_count_callback' => '_update_post_term_count',
    'query_var' => true,
    'rewrite' => array( 'slug' => 'agent' ),
  ));
Regardless of how you set up your taxonomy, you’ll see it in your WordPress administrative back end once it’s registered, and thus have the ability to begin managing content therein. For Rutherford Real Estate, we have chosen to just associate our taxonomies with regular old posts. As a result, you can find our two new taxonomy types on the submenu panel, as shown in Figure 7.4.
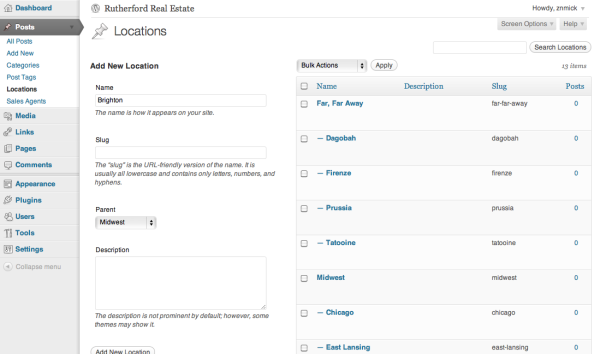
Notice that the locations taxonomy management page looks identical to the categories management page; were we to have a look at the sales agents taxonomy page, we’d see an interface that likewise mimics that tag management page. Furthermore, since we’ve associated our new taxonomies with posts, when we go to add a new post or edit an existing post, we’ll now see the appropriate meta boxes in the right-hand column, as seen in Figure 7.5.

We can use these meta boxes to mark our property’s neighborhood—as well as the sales agents representing it—in the same way we utilize categories and tags. Overall, it’s intuitive, easy-to-use stuff!
Once our custom taxonomies have been set up for Rutherford Real Estate and we’ve begun to put up properties on the site, we’ll want to actually use the data and make it available for public consumption. There are several ways to integrate the data on your website, and it’s all about creatively using the functions and techniques that WordPress provides you. Let’s have a look at some of these methods now as we’d apply them to Rutherford Real Estate.
Take a look back at Figure 7.3 and that final wireframe we ended up with. When we begin coding our theme for Rutherford Real Estate, we’ll set the menu up to manage Home as a standard static page, and both News and Events as standard categories that can be routinely linked to with standard nomenclature. Our three regions and their subsequent categories (as well as our Agents taxonomy), however, can be managed in several ways, and you’re probably going to need some modifications to The Loop in order to make the magic happen. Technically, you could go into your index.php or archive.php template file and begin structuring The Loop with some complex conditional logic to get things moving in the right direction, or you could take advantage of WordPress’s template hierarchy nomenclature as it applies to custom taxonomies.
We’ve already discussed the notion of WordPress template hierarchies and nomenclature at length in Chapter 6, but WordPress does give us a template hierarchy nomenclature dedicated to custom taxonomies. This is seen in Figure 7.6.

Using this template hierarchy system automatically tells WordPress which visual blueprint should be used for any given taxonomy. This automatically simplifies the process of deciding which functional display logic we’ll use for each of our taxonomy types by removing the conditional logic for us. At this point, the taxonomy nomenclature should be fairly straightforward, but let’s review it briefly, just to be sure.
The most specific taxonomy template file is the top one, which in our example might look like taxonomy-location-firenze.php. If this file was created and populated, it would be the default file that WordPress would utilize when displaying information for the “Firenze” neighborhood. However, if we were comfortable with all the neighborhoods and regions having display logic that worked in exactly the same way, we could add that display logic to the taxonomy-location.php file. Similarly, if we wanted our display logic for neighborhoods and agents to act the same way, we’d be fine using a file named taxonomy.php. From there, the nomenclature defaults into the general system, with archive.php and then index.php being the final defaults in that order. It’s easy to see how this can allow you to customize the appearance of WordPress in conjunction with taxonomies (especially if you choose to work with custom post types as well), but exactly what type of functions are available in the context of these template files? We’re glad you asked …
Yes, we’re back to the meat of WordPress again; after all, who doesn’t love The Loop? We know that The Loop is the beating heart of WordPress, and in order to customize the display output and functionality it’s often necessary to roll your sleeves up and plunge into the template files that manage logic in The Loop. With respect to custom taxonomies, there are several functions you can utilize to change the way The Loop pulls in post information.
-
query_posts() -
Back in Chapter 3, we mentioned that you can use
wp_query()to handle just about any queries you want within The Loop, but if you really want to customize your queries and pull from just a subset of all posts, in some instances you may need to usequery_posts()instead. This is one of those instances. Let’s say you would like to display a post for a specific taxonomy term. In our example, this may be a situation where you wanted to display all the properties that are being listed by our sales agent named Tela. In this instance, you could create a template called taxonomy-agent-tela.php and use the function call<?php query_posts( array( 'agent' => 'tela' ) ); ?>to list all properties that are currently being represented by Tela. You can actually pass in an array of parameters to define this as specifically as you’d like. For more information as to the parameters that are available to be passed into thequery_posts()function, look in the Codex. For more information onquery_posts(), see this Codex page. -
get_the_term_list() -
get_the_term_list()needs to be echoed in order to print to the screen, and returns an HTML string of the terms associated with a given taxonomy. For instance, in a situation where we might want to list all the individual properties located in our East Lansing neighborhood, using the function call<?php echo get_the_term_list( $post->ID, ‘east-lansing’, ‘Properties in East Lansing:’, ‘ ‘, ‘’ ); ?>get_the_term_list(), see the relevant page in the Codex. -
get_terms() -
In a situation where you need to retrieve an array of your custom taxonomy values to manipulate them in other ways, you can use the
get_terms()function. In this way,get_terms()is very much a utility function with a wide variety of potential programmable uses. For more details and ideas on using this function, check out the Codex.
The most useful and common way to customize the display of your
taxonomy output outside of The Loop is through the use of the
wp_tag_cloud() function. This core
function creates a Tag Cloud, and one of the parameters it will take is
a taxonomy parameter. Therefore, if we decided
that we wanted to create a Tag Cloud which listed all our agents and
then insert that tag cloud into our sidebar, we could place the function
call <? wp_tag_cloud( array( ‘taxonomy’ => ‘agents’ ) );
?> into the appropriate location, either in a widget or
within the code for our sidebar display.
As you can see, custom taxonomies are useful features that are hidden in the depths of core WordPress, and using them to your advantage can really provide the polish that makes your work superior to your competitors. It’s not that hard to use custom taxonomies; it’s more a case of understanding how to register them and then utilize the template hierarchy and a few loop functions to make all the pieces come together nicely.
WordPress employs taxonomies to manage content loaded inside it. Taxonomies are methods of grouping similar individual instances of content together in meaningful ways. By default, WordPress comes with three types of taxonomies: categories, tags, and link categories. Categories are hierarchical by nature, while tags can be applied to any given piece of content, regardless of where it sits in the content structure, as a label to provide a relational categorization element to the content.
WordPress also gives you the ability to create custom taxonomies, and there are several reasons you might set them up, namely to:
-
better organize the content on your website
-
increase the search engine optimization of the permalinks throughout your website
-
give the website a more professional, polished look and feel
-
segment content so that it can be easily queried on its own
-
institute entirely new functional requirements that a client may have for the website
We illustrated custom taxonomies by looking at a practical example of setting up a taxonomy that could be used in managing properties for a fictional real estate company. We started out by explaining the process of creating a content wireframe to outline an intuitive information hierarchy for content in the site. We then implemented the ideas in that wireframe by registering what we felt was an intelligent taxonomy design in a must-use plugin. Afterwards, we discussed creating specialized page templates that took advantage of the WordPress template hierarchy structure and nomenclature to simplify our conditional logic. We then introduced The Loop functions that could be used to manipulate your new taxonomy data. Like anything else, taxonomies are easy to work with when you know how!