
SAVING A PROJECT
Later chapters explain in depth how to add controls to a form and how to write code to interact with the form. For now, suppose you have built a project complete with controls and code.
If you try to close Visual Studio or start a new project, the dialog box shown in Figure 1-5 appears. Click Save to make the Save Project dialog box shown in Figure 1-6 appear. Click Discard to throw away the existing project. Click Cancel to continue editing the current project.
FIGURE 1-5: Before closing Visual Studio or starting a new project, you must decide what to do with the previous project.
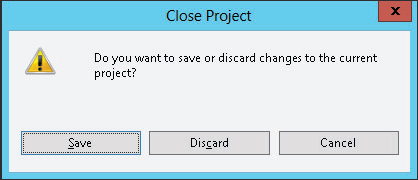
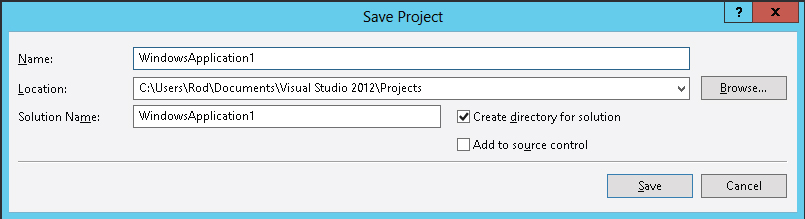
FIGURE 1-6: Use this dialog box to save a new project.
As you work with the new project, Visual Studio saves its form definitions and code in a temporary location. Each time you run the program, Visual Studio updates the files so it doesn’t lose everything if it crashes. The files are still temporary, however.
When you are ready to make the new project permanent, open the File menu and select Save All to display the Save Project dialog box shown in Figure 1-6.
The Name field shows the name that you originally gave the project when you created it. Verify that the name is okay or change it.
Next, enter the location where you want the project saved. The default location is similar to the rather non-intuitive value shown in Figure 1-6. (This image was taken while I was logged in as the user named Developer. When you save a project, the “Developer” part of the location would be replaced with your username.)
Be sure to pick a good location before you click Save. The next time you build a project, the default will be the location you specify now so you won’t need to be quite as careful in the future, assuming you want to build a lot of projects in the same directory.
If you check the Create Directory for Solution box, Visual Studio enables the Solution Name text box and adds an extra directory above the project directory to hold the solution. This is most useful when you want to include more than one project in a single solution. For example, you might want several projects in the same solution to sit in a common solution directory.
If you have Team Foundation Server installed, you can check the Add to Source Control box to place the new project’s code under source control.
After you have entered the project name and location, and optionally specified a separate solution directory, click Save.