
Chapter 8
Expanding the Reading Experience
In This Chapter
![]() Digging deeper with the dictionary, Vocabulary Builder, translations, and X-ray
Digging deeper with the dictionary, Vocabulary Builder, translations, and X-ray
![]() Sharing books and recommendations on Goodreads, Facebook, Twitter
Sharing books and recommendations on Goodreads, Facebook, Twitter
![]() Listening and reading with Whispersync for Voice
Listening and reading with Whispersync for Voice
![]() Browsing the web with your Kindle Paperwhite
Browsing the web with your Kindle Paperwhite
Although the Kindle Paperwhite is first and foremost a reading device, it does offer several features that go beyond reading. You can look up words with the dictionary and memorize their definitions with Vocabulary Builder, make notes, highlight text, translate words from English to other languages and vice versa, dig deeper with the X-ray feature, browse the web, and post comments and interesting quotes on Goodreads, Facebook, and Twitter.
In this chapter, I look at these features — and go beyond reading with your Kindle Paperwhite!
Easy Dictionary Look-Up
One of the most useful Kindle Paperwhite features is the built-in dictionary. The dictionary is easy to access and makes it swift and painless to find the definition of an unknown word.
To display a dictionary definition of a word, long-tap (that is, tap and hold down on) a word. The selected word is highlighted as white text on a black background. When you release your finger, a dictionary definition for the word appears onscreen in a pop-up box, as shown in Figure 8-1. To clear the definition, tap anywhere outside the pop-up box.
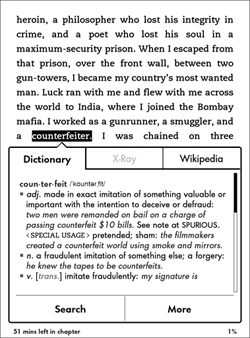
Figure 8-1: Displaying the definition of the word counterfeiter.
![]() In the definition box, note two additional tabs: X-Ray and Wikipedia. Tap X-Ray to display additional information about the selected word. Likewise, if your device is not in Airplane mode, you can tap Wikipedia to open a Wikipedia page with information about your selected word. Note that the information provided by the three resources may be similar. I dig a little deeper into the X-ray feature later in the chapter.
In the definition box, note two additional tabs: X-Ray and Wikipedia. Tap X-Ray to display additional information about the selected word. Likewise, if your device is not in Airplane mode, you can tap Wikipedia to open a Wikipedia page with information about your selected word. Note that the information provided by the three resources may be similar. I dig a little deeper into the X-ray feature later in the chapter.
 X-Ray is not active in all books nor is it active for all words. When this is the case, the option will appear dimmed.
At the bottom of the definition box are two additional choices: Search and More. Tap Search to display the menu shown in Figure 8-2. You have three choices: This Book searches for the word in the current book, All Text searches for the word on your Kindle Paperwhite, and Kindle Store finds all titles that have the word — it doesn't search for every instance of the word in the Kindle Store! Results of the search for Bombay returned 315 hits for the book; 3 hits on my Kindle (which includes the present book with 315 instances of the word); and 176 titles in the Kindle Store.

Figure 8-2: The menu you see when you tap Search from the definition of a word.
The definition box also includes a More button. Tap that button to display the screen as shown in Figure 8-3.
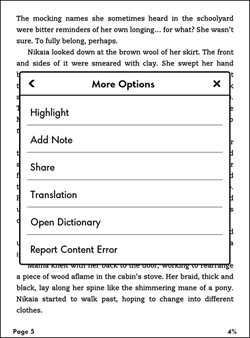
Figure 8-3: Options when you tap More in a dictionary definition.
You have the following options:
- Highlight: Highlight the word on the screen. Note that once the word is highlighted, the choice on the More Options menu changes to Delete. This option deletes the highlighting, not the word.
- Add Note: Add a note regarding the word. When you return to the book, word is highlighted with a superscripted number. Tap the number to read your note. To close the note, tap the X in the upper-right corner.
- Share: Share the word (and any commentary) on Goodreads and, if you want, Facebook and Twitter. Let your friends know how smart you are! (Social sharing is discussed in more detail in an upcoming section.)
- Translation: Translate the word from English to one of 16 other languages, including Chinese, Hindi, and Norwegian. You can also translate from other languages to English. The Kindle Paperwhite will even determine the source language for you. Figure 8-4 shows the translation of the word paix from French to English.
- Open Dictionary: Open the default dictionary at the definition of the word. In this way, you can read a more detailed definition or navigate quickly to linked entries. To return to your book, tap the Back icon. You may need to tap it several times, depending on how much exploring you did in the dictionary.
- Report Content Error: Report errors, such as typos, formatting, or other problems, directly to Amazon. Is a word misspelled or is incorrect punctuation used? Here's your chance to report it. Amazon has made a concerted effort to have publishers correct errors in their Kindle editions so that readers receive the highest quality books available.
The Kindle Paperwhite has two dictionaries: the default New Oxford American Dictionary and Oxford Dictionary of English (both from Oxford University Press). You can change the default dictionary as follows:
 Tap Menu⇒Settings.
- Tap Device Options⇒Language and Dictionaries⇒Dictionaries.
The active dictionary appears.
- Tap the active dictionary to change to a different dictionary.
A list of available dictionaries stored on the device appears.
- Change the default dictionary by tapping the radio button on the right.
The radio button that is darkened (filled in) indicates which dictionary is selected as the default.
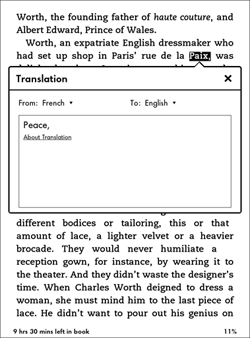
Figure 8-4: Translation of a word from French to English.
Stored in your Kindle Library at your Amazon account are several foreign language dictionaries, including Spanish, French, and Portuguese. Go to www.amazon.com/myk to access your library. Any (or all) of these dictionaries can be delivered to your Kindle Paperwhite. If you change the language on your device, the corresponding language dictionary becomes the default. Note that you won't see the dictionaries if you look in the Cloud on your Kindle Paperwhite; you have to go to your Kindle Library using your computer.
Vocabulary Builder
By default, every word you look up in the dictionary is added to a list that you can access using Vocabulary Builder. From any book, tap Menu — Vocabulary Builder. The screen shown in Figure 8-5 appears, listing the words you've looked up. Tap a word to see its definition. On the menu that appears, you can tap the Usage tab to see how the word was used in the book.

Figure 8-5: Word list in Vocabulary Builder.
To change the view from a list of words to the list of books in which you've searched for words, tap Books at the top of the screen. The screen shown in Figure 8-6 appears. Tap the arrow to the right of a book's title to see all the words you researched in that book. You can then tap a word to see its definition and its usage in the book.
Your Kindle Paperwhite includes a Flashcards feature to help you learn the words on your vocabulary list. At the bottom of Figure 8-6, tap Flashcards to display a screen like the one shown in Figure 8-7. Use the arrows or swipe to page forward and backward through the list. Each flashcard shows the word in context in the book you were reading — if you can't remember the definition, tap See Definition to refresh your memory. When you've learned the word, tap Mark as Mastered to remove it from the active list. Tap Exit Flashcards in the upper left to return to the active word list.

Figure 8-6: Book view in Vocabulary Builder.
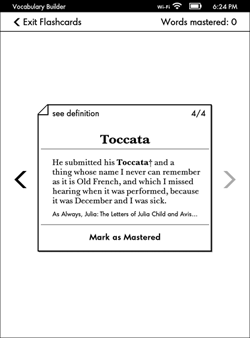
Figure 8-7: Use flashcards to reinforce definitions.
You can also mark a word as Mastered from the Dictionary definition screen.
Vocabulary Builder appears on your Home screen in your list of books. Tap Vocabulary Builder to open it, just as you would a book. You can access Vocabulary Builder (after you've activated it the first time) also from the menu. If your list on the Home screen is sorted by Recent and Vocabulary Builder is the most recent item you've viewed, it will be at the top of the list. If your Home screen is sorted by Collections, Vocabulary Builder will be the first item in the list after the listing of collections.
Kindle Free Time, which is discussed in Chapter 9, works the same way after it has been activated, as does the My Clippings folder.
As noted, Vocabulary Builder is turned on by default. To turn it off, tap Menu⇒Settings⇒Reading Options. Switch the toggle to Off. Now Vocabulary Builder will not appear on your Home screen and the menu option for Vocabulary Builder will appear dimmed. Any words you look up in the dictionary will not be added to your vocabulary list, but any words you've looked up previously will be retained.
Utilizing Highlights and Notes
As you're reading, you may want to highlight text to refer to later or to add your own notes to a particular passage. You may even want to make a Facebook post or Twitter tweet that includes an excerpt from the e-book. The touchscreen makes it particularly convenient for you to make these marks, or annotations:
- Highlights shade a section of text to draw attention to it.
- Notes are text you type, much like when you jot notes in the margins of a printed book.
These annotations are stored on your Kindle Paperwhite and are backed up at Amazon — as long as the annotations backup feature is turned on. To check whether this is the case, tap Menu⇒Settings⇒Reading Options⇒Notes & Highlights. Make sure the toggle switch next to Annotations Backup is set to On. This setting enables you to recover your notes if you lose your Kindle Paperwhite or upgrade to another model. If you borrow a book from the Kindle Owners’ Lending Library or rent a textbook, your annotations are preserved, even when you return the book. See Chapter 6 to find out more about the library and Chapter 9 for information on renting texts.
To make an annotation, select text in your book by touching your finger to a word and dragging your finger across the screen. As you do so, the selected text turns white on a black background.
When you release your finger, a pop-up window provides these options: Add Note, Highlight, Share, and More. In the following sections, I look at each option.
 Annotating is disabled in book samples. You can't add notes, highlights, or bookmarks or share excerpts when viewing a book sample.
Highlighting text
With the desired text selected (see the preceding section), tap the Highlight button. The text is highlighted in the book — appearing as black text on a gray background.
To delete a highlight, select any of the highlighted words by touching and dragging across them or by long-tapping. A Delete button appears in a pop-up window; tap Delete to remove the highlight.
What if the text you want to highlight spans more than one page? Just tap at the beginning and keep dragging to the next page. The text will continue to be highlighted. If you want to see everything on one page, adjust the font size to get all your desired text on the screen. Or you can adjust the starting point of the displayed text by changing the location. Touch the top of the screen to display the toolbar, and then tap Menu⇒Go To⇒Page or Location. Enter a location slightly different than the current location to shift the starting point of the displayed text, until all your desired text is displayed.
An interesting thing about highlights is that you can view highlights that other readers have made. Amazon collects this information and highlights passages in your book that have been highlighted frequently by other readers. Your Kindle Paperwhite displays how many people have highlighted that particular passage.
Although this can be intriguing, some readers find the display of popular highlights distracting. To turn off these popular highlights, follow these steps:
- Tap Menu⇒Settings⇒Reading Options⇒Notes & Highlights.
Popular Highlights is one of the Reading Options listed.
- Tap the On/Off toggle to deactivate the Popular Highlights option.
If you don't want to share your highlighted passages with Amazon, turn off the Annotations Backup option in the Reading Options page under Settings. If you do this, your annotations aren't backed up by Amazon, and they won't appear on other devices registered to your Amazon account.
Taking notes
Want to make margin notes in your books? You can with your Kindle Paperwhite. Adding notes is similar to highlighting text.
With the desired text selected, as I describe in the “Utilizing Highlights and Notes” section, earlier in this chapter, tap the Add Note button. A pop-up window appears with a text entry block and the onscreen keyboard. Type your notes using the keyboard and then tap Save.
Note that the text associated with your note is now highlighted in your book and is followed by a superscripted number. Tapping that number displays your note's text block — where you can edit or delete it.
You can view notes that other readers have made by turning on the Public Notes feature. Tap Menu⇒Settings⇒Reading Options⇒Notes & Highlights, and then turn on the toggle for Public Notes. See https://kindle.amazon.com/faq for more on public notes.
Viewing annotations
You can view all your notes, highlights, and bookmarks for a particular book. Tap Go To, and select the Notes tab from the menu that appears. Your notes, your highlights, and the popular and public highlights for that e-book are displayed.
You can also access your notes from a book by tapping the superscripted number, which opens that particular note. At the bottom of the note block, tap View Notes to display the same screen you accessed by using Go To. (The other options enable you to edit your note and, by tapping More, to delete or share the note.) To exit this screen, tap the X in the upper-right corner.
You can also view all your annotations across all your books, magazines, newspapers, and personal documents. Kindle Paperwhite places these in a My Clippings file that's available as a document from your Home screen. You can read your My Clippings file just as you would any other document on your Kindle Paperwhite.
You can view your annotations from a personal computer by going to http://kindle.amazon.com (United States and other countries) or http://kindle.amazon.co.uk (United Kingdom). Sign in and click the Your Highlights link.
Sharing notes and passages of interest
You probably noticed that when creating or viewing highlights and notes in your book, a Share button is available. This button lets you share a note and a link to the selected passage through Goodreads. If you've linked your Goodreads account to Facebook and Twitter, your notes will be shared on those sites, too. You can do all this directly from your Kindle Paperwhite — no computer required! The Share button is an easy way to let others know about books you're enjoying or passages you found interesting.
When you use your Kindle Paperwhite to share on Twitter, your tweet consists of your short note plus a Goodreads link to a list of quotes for the book you're reading. Figure 8-8 shows a sample tweet created on a Kindle Paperwhite.

Figure 8-8: Tweet a quote of interest from your Kindle Paperwhite.
From your Kindle Paperwhite, you can also update your Facebook status. An image of the book cover or a picture of the author (whatever is embedded in the book), an excerpt of highlighted text that you've selected, a note that you've written, and a link to the quote on Goodreads will be posted. Figure 8-9 shows a Facebook status update created from a Kindle Paperwhite.
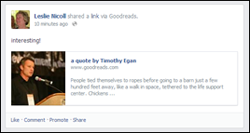
Figure 8-9: A Facebook status update with a link to the book.
To take advantage of these features, you need to link your Kindle Paperwhite to Goodreads. Then you add Facebook and Twitter.
![]() To begin tap the G (for Goodreads) icon on the toolbar. The screen shown in Figure 8-10 appears.
To begin tap the G (for Goodreads) icon on the toolbar. The screen shown in Figure 8-10 appears.
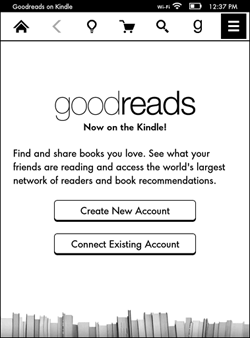
Figure 8-10: The screen you see when you select Goodreads for the first time.
If you already have a Goodreads account, tap Connect Existing Account. You can use your Facebook account, if you have one connected to Goodreads, or simply use your Goodreads credentials, as shown in Figure 8-11.
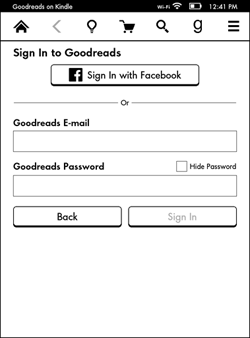
Figure 8-11: Connect using your Facebook account or Goodreads credentials.
If you don't have an existing account, tap Create New Account (refer to Figure 8-10). The screen shown in Figure 8-12 appears, asking you to create a Goodreads account with your Amazon credentials.
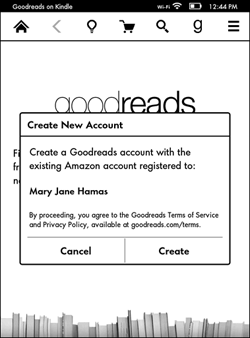
Figure 8-12: Create a Goodreads account with your Amazon credentials.
When you create your Goodreads account, you see screens that enable you to link to Facebook and Twitter. You can also make these connections later. To link or make changes to your Facebook account, you must go to Goodreads.com on your computer. To link to Twitter, follow these steps:
- Tap Menu⇒Settings⇒Reading Options.
- Tap Social Networks. (If wireless is off, you're prompted to turn it on.)
- Tap the Link Account button for Twitter.
- Enter your Twitter e-mail address and your Twitter password on the authorization screen that appears.
After your Kindle Paperwhite is linked, you can share a note about what you're reading by following these steps:
- From within a book, select text by tapping and holding down on a word, and then slide your finger across the page.
- Tap the Share button.
- Enter your message in the text box that appears.
- Tap Share.
Your note and a link to the selected book passage posts to the accounts you've linked to your Kindle Paperwhite (Goodreads, Twitter, Facebook). All comments will be shared to Goodreads. You have the option of sharing to Twitter and Facebook by tapping to select (or deselect) the box in front of the Twitter and Facebook logos, as shown in Figure 8-13.
You can share Twitter and Facebook updates for periodicals and personal documents. Shared items appear on your Facebook wall (as a status update) and will be tweeted from your Twitter account. These comments will be linked to your page at https://kindle.amazon.com/. Comments that you share from periodicals and personal documents are not posted to Goodreads — Goodreads is exclusively for books.
When you finish a book, you can rate it and share it on Amazon and Goodreads. The Share page is shown in Figure 8-14.
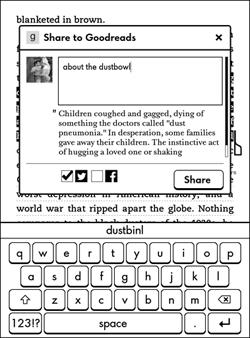
Figure 8-13: This comment will be shared on Goodreads and Twitter but not on Facebook.

Figure 8-14: Share and rate books on Amazon and Goodreads.
Playing with pictures
If the book you're reading has photographs and illustrations, you can see more information as well as make notes and marks. To begin, press and hold down (long-tap) on the photograph or illustration. A magnifying glass appears in the middle of the picture, and a box appears with Share, Add Note, Highlight, and More. These choices operate in the same way as discussed for words, notes, and highlights.
Tap the magnifying glass to enlarge the picture to full-screen size. If appropriate, the photo will rotate to landscape mode for best viewing. Tap the picture again to return to your book.
Would you like to make a screenshot from your Kindle Paperwhite? It's easy! On the desired page, place your thumbs lightly in the upper-right and lower-left corners, and press simultaneously. The screen will blink. Use the USB cable to attach your Kindle Paperwhite to your computer. The screenshot is listed in the root directory. From there you can copy or move the picture to your hard drive, rename it, save it, and use it however you want.
Note that the double-thumbpress maneuver takes a bit of practice. If your desired screenshot doesn't appear the first time, just try again.
Viewing with X-Ray
Some books have the X-ray feature enabled. This feature provides a view into recurring items: characters, settings, topics, and phrases that occur throughout the book. You can view this information for the current page, the current chapter, or the entire book.
Tap the top of the screen to display the toolbar, and then tap X-Ray to see a screen like the one shown in Figure 8-15. (Note that if the X-ray feature is not enabled for the book you're reading, the option will appear dimmed.) Tap any term to view additional information from Wikipedia (if enabled) and to see the other locations in the book where that term appears.

Figure 8-15: An example of an X-ray display from a book about Atlantic City.
Going a Little Further with Goodreads
As discussed, you can share quotes and short comments from Paperwhite to Goodreads, Facebook, and Twitter. But Goodreads offers much more for voracious readers. You can use shelves to organize your books by those you have read, are currently reading, and want to read. You can connect with friends who have similar reading interests to discover new books. And the Updates feature enables you to see what your friends are reading and view their comments and ratings.
One particularly useful feature is the capability to add books from your Amazon Cloud account to Goodreads. With the Goodreads app open, select Add Amazon Books (in the upper right). The screen shown in Figure 8-16 appears. From here, you can add books to Goodreads, either by rating or by adding the book to a shelf.

Figure 8-16: Adding books from your Amazon collection to Goodreads.
If you're familiar with Goodreads, you will find that the Goodreads app has much of the functionality that has been available on mobile apps and PCs. If you're new to Goodreads, take time to play with it and discover what you can do. It can be a great tool for organizing your library and keeping track of what you've read, as well as connecting with other readers and friends.
Using Whispersync with Kindle Editions and Audible Books
Prior versions of the Kindle e-reader included audio capabilities which allowed you to listen to a book on your device or use Text-to-Speech to have a book read to you. The Kindle Paperwhite does not include these features, but don't despair — you can still listen to a book and have it sync with the Kindle edition on your Kindle Paperwhite by using Whispersync for Voice.
To begin, you will need the following:
- A Kindle Paperwhite: Make sure that Whispersync is turned on at your Amazon account. Go to www.amazon.com/myk and select Manage Your Devices. Device Synchronization is near the bottom of the page.
- A device that plays audio files and supports the Audible application: The Audible application is designed to play books purchased from Audible.com or Audible books purchased from Amazon.
- The Kindle Edition of a book and the Audible audiobook version: You need to search on Amazon to find Kindle books with Audible counterparts. If a book supports Whispersync for Voice, that fact will be noted on the product page, as shown in Figure 8-17.
Amazon offers special promotions on Kindle Edition/Audible book combos. When you buy a Kindle book, check to see whether the Audible book is available at a discounted price.
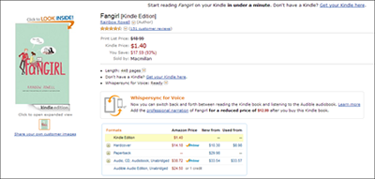
Figure 8-17: A Whispersync for Voice edition is also available, as shown in the middle of the page.
Now all you need to do is begin reading (or listening). When you switch devices, the synchronization should be automatic. See Figure 8-18 for an illustration of the sync screen on your Kindle Paperwhite and Figure 8-19 for the screen on the audio device, in this case, an iPhone. If the sync does not happen automatically, tap Menu⇒Sync to Furthest Page Read.

Figure 8-18: Synchronization screen on a Kindle Paperwhite.

Figure 8-19: Synchronization screen on an audio device.
You do not need to purchase the two books at the same time to have them synchronize between the Kindle edition and audiobook. Books bought at different times will still sync.
At the time of this writing, the synchronization feature was available only between Amazon Kindle Editions and audiobooks purchased from Audible.com, which is an Amazon company.
Accessing the Experimental Browser
Yes indeed, your Kindle Paperwhite sports a built-in browser that you can use to access the Internet. The browser isn't full-featured like the one you surf with on your computer, but it is a usable, albeit stripped-down, browser that you can take advantage of when you're out somewhere with your Kindle Paperwhite and need to get online in a hurry.
If you have a Kindle Paperwhite 3G, free web browsing in 3G mode is limited. You can access only the Amazon website (including the Kindle Store, of course!) and Wikipedia via 3G wireless. For accessing other websites, you need to use a Wi-Fi connection.
Although the Kindle Paperwhite's web browser is simple, it does offer some compelling features. Here are some of my favorite things about the Kindle Paperwhite web browser:
- Even though web access is limited under 3G wireless, this access is free. (Most devices other than Kindles that use 3G require an access fee or monthly charges.) You can access Amazon or Wikipedia anytime and anywhere with your Kindle Paperwhite 3G — as long as you're in an area covered by the AT&T cellular data network used by the Kindle Paperwhite.
- The web browser provides a convenient way to connect to the web any time you're in a Wi-Fi hotspot. This hotspot could be your own home wireless network or the Wi-Fi available in a coffee shop or an airport, for example. (Note: Some hotspots charge a fee for Internet connectivity.)
- The Kindle Paperwhite's web browser enables you to immediately jump to websites from links provided in e-books, blogs, or other content.
- For simple, text-oriented sites, such as mobile versions of most websites, the convenience of having web access available from your Kindle Paperwhite can be a timesaver.
Conversely, the rudimentary nature of the Kindle Paperwhite web browser has some drawbacks, including these:
- The Kindle Paperwhite's grayscale display is less than ideal for most web browsing. If you're accessing sites that are rich in graphics and colors, you'll have a less appealing experience.
- The web browser doesn't support websites that use Flash or Shockwave multimedia effects.
- Java applets aren't supported. Some websites use Java applets for animations or to provide complex functionality.
- Videos are not playable through the web browser.
- The web browser may be unavailable in some countries outside the United States.
Getting online
![]() To access the web browser, tap the Menu icon from the Home screen and then tap the Experimental Browser option, as shown in Figure 8-20.
To access the web browser, tap the Menu icon from the Home screen and then tap the Experimental Browser option, as shown in Figure 8-20.
The first time you launch the browser, the default Yahoo! screen appears. Tap Menu⇒Bookmarks to display the default list of website bookmarks. Amazon is at the top, followed by Wikipedia, Google, and the New York Times. Tap one of the bookmarks to open the bookmarked page in the browser. If you leave the browser and later return, the last page you viewed will open by default.
You can open the browser also by tapping any web address link from content that you read on your Kindle Paperwhite, such as a book or a blog.

Figure 8-20: Access Amazon's Experimental browser from the Menu icon.
Browsing basics
Your Kindle Paperwhite web browser displays the web address, or URL, in its address bar for the last web page you accessed. To change that URL or enter a new one, tap the address bar and use the onscreen keyboard to enter your desired URL. Tap the arrow to the right to navigate to the site.
When entering the URL, you can leave out the http:// prefix and the www part of the address. For example, you can type cnn.com rather than http://www.cnn.com.
On web pages that have more content than can fit on one displayed page, a scroll bar appears on the right side of the browser. You can drag your finger around the page to scroll up and down to view more of the page.
You can use bookmarks to save frequently used web pages and to avoid reentering long URLs from the Kindle Paperwhite's onscreen keyboard. Here are the essentials for working with web browser bookmarks:
- Adding a bookmark: Tap Menu⇒Bookmark This Page.
- Accessing your saved bookmarks: From the web browser, tap Menu⇒Bookmarks. Use this method to access the sample bookmarks that Amazon has preloaded on your Kindle Paperwhite as well.
- Deleting a bookmark: Tap Remove at the bottom of the bookmarks screen. A check box appears for each displayed bookmark. Tap the check box for one or more bookmarks, and then tap Remove.
- Editing a bookmark: Tap Edit at the bottom of the bookmarks screen. Tap a bookmark to edit its name.
Given the nature of the Kindle Paperwhite's display size, you'll probably want to zoom in on areas of a web page. Unpinch on the display to zoom in, and pinch to zoom out. (See Chapter 3 for more on how to navigate the Kindle Paperwhite's touchscreen.) When the page is zoomed in, you can pan around the web page by swiping your finger across the display.
Special settings
You usually don't have to be concerned about the default settings of your Kindle Paperwhite's web browser. However, situations may arise in which tinkering with the settings can resolve problems and improve the speed of browsing from one page to another.
You can see the available options from any web page by tapping Menu⇒Browser Settings. The following options are available:
- Clear History: Your Kindle Paperwhite saves the URLs and content from web pages you've visited previously, to speed up load times when you visit those pages again. Use the Clear History option to delete this saved information.
- Clear Cookies: Some web pages save small strings of information, or cookies, on your Kindle Paperwhite's hard drive. Cookies can be used, for example, to save your login information so you don't have to reenter it on each page of a site. Use the Clear Cookies option to delete this information. You may want to do this if your web browser doesn't respond or responds very slowly.
- Disable JavaScript: Many websites use JavaScript to provide enhanced functionality, such as submenus that appear dynamically when a main menu option is selected. If you find that the web browser responds slowly, try using this option to disable JavaScript.
- Disable Images: Depending on the speed of your Internet connection, web page graphics and pictures can be slow to load. You can choose to eliminate the images and view only the text content of web pages by selecting the Disable Images option.
Some web pages have articles, which are defined areas that can make reading a web page easier. For example, news sites often organize their content into articles to define sections of text and graphics that belong together. You can view articles more conveniently by tapping Menu⇒Article Mode. Your Kindle Paperwhite's web browser will now filter the content it displays to the desired article's text and images.
Article Mode works well with many news sites. When viewing the article, swipe the display to scroll up or down. To turn off Article Mode, tap Menu⇒Web Mode.