
Chapter 3
Getting to Know Your Kindle Paperwhite
In This Chapter
![]() Tapping, swiping, and pinching
Tapping, swiping, and pinching
![]() Becoming familiar with the icons
Becoming familiar with the icons
![]() Touring the Home screen
Touring the Home screen
![]() Using Page Flip to navigate
Using Page Flip to navigate
Your Kindle Paperwhite has exactly one switch: the power switch on its lower edge. There are no buttons for turning pages or accessing menus, as found on earlier generations of Kindles. All navigation is done through the touchscreen, with finger gestures.
In this chapter, you begin by examining the different finger motions as well as where on the screen you use them. With just a few simple motions, you'll be able to open books and other content and quickly navigate from place to place on your Kindle Paperwhite.
Interacting with the Touchscreen
In this section, you discover some techniques for navigation. If you're a seasoned Kindle Touch or previous generation Kindle Paperwhite owner, the following information should be familiar. However, if you're upgrading from a Kindle with buttons or are new to Kindle overall, the following primer will get you started.
Tapping, swiping, and pinching
All common uses of the Kindle Paperwhite — opening books, turning pages, placing bookmarks, and so on — involve a few simple touchscreen gestures, such as finger taps and swipes. For the most part, these gestures are consistent throughout your interaction with the Kindle Paperwhite. (I point out the few cases where the behavior is a bit different than you might expect.)
 Unlike Amazon's first generation touchscreen device, the Kindle Paperwhite has a capacitive touchscreen, which means that it responds only to an ungloved finger or a capacitive stylus that mimics a finger's touch. See Chapter 10 for more information on styli.
Tapping
A simple tap is the most common gesture you use with the Kindle Paperwhite. See an onscreen button and want to activate it? Tap the button. Viewing the list of books on your device? Tap one to open it.
When you're reading a book or other content, you tap to page forward (display the next page), page backward (display the previous page), or display a menu of commands. What happens when you tap a book's page depends on which part of the screen you tap; I discuss the three tap zones of a displayed page later in this section.
Swiping
Swiping — or sliding — your finger from right to left horizontally or diagonally on the screen causes it to page forward. The motion is akin to flipping a paper page in a printed book. To page backward, reverse the motion with a left-to-right swipe.
When reading a book or other content, you advance the page by swiping or tapping.
If you want to page forward or backward when viewing a list of books on the Home screen, you must swipe, not tap. A tap on the title of a book (or other content) on the Home screen opens the item for reading.
 When swiping, you need to move your finger only a short distance. You can probably swipe (or tap) without moving your hands from their reading position.
Long-tapping
For a long-tap, also called a tap and hold, you touch and hold down on the screen for a few seconds before releasing. In general, a long-tap results in a special action, depending on what you're viewing at the time.
For example, when viewing a book page, you can long-tap on a word to display its definition. When viewing a list of books on the Home screen, a long-tap on a particular book displays such options as adding the book to a collection and reading its description. If you tap and hold down on the title of an e-book sample listed on the Home screen, you can buy the book, read the description, or delete the sample from the device. (Sampling content is discussed in more detail in Chapter 5.)
Pinching and unpinching
When reading a book or other content, place two fingers (or a finger and a thumb) on the touchscreen and slide them closer together. This pinch motion decreases the font size. Move your fingers apart — called an unpinch — to increase the font size. You need to move your fingers only a small distance to change the font size.
You might see a lag between the pinching and unpinching motions and a change in the text size. Moving your fingers slowly helps.
Touchscreen zones
The Kindle Paperwhite screen is set up with tap zones, which are designed to let you turn pages effortlessly with one finger. To get an idea of the location of these zones, see Figure 3-1 (Portrait mode) and Figure 3-2 (Landscape mode).
The three zones shown in the figures work as follows:
- Top zone: This area covers the full width of the screen and is approximately 1.25” high. While reading a book, a tap in the top zone displays a black bar and two toolbars. The title of the book, the Wi-Fi or 3G icon, the battery status, and the time are displayed in the black bar. The top toolbar contains the Home, Back, Light, Store, Search, and Menu icons. The second toolbar contains the Font icon, Go To, X-Ray, Share, and the Bookmark icon. At the bottom of the screen, you see the title of the current section or chapter of the book along with your progress, which can be displayed in locations or pages, as well as the time left in the chapter or book. Just tap in the lower-left corner to cycle through these options. For details, see the next section, “Navigating with Icons.”

Figure 3-1: Tap zones in Portrait mode.

Figure 3-2: Tap zones in Landscape mode.
The top toolbar is always displayed on the Home screen. - Central zone: This area, which is the largest of the three zones, covers the middle of the screen to the right of the left zone and below the top zone. A quick tap or swipe here advances to the next page.
- Left zone: This area is a long, narrow rectangle approximately .5” wide. A tap in the left column moves to the previous page. Because this zone is narrow, your tapping has to be precise. That said, if you can visualize the zone on the screen, remembering where to tap will be easier.
To put your Kindle Paperwhite in Landscape mode, tap Menu⇒ Landscape Mode. Note that Landscape mode is accessible only while in a book.
Navigating with Icons
The Kindle Paperwhite has one physical button on the device: the power button. Buttons that were on earlier versions of the Kindle, such as Home, Back, and Font, are incorporated as icons in toolbars on the screen. These virtual buttons are described in this section.
Toolbars when viewing a book
When you open a book and advance through its pages, you see the text on the page and progress information at the bottom of the screen. That's it! But if you tap in the top zone on the screen, you see the toolbars shown in Figure 3-3. The icons displayed on these toolbars are described in the next section.
Home icon
![]() The Home icon always brings you back to the Home screen, no matter where you are or what you've tapped. Consider this icon your virtual friend.
The Home icon always brings you back to the Home screen, no matter where you are or what you've tapped. Consider this icon your virtual friend.
Back icon
![]() The Back icon, like the Back icon in a web browser, lets you retrace your steps. In some instances, the Back icon acts like the Home icon. For example, if you open a book from the Home screen, read a few pages, and then tap the Back icon, you return to the Home screen — not the previous page you looked at.
The Back icon, like the Back icon in a web browser, lets you retrace your steps. In some instances, the Back icon acts like the Home icon. For example, if you open a book from the Home screen, read a few pages, and then tap the Back icon, you return to the Home screen — not the previous page you looked at.
In a newspaper or magazine, however, the Back icon works differently. See the “Toolbars when viewing periodicals” section for details.
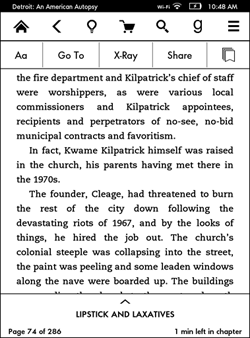
Figure 3-3: The toolbars you see when reading a book.
Light icon
![]() The Light icon controls the built-in light. Tap this icon to display the adjustment meter shown in Figure 3-4. The light gradient has 24 levels, from very dim (1) to very bright (24). To adjust the light, tap the plus or minus sign on either end of the meter or tap on the meter itself. Play with the adjustment meter in different lighting conditions to see what works best for you.
The Light icon controls the built-in light. Tap this icon to display the adjustment meter shown in Figure 3-4. The light gradient has 24 levels, from very dim (1) to very bright (24). To adjust the light, tap the plus or minus sign on either end of the meter or tap on the meter itself. Play with the adjustment meter in different lighting conditions to see what works best for you.
Note that the screen says, “In brightly lit rooms, use a high setting,” and “Use a low setting for dark rooms.” This advice might seem counterintuitive, but it is correct. When your eyes become accustomed to a dark room, your pupils are dilated and you need less light to see. Too bright a light can be painful. In bright light, your pupils are constricted and thus need more light to see.
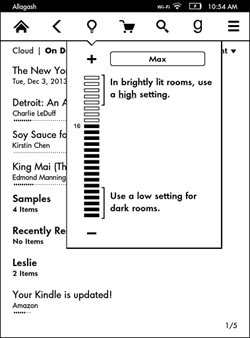
Figure 3-4: The light adjustment meter.
Store icon
![]() Tapping the Store icon takes you to the Amazon Kindle Store. If wireless is turned off, you'll be prompted to activate it. Note that the icon appears dimmed if you've turned off access to the Kindle Store under Parental Controls.
Tapping the Store icon takes you to the Amazon Kindle Store. If wireless is turned off, you'll be prompted to activate it. Note that the icon appears dimmed if you've turned off access to the Kindle Store under Parental Controls.
Parental controls allow you to disable access to the web browser, the Kindle Store, and the Cloud. In addition, when parental controls are enabled, you cannot deregister or reset your Kindle Paperwhite. You might want to disable these features to prevent others who might be using your Kindle Paperwhite, such as your children, from making unauthorized purchases. You might also want to prevent others from seeing what you have purchased by viewing your content in the Cloud. To access this feature, tap Menu⇒Settings⇒Device Options⇒Parental Controls. Parental controls — and other kid-conscious features — are discussed in detail in Chapter 9.
If you have a Wi-Fi–only Kindle Paperwhite and are not in an area with a Wi-Fi hotspot, you can't connect to the Kindle Store.
Search icon
![]() When you tap the Search icon, the screen displays a Search page. Use the onscreen keyboard to type a search term in the search field.
When you tap the Search icon, the screen displays a Search page. Use the onscreen keyboard to type a search term in the search field.
To the left of the search field is a drop-down menu. (By default, the menu says My Items if you're on the Home page.) Tap the arrow to display your menu choices: My Items, All Text, Kindle Store, Dictionary, and Wikipedia. Within a book or a periodical, you can also restrict your search to just the book or periodical by selecting This Book or This Issue. To search the Kindle Store or Wikipedia, the device must be connected to Wi-Fi.
When you change the search parameter (for example, selecting All Text from the drop-down menu), that choice remains in force until you change it again.
Goodreads icon
![]() When you tap the Goodreads icon, the screen displays the built-in Goodreads app. You can look at updates from your friends, view your own shelves, or see what your friends are reading. You can also add books from your Amazon account, and mark them as read, currently reading, or want to read. For books that you've finished, you can rate them from one to five stars.
When you tap the Goodreads icon, the screen displays the built-in Goodreads app. You can look at updates from your friends, view your own shelves, or see what your friends are reading. You can also add books from your Amazon account, and mark them as read, currently reading, or want to read. For books that you've finished, you can rate them from one to five stars.
The Goodreads app is discussed in more detail under social networks in Chapter 8.
If you don't have a Goodreads account, you'll be prompted to create one using your Amazon login credentials.
Menu icon
![]() The Menu icon is probably what you tap most often when using your Kindle Paperwhite. I discuss specific uses of the Menu icon throughout this book — turning on and off the wireless, finding the settings on your device, or reading annotations and notes. If you're wondering how to do something, no matter what it might be, tap the Menu icon first. To close a menu, tap the X in the upper-right corner.
The Menu icon is probably what you tap most often when using your Kindle Paperwhite. I discuss specific uses of the Menu icon throughout this book — turning on and off the wireless, finding the settings on your device, or reading annotations and notes. If you're wondering how to do something, no matter what it might be, tap the Menu icon first. To close a menu, tap the X in the upper-right corner.
Font icon
![]() The first icon on the second toolbar is the Font icon. Tap the Font icon to access the following useful features:
The first icon on the second toolbar is the Font icon. Tap the Font icon to access the following useful features:
- Fonts: Change the font size and the typeface by tapping the options in the first section shown in Figure 3-5.
- Line spacing: Tap the boxes to choose tight, average, or wide line spacing.
- Margins: Tap the boxes to change the width of the page margin to wide, average, or narrow.
Close the menu by tapping the X in the upper-right corner.
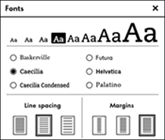
Figure 3-5: Tap the Font icon to change the appearance of text on the screen.
Go To
Tap Go To to display a two-tabbed menu that allows you to quickly navigate through a book and your notes. The Contents tab displays information such as Cover, Book Info, Beginning (the first page of the first chapter), Table of Contents (from here, you can tap and move to individual chapters), End (the last location in the book), and a specific page or location. The Notes tab displays your notes as public notes from other readers. Navigating through a book using the Go To feature is discussed in more detail in Chapter 4.
X-Ray
Tap X-Ray to display a list of words or characters that appear in the page, chapter, or book, along with a frequency graph. (For details on the X-ray feature, see Chapter 8.) X-Ray appears dimmed if the feature is not enabled in the book you're reading.
Share
Tap Share to open a screen that allows you to type comments about the book you're reading. Comments will be shared to Goodreads as well as to Twitter and Facebook, if they are selected. You must have your social networks enabled and connected to your Kindle Paperwhite to be able to use this feature. (See Chapter 8 for details.)
Bookmark icon
![]() Tapping the Bookmark icon allows you to quickly place a bookmark at the location you're reading, to save your place or for future reference. Setting a bookmark and using bookmarks to navigate are discussed in detail in Chapter 4.
Tapping the Bookmark icon allows you to quickly place a bookmark at the location you're reading, to save your place or for future reference. Setting a bookmark and using bookmarks to navigate are discussed in detail in Chapter 4.
Toolbars when viewing periodicals
Within a periodical, such as a newspaper or a magazine, the toolbars are a little different. The main toolbar still contains Home, Back, Light, Search, and Menu icons, but the Store icon is replaced by the following two icons:
 Cover view icon: Tap this icon to see the list of sections with photographs, as shown in Figure 3-6.
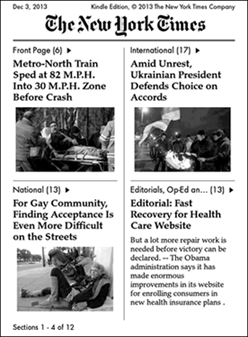
Figure 3-6: Cover view of the New York Times.
 Section view icon: This icon displays a hierarchical, text-based section and article listing, as shown in Figure 3-7. At the bottom of the screen are navigation arrows.
![]() The Back icon returns you to the article listing or the front page. Newspaper and magazine content is sorted by lists of articles or sections that you scroll through to select what you want to read. For tips on reading periodicals, see Chapter 4.
The Back icon returns you to the article listing or the front page. Newspaper and magazine content is sorted by lists of articles or sections that you scroll through to select what you want to read. For tips on reading periodicals, see Chapter 4.
The second toolbar that you see when reading an article in a periodical (such as a magazine or newspaper) is different than the one you see when reading a book. Both toolbars sport the Font icon. But instead of Go To, X-Ray, and Share, which you see when reading a book, you see Clip This Article, as shown in Figure 3-8. Tapping Clip This Article to quickly add an article of interest to the My Clippings file. (For details, see Chapter 4.)
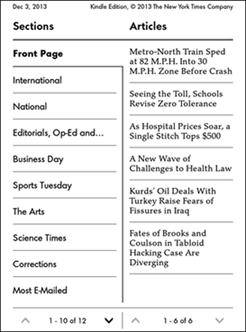
Figure 3-7: Section view of the New York Times.
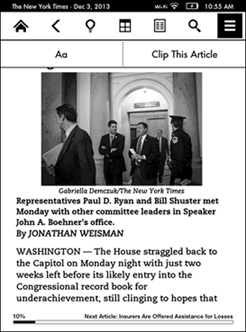
Figure 3-8: You see the second toolbar when reading a periodical.
Navigating with Page Flip
Page Flip on the Kindle Paperwhite enables you to move quickly through a book and return to your original location, without setting a bookmark. To access Page Flip, swipe up from the bottom of the screen. You'll see a screen within the screen, as shown in Figure 3-9.
In the middle of the page, note the left and right arrowheads. Tap these to move forward (right) or backward (left) one page at a time. You can move forward and backward through a book also by swiping across the screen.
At the bottom of the screen is a rectangular navigation pane that displays the current chapter and location. Tap the arrows to move forward and backward by chapter. (If the publisher hasn't set chapter marks, you see only the progress bar.) You can slide the circle on the progress bar to move forward quickly by location — think of this as riffling through the book. Tap on the bar to move to the beginning of a chapter. When you're finished, tap the X in the upper-right corner to close Page Flip and return to your reading location.
Page Flip is a handy feature because it allows you to quickly move through a book without losing your place. Do you need to refresh your memory on a character's name? Does the book contain maps or photographs? Use Page Flip to navigate to these types of features.

Figure 3-9: The Page Flip navigation screen.
You can use Page Flip to quickly jump to a different part of the book (if, for example, you've lost your place and didn't set a bookmark). After you've flipped to the correct location, tap the center of the page view screen to jump to that location.
The size of the font in the page view screen is smaller than the font on the page you're reading. If the Page Flip view is too small to read, increase the size of the font on the page and then restart Page Flip. You can't directly increase the font size within the inserted page that you're viewing on the screen.