
Chapter 4
Reading
In This Chapter
![]() Understanding your Kindle Paperwhite's basic reading features
Understanding your Kindle Paperwhite's basic reading features
![]() Viewing and sorting content on your device and in the Cloud
Viewing and sorting content on your device and in the Cloud
![]() Reading a periodical efficiently
Reading a periodical efficiently
![]() Making the most of comic books, graphic novels, and manga
Making the most of comic books, graphic novels, and manga
![]() Organizing your content in collections
Organizing your content in collections
![]() Reading on other devices
Reading on other devices
In this chapter, I show you the basics of reading on your Kindle Paperwhite — a process so simple and elegant that you'll soon forget you're even using an e-reader.
You also find out how to navigate through your collection of books both on your Kindle Paperwhite and in the Cloud. In addition, I include information on how to have a stellar experience when reading periodicals, such as newspapers and magazines. Along the way, I share tips and hints that can save you time and make the most of your reading experience.
It All Begins on the Home Screen
The Home screen displays a list of all the content loaded on your Kindle Paperwhite. Typically, that content is mostly books but can also include games, newspapers, magazines, blogs, and personal documents.
![]() When you turn on your Kindle Paperwhite (by pressing the power button on the bottom edge or opening the cover if the device is in an Amazon case), it displays your last viewed page or a sponsored screensaver, which you swipe to get to the last viewed screen (if you're using a Kindle Paperwhite with special offers). You can always go directly to your Home screen by tapping the Home icon on the toolbar at the top of the screen. If the toolbar is not displayed, just tap in the top half-inch of the screen and it will appear.
When you turn on your Kindle Paperwhite (by pressing the power button on the bottom edge or opening the cover if the device is in an Amazon case), it displays your last viewed page or a sponsored screensaver, which you swipe to get to the last viewed screen (if you're using a Kindle Paperwhite with special offers). You can always go directly to your Home screen by tapping the Home icon on the toolbar at the top of the screen. If the toolbar is not displayed, just tap in the top half-inch of the screen and it will appear.
 If you're using the Amazon cover, your Kindle Paperwhite will automatically come out of Sleep mode when you open the cover. If you have a Kindle Paperwhite with traditional screensavers, you'll see the last viewed screen. A Kindle Paperwhite with special offers and sponsored screensavers will display one of those screens. Give the screen a quick swipe to display the last viewed screen.
Figure 4-1 shows a typical Home screen on a Kindle Paperwhite.

Figure 4-1: The Home screen in List view.
 The Home screen on the Kindle Paperwhite with special offers and sponsored screensavers displays seven items — one slot for content is taken up by the small special offer banner at the bottom of the screen. If you don't have special offers on your Kindle Paperwhite, eight items will be listed.
The Home screen in Figure 4-1 is shown in List view. If you prefer, you can view your Home screen in Cover view, which is shown in Figure 4-2.

Figure 4-2: The Home screen in Cover view.
If you've selected By Author or By Title on the Home screen, the first page of Cover view displays three covers of your content and four covers of something Amazon thinks you might enjoy (top-rated mysteries and thrillers in Figure 4-2). When you tap to move to the next page, the Home screen will display six covers generated from your content. If you're viewing your Home screen By Collection, generic covers for the collections will be shown. The generic collection covers will be mixed in as appropriate in the other views.
![]() Perhaps you don't like seeing Amazon's recommendations and would prefer to see six covers of your content on every screen. No problem — you have the option to change the display. Tap Menu⇒Settings⇒Device Options⇒Personalize Your Kindle. Recommended content is an on/off toggle switch, as shown in Figure 4-3.
Perhaps you don't like seeing Amazon's recommendations and would prefer to see six covers of your content on every screen. No problem — you have the option to change the display. Tap Menu⇒Settings⇒Device Options⇒Personalize Your Kindle. Recommended content is an on/off toggle switch, as shown in Figure 4-3.
When you turn off Recommended Content, the screen will display six covers, as shown in Figure 4-4.
To switch from List view to Cover view, simply tap Menu⇒Cover View. To switch back, tap Menu⇒List View.
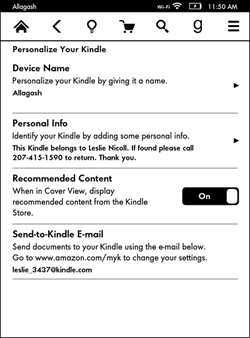
Figure 4-3: Use Recommended Content to choose what is displayed in Cover view.
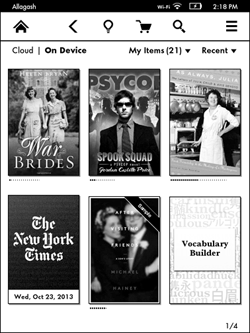
Figure 4-4: Cover display with Recommended Content turned off.
Types of Content
I would hazard a guess that if I picked up a stranger's Kindle Paperwhite, the most common type of content on the device I would see would be books. But that's not the only type of material that you can read, as you can see from the following list:
- Books: Every type of book, from traditional novels to short stories, serialized books, Kindle Singles, and more.
- Periodicals: Newspapers, magazines, and blogs.
- Docs: Personal documents that you create and send to your Kindle whether using Send to Kindle or e-mail (see Chapter 7 for details on this process). In addition, if you capture content from the web and send it to your Kindle Paperwhite by using the Send to Kindle browser feature, this material will be categorized as a Doc.
- Active Content: Games such as “Every Word.”
Throughout this book, when I refer to content, I mean any of the preceding categories.
Moving around the Home Screen
When you first get your Kindle Paperwhite, you may have only one page of content listed on your Home screen. You can easily open a book from the list by tapping anywhere on its name. As the amount of content on your device grows, however, you'll want to be able to move around quickly and easily.
How do you know how many pages of content you have on your Home screen? Look at the bottom-right corner in Figures 4-1 and 4-4. Note the two numbers separated by a slash. The first number is the page you're on; the second number is the total number of pages of content. For convenience, I refer to these numbers as the page indicator.
As you add books and other content, your Home screen can quickly become many pages long. After all, your Kindle Paperwhite can hold about 1,100 e-books! You'll probably accumulate books quickly, given the availability of free material and the ease with which you can download content.
What's more, if you get in the habit of sampling books before you buy, your library of content can really start to mushroom! (I discuss sampling in Chapter 5.)
So how do you manage your fast-growing library? The following sections describe features available from your Home screen that help you browse through your library and find books efficiently.
Sorting and displaying content
The top-right corner of the Home screen provides four options for sorting content: Recent, Title, Author, and Collections. To change the current sort method, simply tap it and then tap your new choice. Presto! Your list appears, re-sorted.
The Recent option displays the most recent content either loaded or viewed on your Kindle Paperwhite. Title, Author, and Collections are displayed alphabetically. When sorted by Collections, the collections appear first and books not in collections appear next, sorted by most recent. If you haven't set up any collections, the Collections choice appears dimmed on the menu. I discuss how to organize your content into collections in the “Creating Collections” section, later in this chapter.
You can also restrict the type of content shown on your Kindle Paperwhite by tapping the down arrow next to My Items. (By default, the device displays My Items, which displays every type of item on your device, with the total number of items listed in parentheses.) Tap Books, Periodicals, Docs, and Active Content (see the “Types of Content” section) to display content only in those categories. The number in parentheses will change depending on the number of items on your Kindle Paperwhite in that particular category.
Removing content
Although it's great to keep adding books and other content to your Kindle Paperwhite, sometimes you'll want to remove items — whether to save space or because you don't like clutter. Some Kindle users don't like to re-read books, so they have no reason to keep books they've read on their device. Whatever the case, realize that sometimes removing content is permanent.
If you long-tap a book's title, you will see that Remove from Device is the last choice on the menu that appears. If you purchased the book from Amazon, it will be available in the Cloud, which is your archive of Kindle books at Amazon. If you remove the book from the device, it is still available to you to download via the Cloud.
However, if you have purchased a book from another source, it will not be backed up in the Cloud, unless you have sent it to your device by using one of the options described in Chapter 7. In this case, when you remove the book, it is permanently deleted unless you have backed it up on your computer.
 Unfortunately, the menu doesn't indicate whether the removal is permanent — you need to remember where you acquired the material.
If you long-tap the title of a sample, you'll see the Delete This Sample option at the bottom of the list. Deleting a sample is permanent, although you can always download the sample again from Amazon.
Paging through the Home screen
If your Home screen has multiple pages, you can flip forward and backward through those pages by swiping from right to left (to move forward) or left to right (to move backward). Note that this swipe can be horizontal or diagonal in List and Cover views, as well as vertical (up to move forward, down to go back) in List view.
From the Home screen, you can navigate directly to a page in your list of books. Begin by tapping the page indicator at the bottom-right corner of the screen. A pop-up window appears, allowing you to enter a page number to jump directly to the list of content. If your Home screen is sorted by Collections, Recent, or Title, you'll also have the option of entering the first few letters of a book's title. If your Home screen is sorted by Author, you can enter the first letters of an author's name. Tap the Go button and you're taken to the corresponding page in your list of content.
Searching from the Home screen
Another way to find a book is to use the device's powerful Search feature, which can scan all your content to find items containing a word or string of characters.
![]() To search from the Home screen, tap the Search icon on the toolbar. The Search screen and onscreen keyboard appear, as shown in Figure 4-5.
To search from the Home screen, tap the Search icon on the toolbar. The Search screen and onscreen keyboard appear, as shown in Figure 4-5.

Figure 4-5: The Search screen.
When using the onscreen keyboard, you can access variations of certain letters by tapping and holding down on a letter. For example, tapping and holding down on the letter E displays accent marks and other diacriticals. Enter text by tapping the appropriate letters on the keyboard, and then tap the arrow to the right of the search box.
The search feature is powerful, and you need to set the parameters carefully to make sure you get the results you want. When you bring up the search bar, look to the left to see what is displayed. If it says My Items, your search will return titles and author names that match your search item in content that is on your Kindle Paperwhite as well as in the Cloud (your archive) at Amazon. Alternatively, if you select All Text, the search will be restricted to content on your Kindle Paperwhite, but it will search all the text on your Paperwhite, not just titles and author names.
Figure 4-6 shows the results of a search for bride with My Items selected. Figure 4-7 shows the same search with All Text as the selected parameter.

Figure 4-6: Search results for bride with My Items selected.

Figure 4-7: Search results for bride with All Text selected.
The number in parentheses next to a title indicates the number of occurrences, or hits, of the search term. For content on your Kindle Paperwhite (All Text parameter), your search results are sorted by number of hits by default. Higher relevance is given to books with the search word in the title or with many occurrences of the word in the text.
You can change the order in which your search options are displayed. At the top of the screen, tap the down arrow next to Number of Hits to see the other sort options: Recent (sorts by the most recent items loaded on the device or viewed), Title (sorts alphabetically), and Author (sorts alphabetically).
When you load new content on your Kindle Paperwhite, the device automatically indexes it — which is why the search function works. Occasionally, though, a file is indexed incorrectly. When this happens, you see Unindexed Items at the end of the search retrieval list. Unindexed items can quickly drain the battery. See Chapter 11 for troubleshooting hints to correct this problem.
Tap on the title of one of the retrieved (searched) items to display the results screen. A page highlights the search term in context, with the location number and, if applicable, the page number in the book. Tap the paragraph to go directly to the page in the book (or other content) that contains your search term. To go back to the search results, display the top menu and tap the Back icon twice.
Selecting a book to read
Any of the methods discussed in the previous sections can be used to quickly find books from your Home screen. When you find the book you want to read, simply tap the displayed title to open it. (If the book is in the Cloud, tap the title to download it and then tap it again to open it.)
Viewing content in the Cloud
If you purchase books, magazines, newspapers, or games from Amazon, those items are stored in the Cloud at your account. To view content in the Cloud as well as on your device, tap Cloud in the top left of the screen. When you do so, the number next to My Items changes to reflect the number of items stored in the Cloud. Items that are in the Cloud and on your device display a check mark, as shown in Figure 4-8.
Before the introduction of the Kindle Paperwhite, the Cloud was known as Archived Items.

Figure 4-8: The check marks indicate that content is in the Cloud and on the Kindle Paperwhite.
You sort and view content in the Cloud the way you do on your device. Tap the arrow next to My Items to select All Items, Books, Periodicals, Docs, and Active Content. You can also sort items by Recent, Title, and Author.
To download content to your Kindle Paperwhite, tap its title. Your wireless connection (Wi-Fi or 3G) must be turned on. If wireless is not turned on — which means your device is in Airplane mode — you'll be asked if you want to turn off Airplane mode.
You can view items in the Cloud without a wireless connection, but Wi-Fi or 3G must be on to download content.
Only content purchased from Amazon is automatically available for viewing in the Cloud. If you've bought or downloaded books from other sites and you want to have that material stored in the Cloud, you need to move it there. The easiest way to do so is to use Send to Kindle, which is discussed in Chapter 7.
If you want to use a computer to view your content in the Cloud, go directly to your Kindle Library at www.amazon.com/myk.
Moving through a Book
Reading a book on a Kindle Paperwhite is intuitive. To go to the next page, tap anywhere on the page, except near the top and along the left. (See Chapter 3 for illustrations of the tap zones in Portrait and Landscape modes.) Tap near the left edge of the display to move back one page. To see the toolbar, tap near the top edge of the display.
As noted previously, you can also swipe left or right to page forward and backward, respectively. Page Flip (discussed in Chapter 3) is another way to move quickly through a book.
Going to a specific spot
You can also jump directly to various parts of a book. Tap near the top of the screen to display the toolbars, and then tap Go To. A pop-up menu appears, as shown in Figure 4-9.

Figure 4-9: Use the Go To menu to move to different sections of a book.
Note the two tabs at the top of the menu that display Contents and Notes. You use the Contents tab to navigate through the book, and the Notes tab to navigate through personal annotations you've made, as well as popular and public annotations.
To see popular and public annotations on the Notes section of the Go To screen, you must have Popular Highlights and Public Notes enabled. To turn them on, tap Menu⇒Settings⇒Reading Options⇒Notes & Highlights. Use the toggle switch to turn on Popular Highlights and Public Notes.
When the Contents tab is selected, the list of Go To options may differ depending on the book. Here are the options you may see:
- Beginning: The first words of text in the book.
- Page or Location: A particular page or location in the book. I discuss the concept of page and location as they pertain to e-books shortly.
- Cover: The book's cover.
- Book Info or Front Matter: Content that appears before the start of the book, such as a dedication and copyright page.
- Chapter listing: The list of chapters, similar to a traditional table of contents. Tap a chapter title or number to go directly to that chapter.
If the chapter listing is more than one page long, swipe up the list with your finger to advance to additional chapters. A scroll bar indicator on the right provides an approximation of the length of the list (refer to Figure 4-9).
- About the Author: Biographical information about the author of the book.
- Recommended Reads: A list of additional books by the same publisher or author.
- End: The end of the book, which displays a page where you can rate and share the book on Amazon and Goodreads. If your Kindle Paperwhite is linked to Facebook through Goodreads, your rating will also be posted to this social networking site.
Setting a bookmark
You can use personal bookmarks to help you navigate through a book. To set a bookmark, tap in the upper-right corner of the screen. A flag appears, along with the location and chapter (or part) of the book, with a plus sign (+) in a circle. To set the bookmark, simply tap the plus sign. The flag darkens, indicating the marked location.
![]() After you set a bookmark, tap the upper-right corner and a small menu appears, displaying all the bookmarks that have been set in the book. When you tap a bookmarked location, a window insert opens on the screen, as shown in Figure 4-10. You can read the page from the insert or go directly to it by tapping the page on the screen. To return to your former location, navigate by bookmark or use the Back icon from the toolbar.
After you set a bookmark, tap the upper-right corner and a small menu appears, displaying all the bookmarks that have been set in the book. When you tap a bookmarked location, a window insert opens on the screen, as shown in Figure 4-10. You can read the page from the insert or go directly to it by tapping the page on the screen. To return to your former location, navigate by bookmark or use the Back icon from the toolbar.
To delete a bookmark, tap the X in the drop-down menu. To add the bookmark again, tap +. Note that the display toggles between + and X, depending on whether or not a bookmark is set.
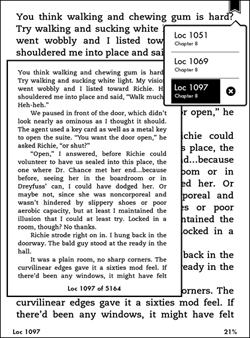
Figure 4-10: The navigation screen from a bookmarked location.
Finding your place
The Kindle Paperwhite gives you several options for knowing your location in a book.
As you read, the area at the bottom of the screen displays a location number for the text currently in view and a percentage indicating how much of the book you've read. Tap the location number to cycle through the minutes left in the chapter, the hours and minutes left in the book, the location, and when available, the page number. Your final choice becomes the default.
All e-books have location information, but not all have page numbers. (For example, if a book exists only in e-book form, page numbers are not available.) Time to dig into the difference in these terms and how you may use them to reference different parts of a book:
- Location: The concept of a fixed, printed page doesn't apply to e-books because you can vary the font type, font size, line spacing, and words per line. These changes affect how much of the e-book is displayed on a given screen. Instead of page numbers, location is used as a marker to indicate how far you are in an e-book. The location remains constant even if the screen or font size changes.
 One unit of location is equivalent to 128 bytes of information in the e-book file.
 - Page number: Many e-books can also display a page number that reflects the page number in the printed edition of the book. This information is helpful, for example, if you're in a reading group in which some members use Kindles and others use printed copies of the book.
For e-books that display page numbers, you may be curious as to which version of the printed book matches those page numbers. You can find this out by going to the e-book's product details on Amazon and opening the drop-down menu next to the page number listing. The ISBN for the book that served as the source for the page numbers is displayed, as shown in Figure 4-11.

Figure 4-11: Determining the source for page numbers in a Kindle e-book.
Discovering your reading speed
The Kindle Paperwhite can learn your reading speed, so it can tell you how many minutes or hours of reading time remain in the current chapter or book.
How does the Kindle Paperwhite determine how much reading time is left in a chapter or book? When you first open a book, Learning reading speed appears at the bottom of the screen. After the device calculates your reading speed, it uses this figure for the rest of your reading experience in that particular document.
![]() The device can relearn your reading speed. This feature is helpful if you've paged quickly through a book, making the reading speed inaccurate. Simply tap the top of the screen to display the toolbar, touch the Search icon (see the margin), and type the following:
The device can relearn your reading speed. This feature is helpful if you've paged quickly through a book, making the reading speed inaccurate. Simply tap the top of the screen to display the toolbar, touch the Search icon (see the margin), and type the following:
;ReadingTimeReset
![]() Tap the search arrow and the device will display 0 search results. Tap the Back icon and Learning reading speed will again be displayed at the bottom of the screen.
Tap the search arrow and the device will display 0 search results. Tap the Back icon and Learning reading speed will again be displayed at the bottom of the screen.
Menu options for books
![]() When reading a book, you can access useful features by tapping the top of the screen to display the toolbar and then tapping the Menu icon. The following options appear:
When reading a book, you can access useful features by tapping the top of the screen to display the toolbar and then tapping the Menu icon. The following options appear:
- Shop Kindle Store: Go to the Kindle Store to browse and find e-books.
- Vocabulary Builder: Open the list of words you have looked up in the dictionary.
- Settings: Toggle Airplane mode on and off and access options for Wi-Fi networks, registration, reading, parental controls, time, language, and more.
- Book Description: Display the book's Kindle Store description. Wireless must be on (that is, Airplane mode must be off) to view this information.
- About the Author: When available, see biographical information about the author as well as a list of other Kindle books that the author has written.
- Landscape Mode: Change the orientation of the page from Portrait to Landscape mode.
In Landscape mode, you need to tap the top of the page (which would normally be the left side of the screen) to display the toolbar.
- Sync to Furthest Page Read: If you (or others on your Amazon account) have viewed the current book on another device, you can adjust your location to the furthest page read. To reset the furthest page read (for example, if you want to re-read the book, or if someone else on your account has already read the book), go to the book's listing in Manage Your Kindle and select Clear Furthest Page Read in the drop-down menu on the right.
Select this option if you want to use Whispersync to synchronize your Kindle Paperwhite book with an audiobook from Audible. Audiobooks and Whispersync are described in Chapter 8.
- Reading Progress: Select the default for the reading progress displayed at the bottom of the screen (location in book, time left in chapter, or time left in book).
You can reset the default location also by simply toggling through the choices at the bottom of the screen.
Reading Newspapers and Magazines
Books are typically organized into chapters, which are read in a linear fashion, that is, from beginning to end. Periodicals such as newspapers and magazines, on the other hand, usually contain a number of articles grouped by section. Readers often choose to skip around among sections and articles. Fortunately, the Kindle Paperwhite has several special features to enhance the experience of reading periodicals.
Basic navigation
From the Home screen, tap the title of the periodical you want to read. By default, it opens in a view that displays different sections, with the number of articles in each section. For example, Figure 4-12 shows the default display from a recent issue of Reader's Digest.
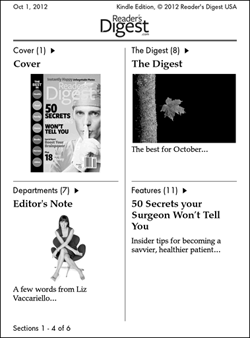
Figure 4-12: The default Cover view of a periodical.
Tap the top of the screen to display the toolbar. The Store icon you see while reading a book has been replaced by two icons that enable you to switch between the default Cover view and the Section view. You can think of these views as similar to Cover view and List view on the Home screen (see the “Moving around the Home screen” section, earlier in this chapter).
Figure 4-13 illustrates the Section view of the Sports Friday section of the New York Times. The left side of the screen lists the various sections, and the right side lists the articles in the selected section. The bottom left shows the total number of sections (11) and the bottom right displays the total number of articles (20). Tap the section or article you want to read.
You can navigate through the pages of sections and articles by using the arrows at the bottom of the screen or by simply swiping the screen.
You can move forward in a periodical in a linear fashion by tapping the title of the next article at the bottom of the screen. The percentage that appears to the left of this navigation bar shows how far in the article you've read.

Figure 4-13: The Section view of a periodical.
Menu options for periodicals
![]() When you tap the Menu icon while reading a periodical, you see fewer options than those for a book:
When you tap the Menu icon while reading a periodical, you see fewer options than those for a book:
- Shop Kindle Store: Go to the Kindle Store to browse and find periodicals and e-books.
- Vocabulary Builder: Open the list of words you have looked up in the dictionary.
- Settings: Toggle Airplane mode on and off and access options for Wi-Fi networks, registration, reading, parental controls, time, language, and more.
- Keep This Issue: Store the periodical on your device until you choose to remove it. (When a periodical has already been stored, the option changes to Do Not Keep This Issue.)
- Sync to Furthest Page Read: If you (or others on your Amazon account) have viewed the periodical on another device, you can adjust your location to the furthest page read. If no one else has read this periodical, the choice will appear dimmed.
- View Notes & Marks: Display the highlighted sections, notes, and bookmarks for the current periodical.
- Share: Share articles of interest on Facebook and Twitter. See Chapter 8 for more information on using these social media sites to share favorite content with your friends.
In addition, the second toolbar sports a Clip This Article option. Tap that option to save an article to your My Clippings file. My Clippings is listed on your Home screen, just like a book or other content. If My Clippings isn't at the top of the list, swipe through the pages — it's probably at the end.
Reading Comic Books and Manga
Do you enjoy graphic novels, comics, and manga? You can read all these on your Kindle Paperwhite. A few special features improve the reading experience for these visual documents.
- Panel view: In a book with multiple panels on a page, you can double-tap the screen to enlarge each panel to full-screen for an optimized reading experience. In this Panel view, simply tap the screen to advance through each panel individually (see Figure 4-14). When you reach the last panel (the equivalent of reading one page in the print version), the screen displays the next page of panels, and then displays each panel separately as you tap. In this way, you can see the “big picture” but also read each panel easily. Double-tap to exit Panel view.
- Refresh every page: You can set the screen refresh to refresh every page in a comic, graphic novel, or manga — independent of the setting you have for other books on your device. Tap Menu⇒Page Refresh On. The menu will display Page Refresh On (as shown in Figure 4-15) or Page Refresh Off, depending on what you have selected.
If the Page Refresh On option doesn't appear on the menu, the book has probably not been configured to take advantage of this feature.

Figure 4-14: This manga provides instructions on how to change to single-panel view.

Figure 4-15: Page Refresh option in a graphic novel or manga.
Creating Collections
As you use your Kindle Paperwhite, you'll likely deal with a long and growing list of e-books and other content on the device, and putting your fingers on specific content can become challenging.
You can organize this cornucopia of content with collections. For example, if you want to keep track of all books you've read in a given year, you could create a Finished in 2013 collection. You might want to put dictionaries and product manuals in a References collection. (Note that a Dictionaries collection is automatically created for you; it appears at the end of your list of content.) Perhaps you want to set up collections for your favorite genres: Paranormal, Romance, Horror, Biographies, and so on.
For some clever titles for collections, see the list in Chapter 12.
Note that periodical back issues are stored in their own collection, following the Dictionaries collection in your list of content. You can't create a collection containing both periodicals and books.
To create a collection, follow these steps:
 From the Home screen, tap the Menu icon.
- Tap Create New Collection.
A pop-up window appears.
- Using the onscreen keyboard, enter a name for the new collection.
A list of your content appears, both on your Kindle Paperwhite and in the Cloud.
- Tap the check box for each title you want to add to the collection.
- When you're finished, tap Done.
The collection is created.
You can add books after you've created a collection, as follows:
- From the Home screen, tap and briefly hold down on the name of the e-book.
A set of options appears.
- Tap Add to Collection.
- Tap the check box for the collection to which you want to add the book.
- Tap Done.
You can assign a book to more than one collection. For example, you might put a book in a Finished collection as well as a Biographies collection.
After you move your book to a collection, you might be surprised to see it appear on your Home screen list. When you sort the Home screen by title, collections are listed alphabetically along with all the books on your Kindle Paperwhite. If you instead sort the Home screen by collections, your collections are displayed in alphabetical order, followed by any books and other content that aren't assigned to a collection. (See the “Sorting and displaying content” section, earlier in this chapter, for details on sorting your content.)
When you view a collection, books on your Kindle Paperwhite are displayed in dark letters with a check mark in the right column. Items in the Cloud appear dimmed. If you tap a dimmed title, the book will be downloaded to your Kindle Paperwhite, assuming wireless is turned on and your Kindle Paperwhite is connected. If it is in Airplane mode, a message appears asking if you want to turn off Airplane mode. Tap OK and the item will automatically download from the Cloud to your Kindle.
You can change to Cover view from within a collection. Tap Menu Menu⇒Cover View.
To remove items from a collection or to delete a collection, open the collection and tap the Menu icon. You see options to Add/Remove Items, Rename Collection, and Delete Collection. Note that if you delete a collection, any books contained in the collection are not deleted from your Kindle Paperwhite. You can delete a collection also by long-tapping the collection name on the Home screen.
Reading on Other Devices
E-books purchased from the Kindle Store can be read not only on your Kindle Paperwhite but also on the following devices, when used with a free Kindle reading app:
- PC
- Mac
- iPad, iPhone, and iPod touch
- Kindle Cloud Reader
- Android tablet
- Android phone
- Windows phone
- Kindle for Windows 8
- BlackBerry 10
- WebOS
The list of supported devices is likely to grow over time. For a current list of supported devices, go to the Kindle Support page (www.amazon.com/gp/help/customer/display.html) and choose Kindle Help⇒Kindle Reading Applications.
To read Kindle e-books on other devices, you need to install the free reading app and register those devices to your account. The registration process should happen automatically, but you can also register from your Manage Your Kindle page (www.amazon.com/myk). You're prompted to sign in if you haven't already done so. Tap the Manage Your Devices link, and then scroll down to the Registered Kindle Reading App section for instructions for your particular device.
You can use Whispersync to keep your reading synchronized across all devices registered to your Amazon account. Whispersync synchronizes the furthest page read as well as your bookmarks, notes, and highlights. Remember that for the synchronization to take place, wireless must be turned on in each of the devices to be synced.
Whispersync for Voice allows you to sync between a Kindle edition of an e-book and an audio version from Audible.com. See Chapter 8 for details.
If you want to turn off Whispersync, go to the Manage Your Kindle page on Amazon (www.amazon.com/myk) and then tap Manage Your Devices. The Device Synchronization area provides a link where you can turn synchronization on and off.