
Chapter 7
Adding Documents
In This Chapter
![]() Understanding Kindle-friendly file formats
Understanding Kindle-friendly file formats
![]() Transferring documents from your computer
Transferring documents from your computer
![]() Sending files from a desktop, a browser, or an Android device
Sending files from a desktop, a browser, or an Android device
![]() Sending documents by e-mail
Sending documents by e-mail
![]() Viewing PDFs on your Kindle Paperwhite
Viewing PDFs on your Kindle Paperwhite
![]() Paying fees to transfer documents
Paying fees to transfer documents
After you've had your Kindle Paperwhite for a while, you're sure to have downloaded e-books from the Kindle Store or from other online sources. But what if you want to read some of your own content on your Kindle Paperwhite? Most people have a massive collection of materials from work or school on their computers: reference manuals, lists, maps, correspondence, creative writing, and other personal documents. Wouldn't it be nice to have some of that content available on your Kindle Paperwhite as you travel or go about your daily life?
Or what if you're surfing the web and you see an interesting article or blog post and think to yourself, “I'd like to put that on my Kindle Paperwhite to read later.” Guess what? You can! Amazon and the Kindle Paperwhite have some new tools to allow you to do this quickly and easily.
In this chapter, you explore how to put your own documents onto your Kindle Paperwhite. You also find out how to create documents that you might acquire from other sources. Then you discover some handy services and tools to send compatible files to your Kindle Paperwhite and to convert documents so that they're readable on your device.
Transferring Kindle-Friendly File Formats
Your Kindle Paperwhite can't read every file that's on your computer. A file has to be in a Kindle-compatible format so that the device can display it. The following list describes the Kindle-friendly file types:
- AZW is the Kindle format, so most files you download from the Kindle Store will have an AZW extension. Note that some files might have a number, such as 1, 2, or 3, after the AZW.
- MOBI, a file format developed by Mobipocket, is widely used and compatible with the Kindle Paperwhite. Note, however, that secure Mobipocket or secure MOBI files do not work on a Kindle Paperwhite.
- PRC is equivalent to MOBI and is the standard file format for the Kindle family of e-readers for content that comes from sources other than Amazon.com.
- TXT is a simple text file, such as one you might create with Notepad.
- PDF: Your Kindle Paperwhite can display files in Adobe's Portable Document Format (PDF).
Files in these formats are generally readable natively — that is, without needing to be converted — by your Kindle Paperwhite. So all you have to do is transfer the files onto your Kindle Paperwhite, as I describe in the next section.
 If you use Windows Explorer or Finder on a Mac, you may see files with the POBI extension on your Kindle Paperwhite. Curious about these? Do you have any periodicals (newspapers or magazines) on your device? If so, they'll have the POBI extension. POBI is a variation of MOBI and enables the display of articles and sections in periodical content. To learn more about navigating in a periodical, see Chapter 4.
Copying Files from Your Computer
If your file is in one of the Kindle-compatible formats listed in the preceding section, you can transfer it directly from your computer to your Kindle Paperwhite via USB.
To transfer the files, follow these steps:
- Connect your Kindle Paperwhite to your computer using the USB cable.
Your computer recognizes your Kindle Paperwhite when it's plugged in and displays the Kindle Paperwhite as a removable drive, as shown in Figure 7-1. If you go to My Computer (PC) or Finder (Mac), your Kindle Paperwhite appears as a drive.

Figure 7-1: Your Kindle Paperwhite appears as a removable hard drive when connected to your computer.
- Double-click the drive to open it and view the folders on your Kindle Paperwhite.
- Open another window and navigate to the file(s) you want to transfer to your Kindle Paperwhite.
- Drag the file(s) to the Documents folder on your Kindle Paperwhite.
 You can also use the Copy and Paste commands to move documents to the Documents folder.
 - Eject your Kindle Paperwhite from your computer:
- On a Windows 8 PC: Right-click the Kindle drive icon and choose Eject. A notification that it is safe to remove the device from the computer appears.
- On a Windows Vista or Windows 7 PC: Choose Start⇒Computer, and then right-click the Kindle drive icon and choose Eject. You can also left- or right-click the Safely Remove Hardware and Eject Media icon in the lower-right corner of the taskbar.
- On a Mac: Control-click the Kindle device icon and choose Eject.
The files you transferred are displayed on your Home screen and are available for you to view on your Kindle Paperwhite.
 If files are protected with DRM, your Kindle Paperwhite cannot read them and you'll see an error message when you try to open the e-book. Before buying books from sources other than Amazon, make sure that the file is compatible with your Kindle Paperwhite.
Sideloading describes the transfer of files directly from one device to another. Uploading and downloading are terms that are commonly used to describe transferring files to or from an Internet server. What I describe here is sideloading.
Transferring Files Using Send to Kindle
If you have a document in a format that is not native to the Kindle Paperwhite (as described in the preceding section), you can send it to your device using the Send to Kindle application. The document will be converted to a compatible format and displayed on the Home screen of your Kindle Paperwhite.
To begin, go to the Send to Kindle home page at www.amazon.com/gp/sendtokindle. You'll see options for sending documents to your Kindle Paperwhite from your desktop, browser, Android device, and e-mail.
Sending from the desktop
In the From Your Desktop section of the Send to Kindle home page, click the appropriate link for your computer: PC or Mac. You see instructions on how the Send to Kindle program works and the system requirements for your computer.
Agree to the terms of service, and click Download Now to begin the download and installation process. Figure 7-2 shows the screen that appears when the program has been successfully installed.

Figure 7-2: Successful installation of Send to Kindle for PC.
After the program is installed, you can access it in a variety of ways. Here are a few examples:
- Do one of the following:
- Word processing, spreadsheets, and other productivity applications: Choose Print.
- Windows Explorer (PC): Right-click to select a document. To select multiple documents, use Control-Click or Shift-Click.
- Finder (Mac): Control-click to select one or more documents.
- Choose Send to Kindle as your printer, and then choose Print.
- In the dialog box that appears:
- Insert a title and an author.
- Choose the devices to which you want to send the document.
You can also choose to have the document archived in your Kindle Library, which means you'll be able to download it from the Cloud later to any of your Kindles.
- Decide whether to use Wi-Fi delivery, which is free, or Whispernet, which may incur a charge.
See the last section, “Paying Fees for Transferring Documents,” for details.
- Choose Send.
The document will be converted to PDF format and delivered to your Kindle Paperwhite.
 Wireless must be turned on for your Kindle Paperwhite to receive documents.
If you do not see Send to Kindle on the pop-up menu that appears, you are probably trying to send a file in a format that is not compatible with your Kindle Paperwhite and cannot be converted to a PDF through the Send to Kindle process.
Sending from a browser
If you use Google Chrome or Mozilla Firefox as your browser, you can download a nifty little app that lets you send news articles, blog posts, or any other content that grabs your eye to your Kindle Paperwhite. On the Send to Kindle page, click the link for either Google Chrome or Mozilla Firefox in the From Your Browser area.
Follow the instructions for downloading the app. When the app is installed, you see a small K at the top right of the screen. When you click the K button in the browser, the dialog box shown in Figure 7-3 appears.
You can send directly to your Kindle Paperwhite, preview before sending, or send selected text. After you make your choice, the content will be formatted and will appear on the Home screen of your Kindle Paperwhite in a few minutes — as long as wireless is turned on.
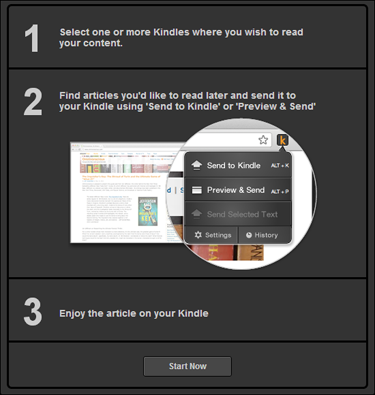
Figure 7-3: Send to Kindle in Google Chrome.
Sending from an Android device
If you have an Android device, you can send documents to your Kindle Paperwhite using the Send to Kindle for Android app. On the Send to Kindle page, click the link in the From Your Android device area to download the application and follow the instructions.
Then you can use the Share feature found in many apps to send documents to your Kindle Paperwhite. Supported file types include Microsoft Word (DOC, DOCX); PDF; images (JPG, JPEG, GIF, PNG, BMP); and Kindle format (MOBI, AZW).
Sending from E-Mail
The Send to Kindle application certainly makes converting and transferring documents quick and easy. However, e-mail is a reliable standby to use for file transfer.
You can use e-mail also when you don't want to sideload content onto your Kindle Paperwhite with the USB cable.
File types that can be transferred through e-mail
You can send the following types of files to your Kindle Paperwhite using the unique e-mail address for your device. Note that these files must be unprotected (that is, not protected by DRM) to be readable on your Kindle Paperwhite:
- Microsoft Word (DOC or DOCX)
- PDF (PDF)
- HyperText Markup Language (HTML, HTM)
- Plain text (TXT)
- Rich text (RTF)
- Kindle format (MOBI, AZW)
- Graphics (JPG, GIF, PNG, or BMP)
Utilizing the Kindle Paperwhite e-mail address
To convert your personal documents so you can read them on your Kindle Paperwhite, send them to the e-mail address associated with your Kindle Paperwhite: [email protected], where yourname is the unique name identified with your Kindle Paperwhite. This e-mail address was created automatically when you registered your Kindle Paperwhite. You can change the e-mail address, if you want; the steps to do so are described shortly.
Discovering your Paperwhite's e-mail address
To find out what your Kindle Paperwhite's e-mail address is, follow these steps:
 Tap Menu⇒Settings.
- Tap Device Options⇒Personalize Your Kindle.
The Personalize Your Kindle screen appears. Send-to-Kindle E-Mail, the fourth item in the list, displays the e-mail associated with your Kindle Paperwhite.
Changing your Paperwhite's e-mail address
To change your Kindle Paperwhite's e-mail address, you must do so from your Amazon account on your computer. Follow these steps:
- Go to www.amazon.com/myk.
- If prompted, enter your e-mail address and password.
- Click the Sign In Using Our Secure Server button.
- From the left menu, under Your Kindle Account, choose Personal Document Settings.
Your Kindle Paperwhite and its associated e-mail address appear.
- Click Edit and input a new address.
If you create an e-mail address that is already in use, you'll be prompted to modify it or create another.
- Click the Update button to save.
To send an e-mail to your Kindle Paperwhite, you need to approve your own e-mail address and any others that might send content to your device. This can be accomplished only through your Amazon account, not from the Kindle Paperwhite.
Approving an e-mail address
Amazon adds a level of security to the e-mail transfer process by limiting which e-mail addresses can be used to send documents to your @kindle.com e-mail address. This prevents unauthorized users from sending documents to your Kindle Paperwhite and potentially running up document transfer charges.
You manage this approved e-mail list from the Manage Your Kindle page. To approve an e-mail address so it can send content to your Kindle Paperwhite, follow these steps:
- Go to www.amazon.com/myk.
- If prompted, enter your e-mail address and password.
- Click the Sign In Using Our Secure Server button.
- From the left menu, under Your Kindle Account, choose Personal Document Settings.
The list of approved e-mail addresses is in the center of the screen under the heading, Approved Personal Document E-Mail List. If you have not previously approved any e-mail addresses, the list will be blank.
- Click Add a New Approved E-Mail Address.
- Enter the e-mail address you want to approve, and then click Add Address.
- To add and approve additional e-mail addresses, repeat Step 6.
The approved addresses are listed in the table in the center of the screen, with the option to delete them on the right (if you later choose to do so).
Make sure to include your own e-mail address (or addresses, if you have multiple e-mail accounts from which you might be sending documents to your Kindle Paperwhite) so that you can send documents to your device.
Many e-book retailers allow you to set up your account so that purchases you make are e-mailed automatically to your Kindle Paperwhite. In essence, this mimics the wireless delivery service that Amazon offers. If you want to take advantage of this, make sure to add the e-mail address of the e-bookseller to your approved list of e-mail addresses.
If you want to allow documents to be sent from anyone from a particular domain, don't include a username. For example, adding @mycompany.com authorizes anyone with an e-mail address matching that domain name to send documents to your Kindle Paperwhite. However, you are responsible for any charges for documents sent from those e-mail addresses via Whispernet to your Kindle Paperwhite. Transferring files via Wi-Fi is free. If you set the maximum charge for Whispernet Delivery over 3G to $0, personal documents will be sent only via Wi-Fi even if you have 3G. You can make this change in the Personal Documents Settings.
Sending the files
When you know your Kindle Paperwhite's e-mail address and you've added your personal e-mail address to the Approved Personal Document E-Mail List (see the preceding section), transferring files is simple:
- Open your e-mail program or your e-mail web page. Log on to your account, if necessary.
- Create a new message. In the To text box, enter the e-mail address of your Kindle Paperwhite.
- Attach the document you want to transfer to your Kindle Paperwhite.
There's no need to specify a subject or to provide text in the body of the message. Amazon recommends that each personal document be no larger than 50MB.
- Click Send.
If you're connected in a Wi-Fi area (or with 3G for Kindle Paperwhites so enabled), you receive the converted file on your Kindle Paperwhite in about five minutes. Very large files can take longer to convert and receive.
When you send personal documents to your Kindle Paperwhite, they're stored automatically in your Kindle Library at Amazon. You can store up to 5 gigabytes of personal documents in the archive.
If you're sending a PDF file and would like to take advantage of features on the Kindle Paperwhite, such as changing font size and making notes, convert the file to Kindle format (AZW) by typing CONVERT in the subject line of your message.
Reading PDF Documents
Some of the personal documents that you load on your Kindle Paperwhite may be PDF documents. The Kindle Paperwhite can read PDF documents natively — in other words, without converting them.
The Kindle Paperwhite handles PDF documents differently from how it handles text in the usual Kindle format:
- PDF documents are displayed with the text and graphics laid out exactly as in the original PDF document. You can't change the layout, font size, typeface, line spacing, and words per line.
- You can zoom in on a PDF document by unpinching (placing two fingers on the screen and moving your fingers apart). Note that this is different than increasing the font size. The text doesn't reflow; instead, you see an enlarged view of a section of the screen. You can then pan around the screen by sliding your finger on the display. To zoom out, pinch the screen (move two fingers together). You can't turn the page while zooming in.
You can adjust the contrast of the displayed document by tapping the Menu icon.
- At the bottom of the screen, your Kindle Paperwhite displays the original PDF document's page numbers.
Why would you want to read a document in PDF format? Many PDF documents are highly formatted with columns, tables, and figures that do not convert well to Kindle Paperwhite format. Although you lose the ability to make notes and marks in a PDF, you are able to read the document as originally presented.
The Kindle Paperwhite does not support reading PDFs in Landscape mode.
Do you want to use Kindle Paperwhite features such as changing font size and making notes? When e-mailing the PDF file, simply convert the file to Kindle format (AZW) by typing CONVERT in the subject line of your message. If you do this, look carefully at the formatting of the PDF to make sure that a converted file is going to be acceptable to you for reading.
Paying Fees for Transferring Documents
If you have a Wi-Fi–only Kindle Paperwhite, all your documents will be delivered by Wi-Fi without charge. If you're in an area where Wi-Fi is not available, your documents will be queued and delivered when Wi-Fi is available.
If you have a 3G device and Wi-FI is not available, the document can be delivered using Whispernet — that is, over a 3G network. Amazon does not charge a monthly fee for 3G, but you do incur a charge for receiving documents this way. At present, the fee is $.15 per megabyte for customers in the United States and $.99 per megabyte when traveling outside the United States and for Kindle users living outside the United States.
Wireless file transfer isn't available in all countries. For the latest availability information, go to www.amazon.com/myk, log in if necessary, and click the Kindle Support link. Scroll down to the Wireless Delivery section. Even if wireless file transfer isn't available, you can still use the Kindle e-mail conversion service and then transfer the converted files to your Kindle Paperwhite via USB.
You can set a limit on the charges allowed for personal documents to be transferred. Go to the Manage Your Kindle page (www.amazon.com/myk), and click the Personal Document Settings link in the left column. Scroll down to the middle of the page to the section headed Whispernet Delivery Option. Choose Edit (on the right) to change the maximum amount that you will be charged (from $0 to $49.50 with a default of $2.50). If you try to convert a document that exceeds that charge, it won't be delivered and you'll be notified by e-mail. Some Kindle Paperwhite users set the limit at $0 to ensure that all personal documents are transferred via Wi-Fi and thus incur no charges.