
Chapter 11
Using Android NDK with Android Studio
WHAT'S IN THIS CHAPTER?
- Introduction to Android NDK
- Android Studio NDK integration
- Starting a new NDK application in Android Studio
- Building NDK applications with Android Studio and Gradle
- Building NDK projects for multiple platforms
- Multi vs. fat APK
- NDK application release and deployment
This chapter focuses on the details of Android NDK and shows you how to build native C/C++ code in Android Studio. Native code is commonly used in Android projects for games and applications, which require high performance face recognition, audio processing, and so on. Although Android NDK is a powerful tool, many Android developers and projects may not need to use it. This chapter does not aim to teach Android NDK from the ground up but focuses instead on how to use Android NDK with the new Android Studio and Gradle.
At the time of this writing, Android NDK integration with Android Studio is still experimental and subject to change. We strongly suggest keeping your tools up-to-date and that you follow the updates to NDK integration if your application relies on NDK.
If you are an Android NDK newbie looking to learn NDK, we suggest you visit http://developer.android.com/ndk and follow the tutorials and code samples. NDK might look scary if you are not familiar with C/C++; however, it can unleash the full potential of your device's hardware and native libraries, and is well worth the effort.
INTRODUCTION TO ANDROID NDK
Android NDK is an essential part of Android development that lets developers use C/C++ code from Java via JNI. Although the history of Android dates back to 2003, by the time the SDK was released, iPhone was already the main player in the mobile market with a growing application store. To compete, Android needed fast adoption in the developer community. Thus, Google's decision to promote Java as the main language was wise and worked quite well. Android activities, UI widgets, and APIs are all designed in a way that can be used through Java. Java and the Dalvik VM did a great job of lowering the learning curve but that solution lacked the performance that most games and some apps need more than they need features like garbage collection.
Android NDK, which was actually released several months after Android SDK, addressed such performance concerns with native code that can be loaded from Java code. When it was released, Android NDK relied on command-line tools, unlike Android SDK, which can be compiled and run via Eclipse IDE.
With the release of Android Studio, NDK was once again left out of the official tool set. At Google I/O 2015, Google finally announced Android NDK support in Android Studio.
ANDROID STUDIO NDK INTEGRATION
NDK integration for Android Studio was announced with version 1.3. At the time of this writing, NDK integration with Android Studio is still beta and relies on an experimental version of the Gradle plugin. Before going forward with NDK use cases in Android Studio, let's see how to install NDK for Linux, Windows 10, and Mac OS X.
Android NDK packages can be accessed at http://developer.android.com/ndk/downloads/index.html. There you will see the list of packages for Linux, Windows, and Mac OS X.

Figure 11.1 Android NDK bundle license agreement
Android NDK Installation on Linux
In this section, you install Android NDK on Ubuntu 14.04. Download the Linux 64-bit version, android-ndk-r11b-linux-x86_64.zip, from the URL mentioned in the previous section. Next, extract NDK to the Android SDK installation root. for example /path/to/Android/Sdk/android-ndk-r11b.
The zip file contains all required binaries to build native Android code.
You can also install Android NDK from Android Studio's SDK Manager. The easiest way to do this when you have an open project is to select the Project Structure option from the File menu to open the Project Structure window. Select SDK Location, as shown in Figure 11.2.

Figure 11.2 Project Structure window
You will see that the Android NDK location box is empty. You can give the path to the location where you extracted the NDK package or click the Download Android NDK link to have Android Studio install it for you, as shown in Figure 11.3.

Figure 11.3 Android Studio installs Android NDK
Android Studio will install NDK to the ndk-bundle folder in your SDK path.
Android NDK Installation on Windows 10
There are two ways to install Android NDK for Android Studio on Windows 10. You can install it manually by downloading it from https://developer.android.com/ndk/downloads/index.html or you can install it from Android Studio's Project Structure window.
To install Android NDK from Android Studio, open the Project Structure window, select SDK Location in Android Studio, and click the Download link under Android NDK Location as shown in Figure 11.4. After you accept the license agreement, the Android NDK binaries and libraries will be extracted into the Android SDK ndk-bundle folder.

Figure 11.4 Android Studio Project Structure window in Windows 10
No further configuration is needed; you are ready to use Android NDK for your project in Windows 10.
If you want to download Android NDK manually, you can select either the 32-bit or the 64-bit version. Choose version that's appropriate for your Windows 10 machine architecture. In our case we downloaded android-ndk-r11b-windows-x86_64.zip and extracted it to a folder.
When you finish extracting the zip file, enter the path to the folder in the Android NDK Location text box as shown in Figure 11.4. Now you are ready to use Android NDK for your Android Studio project.
Android NDK Installation on Mac OS X
Android NDK installation for Mac OS X can be done either by downloading it from https://developer.android.com/ndk/downloads/index.html or you can open the Project Structure window to download and extract NDK.
If you choose to install manually, navigate to the URL just mentioned and click the link for the android-ndk-r11b-darwin-x86_64.zip file.
Extract the zip file to the folder where you want to keep NDK files. Then open the Project Structure window and enter the folder's path in the Android NDK Location text box. Now your project is ready to use Android NDK.
Alternatively, Android Studio can download and extract Android NDK automatically. Open the Project Structure window and select SDK Location, then click Download in the Android NDK Location section. After clicking Download, accept the license agreement, then click Next to open the Component Installer window shown in Figure 11.5.
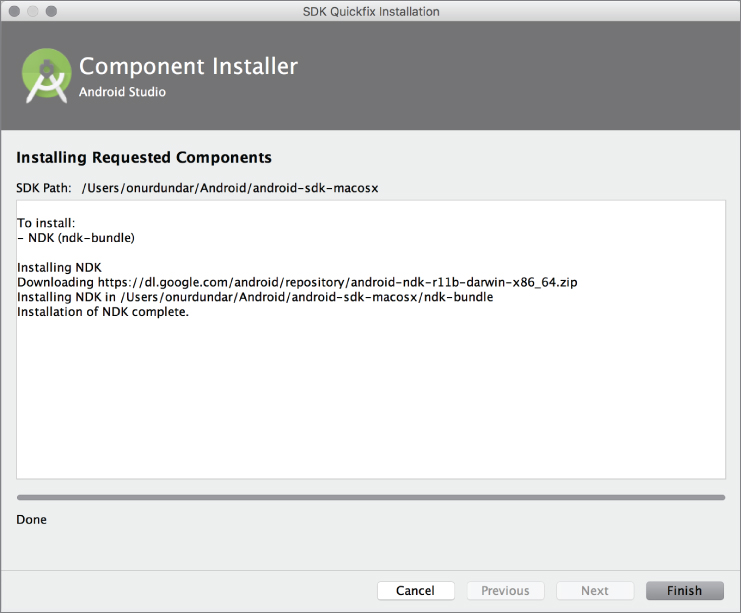
Figure 11.5 Android NDK setup completion
When the installation finishes, the last line in this windows will read “Installation of NDK complete,” and you can click Finish.
Now you can use NDK tools to build native C/C++ code for your application.
ANDROID NDK WITH ANDROID STUDIO PROJECTS
Now that NDK is installed, you can create a new project and start adding your native code to it. (Note that Android Studio does not offer a specific wizard or a template to create NDK projects.)
We first cover some common user preferences, how native applications handle where the native code should be stored, how to create the Gradle file, and so on.
In legacy native application development, Android make files are used to build native modules. These make files were used to define the environment variables and the path of the ndk-build binary to build native C/C++ code. However, when developing in Android Studio, the Gradle build system is used to build native code instead of Android make files.
Native code is usually stored under the jni folder, which is at the same level as the java folder. The output of native library code is a shared library, a .so file. You also need to identify the .so file location according to its compatible architecture. The main folder for libraries should be named jniLibs. Subfolders, which also need to be named so as to identify the architectural elements they hold (such as mips, x86, armeabi, and so on), need to be created under the jniLibs folder.
In the following section, you work on the sample HelloJNI sample.
Importing a Sample NDK Project
Let's open an existing sample application to understand more about how to use Android NDK and Gradle to build native code.
As in earlier chapters, we will import an Android code sample. Open the Welcome to Android Studio window by closing your currently open project; then click Import an Android code sample, as shown in Figure 11.6.

Figure 11.6 Importing a sample project from the Welcome to Android Studio window
When the Browse Samples window opens, enter ndk in the Select a sample to import box to filter NDK projects, as shown in Figure 11.7.

Figure 11.7 Sample NDK projects list
Select the Hello JNI project, which you will use to learn the basics of NDK development with Android Studio. Click Next to open the Configure Sample window shown in Figure 11.8 where you name the sample application and download source code from GitHub.

Figure 11.8 Sample configuration
Google's code samples for Android Studio are hosted on GitHub; download and import the sample project, as shown in Figure 11.9.

Figure 11.9 Downloading the sample project
Once the import is complete, expand the java and jni folders to locate Java and C code for the project, as shown in Figure 11.10.

Figure 11.10 Project View of the Hello JNI project
Now check the basic integration of the NDK module into the project. Start by expanding the project scope in the build.gradle file and locate the experimental Gradle plugin declaration, which may introduce a different version number than the one used in the previous section.
At the time of this writing, experimental plugin version 0.7.0-alpha1 is used for classpath. The version name might be different by the time you read this chapter. The project's Gradle file is shown in the following snippet.
buildscript {
    repositories {
       jcenter()
    }
    dependencies {
        classpath 'com.android.tools.build:gradle-experimental:0.7.0-alpha1'
    }
}
allprojects {
    repositories {
        jcenter()
    }
}
Next, expand the build.gradle file of the app module. You should notice that the com.android.model.application plugin is used instead of the regular com.android.application plugin. You should also see DSL syntax changes such as model and android.ndkmoduleName as well as different build flavors to target different platforms and architectures. The jni folder contains the hello-jni.c source file, which has been declared as an NDK module in project scope in the build .gradle file, as shown in the module's Gradle code in Listing 11.1.
The Hello JNI sample is the most basic use of NDK in Android applications. Its C code returns only a string and will be used in your activity via JNI. Open the Android activity code, shown in Listing 11.2.
This listing demonstrates a simple example but includes all necessary steps to call your C/C++ code from Java. Because your Java code runs on a VM-managed runtime, you need to manually load the non-vm managed code. Static blocks serve well for this purpose because they are initiated even before the constructor and only once for a class.
Java is a type-safe and strongly-typed language, which makes it impossible to see and call the non-vm code even if it is loaded successfully. To be able to call C/C++ code from Java, you would need a placeholder method, which acts as a gateway proxy. Methods, which are marked with the native keyword, do not have a method body but share a special naming convention with their C/C++ counterpart; thus, they know which native code to execute when C/C++ codes are accessed.
In the example here, the stringFromJNI method returns a string and is called when the activity is created. That's it. If you run the sample application, the activity will call the C code and display the returned string. Try changing the string returned from the C code and see how the changes are reflected to the UI.
Sample NDK Applications
As the list in Figure 11.7 shows, there are multiple sample applications that you can load to learn more about NDK application development. We will give a quick overview of the samples so you can pick one to learn more about the relationship between Android Studio and NDK.
Using Android NDK in an application requires high performance graphics processing, image processing, and audio processing. The following NDK sample applications are mostly focused on showing basic uses of those features with Android NDK. This list of sample applications follows the order shown in Figure 11.7:
- More Teapots—This sample application uses OpenGLES 3.0 and C++ to draw teapots. It shows the use of the Gradle Experimental Android Plugin and the Android Native Activity.
- Teapot—This sample application draws a single teapot using the OpenGLES 2.0 API using C++. Its aim is to show how you can use OpenGLES 2.0 with the Gradle Experimental Android Plugin in Android Studio.
- Audio-Echo—This sample application uses OpenSL ES to create an audio player and recorder. Audio processing can be costly if you require a high-performance, low-power-consumption application. Using a native library such as OpenSL ES helps to create a better sound application. The Audio-Echo sample can be good practice to learn the basics. This sample application also uses the Gradle Experimental Android plugin.
- Bitmap Plasma—This sample application shows how to use the
Bitmapclass inside NDK to render a plasma effect and open with a JNI interface on an Android device. The Bitmap Plasma application also uses the Gradle Experimental Plugin to build native code under the jni folder. - Endless Tunnel—This application is a good entry point to show how to develop a game using the Android native app glue to create native activity. This application is a little more complex than others because it is literally a game with OpenGL Mathematics library support.
- Hello GL2—This application offers a basic introduction to the GLES 2.0 API, loading a triangle on the native activity. This is a nice entry point for learning NDK instead of the more complex samples listed earlier.
- Hello Third Party—This application shows how you can load native third-party libraries and include those libraries in your build process using the Gradle Experimental Android plugin. This is also a good entry point for NDK development; the main purpose of NDK development is reusing your previously developed and built native libraries.
- Native Activity—As the name implies, this application shows how to create a native Android activity.
- Native Plasma—This application is similar to Bitmap Plasma, but it doesn't use a Java activity. Instead, it uses a native activity to create and show a rendered plasma effect.
- San Angeles—This sample application might be the most complex because it is a port of an existing C++ application to Android. The aim of this sample is to show how you should port any existing native source code to Android and build it in Android Studio using the Gradle Experimental Android plugin.
- Sensor Graph—Finally, this sample application shows developers how to access hardware resources with native code. We know that there are Java libraries that give access to accelerometer, gyroscope, and other sensors, but you will definitely need to access hardware resources to make games playable. This sample only reads the values and prints them on the screen.
Migrating an Existing NDK Project
The experimental Gradle plugin, which provides support for NDK, introduces some changes in Gradle DSL. This section teaches you how to use the plugin to migrate an existing NDK project.
- Start Android Studio and select New ⇨ Import Project from the File menu, as shown in Figure 11.11. Android Studio will migrate your Eclipse project into a Gradle project.
Once the import is complete, you can move on to making changes on Gradle files.
- Expand the Gradle Scripts group, which consists of a build.gradle file for the project and a build.gradle file for each module, as shown in Figure 11.12.
- Find the Gradle plugin declaration under the dependencies group. Change this dependency to the bold one in Listing 11.3. Android Studio doesn't load the experimental plugin by default, so you need to change it to the experimental one in order to build native code.
Changing the declaration as shown tells Android Studio to use the experimental Gradle plugin for your project. Android Studio will detect the change and ask you to perform project sync.
- Click Sync Now in the upper right, as shown in Figure 11.13.
The build will fail with a message like the one shown in Figure 11.14. Don't worry: You haven't yet completed the necessary changes.

Figure 11.11 Importing an NDK project
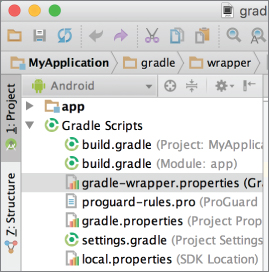
Figure 11.12 Gradle scripts after importing an NDK project

Figure 11.13 Syncing the project after changing the plugin
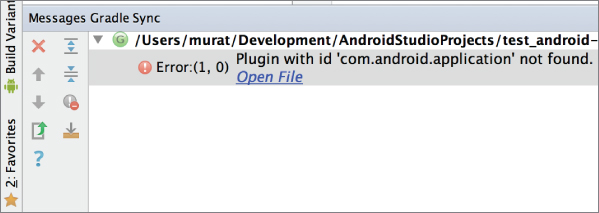
Figure 11.14 Gradle build failure after changing the plugin
Next, you can update module scope build.gradle file. There are some structural changes you need to implement, introduced by the experimental Gradle plugin. The most major change is the plugin name, which should be the first line in the gradle file. Change apply plugin: com.android.application to apply plugin: 'com.android.model.application'. Another major change is the model block, which wraps the android block. As you remember from the sample application, you are trying to change your imported project to be usable with the experimental plugin.
model {
    android {
          …
    }
}
The experimental Gradle plugin also introduces some syntactic changes on configurations inside the Android block. You would need to change the proguard configuration to the following:
proguardFiles.add(file("proguard-rules.pro"))The full code for the build.gradle module appears in Listing 11.4.
You have completed all the necessary modifications for the new Gradle plugin syntax. However, you are still missing an important artifact—your NDK module name. The NDK module is declared as shown in Listing 11.5.
The experimental Gradle plugin introduces some other syntax changes to Gradle DSL. Although we covered the most common changes, you may refer to http://tools.android.com/tech-docs/new-build-system/gradle-experimental for the full set of changes.
In order to see more complex NDK project import samples, refer to Chapter 13, where we work on the vendor-provided NDK samples and import them to Android Studio using the rules covered here. Some examples are more complex with external libraries and some are as easy as changing the Gradle file.
Building Android NDK Projects
Building and packaging Android projects is pretty straightforward and does not introduce any more complexity, provided that your project has already implemented the DSL differences for the experimental Gradle plugin. This section covers some of the Gradle configurations that you may need to configure your builds.
The first change, which we covered in the previous section, is for configuring ProGuard. Because ProGuard is needed both for obfuscation and shrinking your APK, this configuration should be taken as a mandatory one rather than optional.
The experimental Gradle plugin introduces some changes to DSL syntax, which is shown in bold in the following snippet.
proguardFiles.add(file("proguard-rules.pro"))Another change we have already seen but not covered in detail is to create and declare productFlavors. Product flavors are an essential part of working with NDK because native code is sensitive to device architecture unlike VM managed Java code. Product flavors from our sample project that create different products for different platform architectures are listed in Listing 11.6.
By default, Android Studio assumes C/C++ code is placed in the src/main/java directory. However, C/C++ source code can be customized from Gradle, as shown in Listing 11.7.
Most tool and compiler-related configuration is performed in the model.android.ndk block. The following items are some of the options you may choose to configure. Please note that these items are case sensitive and should be used as they appear.
moduleName—Name of NDK module.toolchain—Toolchain used by NDK, llvm, or gcc. If you write"clang"on this parameter, the NDK build system will use the LLVM compiler.toolChainVersion—Version of the toolchain. There might be versions like 3.7, 2.8, and so on. You can change the version with this parameter.CFlags.add("…")—Environment variables needed by the C compiler.cppFlags("…")—Environment variables needed by the C++ compiler.ldFlags("…")—Library flags for the linker.stl "…"—Standard Template Library options.
Finally, you can set ABI specific configurations using a model.android.abis block. The following code snippet shows disabling SSSE3 instructions for x86 architecture.
android.abis {
    create("x86"){
        cppFlags.add("-DENABLE_SSSE3")
  }
}
Because the Gradle plugin for NDK integration is still experimental, changes to DSL syntax should be expected with new releases of the plugin.
ANDROID NDK PROJECTS RELEASE AND DEPLOYMENT
Android NDK projects used to rely on Android make files, and today, many Android projects with NDK modules still use android.mk files for the build process. However, Gradle offers an easier and single way to manage dependencies, automated tests, and the build/release cycle.
Although Android runs on different architectures, VM managed code, which is usually written in Java, is abstracted from the hosting platform. This gives the ability to deploy the same code to different architectures and delegates the interpretation problem to the VM. However, C/C++ code built with NDK is not managed by the VM and may require additional steps to preserve compatibility.
One main problem with NDK builds was integrating shared library (.so) files into your project. The new Android Studio and Gradle offers a more flexible way to handle .so files.
To include a .so file, create a folder named jniLibs under the src/main folder. Each target platform architecture is represented with a folder inside jniLibs, as shown in Listing 11.8.
The current jniLibs folder is the default location to place platform-dependent code. However, this location can be changed via Gradle. To declare a custom folder for .so files, add the following line to your build.gradle.
android {
    sourceSets.main {
        jniLibs.srcDir 'src/main/libs'
    }
}
This declaration will result in the following change to your folder structure:
- src/main
              - libs
                           - amreabi
                         - mylib.so
                           - mips
                         - mylib.so
                           - x86
                         - mylib.so
You finished adding your native libs and code to your project, but depending on the size of your native code, you may have introduced another problem to your project by creating a huge monolithic APK.
Multi vs. Fat Android Application APKs
Packaging all native code for each platform into one APK is not necessarily a bad thing and actually might help keep your builds and versioning simple. However, if the native code and libraries included in your APK grow in size, the size of the APK grows with a multiplier of each platform, which may introduce unnecessary network traffic and disk usage.
By default, Gradle packages all native code and libraries into one fat APK. Basically, if you don't worry about the APK size, you may choose to continue with the defaults. However, if you want to split native code into platform-dependent APKs, you would need to add a product flavor for each APK, as shown in the following code. Version code has to be dynamically adapted when you have multiple APKs
def versionCodeBase = 11;
def versionCodePrefixes = ['armeabi': 1, 'armeabi-v7a': 2, 'arm64-v8a': 3,
 'mips: 5, 'mips-64': 6, 'x86: 8, 'x86-64': 9];
android.productFlavors {
    create("arm") {
        ndk.abiFilters.add("armeabi")
        versionCode = versionCodePrefixes.get("armeabi", 0) * 1000000 +
versionCodeBase
    }
    create("arm7") {
        ndk.abiFilters.add("armeabi-v7a")
        versionCode = versionCodePrefixes.get("armeabi- v7a", 0) * 1000000 +
versionCodeBase
    }
    create("arm8") {
        ndk.abiFilters.add("arm64-v8a")
        versionCode = versionCodePrefixes.get("arm64-v8a ", 0) * 1000000 +
versionCodeBase
    }
    create("x86") {
        ndk.abiFilters.add("x86")
        versionCode = versionCodePrefixes.get("x86", 0) * 1000000 + versionCodeBase
    }
    create("x86-64") {
        ndk.abiFilters.add("x86_64")
        versionCode = versionCodePrefixes.get("x86_64", 0) * 1000000 +
versionCodeBase
    }
    create("mips") {
        ndk.abiFilters.add("mips")
        versionCode = versionCodePrefixes.get("mips ", 0) * 1000000 +
versionCodeBase
    }
    create("mips-64") {
        ndk.abiFilters.add("mips64")
        versionCode = versionCodePrefixes.get("mips64", 0) * 1000000 +
versionCodeBase
    }
Now you can choose any product flavor to build, run, or package platform-specific APKs. If you still need a fat APK among platform-specific ones, add the following product flavor to include all native code in one APK.
android.productFlavors {
    create("arm") {
        ndk.abiFilters.add("armeabi")
    }
    create("arm7") {
        ndk.abiFilters.add("armeabi-v7a")
    }
    create("arm8") {
        ndk.abiFilters.add("arm64-v8a")
    }
    create("x86") {
        ndk.abiFilters.add("x86")
    }
    create("x86-64") {
        ndk.abiFilters.add("x86_64")
    }
    create("mips") {
        ndk.abiFilters.add("mips")
    }
    create("mips-64") {
        ndk.abiFilters.add("mips64")
    }
    // To include all cpu architectures, leaves abiFilters empty
    create("fat")
}
Fat APKs can be useful for development and CI builds where platform APKs would help you to have a smaller footprint in terms of network and storage of your app.
SUMMARY
In this chapter we covered Android NDK, which is an essential tool to unleash the performance and graphic capabilities of Android. Native code may be needed for deeper hardware integration, so there is no guarantee that an Android developer would never need to learn the basics of NDK. You have seen how Android Studio offers NDK integration via the experimental Gradle plugin. We focused on configuration and differences in Gradle DSL. We also covered how to integrate a piece of C/C++ code with your project.
Finally, we focused on different packaging options for projects that consist of native code and libraries. You learned how to separate platform-dependent code to minimize network and storage usage as well as how to package the app into a fat APK.