
Chapter 12
Writing Your Own Plugin
WHAT'S IN THIS CHAPTER?
- What are plugins?
- IntelliJ plugin architecture
- Writing your own plugin
- Interacting with UI
- Integrating with editor
- Packing and distributing plugins
WROX.COM CODE DOWNLOADS FOR THIS CHAPTER
The wrox.com code download for this chapter is found at www.wrox.com/go/expertandroid on the Download Code tab. The code for this chapter is in the Chapter12.zip file.
Because Android Studio is great as is, you might think you would never need to implement a new feature. But you might need to write a plugin to meet a custom need and unleash your full development potential.
This chapter focuses on the architecture of IntelliJ plugins and shows you how to write a plugin that can act without code, resources, a UI, or even a build cycle. The ability to write your own plugins will enable you to fix missing functionality. You can even share your plugins with other developers.
INTELLIJ IDEA PLUGIN ARCHITECTURE
All popular IDEs—Eclipse, NetBeans, and, of course, IntelliJ Idea—support adding functional extensions and integrating them easily with the platform. Those functional extensions, called plugins, add new functionality and provide their own extensions for future plugins to introduce new functionality. The IntelliJ platform acts like a giant Lego platform in which other Lego blocks can be added by plugging into the right extensions.
All IDEs face the same problems. They need to work on different OSes, which introduce different file systems, while abstracting projects, runtimes, and even compilers from each other. In addition, they suffer from a problem that all applications have: an unresponsive UI resulting from time-consuming computations in the UI thread. This problem can become extreme because compiling and packaging code can be quite time-consuming when compared to other tasks performed by applications.
IDEs offer their own APIs and approaches to solve those issues. All IDEs, including IntelliJ, introduce their own project/file system, controlling time-consuming tasks, communicating with the UI when needed, and finding solutions to similar problems.
Actions
Actions are the most basic building blocks for interacting with users. An action is a selectable item that informs the platform that the user wants to trigger something. Creating new projects or opening existing ones are actions baked into the IDE. IntelliJ offers actions that can be added easily. Actions can be added though the UI or by adding a declaration to the plugin.xml file. ActionEvent, which carries data about the action itself (such as a selected file or text), is passed to the actionPerformed method related to the action.
In this section, you create a simple action. You start by downloading and installing IntelliJ, then move to adding an action with a declaration in the plugin.xml file, and finally you learn how to add an action using the wizards.
Creating a Simple IntelliJ Plugin
To start developing plugins for IntelliJ, first you need to download IntelliJ. Both the Community and Ultimate editions of IntelliJ Idea are capable of building plugins; however, we demonstrate the process with the Community edition because it is free of charge. From the JetBrains website at https://www.jetbrains.com/, click the IntelliJ IDEA link. From the page that opens, click the download link. Then click the Community Download option, as shown in Figure 12.1.

Figure 12.1 IntelliJ IDEA download page
Installing IntelliJ Idea is identical to installing Android Studio. (Refer to Chapter 1 for information on how to complete the installation once the download is complete.)
After IntelliJ is installed, follow these steps to add a plugin.
- Click the IntelliJ Idea icon to start the IDE. You should already be familiar with IntelliJ Idea because it is the basis of Android Studio.
- Select Create New Project, as shown in Figure 12.2.

Figure 12.2 IntelliJ IDE Start screen
- In the window that opens, select the IntelliJ Platform Plugin option from the list in the left pane, as shown in Figure 12.3.

Figure 12.3 List of project types
- Because building plugins for IntelliJ means you need to build an IntelliJ within IntelliJ, point to the IntelliJ Idea folder as the IntelliJ Platform SDK location, as shown in Figure 12.4. This folder can be the same IntelliJ instance you have been working with as well as a newer or older version of IntelliJ to target another version of the SDK platform. This gives developers the freedom to develop the next version of an IDE inside the IDE.
Once the SDK is configured, the Plugin option will appear for running the project, as shown in Figure 12.5.

Figure 12.4 IntelliJ SDK location configuration

Figure 12.5 Plugin option on the IntelliJ toolbar
- Click Run. IntelliJ Idea starts a new instance and displays the Welcome to IntelliJ IDEA wizard shown in Figure 12.6. You may close the new instance for now because it does not yet offer any new functionality.

Figure 12.6 IntelliJ IDEA welcome wizard
Implementing a Simple Action
You have just built an IntelliJ Idea inside IntelliJ Idea, but because you haven't yet implemented anything, there is no new functionality added to the base platform of the current SDK. So let's implement the new, simple action.
- Expand the resources folder, open
META-INF, and selectplugin.xml, as shown in Figure 12.7.
Figure 12.7 Contents of the plugin.xml file
- Because you want to add a new action, you need to declare your action inside
<action>tags as seen in Listing 12.1. Type the following code to declare a simple action.Your declaration starts with a
<group>tag, which can be used to group several actions. This is a good technique, one that is followed by many applications such as Word to group similar actions such as cut, copy, and paste into the Edit group, for example. Next, you use the<add-to-group>tag to declare where you want to hook your group. In this example, your new group will appear as the last item of theMainMenu.Finally, it is time to declare the action itself. Your new action declares a unique ID, a class that is delegated to run when the action is clicked, text that will be shown in the menu, and finally the description of your new action.
The
plugin.xmleditor is smart enough to analyze and validate the XML file. You may have noticed that all fields are marked green except for the class field of the action, which is normal because you don't have the class yet. When focused on the class name, IntelliJ even offers a smart fix, as shown in Figure 12.8.
Figure 12.8 Smart fix options
- Select the first option to create an action class with the name and package you already declared in the XML. Android Studio will create a new class in the correct package.
- Navigate to the new InfoPopup class and double-click to open. In order to respond as an action, the
InfoPopupclass must extend theAnActionclass. - Check whether
InfoPopupextends theAnActionclass and, if not, as shown in Figure 12.9, use the smart assistance provided by the editor, as shown in Figure 12.10.
Figure 12.9 Class inheritance control

Figure 12.10 Smart assistance to help class extension
Every class that extends
AnActionclass needs to implement anactionPerformedmethod. This method received anAnActionEventparameter, which carries all the data related to the action. Listing 12.2 shows a simple example to get the project object data from the event and finally display a message dialog box greeting us with the project name. - Now, it is time to try your plugin. Click Run and start a new IntelliJ instance that consists of your new plugin. Choose New Project and start the IDE. You are free to choose any project name but keep in mind that the name you have chosen for the project will be displayed by your action. Check the top menu bar for the Extended Menu menu, which should be the last item in the list, as shown in Figure 12.11.

Figure 12.11 New menu view
- Click the Extended Menu to display its item. The list should display only one item, shown in Figure 12.12, which you added to the XML file.
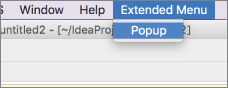
Figure 12.12 New menu item
- Select Popup from the drop-down menu. This action should trigger your action class, which retrieves project metadata and displays a popup to greet you with the project name, as shown in Figure 12.13.

Figure 12.13 New plugin's popup greeting
That's it! You have completed your first plugin and customized the IntelliJ. Your plugin doesn't perform much yet, but this is a gateway to many capabilities to extend the IDE.
Alternatively, you can use the New Action wizard to create your plugin rather than editing the XML manually. Right-click anywhere on the project and select New ⇨ Action, as shown in Figure 12.14.

Figure 12.14 New action selection
This option will bring up the New Action dialog box, which offers a GUI editor to tweak all the available settings related to the action you want to create. You may add a new action and choose the Extended Menu group you previously created to add a new action, as shown in Figure 12.15.

Figure 12.15 New Action window
The end product will be no different when using the wizard than when adding a declaration to the plugins.xml file.
Threading
IntelliJ does not enforce strict control over what you can't do on the UI thread, but this does not mean you should be adventurous. Window managers run a single thread to interact with users, including collecting the input and presenting the output. As a general rule, to keep an application responsive, you as a developer should not lock the UI thread by performing lengthy operations. Ideally anything that is not directly interacting with a user through the UI shouldn't be performed in the UI thread.
Plugins should execute tasks by passing a runnable by calling the executeOnPooledThread method of ApplicationManager, as shown in the following code.
ApplicationManager.getApplication().executeOnPooledThread(new Runnable() {
    @Override
    public void run() {
        //…
    }
});
The runnable this provides will be executed in the background without blocking the UI thread. But wait a minute—because this code will run in the background thread, how can you return and perform something on the UI thread? The executeOnPooledThread method returns a Future<T> reference object, which can be used for asynchronous response. However, constantly checking the Future object would also lock the UI thread and create a similar problem.
A proper way to return to the UI thread is with an API similar to executeOnPooledThread. Passing a runnable object to the invokeLater method of ApplicationManager, as shown in the following code, will delegate the execution of the runnable to UI thread.
ApplicationManager.getApplication().invokeLater(new Runnable() {
    @Override
    public void run() {
        //…
    }
});
As shown in the following code, IntelliJ also offers runReadAction and runWriteAction methods in ApplicationManager that similarly take a runnable and execute read/write operations without blocking the UI thread.
ApplicationManager.getApplication().runReadAction(new Runnable() {
    @Override
    public void run() {
        //…
    }
});
ApplicationManager.getApplication().runWriteAction (new Runnable() {
    @Override
    public void run() {
        //…
    }
});
File System
Abstracting the project and file structure is crucial to handling different operating systems and file systems. The IntelliJ platform introduces several concepts to handle file-related operations.
- Virtual files—IntelliJ offers VFS (Virtual File System) for representing files on a file system in the com.intellij.openapi.vfs package. Most file operations such as read/write are done via the
VirtualFileclass. VFS reference of a file can be gathered from actions, directly from paths or documents, and from PSI files, which we cover last in this list. Although read/write operations are the most well-known interactions with files, listening for changes or updates about the file becomes more important when IDEs are involved. VFS also offers a very simple mechanism to be notified about changes in the file system by adding aVirtualFileListenerviaaddVirtualFileListener. VirtualFiles represent already existing files in the file system, so they cannot be created programmatically. - Documents—Documents represent the contents of VirtualFiles. The contents of the Document are editable. Document references can be accessed from actions, VirtualFiles, and PSI files. Documents are weak objects that are dynamically created when contents of a VirtualFile is accessed, but unlike VirtualFiles, they are eligible for garbage collection if not referenced. Unlike VFS, new Documents can be created programmatically via
EditorFactory.createDocument(), which will create a new PSI. Changes in the contents of Documents can be listened for with aDocumentListenerby callingaddDocument Listener. Global listeners, which observe changes on all documents, can also be added over theEditorFactory.getEventMulticaster().addDocumentListenermethod. Document contents can be modified with several different methods, such assetText,insertString, andreplaceString. -
Program Structure Interface (PSI) files—PSI files represent files but with hierarchical elements based on programming language syntax. There are specific PSI implementations such as PsiJavaFile, XmlFile, PyFile, and more. Unlike VFS and Documents, which are application scoped, PSI files are project scoped. This way, each project can work on its own PSI instance for a file, which is shared among projects. PSIs consist of PSI elements, which form a tree structure to represent the contents with respect to the programming language.
A PSI document reference can be accessed via a VirtualFile reference, Document reference, an action, or by a child element belonging to the target PSI. PSI documents can also be searched in a project's
getFilesByNamemethod from theFileNameIndexclass by passing project reference, search name, and the scope. PSI files can be created usingPSIFactory. Changes can be listened for by adding aPsiTreeChangeListener. Thanks to the hierarchical structure, it is easy to navigate between PSI elements and perform modification on elements instead of files. Elements can be iterated using aPsiRecursiveElementWalkingVisitorobject.
Projects and Components
Now that you know about IntelliJ plugin architecture, you can write a more complex plugin. If you have read the war story sidebar earlier in this chapter, you know about the special Turkish characters that are not compatible with anything but Unicode. Although this example seems to target a very specific task that covers a small percentage of the whole world's app ecosystem, it clearly demonstrates how to write a plugin that listens for changes in a file, responds to them, and reads or writes file contents.
Let's start by designing a plugin and separating tasks. First, you need to listen for changes in files. You already know that IntelliJ Idea has its own file system API, so you can expect to find something that suits your needs in the API.
The first step in building a new plugin is to declare it in the plugin.xml, as you did in the “Implementing a Simple Action” section earlier in this chapter. In that example, you built an action. This time, your plugin needs to do more than just receive actions. This plugin needs to integrate into the IDE and check project files for changes. IntelliJ Idea's plugin architecture offers project components that suit this purpose. Each project component implements the ProjectComponent interface, which introduces the following project and component lifecycle methods as well as the project instance.
void initComponent()—Entry point for component related initialization code.void disposeComponent()—Exit point for component related disposal code.String getComponentName()—Returns component name.void projectOpened()—Project lifecycle method that is called when the project is opened.void projectClosed()—Project lifecycle method that is called when the project is closed.ProjectComponent (Project project)—Constructor for concreteProjectComponentimplementation. Reference to the project object is passed at the time of initialization.
To listen for file changes, you need to start, register, and unregister your plugin. The initComponent and disposeComponent methods are the perfect candidates for that purpose. Next, you need to listen for file changes. You need to target project files, which exist in the OS's file system, and because you don't need to create and work with new files, Virtual File System looks suitable for the job. VFS offers the VirtualFileListener interface, which can be registered to listen to a variety of file-related events.
void propertyChanged(VirtualFilePropertyEvent)—Called when properties of the file have changed.void beforePropertyChange(VirtualFilePropertyEvent)—Called before the property change action takes place. Think of this method as a hook that is executed just before the change.void contentsChanged(VirtualFileEvent)—Called when contents of the file have changed. Typically occurs when the file is accessed via an editor.void beforeContentsChange(VirtualFileEvent)—Called before the contents change action takes place. Think of this method as a hook that is executed just before the contents change.void fileCreated(VirtualFileEvent)—Called when a new file is created. Typically occurs when a wizard or another plugin creates or generates a new file.void fileDeleted(VirtualFileEvent)—Called when an existing file is deleted. Typically occurs when the user or another plugin deletes an existing file.void beforeFileDeletion (VirtualFileEvent)—Called before the file deletion action takes place. Think of this method as a hook that is executed just before the deletion.void fileMoved(VirtualFileEvent)—Called when the location of an existing file has been changed by moving the file. Typically occurs as a result of refactoring or dragging a file to another package or folder.void beforeFileMovement (VirtualFileEvent)—Called before the file move action takes place. Think of this method as a hook that is executed just before the file is moved.void fileCopied(VirtualFileEvent)—Called when a file is copied to another location while maintaining the original copy in the original location. Typically occurs when the user copies/pastes a file.
Although there are many different event methods, it is clear that you need to be targeting the contentsChanged method to listen for changes to a file and take action. The action should be simple enough to search for specific characters and replace them with specific codes, and because you know when the contents of the file change, you can easily hook your functionality there. Let's start by writing a simple method to go over a string and replace each “special” character with the specified Unicode value. Listing 12.3 shows a simple but naïve implementation to do the job. (Note that this string conversion can be done more efficiently with regular expressions, but that is beyond the scope of this chapter.)
Now you can implement the VirtualFileListener to extract the string contents from the file when a change occurs. As we discussed earlier, the target method is contentsChanged. However, because the VirtualFileListener interface offers a long list of methods, you need to create the method bodies even if you don't plan to do anything when the related event occurs, as shown in Listing 12.4.
Each time a change occurs, your contentsChanged implementation will be called. It reads the file content using the FileChangeEvent and calls your function that converts the characters in the stream. Finally, you write the file contents back to the file. Although you implemented all the logic behind your plugin, you haven't yet hooked your VirtualFileListener to your component. To achieve that, you need to register the event listener when the component is initialized and unregister it when the component is disposed of, as shown in Listing 12.5.
The plugin code is ready, but you haven't yet added the description to plugins.xml. Component declaration is much simpler and more straightforward than an action. Open plugin.xml and add the declaration in Listing 12.6.
Now create the class MyProjectComponent inside the com.expertandroid.plugin package and paste the code you have written so far. Your plugin is ready to be used. But wait a minute—previously we said that read and write operations should be done through Runnable with the provided API so as not to block the UI thread. So let's refactor the code to make use of runReadAction on reads and runWriteAction on writes. Listing 12.7 has the complete code listing we have covered in pieces so far.
Now click Run to fire an IntelliJ with your new plugin to give a test drive. Create a new file or open an existing file and type one of the special characters that your plugin covers and watch how the file dynamically updates its contents.
That's it—you have written your first useful plugin. So far, you have seen how to define actions and how to respond to file events but you haven't actually yet interacted with the editor.
Editors
Your plugin currently reads the entire contents of the file and writes back the modified string. This strategy might suffer as the file size gets larger. Alternatively, you can hook an action into your editor to run your algorithm on a selection of text and replace it with the Unicode values. This way, you can have better control on what parts of the text are being changed and also run your algorithm in a more efficient way.
- Create a new plugin project as you did in the previous example and choose New Window, as shown in Figure 12.16.

Figure 12.16 New plugin creation
- Open the
plugin.xmlfile and add the Action declaration using the<action>tag, as shown in Listing 12.8.You have just added a new action labeled
"Replace"as the first item in the editor popup menu. Because you haven't created theEditorActionclass yet, it is marked in red in Figure 12.17.
Figure 12.17 Creating the EditorAction class
- Click the Create class option from the contextual help to create your action class. You will use the contextual help to implement the needed methods in your new class.
- Select Implement methods, as shown in Figure 12.18.

Figure 12.18 Implement methods selection
- Now modify your existing code from the previous example to work with the editor action.
This time you will use the Document API instead of VFS. Documents are structural files so you can easily use the selection made in the editor. To access the selected text, you need the active instance of the Project, Editor, and the Document. You will use the Document for accessing the file contents and the editor to access the SelectionModel object, which will let us interact with the editor and the selection.
final Editor editor = anActionEvent.getRequiredData(CommonDataKeys.EDITOR);
final SelectionModel selectionModel = editor.getSelectionModel();
final int start = selectionModel.getSelectionStart();
final int end = selectionModel.getSelectionEnd();
In Listing 12-9, you access the Editor from the action event and get the beginning and ending indexes of the selection via the SelectionModel object of the editor. Now you can get the document instance and change the selection by using your previous convertUnicode method. Listing 12.9 shows the complete code of the actionPerformed method.
You may have noticed that you used runWriteCommandAction from the WriteCommandAction class instead of runWriteAction from ApplicationManager. Both methods execute write actions in a separate thread, but this time you are executing write from an action instead of an application component. Now you can copy the convertUnicode method from the previous example to complete the missing piece.
Everything looks ready, but what if the selection is empty? Your selection model may not even exist because the user may not be working with an editor all the time. You need to make your plugin safe by checking if the editor is open and has a valid selection. To achieve this goal, you need to implement an update method in your Action class. Listing 12.10 gets the current instance of the project and the editor and enables the presentation of your action only if there is a selection made in the editor.
Finally, you are ready to test your plugin. Click Run and start a new project or open an existing one. Open the editor and right-click after making a text selection, as shown in Figure 12.19.

Figure 12.19 The plugin action with text selected
Once you click Replace, your plugin will kick in and replace the special characters in the text selection with given Unicode values. If no selection is made, the Replace action will not appear on the action menu, as shown in Figure 12.20.

Figure 12.20 Right-click actions when no text is selected
You may use the same strategy to easily generate or edit code, either by listening for changes in files or waiting for user action.
Wizards
Wizards are a well-known part of the user experience when software needs to complete a task that consists of one or more steps. IntelliJ Idea offers an easy way to create wizards for your custom tasks.
- Declare an extension by adding the extension in Listing 12.11 to your
plugin.xml. - Use the contextual help to create a
CustomWizardclass, as shown in Figure 12.21.
Figure 12.21 CustomWizard class creation
-
Find and open the newly created
CustomWizardclass.Wizards in IntelliJ Idea extend from the
ModuleBuilderclass. Because your class is also extending the same base class, you need to implement missing methods. -
Use the contextual help as shown in Figure 12.22 to create the two missing methods in Figure 12.23.

Figure 12.22 Implementing the CustomWizard action
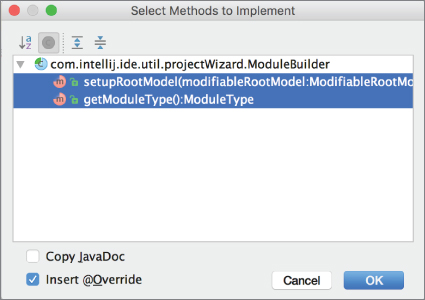
Figure 12.23 ActionWizard class methods
The first method,
setupRootModel, is where project-specific setup such as setting the compiler, libraries, and default folder and files is done. Let's leave this module as is because building a complex custom project is beyond the scope of this chapter. However, if you are interested in learning more about what can be done on this method of theJavaModuleBuilderclass, which is responsible for creating Java projects from IntelliJ source code, checking the source can give you a better understanding (https://upsource.jetbrains.com/idea-ce/file/idea-ce-1731d054af4ca27aa827c03929e27eeb0e6a8366/java/openapi/src/com/intellij/ide/util/projectWizard/JavaModuleBuilder.java).The second method you implemented is
getModuleType, which returns the type of theModule. There are predefinedModuleTypesin IntelliJ, such asStdModuleTypes.JAVAfor common project types. - For now, change the
getModuleTypemethod to returnModuleType.EMPTY, as shown in Listing 12.12. - Add some content to your wizard by adding steps.
Each step is defined with a
ModuleWizardStepobject, which will introduce its own UI elements and will update the data model with user-specified values. Listing 12.13 creates twoModuleWizardSteps.The first
ModuleWizardStepreturns aJFileChooserin thegetComponentmethod. This method is responsible for building the UI for the wizard step. Because the return type isJComponent, you can easily create swing composites, which are basic Java UI elements for Java-based desktop applications. As we mentioned before,updateDataModelis responsible for reflecting the changes introduced by the user to the data model of the wizard. For the sake of keeping the example simple, you will leave it empty.The second
ModuleWizardStepreturns aJRadioButton, which can also be used to modify the data model of the wizard. - Now add your wizard steps to your wizard.
The
ModuleBuilderbase class has a method namedcreateWizardStepsthat you need to override to return your new steps, as shown in Listing 12.14.
The complete code for your custom wizard is given in Listing 12.15.
Now it is time to run and test your new wizard. Click Run plugin and select New Project from the welcome screen. Select Empty Project from the bottom of the list on the left pane, as shown in Figure 12.24.

Figure 12.24 Creating the new wizard
Clicking Next will display the custom wizard steps, as shown in Figure 12.25.

Figure 12.25 Custom wizard steps
Although creating wizards may not seem like something you will use daily, wizards can be very helpful when you're creating custom projects and custom settings.
PACKAGING AND DISTRIBUTION
Packaging and releasing your plugin is very easy and straightforward. IntelliJ packages plugins as JAR files that can be installed from external repositories or from the local disk. To package your plugin, right-click the project pane and select the Prepare Plugin Module option with your project name, as shown in Figure 12.26.

Figure 12.26 Plugin deployment selection
IntelliJ will compile, build, and package your plugin as a jar file and will display a popup dialog box stating it is ready for deployment, as shown in Figure 12.27. That's it, you have just finished building your plugin and you can upload your plugin into a repository or just make it available publicly as a jar file.

Figure 12.27 Plugin package info popup dialog box
Now let's install the plugin to Android Studio and give a test run. First locate the newly packaged jar file. You may refer to the URI, which was provided in the popup in Figure 12.27.
Open Android Studio and select Preferences. Highlight the Plugins option in the left pane in the Preferences window. As shown in Figure 12.28, click the Install Plugin from disk option at the bottom of the screen and locate the jar file.

Figure 12.28 Installing the plugin from disk
That's it. You have just installed your new plugin to Android Studio. Ideally, your plugin should be uploaded into a repository, which can be installed via the Browse repositories option.
SUMMARY
In this chapter, you learned how to build plugins for the IntelliJ Idea platform to extend Android Studio for your special needs. IntelliJ Idea offers an easy-to-extend architecture with many APIs to help you write your own plugin. The chapter started with building basic actions; then you learned how to listen to files and projects. You integrated a plugin with the editor to interact with its contents. We covered how to create custom wizards for specific tasks and how to customize their steps.
Finally, you learned how to package, load, and release your plugins for other developers' use.