
Chapter 14
Ten Tips and Tricks
IN THIS CHAPTER
![]() Customizing your camera
Customizing your camera
![]() Restoring default settings
Restoring default settings
![]() Creating your own menu
Creating your own menu
![]() Editing your images in Adobe Lightroom
Editing your images in Adobe Lightroom
![]() Downloading Nikon software
Downloading Nikon software
When you start exploring the possibilities of your camera, it’s like chipping away at the tip of an iceberg. There’s so much you can do with your Nikon D780, it boggles the mind. You can customize your camera to suit your working preferences, making life easier when you’re busy creating images. You can also create a custom menu to quickly access your frequently used menu commands. Speaking of menus, they can be a little confusing at times. Not to worry, say the Nikon camera gurus, we’ve added help to the camera so you don’t have to carry the manual with you. How cool is that?
In this chapter, I show you how to customize your camera, create your own menu, add copyright information to your images, and more. I also introduce you to Adobe Lightroom, which in my opinion, is the most powerful image-editing software on the planet. And just in case you make changes to the camera you don’t like, I show you how to restore the camera to its default settings.
Creating Custom User Settings
You have two buttons on the mode dial that are fully customizable: U1 and U2. (The latter will not play music from the rock band of the same name.) To create custom user settings, follow these steps:
-
Make the desired changes to your camera’s settings.
You can save some settings from the photo shooting menu, the movie shooting menu, shooting mode, white balance, and so on. An example of custom settings would be to customize mode U1 for sunsets with the following settings: aperture-priority auto (A) mode on the mode dial, the white balance set to cloudy, the ISO sensitivity set to 100, and the focusing set to AF-S autofocus mode.
-
Press the MENU button.
All the Nikon menus are displayed on your tilting monitor.
-
Press the down arrow on the multi selector to highlight the setup menu, and then press the left arrow on the multi selector.
The setup menu icon is highlighted.
- Press the down arrow on the multi selector to highlight Save User Settings (see Figure 14-1).
-
Press the right arrow on the multi selector.
The Save User Settings options appear on your tilting monitor (see Figure 14-2).
-
Use the multi selector to highlight Save to U1 or Save to U2 and then press the right arrow on the multi selector.
The Save User Settings menu resets, and you have two options: Save to U1/U2 (the number depends on the option you choose in Step 6) and Cancel.
-
Highlight Save Settings.
The settings are assigned to the specified button.
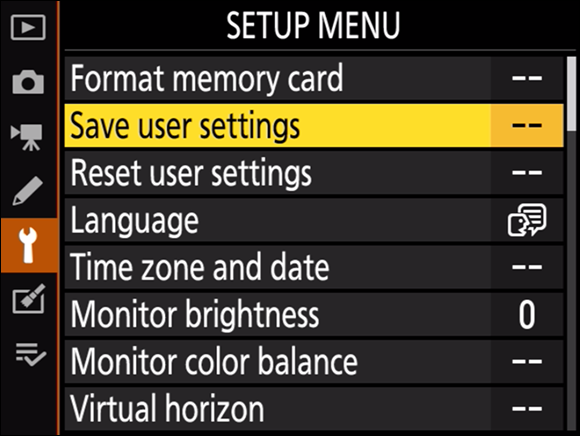
FIGURE 14-1: The Save User Settings command.
-
Press the shutter-release button halfway to return to shooting mode.
To access the custom settings, rotate the mode dial to the button to which you assigned the settings (U1 or U2).
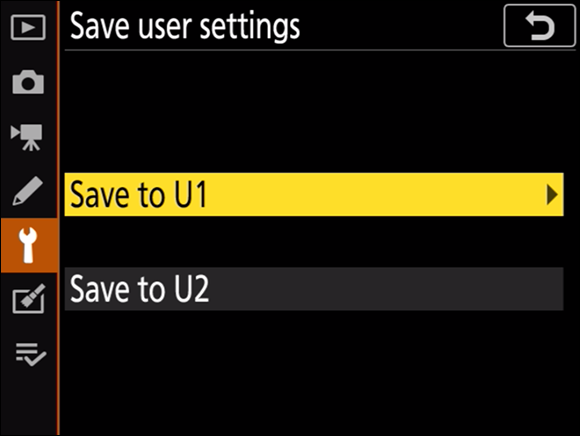
FIGURE 14-2: Saving user settings to mode U1 or U2.
If after using the customs settings, you decide you need to reset the button, you can easily do so by following these steps:
-
Press the MENU button.
All the Nikon menus are displayed on your tilting monitor.
-
Press the down arrow on the multi selector to highlight the setup menu, and then press the left arrow on the multi selector.
The setup menu icon is highlighted.
- Press the down arrow on the multi selector to highlight Reset User Settings (see Figure 14-3).
-
Press the right arrow on the multi selector.
The options appear on your tilting monitor (see Figure 14-4).
-
Select Reset U1 or Reset U2 and press the right arrow on the multi selector.
The reset command refreshes, and you have two options: Reset U1/U2 (the number depends on the option you choose in Step 4) and Cancel.
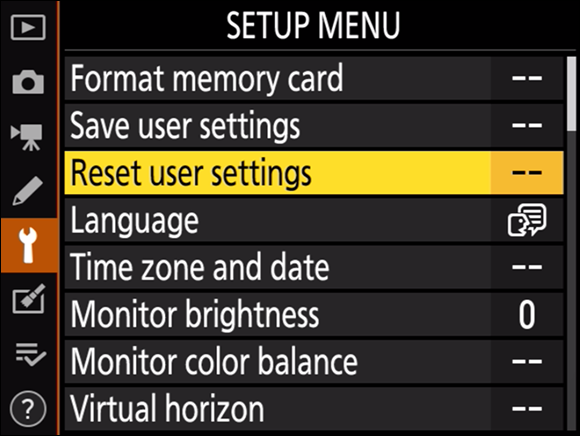
FIGURE 14-3: Resetting user settings.

FIGURE 14-4: Choose the mode to reset.
-
Highlight Reset and then press OK.
The custom settings for the mode specified are reset.
-
Press the shutter-release button halfway to return to shooting mode.
You can now choose new settings to assign to the mode you just reset.
Resetting Default User Settings
If you’re like me, sometimes you go over the top and change so many settings, the camera doesn’t work the way you want it to. No problem, you say, just undo the command that changed the camera for the worse. Yes, dear reader, that’s fine … if you can remember which command that was. But in case you can’t, you can restore the camera to the default settings by performing a two-button restore.
To reset the camera to default settings, press and hold the zoom out/metering button (see the left side of Figure 14-5), which is located on the lower-left side of the camera when pointed toward your subject, and the exposure compensation button, which is located near the shutter-release button (see the right side of Figure 14-5). Each of these buttons has a green dot alongside it. Hold both buttons for 2 seconds and — poof! — the default settings are restored.

FIGURE 14-5: The two-button restore.
Creating a Custom Menu
The one thing that drives me crazy with the Nikon D780, and every other camera really, is fiddling around in the menu to find the command I need and missing a shot in the process. But that doesn’t have to be the case. You can make a custom menu with the commands you frequently use. With a custom menu, you can quickly cut to the chase, make the change you need to make, and grab the shot. For example, if you frequently use Active D-Lighting or use the HDR option to create images with an increased dynamic range, you can add these commands to your custom menu.
To create a custom menu, follow these steps:
-
Press the MENU button.
All the Nikon menus are displayed on your tilting monitor.
-
Press the down arrow on the multi selector to highlight My Menu and press the left arrow on the multi selector.
The My Menu icon is highlighted.
- Press the right arrow on the multi selector to place the cursor inside the menu, and press the down arrow on the multi selector to highlight Add Items.
-
Press the right arrow on the multi selector.
The menus are displayed.
-
Highlight the menu from which you want to add an item, and then press the right arrow on the multi selector.
For example, if you want to add items for the movie shooting menu, highlight it and press the right arrow on the multi selector to display the menu items. Figure 14-6 shows the movie shooting menu.
-
Highlight the desired menu item (see Figure 14-7), and then press OK.
The item is added to your custom menu.

FIGURE 14-6: Adding items to the custom menu.
- Press the up arrow or down arrow on the multi selector to position the item in your menu.
- Repeat Steps 3 through 7 to add additional items to the menu.
-
Press the shutter-release button halfway to exit the menus and return to shooting mode.
The next time you need a command from your custom menu, press the MENU button to open the menus, and then open My Menu to choose the desired command.
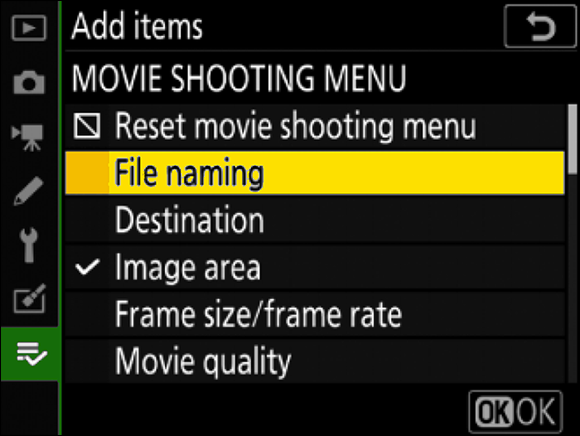
FIGURE 14-7: Choosing items to add to the menu.
After you use your custom menu for a while, you may decide that you need to remove some items from the menu. To remove items from your custom menu, follow these steps:
- Open My Menu.
-
Highlight Remove Items and then press the right arrow on the multi selector.
The items on your custom menu are displayed.
-
Highlight an item you want to remove, and press the right arrow on the multi selector.
The item is marked for deletion.
- Repeat Step 3 to mark other items for deletion.
-
After selecting the items you want to remove, press OK.
A dialog appears asking you to confirm deletion.
-
Press OK.
The items are removed from your custom menu.
Customizing Your Camera
Many of the buttons on your camera are customizable. If the task a specific button accomplishes is something you don’t do frequently, you may be able to customize the button. To customize the buttons on your camera, follow these steps:
-
Press the MENU button.
The camera menus appear on the tilting monitor.
-
Press the down arrow on the multi selector to highlight the Custom Settings menu, and then press the left arrow on the multi selector.
The Custom Settings menu icon is highlighted.
-
Press the right arrow on the multi selector to place the cursor inside the menu, then press the down arrow on the multi selector to highlight f3: Custom Controls, and press the right arrow on the multi selector.
An illustration of the camera appears on the tilting monitor.
-
Use the multi selector to highlight the button you want to customize and press the right arrow on the multi selector.
For the purposes of this tutorial, I show you how to customize the Pv button, which is selected in Figure 14-8. You can customize the following buttons:
- Pv: The default function of this button is to stop down the lens to the current aperture to preview depth of field.
- Fn: This button is used for quick access to frequently used settings.
- AE-L/AF-L: The default function of this button is to lock exposure and focus to a specific part of the frame.
- AF-On: This button can be used to lock focus in autofocus mode.
- BKT: This button is used for bracketing exposure, flash, white balance, and Active D-Lighting (ADL).
- Movie Record: This button is used to start and stop movie recording.
-
After selecting a button, press the right arrow on the multi selector.
The functions you can assign to the button are displayed (see Figure 14-9).
-
Press the down arrow on the multi selector to highlight the function you want to assign to the button.
For example, if you frequently photograph scenes that require center-weighted metering, you can assign that function to the Pv button.

FIGURE 14-8: Customizing a button.
-
After choosing a function for the button, press OK.
The function is assigned to the button and you’re returned to the previous menu.
- Repeat Steps 4 through 7 to customize other buttons.
-
After customizing your camera, press the shutter-release button halfway.
You’re returned to shooting mode, and you can test the buttons.

FIGURE 14-9: Choosing an option to assign to a button.
Creating a Makeshift Tripod
Tripods take up a lot of room. When packing for a trip, you may decide to leave your tripod at home to free up some space in your luggage. Or you may leave home for a photo shoot thinking you won’t need a tripod, then find out you need one. When you have the need for a tripod, but you don’t have one with you, creating a makeshift tripod will save the day.
 Here are some suggestions for crafting a makeshift tripod:
- Switch to live view mode and place the camera near the edge of a table. If you can see the tabletop in the viewfinder or tilting monitor, move the camera closer to the edge.
- Use a wall to steady the camera. This option is handy if you’re shooting in portrait orientation (rotating the camera 90 degrees to create an image that is taller than it is wide). Hold the camera tightly against the wall and take the picture.
-
Use a small beanbag to steady the camera. You can just toss the beanbag in your camera bag; it doesn’t take up much space. Place your camera on the beanbag and move it to achieve the desired composition. You can purchase beanbags at your local camera store.
As an alternative to the beanbag, you can carry a resealable plastic bag filled with uncooked rice (cooked rice is messy and will spoil) in your camera bag. Place your camera on the bag and move it until you achieve the desired composition.
- Use a crumpled t-shirt to steady your camera. Place a crumpled t-shirt on a flat surface, place your camera on it, and take the picture.
- Become a human tripod. Stand with your feet spread apart, press your elbows into your ribs, bring the camera to your eye, and take the picture.
- Use a monopod to steady your camera. You can purchase a monopod at your favorite camera store. Many monopods have retractable feet in the base that, when extracted, stabilize the monopod. It’s not a tripod, but it may fit the bill.
In addition to using one of these techniques, use the self-timer to delay the release of the shutter. This gives the camera a chance to stabilize from any vibration that occurs when you press the shutter-release button.
Working with Adobe Lightroom Classic
If you’re serious about your photography, and you capture your images using your camera’s NEF (RAW) mode, you may want to consider getting a subscription to Adobe Lightroom. The software has everything you need to organize a huge collection of photographs. In addition, you use the software to process your images, export your images, create slideshows, and more. In fact, you can even use the application to create a gallery of your photos and upload the gallery to your website. As of this writing, Adobe has a Photography subscription for $9.99 per month that includes Lightroom and Photoshop. With a subscription, you get free updates to both applications when Adobe releases them.
Lightroom is divided into seven modules. The modular workflow is much better than an all-in-one application of this magnitude. Each module is dedicated to the task at hand. The application is divided into the following modules:
- Library: You organize your images in the Library module. You have options to create folders and transfer images between folders in this module, which is a great way to stay organized. After all, who wants to search for a needle in a haystack (which is exactly what you do if you store all your images in one folder)? You can also rename images in the Library module, assign keywords to images, rate images, search for images, and export them. In addition, you can create multiple export presets. For example, if you upload images to your website or to social media, you can create a preset with the image size, file format, and quality. You can also create a watermark preset. Watermarks can be used to protect your images from theft when you post them on the Internet, which is still like the Wild West.
- Develop: In the Develop module (shown in Figure 14-10), you process your images to pixel perfection. The module is logically organized into several sections. In one section, you apply basic processing to the image, such as adjusting the exposure, setting white balance, setting the black point and white point, applying noise reduction to the image, sharpening the image, and much more. You can also crop images in the Develop module, correct perspective, and correct lens anomalies such as pincushion and barrel distortion. Adobe has a huge database of popular lenses in the application; the application may be able to detect the lens you shot the picture with, which enables you to instantly correct any problems associated with the lens. In addition, you can use the Develop module to apply special effects to the image such as split toning, adding a vignette, simulating film grain, and so on. And if you have some settings you use over and over again, you can create a preset to apply the settings in one fell swoop.

FIGURE 14-10: The Develop module.
- Map: If you attach a GPS receiver to your camera when shooting, the longitude and latitude are saved as metadata. After you import images with this data, you open the Map module and the images are placed on a map in the exact location from which you shot them. This is a great way to find images that were shot in a certain location. If you don’t use a GPS receiver, you can manually place images on a map in this module.
- Book: In this module, you can create a book with selected images. After creating the book, you can upload it to Blurb (
www.blurb.com) from the module to get a printed copy of the book to share with friends and family. I’ve used Blurb to create books for wedding clients. The book Blurb offers is high quality. You can order a hardcover book or a soft cover one. - Slideshow: In this module, you can create a slideshow. You can create a slideshow with music for viewing on your computer or export the images as a PDF for sharing with other photographers and friends. You can also export a video slideshow.
- Print: As the name implies, you use this module to print your images. You can print a single image or multiple images on a sheet. You can even create a contact sheet (which contains thumbnail-size images) of several images.
- Web: In this module, you can create a web gallery of images you select in the Library module. There are several web templates from which to choose. You can even customize a template and save it for future use. After creating the gallery, you can upload it from the module to your website.
There is a logical workflow to Adobe Lightroom from import to export. To learn more about the possibilities of this application, pick up a copy of Adobe Photoshop Lightroom Classic For Dummies, 2nd Edition, by Rob Sylvan (Wiley).
 Another option is Adobe Lightroom CC, which you can use on your smartphone or tablet. The editing process is different, but the application does allow you to upload photos from the desktop version of Lightroom (discussed here) to the cloud and display them on your tablet or phone, which is a great way to show your work to clients or friends.
Compiling Focus Shift Images in Adobe Photoshop
In Chapter 11, I show you how to use your camera’s focus shift settings to vary the focus of a scene over a series of images. Focus shifting (also known as focus stacking) is a great way to create a image that is in sharp focus from front to back. However, the camera does not compile the images with shifted focus into a single image. You have to do that in a third-party application like Adobe Photoshop, which is available by subscription. If you have the Adobe Photography subscription, you can use Lightroom in conjunction with Photoshop to combine the focus-shifted images into a single photograph.
Here’s how to combine focus-shifted images:
- Import the images into Lightroom.
-
Select the focus-shifted images in the Library module, right-click, and choose Edit In ⇒ Open As Layers in Photoshop.
Lightroom processes the images for export, Photoshop launches, and a single document is created with a layer for each photo you selected in Lightroom.
 If you specified lots of images for your focus shift, it may take a long time for Photoshop to launch and distribute the photos to layers.
 -
In Photoshop, open the Layers panel, select all the layers, and then choose Edit ⇒ Auto-Blend Layers.
A dialog appears with two options: Panorama and Stack Images (see Figure 14-11).

FIGURE 14-11: Stacking focus-shifted images in Photoshop.
-
Accept the default options and click OK.
Photoshop merges the layers into a single image. This may take some time if there many layers of focus-shifted images.
-
In the Layers panel, select all the layers and then choose Layers ⇒ Merge.
Photoshop merges the layers to a single image.
-
Choose File ⇒ Save As.
Choose the file format and destination for the image.
Photoshop offers a wide variety of export formats. You can also resize the image before saving it. Unfortunately, that’s beyond the scope of this book. If you want to learn more about Photoshop, check out Adobe Photoshop CC For Dummies, 2nd Edition, by Peter Bauer (Wiley).
Adding Copyright Information and Author Name to the Camera
Protecting images is very important to every photographer. You can add your copyright information and name to every image you create. The information is saved as metadata. Nikon Capture NX-D and many other image-editing applications recognize the metadata you add in camera. This approach isn’t foolproof, but it’s better than no protection at all.
To add your name and copyright information to the camera, follow these steps:
-
Press the MENU button.
The camera menus appear on the tilting monitor.
-
Press the down arrow on the multi selector to highlight the setup menu, and press the left arrow on the multi selector.
The setup menu icon is highlighted.
- Press the right arrow on the multi selector to place the cursor inside the menu, and then press the down arrow to highlight Copyright Information (see Figure 14-12).
-
Press the right arrow on the multi selector.
The Copyright options are displayed on your tilting monitor (see Figure 14-13). Artist is selected by default.
-
Press the right arrow to add artist information to the camera.
The camera keyboard appears.

FIGURE 14-12: Adding copyright information to the camera.
-
Enter your name.
For more information on the camera keyboard, see Chapter 4.
-
Press the zoom in/QUAL button.
Your name is recorded and you’re returned to the previous menu.
-
Press the down arrow to the multi selector to highlight Copyright, and then press the right arrow on the multi selector.
The keyboard appears.
-
Enter your copyright information.
I’m not a lawyer, but I’ve heard the proper way to write a copyright is the copyright symbol, followed by the year, followed by your name (for example, © 2020 Doug Sahlin).
-
Press the Zoom in/QUAL button.
Your copyright information is recorded and you’re returned to the previous menu.
-
Press the up arrow on the multi selector to highlight Attach Copyright Information, and then press the right arrow on the multi selector.
A check mark appears in the Attach Copyright Information check box (see Figure 14-14).
-
Press OK.
The copyright and artist data are saved to the camera and will be written to the metadata of each image you create.

FIGURE 14-13: Copyright options.

FIGURE 14-14: Attaching your copyright information.
 Make a note to change the copyright information to the new year on January 1.
Using the Nikon Download Center
When you need manuals, software, or firmware for your Nikon D780, you can find it at the Nikon Download Center. Simply launch your favorite web browser and navigate to https://downloadcenter.nikonimglib.com/en/index.html.
Getting Help
Your camera has a built-in help menu. Whenever you see a menu command and you’re not sure what it does, you may be able get help by pressing the help/protect/WB button (see Figure 14-15). Figure 14-16 shows help for the pixel mapping command in the setup menu. If the help dialog extends below the screen, press the up and down arrows on the multi selector to scroll. After reading the help, press the help/protect/WB button again to return to the menus.

FIGURE 14-15: Click this button to get help.

FIGURE 14-16: Help me!