MAKING IMPACT HAPPEN – 40 ESSENTIAL VISUAL TOOLS THAT BELONG TO YOU
HOW THE TOOLS ARE ORGANISED
In Section 5 I introduced you to the five stages of a successful meeting. Here they are below as a reminder.

The tools in Section 6 are purposely arranged into five groups, matching these five stages. That being said, it is possible to use a tool from one stage in another stage should it support your process. You might also choose to use a tool more than once in your meeting. For example, lists are commonly used several times in many meetings to great effect.
All the tools are deliberately simple in design and easy to create given that your time is precious. I urge you to use colour when creating your charts and embellish with simple imagery if appropriate. You will be surprised at the positive feedback you receive from your participants, and at the difference this way of working will lead to in your meetings.
Each tool has been numbered so you can refer to it quickly in your planning. Also included is a simple illustration of the tool: (1) its blank form which is intended to be a sample guide to what the tool might look like so you can create it easily, and (2) what the tool might look like once participants have used it in a meeting. Some of the tools don’t use charts at all, but you’ll spot those easily as you peruse. Also, in the description of the tools you will find…

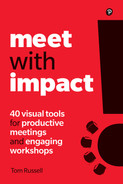
The Meeting Kaleidoscope
The strength of the tool based on People, Process and Content.
Flow flavour

I like a nice ‘juicy’ process, and I have suggested one for each tool. Of course, you can choose to adapt it to better suit the group’s needs.
Watch out!

Things to be aware of either before or when using this tool. These might not arise, but it is worthwhile being prepared.
Resources and kit

The core materials you will need to bring this tool to life. More information is given about these in Section 5.
Expert insight

An expert tip from Ben, Catherine, Helen or me based on our experience of using this tool.
MEET THE EXPERTS
I’d like to introduce you to three very special people. I am introducing them to you now as, when you turn to the tools, you will notice that they offer insights and tips, and share their knowledge of these tools with you in the spirit of helping you and your organisation to work smarter. Meet Ben, Catherine and Helen (oh, and me too as I have added my insights against two of the tools).

Ben Robinson

Catherine Hennessy

Helen Chapman

Tom Russell
IT’S NOT WHAT YOU DO, IT’S THE WAY THAT YOU DO IT
The tools will give their absolute best if you (as meeting leader) take an active role in guiding your meeting participants through the process of using the tools. In crude terms, a good meeting leader won’t use the tools simply as a data-filling exercise. The quality of the conversation is the most important element.
A great meeting leader will use the tools as a means to achieve the meeting outcomes. That’s not to say that standing back and allowing the group to work is a bad thing, quite the opposite. A great meeting leader also knows when to step back and allow the conversation to develop and the group to work together.
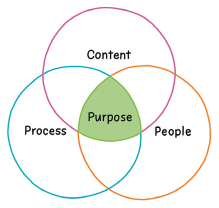
THE MEET WITH IMPACT PLANNER
I have provided you with a visual planning tool – The Meet with Impact Planner – that you can use when planning your meetings. The design is deliberately simple so you can replicate it many times and get used to using it, and features space for the following core elements:
USING THE MEET WITH IMPACT PLANNER
The Meet with Impact Planner can be used for a short meeting with only one topic under discussion, or for a longer meeting with several topics. You will remember that Process, within the Meeting Kaleidoscope, is focussed on how the group works through an agenda topic, which is why you should consider all five stages for each agenda item.
The following steps will help you as you work through the process:
- Populate the title of the meeting, the date, start and finish time, and location. It’s fine if you don’t know the timing at this stage, as your process thinking may lead you to a different duration than you originally anticipated.
- Add the meeting purpose and expected outcomes. Keeping these visible will guide you as you plan the stages of the meeting.
- Include the names of the participants whom you wish to invite.
- Start with the first topic you wish to discuss and use the five stages of a successful meeting as your guide. Not every meeting will include all five stages; in fact many meetings don’t include the Stretching stage.
- Remember to plan your Opening stage especially well, however short or long your meeting, as this will ensure participants are focussed and ready to get to work.
- Add the headline of conversations you wish to have about the topic at each stage, bearing in mind the intent of each stage. Using small sticky notes can be helpful instead of writing directly onto the planner, as you can move the headlines around before settling on your final design.
- Note the numbers of the tools you wish to use at each stage, so you are ready to go straight to each tool page and use the examples as a guide when creating your tools.
- Use the planner as a guide when leading your meeting. You can add timings to each stage to guide you.
The planning tool is intended to be YOUR planning tool, as the meeting leader. It is not designed to be the document you share with your meeting participants before the meeting. Use the e-mail template in Section 3 to guide you when creating a meeting invite.
Please also be mindful that just because you have planned your meeting in this way it does not always mean that your meeting will stick fast to that plan. Although you will surely be very proud of your meeting plan, resist being ‘married’ to it. Be prepared to adapt in the moment and make those subtle metaphorical twists and turns of the kaleidoscope as you lead your meeting.
Meet with Impact Planner – Example 1
This planner maps out a straightforward meeting that does not contain a Stretching stage. Many meetings do not contain this stage, which is completely fine, because if they did people would probably be reluctant to attend!
In addition to the important meeting purpose and outcomes you can see that the meeting leader has mapped out the start and finish time of the meeting, and where the tools will be used in each of the stages. Details of participants are also added so when it comes to sending out the invitation to the meeting everything that is needed for the e-mail is here on the planner.

Meet with Impact Planner – Example 2
This second example features a more complex agenda over one day, including the Stretching phase, for two key topics. Again all the key information has been mapped out. For example, note how the meeting leader has indicated where the Actions and Next Steps tool has been used throughout the meeting, following Helen’s tip for Tool 35.
You can see how the meeting leader has mapped out all five stages for each of the two topics. If you are holding a meeting with several topics you could use one page of the planner for each topic, so you have sight of all the visual tools you will be using throughout.

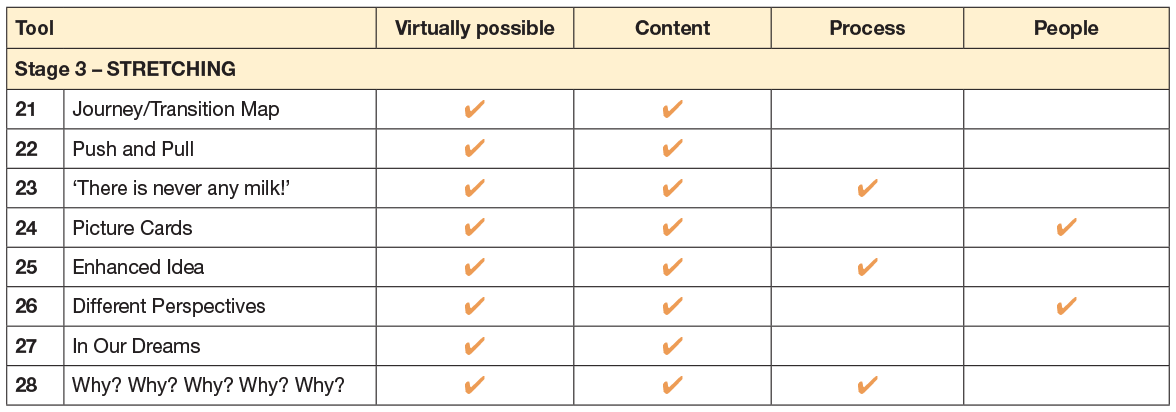
THE TOOLS!
And here they are, 40 visual tools (plus the Meet with Impact Planner of course) which you can start using right now. Below I have listed the tools under each stage of a successful meeting. I have highlighted where each tool supports Content, People or Process within the Meeting Kaleidoscope.
I have also indicated where I believe a tool can be used in a virtual meeting (especially video conferencing). You might initially wonder how a tool can be used virtually, but it can be done with the help of a little creativity and lateral thinking.