
Chapter 6
Switches
After finishing the touches app in Chapter 5, you can say that you've coded Objective-C apps without flinching! You are not alone if, while coding Chapter 5, you felt as though you were struggling to make your way across a tough and rocky road. I say this because all programmers have had to journey over this road. It's absolutely OK to look back on that chapter and think to yourself that you don't remember what you did. Yes, that's normal, and I'm about to prove to you that it's normal. First, I need to explain why you are going to take time out at this point.
In my experience, when teaching students languages such as C, C++, C#, Assembly, Machine Languages, Java, and the list goes on, many students drop out even when they seem to be doing fine. In recent years, I began to catch students as they neared this junction, and I would ask them why they were contemplating dropping out. They would all tell me something similar to this: “I can see I did the homework but I'm scared I will fail because it's just not sinking in. I don't grasp it.” About four years ago I tried an experiment. When the students walked into the lecture hall they were in shock when I told them to close their text books, close their laptops, and put away their books because we were going to take a journey inside their brain and have a class on neurology. In fact, we were going to scientifically illustrate why many felt they were stupid, not getting it, and essentially feeling like a dork! The entire lecture hall collapsed in laughter. At the end of the lecture that I now call “Don't Freak Out! Let's Have a Look at Your Brain!” some students were crying and came up to me after class and thanked me. Not a single student dropped out.
Right now I bet that you feel you have not retained anything from Chapter 5 and that you feel a little overwhelmed and insecure in your geek abilities. Well, that's OK—just read on and you'll see why you feel a little uneasy. Even if you do feel confident at this point, you probably will falter at some point down the road as it gets harder, but I still want you to read on. This is important, so I want you to really understand this.
Don't Freak Out: Let's Look at Your Brain!
One of the best ways to explain this is to ask you something that has nothing to do with Objective-C and computer science. It's about childhood memories.
Do you ever smell something you've not smelt before and without any warning your brain immediately takes you back to a place in your early childhood? Yes, this happens to all of us. After smelling this smell, you will suddenly see everything clearly in your head: the walls, the people—it's all crystal clear and sometimes it may overwhelm you emotionally. You may feel blown away that you've not thought about those walls or images for many years, and now suddenly they're overwhelming your senses. Let me explain why this happens. I will use my smell of old-fashioned soap to illustrate this, and then show how this is related to the neural connectors you've just created.
Look at Figure 6–a. Under the first title, “ILLUSTRATION,” you will see a very simplified illustration of how, once your brain receives a new input that it's never experienced before, it creates a nucleus housed inside a cell body that retains that event. This is connected to the rest of your brain by threads and axons. As you experience new events that relate to this new event, a tree of synapses and neurons connect to this nucleus. Some of these connections become quite full of what we call dendrites.
When I was a little boy in Durban, South Africa, I went down to where the servants were washing laundry. Back in 1963, most families used old-fashioned ammonia-filled soap that had a very distinct smell. This smell created a new nucleus in my baby brain. It connected with the joyful songs the Zulu servants were singing as they hand-washed the laundry. My brain also connected the imagery of the walls, the paint, and my dog Samson. These connectors of the singing, the walls, the paint and the dog formed four groups of connections to that new smell, as illustrated under “SYNTHESIZED” in Figure 6–a. Some groups immediately had more connections, such as songs, because I used to sing many Zulu songs as a small boy. The next biggest group was probably that of my dog. I've labeled the groups from 1 to 4 in order of size.
Many years later, in New York City, probably around 1993, I was rushing to keep an appointment with a law professor who had said he would meet me for lunch at a little restaurant. As I was running across 8th Avenue, I noticed some people cleaning the sidewalk in front of another restaurant. They were using soap and water and scrubbing it with these large straw brushes. Suddenly I smelt it. The smell I hadn't smelt since the time I was a three-year-old boy in that laundry room. I suddenly saw those servants, I could hear their songs and laughter, and I could see my old dog Samson. I became overwhelmed with that day, the people, the energy from so long ago, and I was so overwhelmed with emotion I stopped running and started crying. When I reached the restaurant, the law professor stood resplendent in his tweed suit and said: “Rory, it's OK that you're a couple of minutes late. Oh my gosh, are you crying?”

Figure 6–a. Don't freak out: Let's have a look at your brain.
So what happened? What happens when you experience similar events? Why does this often happen with smell? Let's first look at events in life, such as the first time you realized that 1 + 1 = 2. Do you remember the first time you realized 1 + 1 = 2? Probably not. This is because after you created a nucleus associating 1 + 1 = 2 there were trillions of connectors going to 1 + 1 = 2. Every time you perform any function that related to 1 + 1 = 2 your brain makes a connection to the nucleus housing 1 + 1 = 2. Even as you flip through this book and it goes from pagen to pagen+1, you make synaptic connectors to dendrites and groups of associations connected to 1 + 1. Somewhere in those trillions of 1 +1 = 2 connectors are the visuals and sound effects of the room where you realized this, but it is lost in the maze of trillions of other connectors.
That rare smell though, that's different. Think about it. I have illustrated four groups associated with that smell from when I was three. Over the next 30 years, following the creation of that nucleus and the four groups linking it, there was never a connection made. It just lay there. However, as I crossed 8th Avenue and smelt that smell, it immediately invoked that same nucleus AND the contents of the four groups connected to that event. These connectors were STRONG because they were not interconnected with other complex relationships. This made the singing, the feeling I had towards my dog, the laughter, and the other events come hurtling into me.
Now go back to when you read Chapter 5 for a moment. Look at the “YOU RIGHT NOW” illustration in Figure 6–a. You created a set of nuclei when you made your way through Chapter 5. Let's imagine, for purposes of illustration, that it was only one event or one thing you learned while reading Chapter 5. The nucleus containing that knowledge is housed in the light grey circle. You may, at the most, have created one semblance of connectivity to some related thought or concept. That is why I connected one small group to the Chapter 5 knowledge nucleus. More importantly, notice that I have created five other groups of potential connectors to the Chapter 5: they are “rest of the book,” “problem solving,” “teaching to others,” “real life application,” and “making $$.” Right now it's absolutely natural that these groups have no connectivity to the nucleus of Chapter 5's knowledge because you have not had time to create these connections. For example, right now, as you read this chapter, you probably “feel” like you have no connection to the knowledge you gained in Chapter 5. This is because there is no connection to it as you read this. There is also zero connectivity to making $$ from what you learned in Chapter 5, nor to the other groups.
I carefully choose topics, innuendo, and semantics to optimize, as best I can, connectivity between what I teach at the moment to what was taught in the past. By the time you reach the end of this book, create your first app, and sell it in the store, your brain will have begun to create many connectors to Chapter 5. I have illustrated this in Figure 6–a under GEEKDOM. Something that connects a huge amount of synapses to nuclei containing a difficult-to-understand concept is teaching others. It's great to go onto forums, such as mine at www.rorylewis.com/ipad_forum/ or bit.ly/oLVwpY, and help out newbies with their questions (even if you are a newbie yourself) because it creates many connections to that difficult concept, making you smarter. In essence, helping others forces one to answer the same question in thousands of different ways. So I strongly encourage you to go to the forum, ask questions, and then, as you become wiser, help others.
So the first good news is that it's OK to feel disconnected to what you coded in Chapter 5. It's OK; you'll make those connections as you move forward. The second piece of good news is that Chapter 6 will not be as huge a leap as Chapter 5 was. Instead, you are going to take a break from serious code and connect new ideas to the synapses that you connected with code in Chapter 5. In fact, in both Chapter 6 and Chapter 7 there will be very little code! Instead, I will connect cool new thoughts to the portion of your brain that is associating code with ideas explored in Chapter 5. Once you have established these connections in your brain, you will associate more code. In Chapter 6, you will explore a popular method for navigating through iPhone apps using the platform of a “tabbed application.” But for now, just relax and enjoy Chapter 6: Switches.
switch: A Tabbed Application
So far you have written code that allowed the user to poke or prod an iPhone or iPad in certain ways to make it do interesting things. This is now going to change. In this chapter, you will demonstrate how to create an iPhone app that allows you to do all of these cool functions without overwhelming your user, by dividing the functionality into several easy to locate tabs. This model, called the “tabbed model,” is so popular amongst app developers that Apple has included a basic tabbed application project in the New Project options in Xcode. In other words, the people at Apple recognize how much programmers like to use this model, so they created most of the code you need. When you're all done writing this app, you'll have a display with two tabs at the bottom. The content of the first tab will be an image that you set using Interface Builder with a button overlaid on top of it. This button will cause Mobile Safari to open the Apress Publishing Web Site. The content of the second tab will be a different image, but you can set the image name and other attributes in the implementation file and only set up enough of a framework in Interface Builder to make that possible.
Obtaining the Resources
You can watch a video of the wild and crazy, beaming-with-life, groovy PhD student Brian Parks coding this switches app at bit.ly/mX4pkk and simply follow along with him. You can also download the code to this project at bit.ly/vBSKMa where you can visually compare your code with mine. Most importantly, you will either need to download the three images at bit.ly/tIYl9Y or create your own two images and icon using the same dimensions as mine: 320 × 480 pixels for the two large images, and, of course, 57 × 57 pixels for your icon.
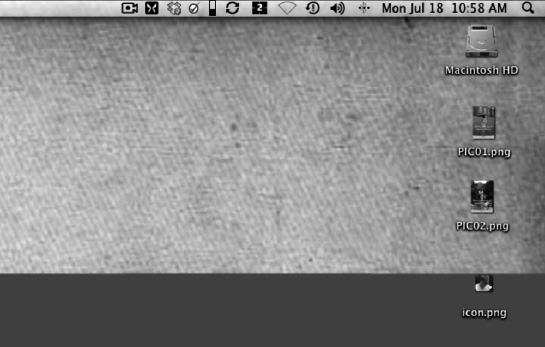
Figure 6–1. Download the three images onto your squeaky clean desktop.
1. Start off by cleaning out your desktop so there is nothing on it. Then either create your two 320 × 480 pixel images, one for each view, and then one icon, at 57 × 57 pixels, or download the three images used in the video, as illustrated in this book, at bit.ly/vBSKMa. This is shown in Figure 6–1.
Creating the App
Now let's create the app.

Figure 6–2. Start a Tabbed Application.
2. Start this app just like you've started all the apps so far: use ![]()
![]() N to start a new project. Select “Tabbed Application” from the sheet that appears. This template sets up a significant portion of the tab framework for you, so you can focus on filling in the content and not worrying about the gory details of the interaction model. Click “Next.” This is illustrated in Figure 6–2.
N to start a new project. Select “Tabbed Application” from the sheet that appears. This template sets up a significant portion of the tab framework for you, so you can focus on filling in the content and not worrying about the gory details of the interaction model. Click “Next.” This is illustrated in Figure 6–2.
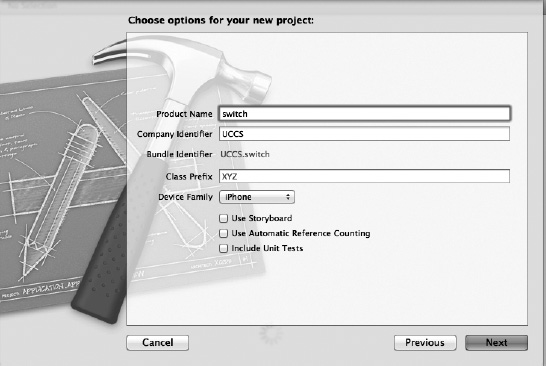
Figure 6–3. Name the app “switch.”
3. As illustrated in Figure 6–3, name your app “switch” and ensure that both of the checkboxes are unchecked. “Use Storyboard” drastically changes how a tabbed application is set up and is explored in detail in Chapter 7. In this app, you'll specifically target the iPhone because tabs become cumbersome on the iPad.
Adding the Images to the Project
At this stage, it's probably a good idea to drag your imagery to use on the tabs, so you won't have to worry about it later.
Figure 6–4. Drag in your 3 images from the desktop.
4. Drag your images from the desktop into supporting files, and in the process develop a very good habit for yourself. After dropping your images into the folder, you will be presented with a dialog, as shown in Figure 6–5.

Figure 6–5. Copy the items into the destination page's folder.
5. Xcode recognizes that the images are not already part of this project, so it strongly recommends that you let it add them for you. As mentioned before, it's also making sure that it has encapsulated your images inside itself, so if you go elsewhere to run it then it will be able to find your images and display them. This dialog also gives you the opportunity to change the actions it is about to perform, but, in general, the assumptions it makes are correct, so accept Xcode's recommendations, as illustrated in Figure 6–5.
Figure 6–6. Drag your icon to the app's icon property.
6. Typically, you open the plist to include the icon. In this app, you see a new way to associate an icon with your app. So, drag your icon file to the app's properties. Notice how Xcode takes care of putting it in the right place in your project and setting up all the necessary linkages. This step is not critical if you don't have an appropriately sized .png readily available. You can always change the icon later. Note that it only allows you to drop the correct sized icon into each specific box. In Figure 6–6 you see the icon being dragged into the app's icon property.
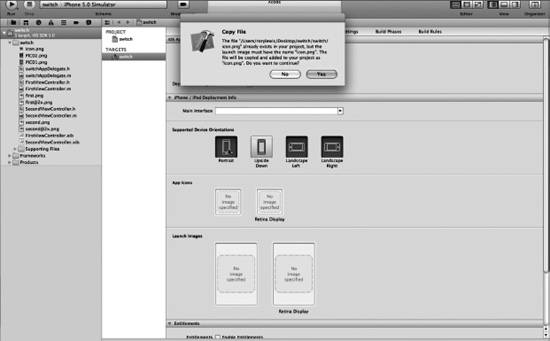
Figure 6–7. Warning that you dropped the images into the wrong place.
7. Xcode displays a warning indicating that it will copy the icon from its current location to the “correct” place, which is fine. As with the previous warning, simply accept Xcode's recommendations. You, of course, will not see this if you dropped your images into the correct folder. This is illustrated in Figure 6–7.
Running the App
You do know that some of the readers of this book, and students from my former classes, actually work at Apple developing iOS code and doing the very special things you are about to see in this step. That's why I love to say, “The clever people at Apple have coded…” because these clever people at Apple include people just like you, who began right here, reading the first version of this book. Right now, you probably just want to see what the clever people have coded for the Tabbed Application.

Figure 6–8. Run it so we can see what Apple has already coded for us.
8. Run the app by clicking the Run button or pressing ![]() R, as illustrated in Figure 6–8. If you've followed the instructions faithfully, you will see a “Build Succeeded” message and the iOS Simulator will start.
R, as illustrated in Figure 6–8. If you've followed the instructions faithfully, you will see a “Build Succeeded” message and the iOS Simulator will start.
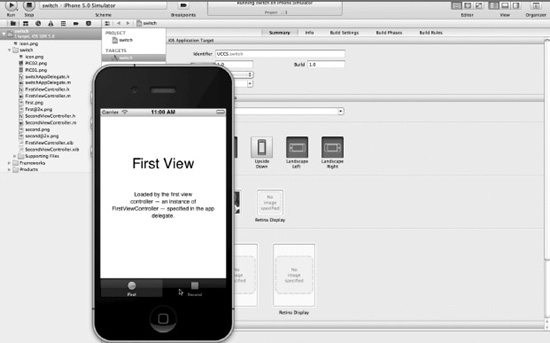
Figure 6–9. The first view to pop up will be the… First View.
9. As illustrated in Figure 6–9, after you run the app you will see how the iOS Simulator pops up a First View. This is quite amazing. Those clever people at Apple have coded so much hardcore stuff and cool things that it leaves very little for you to do. Go ahead and play around with the app; click on the tabs to see that there really are, in fact, two different sets of content being shown. Remember that you haven't even touched the .xib files or any of the code! However, this is exactly the point where the magic of the Tabbed Application template ends and your creative input begins.
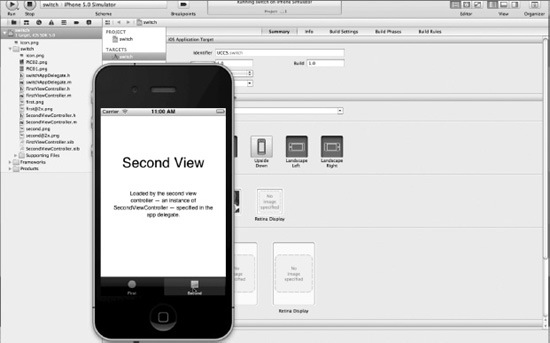
Figure 6–10. The Second View appears when you select the “Second” tab.
10. When you press the “Second” tab, located at the bottom of the screen, you will see that “Second View” pops up. So the tabs are actually working perfectly. I'm sure you will notice that while the Tabbed Application template sets up quite a bit and has prefilled some content, it's rather drab and uninteresting. Most importantly, it doesn't reflect anything that you might want it to do. Let's fix that.
Customizing the Tabs
That Second View that you see in Figure 6–10 can be replaced, along with the first introductory view, with code, or the next level of a game, or the details of an address tab or recipe. For your purposes, simply insert a first image into the First View and a second image into the Second View.
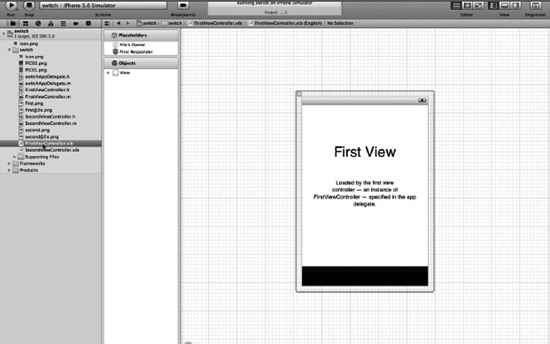
Figure 6–11. Open up the First View nib file.
11. Switch back to Xcode and click the “Stop” button. Select the .xib file called FirstViewController.xib, as shown in Figure 6–11. This shows what you saw in the iOS Simulator, minus the actual tabs on the Tab Bar. Let's set up your environment to make it easier for you to edit the nib (.xib). If you don't already have the Utilities View visible, click the appropriate view button to make it visible at the right side of the screen. You don't need the Debug View right now, so you can hide that. You don't really need the Navigator at the moment, either, but some developers (like Brian, the PhD student running this video) like to have it visible at all times. That is your choice.

Figure 6–12. Delete the UILabels.
12. To use your own images, you need to get rid of the ones Apple has provided. Click each of the UILabels and delete them by pressing the Delete key while each is selected. Your screen should resemble Figure 6–12. Many tabs do have text content, but yours will not, so these UI elements are not necessary. This leaves you with a blank view, as can be seen explicitly in the left side of the Standard Editor.

Figure 6–13. Drag a UIImage onto your view.
13. From the toolbox at the bottom of the Utilities View, find the image view (UIImageView) icon and drag it into the main area. As you do so, it expands to the same size as the area you can fill (in this case, the whole view). Use the guides to line up the UIImageView with the borders of the simulated iPhone window. This is illustrated in Figure 6–13.

Figure 6–14. Associate your first images with the first UIImageView.
14. In the Utilities View, go to the Attributes Inspector (![]()
![]() 4) and click the Image drop-down, as shown in Figure 6–14. This list is populated with a list of images that Xcode has found in our project:
4) and click the Image drop-down, as shown in Figure 6–14. This list is populated with a list of images that Xcode has found in our project: first.png and second.png are the circle and square that Xcode has used as icons for each of the respective tabs, while icon.png is our app icon, leaving two entries that correspond to the images you dragged into the project in Figure 6–6. Select PIC01 and Xcode will show it in the UIImageView.

Figure 6–15. Select a View Mode.
15. As shown in Figure 6–15, you can now see PIC01 being displayed on the view, and you should now see either PIC01, if you downloaded it from my site, or your own first image. You know the image is the correct dimension for a tabbed view, but it's still a good habit to line it up to the top or bottom, so that it fits exactly. In Figure 6–15, one can see Brian selecting a View Mode, placing PIC01 at the top of the screen. I typically place it at the bottom. It makes no difference if your images are perfectly sized. This is your choice, though, so get into the habit of selecting a view mode that pleases you. I usually choose the bottom alignment because I don't want to cut off the bottom of the image. The other content view modes, and what they mean, are described in more detail later in the chapter.
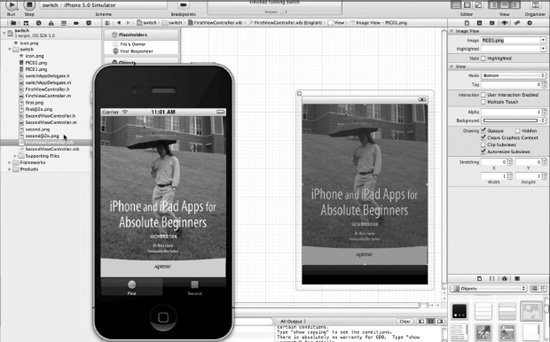
Figure 6–16. Run it and see what happens.
16. Let's see what you have now. As expected, you can see in Figure 6–16 that the first tab looks exactly like the way you've set it up in Interface Builder.
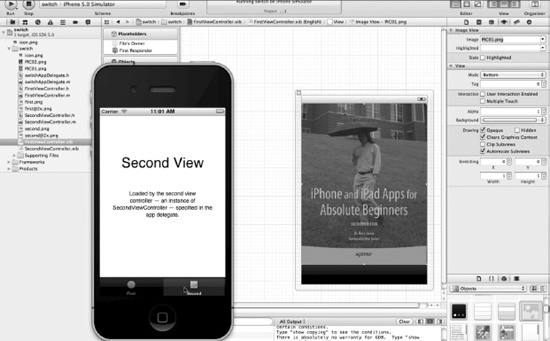
Figure 6–17. Second View still looks the same.
17. Of course, you haven't changed anything on the second tab. Select Second View and see that, as expected, it still looks exactly the same as shown in Figure 6–17. Let's add an image to this tab, but instead of telling Xcode which image to load directly in Interface Builder, you can write a couple of lines of code that load the image when the tab is shown.
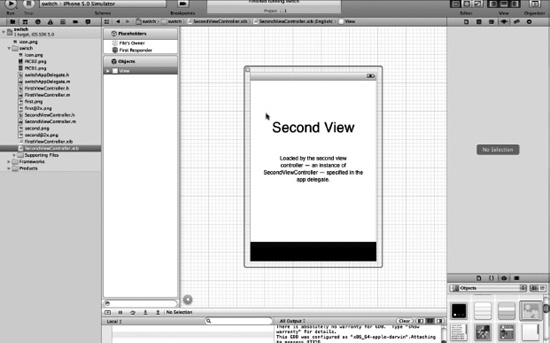
Figure 6–18. Control-drag a connection from your icon in Interface Builder into your header file.
18. Let's start by fixing up the Second View in exactly the same way you dealt with the first view. Select Second View in the Navigator and get your workspace set up. Again, select each label and delete it from the interface so that you have a clean UIView. This is illustrated in Figure 6–18.
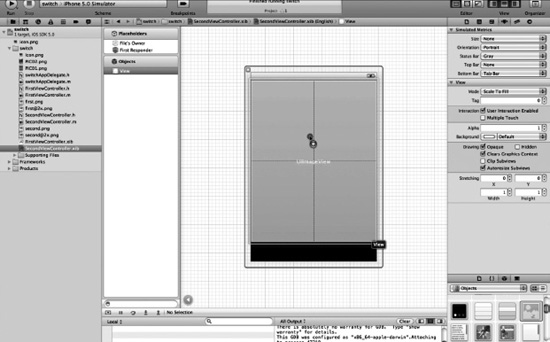
Figure 6–19. Open the SecondViewController.xib and drag a UIImageView into the interface.
19. You now need to work on the Second View. So open up the SecondViewController.xib and drag a new image view (UIImageView)into the interface just as you did for the first view in Figure 6–13, except now you are resizing the boundaries, as illustrated in Figure 6–19. Note that up to this point you haven't done anything differently. However, instead of using the Attributes Inspector to set the image and Content View Mode, you'll now do something a little different.
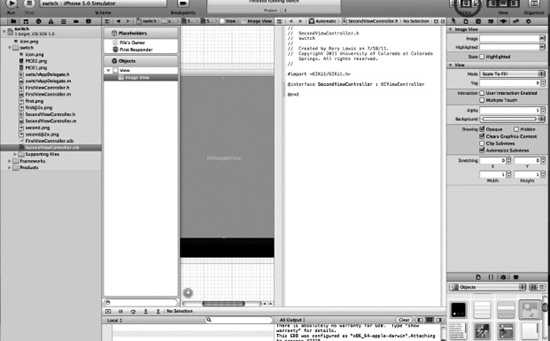
Figure 6–20. Open the Assistant Editor.
20. Pull up the Assistant Editor to show the header (.h) file that corresponds to your SecondViewController.xib file. This will allow you to indicate to Xcode how you wish to communicate between your code (which you'll write in a minute) and the interface that you've just finished designing. This is illustrated in Figure 6–20.
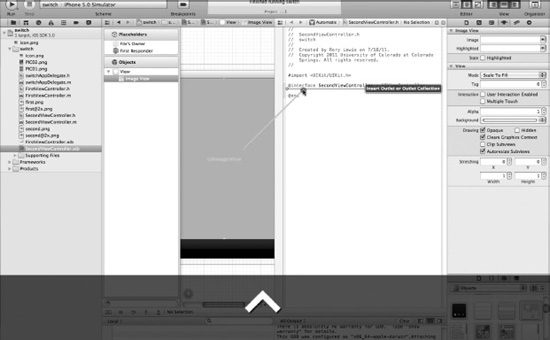
Figure 6–21. Control-drag an outlet into your header file.
21. Control-drag from the UIImageView in the main drawing area to anywhere between the @interface and @end directives. As shown in Figure 6–21, Xcode will display a translucent message reading “Insert Outlet or Outlet Collection.” Outlet Collections are a more advanced topic, but you've seen Outlets before and that's exactly what you're looking for.
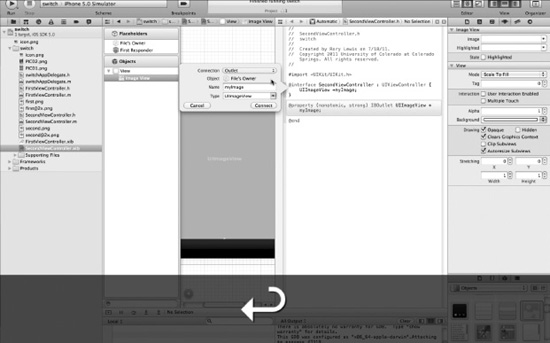
Figure 6–22. Name the outlet “myImage.”
22. Upon letting go of the mouse button and completing the control-drag, Xcode presents you with a popover to get some additional information. You've already determined you want an Outlet, so all that remains is to give it a name, say “myImage,” as illustrated in Figure 6–22.
Coding the Second View
Now let's write some code to make use of this new Outlet. To do so, select the file SecondViewController.m in the Navigator and find the method definition for viewDidLoad. It should look something like this:
- (void)viewDidLoad

{

[superviewDidLoad];

// Do any additional setup after loading the view, typically from a nib.

}
Add the lines in bold below, so that the method reads as follows (be sure to change myImage appropriately if you named your Outlet something different). Unless you named your image PIC02, you will have to change the text in quotes to the name of your image (without the “.png”):
- (void)viewDidLoad

{

    [superviewDidLoad];

// Do any additional setup after loading the view, typically from a nib.
    [myImagesetImage:[UIImageimageNamed:@"PIC02"]];

    [myImagesetContentMode:UIViewContentModeBottom];

}
These two lines of code are more or less equivalent to the changes you made in the Utilities View in Steps 14 and 15. The primary difference is that Steps 14 and 15 set these attributes directly in the nib file at development time, while the code you've just written sets these attributes at runtime, after the project has already been compiled onto our device. You'll look at the distinction between compile-time and runtime a little bit more in this chapter's “Digging the Code” section.
Figure 6–23. Time to write some code for the Second View.
23. When this is done, check Figure 6–23 against your code; they should look similar. You can now close the Second View.
Adding a Button
You want to make a button that links up to the apress.com site—just for illustrative purposes of how to can include code in your view.
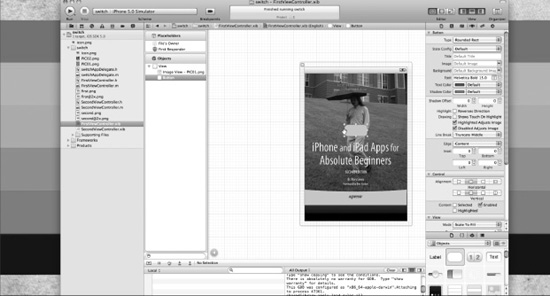
Figure 6–24. Drag a button onto the First View.
24. Let's do this on the First View: open up the FirstViewController.xib file and drag a button onto the image of me walking in the rain, as shown in Figure 6–24. Don't forget to type some text into the button. You can call the button that will take you to the Apress web site “Apress Web Site.” You can name a button whatever you like.

Figure 6–25. Control-drag from the button into your header file.
25. You've dragged so many buttons from nib files onto header files that all I need to say at this point is open the Assistant and control-drag an outlet onto your header, as illustrated in Figure 6–25. See how smart you are!
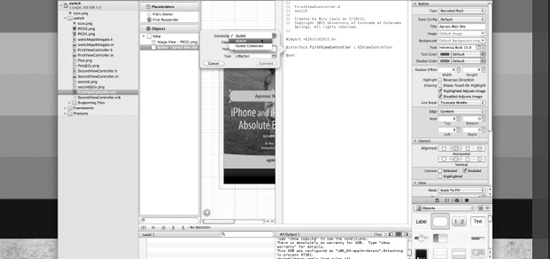
Figure 6–26. Change the default Outlet to an Action.
26. You know that if the button is going to perform an action then it cannot be an Outlet. Therefore, as illustrated in Figure 6–26, change the default Outlet to an Action.
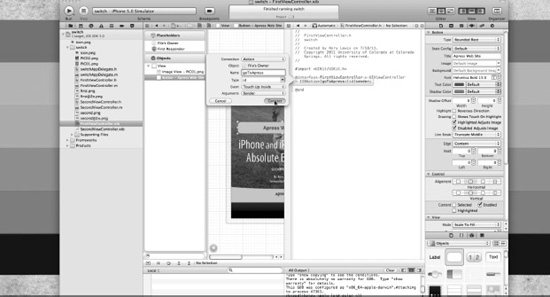
Figure 6–27. Name the Action “goToApress.”
27. You want this Action to take a user to apress.com when they hit the button. You need to give the Action button a name, so let's call it goToApress, as illustrated in Figure 6–27. Once done, click Connect or press Return.
Coding the Button
You now need to code the button.
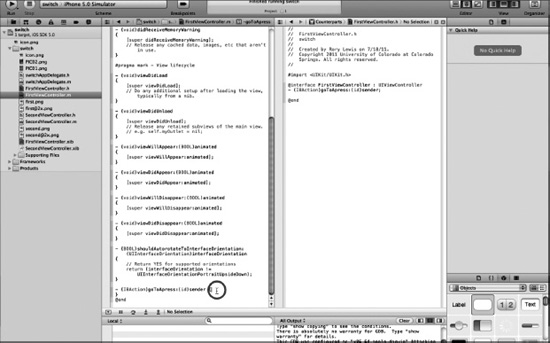
Figure 6–28. Let's code the goToApress method.
28. Open up your implementation file, as shown in Figure 6–28. You will see that that Xcode has also created a method stub for you (the framework for the method, but with no actual code that does anything useful). Click in this method and enter the following single line of code:
[[UIApplicationsharedApplication] openURL:[NSURL

URLWithString:@"http://apress.com"]];
Figure 6–29. Re-inspecting the code.
29. When you think about it, it's really amazing that a seemingly complex operation like opening Mobile Safari from within your own app could have been condensed into a single statement by the people at Apple. So let's dissect the code you've just written, as shown in Figure 6–29.
In iOS, all apps are sandboxed into their own little piece of the system's resources. The topic of sandboxing is so complex that books can and have been written about the subject, so I won't go into detail here. Instead, it's sufficient to understand that iOS isn't going to let your app just do whatever it wants, so you have to use certain APIs that Apple has provided to tell the underlying system to do these things on your behalf.
In this case, send a message to the UIApplication class to obtain a reference to sharedApplication—that is, an object representing your application's gateway to the rest of the system. This object has a method called openURL, which does exactly that when passed an instance of NSURL.
In order to pass openURL an instance of NSURL, send the NSURL class the URLWithString message, which transparently converts the string you provide into an instance of NSURL.
Using the Button
It's time to test out the button.
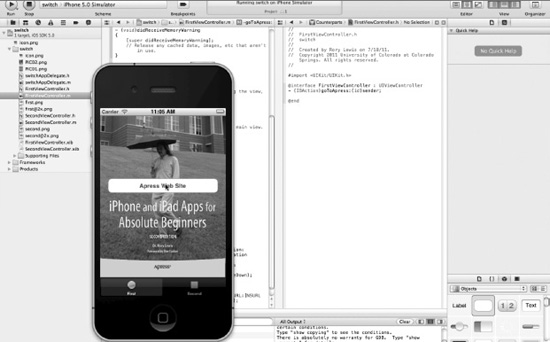
Figure 6–30. Run it!
30. As shown in Figure 6–30, when you run the app and click the button saying “Apress Web Site,” your app will call off to iOS and launch Mobile Safari, as shown in Figure 6–31.
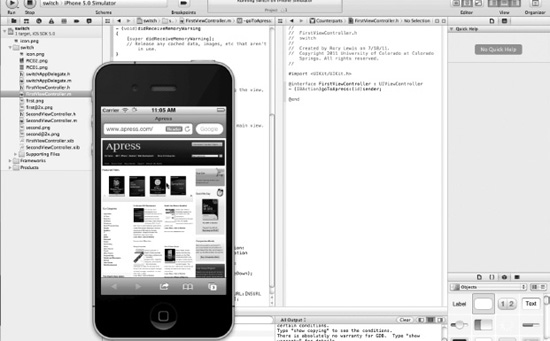
Figure 6–31. The apress.com website on your iPhone!
31. Congratulations! You've successfully completed your sixth iPhone app! See Figures 6–31 and 6–32.
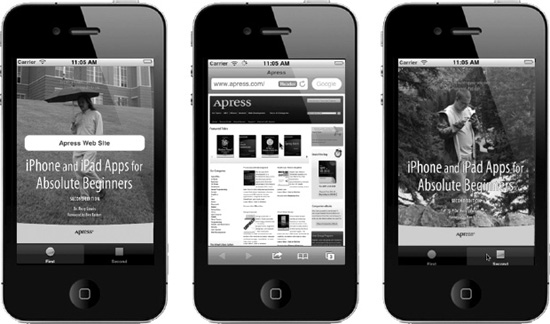
Figure 6–32. Your sixth iPhone app.
Digging the Code
In this chapter, you quickly flew by a few advanced topics in order to get through the app. Let's take a step back from the code you've written and have a more in-depth look at some of these topics.
- In Step 15, you set a Content View Mode to alter how your image would be scaled and cropped to fit in the UIImageView. Take a look at what this means, and how each of the options differ from one another.
- In Step 24, I mentioned the difference between compile-time and runtime. For the purposes of writing the app, it was sufficient to know that the distinction led to two different ways of evoking the same resulting behavior. Here, I'll diverge into the philosophy of code and talk about why you might want to use one strategy over another in a given situation.
Content View Modes
In Step 15, you loaded an image into a UIImageView. If you used the images from the companion web site, the image was mostly the right size (it was exactly the same size as the full iPhone screen). Since the tab bar took up some of the available screen space, the space available for the UIImageView was a little shorter than your image. Xcode initially squished the image to make it fit. This view mode (the default) is called “Scale To Fill” (UIViewContentModeScaleToFill) because it scales the image in both X and Y directions to fill the content frame.
Unless your images are exactly the same size as your UIImageView, this will result in distortion. This might be tolerable if you are loading images that you have created directly into your interfaces (either in Interface Builder or via the viewDidLoad method), but that limits what your app can do. On the other hand, if you will be loading an image of unknown or unrestricted dimensions, some of the other view modes will be more appropriate. Have a look at Figure 6–33 for a list of the available view modes.
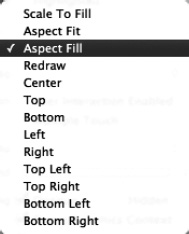
Figure 6–33. Xcode's UIImageView Content View Modes.
Starting at the top of the list in Figure 6–33, following Scale To Fill, Aspect Fit and Aspect Fill (UIViewContentModeScaleAspectFit and UIViewContentModeScaleAspectFill, respectively) will probably be the most useful to you.
- Aspect Fit. This scales the content, maintaining aspect ratio, until the largest dimension is equal to the corresponding dimension of the image view. Thus, if you have a UIImageView similar to the one in this chapter's app and a photo that was taken in landscape orientation, the image will be scaled so that the entire image is visible and empty space will appear above and below the photo in the interface.
- Aspect Fill. This scales the image until the other dimension fills the available space. This results in the entire view being filled with your image, at the expense of trimming off some of the image. Using the same example, this would cause the left and right edges of your photo to be trimmed.
The nine view modes at the bottom of the list (Center through Bottom Right) do no scaling at all on your image, and simply anchor the specified point in your image to the corresponding point in the content frame. For instance, choosing “Top Left” will cause the top left section of your image to be displayed so that the top edge is aligned with the top of the UIImageView, and the left edge is likewise aligned. Any extra image beyond the size of the content frame is cropped. In this app, you chose “Bottom” so that the bottom edges were aligned, and the extra portion of the image at the top was cut off.
The “Redraw” view mode provides a way to customize how your content scales and is a far more advanced topic than this discussion.
Compile-time and Runtime
In Step 24, I mentioned the terms compile-time and runtime in passing, noting that the distinction in that context was that the former meant you configured things in the Interface Builder part of Xcode and the latter meant you did this configuration by writing some code in your implementation file. That was a suitable definition of the terms at that time, but they can be defined a little more formally now.
Compile-time indicates that something happens when your project is compiled, or built, prior to being run on the simulator or on a real iOS device. These are things like the definition of classes in .h and .m files, the organization and layout of UIViews in your nib files, and the configuration you do in Xcode's various inspectors. Everything that is set at compile-time defines exactly the state your app will be in when it is started.
Runtime, on the other hand, describes the segment of time after your app has started running. This is when all the code you've written is actually executed, effecting changes in the state of the app from the way it was set up at compile time. In this chapter, you specified the image for the second tab through a message in your implementation file. Thus, the image to show was unspecified at compile time, but at runtime a series of instructions was executed to display the desired image in the UIImageView you provided.
Why is this difference significant? You proved, during the course of writing this app, that you can do the exact same thing at runtime as you could at compile-time. However, executing instructions to do what you wanted required several extra clicks and drags, and a few more lines of code. If you already know how you're going to configure something at compile-time, the advantages of writing code to do the same thing will diminish. However, if you want to dynamically change the properties of an object during the execution of the app (last chapter's app is a great example of this), it is obviously impossible to set all aspects of the state at compile-time.
In short, compile-time defines the starting state of your app, while runtime describes the actions that occur once your app begins running.
In the Chapter Ahead
In Chapter 7, you will move into the next level of complexity: Storyboarding.
Storyboarding is the new way Apple allows one to lay out how a user moves through an app, in much the same way that a movie producer sets up a storyboard to show how a movie will go from one scene to the next. Storyboarding has segues (pronounced “segways”) that connect each view in your app with another. It is tempting to just go straight to storyboarding, but it's best to first learn a little about the code behind these buttons and images, as you have done. So take a break, and then let's move on to the land of storyboarding.