
CHAPTER 6
![]()
Get Moving: Adding Animation to Your Apps
Animation is at the heart of nearly everything that happens on a Windows Phone. The most engaging Live Tiles are those that can animate, move around, and change their data dynamically. To move around the operating system, we slide from screen to screen, both vertically and horizontally. Finally, when we open an application, we get a nice page-turning animation that leads us directly into the app. Each of these animations has a purpose, and this chapter will focus on how to use this subtle, but effective, tool.
When we talk about animation, we're not talking about spinning buttons, or shapes streaking across the screen. Those types of actions are certainly possible, but fall squarely in the category of gratuitous animation. While you might use something like this for creating a game in Silverlight, this chapter is going to focus on what we call purposeful animation within the context of business applications.
Purposeful animation is done with a specific goal in mind. Perhaps we need to elegantly swap out some data from the screen. Or we need to compensate for a long page-load time. Maybe we just want to provide an immersive user experience. Animations make all of this possible. In this chapter, we're going to focus specifically on how to create animations, and how we can use those animations to buy ourselves some time when loading our pages.
Understanding the Lexicon of Animation
There are many words that will be used when you talk with other developers about using animations in your apps: animation, storyboard, keyframe, and tweening are the most common.
Animation is probably the most overused word of the group, and it's essentially meaningless. It doesn't refer to a specific code structure at all; instead it refers to the concept of moving some object on the screen. Anything that involves motion on an applications' screen will often be referred to as animation.
Storyboard is a bit more specific, and you'll see this in the next section. A storyboard is a specific code structure that holds all of the instructions for a specific set of movements or changes in our UI.
A keyframe is a code structure within a storyboard. Each time we want to move or change something on the screen, we need to determine what the beginning and ending states are. These beginning and ending states are keyframes; we will use these extensively in our animations.
Finally, you may hear the word tweening used from time to time. Tweening refers to the magic that happens between keyframes. Remember, with keyframes, we only define the starting and ending point of an animation. The best way to think about tweening is to imagine when you were younger, and you drew a small animated cartoon in the corner of one of your notebooks. On the next page, you drew the same picture, but changed by just a little. You continued through a dozen or more pages. By flipping each page of the notebook, you could piece together a simple animated scene, but you had to draw every single frame of that animation. In Silverlight animation, you basically get to draw the first and last frame of that notebook animation, and the runtime takes care of creating everything in the middle.
Creating a Simple Animation
Before we start our example, let's take a look at what defines an Animation in our Windows Phone applications. The specific Xaml structure is called a Storyboard, and all of the interactions can be completely defined in the Xaml markup and the code-behind. The Storyboard can contain multiple animation elements, which you can just think of as sets of instructions executed over time. Listing 6-1 is a simple Storyboard that fades the Opacity of the TargetName element to 0, which would make it invisible.
Listing 6-1. Simple FadeOut Storyboard
<Storyboard x:Name="FadeOut">

        <DoubleAnimationUsingKeyFrames Storyboard.TargetProperty="(UIElement.Opacity)"

Storyboard.TargetName="TextRotator">

                <EasingDoubleKeyFrame KeyTime="0" Value="1"/>

                <EasingDoubleKeyFrame KeyTime="0:0:1" Value="0"/>

        </DoubleAnimationUsingKeyFrames>

</Storyboard>
As you can see in Listing 6-1, we start with a Storyboard element. In order to call the Storyboard from code (as with all other Xaml elements), it needs to be named. In this case, we've called it “FadeOut.”
Inside that element, we have an element of type DoubleAnimationUsingKeyFrames. All this really means is that we are going to manipulate a Double value over a set of KeyFrames. We've also specified the TargetProperty of this animation, (the property we're manipulating), as well as the TargetName(the object whose property we're manipulating). In our example, we're changing the Opacity of the TextBlock named TextRotator.
We have defined two KeyFrames in our animation. They represent the starting and ending points we desire, and Silverlight takes care of the rest of it for us. The first KeyFrame states that at the 0th second of our animation (in other words, the beginning), the Opacity value should be 1, or fully opaque. At one second, however, the Opacity should have changed to 0, or fully transparent. The animation itself will take care of rendering the rest of the animation for us by tweening, or interpolating all the interim positions between fully visible and fully opaque, so that the text appears to fade from view over the duration of a second.
There's much to know about creating animations, all of the different animation and keyframe types, and their specific syntaxes. It would be nearly impossible to keep all of it straight in your head. Instead of typing all of this in Xaml, we recommend using Expression Blend, which can do 100 percent of the work for you using a convenient user interface.
For a simple example of an animation, let's start with a Text Rotator. Suppose we have several messages that we want to present to our user, much like a news web site (or the ticker at the bottom of the ESPN television channels.) We can manipulate the Opacity property of a TextBlock to fade the current text from the user's view, replace it with the next message, and fade it back onto the screen. We'll implement our text rotator in two steps. First, we'll create a storyboard for the animation, then we'll write the code we need to invoke it.
Using Expression Blend to Create a Storyboard
To begin work on our text rotator, we'll use Expression Blend to quickly build its storyboard. As you'll see as you work through this example, Blend simplifies the animation process, and lets you focus on the animation visually, rather than having to play a guessing game with XML values in Visual Studio.
1. In Expression Blend, create a new Windows Phone project, or just revisit one of the other projects you've created so far in this book. All we need is a page with a TextBlock on it. In the following example, we're going to use the PageTitle element that is on each page by default:
<TextBlock x:Name="PageTitle" Text="page name" Margin="9,-7,0,0" Style="{StaticResource

PhoneTextTitle1Style}"/>
2. In Blend, click on the TextBlock element in your design surface or Object list, as shown in Figure 6-1.
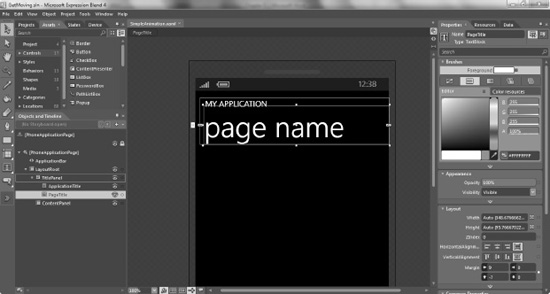
Figure 6-1. Selecting a TextBlock element
In the Objects and Timeline panel, you find a series of icons that represent our interactions with Storyboards. You can take a closer look at them in Figure 6-2, but the only button currently enabled is the + button, which we'll use to create a new Storyboard.

Figure 6-2. Creating a new Storyboard in Blend
3. Click the New Storyboard button, which will bring up a Create Storyboard Resource dialog box, shown in Figure 6-3, for you to name this Storyboard. Name it FadeOut and click OK.
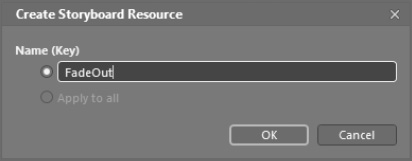
Figure 6-3. Naming a Storyboard
You should notice a few changes to the Blend environment at this point, as shown in Figure 6-4. First, the design surface is now wrapped in a red outline, and there is text that reads “FadeOut timeline recording is on.”

Figure 6-4. Timeline recording in Expression Blend
You should also notice, as shown in Figure 6-5, that your Objects and Timeline panel has become much more crowded. This is because we're now working directly on a Storyboard, and the timeline and playback controls are displayed.
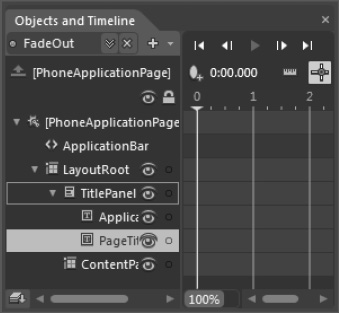
Figure 6-5. The Objects and Timeline Panel
4. To give yourself more room, you can press F6 to change your workspace from Design to Animation. It just moves the Objects and Timeline panel to the bottom of Blend, so that you can see the entire timeline easily (as shown in Figure 6-6). You can also do this by choosing the menu options Window ![]() Workspaces
Workspaces ![]() Animation.
Animation.
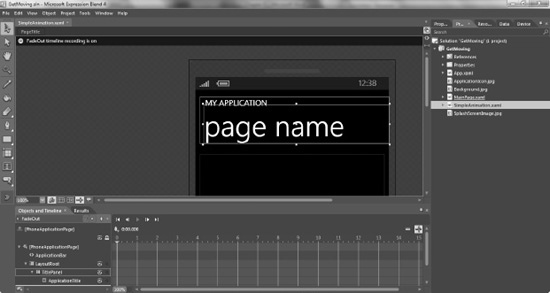
Figure 6-6. The Animation workspace in Expression Blend
Now we are going to use this new timeline tool to manipulate the Opacity of our TextBlock over time. In Figure 6-7, there are several important features we'll be using.
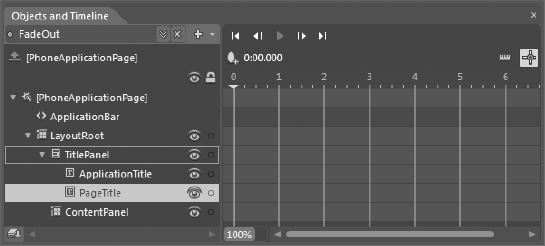
Figure 6-7. The Storyboard timeline
The first thing you should see is the yellow arrow stripe that is sitting on the zero in the timeline. This indicates the current time that you are working on in the animation. Zero means the beginning. There is a small icon above the zero that looks like an egg with a plus sign next to it. This is the New Keyframe button.
As we discussed earlier, key frames are those specific moments in your animation where you're being explicit about the position of an object, or its opacity, or whatever property you're manipulating. In the Xaml we showed you in Listing 6-1, there were two key frames defined: one at zero seconds, and one at one second. Let's do the same thing here.
5. Make sure that you've selected the PageTitle element from the list of objects on the left (like Figure 6-7), and then press the New Keyframe button. This will record that the PageTitle had opacity of 100 percent at zero seconds (as shown in Figure 6-8). Next, move that yellow line from zero seconds to one second.

Figure 6-8. Setting keyframes in a Storyboard
Now, instead of creating another keyframe, you can just change the Opacity of the element, and Blend will automatically create the second keyframe for you.
6. Look over to your Properties panel, and find the Opacity property (as shown in Figure 6-9). We need to change this value to zero.
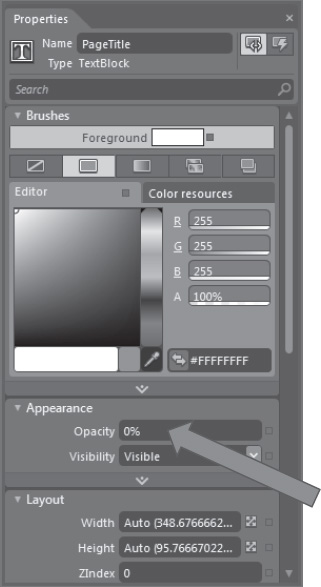
Figure 6-9. Changing the Opacity property of a TextBlock
At this point, our FadeOut storyboard is complete. Looking back at your Objects and Timeline panel, it should now look like Figure 6-10.

Figure 6-10. A simple, completed Storyboard in Expression Blend
7. Above the New Keyframe button, there are playback controls. If you press the Play button, you should now see your PageTitle text fade away to invisible.
In most cases, you're probably going to want to have a second animation that brings that text back to visible. While it might seem obvious to just follow these steps in Blend again, we recommend optimizing for programmer speed.
If you look at the Xaml that Blend has created for you, it should look nearly identical to Listing 6-1 from earlier. In Listing 6-2, we've simply copied and pasted that new Xaml, and changed a few values. Blend makes it very easy to create animations, but it is in your best interest to stay close to the Xaml that it generates, so you can make changes inline when necessary. If you would like, you can copy the Xaml in Listing 6-2, replacing your existing storyboard with these two.
Listing 6-2 FadeOut and FadeIn Storyboards in Xaml
<Storyboard x:Name="FadeOut">

        <DoubleAnimationUsingKeyFrames Storyboard.TargetProperty="(UIElement.Opacity)" Storyboard.TargetName="PageTitle">

                <EasingDoubleKeyFrame KeyTime="0" Value="1"/>

                <EasingDoubleKeyFrame KeyTime="0:0:1" Value="0"/>

        </DoubleAnimationUsingKeyFrames>

</Storyboard>

<Storyboard x:Name="FadeIn">

    <DoubleAnimationUsingKeyFrames Storyboard.TargetProperty="(UIElement.Opacity)" Storyboard.TargetName="PageTitle">

        <EasingDoubleKeyFrame KeyTime="0" Value="0"/>

        <EasingDoubleKeyFrame KeyTime="0:0:1" Value="1"/>

    </DoubleAnimationUsingKeyFrames>

</Storyboard>
You can see that all that was changed in the new FadeIn storyboard was its name, as well as the order of the Value properties of the two KeyFrames. Otherwise, the Xaml is identical. If you run your project (F5) in the emulator, you will notice that none of our animations actually take place. This is because we never called them from our code. Let's look at that next.
Calling Our Storyboard from Code
To kick off our Storyboard, we need to call its Begin() method from our code-behind file. In nearly every case, we're going to be triggering our Storyboards in response to some user interaction. Perhaps they chose to navigate to another page, or maybe they were just clicking a button. In any case, starting an animation couldn't be more straightforward.
1. To do this, open the code-behind file for your project, and add the line from Listing 6-3: FadeOut.Begin();. You can do this in Expression Blend or Visual Studio, so use whichever tool you are more comfortable using.
Listing 6-3. Calling a Storyboard from Code
namespace GetMoving

{

    public partial class SimpleAnimation : PhoneApplicationPage

    {

        public SimpleAnimation()

        {

            InitializeComponent();

            FadeOut.Begin();

        }

    }

}
In our example, we created two opposite storyboards. One to FadeOut, and one to FadeIn. In this example, we want to chain them together, so that the FadeIn animation starts as soon as the FadeOut animation ends. Thankfully, each storyboard also has a couple of events that we can leverage. We'll be using the Completed event to determine when each animation finishes. (This is also a simple way to create a delay timer. Create a storyboard that doesn't actually do anything over a specific period of time, and when it completes, you know your application has waited the appropriate amount of time.)
2. In Listing 6-4, we've created event handlers for both of our Storyboards, and they just bounce between each other. Add Listing 6-4 to the code-behind for the project.
Listing 6-4. Using the Completed Events of a Storyboard
public partial class SimpleAnimation : PhoneApplicationPage

{

    public SimpleAnimation()

    {

        InitializeComponent();

        FadeOut.Completed += new EventHandler(FadeOut_Completed);

        FadeIn.Completed += new EventHandler(FadeIn_Completed);

        FadeOut.Begin();

    }


    void FadeIn_Completed(object sender, EventArgs e)

    {

        FadeOut.Begin();

    }


    void FadeOut_Completed(object sender, EventArgs e)

    {

        FadeIn.Begin();

    }

}
As you can see, the Completed event handlers simply call the Begin method for the opposite Storyboard, causing our PageTitle element to fade and return from the background repeatedly. In our next step, we're going to swap the text values in PageTitle from an array of strings we have in our code-behind.
3. Add Listing 6-5 to the code-behind for the project.
Listing 6-5. Adding Text Swapping to Our Animations
public partial class SimpleAnimation : PhoneApplicationPage

{

    string[] textCollection=new string[5] {"number one!","two seconds","threeve","use the

fourth","a fifth is 20%"};

    int textCounter = 0;


    public SimpleAnimation()

    {

        InitializeComponent();

        FadeOut.Completed += new EventHandler(FadeOut_Completed);

        FadeIn.Completed += new EventHandler(FadeIn_Completed);

        FadeOut.Begin();

    }


    void FadeIn_Completed(object sender, EventArgs e)

    {

        FadeOut.Begin();

    }


    void FadeOut_Completed(object sender, EventArgs e)

    {

        FadeIn.Begin();

        PageTitle.Text = textCollection[textCounter];

        textCounter++;

        if (textCounter == 5) textCounter = 0;

    }

}
Because we've already identified the place where our text is invisible (The FadeOut Completed event handler), we can use this opportunity to swap the text in our PageTitle element while the user can't see it.
In Listing 6-5, we added an array of strings at the top of the page, and iterated through that list each time the text is invisible. We've now created a completely functional text rotator. You could use this for updating the interface with news stories, sports scores, or other relevant information that updates on a regular basis.
One of the major limitations with Storyboards that most developers find is that the name of the target element is explicitly called out in the Xaml. This means that you can't do clever tricks like the following:
FadeOut.Begin(SomeOtherTextBlock);
However, as we mentioned earlier in this book, everything that is written in Xaml can be manipulated by code. Let's take a look at how we could use the same Storyboards we just created to manipulate the other default TextBlock on the page, ApplicationTitle.
Reusing a Storyboard
To change the target of a Storyboard in code, we just need to access the Storyboard.SetTarget method. In our earlier example, Listing 6-5, we rotated our string values on only the PageTitle text block. In Listing 6-6, each time we reach the end of our string array, we switch the target of our Storyboards, resulting in our string values rotating on PageTitle, and then switching and rotating through ApplicationTitle.
Listing 6-6. Changing the Target of a Storyboard
    public partial class SimpleAnimation : PhoneApplicationPage

{

    string[] textCollection=new string[5]{ "number one!","two seconds","threeve","use the

fourth","a fifth is 20%"};

    int textCounter = 0;

    TextBlock currentTextBlock;


    public SimpleAnimation()

    {

        InitializeComponent();

        currentTextBlock = PageTitle;

        FadeOut.Completed += new EventHandler(FadeOut_Completed);

        FadeIn.Completed += new EventHandler(FadeIn_Completed);

        FadeOut.Begin();

    }


    void FadeIn_Completed(object sender, EventArgs e)

    {

        FadeOut.Begin();

    }


    void FadeOut_Completed(object sender, EventArgs e)

    {

        FadeOut.Stop();

        FadeIn.Stop();

        currentTextBlock.Text = textCollection[textCounter];

        textCounter++;

        if (textCounter == 5)

        {

            textCounter = 0;


            if (currentTextBlock == PageTitle) currentTextBlock = ApplicationTitle;

            else currentTextBlock = PageTitle;


            Storyboard.SetTarget(FadeIn, currentTextBlock);

            Storyboard.SetTarget(FadeOut, currentTextBlock);

        }


        FadeIn.Begin();

    }

}
If you use the code in Listing 6-6, you should see both of the TextBlocks change their values in the animation over time. It will eventually look like Figure 6-11.

Figure 6-11. Changing the target of a Storyboard
So, at this point in the chapter, we've shown how to make a simple animation, and use it in several ways. The rest of this chapter is going to be dedicated to a noble goal: stalling your user.
Creating Custom (and Distracting) Page Transitions
There are many reasons to use animation in your applications, but none are as devious and psychological as what we're going to discuss in this section. If you've ever bought anything from a web site, you've likely seen the spinning icons and status bars that get displayed. These distractions give zero indication about how much waiting you're going to be doing, but you're content to wait because the application seems to be indicating that it's working.
We're not making spinning icons in this chapter. We can do one better. We're going to focus on creating custom page transitions that allow us to stall the user a bit. If your page loads with a transition, this means that you are giving yourself the amount of time the animation takes to load other content.
In our example for this section, we're going to create a page-turning animation that we use when a page is loaded or unloaded. The current page will fly away, and the new page will fly in. The entire transition will take under two seconds to complete, but the distraction it provides will buy you significant time to populate a ListBox, or bring data in from a web service. Plus, it looks very cool.
Creating the Page Turn Animation
To build this example, let's keep it very simple.
1. Add two new pages to your project. One named PageOne.xaml, and one named PageTwo.xaml. We will jump between these two pages for our entire example. On both pages, we need to start with creating an animation that rotates the entire screen like a door, both opening and closing.
In each case, we will be manipulating the LayoutRoot Grid element that is the root element on our pages. The earlier parts of this chapter illustrated how to create an animation using Expression Blend, so this case will focus on the Xaml that is generated, and why it is there.
2. Copy the contents of Listing 6-7 into PageOne.xaml, replacing the default contents of the page.
Listing 6-7. The Xaml Contents of PageOne.xaml
<phone:PhoneApplicationPage

    x:Class="GetMoving.PageOne"

    xmlns="http://schemas.microsoft.com/winfx/2006/xaml/presentation"

    xmlns:x="http://schemas.microsoft.com/winfx/2006/xaml"

    xmlns:phone="clr-namespace:Microsoft.Phone.Controls;assembly=Microsoft.Phone"

    xmlns:shell="clr-namespace:Microsoft.Phone.Shell;assembly=Microsoft.Phone"

    xmlns:d="http://schemas.microsoft.com/expression/blend/2008"

    xmlns:mc="http://schemas.openxmlformats.org/markup-compatibility/2006"

    FontFamily="{StaticResource PhoneFontFamilyNormal}"

    FontSize="{StaticResource PhoneFontSizeNormal}"

    Foreground="{StaticResource PhoneForegroundBrush}"

    SupportedOrientations="Portrait" Orientation="Portrait"

    mc:Ignorable="d" d:DesignHeight="768" d:DesignWidth="480"

    shell:SystemTray.IsVisible="True">


    <phone:PhoneApplicationPage.Resources>

        <Storyboard x:Name="FlipIn">

            <DoubleAnimationUsingKeyFrames

Storyboard.TargetProperty="(UIElement.Projection).(PlaneProjection.RotationY)"

Storyboard.TargetName="LayoutRoot">

                <EasingDoubleKeyFrame KeyTime="0" Value="-120"/>

                <EasingDoubleKeyFrame KeyTime="0:0:0.8" Value="0"/>

            </DoubleAnimationUsingKeyFrames>

        </Storyboard>

        <Storyboard x:Name="FlipOut">

            <DoubleAnimationUsingKeyFrames Storyboard.TargetProperty="(UIElement.Projection).(PlaneProjection.RotationY)" Storyboard.TargetName="LayoutRoot">

                <EasingDoubleKeyFrame KeyTime="0" Value="0"/>

                <EasingDoubleKeyFrame KeyTime="0:0:0.5" Value="90"/>

            </DoubleAnimationUsingKeyFrames>

        </Storyboard>

    </phone:PhoneApplicationPage.Resources>


    <Grid x:Name="LayoutRoot" Background="Transparent" RenderTransformOrigin="0,0">

        <Grid.Projection>

            <PlaneProjection CenterOfRotationX="0" RotationY="-120"/>

        </Grid.Projection>

        <Grid.RowDefinitions>

            <RowDefinition Height="Auto"/>

            <RowDefinition Height="*"/>

        </Grid.RowDefinitions>

        <StackPanel x:Name="TitlePanel" Grid.Row="0" Margin="12,17,0,28">

            <TextBlock x:Name="ApplicationTitle" Text="MY APPLICATION" Style="{StaticResource PhoneTextNormalStyle}"/>

            <TextBlock x:Name="PageTitle" Text="page one" Margin="9,-7,0,0" Style="{StaticResource PhoneTextTitle1Style}"/>

        </StackPanel>

        <Grid x:Name="ContentPanel" Grid.Row="1" Margin="12,0,12,0">

            <Button Content="Button" Height="72" HorizontalAlignment="Left" Margin="137,153,0,0" Name="button1" VerticalAlignment="Top" Width="160" Click="button1_Click" />

        </Grid>

    </Grid>

</phone:PhoneApplicationPage>
As you can see, we've created two separate Storyboards, FlipIn and FlipOut. They rotate the entire page of our application like a door swinging inwards and outwards. We can do this by manipulating the RotationY property of its PlaneProjection. Another important change to note is the RenderTransformOrigin on the LayoutRoot Grid element. It is set to “0,0”—which means that all of our calculations on the x and y-axis will happen from their respective zero values, not from the middle of the element, which is the default. Finally, you should see that we have rotated our LayoutRoot element by the amount of -120 degrees on its Y axis. This is the starting position that all of our pages will contain, because in order to rotate it in, it can't already be displayed on screen. Much like our previous example, however, we need to call these storyboards from code. Let's take a look at that in the next section.
Adding the Animation to Your Page Events
Initially, it might seem to make sense to attach our animations to the page lifecycle events: OnNavigatedTo and OnNavigatedFrom. What you'll find, however, is that both OnNavigatedFrom and OnNavigatingFrom will terminate your page before the animation completes. This means that we've got to handle the animation and page navigation ourselves, using a combination of event handlers and the OnNavigatedTo event.
1. Copy the code from Listing 6-8 into your PageOne.xaml.cs file, replacing the default code.
Listing 6-8. Code Contents of PageOne.xaml.cs
using System;

using System.Windows;

using Microsoft.Phone.Controls;


namespace GetMoving

{

    public partial class PageOne : PhoneApplicationPage

    {

                public PageOne()

        {

            InitializeComponent();

        }


                protected override void

OnNavigatedTo(System.Windows.Navigation.NavigationEventArgs e)

                {

                        base.OnNavigatedTo(e);

                        FlipOut.Completed += new EventHandler(FlipOut_Completed);

                        FlipIn.Begin();

                }


        void FlipOut_Completed(object sender, EventArgs e)

        {

                        NavigationService.Navigate(new Uri("/PageTwo.xaml", UriKind.Relative));

        }


        private void button1_Click(object sender, RoutedEventArgs e)

        {

                        FlipOut.Begin();

        }

    }

}
In Listing 6-8, we have three methods that we are using to manage both the FlipIn and FlipOut animations. The first, and most important, is the OnNavigatedTo method. This is fired each time that your page is navigated to (vs. the Loaded method, which is only called when the page is actually loaded), so kicking off the FlipIn storyboard makes perfect sense here. We also want to define a Completed event handler for the FlipOut storyboard, because we'll need to know when it's done in order to navigate to the appropriate page.
In our button1_Click event, we are handling for when the user clicks the button in our interface. Since the button is designed for navigation to another page, we call the FlipOut storyboard, to show the final animation for our page.
When FlipOut completes, we can run the code that is in the FlipOut_Completed event handler. In our simple example, we've hard-coded the navigation method here, which navigates to PageTwo.xaml.
The code for PageTwo.xaml (Listing 6-9) and PageTwo.xaml.cs is in Listing 6-10. You'll notice that they're nearly identical to PageOne's files in every way, except where the pages refer to themselves or each other.
2. Copy the contents of Listing 6-9 and Listing 6-10 to their appropriate pages in your project.
Listing 6-9. Code Contents of PageTwo.xaml
<phone:PhoneApplicationPage

    x:Class="GetMoving.PageTwo"

    xmlns="http://schemas.microsoft.com/winfx/2006/xaml/presentation"

    xmlns:x="http://schemas.microsoft.com/winfx/2006/xaml"

    xmlns:phone="clr-namespace:Microsoft.Phone.Controls;assembly=Microsoft.Phone"

    xmlns:shell="clr-namespace:Microsoft.Phone.Shell;assembly=Microsoft.Phone"

    xmlns:d="http://schemas.microsoft.com/expression/blend/2008"

    xmlns:mc="http://schemas.openxmlformats.org/markup-compatibility/2006"

    FontFamily="{StaticResource PhoneFontFamilyNormal}"

    FontSize="{StaticResource PhoneFontSizeNormal}"

    Foreground="{StaticResource PhoneForegroundBrush}"

    SupportedOrientations="Portrait" Orientation="Portrait"

    mc:Ignorable="d" d:DesignHeight="768" d:DesignWidth="480"

    shell:SystemTray.IsVisible="True">


    <phone:PhoneApplicationPage.Resources>

        <Storyboard x:Name="FlipIn">

            <DoubleAnimationUsingKeyFrames Storyboard.TargetProperty="(UIElement.Projection).(PlaneProjection.RotationY)" Storyboard.TargetName="LayoutRoot">

                <EasingDoubleKeyFrame KeyTime="0" Value="-120"/>

                <EasingDoubleKeyFrame KeyTime="0:0:0.8" Value="0"/>

            </DoubleAnimationUsingKeyFrames>

        </Storyboard>

        <Storyboard x:Name="FlipOut">

            <DoubleAnimationUsingKeyFrames Storyboard.TargetProperty="(UIElement.Projection).(PlaneProjection.RotationY)" Storyboard.TargetName="LayoutRoot">

                <EasingDoubleKeyFrame KeyTime="0" Value="0"/>

                <EasingDoubleKeyFrame KeyTime="0:0:0.5" Value="90"/>

            </DoubleAnimationUsingKeyFrames>

        </Storyboard>

    </phone:PhoneApplicationPage.Resources>

    <Grid x:Name="LayoutRoot" Background="Transparent" RenderTransformOrigin="0,0">

        <Grid.Projection>

            <PlaneProjection CenterOfRotationX="0" RotationY="-120"/>

        </Grid.Projection>

        <Grid.RowDefinitions>

            <RowDefinition Height="Auto"/>

            <RowDefinition Height="*"/>

        </Grid.RowDefinitions>

        <StackPanel x:Name="TitlePanel" Grid.Row="0" Margin="12,17,0,28">

            <TextBlock x:Name="ApplicationTitle" Text="MY APPLICATION" Style="{StaticResource

PhoneTextNormalStyle}"/>

            <TextBlock x:Name="PageTitle" Text="page two" Margin="9,-7,0,0" Style="{StaticResource PhoneTextTitle1Style}"/>

        </StackPanel>

        <Grid x:Name="ContentPanel" Grid.Row="1" Margin="12,0,12,0">

            <Button Content="Button" Height="72" HorizontalAlignment="Left"

Margin="145,153,0,0" Name="button1" VerticalAlignment="Top" Width="160" Click="button1_Click" />

        </Grid>

    </Grid>

</phone:PhoneApplicationPage>
Listing 6-10. Code Contents of PageTwo.xaml.cs
using System;

using System.Windows;

using Microsoft.Phone.Controls;


namespace GetMoving

{

    public partial class PageTwo : PhoneApplicationPage

    {

        public PageTwo()

        {

            InitializeComponent();

        }


                protected override void

OnNavigatedTo(System.Windows.Navigation.NavigationEventArgs e)

                {

                       base.OnNavigatedTo(e);

                       FlipOut.Completed += new EventHandler(FlipOut_Completed);

                       FlipIn.Begin();

                }


                void FlipOut_Completed(object sender, EventArgs e)

                {

                        NavigationService.Navigate(new Uri("/PageOne.xaml", UriKind.Relative));

                }


                private void button1_Click(object sender, RoutedEventArgs e)

                {

                        FlipOut.Begin();

                }

    }

}
In each case, you can see that the pages have practically the same contents. This straightforward approach to page navigation with animation will ultimately save you from the perceived load times that each of your pages take.
Run your project. You should see that when you click on the buttons of the pages, they neatly transition to each other. The time that elapses during that transition is free time that you have to load data, or get other processing out of the way. You've probably already noticed that you wait until the page transition completes before you attempt to the click the button again.
Regarding page transitions, there's another great set of tools and code that you can use that includes several different page transitions and controls that are not included with the default Windows Phone tools. You can use these additional page transitions and controls instead of trying to build them yourself from scratch. There is a free download from Microsoft on CodePlex (http://codeplex.com), an open source software repository. It is called the Silverlight Toolkit for Windows Phone, and we will be covering it in more depth in Chapter 11 of this book. To get the code and find out more about this collection of controls, you can download it at http://silverlight.codeplex.com.
Summary
Every time you add an animation to your app, it should be done with purpose. This chapter showed you how we can use animations both for swapping content from the screen in an elegant way, as well as a way to create page transitions (also known as distractions) that buy you time to load the contents of a page. In either case, they were done with a goal in mind, and not just for the gratuitous sake of moving elements on the screen. Animations are also a great way to create simple Silverlight games, and the event model that we used makes game development a fun way to interact with our users.
In the next chapter, we are going to walk through an extensive set of tools that make it easy for us, as developers, to interact with many of the default apps and user data that live on the phone. You'll learn how to make the phone dial a phone number, send a text message, and even how to retrieve a user's contact list. These mechanisms, called Tasks, will make your app much more interesting with only a few lines of code.