
CHAPTER 3
![]()
Get the Data
Virtually every meaningful Windows Phone application deals with data from some source, and often it is very convenient (if not downright necessary) to bind that data to one or more controls, store it away for later use, or even stash it in a relational database.
In this chapter, you will learn about the following three most important ways we manipulate data in Windows Phone:
- Binding data to controls
- Storing data in isolated storage
- Storing data in a local database
There are myriad sources of data. Some are local to your application, such as recording your daily workout, and might be stored in a database or in isolated storage (both of which are covered later in this chapter). Other data is retrieved from outside sources such as Web Services (e.g., nutritional information retrieved from a centralized service).
Our goal in this chapter is to explore databinding and local data storage. Towards that end, we will create an in-memory data source, a Customer object to which we will bind controls. The essentials of databinding are the same whether you are binding to in-memory local objects or to objects obtained over the internet.
We will also explore using isolated storage to persist data between usages of the application and then we'll go on to look at creating and using local databases to store data in a relational format.
Binding Data to Controls
You can put data into your controls programmatically, but that is very code-intensive and prone to errors. Programmatically manipulated data is difficult to maintain and can cause massive changes to your code when the data types change.
Far better is to bind data to your controls so that updates are made automatically, and you need to write much less code.
Databinding a control to data creates a relationship so that when the data changes the control is updated. This is known as one-way binding. Two-way binding occurs when the control which the data is bound to itself changes (e.g., when the data is changed by a different user).
There are two key aspects to data binding: 1) the binding must be created in the control (typically in the Xaml), and 2) the DataContext must be set. A control can be bound to any public property of an object.
While we name the property we want the control to bind, and we do not identify the object that contains it. We use a DataContext to specify the object with the property we want to bind to. The DataContext is usually set at runtime while the binding is typically set at compile-time. This provides enormous flexibility and power because any object that has the appropriate properties can be used as the data context, and the data context can be determined at runtime.
Let's set up an example by creating a new Windows Phone Application called Data Binding.
Creating the Data
We'll begin by creating a new Windows Phone project.
- Open Visual Studio and use the standard Windows Phone Application template to open a new project.
In order to have some data to work with, let's create a
Books.csclass in which we'll define a Book object and create static properties to retrieve a single book or a list of books. - To do this, right-click on the project, choose Add Class, and name the new class Books.cs.
- Add four public properties to the top of the class, as follows:
public string Title { get; set; }

 public string Authors { get; set; }

 public string Publisher { get; set; }

public string ISBN { get; set; } - Add a static property to return a single book with pre-filled data, as follows:
public static Book ABook

 {

     get

     {

         return new Book()

         {

             Title = "Programming Windows Phone",

             Authors = "Jesse Liberty and Jeff Blankenburg",

             ISBN = "143023816X",

             Publisher = "Apress"

         };

     }

} - Finally, add a property to return a list of Book object so that we can populate a list box, as follows:
public static List<Book> Books

{

    get

    {

        return new List<Book>()

        {

            new Book()

            {

                Title = "Programming Windows Phone",

                Authors = "Jesse Liberty and Jeff Blankenburg",

                ISBN="143023816X",

                Publisher = "Apress"

            },

            new Book()

            {

                Title = "Programming Reactive Extensions and LINQ",

                Authors = "Jesse Liberty and Paul Betts",

                ISBN = "1430237473",

                Publisher = "Apress"

            },

            new Book()

            {

                Title = "Programming Windows 8",

                Authors = "Jesse Liberty",

                ISBN = "TBD",

                Publisher = "Apress"

            },

        };

    }

}
Now we're ready to create a couple TextBox controls which we'll bind two properties of a book to.
Creating Controls
Since we want to layout the controls, let's switch over to Expression Blend, being sure to save all the files we've created so far.
- Open Expression Blend.
- Set the title to DATABINDING and the page name to binding.
- Click in the left margin and create two small rows to hold the two controls we'll be binding to. Drag a TextBlock onto the first row, name it “Title” and center it. Copy and paste the TextBlock and drag the copy into row 2, making sure that its margins are all zero and it is set to be centered both vertically and horizontally. Set its name to ISBN. Save the file and switch back to Visual Studio.
You'll be prompted to update Visual Studio with the changes that were made in Expression Blend; click “Yes to All.”
Switch to MainPage.xaml and click on the first TextBlock. Notice that the associated TextBlock in the Xaml is highlighted. This is where we want to add the databinding code. Find the Text property and modify it so that it looks like the following:
<TextBlock

     x:Name="Title"

     HorizontalAlignment="Center"

     Margin="0"

     TextWrapping="Wrap"

     d:LayoutOverrides="Height"

     VerticalAlignment="Center"

     Text="{Binding Title}" />
The keyword Binding indicates that the Text in the TextBox will come from the property of some object (to be named at a later time), and the word Title names that property. Notice that nowhere do we indicate which object will have that property to bind to. This will be handled by the DataContext, as you'll see in just a moment.
Modify the second TextBlock so that it binds to the ISBN property of the yet-to-be-named object.
Adding DataContext
Now that you've specified which properties are to be bound to our TextBox, you must provide the object that has these properties. This you can do at compile time (by writing it in the Xaml) or, more commonly, at runtime in the code-behind. Open MainPage.xaml.cs and in the constructor add the following line:
DataContext = Book.ABook;
This sets the DataContext for the current page to what is returned from the static property ABook. If you run the application, you'll find that the TextBlocks have been populated with the Title and ISBN respectively.
To review, briefly, the Binding syntax says, “There is a property of this name that has your data. I'll let you know which object that has this property to use later,” and the DataContext says, “Remember I gave you properties to bind to? This is the object with those properties.”
The bound data will be displayed in a list box. Let's add that to the page now.
ListBoxes and DataTemplates
The list box provides a convenient way to display data from more than one object at a time. In this case, we'll use it to show the name and ISBN of the books in our collection.
4. Add a ListBox to the third (much larger) row on your page
5. Set its horizontal and vertical alignments to stretch
6. Set its margins to zero
7. Set its width and height to auto (it will take up all the room in the third row)
8. Set its name to BooksList
You can indicate to the ListBox that it is to draw its contents from the static property Books from the Book class by assigning the list to the ListBox's ItemsSource property. To do so, all you need do is add the following line in the constructor:
BooksList.ItemsSource = Book.Books;
The problem is that while the list box knows it is to get its data from the list of Book objects, it has no way to know which of the three properties to display, and so it just displays the type of each object. To fix this, you'll need to create a DataTemplate—a template that teaches the list box how to layout the sub-controls that will display the contents of the list.
<ListBox

    Grid.Row="2"

    HorizontalAlignment="Stretch"

    Margin="0"

    Name="BooksList"

    VerticalAlignment="Stretch"

    Width="Auto"

    Height="Auto"">


    <ListBox.ItemTemplate>

        <DataTemplate>

            <StackPanel

                Margin="0,0,0,17"

                Width="Auto"

                Height="78">

                <TextBlock

                    Text="{Binding Title}"

                    TextWrapping="Wrap"

                    />

                <TextBlock

                    Text="{Binding ISBN}"

                    TextWrapping="Wrap"

                    Margin="12,-6,12,0"

                     />

            </StackPanel>

        </DataTemplate>

    </ListBox.ItemTemplate>
Notice that the ListBox opening and closing tags enclose the DataTemplate. Within the DataTemplate can be exactly one control; in this case the StackPanel. Fortunately, StackPanel can have multiple controls and acts in this case as the container for two TextBlocks. The TextBlocks bind to the data in exactly the same way we saw earlier. The difference is that the DataContext iterates through each book in the list, providing the Title and ISBN for each in turn.
Binding Data with the DataBound Template
Both Visual Studio and Expression Blend offer a special template to get you started with DataBound applications, as shown in Figure 3-1.
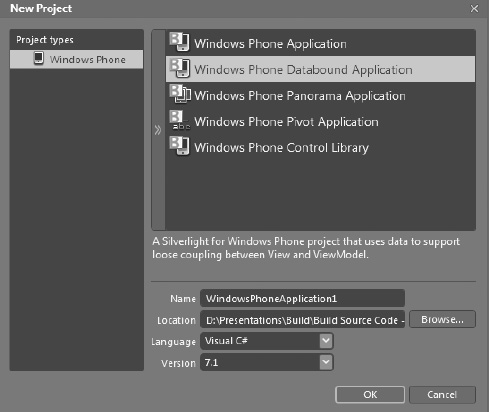
Figure 3-1. Template for DataBound application
This template does so much of the primary work of databinding that it is well worth exploring what you get right out of the box.
The first thing to notice is that there is data available at design time (while you are creating the form) rather than only being available at runtime. We'll take a look at how this is done in just a moment.
The out-of-the-box application consists of two pages: the list (MainPage.xaml) and the details page (DetailsPage.xaml).
Let's start with MainPage.xaml and find a few things to point out.
The design-time DataContext is set in the heading.
d:DataContext="{d:DesignData SampleData/MainViewModelSampleData.xaml}"
- The DataTemplate TextBlocks use styles to make the individual entries stand out.
<TextBlock

    Text="{Binding LineOne}"

    TextWrapping="Wrap"

Style="{StaticResource PhoneTextExtraLargeStyle}" /> - The ItemsSource is bound in the ListBox Xaml declaration rather than in code, and while they're at it, the SelectionChanged event handler is registered.
The key thing to note on the MainPage.xaml.cs code-behind page is that when the selection changes, the application navigates to a new page (the details page) passing in the selected index.
NavigationService.Navigate( new Uri( "/DetailsPage.xaml?selectedItem=" +

MainListBox.SelectedIndex, UriKind.Relative ) );
The selected index is passed in as an argument to the Uri for the details page.
new Uri( "/DetailsPage.xaml?selectedItem=" + MainListBox.SelectedIndex,

UriKind.Relative ) );
This causes navigation to the DetailsPage. Take a look at OnNavigatedTo in DetailsPage.xaml.cs to see how the value that was passed in is fished out of the QueryString property.
protected override void OnNavigatedTo( NavigationEventArgs e )

{

    string selectedIndex = "";

    if (NavigationContext.QueryString.TryGetValue( "selectedItem",

            out selectedIndex ))

    {

        int index = int.Parse( selectedIndex );

        DataContext = App.ViewModel.Items[index];

    }

}
Once we have the selectedIndex, we use that as an index into the Items collection, allowing us to retrieve the complete associated record, and then to bind various fields to its properties.
Before we leave the topic of databinding, we should mention that it is also possible to bind one control to the value of another (see sidebar on Binding to an Element).
![]() Note Not only is it okay, it is recommended to start with and modify the code in this template for your own purposes.
Note Not only is it okay, it is recommended to start with and modify the code in this template for your own purposes.
BINDING TO AN ELEMENT
In addition to binding to data, you can bind one control to another. There are a number of common ways of doing this, but let's examine how we might bind a slider to the opacity of a control on the page. To do this, open Expression Blend and create a new application named ElementBinding, using the standard Phone template.
- Delete the PageName and set the application name to ElementBinding.
- Click the rectangle in the toolbar, and drag the rectangle onto the Design surface. Right-click on the rectangle in the Objects and Timeline, and select group into border. Set the border to 3 pixels, and set the border color to white (255,255,255).
- Open the chevron and search for the slider. Make sure the ContentPanel is the selected panel and double-click the slider onto the grid. Use the Selection tool to move the slider next to the rectangle and size it so that it is as tall as the rectangle.
- Name the rectangle MyRect and name the slider MySlider. Set the border on the slider to white and set the orientation to vertical.
- We want the slider to run from 0 to 1, so set the maximum to 1, the large change to 0.1 and the small change to 0.01.
- Now it is time to tie the opacity of the rectangle to the slider. Click on the advanced properties tab next to opacity on the rectangle and select Element Property Binding. The cursor will change, as shown in Figure 3-2.

Figure 3-2. Dropping the Element Binding on the slider
- Hover over the slider and click, tying the Opacity property of the rectangle to the slider. A dialog box will pop up and ask which property of the slider you want to bind to (notice that it defaults to the property we want, Value. Click to accept and—Presto! The elements are bound. Hit F5 to test. Move the slider up and down and note the opacity of the rectangle as it changes with the slider.
Storing Data in Isolated Storage
An essential ingredient in storing the state and other data of your application, especially when your application may be tombstoned (see Chapter 4) or, even more extreme, closed, is the ability to create persistent storage—that is to write to the disk so that you can retrieve your data when the application resumes or is restarted.
This is the purpose of isolated storage. The term is nearly self-explanatory; it is persistent storage that is isolated from the storage used by all other applications.
There are a number of ways to store data to isolated storage, but it boils down to key/value pairs.
You can store these pairs in the ApplicationSettings collection of the IsolatedStorageSettings object. This is, essentially, a dictionary that is unique to your application and that is stored on the device securely isolated from all other similar storage.
To see this at work, create a new application with two TextBlocks as prompts, two TextBoxes (Key and Value), a Button (Save) and a ListBox (KeysAndValues), as shown in Figure 3-3.
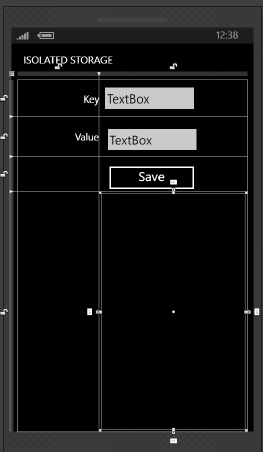
Figure 3-3. Keys and Values
To begin, you'll need a member variable to represent isolated storage, as follows:
private IsolatedStorageSettings _isoSettings;
IsolatedStorageSettings will not be recognized. Click Control-dot (that is, control-period) to bring up the IntelliSense assistant and accept the following new using statement:
using System.IO.IsolatedStorage;
Initialize the _isoSettings private member variable in the constructor, as follows:
_isoSettings = IsolatedStorageSettings.ApplicationSettings;
There are two events that you want to capture:
- The click of the Save button
- The SelectionChanged event on the list box
The Save button saves new key/value pairs or updates existing key/value pairs.
Clicking an entry in the list raises SelectionChanged, which makes the selected key current and populates the Key and Value TextBoxes
Let's start with the Save_Click event handler. The tasks here are as follows:
9. Make sure we have both a key and a value to add
10. See if the key exists, if so update it
11. If the key does not exist, add it
The following is the code for the event handler:
private void Save_Click( object sender, RoutedEventArgs e )
 {

     if (

         String.IsNullOrEmpty( Key.Text ) ||

           String.IsNullOrEmpty( Value.Text ))

     {

         return;

     }


     if (_isoSettings.Contains( Key.Text ))

     {

         _isoSettings[Key.Text] = Value.Text;

     }

     else

     {

         _isoSettings.Add( Key.Text, Value.Text );

     }


     RebindListBox();

 }
Adding to or updating the isolated storage itself is as simple as managing a dictionary; the actual business of writing to disk is handled for you by the IsolatedStorageSettings object.
Notice that the method ends with a call to RebindListBox—the job of that method is just to rebuild the list box based on the keys and values in isolated storage.
private void RebindListBox()

{

     Value.Text = Key.Text = String.Empty;

     KeysAndValues.Items.Clear();

     foreach (string key in _isoSettings.Keys)

     {

         ListBoxItem lbi = new ListBoxItem();

         string newKey = key + ": " + _isoSettings[key];

         KeysAndValues.Items.Add( newKey );

     }

 }
I've chosen to list both the key and its value. This makes the workings of the project a bit easier to understand but it does complicate, slightly, the handler for clicking on an entry in the list box.
private void KeysAndValues_SelectionChanged(

    object sender,

    SelectionChangedEventArgs e )

{

    if (e.AddedItems.Count < 1)

        return;

    string selected = e.AddedItems[0].ToString();

    string key = selected.Substring(

       0, selected.IndexOf( ":" ) );

    Key.Text = key;

    Value.Text = _isoSettings[key].ToString();

}
The small amount of extra work is to isolate the key from the colon and the value; with this in hand, we can proceed to populate the Key TextBox as well as the Value TextBox.
![]() Note After you add a key/value pair, you can change applications or stop debugging altogether and then restart to find the values have been saved (persisted) and are restored just as you left them.
Note After you add a key/value pair, you can change applications or stop debugging altogether and then restart to find the values have been saved (persisted) and are restored just as you left them.
Storing Data in a Local Database
Windows Phone supports a full SQL CE database that you interact with using LINQ to SQL, a SQL-like query syntax with objects. This is a fairly straightforward syntax for manipulating data in the database (for more on LINQ to SQL we recommend Programming with Reactive Extensions and LINQ (Apress, 2011) by Jesse Liberty and Paul Betts.)
To get started, let's build a dead-simple example that hardwires two objects and places them into the database, and then extracts them and shows their values in a list box.
The program will store information about Books, including the Author(s) and the Publisher, and then display that information on demand.
Building the UI
The initial UI consists of a button that will create two books, a button that will retrieve the two books and a list box that will display the two books, as follows:
<Grid

    x:Name="ContentPanel"

    Grid.Row="1"

    Margin="12,0,12,0">

    <Grid.RowDefinitions>

        <RowDefinition

            Height="1*" />

        <RowDefinition

            Height="1*" />

        <RowDefinition

            Height="4*" />

    </Grid.RowDefinitions>

    <Button

        Name="CreateBook"

        Content="Create Books"

        VerticalAlignment="Center"

        HorizontalAlignment="Center"

        Margin="0" />

    <Button

        Name="ShowData"

        Content="Show Books"

        Grid.Row="1"

        VerticalAlignment="Center"

        HorizontalAlignment="Center"

        Margin="0" />

    <ListBox

        Name="BooksLB"

        Grid.Row="2"

        VerticalAlignment="Stretch"

        HorizontalAlignment="Stretch"

        Margin="20">

        <ListBox.ItemTemplate>

            <DataTemplate>

               <!-- Details elided -->

            </DataTemplate>

        </ListBox.ItemTemplate>

    </ListBox>

</Grid>
![]() Note For now, we've left out the details of the DataTemplate; we'll return to that shortly.
Note For now, we've left out the details of the DataTemplate; we'll return to that shortly.
Accessing Local Storage
We begin the work of managing the data by creating a DataContext.
Add a reference to System.Data.Linq and add these three using statements to the top of every related file.
using System.Data.Linq;

using System.Data.Linq.Mapping;

using Microsoft.Phone.Data.Linq.Mapping;
With these in place we can create the BooksDataContext, which will consist of three Tables and a constructor that passes its connection string to the base class:
public class BooksDataContext : DataContext

{

    public Table<Book> Books;

    public Table<Author> Authors;

    public Table<Publisher> Publishers;

    public BooksDataContext( string connection )

         : base( connection ) { }

}
As written, the program will not compile because we have not yet defined the Book, Author, and Publisher classes. Let's do so now, and we'll do so with an understanding of relational data and normalization; that is, we'll have the Book class keep an ID for each author and for each publisher, rather than duplicating that information in each instance of Book.
This approach is informed by relational database theory, but is good class design in any case.
![]() Note We make the simplifying assumption that every book has but a single author.
Note We make the simplifying assumption that every book has but a single author.
The following code appears in Books.cs:
[Table]

public class Book

{

    [Column( IsPrimaryKey = true )]

    public string BookID { get; set; }


    [Column]

    public string Title { get; set; }


    [Column]

    public string Author { get; set; }


    [Column]

    public string Publisher { get; set; }


    [Column]

    public DateTime PublicationDate { get; set; }

}
Table and Column are LINQ to SQL mapping attributes that tell LINQ to SQL how to map properties in your class to Columns in the tables. The following are the contents of Author.cs and Publisher.cs:
[Table]

public class Author

{

    [Column( IsPrimaryKey = true )]

    public string AuthorID { get; set; }


    [Column]

    public string FirstName { get; set; }


    [Column]

    public string LastName { get; set; }


}


 [Table]

 public class Publisher

 {

     [Column( IsPrimaryKey = true )]

     public string PublisherID { get; set; }


     [Column]

     public string Name { get; set; }


     [Column]

     public string City { get; set; }


     [Column]

     public string Url { get; set; }

 }
We create an instance of the database in MainPage.xaml.cs, in the constructor, where we also wire-up event handlers for the two buttons.
![]() Note Event handlers can be wired up in the Xaml or in the constructor. It is a matter of personal taste.
Note Event handlers can be wired up in the Xaml or in the constructor. It is a matter of personal taste.
public MainPage()

{

    InitializeComponent();

    DataContext db =

      new BooksDataContext( "isostore:/bookDB.sdf" );

    if (!db.DatabaseExists())

        db.CreateDatabase();


    CreateBook.Click +=

      new RoutedEventHandler( CreateBook_Click );

    ShowData.Click +=

      new RoutedEventHandler( ShowData_Click );


}
Notice the syntax for storing our database file (bookDB.sdf) inside of isolated storage. With the DataContext that we get back, we create the new database.
When CreateBook is clicked the event handler is called, and at this time we want to create two books. Since our books have a publisher and different authors, we must create those objects first (or we'll refer to a publisher or author ID that doesn't exist). Let's start with the creation of the publisher.
BooksDataContext db =

   new BooksDataContext( "isostore:/bookDB.sdf" );


Publisher pub = new Publisher()

{

    PublisherID = "1",

    Name = "Apress",

    City = "Acton",

    Url = "http://Apress.com"

};


db.Publishers.InsertOnSubmit( pub );
This code gets a new reference to the database, and then instantiates a Publisher object, initializing all the Publisher fields. The last line instructs the database context to insert this record when the Submit command is called. Before calling the Submit command, however, we'll create a few author records.
Author auth = new Author()

{

    AuthorID = "1",

    FirstName = "Jesse",

    LastName = "Liberty"

};


db.Authors.InsertOnSubmit( auth );


auth = new Author()

{

    AuthorID = "2",

    FirstName = "Paul",

    LastName = "Betts"

};


db.Authors.InsertOnSubmit( auth );


auth = new Author()

{

    AuthorID = "3",

    FirstName = "Jeff",

    LastName = "Blankenburg"

};


db.Authors.InsertOnSubmit( auth );
With these four records ready to be submitted, we call SubmitChanges on the databaseContext.
db.SubmitChanges();
We're now ready to create the two book objects. Once again we instantiate the C# object and initialize its fields, and once again we mark each instance to be inserted on submission.
db = new BooksDataContext( "isostore:/bookDB.sdf" );


Book theBook = new Book()

{

    BookID = "1",

    Author = "2",

    Publisher = "1",

    PublicationDate = DateTime.Now,

    Title = "Programming Reactive Extensions"

};

db.Books.InsertOnSubmit( theBook );


theBook = new Book()

{

    BookID = "2",

    Author = "3",

    Publisher = "1",

    PublicationDate = DateTime.Now,

    Title = "Migrating to Windows Phone"

};

db.Books.InsertOnSubmit( theBook );


db.SubmitChanges();
The two books are now in the database, and we can prove that to ourselves by implementing the event handler for the ShowData button.
private void ShowData_Click( object sender, RoutedEventArgs e )

{

    BooksDataContext db =

      new BooksDataContext( "isostore:/bookDB.sdf" );

    var q = from book in db.Books

            orderby book.Title

            select book;

    BooksLB.ItemsSource = q;

}
Once again we create a new DataContext, but pointing to the same local database. We now execute a LINQ Query against the database, obtaining every record in the Books table, ordered by Title. We set the resulting IEnumerable (q) as the ItemsSource property for the BooksListBox. This then becomes the DataContext for the databinding in the DataTemplate of the list box.
<ListBox.ItemTemplate>

    <DataTemplate>

        <StackPanel>

            <TextBlock

                Text="{Binding Title}" />

            <StackPanel

                Orientation="Horizontal">
                <TextBlock

                    Text="Author ID: " />

                <TextBlock

                Text="{Binding Author}" />

            </StackPanel>

            <StackPanel

                Orientation="Horizontal">

                <TextBlock

                    Text="Published: " />

                <TextBlock

                    Text="{Binding PublicationDate}" />

            </StackPanel>

            <TextBlock

                Text="------------------" />

        </StackPanel>

    </DataTemplate>

</ListBox.ItemTemplate>
Adding Relationships
It turns out that any given book can have only one publisher, but a publisher, of course, can have many books. We can model this by modifying the Book class.
[Table]

    public class Book

    {

        [Column( IsPrimaryKey = true )]

        public string BookID { get; set; }


        [Column]

        public string Title { get; set; }


        [Column]

        public string PublisherID { get; set; }


        private EntityRef<Publisher> _publisher;


        [Association(

            OtherKey = "PublisherID",

            ThisKey = "PublisherID",

            Storage = "_publisher" ) ]

        public Publisher BookPublisher

        {

            get

            {

                return _publisher.Entity;
            }

            set

            {

                _publisher.Entity = value;

                PublisherID = value.PublisherID;

            }

        }


        [Column]

        public DateTime PublicationDate { get; set; }


    }
We have a public PublisherID that allows us to link this Book's publisher to the ID of a publisher in the database. In addition, we have a private Entity Reference back to the instance of the Publisher class. Finally, we add the public property BookPublisher, adorning it with the Association attribute. In this case we've added the following three properties to the attribute:
- OtherKey: The key as it is represented in the publisher class
- ThisKey: The foreign key in the Book class
- Storage: The backing variable for the property
Since we are only going to follow the association from the Book to the Publisher, that's all we have to do to the class.
We are ready to instantiate a couple publishers.
BooksDataContext db = new BooksDataContext( "isostore:/bookDB.sdf" );

Publisher pub = new Publisher()

{

    PublisherID = "1",

    Name = "Apress",

    City = "Acton",

    Url = "http://Apress.com"

};

db.Publishers.InsertOnSubmit( pub );


Publisher pub2 = new Publisher()

{

    PublisherID = "2",

    Name = "O'Reilly",

    City = "Cambridge",

    Url = "http://Oreilly.com"

};

db.Publishers.InsertOnSubmit( pub2 );
With these we can instantiate a Book object. Notice that we handle the relationship from an object perspective, making an instance of the publisher a member of the Book object (tying this back to the EntityRef ).
Book theBook = new Book()

{

    BookID = "1",

    BookPublisher = pub,

    PublicationDate = DateTime.Now,

    Title = "Programming Reactive Extensions"

};

db.Books.InsertOnSubmit( theBook );
We can make as many Book instances as needed, assigning either pub or pub2 (or other publishers we created) to each Book.
theBook = new Book()

{

    BookID = "2",


    BookPublisher = pub,


    PublicationDate = DateTime.Now,

    Title="Migrating to Windows Phone"

};

db.Books.InsertOnSubmit( theBook );


theBook = new Book()

{

    BookID = "3",


    BookPublisher = pub2,


    PublicationDate = DateTime.Now,

    Title = "Programming C#"

};

db.Books.InsertOnSubmit( theBook );
Querying the Local Database
When we are ready to display the Books, we will execute a query obtaining the Books, ordered by Title. We can then assign the results to the ItemsSource property of the ListBox.
var q = from b in db.Books

        orderby b.Title

        select b;


BooksLB.ItemsSource = q;
Rather than retrieving all the books, it is more efficient to create a temporary class with just the fields we need.
var q = from b in db.Books

        orderby b.Title

        select new

        {

            b.Title,

            b.PublicationDate,

            b.BookPublisher

        };


BooksLB.ItemsSource = q;
Anonymous Types are internal and by default Windows Phone does not allow reflection into internal types. To allow this anonymous type to provide data via binding you need to add the following line to AssemblyInfo.cs:
[assembly: InternalsVisibleTo("System.Windows")]
We need to modify the Xaml to bind to the publisher as a reference within the Book object (we do this with the Path property). The following is the relevant excerpt:
<ListBox

  Name="BooksLB"

  Grid.Row="2"

  VerticalAlignment="Stretch"

  HorizontalAlignment="Stretch"

  Margin="20">

  <ListBox.ItemTemplate>

    <DataTemplate>

      <StackPanel>

        <TextBlock

          Text="{Binding Title}" />

        <StackPanel

          Orientation="Horizontal">

          <TextBlock

           Text="Published: " />

          <TextBlock

           Text="{Binding PublicationDate}" />

        </StackPanel>

        <TextBlock

          Text="{Binding Path=BookPublisher.Name}" />

        <TextBlock

          Text="------------------" />

      </StackPanel>

    </DataTemplate>

  </ListBox.ItemTemplate>

</ListBox>
Performance is always an issue with databases, and the Windows Phone DB is no exception. Let's take a look at some simple steps you can take to enhance the performance of your application.
Database Performance Optimization
Perhaps the easiest performance optimization available in Windows Phone programming is to add a version control column to your class. The following is all you have to do:
[Table]

public class Book

{

    [Column( IsPrimaryKey = true )]

    public string BookID { get; set; }


    [Column]

    public string Title { get; set; }


    [Column]

    public string Publisher { get; set; }


    [Column]

    public DateTime PublicationDate { get; set; }


    [Association( OtherKey = "AuthorID" )]

    public EntitySet<Author> BookAuthors { get; set; }


    [Column(IsVersion=true)]

    private Binary _version;

}
By adding the Binary _version column, you can improve performance on your DataBase application by up to 700 percent. Here's why: LINQ to SQL is based on optimistic concurrency, which means that possible inconsistencies caused by concurrent users updating the database is checked for only when you submit the transaction (there is no prophylactic record locking). By default, LINQ to SQL submits your changes to the database query processor, which does the consistency check.
The performance enhancement comes by ignoring the query processor and working directly with the tables. But this means that there has to be another way to determine if the record has changed since the previous query. Enter the version column; if this has not changed, then the entire transaction is safe. If it has changed, of course, then LINQ to SQL will throw a ChangeConflictException, but it would have done that anyway.
In short, by adding a version column, only one column needs to be tested, and performance gets a big boost.
Summary
In this chapter you saw how to bind data to controls and how to bind one control to another. You also saw how to store data in isolated storage, which excels at storing key/value pairs. Finally, you saw how to use LINQ to SQL to create and modify a local database.
In the next chapter, we'll take a look at the application lifecycle and you'll see isolated storage put to work.