
Chapter 10
Leveraging Your Desk Set
Back in the days before iPads and iPhones, we used what was commonly referred to as a desk set. That set varied from year to year but usually consisted of a notebook in which we'd keep meeting notes; a Day-Timer planner where we'd write our appointments; an address book into which we laboriously wrote all of our contact names, addresses, and phone numbers; and a reminders book where we'd jot down to do lists and such.
In the 1990s, many Mac owners were proud owners of a series of Apple Newton MessagePads. These were referred to as personal digital assistants (PDAs), and they were the first electronic organizers to synchronize notes, calendars, to-do lists, and contacts to equivalent applications on a desktop computer. Alas, the Newton MessagePad was quite a bit ahead of its time and rather expensive, and Apple dropped the device in 1998.
The PalmPilot took the place of the Newton, followed by several handheld devices running Microsoft operating systems, which were followed by the first series of smartphones. All of these devices had their special capabilities and quirks, and they all had some sort of note-taking facility, a calendar, and an address book.
In 2007, the first iPhones appeared on the market, making life good again for Apple fans and introducing the world to a new form of handheld computing. The iPhone has always had three apps—Notes, Calendar, and Contacts—to perform common desk-set tasks. Now with the introduction of the iPad, the three apps have made the move to another platform. And with the introduction of iOS 5, a fourth app, Reminders, has been added to the desk set bunch.
Notes, Calendar, Contacts, and Reminders really shine on the iPad thanks to the larger-than-iPhone screen. In this chapter, we'll show you how to make the most of these built-in apps and how they synchronize to other devices.
Notes
On the iPhone, Notes is roughly the equivalent of a small pocket notepad. You probably wouldn't want to attempt to take a long set of notes with the app. Even though the note can be scrolled, there isn't a lot of available room. Typing would most likely be done with one finger, slowing down your text entry and making errors more likely.
The Notes app on the iPad is a totally different animal. It's more like a legal pad (see Figure 10–1), both in looks and in how it can be used. In landscape orientation, Notes looks like a leather-bound portfolio, with a small, white, paperlike index list on the left side and a legal pad at the right (complete with margin lines as well as the remnants of torn-off pages at the top).
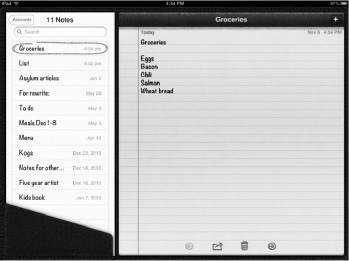
Figure 10–1. Your iPad's legal pad, the Notes app. The list on the left side displays all the notes you've written.
When you flip the iPad into portrait orientation, Notes appears to be just a normal legal pad. We personally find the landscape orientation easier to use for data entry in Notes, since we get an almost full-sized keyboard to touch-type on.
When you're using Notes in portrait mode, the index list disappears from the left side of the portfolio, and a Notes button appears at the top of the notepad. To display the index list, just tap the Notes button (see Figure 10–2).

Figure 10–2. The Notes app in portrait orientation really looks like a legal pad, complete with yellow paper.
When Notes is being used in landscape mode, touching a note on the white index list highlights it with a red-penciled oval and displays the full note on the legal pad. At the top of each page, whether you're using Notes in landscape or portrait orientation, is the date and time when the note was created, as well as how many days ago it was written. If it was just written, the notebook will display “Today” at the top; if it was written yesterday, it will display “Yesterday.” After that, the number changes to the number of days ago that the note was written.
On the bottom of each page are four icons (see Figure 10–3). Tapping the left and right arrow icons flips between pages in the notebook. Tapping the Share icon allows you to e-mail or print the text of the note page, while tapping the trash can icon displays the Delete Note button you see in Figure 10–3. The first line of the note is used as the subject line when sending a note as an e-mail, speeding the process of mailing notes to others.

Figure 10–3. The Notes app icons at the bottom of each page are (from left to right) used to go to the previous note, send the text contained in the note in an e-mail, delete the note, or move to the next note.
Adding and Deleting Notes
To create a new notebook page, tap the plus sign (+) in the upper-right corner of the notebook. The first line of text typed on the note page is the title of your note and is repeated both on the index list and at the top of the notepad. To search for a word or phrase in any of the notes, type it into the Search box at the top of the index list. The list magically shrinks to show only those notes containing the search word or phrase (see Figure 10–4).

Figure 10–4. Typing letters or words into the search field narrows the index list to only the notes containing the search criterion.
You can delete notes in two ways. First, as described earlier, tapping the trash can icon at the bottom of each note displays a Delete Note button. Tap that button to complete the deletion.
The second way to delete a note is to swipe your finger either left or right over the title of the note in the index list. This is easier to do in landscape mode, since the index list is always in view on the left side of the Notes window. In portrait orientation, tapping the Notes button at the top of the notebook displays the index list; then you can swipe to delete a note.
Syncing Notes
If you're writing notes on your iPad, you may want to use them on your Mac or Windows computer. There are a couple of ways to go about moving them to a personal computer—either e-mail them to yourself using the e-mail button we described earlier or use Notes syncing.
To set up Notes syncing, launch iTunes on your computer, and then connect your iPad to the computer using the USB cable, as described in Chapter 2. When the name of your iPad appears in the Devices list on the left side of the iTunes window on your computer, click it, and then click the Info tab. Scroll down the window a bit, and you'll see the cryptic Other heading (see Figures 10–5 and 10–6). Under that heading is the check box you're looking for.
Be sure to take note of the warning displayed in Figure 10–5. If your iPad is being synced to your computer over the air using iCloud and you also decide to perform local syncing using the USB cable, you may get duplicate notes appearing on your computer.

Figure 10–5. The Other section under Info in iTunes contains a check box for syncing notes from the iPad to your Mac.

Figure 10–6. You can find the check box for syncing notes with Outlook under Other in iTunes for Windows.
To sync notes to your computer from your iPad, select that box, and then click the Sync button on the bottom-right side of the iTunes window.
So, now you've synced all of those notes to your computer—where are they? Oddly enough, there is no similar app on the Mac, so notes end up in Mail. Launch Mail on your Mac, and then take a look at the sidebar on the left side of the Mail window (see Figure 10–7).
See the Reminders heading? There is a small replica of the Notes icon from the iPad below that. Click that icon, and you'll see two more notepads—one that says “On My Mac” and another that says “iCloud.” Click the On My Mac icon, and the notes you've created are there.
On Windows computers, Notes are synced to Microsoft Outlook 2003, 2007, or 2010 (see Figure 10–8). To view your synced notes in Outlook, click the Notes button.

Figure 10–7. The text created in Notes on your iPad syncs to Mail on your Mac.

Figure 10–8. The text created in Notes on your iPad syncs to Microsoft Outlook 2003, 2007, or 2010 on your Windows computer.
These notes are fully synced, so if you choose to make a change to one of them or create a new one on your Mac or Windows computer, the changes or new file is moved to the iPad the next time you sync. Likewise, any changes, additions, or deletions you make on the iPad are reflected on your computer.
So, what's that iCloud icon all about? If you have an Apple iCloud account, then you can synchronize your notes on all sorts of devices and in various places. Initially, the only way to sync your notes between your computer and iPad was through that hardwired USB connection. Now notes are another type of content that can be synchronized over the air.
Calendar
Like many people who enjoy the layout of the Day-Timer planner, we were thrilled to see how Apple changed the plain-Jane iPhone Calendar app to a thing of beauty on the iPad. In landscape orientation (see Figure 10–9), Calendar looks remarkably like that old Day-Timer.
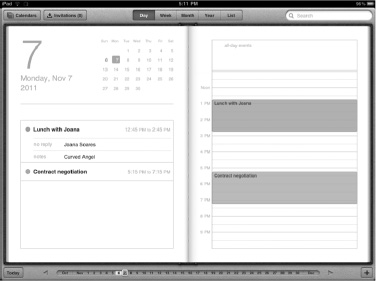
Figure 10–9. The iPad Calendar app in Day view looks like a traditional paper appointment book.
There are five Calendar views, each of which provides a slightly different view of your calendar information. To switch between them, tap Day, Week, Month, Year, or List at the top of the calendar.
The view shown in Figure 10–9 is the Day view, which displays an hour-by-hour listing of what's going to happen during the current day.
On the left side of the Calendar app in Day view, there's a handy month calendar and a list of all the appointments scheduled that day. To turn to the next page in this virtual appointment book, tap the right arrow at the bottom of the page. Moving to the previous page just requires tapping the left arrow. You can also drag a finger back and forth on the days of the current month, which are listed between those two arrows, to navigate to a particular date.
If all of this moving around in Calendar causes you to get lost, there's a Today button in the lower-left corner of the app to quickly jump to the current day. Before we talk about adding or searching for Calendar events, let's take a look at the rest of the available Calendar views.
The Week view (see Figure 10–10) is helpful in mapping out what tasks need to be accomplished during a specific week. Any items listed at the top of the calendar are all-day events, while colored boxes denote the time and duration of your meetings. The days of the week are listed across the top, with the hours of the day on the left side. To scroll earlier or later in the day (the calendar shows only 12 hours of each day at a time), use your finger to scroll up or down.
See that pinhead with the line across from it at about 6 p.m.? That indicates the current time so you can see at a glance how much time you have until your next appointment. Another feature of the Calendar is the Invitations inbox, in the upper left. If someone has used iCal or another calendar application to send you an invitation to an event, it is listed when you tap the Invitations inbox button. It's possible to view the details of the invitation, accept it, or decline it, all from this one place on your iPad.
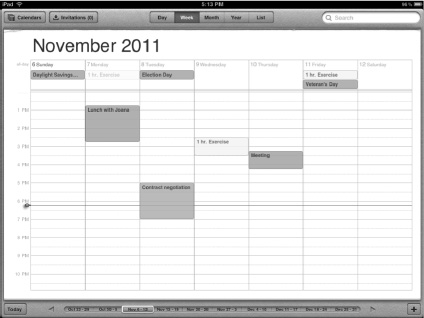
Figure 10–10. Using the Calendar app's Week view to capture a week at a glance
The Week view lists ten one-week periods at the bottom of the page, and you can tap any one of those weeks or slide a finger left or right to look at previous or future weeks.
The Month view (see Figure 10–11) provides the look of those “Month at a Glance”–style calendars that have been sold for years as desk pads. Here, every appointment during the month is designated by a small dot on a particular day. To get details about an appointment, just tap the dot, and a pop-up arrow appears with the time of the appointment and an edit button.

Figure 10–11. You can look at an entire month's worth of appointments in the Calendar app's Month view. Tap an appointment to open a pop-up arrow for details or to edit the event.
The area at the bottom of the page changes to a list of the months of a year for jumping to a specific month with the tap of a finger. There are also buttons to navigate to the previous and next months with a tap, as well as links to previous and future years.
The Year view (Figure 10–12) gives you a heat map of all your events in the selected year. The color of the square tells you how many events you have on that day. White date squares have no events scheduled. Yellow date squares have one event. Orange date squares have two events. And red date squares have three or more events.
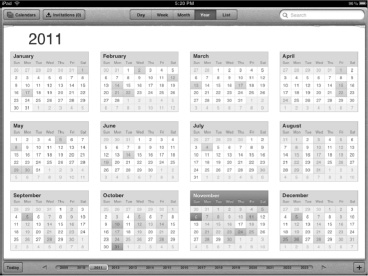
Figure 10–12. The Year view gives you a heat map of all your events.
The last view is the List view (see Figure 10–13), which lists upcoming appointments on a scrollable list on the left side of the page, along with a close-up view of a current event on the right side.

Figure 10–13. The List view in the iPad Calendar app displays a list of upcoming appointments (left) and details of any appointment you tap (right).
Tapping any of the appointments in the list on the left displays the details of that event on the right side. Any alerts that were set are listed, as well as notes that are associated with the event. If someone else sent the appointment to you and you accepted it, the detailed view will also show who sent the original appointment and list anyone else who has accepted the event invitation, as well as those who have been invited but have not yet offered a reply.
Adding Calendar Events
Your iPad allows you to add calendar events on the go. This lets you adjust and update your schedule when you are away from your computer. You have two ways to add events. In Day, Week, Month, or List view, you can simply tap and hold on the screen, and a new event bubble appears (Figure 10–14). Drag the grab circles to adjust the times that the event covers. In Week and Month view, you can also drag an event from one day to another.

Figure 10–14. Creating new events by touch
If you are in the List, Day, Week, or Month view, you can also add a new event by tapping the + button at the lower-right corner of the screen. The Add Event pop-up opens. To enter event information, tap any one of the fields and begin typing on the keyboard. Tapping Start & End, which is used to enter the beginning and ending of an event, displays a date and time picker (see Figure 10–15). Use your finger to roll the start date and time up or down, and then do the same with the ending time of the event. If an event is going to last all day (for example, an all-day meeting or a birthday), then slide the All-day button to On.
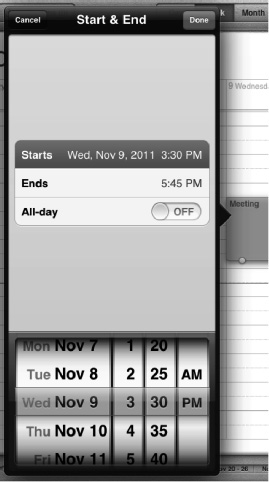
Figure 10–15. Whenever you're adding events to a calendar, you use the date and time picker to select the starting and ending dates and times.
If you want to make the event repeat at regular intervals, just tap the Repeat field. You'll be given the choice (see Figure 10–16) of repeating the event every day, week, two weeks, month, or year. A daily repeating event would be useful in reminding yourself to take important medication, while an annual repeating event could save your marriage by reminding you of an impending anniversary.

Figure 10–16. Any event can be set up to repeat at distinct time intervals that you set.
Any event can have up to two alerts. Alerts on the iPad are both audible and visual; there is no choice between the two types of alerts like there is on the Mac. Tapping the Alert or Second Alert field displays a list of times before an event at which an alert can go off. Those times vary from five minutes to two days before, or you can have your iPad alert you on the date of the event.
What happens when the alert goes off? A small visual alert appears on the screen (see Figure 10–17), with a Close button that dismisses the alert with a tap and a View Event button that takes you to the calendar to see the details. If you have the sound turned up on your iPad, you'll also hear an alert tone ring.

Figure 10–17. Your iPad alerts you of impending appointments with an alert tone and a visual reminder.
There are also fields for entering the location of an event or notes about it. When you're done entering the event information, tap the Done button, and the event appears on the calendar.
Syncing Calendar
As with the Notes app, much of the power of Calendar on the iPad becomes apparent when you synchronize to Microsoft Outlook 2003, 2007, or 2010 on your Windows computer, or to iCal or Outlook on your Mac. The method of setting up synchronization is similar to how you set up Notes.
Connect your iPad to your Windows computer or Mac using the Dock Connector to USB Cable, and then launch iTunes if it doesn't start by itself. In iTunes on your computer, click the icon designating your iPad under Devices in the sidebar on the left side of the window. Next, click the Info tab, and scroll down until you see the words Sync iCal Calendars (Mac; Figure 10–18) or Sync Calendars (Windows; Figure 10–19).

Figure 10–18. Setting up Calendar syncing in iTunes

Figure 10–19. Setting up Calendar syncing in iTunes on Windows
To set up synchronization of iCal and the Calendar app on your iPad, select the Sync Calendars (Windows) or Sync iCal Calendars (Mac) check box. Below the check box are radio buttons for syncing all calendars on your Mac or Windows computer to the iPad or just selected calendars. You might want to select certain calendars for syncing if you have many calendars on your computer and really don't need to view or edit all of those on your iPad.
You can choose to sync only future and recent events by selecting the “Do not sync events older than 30 days” box. That's very useful if you have many events on your calendar and don't want to waste space on your iPad filling it with calendar debris. The number of days is editable, so if you'd like to only sync events back two weeks and into the future, you can change the number 30 to 14.
To apply the changes and sync your calendar to your iPad, click the Apply button in the lower-right corner of the iTunes window. After the sync is done, launch Calendar on your iPad; then applaud your work! Remember, it's a two-way sync, so any changes or additions you make on your iPad are synced to your computer, and vice versa.
Contacts
The third component of the iPad desk set is Contacts, your electronic address book. On the left side of the address book is a scrolling list of names, while the details of a specific person or company appear on the right side (see Figure 10–20).
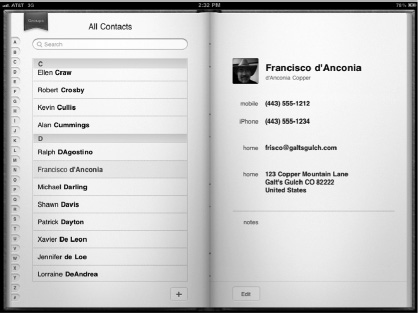
Figure 10–20. Contacts is your personal address book, synchronized to your Mac or Windows computer and to other devices if you want.
Compared with Calendar, the Contacts app is very simple. Instead of multiple ways to display the information, there's only one view, which is similar in both landscape and portrait orientations. That's not to say that Contacts isn't useful; in fact, the address list is used by Mail and many other iPad apps to enable sharing of information with other people.
Adding a Contact
To add a contact, tap the plus sign (+) icon on the bottom of the left page. A blank page in the Contacts book appears (see Figure 10–21) with helpful labels to tell you what information needs to be entered into each field. To start entering information into any field, tap it, and the iPad's virtual keyboard appears.
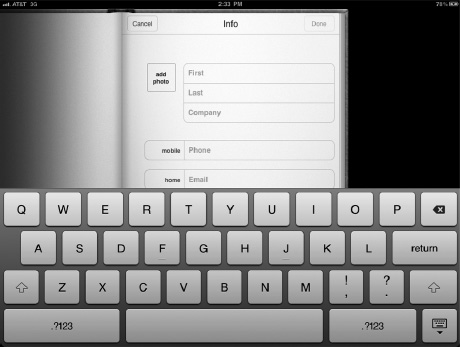
Figure 10–21. Starting with this blank page, your contact information can be simple or complex.
Apple did a great job with the Contacts edit fields. Entering a phone number as a string of numbers produces a nicely formatted number with dashes and parentheses in all the proper places for your country. Adding a state or province code in the address area locks the caps key so that all the letters in the code are capitalized. It's little details like this that make the iPad such a joy to use.
You can even add a photo to each Contacts entry by tapping the “add photo” box. This displays a list of photo albums stored on your iPad, which you can browse until you find a photo of the person you're entering information about. Tap their photo, and you can move and scale the image with the common iPad gestures until the photo looks just right. Finally, tap the Use button, and their photo is inserted into the page. You can also use the iPad's camera to take a photo to use with a contact.
Once you're done entering information about a person or company, tap the Done button in the upper-right corner of the Contacts app to see the finished page in your virtual address book.
Should you need to add or change information at any time, tap the Edit button to reveal the edit fields for Contacts. There's also a Share button at the bottom of each Contacts entry that creates an e-mail containing a .vcf (vCard file format) file that can be opened by most address book applications. For those people who have a second- or later-generation iPad, a FaceTime button appears at the bottom of each Contacts entry. With a tap or two, you can video chat with your friends or family.
To delete a contact, tap the Edit button, and then scroll to the bottom of the contact information. There's a large red Delete Contact button there. Tap it, and a small dialog box appears asking whether you want to delete the contact or cancel the deletion. When you tap Delete, the contact is removed from your iPad contacts list.
Groups and Searching
At the top of the left page in Contacts is a small red ribbon bookmark with the word Groups on it. Tapping that red ribbon lists all the groups that you have created…but not on your iPad. You cannot create groups of contacts on your iPad. That task has to be done on your Mac or Windows computer.
Why use groups? It's a great way to make it easier to find certain people who you know are in a specific group or to list everyone in a certain group. In other words, instead of searching 2,000 contacts for a person you know is a member of a particular group, you can narrow it down to the people in that group.
Speaking of searching, you can use the Search field at the top of the Contacts left page to look for specific people or companies. Tap in the Search field, start typing, and Contacts provides a list of people or companies that fit the search criteria. As an example, searching for Steve produces a list of people with that first name who are included in the contacts list (see Figure 10–22).
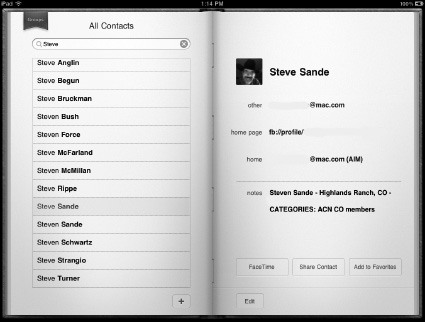
Figure 10–22. The Search field is helpful when you need to find someone quickly in a large number of contacts.
Syncing Contacts
Remember how you set up syncing of Calendar and Notes earlier in this chapter? That's how you're going to set up syncing of Contacts as well. The companion applications on a Windows computer can be Microsoft Outlook 2003, 2007, or 2010; Windows Address Book (Windows XP), or Windows Contacts (Windows Vista and Windows 7). On the Mac, contact synchronization can be set up with Address Book and Microsoft Entourage 2004 or 2008. Which application should you use? If you use Outlook on your Windows computer, then sync with the Outlook contacts list. If you use web mail or an application other than Outlook for mail, contacts, and calendar, then use either Windows Address Book or Windows Contact depending on which is available in the version of the Windows operating system you're using.
Connect your iPad to your Mac using the Dock Connector to USB Cable, and then launch iTunes if it doesn't start by itself. In iTunes on your computer, click the icon designating your iPad under Devices in the sidebar on the left side of the window. Next, click the Info tab and scroll down until you see the words Sync Address Book Contacts (Mac; Figure 10–23) or Sync Contacts (Windows; Figure 10–24).
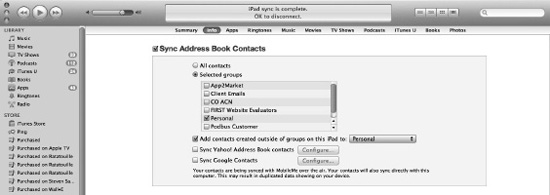
Figure 10–23. To sync Contacts with your Mac, select the Sync Address Book Contacts box.

Figure 10–24. To sync Contacts with your Windows computer, select the Sync Contacts in iTunes box.
As with syncing calendars, you have the choice of either syncing all your contacts to the iPad or just selected groups. There are several other check boxes to consider when setting up address book syncing.
First, you may want to add contacts that you create on your iPad to a specific group. That's what the “Add contacts created outside of groups on this iPad to” check box is for. Select the box, and then select a group. Any new contacts created on the iPad are automatically added to that group.
Apple also built in synchronization with other address books. The next two check boxes are used to set up synchronization with Yahoo! Address Book or Google Contacts. Checking either of the boxes displays a legal agreement allowing iTunes to synchronize with Yahoo! or Google. You can either agree or disagree with the statement, but realize that you won't be able to sync with these services without clicking the Agree button.
Once you've agreed to allow the sharing of information with Google or Yahoo!, a configuration screen appears requesting your user ID and password for that service. Entering that information and then clicking Apply in the lower-right corner of iTunes ensures that your Contacts information is synced between your iPad, your computer's address book or Contacts application, and either Yahoo! Address Book or Google Contacts.
Setting Reminders
Remindersis a new app included on every iPad. It's a to-do app that lets you create lists and set reminders so you never forget anything again. To launch Reminders, tap its icon on your Home screen. When you launch the app, you'll first see a loose-leaf piece of paper with the title “Reminders” at the top. This is your main reminders list (Figure 10–25). To create a reminder, tap the + button and enter a name or description for the reminder. Tap Done when you have finished naming the reminder. In Figure 10–25, one of our reminders is to “Buy flowers.”

Figure 10–25. The Reminders app
The lists button appears at the top-left corner of the screen. Tap it to reveal all your lists. Tap a list to jump right to that list. To create a new list, tap the edit button on the list screen and then tap Create New List. Multiple lists can be very handy. You can create one for work, one for groceries, one for your personal life, and so on.
But Reminders isn't just an app that helps you create lists. It's called “Reminders” for a reason. You can set a number of ways to be reminded to do something on your list. Reminders reminds you of your to-do list items via the Notification Center, and you can set reminders to notify you based on date and time.
To set details and notifications for your reminders, tap an item from your reminders list. On the details screen that appears (Figure 10–26), you can set the time and date for your reminder, set whether the item on your list is a one-time or repeating event (such as weekly), set when to end the repeating reminders, set the priority of the to-do item (None, Low, Medium, High), set the list the reminder should be on (“travel” or “family,” and so on), and even add notes to the reminder to give it more details.

Figure 10–26. Setting the details of a Reminders event
When you are done entering details about a reminder event, tap the Done button. To delete a reminder, tap the red delete button that appears at the bottom of the details screen.
Besides viewing your reminders as a list, you can also view them by date. Tap the Date button at the top of the screen (Figure 10–25), and you'll be taken to the date view (Figure 10–27). Tap any date on the calendar to be taken to its date page to view the reminders on that date.

Figure 10–27. Browsing Reminders by date
When you complete an event in your reminders list, tap the box to mark it off. The event is removed from your Reminders list and added to your Completed list (Figure 10–28). To view your Completed list, tap its name in your Reminders list.
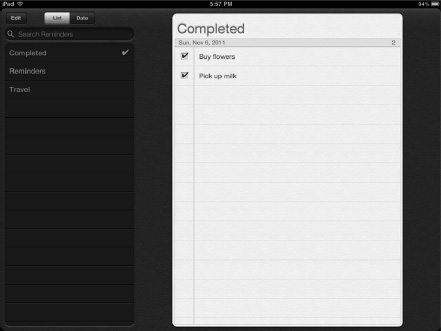
Figure 10–28. The Completed list
Reminders syncs with iCal on the Mac and Outlook 2007 and 2010 on a PC.
Summary
Some of the most useful apps on your iPad consist of Calendar, Notes, Contacts, and Reminders—the desk set of your device. In this chapter, you learned how to use your iPad as a digital notepad, Day-Timer, address book, and reminders list, as well as how to sync that information to your Mac or Windows computer. These are several important topics to remember from this chapter:
- The desk-set application(s) on your computer (iCal and Address Book on your Mac, Outlook on your Windows computer) can sync with similar apps on your iPad. Calendar is a powerful desk calendar on the iPad, while Contacts gives you access to all your address book information. The Notes app is a quick way to capture text and move it to your computer.
- Notes sync to Mail on the Mac and Outlook on Windows computers.
- There are five ways to view your calendar information—Day, Week, Month, Year, and List views.
- Reminders is a wonderful app that can help those of us with poor memories remember when things need to get done.
- Although you can't create groups of contacts on your iPad, Contacts does support groups that have been created in Address Book or Outlook. Groups are a powerful tool for organizing large numbers of contacts.