
Chapter 15
Using the iPad Cameras with Camera, Photo Booth, and FaceTime
Perhaps the most significant upgrade to the second-generationiPad is represented in its two cameras. These cameras introduce new and compelling features to the formerly cameralessiPad: the ability to take photos and record high-definition video, the ability to play with those videos using Photo Booth, and the ability to place and receiveFaceTime video calls.
Are you lucky enough to own one of the latest iPads? If not, this chapter is really not for you, at least until you're ready to upgrade. But if you've been able to purchase a newer-generation iPad, then this chapter will teach you great ways to take photos and record video.
The Camera Hardware
TheiPad 2 features two cameras—one in the front and one in the rear. These cameras allow you to snap photos and record video. The cameras aren't created equal, however. As you'll see, each one has been designed for different uses.
Front Camera
The front iPad camera is located at the top of the device, directly in the center of the iPad's upper bezel, across from the unit's Home button. If you own a white iPad, the tiny dot is quite obvious to see; it's less conspicuous on black models. Behind this dot lies the front-facing camera.
This front camera is meant primarily for FaceTime video calls, but you can also take photos and record video with it. For example, you might use the front-facing camera to snap a profile picture for your Facebook account or to record yourself and a friend singing “Happy Birthday” to a special someone. With the front camera, there's no shooting pictures in a bathroom mirror or turning a camera around and hoping you frame yourself into the shot. The front camera allows you to see and compose the shot as you take it.
The front-facing camera isn't as powerful as the rear camera; it cannot record high-definition (HD) video. HD video is video that has at least 720 lines of resolution. With video, the more lines of resolution you have, the sharper the picture will be. Although the front camera can record video, its resolution is limited to standard-definition (SD). SD video, also called video graphics array (VGA), uses a resolution of 640x480. VGA refers to an old computer monitor standard and is actually a higher resolution than the 525 lines that was originally broadcast over commercial television stations in the original NTSC standard.
Why didn't Apple use an HD camera in the front? Well, it would be unnecessary. The front camera was designed for FaceTime video calling, not recording video. The image quality while video calling on a portable device like the iPad is more than good enough using an SD camera.
Rear Camera
TheiPad's powerful rear camera allows you to take photos, record video, and work with third-party augmented reality applications. When you flip your iPad over, you can easily spot the rear camera in the top-left corner of the device.
The rear camera records videos in 720p HD resolution at 30 frames a second; that's 1280x720 pixels wide. Although its still-camera capabilities are better than the front-facing camera, the rear-facing camera is still limited to taking still pictures at 960x720 resolution. If that doesn't sound like a lot, it's because it isn't. 960x720 resolution isn't even equivalent to a 1-megapixel camera; or, if you want to get specific, the iPad's still capabilities record photos in 0.69 megapixels. That's far less than you expect with most point-and-click digital cameras you buy on the market today.
The iPad's sub-megapixel resolution is fine for simple snapshots for e-mailing or posting to Facebook, but when you are at an important event like a wedding or a child's birthday party and want to take some goodquality pictures suitable for framing, leave the iPad at home and bring your point-and-shoot digital camera.
NOTE: What's the p stand for in 720p, you ask? It means progressive. When HD video is displayed on a screen, it shows either all 720 lines of resolution at a time or just half of them. If it shows only half of them, this is known as interlace video and is denoted with an i. Simply put, progressive video generally looks sharper, because it shows you all the data (or lines of resolution) in a single frame at a time, and interlace shows you only half the data at a time (followed quickly by the other half). Interlace video used to be the norm when bandwidth issues were more of a factor for television reception, but as bandwidth increased, progressive video slowly took over.
Real-World Use
In real-world use, the iPad does an acceptable job at recording HD video in good lighting conditions. While developing this chapter for the book, the video shot outdoors in the daytime or inside with good lighting showed up watchable when played it back on our HDTVs. Like the newer-generation iPod touch, whose camera system the iPad basically shares, the iPaduses a light-sensitive sensor, which can be used in a wide range of lighting situations. This sensor allows for the best video quality the hardware can record. Because of this sensor, even in low-light conditions, the video quality was usable, but it can appear somewhat grainy as illumination decreases.
As for taking still images, the iPad is convenient to have around when you're out and about and might not necessarily have your digital camera on you. Because of its 0.69-megapixel images and lack of a camera flash, the iPad is in no way a replacement for your standard digital point-and-shoot camera or even the quality camera shipping on the iPhone 4 and newer. That being said, Apple didn't set out to design the best camera possible; Apple set out to design the best iPad possible at the best possible price—and at that, Apple excelled. The iPad isn't about capturing great art; it's about social use, especially in situations where you normally bring your iPad along with you. So, it's a trade-off. If you want a really good camera, then buy a camera or anewer-modeliPhone. Because with its large form factor and awkward handling, the iPad isn't all about photos. It's about integrating cameras and photography into the iPad user experience.
Navigating the Camera App
To launch the Camera application, tap the Camera icon. It's a silver-gray button with a camera lens on it (see Figure 15–1). The camera can be used in either portrait or landscape mode. Simply rotate your iPad to switch between the two orientations.

Figure 15–1. The Camera app
Figure 15–2 shows the standard layout of the Camera app. With the exception of the Switch Camera button in the top-right corner, all the camera controls reside in the gray bar at the bottom of the screen in portrait orientation. When you rotate into landscape orientation, the Switch Camera button remains in the top-right corner, but the camera control bar shifts to the left (or right) of the screen. The icons on the control bar rotate to match your iPad's orientation.
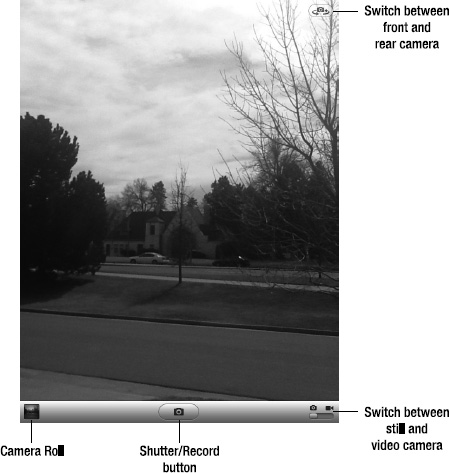
Figure 15–2. The camera controls
The camera controls are as follows:
Switch between still and video camera mode: A tiny slider appears at the bottom right of the screen. The slider has two icons, a still camera and a video camera. To toggle between recording modes, tap this slider. The slider's button rests below the icon whose mode is selected. When it is to the left, your iPad is in single-shot mode. On the right, you are ready to record video. In Figure 15–2, the slider is below the still camera, so you know that you are in still-camera mode.
Switch between cameras: Tap the Switch Camera icon in the top right of the screen to switch between the front and rear cameras. The icon looks like a traditional still camera with swirling arrows on either side. You'll see a 2D animation of the screen flipping between cameras.
Shutter button: Tap the oval button with the icon of a traditional still camera in the center of the control bar to snap a still photograph. This button changes to an oval button with a pulsing red dot in the center when you are in video camera mode. Tap the button to record video. Tap again to stop recording. If you have your finger on the Shutter/Record button but then change your mind about photographing or recording your subject, you can slide your finger off the button and no image will be taken, nor will video begin being recorded.
Access the Camera Roll: Tap the square button on the left of the control bar. The square will be filled with an icon of the last image or video recorded. Once tapped, your Camera Roll will slide up on-screen. This is a great feature for reviewing your last photo or video. It saves you a lot of time, because you don't have to leave the Camera app to check out your Camera Roll in the Photos app. Tap Done to return to the camera from the Photos app Camera Roll.
Taking Still Pictures
Taking a still photograph couldn't be easier. Point your camera at what you want to photograph and tap the shutter button. You'll hear a shutter click sound effect and see a cool animation of a lens's iris quickly closing and then opening. After that, the still image you just took will jump down into the Camera Roll icon.
One of the rules for good composition is truly “classic.” The ancient Greek and Egyptian philosophers discovered an important feature about beauty. Much of what we find attractive and beautiful incorporates a specific ratio, which is approximately 3:2. They called this ratio Phi (rhymes with “tie”), the “golden ratio,” or even the “divine ratio.” You can find this mathematical relationship abundantly in nature, such as in the way a tree grows, flowers bloom, or our body parts (fingers, hands, arms, and so on) are laid out.
The ancients incorporated this idea into their art and architecture. It was this transference from nature into art that came to be known as the rule of thirds. Basically, the rule is that things that are split into thirds, with features placed at the one-third mark and/or two-thirds mark, look better than things with more arbitrary placements. It's as simple as that.
We personally like to enable the grid overlay when composing pictures on my iPad. To do this, tap the background, choose Options and switch Grid to On. This creates an overlay that floats over the image, letting you use the grid lines to follow the rule of thirds when composing pictures. By placing features along the rule-of-thirds lines, especially at the four intersections, you'll end up with better-composed scenes.
NOTE: Some people find that tapping the on-screen shutter button to take a still photo causes their composition to get messed up. A neat trick Apple included to counteract any accidental nudging when you tap the shutter button is this: tap and hold the shutter button and then compose your shot. When you are ready to take the photo, simply remove your finger from the shutter button, and the shot will be recorded.
Changing the Exposure
You can set the exposure of the camera by tapping anywhere on the screen. You'll see a white box with crosshairs quickly appear. The iPad's camera reads the exposure setting of the part of the image inside the box and adjusts the camera sensors accordingly.
Setting the exposure helps when you are shooting an image of a cloudy sky, for example. If you want the sky to appear other than blinding white, tap the area of the image on your iPad's screen, and the exposure adjusts to better emphasize the lighting conditions at that point.
Zooming In and Out
When you tap the screen to set the exposure, you'll also see a zoom bar appear along the bottom (Figure 15–3). This zoom bar allows you to adjust the digital zoom settings of the photograph; it lets you zoom in and out on your subject. Digital zoom, unlike optical zoom, does not actually increase the fidelity of your image. Instead, it blows up a smaller section of your image using whatever data is already there. Because of that, the more you zoom, the lower quality your image will be. Slide your finger along the bar to zoom in or out. You can also tap the + or – button to zoomin increments.

Figure 15–3. The zoom controls appear above the control bar when you tap the screen in still-camera mode.
NOTE: You can only zoom on while in still camera mode using the rear camera. You cannot zoom using the front-facing camera. There is also no zoom while in video camera mode.
Recording Video
To record video, set the slider in the control bar to video camera mode. The camera's shutter button will be replaced with a recording button (see Figure 15–4). Tap the record button to begin recording your video. The red dot on the record button will begin to glow, and a time code stamp will appear in the upper right of the screen showing the hours, minutes, and seconds that have elapsed since recording began. To stop recording, tap the record button again.
Just how much video can you record on your iPad? That depends on the size of your iPad and how much space you have available. If you have a 32GB iPad but haveonly 10GB of free space on it, you'll be able to record only 10GB of video.
Here's a simple rule of thumb: 720p/30fps video works out to about 120MB per minute. If you think in terms of gigabytes, one hour of 720p/30fps video will occupy about 7GB of space on your iPad. One hour of video is a lot, but so is 7GB of storage space, especially if you own one of the lower-end iPad models with less onboard space. If you are going to be recording a lot of video, it's helpful to be close to your computer or have your laptop with you so you can easily dump your video onto your computer's hard drive and then wipe it from your iPad, freeing up space for more video.
Do you travel without a laptop? At this time you cannot use the iPad's Camera Connection Kit to offload video to an SD card while on the go, although it's a feature that Apple might add in future iOS updates. You can, however, use the kit to move data between one iOSdevice to another. If you have extra room on a noncamera unit, you can transfer media between devices.
Whether you want to do this at all is another matter. Transferring data using the Camera Connection Kit to clear up space on your iPad is probably all a little more work than it's actually worth, but if you're quickly running out of space and you want to keep taking pictures and videos, it's a workaround that could help you out when space gets tight.

Figure 15–4. The video-recording screen shows the time elapsed while recording at the top left corner. The red record button at the bottom center will pulse during video capture.
TIP: If you are going to be using the recorded video in a movie or be viewing it on your TV, you probably want to make sure you record in landscape mode. Although you can also record in portrait mode, portrait mode provides a weird aspect ratio to view videos in and, if you use the iMovie on your iPad, to edit videos in. What's more, the iPad is a bit big and cumbersome to hold up in portrait mode, especially if you want to have a finger free to be able to tap the stop/start recording button.
Changing the Exposure
As with still images, you can set the exposure of recorded video. You'll see a white box with crosshairs quickly appear. The iPad's camera reads the exposure setting of the part of the image inside the box and adjusts the video's exposure settings accordingly. This optimizes the recording for the quality of the scene at the point you touch.
Viewing Your Camera Roll
To view all the photos you have taken and the videos you have recorded, tap the Camera Roll icon at the left of the bottom control bar. The last image or video you recorded isintegrated into the look of the button as a little reminder. You can just barely see this in Figure 15–4, where the last image of a cloudy day was rather similar to the view being shown in the viewfinder.
Tap the Camera Roll arrow to be taken to the Camera Roll (Figure 15–5). You can instantly detect which items are videos and which are still images. Videos appear with a small “video camera” icon (a rectangle with a triangle lens image to its right) and a time indicating the duration of the video that has been shot. The fifth item (second to last) in Figure 15–5 is a five-second video segment.
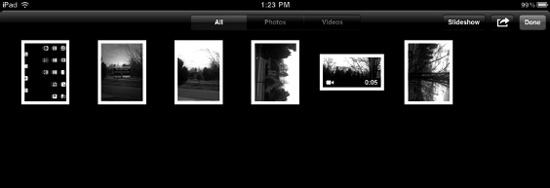
Figure 15–5. The Camera Roll contains all the photos and videos you have taken with the iPad's camera.
As Figure 15–5 shows, the tabs located at the top of the Camera Roll interface allow you to sort through your recordings in the following three ways:
All: Shows you all your photographs taken and videos recorded
Photos: Shows you just the photos you have taken
Videos: Shows you just the videos you have recorded
To view any individual photo or video, simply tap its thumbnail. The item you select will zoom out, and you will be able to view or play it back.
Viewing Individual Photos
When in your Camera Roll, you will see thumbnails of the photos it contains (see Figure 15–5). To view a photo full-screen, tap the photo once. As you can see from Figure 15–6, you can view the photo in portrait or landscape mode, depending on how you hold your iPad.
If the image was shot in the opposite mode to the current iPad orientation, as demonstrated in the image on the right, the Photos application will use letterboxing or pillarboxing to pad the image as it presents it. In Figure 15–5, pillarboxing adds black columns to each side of the portrait photo, allowing you to view the entire image in its original aspect. Letterboxing, which is used for landscape photos presented in portrait orientation, adds black rectangles above and below the image.
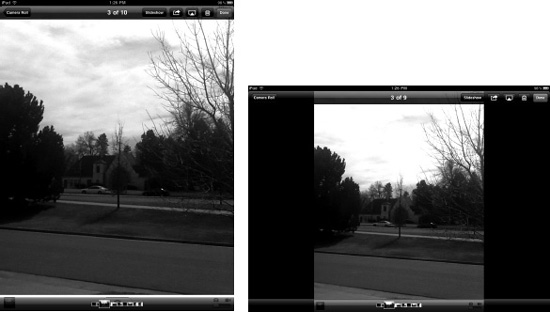
Figure 15-6. Viewing a photo in portrait and landscape modes
Once you display a photo full-screen, you have several ways to interact with it, as discussed in more detail in Chapter 13. These include the following:
- Pinch to zoom into and out of the photo.
- Double-tap to zoom into the photo. Double-tap again to zoom out.
- When your image is displayed at the normal zoomed-out size, drag to the left or right to move to the previous or next image in the album. When zoomed into an image, dragging the photo pans across it.
While viewing individual photos, you may flip your iPad onto its side at any time. The photo will automatically reorient itself. If the photo was shot using landscape orientation, it will size itself toa wider view; if the photo was shot using portrait, it will resize to a longer one.
Tap any image once to bring up the image overlay, as shown in Figure 15–6. The image overlay features a menu bar at the top and a photo-selection slider at the bottom of the screen.
The image overlay menu bar at the top of the screen shows you the number of the selected image out of the total number of items in the Camera Roll and shows you the back button, here labeled Camera Roll, to return to the album of items shot on this device. You can tap the Done button to exit the Camera Roll and return to the Camera app.
You'll also see the Share button (it looks like an arrow breaking free from a small box), the Airplay button (it's a rectangle with a triangle inside it), and the trash can button. Tapping the trash can button will bring up a deletion confirmation menu. Tap the red Delete Photo button to delete the selected photo.
The Slideshow button presents options for showing your images as a local slideshow or remotely using AirPlay wireless connections. If you have connected your iPad to a TV using any of the many dock connector adapters (these include HDMI, VGA, Composite, and Component video adapters), you can play your slideshow back on that bigger screen.
AirPlay not only offers a wireless solution, assuming you either have an Apple TV on-hand or have purchased a third-party solution like Banana TV for the Mac (http://bananatv.net) but also (in the case of Apple TV) provides a wider range of slideshow presentations for more eye-catching displays.
See Chapter 13 for more details about slideshow presentations with your iPad and for sharing your photos and videos with others.
Viewing Videos
To view any video you have recorded, simply tap its thumbnail in the Camera Roll. The video will appear with a big play button in the center. Tap any area of the screenonce to bring up the on-screen video controls (see Figure 15–7).

Figure 15–7. Displaying video from the Camera Roll. Tap once to bring up the on-screen menus.
Once you display a video full-screen, you have several ways to interact with it.
- Tap the video once to play it. Tap again to pause it.
- Scrub through the video by tapping and holding the silver drag bar in the scrubber bar at the top of the screen. The scrub bar shows you segments of the video represented by thumbnails for those segments.
- Hold your finger on the scrub bar for a few seconds, and you'll see the scrub bar stretch out. This gives you finer control over finding a specific spot in videos longer than a few seconds in length.
- Adjust the video's in- and out-points by dragging the sliders at each end of the video overview slider. As you adjust them, these will turn golden in color. A Trim button will appear, allowing you to keep the selected segment of the video and to discard the rest. You can trim the original video in-place or to save the trimmed version as a new clip. Using a new clip keeps the original video intact but takes up extra room on your iPad (see Figure 15–8), up to 120MB per minute. Tap the Cancel button to return to the Image/Video browser without applying your edit.
- Use the AirPlay menu to redirect the video to an AirPlay-capable device. During AirPlay playback, your screen goes dark and a message will appear, letting you know that the video is being sent to that AirPlay destination.
- Use the Sharing menu to e-mail your video (if it is short enough), to send it to YouTube, or to copy your video to the system pasteboard for use in other applications. If you are a Mobile Me customer, you'll find an option to post your video to a Mobile Me gallery from this menu. See Chapter 13 for more details about sharing your videos and images with others.
The video overlay menu bar at the top of the screen shows you the back button, labeled Camera Roll. Tapping this returns you to the main Camera Roll on your iPad. From there, you can tap the Done button to exit the Camera Roll and return to the Camera app.
Other items you may see on-screen include the trash can button, which brings up a deletion confirmation menu and an asset slider, which appears at the bottom of the screen. Dragging along the slider lets you select what image or video you want to view, for easy navigation through your Camera Roll library.

Figure 15–8. Video-trim mode. Yes, that is a video of the writing of this book. See if you can spot where in the chapter it was recorded.
Having Fun with Photo Booth
With its bright red curtain, it's hard to miss the cheerful icon that represents the Photo Booth application (see Figure 15–9). Photo Booth lets you apply special effects to pictures as you are taking them. Working with both the front- and back-cameras, Photo Booth isn't about to cure cancer or create world peace, but it will offer a lot of fun for playing with your cameras and the pictures you take.

Figure 15–9. The iPad's Photo Booth icon leads to a fun application for playing with your pictures.
Photo Booth lets you select an effect that distorts or otherwise changes images in real time. At first launch, you're presented with a selection of those special effects, as shown in Figure 15–10. Choose the effect you want to work with (undistorted/normal is right in the center, if you want to play things safe) and tap it. You then move to the photo-taking portion of the application (see Figure 15–11).

Figure 15–10. Select one of eight image effects (or the center for Normal undistorted imagery) from Photo Booth's effects screen. Effects include X-Ray, Light Tunnel, Stretch, Mirror (not reverse, the center mirrors out to either side), Twirl, Thermal Camera, Kaleidoscope, and Squeeze.
Here, as shown in Figure 15–11, is where you can manipulate, select, and share your photos. You can return to effect selection at any time by tapping the kaleidoscope-looking button at the bottom left of the Photos/Camera screen.

Figure 15–11. The Photos/Camera screen of Photo Booth allows you to snap new photos (tap the gray camera button at the bottom middle); to control the camera you're using (tap the camera selection button at the bottom right); and to select, view, and share your photos.
Snapping Photos
Initially, you're presented with a live camera preview. When working with live effects, you can sometimes stroke your finger across the screen—up and down or side to side—to affect the way the special effect is applied to the image.
Adjustments are not available for every effect; for example, they do not work with the “thermal” images, but they do set the center of the light tunnel and the position of the mirror effect. It's best to explore by touching to see how you can affect your results during the live preview.
To snap a photo with Photo Booth, just aim the camera you want to use at your subject and tap the camera button. You'll hear a shutter sound, indicating the picture has been captured. Switch between the front and back cameras by tapping the camera flip button at the bottom right of the screen.
Each time you take a picture, the Photo Booth library adds a new image to the row just above the buttons at the bottom of the screen. You can view each image by tapping on it. When selected, the live camera preview stops, and the selected image appears on-screen. Figure 15–12 shows what Photo Booth looks like during image viewing.
To delete an image, tap the circled X that appears to the top left on selection (see Figure 15–12). A red Delete Photo confirmation menu will appear. Tap Delete Photo to remove the photo from the library or anywhere else on the screen to cancel and dismiss the menu.
Tap the black Photo button at the bottom center to return from the static display of library images back to the live camera preview.

Figure 15–12. Tapping on any item in the library list displays that photo on-screen in image-viewing mode. Tap the blackened camera icon at the bottom center to return to the live preview mode or tap the manage button (bottom right) to manage your entire Photo Booth library at once.
Managing Photos
While displaying any image, you can tap the Manage button at the bottom right of Figure 15–12 to select photos. The Manage button looks like a rectangle with an arrow coming out from it. When in library management mode, you can tap any photo select it. A check mark appears to indicate your selection, and the display changes (as shown in Figure 15–13) to a pile of photos. Tap a photo again to remove it from your selection. A check mark will disappear.
Once you've assembled your selection—the number of items you have chosen is listed at the bottom of the screen—choose to e-mail, copy, or delete that collection. By choosing e-mail, the iPad composes a new message and adds your images. Remember that you can attach up to five photos to any e-mail. Copy will, as the name suggests, copy the images to your iPad's system pasteboard, ready to be pasted into other applications. Delete, once confirmed, removes all selected images from your library.
Be aware that Photo Booth coordinates with your main Photo application library. When you snap a picture in Photo Booth, it's automatically added to your main library. When you delete a Photo Booth image, it's also deleted from the main library as well. At this time, Photo Booth images are not collected into a separate album in Photos, although Apple may move that way in the future.
Uploading Photo Booth Pictures to Your Computer
Although you can e-mail photos to yourself, it's generally easier to upload photos directly when connected to your computer. On the Mac, you can use iPhoto's Import and Download buttons. Under Windows, you need to follow the instructions that shipped with the photo application you're using.

Figure 15–13. Create a collection of images by tapping the Share button and adding images from the scrolling library at the bottom of your screen. Checks indicate that images have been selected for the collection.
Using FaceTime to Chat
This chapter has already introduced the iPad's front and rear cameras. These cameras signify a major hardware upgrade for the iPad. They aren't just for taking pictures and recording video: you can also use them for FaceTime, a technology that brings easy and intuitive video calling to the masses.
With the FaceTime app on the iPad, you can video call anyone whose computer or device also runs FaceTime. This includes second-generation or newer iPads, fourth-generation or newer iPod touches, iPhone 4 or newer, and Mac computers that are running FaceTime software. Ideally, FaceTime will soon arrive on Windows as well.
Apple wants to make FaceTime the de facto standard for video calling, and in order to do so, Apple has made the FaceTime technology an open standard. That means other phone manufacturers can build the technology in their phones, so one day, ideally, you'll be able to FaceTime video call on your iPad to someone on an Android phone.
To use FaceTime, besides your iPad, you'll need to have a Wi-Fi Internet connection and an Apple ID. The person who you are calling must also have a Wi-Fi connection, even if you are calling them on an iPhone 4. At the time this book was being written, iPhone 4 owners could use FaceTime only over Wi-Fi, not over their service provider's data network. The service providers and not Apple most likely put this limitation in place. Streaming live video over a cellular network takes a lot of bandwidth—something that is very costly for a service provider. It's also very taxing on the network itself.
Opening FaceTime
To begin using FaceTime, tap the FaceTime icon on your Home screen. The icon looks like a white video camera with a blue lens on a metallic background (Figure 15–14). If this is the first time you've launched the app, you'll be presented with the FaceTime Get Started screen (Figure 15–15). Enter your Apple ID and password and then tap Sign In to get started. If you do not have an Apple ID, you will need to tap Create New Account instead.
If you click the “Learn more about FaceTime” link, Safari will open, and you'll be taken to Apple's iPad FaceTime page on Apple's web site.
Signing In
To sign in with your existing Apple ID, fill in the e-mail and password fields, and tap Sign In. You already have an Apple ID if you use the iTunes Store, the App Store, or the iBookstore. You also have an Apple ID if you have an iCloud account.
If you do not already have an Apple ID, you can set up a new account from FaceTime. Tap Create New Account. The creation screen (see Figure 15–16) appears. You will be prompted to enter your name, a valid e-mail (which will act as your new Apple ID), a password, and other security information.
When you sign in for the first time, whether creating a new account or using an existing ID, Apple notifies you that people will call you using your e-mail address. You are asked which e-mail address you would like to use. You can keep the same e-mail address that is your Apple ID, or you can enter another e-mail address.
Once you have entered the e-mail address you want associated with FaceTime calls, tap the Next button. A short verification screen appears as Apple verifies that your e-mail address is authentic. Then a Check Mail button will appear; tapping it will navigate you to your selected e-mail account in the iPad's mail app.
Look for an e-mail with the subject “Please verify the contact e-mail address for your Apple ID.” Tap the Verify Now link in this e-mail. A Safari window opens, taking you to the My Apple ID page. There you'll need to enter your Apple ID and password to verify your FaceTime e-mail address.
Once you are presented with the “E-mail address verified” web page, return to the FaceTime app. You'll be presented with a list of contacts, similar to the Contacts application on your iPad's Home screen.
NOTE: Apple now requires e-mail style Apple IDs. If you are used to using an older account name style (such as firstname_lastname), you will be prompted to associate an e-mail address with your existing account. After doing so, you will need to log in using the e-mail in future, not your original account name.

Figure 15–14. The FaceTime icon

Figure 15–15. The FaceTime Get Started screen. You will generally see a live front-facing camera preview in the area to the left.

Figure 15–16. Use this screen to create a new Apple ID to use with FaceTime. The account creation and authorization procedure for FaceTime is subject to change as Apple evolves its software.
Creating an Account
When you have not previously established an Apple ID, you can create one by tapping the Create New Account button. The New Account screen (Figure 15–16) appears. On this screen, you will enter your first and last name, your e-mail address (which will become your new Apple ID), and a password of at least eight characters.
This password does not have to be the same as the password for your e-mail account. Apple requests that you include a number, an uppercase letter, and a lowercase letter as part of your ID to increase the security of your password.
You'll also need to choose a security question and enter the answer. This question and answer is used in case you forget your Apple ID password. Finally, enter your month and date of birth, choose which country you reside in, and select whether you want to subscribe to the Apple e-mail list.
Once you have entered this information, tap the Next button. You'll be returned to the Sign In screen with your Apple ID and password already entered, and signing in will commence.
You'll need to go through the same e-mail verification process described in the previous section. A short verification screen will appear as Apple verifies that your e-mail address is authentic. Once verified, you can return to FaceTime and sign in.
Navigating Your FaceTime Contacts
Each time you launch the FaceTime app, once you've established your identity and signed into your account, you are presented with a list of contacts. The contacts screen is divided into three sections, accessible by tapping the buttons in the contact bar at the bottom of the screen.
Favorites: This screen allows you to add your favorite contacts to it. It's handy as a shortcut to the people you call the most.
Recents: This screen lists the recent FaceTime calls you've made or received.
Contacts: This screen lists all the contacts in your address book.
Here's a closer look at each of these contact sections.
Favorites
The Favorites screen (Figure 15–17) allows you to create and maintain a list of your favorite contacts. Favorite contacts generally are the people you call the most, such as family and friends and important work contacts. This screen acts as a shortcut to their FaceTime e-mail addresses or phone numbers.

Figure 15–17. The Favorites screen (left). Selecting the e-mail or phone number of a Favorites contact (right).
Adding a contact to Favorites: Tap the + button in the upper-right corner, and then select your contact from the address book list that slides up on the screen.
Choosing the contact's FaceTime info: From your selected contact's information screen, tap the FaceTime e-mail address or phone number for the contact. If your contact is using an iPad, you must choose their associated FaceTime e-mail. If you contact is using an iPhone 4, you can choose their iPhone 4 phone number. Once you have chosen your contact's FaceTime info, a blue star appears by their FaceTime e-mail or number.
Calling a Favorite: Once you have set up your favorites, simply tap their name in the Favorites list, and a FaceTime call will be initiated.
You can tap the chevron next to a favorite's name to view or edit their contact information.
Recents
The Recents screen (see Figure 15–18) gives you a list of recently made or received FaceTime calls. This list can be sorted into the following two categories via the tabs at the top of the screen:
All: Shows you all the FaceTime calls you have made, received, or missed. Missed calls show up in red. The time of the call is shown to the right of the name of the person called. You can tap the chevron next to a favorite's name to view or edit their contact information.
Missed: Shows only the FaceTime calls you have missed.
To clear your Recents list, tap the Clear button in the upper-right corner of the screen.

Figure 15–18. The Recents list
Contacts
The Contacts screen features your entire address book. It works just like your stand-alone Contacts application. When you find the contact you want to call, tap their name, and their contact information card will be displayed. Tap their FaceTime e-mail or FaceTime phone number, and your call will begin (see Figure 15–19).

Figure 15–19. Placing a FaceTime call from your iPad. A front-facing camera preview appears on-screen as the call is being placed. Tap End to terminate the call without connecting.
Placing and Receiving a FaceTime Call
To make a FaceTime call, select a contact from your Favorites, Recents, or Contacts list. Tapping a name in the Favorites or Recents list will initiate the FaceTime call (Figure 15–11). To start a call using your Contacts list, you'll need to tap the contact's name and then tap either a FaceTime phone number or e-mail. To cancel a call before the person has picked up, tap the END button shown in Figure 15–19.
NOTE: You can change your incoming FaceTime ringtone by navigating to the Settings app and then choosing Sounds ![]() Ringtone.
Ringtone.
When you receive a FaceTime call, a message will appear on-screen telling you that a friend would like FaceTime with you (Figure 15–20). The front camera automatically activates so you can see what you look like. To accept, slide your finger along the “slide to answer” area.

Figure 15–20. Receiving a FaceTime call
Figure 15–21 shows you what it looks like when you are in a FaceTime call. The speaker's image takes up a majority of the screen, while your image appears in a rectangle at the corner of the screen. Below your image is the FaceTime control bar. This gives you several options.

Figure 15–21. A FaceTime video call
Mute: Tap the microphone icon to switch between muting and unmuting a call. While you call is muted, you can still hear the person you are calling, but they cannot hear you. While a call is muted, the other person can still see you, so be careful what you do!
Switching cameras: Tap the Switch Camera icon in the bottom right of the screen to switch between the front and rear cameras. The icon looks like a traditional still camera with swirling arrows on either side. Switching cameras changes what the person you are talking to sees. When the camera is switched, your friend will see what the rear camera on the iPad is pointed at.
Switching cameras during a call is a handy feature. It allows your friend to see what you are looking at, like your newborn crawling on all fours, for example.
Ending the call: To end a FaceTime call, tap the End button.
NOTE: You know that the iPad has two cameras, but did you know the front one has been specifically designed for FaceTime? Apple made sure it has just the right focal length and field of view to focus on your face at arm's length.
Other FaceTime Calling Options
FaceTime gives you several advanced options while on a call that help with its usability features:
Change orientation: You can rotate your iPad into landscape mode, and the image your caller sees will change to match. Landscape mode while FaceTime calling is useful if you want to show your caller a wide shot of something using the rear camera, like a beautiful sunset from your backyard.
TIP: To avoid unwanted orientation changes as you move the camera around, lock your iPad in portrait orientation by pressing the Home button twice and flicking right until you see the portrait lock button. You can also set the switch on the side of the iPad, normally used for muting, to work as an orientation lock in Settings. Choose Settings ![]() General
General ![]() Use Side Switch to:
Use Side Switch to: ![]() Lock Rotation.
Lock Rotation.
Moving picture-in-picture: That little square in the corner that shows you what your caller is seeing can be moved around. Tap and hold the square and drag it to any of the four corners of the screen. This is useful if the square is blocking something on the screen that you want to see.
Multitasking during a FaceTime call: You can use any app on your iPad while on a FaceTime call. To do so, while in a FaceTime call, press your iPad's Home button once to be taken to the Home screen. You can then launch any app you want. To return to your FaceTime call, tap the glowing green “Touch to resume FaceTime” bar at the top of the screen (Figure 15–22).

Figure 15–22. You can use other apps while on a FaceTime call. Touch the green bar at the top of the screen to return to the FaceTime call when you're done.
The multitasking feature is particularly nice when you are on a FaceTime call. It allows you to check the Yelp app for restaurants while you're making dinner plans with your FaceTime caller, for example.
While you are multitasking, you can still talk to your FaceTime caller, but neither of you can see the other.
FaceTime Settings
FaceTime has several settings. You can find them in the Settings app under FaceTime (Figure 15–23).

Figure 15–23. FaceTime settings
SwitchFaceTime on or off: Tap the FaceTime switch to On or Off. While off, you cannot make or receive FaceTime calls, which means you may miss a special treat while you are busy getting work done. When enabled, however, other people can call you, interrupting whatever you are doing.
Change your FaceTime geographic location: Tap your blue Account e-mail. From the pop-up menu, tap Change Location. Choose your location's new region from the list of regions.
View your FaceTime account settings: Tap your blue Account e-mail. From the pop-up menu, tap View Account. Sign in with your Apple ID and password. The account settings screen from Figure 15–6 will show up on-screen. Tap any field to change your account settings, such as your name or security question.
Sign out of FaceTime: Tap your blue Account e-mail. From the pop-up menu, tap Sign Out. This will immediately sign you out of FaceTime without any more warnings. To sign back in, reenter your Apple ID password on the Sign In screen.
Remove a FaceTime e-mail address: You can dissociate your FaceTime e-mail address by tapping it and then tapping the Remove This E-mail button.
Adding more e-mail addresses:FaceTime allows you to associate more than one e-mail address with your FaceTime account. This is handy if you use several e-mails for different purposes in your life. For example, you might have one for friends and one for work colleagues, and so forth. When multiple e-mails are associated with your FaceTime account, people can initiate a FaceTime video call with you using any one of them.
To add additional e-mails, tap the Add Another Email button, and then enter your other e-mail address. Repeat this step for each e-mail address you have. With each e-mail added, you'll need to check that e-mail account for the FaceTime verification e-mail from Apple and click the link in that e-mail before the e-mail address can be added to your FaceTime account.
Summary
The front and rear cameras add some nice features to the iPad. The HD video-recording capabilities are amazing, but the still photography leaves something to be desired, even if you take Photo Booth into consideration. In addition, FaceTime is an awesome feature, and its popularity is sure to grow as more devices become FaceTime-compatible. Here are a few more tips for using your camera and FaceTime:
- Do not leave your regular digital still camera at home when going on vacation. Yes, you can take still photos with the iPad, but it's more for social use, such as taking quick snaps of friends or self-portraits. If you want to catch that beautiful sunset over the ocean, do it on a point-and-shoot camera or on a cool new iPhone 4S. Want to distort your face and send it on to your pals? The iPad plus Photo Booth is the answer.
- You can zoom in while in still camera mode using digital, but not optical, zoom, but there is no zoom option while recording video.
- One minute of 720p video takes up about 120MBs. Keep this in mind if you are going to be recording a lot of video because you'll need a lot of free space on your iPad.
- Apple has limits size when e-mailing videos. In our tests, a video clip must be 54 seconds long or shorter in order for you to e-mail it. If it's 55 seconds or longer, you'll be asked to trim the clip before you e-mail it.
- When you are taking pictures or recording video within range of a Wi-Fi network or if you own a GPS-enabled 3G iPad, the iPad's Camera app can tag your photos and videos with geodata. Applications such as Apple's iPhoto can then display your photos on a map. If you are planning to make a lot of FaceTime calls at home or in the office, you may want to invest in an iPad dock or a simple picture stand so you don't have to keep holding your iPad at arm's length. A dock helps you eliminate those horrible up-the-nose and double-chin points of view that happen when we hold the iPad out.
- Use FaceTime from the sky! If you're on a plane that offers Wi-Fi service, you can use FaceTime to talk to your friends and family back on the ground.
- Don't forget to use the rear camera to show your caller what you are looking at. You don't have to turn your iPad around to show them!
- FaceTime is an amazing feature for those who can't speak. The screen resolution is big enough and crisp enough where sign language can easily be read.
- Watch out for bright backgrounds. If light is glaring in through the window behind you, it's likely to cause your viewer to see you in silhouette. To fix this, move your iPad's camera just a tiny way away from the light source, and your face should show up just fine.