
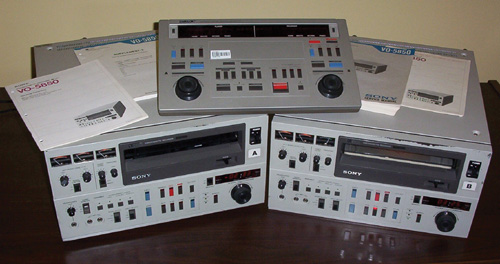
I remember the days when I first started editing my video, over 15 years ago. Back then, when we wanted to put two clips together, we used tape decks. One tape deck was used to cue the footage, and another had a blank tape in it. Then, once the first clip was found on Deck A, it could be recorded to Deck B. Then the second clip was cued up and recorded, the third clip followed, and so on. We couldn’t go back and change the order without starting over again. We had to edit in a linear fashion, so making choices ahead of time was really important. That’s why a paper edit was prepared before the editor got to work.
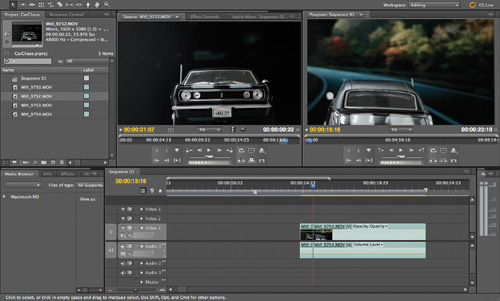
Now, photographers all use non-linear video editors that allow us to go back and forth all we want in the timeline. You can even edit backwards or start from the middle and go forward and then come back to the beginning. This is accomplished by using large hard drives to store the footage instead of tape so that you can use any section of the video you want. You simply select the right clip and trim. The original footage on the drives is not affected because the edit software is just a playback machine that is following your instructions on how to display the footage in any order you desire. It’s kind of like editing RAW photo files in a RAW editor. The original files aren’t touched, but instead a metafile is modified until you output a flattened JPEG or TIF.
Basic video editing involves the act of putting your video clips in an order that tells the story you want to tell. Advanced techniques involve mixing clips together, layering video through composites, adding special transitions, and other tricks. After editing your video, you can color-correct, add graphics and titles, sweeten the audio, and mix the music and sound to create the look you want.
A lot of you will be using one video-editing software program for all of these tasks, and that’s fine. Just keep in mind that if you bring more people in the project to help you out, you will get a better film in the end. You might have to learn what kinds of file formats that the sound, graphics, VFX, and music professionals deal with so that you can export/import them in and out of your editing timeline.
The editing timeline is the basic tool needed to create a cohesive end product
The basic steps in video editing involve first choosing a clip you want to use in your timeline. The timeline is where your story is going to be laid out. When you select a section of your clip to place in the timeline, you are creating a roadmap for your edit. The in and out points don’t have to be perfect; you can always go back and trim some more on the timeline itself. That’s the beauty of non-linear editing. You simply select the next clip to place in the timeline, trim down to the selection you want, and lay it after the first clip. This is how you start to create a story. Refer to your video-editing software manual or tutorials to get started with laying down clips.
Tip
Remember to save often during the editing process! I like saving my edit as a new project file each time I sit down to work on that film. This way, I have an archive of all my edited files (which don’t take up that much space) in case something gets corrupted.
Using Cuts and Fades
Built into your video-editing software, you will find a number of ways to transition between clips. A transition is a change between clips. The two most commons transitions are cuts and fades. A cut happens when there is an abrupt, one-frame change between two video clips. Most of your editing will be in the form of cuts. For example, say you are showing the outside of a house in the first clip and then there is a cut to a close-up on the door handle of the house as a hand grabs it. Right away, you are telling the beginning of a story.
A fade (or dissolve) is when two clips are blended. You can dissolve from clip to clip, meaning for part of the time you will see both images overlap as you go from one to the other. Fading from black involves transitioning between a black clip and your video clip. Your editing software takes care of the black, so all you need is your own clip to do a fade. (This is unlike the old film cutting days where actual black film clips had to be used.)

Cuts and fades both have their places as methods for transitioning between clips
Every video-editing software program comes with its own set of transitions that can range from the cool to the crazy. Simple stuff like wipes, complicated 3D transitions, and colorful light transitions are just a few examples. You should experiment with the tools at your disposal because the proper use of transitions can add to your story. Just be wary of loading up your timeline with weird checkerboard wipes and morphs to the point where they become distracting. Your audience may well become annoyed and be taken out of the story.
Another great function added to video-editing software programs is effects. There are literally millions of combinations of effects possible within video-editing software. You don’t even have to use special effects software like After Effects to make the most out of your edits. Start with the effects that come with your software, experiment, and modify to get the look you want. You will learn about finishing options in the next chapter.

Many video and audio effects are at your disposal, regardless of the program you use
Great video has to go hand in hand with great sound. Since you started with good on-set audio (as covered in earlier chapters), you probably recorded on a device along with a scratch track in your camera. Now you want to line up the video with the audio from your digital recorder, so that everything is in synch with the actors, you can use PluralEyes, by Singular Software.
Manually lining up audio involves laying down your original clip in the timeline with the front part that has the clap slate. Using the instant the clap slate is closed, you find the audio clip that goes with that video clip and line it up where the “clap” sound makes the audio spike.
Your audio clips should be labeled according to the same scene/take name written on the clap slate. If the sound files are unlabeled, listen to the file for someone calling out the scene and take and re-label the sound clip. Don’t worry; this does not rename the actual filename on your drive, just the name in your editing software. Of course, you must go through this process of lining up the audio for each clip that will be used.

Lining up the audio and video using the clap slate
An easier and quicker way to accomplish this same goal is by using the PluralEyes software. This software matches up audio waveforms from your digital audio files to the audio waveforms from the video files (which has the audio you recorded in-camera), and does so automatically within your editing timeline. PluralEyes works with most video-editing software and is only $150. The instructions are easy to follow, and the results are fantastic. I’ve been able to line up clips from four different cameras and have them all synch to the audio track. Depending on the power of your system, large amounts of material will take a while to synch, but it’s all automated.

PluralEyes, by Singular Software, is well worth its reasonable price