Chapter 16. Sync Up with MobileMe

Even though your iPad is a cool personal media center, under the hood, it’s a computer (a sleek one, yes, but a computer nonetheless). Odds are, you have another one or two computers in your life—at work, at home, or both. You may have an iPhone, too. Each of these devices can send and receive email, store contact information, keep track of your appointments, and save website bookmarks. Wouldn’t it be great if they could all share all this information so that all your gadgets were always in sync and always up-to-date?
That’s where Apple’s MobileMe service used to come in. In early June of 2011, Apple announced it would phase out MobileMe in favor of a new online service called iCloud. Scheduled to arrive in Fall 2011, iCloud will handle all your info-synching needs between computers and devices. The service gives you 5 gigabytes of free online storage so you can sync, share, and back up contacts, calendars, mail, documents, music, and more between Macs, PCs, iPads, iPhones, and iPod Touches.
If you already have a MobileMe account, this chapter tells you how to use it until iCloud blows in. While you can no longer sign up for a new MobileMe account, existing MobileMe-ers can still use the service to keep your contacts, calendars, and more in sync across your computer and your Apple devices. MobileMe itself will be active until June 30, 2012, giving you plenty of time to transition your stuff to the new iCloud service. But if you can’t wait to gaze up into iCloud, read about it at http://www.apple.com/icloud.
Sign Up for MobileMe
MobileMe isn’t an Internet service provider that gets you on the Web—you still have to pay your cable or DSL company for that. Instead, it’s an Internet service that syncs your email, contacts, calendars, and bookmarks—all the programs you use to manage mail and personal information, in other words—across your devices.
On the PC side, MobileMe works with Outlook 2007 and 2010 and Windows Mail, and you can sync bookmarks from Internet Explorer and Safari. (Outlook 2011 owners can sync contacts, but not calendars.) On the Mac side, you can sync data from the Mac OS X Address Book, iCal, and Safari.
When you sign up for MobileMe, you get an @me.com email address. MobileMe keeps all your me.com mailboxes current across your gadgets, whether you read messages in your dedicated mail program or on the Web. (MobileMe can receive mail from other POP-based mail services, too, and deposit them in their own folder on your iPad so you know which account they came from, but it doesn’t synchronize the mail from these accounts across your devices.)
You also get an online photo and video gallery, and a chunk of space on Apple’s servers called an iDisk, where you can back up or share large files. iDisk comes with 20 gigabytes of storage, but Apple will gladly sell you more—40 gigabytes costs another $49 a year, for example.
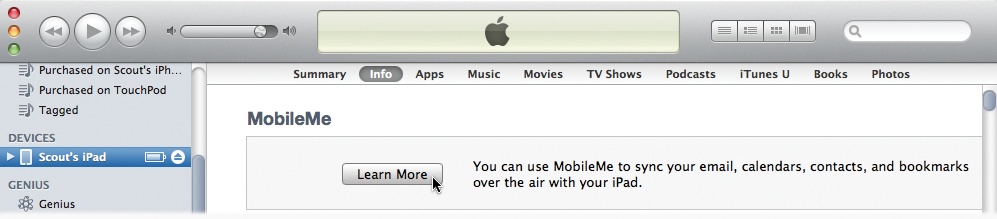
So how do you get started with MobileMe? Easy. Connect your iPad to your computer and click the Info tab in iTunes. In the MobileMe area, click Learn More.
iTunes whisks you away to MobileMe’s sign-up area, where you supply your credit-card number, pick out a user name and password, and download any necessary software, like the MobileMe control panel for Windows. (Alternatively, you can road-test MobileMe for 60 days for free at www.apple.com/mobileme).
Once you’re all signed up and have that software installed, it’s time to set up your computer and then your iPad. The next page explains how.
Sync Using MobileMe
While MobileMe will seamlessly sync up your machines, you have to tell it what to sync.
In Windows, choose Start→Control Panel→Network and Internet→MobileMe. On a Mac, choose
 →System Preferences→MobileMe.
Click the Account tab and sign in with your user name and password.
Click the Sync tab. Turn on “Sync with MobileMe” and choose how often you want MobileMe to push data out to your iPad (and any other device you use with the service). Most people choose “Automatically,” which syncs your info whenever you connect to the Web, and then once an hour if you stay online.
Next, choose the info on your computer, like email accounts, contacts, appointments, and bookmarks, that you want to sync to your iPad and other devices.
Click the Sync Now button to upload the info on your computer to Apple’s servers. Then click OK to close the box.

All right, that part’s done. Now you need to set up your iPad to accept the data MobileMe sends.
Set Up MobileMe on Your iPad
Tap Fetch New Data. On the next screen, set the Push option to On.
In the line above Fetch New Data, tap Add Account, choose MobileMe, and fill in your user name and password.
Turn on Mail, Contacts, Calendars, and Bookmarks. You can even activate Find My iPad—which maps the location of a lost or stolen tablet on www.me.com if it’s within range of a 3G or known Wi-Fi network.

Use the MobileMe Gallery
MobileMe’s life-synchronization function is just one of its features. You also get an elegantly designed online gallery where you can post your favorite snaps and videos for all to see. That way, your relatives don’t have to download huge email attachments, saving them tons of time and hard drive space. (And if these are personal family photos, you can even password-protect them.)
Creating an album in the MobileMe gallery and filling it with images is easy, thanks to the service’s built-in tools. Here’s what you do:
Find some photos or videos on your computer you’d like to share.
Log into your MobileMe account at www.me.com.
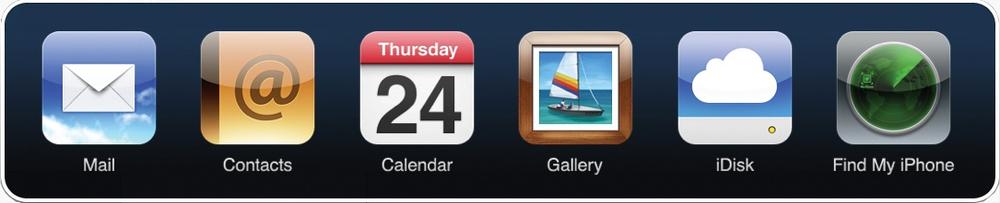
Click the Cloud icon in the upper-left corner, and, when the MobileMe icon bar appears (shown right), click the gallery icon (it looks like a framed sailboat photo).
When the gallery page appears, click the little + button at the bottom left (circled) to add a new photo album. The Album Settings screen appears, asking you to name the album and set up permissions for what viewers can do there, like download your photos or upload theirs (which is useful when everybody at the family reunion brought their own camera).
Click the Create button to add the new album to your gallery.
On the next screen, click the green arrow. In the box that pops up, click the Choose button, navigate to the photos on your computer, and then click the names of the photos you want to add to your newly created album. Hold down the Ctrl (or ⌘) key to grab multiple files as you click.
Click the Select button to start the upload. You can upload images in the JPEG, GIF, or PNG formats and video in the MOV format, but nothing bigger than 1 GB in size. MobileMe resizes images larger than 6 megapixels for onscreen display, but this doesn’t affect the originals.

Besides photo and clip sharing, putting your media files on MobileMe gives you another advantage: You can view your file on your iPad over its Internet connection, which is especially handy if you have a lot of photos and, say, a 16 GB iPad. Why devote some of that precious space to photos and videos when you can store them online and look at them there, through the iPad’s Web connection? You’ll end up with more room on your iPad for music, movies, and apps.
Speaking of apps, you can download a free MobileMe Gallery app from the App Store to make it easy to see your pictures and videos when you’re on the go. Rather than fire up Safari and jump to your MobileMe page through the Web all the time, use the gallery app to view and share your media.
To get the gallery app, tap the App Store icon on the iPad’s Home screen. Then tap the Search button and look for Gallery. When the app appears, tap it, then tap the Free button, and then tap the Install button.
Once you install it, tap open the app and type in your MobileMe account name and password. You’ll see all your uploaded albums and videos listed, and samples from your collection will crawl across the screen.
You can share gallery items with friends by tapping the envelope icon in the top right of the My Gallery screen. A Mail message opens with an embedded link to your gallery or a particular album, ready for your pals’ email addresses.
Use iDisk
In addition to photo and video sharing, MobileMe gives you some personal Internet-based storage space called an iDisk, where you can store files online. Need to back up some Microsoft Word files but don’t have a flash drive handy? Want to make sure you can always get to a set of important PDF documents, whether you’re at home or in a London hotel room? iDisk lets you retrieve files from any Web-connected computer.
From your desktop computer, you can tap into iDisk a couple of ways:
Open your browser and log in to www.me.com, and then click the blue iDisk icon in the MobileMe toolbar.
On a Mac, double-click the iDisk icon in the Finder sidebar.
In Windows, add the iDisk as a network drive. For Windows XP, choose Start→Network→My Network Places and choose “Add a network place” in the next box. As the Add a Network Place wizard opens, go with “Choose another network connection.” When asked for a URL, type in http://idisk.me.com/YourAccount/, and then enter your MobileMe name and password.
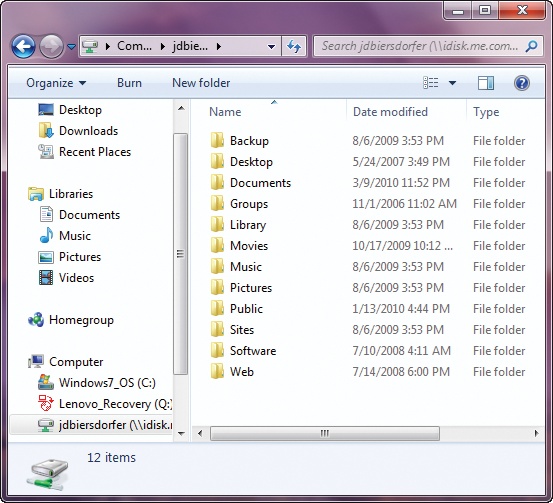
For Windows 7 and Vista, choose Start→Computer→Map a Network Drive. In the next box, pick a drive letter, and in the Folder field, type in http://idisk.me.com/YourAccount. Turn on the checkbox for “Connect using different credentials/user name.” Click Finish and type in your MobileMe user name and password when prompted.
No matter how you get to iDisk, you’ll find a series of folders with names like Documents, Pictures, and Public. To upload files to one of these folders, click the upward-pointing arrow in the MobileMe toolbar. To download files, use the downward-pointing arrow.
If you have an iDisk icon in Windows Explorer or the Mac Finder, you can just drag files on and off the icon. To share files too huge to email with relatives, friends, and colleagues, use iDisk’s Public folder. Add your files to it, click the Share File button, and then send a clickable link to your friends so they can download the files.
The iDisk App on Your iPad
So yeah, MobileMe is great for your desktop computer and all, but just what does it do for you on the iPad? Just as you can get a native iPad app for the MobileMe gallery, so you can get a free iDisk app from the App Store. It gives you access to all the files you stored online. Need to double-check something in an Excel spreadsheet or refer to a PDF manual? Tap the iDisk icon on the iPad’s Home screen and browse your way through your MobileMe drive. iDisk is especially helpful if you need to view a Microsoft Office file and don’t have iWork (Chapter 10) installed on your iPad—the app renders a read-only version of the file onscreen.

Away from your main computer but need to send that giant Word document to a colleague?
The iDisk app, like its desktop counterpart, lets you share files. Open the file you want
to send and tap the Share Files icon at the bottom of the screen ( ![]() ). The iPad’s Mail program opens with a link to the file embedded in
the body of the message, ready for your recipient’s address.
). The iPad’s Mail program opens with a link to the file embedded in
the body of the message, ready for your recipient’s address.
To stop sharing a file after you’ve sent out links, open the shared folder, tap the green Share icon on the right side, and then choose Stop Sharing from the menu that slides up.
Note
MobileMe’s upcoming conversion to iCloud isn’t the only change scheduled for Fall 2011. Apple plans to roll out iOS 5, which brings 200 new features to the iPad, including a new messaging service, a virtual newsstand for digital publications, Twitter integration, and much more. For a preview of the changes to come, stroll over to http://www.apple.com/ios/ios5.