![]()
Typical Printer Settings
Several chapters in this book, most notably Chapters 5 and 8, discuss settings for slicing a file. If you use Slic3r, you may be intimidated by all the settings you see in the Configure panel. The Slic3r manual (http://manual.slic3r.org/) defines all these in detail, and we will not reproduce those definitions here.
Printer settings are something that, like recipes, you will experiment with and evolve over time. The Slic3r settings provided here are appropriate for a Deezmaker Bukobot, which is a fairly typical RepRap printer, except perhaps for having somewhat higher speeds than some. The author thanks Rich Cameron for developing these standard “starter” settings, and Deezmaker for sharing them.
![]() Note To get a more current settings file (since the slicing software and community practices change) go to www.bukobot.com, click on a printer, and then click Settings. Directions for downloading the latest complete set will appear. Your manufacturer likely has a similar page, but if not, this chapter will give you some plausible starting points.
Note To get a more current settings file (since the slicing software and community practices change) go to www.bukobot.com, click on a printer, and then click Settings. Directions for downloading the latest complete set will appear. Your manufacturer likely has a similar page, but if not, this chapter will give you some plausible starting points.
Three Slic3r cases are given here: for an “easy print” that does not need any support, for a print that does need support, and for a vase. These settings might not match every value used in Chapter 8 for similar prints, because each print may need a bit of optimization. Over time, you will decide which settings to change and which ones generally to leave alone.
Of course, Slic3r is open source software, and both the settings names and behavior associated with a particular value will change over time. The various host programs give access to Slic3r parameters in different formats; see Chapter 6 for a discussion of Repetier Host and Matter Control, and Chapter 8 for Matter Control screenshots.
Slicing settings are typically grouped by the software into Printer, Print, and Filament parameters. Printer settings usually are associated with a machine and do not change much from print to print. In Table A-1, we have the standard settings for a Bukobot, which has an 8 inch (200 mm) cubic print bed.
Values for physical dimensions (e.g. layer height) in the following tables are given in mm; temperatures are in degrees Centigrade.
Table A-1. Printer Settings (Regardless of What Is Being Printed—Machine-Dependent)
|
General |
|
|
Bed size, x |
200 |
|
Bed size, y |
200 |
|
Print center, x |
100 |
|
Print center, y |
100 |
|
Z offset |
0 |
|
G-code flavor |
RepRap (Marlin/Sprinter) (But see your manufacturer just in case) |
|
Use relative E distances |
Unchecked |
|
Extruders |
1 |
|
Vibration limit |
0 |
|
Custom G-code |
|
|
See manufacturer’s suggestions* |
|
|
Extruder |
|
|
Size: Nozzle diameter |
See manufacturer’s specification |
|
Position: Extruder offset, x |
0 |
|
Position: Extruder offset, y |
0 |
|
Retraction: Length |
1.4 |
|
Retraction: Lift Z |
0 |
|
Retraction: Speed |
Ranges from 10-200 mm/s |
|
Retraction: Extra length on restart |
0 |
|
Retraction: Minimum travel after retraction |
2 |
|
Retraction: Retract on layer change |
Checked |
*Custom G-code can include things like homing all axes before a print, turning off heaters after, and the like.
Filament settings are tied to the filament; each printer typically uses just one size of filament (here, 3 mm, measured to be 2.85mm actual diameter). A 2.85mm nominal diameter is common for what is normally called “3mm” filament. It's a bit of an accident of history (and convenient imperial drill sizes) that 3mm, in this case, is considered an upper safe limit to allow tolerance for the filament to move without jamming. The same is not true for 1.75mm filament, which almost always has a nominal diameter of 1.75 (or, occasionally, 1.8). The other filament settings that normally needs to be input by a user are the extruder and heated bed temperatures associated with that material,and sometimes an adjustment for the cooling settings (although this last is an expert-level adjustment).
Table A-2 shows the settings for PLA. See Chapter 7, Table 7-1, for settings for different filament materials.
Table A-2. Filament Settings
|
Filament Settings |
PLA |
|
Filament: Diameter |
2.85* |
|
Filament: Extrusion multiplier |
1 |
|
Temperature: Extruder: First layer |
210 |
|
Temperature: Extruder: Other layers |
210 |
|
Temperature: Bed: First layer |
60 (or 0 for unheated bed) |
|
Temperature: Bed: Other layers |
60 (or 0 for unheated bed) |
|
Cooling Settings |
|
|
Enable cooling |
Checked |
|
Fan settings: Fan speed min |
35 |
|
Fan settings: Fan speed max |
100 |
|
Fan settings: Bridges fan speed |
100 |
|
Fan settings: Disable fan for the first ___ layers |
1 |
|
Keep fan always on |
Unchecked |
|
Cooling thresholds: Enable fan if layer print time is below __ approximate seconds |
60 |
|
Cooling thresholds: Slow down if layer print time is below __ approximate seconds |
35 |
|
Cooling thresholds: Min print speed |
10 |
*Ideally, you should measure actual filament diameter with calipers (Chapter 7).
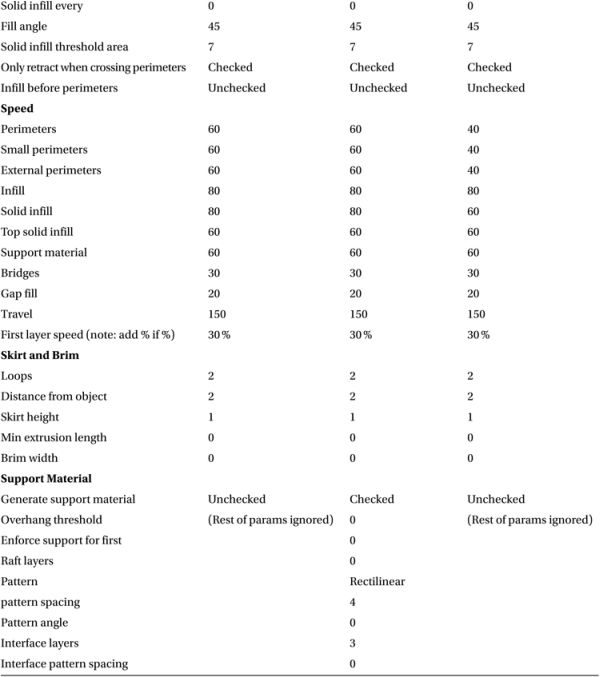
The majority of the settings are in the Print category. In Table A-3 we split them into settings that do not typically change from one run to another, and in Table A-4 into ones that would be different among the simple, vase, and support prints.
Table A-3. Printer Settings that Typically Do Not Change from Run To Run
|
Output Options |
|
|
Complete individual objects |
Unchecked |
|
Extruder clearance |
Ignored if previous item unchecked |
|
Advanced |
|
|
Default extrusion width |
0 (Slic3r will use defaults) |
|
First layer (use % if %) |
200 % |
|
Perimeters |
0 |
|
Infill |
0 |
|
Solid infill |
0 |
|
Top solid infill |
0 |
|
Support material |
0 |
|
Bridge flow ratio |
1 |
|
Threads |
4 |
|
Resolution |
0 |
Table A-4. Printer Settings that Vary Among the Simple, Vase, and Support Prints

There are other slicing programs besides Slic3r, notably Cura (see Chapter 5 for more about Cura). Cura has fewer user-alterable settings than does Slic3r. However, it tends to be more forgiving of mesh errors and very large files. Cura allows the creation of support only where it touches the platform, which is often very useful, to avoid having support where it might not be needed but would be hard to extract. Another crucial difference between Slic3r and Cura is that in Cura you specify the wall thickness and solid surface thickness in millimeters, not in perimeters or layers.
In Cura, under Support, there are these options:
- Support type
- None
- Touching Buildplate
- Everywhere
- Platform adhesion type
- None
- Brim
- Raft
The Touching Buildplate option allows for building support only under the object—sort of like a shaped raft. This option avoids picking support out of complicated structures farther up the print where you might get away without it. These options collectively give you a lot of flexibility to support your print without having to invest an inordinate amount of time picking off that support. Other than the support, the settings are named similarly to those in Slic3r, but with fewer available for user alterations.